 Understanding PeopleSoft HRMS Common Components
This chapter provides an overview of PeopleSoft HRMS common components and discusses how to:
Configure Direct Reports functionality.
Configure person search.
Set up employee mouse over popup pages.
Configure and work the HR Notepad.
Set up the Text Catalog.
Configure attachments.
Note. PeopleSoft Human Resources also delivers as common components the approval workflow, delegation, and XML publishing functionality. These features are discussed in their respective chapters.
See Also
Setting Up and Working with Approvals
Setting Up and Working with Delegation
Working with HCM Transformation Framework
Understanding PeopleSoft HRMS Common Components
This section lists common elements and discusses common component pages.
 Common Elements Used in this Chapter
|
Identifies the application in which a common component is used. This is delivered functionality. |
|
|
Used to further partition component entries by function. . For example, the Sub ID of M (Manager) allows component entries different from those of a Sub ID of E (Employee). |
Common Component PagesPeopleSoft provides common pages to perform functionality across multiple Human Capital Management (HCM) applications. These pages are implemented as plug-in applications that you can easily configure and embed into an application via provided application program interface (APIs).
These applications are typically used to capture, store and present information for a particular generic function within the context of a calling application (for example, an application such as eRecruit, ePerformance or Benefits Administration).
Each common component manages its own data source. These common components have keys. All applications that embed the plug-in share the same data structure that uses a configurable key structure to accommodate the different requirements that each application has for organizing this data. Each application defines, or registers, the actual keys that are used when the plug-in runs within the context of the application that has embedded it. You register the keys by making an entry for the application in the plug-in's configuration page, which is keyed by the object owner ID of the embedding application.
The use of plug-ins enables all applications that embed a plug-in to present the data consistently. For example, the same format is used to capture and present context-sensitive notes, whether the user is in eRecruit, ePerformance, Payroll for North America, or Benefits. To provide context-sensitive instructional text, labels, and so forth, each of the plug-in applications uses the text catalog to provide context sensitivity while maintaining a consistent style across all of HCM.
Some embedding applications need the ability to enable, disable, or modify the plug-in functionality. Applications manipulate these configuration options inside the plug-in's configuration page—the same place it registers its keys.
HCM plug-ins, except for the text catalog, are embedded in an application by placing a graphic button on a page, and a simple API call on the button's FieldChange PeopleCode. The Text Catalog is generally invoked via an API in component-build, and/or PageActivate code.
Warning! Be careful when modifying configurations. PeopleSoft does not support some modifications, for example changing key values, that might cause other functionality in the application to not work as intended.
Configuring Direct Reports Functionality
To configure direct reports functionality, use the Configure Direct Reports UI (HR_DR_UI_CFG) and component.
This section provides an overview of direct reports and discusses how to:
Configure components and transactions for direct reports functionality.
Select the actions and fields that appear on the direct reports UI.
Test the direct reports API.
View exceptions and data returned by a method.
View the trace log of method executions.
Test the direct reports user interface.
See Also
Generating Documents as a Manager
Understanding Direct Reports Functionality
Direct reports information is used throughout HCM applications, especially in the manager self-service applications. Typically, direct reports information is used in a way that involves navigating an organizational hierarchy. For example, a manager uses Direct Reports to promote or give a raise to an employee. You may use direct report information in:
Drill-down mode, enabling managers to select workers for processing in a self-service application.
Chain of command mode, which determines workflow for approvals and notifications.
There are two major components for implementing direct reports functionality:
Data service.
The data service navigates an organization structure and returns a list of workers that report to a particular manager or a management hierarchy for a particular worker. The data service is completely unaware of its context, which enables to service both online and batch requests.
User Interface.
This is a common, configurable user interface (UI) that is de-coupled from data service. It receives information from the data service and presents it in a streamlined, consistent, reusable UI that enables users to visually navigate an organizational structure and select one or more workers for processing.
Direct Reports for Self Service Applications
There are two methods of setting up direct reports functionality. If you are setting up direct reports for the following applications, use the Direct Reports Setup (SS_LINK_TBL) component:
PeopleSoft Enterprise eDevelopment
PeopleSoft Enterprise eCompensation
HRMS Portal Pack
PeopleSoft Enterprise ePay
PeopleSoft Enterprise Stock Administration
Note. Otherwise, use the Configure Direct Reports UI component described in this section.
See Also
Setting Up Access to Direct Reports Data
Pages Used to Configure Direct Reports Functionality|
Page Name |
Definition Name |
Navigation |
Usage |
|
HR_DR_UI_CFG_1 |
Set Up HRMS, Common Definitions, Direct Reports for Managers, Configure Direct Reports UI, Manager Desktop Transactions |
Configure the components and transactions that include the direct reports data functionality. |
|
|
HR_DR_UI_CFG_2 |
Click the Configure button for an application on the Manager Desktop Transactions page. |
Select the actions and fields that appear on the direct reports UI for a transaction. |
|
|
HR_DRPT_API_EXEC |
Set Up HRMS, Common Definitions, Direct Reports for Managers, Invoke Direct Reports API, Set / Execute |
Test the direct reports API. |
|
|
HR_DRPT_API_RSLTS |
Set Up HRMS, Common Definitions, Direct Reports for Managers, Invoke Direct Reports API, Set/Execute Select the Execution Results tab on the Invoke Direct Reports API - Set/Execute page. |
View the exceptions and data returned by a method. |
|
|
HR_DRPT_API_TRACE |
Set Up HRMS, Common Definitions, Direct Reports for Managers, Invoke Direct Reports API, Set/Execute Select the Trace Results tab on the Invoke Direct Reports API - Set/Execute page. |
View the trace log of a method execution. |
|
|
HR_DRPT_API_UITEST |
Set Up HRMS, Common Definitions, Direct Reports for Managers, Invoke Direct Reports UI API, Invoke Direct Reports UI API. |
Test the direct reports user interface. |
|
|
<application context> |
HR_DR_ADDL_INFO |
Select a value from the Component Name field and click Execute API on the Invoke Direct Reports UI API page. |
Enter a date to use to generate a list of direct reports to invoke the specified application context. |
|
<application context> - Select <context> |
HR_DR_SELECT_EMPS |
Click Continue on the <application context> (HR_DR_ADDL_INFO) page. |
View a list of direct reports and select employees to add to the API Results list on the Invoke Direct Reports UI API page. |
Configuring Components and Transactions for Direct Reports Data Functionality
Access the Manager Desktop Transactions page (Set Up HRMS, Common Definitions, Direct Reports for Managers, Configure Direct Reports UI, Manager Desktop Transactions).
Displays a list of components and transactions for which direct reports functionality is enabled. You can add a new component and transaction or click the Configure button to specify how the direct reports API and UI function within the context of the component and transaction.
Selecting the Actions and Fields that Appear on the Direct Reports
UI
Access the Manager Desktop Transactions - Configure page (Click the Configure button for an application on the Manager Desktop Transactions page).
Processing Rules
Displayed Fields
Select one or more fields to appear within the direct reports list when rendered by the application.
See Also
Setting Up and Working with Self-Service Transactions
Testing the Direct Reports API
Access the Invoke Direct Reports API - Set / Execute page (Set Up HRMS, Common Definitions, Direct Reports for Managers, Invoke Direct Reports API, Set / Execute).
|
Select a method from the available options:
|
|
|
Execute Method |
Click to execute the method using the class properties you set. |
Class Properties
The properties and their default values, if any, of the selected class appear in this page region. You can change any of these before executing the method.
|
Navigation Method |
Select the method to use when determining reporting relationships. The options are: 1 - Department Security Tree, 2 - Supervisor ID, 3 - Department Manager ID, 4 - Reports To Position, 5 - Position / Supervisor ID, 6 - Position / Dept Manager, and 7 - Group ID. |
|
Target Employee ID |
Enter the employee ID of the target employee. |
|
Target Empl Record |
Enter the employee record number of the target employee. |
|
Position |
Enter the position of the target employee. |
|
As Of |
Enter the as of date to use when determining reporting relationships. |
|
Group ID |
Enter a group ID when Navigation Method is Group ID. |
|
Show Name |
Indicate if the system should include employee names in the Direct Reports Rowset grid. The default value is True. |
|
Show Empty Positions |
Identify whether unfilled positions should be returned in the Direct Reports Rowset grid when the navigation method is position-based. The default value is False. |
|
Show Indirect Indicator |
Identify whether the Direct Reports Rowset grid should indicate whether an employee has direct reports. The default value is False. Note. Not applicable when Navigation Method = Department Securityor Group ID. |
|
Include Target Employee |
Should the target employee be filtered out of the returned Direct Reports Rowset and Supervisor Rowsets grids. When True, the target employee is not filtered out. When False (which is the default), circular reporting relationships are not shown. |
|
LimitDrillUp |
Indicate if the user be allowed to DrillUp to a level higher than the target employee/job that was first specified. For example, when used in a manager self-service transaction, should I be able to drill down 2 levels, and then up 3 levels to expose and select my peers? On the other hand, when used in a notification process, drilling up beyond the initial target employee/job is essential. When True (which is the default), DrillUp is limited. |
|
Combine Partials |
Indicate, when using one of the partial position management navigation methods, whether the secondary method be applied even if the primary method returns valid data. The default value is True. |
|
Rebuild Group |
Specify, when the Navigation Method is Group ID, if the system should force the group to be rebuilt, even if group results for this effective date already exist. |
|
Buffer |
Indicate if the service should buffer the next level up and down to increase performance. The default value is False. |
|
Trace |
Indicate if the service should generate a trace of processing when executing class method. The default value is False. |
|
Debug Mode |
Specify, when Debug Mode = True, if any exceptions encountered during execution should be displayed prior to the results set being displayed. |
Viewing Exceptions and Data Returned by a Method
Access the Invoke Direct Reports API - Execution Results page (Set Up HRMS, Common Definitions, Direct Reports for Managers, Invoke Direct Reports API, Execution Results).
This page enables you to view results of the method execution.
Viewing the Trace Log of Method Executions
Access the Invoke Direct Reports API - Trace Results page (Set Up HRMS, Common Definitions, Direct Reports for Managers, Invoke Direct Reports API, Trace Results).
Data appears on this page only if you select True for the Trace class property.
Testing the Direct Reports User Interface
Access the Invoke Direct Reports UI API page (Set Up HRMS, Common Definitions, Direct Reports for Managers, Invoke Direct Reports UI API, Invoke Direct Reports UI API).
The testing of this API shows the results set that the you will see based on the current configuration. To populate the API Results grid, select a component name and click Execute API. The system will present you with two additional <application context> pages where you will enter an as of date and then select employees as of that date.
The example here shows the API Results values that were made by selecting Cynthia Adams from within the application context Location Change component pages.
Access the <application content> page (HR_DR_ADDL_INFO) (select a Component Name and click Execute API on the Invoke Direct Reports UI API page).
Access the <application content> - select page (HR_DR_SELECT_EMPS) [enter an as of date and click Continue on the <application content> page (HR_DR_ADDL_INFO)].
Use this page to select the direct reports. The direct reports plug-in executes within the context of the component and returns the results to the API Results grid on the Invoke Direct Reports UI API page.
Configuring Person Search
To configure the person search, use the Configure Person Search (HR_PSS_CONFIG) component
This section provides an overview of simple person search and discusses how to:
Configure components for simple person search.
Test simple person search.
Understanding Simple Person SearchThis page enables users of an application to search for and select a person to process. Using this component, an application can easily render a UI that prompts the user for partial names and displays a list of candidates from which the user can select. Additional features include optional drill-down to additional non-sensitive data.
Pages Used to Configure Simple Person Search|
Page Name |
Definition Name |
Navigation |
Usage |
|
HR_PSS_CONFIG |
Set Up HRMS, Common Definitions, Person Search Match, Configure Simple Person Search, Configure Simple Person Search |
Configure components for simple person search. |
|
|
HR_PSS_TEST_API |
Set Up HRMS, Common Definitions, Person Search Match, Invoke Person Search API, Invoke Person Search API |
Test simple person search within the context of an application. |
|
|
HR_PSS_SEARCH |
Select an Object Owner ID value and click the Execute API button on the Invoke Person Search API page. |
Search for and select a person. This page is invoked from several calling applications. |
Configuring Components for Simple Person Search
Access the Configure Simple Person Search page (Set Up HRMS, Common Definitions, Person Search Match, Configure Simple Person Search, Configure Simple Person Search).
You select the options that govern how an application searches for and returns person information on the Simple Person Search page within an application.
|
Enter the maximum results rows to return to the calling application. Any rows that meet the search criteria are returned and appear in the results list. If a search returns more than the maximum number of rows, the user is prompted with a message that the search returns more than the maximum number of people and asks them to narrow the search. |
|
|
Select Multiple Employees |
Select to enable the user to select more than one person from the search results. If you select this field, a check box appears next to the names in the results list, otherwise a radio button appears. |
|
Alternate Character Names |
Select to enable the user to search for names by entering the search string in alternate character format. If you configured the system to enable the entry of names in alternate character format, this check box is selected by default. |
|
Expose Employee IDs |
Select to have the person's ID appear in the results details. This field is deselected by default. |
|
Select one of these values:
|
|
|
HR Status Active |
Select to return rows for active workers only. This check box is selected by default. |
|
HR Status Inactive |
Select to return rows for inactive workers only. |
|
Select one of these values to control how the person's relationship to the organization is used on the Person Search page:
|
|
|
Employees |
Select to return employees in the search results. This field is selected by default. |
|
Contingent Workers |
Select to return contingent workers, for example, temps or contractors, in the search results. |
|
Persons of Interest |
Select to return other persons of interest, for example, retirees or job applicants, in the search results. |
Testing Simple Person Search
Access the Invoke Person Search API page (Set Up HRMS, Common Definitions, Person Search Match, Invoke Person Search API, Invoke Person Search API).
This page enables you to test the configuration of the Simple Person Search page within the context of an application and sub application that you select. When you click Execute API the search page is rendered as you configured it for the application. You can enter any search criteria to view how the results appear.
Searching for and Selecting a Person from the Simple Person Search
ResultsAccess the Person Search - Simple page (select an Object Owner ID value and click the Execute API button on the Invoke Person Search API page).
Setting Up Mouse Over Popup Pages
To set up the employee mouse over pop up page, use the MouseOver Field Definition (HR_MO_FLDNM_TBL), MouseOver Page Design (HR_MO_TBL), and MouseOver Component Setup (HR_MO_COMPONENTS) components.
This section provides an overview of the mouse over popup page and discusses how to:
Define mouse over popup fields.
Create mouse over popup page designs.
Enable the mouse over popup page for a component.
Indicate the ID field to retrieve the mouse over page.
Understanding the Mouse Over Popup PageThe MouseOver Popup feature enables you to quickly see additional employee or applicant information by pausing on a person's name or ID that has a dotted line under it, as shown in this example.
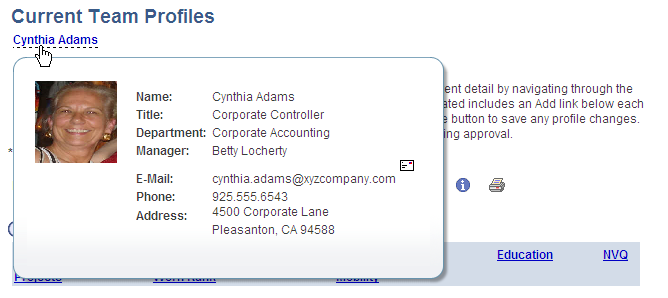
Example of a mouse over popup page showing additional employee data
The PeopleSoft HCM application provides you with the flexibility to configure this mouse over popup page in a way that is useful to you or other groups within your organization. You may want to set up a popup page that includes employee information such as a picture, job title, department, supervisor's name, and work location. Or, when performing certain business processes, you may find it beneficial to have a popup page that includes contact information, such as an email for an employee or applicant. You can even associate this email contact information with an icon that, by clicking, will initiate an email notification.
Create different mouse over popup page designs to associate with a specific product, feature, or user role; or share the same design across multiple products. For example, you may want to view information regarding an employee's benefit selections on one page while on another page you may find it more beneficial to view the employee's holiday schedule.
Mouse Over Popup Page Layout and Design
Use the MouseOver Page Design component to identify mouse over IDs, which define the fields and number of columns that should appear on a given mouse over popup page. The system delivers these three layout designs that enable you to display pages differently:
One column of data (HR_MO_DSP_1_POP)
Two columns of data (HR_MO_DSP_1_2_POP )
An employee picture in one column and a second column of data (HR_MO_DSP_P_2_POP)
Each column can include up to seven fields. However, when you include an employee's picture on the mouse over popup page, the image will display in column 1 and no other fields will appear in that column.
The PeopleSoft application delivers these mouse over IDs:
|
Mouse Over ID |
Description |
|
APPLICNT_INFO_1 |
Applicant Information – Column 1 and Column 2 of data |
|
APPLICNT_INFO_2 |
Applicant Information – One column of data |
|
EMPLOYEE_INFO_1 |
Employee Information – Employee Picture and one column of data |
|
EMPLOYEE_INFO_2 |
Employee Information – Column 1 and Column 2 of data |
|
EMPLOYEE_INFO_3 |
Applicant Information – One column of data |
Note. PeopleSoft recommends that if you want to use a variation of one of these delivered mouse over IDs that you insert a row in the MouseOver Page Design for the ID and use the Owner ID and Sub ID fields. Do not modify the delivered value other than by inserting a row and using the owner field, since other applications may be using the delivered value. Changes to the delivered ID can affect other application currently using the mouse over ID.
Prior to creating your mouse over popup page designs, you must identify the fields that can be included on the page in the MouseOver Field Definition component. The PeopleSoft application delivers these predefined fields:
|
Applicant Data |
Person and Job Data |
|
|
Warning! Adding other fields is considered a customization and requires modifications to the Application Package/Class (HR_MO_COMMON: SET_UP_COMMON) PeopleCode that is used to retrieve the data associated with any new fields.
PeopleTools Application Designer Setup
The majority of the setup for the mouse over popup page is done through delivered PIA setup pages in the HRMS system. However, the Mouse Over Popup properties must also be set within the page field properties within Application Designer by enabling the page popup and selecting the page layout, which is identified in the MouseOver Page Design component, Suggested Popup Page field. When mouse over popup is set up, the system places the mouse over indicator of a dotted underline under the field, which will initiate the popup.
Note. The Mouse Over Popup feature can be applied to many different pages within HCM as long as the employee or applicant ID is located at level 0 in the record structure.
Important! When you have set up a page field property for use with the mouse over popup, and this page is used in a component, the mouse over indicator will be present on the page. If this page exists in multiple components and each of those components has not been properly setup then the user will receive a message indicating so.
For more information about page levels and enabling mouse over popup pages, see Enterprise PeopleTools PeopleBook: PeopleSoft Application Designer.
Pages Used to Configure the Employee Mouse Over Page|
Page Name |
Definition Name |
Navigation |
Usage |
|
HR_MO_FLDNM_TBL |
Set Up HRMS, Common Definitions, Mouse Over Popup, MouseOver Field Definition, MouseOver Field Definition |
Define mouse over popup fields and supporting fields that will be available in the MouseOver Page Design component and can be used with the mouse over popup page. Note. Only the fields delivered as system data will be retrieved by the mouseover popup application class. |
|
|
HR_MO_CL1_TBL |
Set Up HRMS, Common Definitions, Mouse Over Popup, MouseOver Page Design, Mouse Over Column 1 |
Create mouse over page designs by defining the fields for the first column of the mouse over popup page. |
|
|
HR_MO_CL2_TBL |
Set Up HRMS, Common Definitions, Mouse Over Popup, MouseOver Page Design, Mouse Over Column 2 |
Create mouse over page designs by defining the fields for the second column of the mouse over popup page. |
|
|
HR_MO_COMP_SETUP_1 |
Set Up HRMS, Common Definitions, Mouse Over Popup, MouseOver Component Setup, MouseOver Component Setup |
Enable the mouse over popup page for a component. Define the components which will utilize the Mouse Over Popup feature. This setup will define the popup type, the mouse over ID to be used with the component, and the owner and sub owner ID, if needed. |
|
|
HR_MO_COMP_SETUP_2 |
Click Person Detail on the MouseOver Component Setup page. |
Indicate the ID field to retrieve the mouse over page. |
Defining Mouse Over Popup FieldsAccess the MouseOver Field Definition page (Set Up HRMS, Common Definitions, Mouse Over Popup, MouseOver Field Definition, MouseOver Field Definition).
Define the fields that are configured for use with the mouse over popup page. There are 31 fields that we are delivering with this feature. Adding any other fields would be considered a customization and will require peoplecode modifications to the Application Package/Class (HR_MO_COMMON: SET_UP_COMMON) that is used to retrieve the data associated with any new fields.
Note. Only the fields delivered as system data will be retrieved by the mouseover popup application class. Any new fields added to the component require modifications to HR_MO_COMMON application package in order to retrieve the data.
|
Field Name |
Define a field name that should be available for entry on the MouseOver Page Design pages when creating the design of the mouse over popup page for the user. The PeopleSoft application delivers several predefined fields for the mouse over popup page. |
|
Label |
Define the default label name that will appear on the mouse over popup page. The value you enter here will supply the default value for the Label field on the Mouse Over Column 1 and 2 page but can be overwritten on that page. |
Supporting Fields for Setup
|
Show Display Field |
Select this check box to have the Display field appear on the Mouse Over Page Design pages for this field. You use the Display field to specify whether the field value on the mouse over popup page should display the code, the description, or both the code and description for the user. For example, you can determine whether to have the Department field display the department code of 11000, the department description of Accounting, or both the code and description 11000 Accounting. |
|
Show Type Field |
Select this check box to have the Field Type field appear on the Mouse Over Page Design pages for this field. You use the Field Type field when the field can have different types of the same data. For example, you may have a phone type of Home, Business, or Other for a person. |
|
Show Icon Field |
Select this check box to have the Icon ID field appear on the Mouse Over Page Design pages for this field. You use the Icon ID field when the field can have an image associated with a field. For example, you may want to have an email field with an icon image that when selected will take the user to another window and bring up their email software. Note. The PeopleSoft application is set up to support email field icons. You will need to make modifications to PeopleCode to use other types of software. |
Creating Mouse Over Popup Page Designs
Access the Mouse Over Column 1 page (Set Up HRMS, Common Definitions, Mouse Over Popup, MouseOver Page Design, Mouse Over Column 1) or the Mouse Over Column 2 page (Set Up HRMS, Common Definitions, Mouse Over Popup, MouseOver Page Design, Mouse Over Column 2).
Note. Set up the Mouse Over Column 2 page the same way you set up the Mouse Over Column 1 page with the exception of the Owner ID / Sub ID Data fields. The Include Employee Picture check box and the Popup Page field are available on the Mouse Over Column 1 page only. The Owner ID and Sub ID fields are display only on the Mouse Over Column 2 page.
When creating a mouse over popup page, you can define fields to display in column 1 only, column 2 only, or both columns 1 and 2.
|
Mouse Over ID |
Enter a mouse over ID that defines this unique mouse over popup page layout. You will associate this code with each component that should use this mouse over popup layout. |
Owner ID / Sub ID Data
This level enables the system to display different items on the mouse over popup page for owners and sub owners. You can have several different owner IDs and page structures associated with the same mouse over ID.
|
Owner ID |
Enter an owner ID when there are different views of the same popup page for different owners. For example, use this field when a group or applications want to use the same mouse over ID but would like to change the data details of an existing ID. If you do not specify an owner id, the system uses the most recently effective mouse over ID for the display of the page. When you associate the mouse over ID with a component on the MouseOver Component Setup page, you can also enter the owner ID to specify the unique mouse over popup page design for this owner. |
|
Include Employee Picture |
Select this check box to have the popup page display the employee picture, if available. When this check box is selected, the Column 1 fields are unavailable for entry and the system displays a message that no other data will display in column 1 other than the picture. Note. This field is only available on the Mouse Over Column 1 page and will display employee pictures only and should not be used for applicant mouse over popup pages. |
|
Sub ID |
Enter a sub owner ID in order for the system to display different views of the same pop up page for the different sub owners. If you do not specify an owner or sub owner id, the system uses the most recently effective mouse over ID for the display of the page. When you associate the mouse over ID with a component on the MouseOver Component Setup page, you can also enter the owner ID and sub owner ID to specify the unique mouse over popup page design for this owner or sub owner. |
|
Suggested Popup Page |
Displays the name of the page layout upon saving the page and determines which popup/layout to apply to the page in application designer when using the selected mouse over ID. The page layouts identify a page with one column of data (HR_MO_DSP_1_POP), a page with two columns of data (HR_MO_DSP_1_2_POP ), or a page that displays an employee's picture and one column of data (HR_-MO_DSP_P_2_POP ). |
Column 1 and Column 2
The fields in this grid box depend upon the Fieldname values you select and the supporting fields that you selected for this field name on the MouseOver Field Definition page. The fields and field detail data you enter on these pages determine how the system will display the mouse over popup page for the user.
Note. The system enables you to select up to seven field items per column.
|
Ord Seq (order sequence) |
Enter a sequence number up to 98 for any field name except for address fields, which the system automatically assigns with the sequence number of 99. The layout of the mouse over page puts address fields at the bottom of the column because the system displays the address as two rows. |
|
Fieldname and Field Name |
Select the fields that should appear on the mouse over popup page. Values are defined on the MouseOver Field Definition page. When you enter a value in the Fieldname field, the Field Name value displays. The grid displays additional fields based upon the supporting fields that were selected on the MouseOver Field Definition page. |
|
Field Type |
Select a specific type of field value that should display when there may be more than one option available. For example, select whether to show the business phone number or the home phone number for the Phone field. This field is available when the Show Type Field check box is selected on the MouseOver Field Definition page for the field name. |
|
Display |
Identity how the system should display the field value to the user. You can choose to show the field value code (CODE), the description of the field (DESC), or display both the code and description in the field BOTH. For example, you can have the system display the job code 290000, the description of the job Clerk, or have the system display both 290000 Clerk. This field is available when the Show Display Field check box is selected on the MouseOver Field Definition page for the field name. |
|
Label |
Enter the label name that should appear for the user. The field value is provided by default from the MouseOver Field Definition page but can be overwritten on this page. |
|
Icon ID |
Specify the icon that should display for the user that will enable him or her to click and initiate contact with the person. For example, the user can click an email icon to have the system launch the email software The PeopleSoft application supports this functionality for contacting a person through email. This field is available when the Show Icon Field check box is selected on the MouseOver Field Definition page for the field name. |
|
Icon |
Displays the icon selected in the Icon ID field. |
|
Icon Text |
Specify text that should appear when the user places the mouse over the icon. The default value comes from the icon ID description but can be overwritten here. This field is available for entry after selecting a value in the Icon ID field. |
Enabling the Mouse Over Popup Page for a Component
Access the MouseOver Component Setup page (Set Up HRMS, Common Definitions, Mouse Over Popup, MouseOver Component Setup, MouseOver Component Setup).
|
Component Name |
Identify the component that will utilize the Mouse Over Popup functionality. |
|
Market |
Indicate the markets for the component. The mouseover popup key structure is by component, however, when different markets exist with the same component name you can differentiate them by market. For example, you differentiate between the Canada and United States balance arrears components by entering the market code of CAN in one row of the component name and USA in another row of the component name. |
|
MouseOver Popup Type |
Select the mouse over type that should be used within this component. Values are Employee and Applicant. |
|
Include Job |
Select this check box to enable the user to specify the employment record number if the data retrieved through the popup should be based on a particular employee record number. When you deselect this check box, the system uses the employee's current effective job data. |
|
Mouse Over ID |
Enter the mouse over ID that should be used in relation to this component. The mouse over ID determines the look of the mouse over popup page, which is defined in the MouseOver Page Design component. |
|
Owner ID and Sub ID |
Enter an owner or sub owner ID when there are different views of the same popup page for different owners. If you do not specify an owner or sub owner id, the system uses the most recently effective mouse over ID for the display of the page. |
|
Person Detail |
Click this link to access the Person Detail page and enter the record name and field name that will initiate the mouse over popup page. |
Note. The field properties for a page must be setup to use a mouse over popup page in the Application Designer. When this is done the system displays the dotted lines under the ID, indicating that the Mouse Over Popup functionality has been enable for the field. The system will display an error message if the component that contains the page has not been properly setup in the MouseOver Component Setup component.
See Enterprise PeopleTools PeopleBook: PeopleSoft Application Designer
Indicating the ID Field to Retrieve the Mouse Over Page
Access the MouseOver Component Setup - Person Detail page (click Person Detail on the MouseOver Component Setup page).
Employee or Applicant Record and Field
If the Include Job check box is not selected on the MouseOver Component Setup page, the system will only these fields for entry.
|
Employee Record Name or Applicant Record Name |
Enter the record in the selected component that the system will use to retrieve the employee or applicant information. |
|
Employee Fieldname or Applicant Fieldname |
Specify the field from the record identified in the Employee/Applicant Record Name field that will invoke the mouse over popup page and retrieve the employee or applicant information. |
Important! The field that will be used to retrieve the applicant or employee information must be at level 0 in the component and the Mouse Over Popup properties must also be set within the page field properties within the Application Designer.
See Enterprise PeopleTools PeopleBook: PeopleSoft Application Designer
Employment Record and Field
These fields appear when the Include Job check box is selected for the component on the MouseOver Component Setup page when the mouse over popup type is Employee.
|
Job Record Name |
Enter the name of the record of the selected component that the system will use to retrieve job related information specific to an employment record number. |
|
Job Fieldname |
Enter the name of the field in the job record which the system will use to retrieve job related information specific to an employment record number. |
Note. The record and field must be at level 0 of the component.
Configuring and Working with the HR Notepad
To configure the HR Notepad, use the HR Notepad Configuration (HR_NP_CONFIG) component.
This section provides an overview of the HR Notepad and discusses how to:
Configure HR Notepad for application use.
Set up keys for storing notes.
Configure application note page links.
Test the notepad configuration.
Access the notepad page.
Enter or update a note.
Understanding the HR Notepad
A notepad is a logical grouping of text-based notes, or a collection of notes that a user has entered within the context of an application. For example, an employee might have a performance notepad within the context of ePerformance, and a manager might have a recruiting notepad within the context of eRecruit.
You can integrate the plug-in application that maintains the HR Notepad into any HCM application. This application enables the user to record logical notes that are relevant to a row of application data. A common data structure, partitioned by application, is used to store notes.
The notepad provides a consistent user interface (UI) that enables users to create, edit, view, and delete text-based notes. The Notepad UI is a single component that contains two pages for selecting and maintaining notes, a secondary page for displaying warnings and errors, and a tertiary page for viewing note history. In most cases, you can access the notepad pages when an application page displays the Maintain/View Notes icon.
|
|
The Maintain/View Notes icon enables users to access the notepad pages to enter and view notes. |
Although the Notepad UI is consistent across all applications, detailed notepad presentation and behavior specific to a given application are defined in a configuration table entry for the application. This entry defines the behavior of the Notepad UI and the keys that are used for the particular application. You can use this configuration table to integrate the notepad pages into applications for which PeopleSoft does not currently deliver Notepad functionality, add Notepad functionality to applications that you build with PeopleTools, or modify the appearance of notepad pages.
Pages Used to Configure and Work with the HR Notepad|
Page Name |
Definition Name |
Navigation |
Usage |
|
HR_NP_CONFIG_HDR |
Set Up HRMS, Common Definitions, Text Catalog and Notepad, Configure HR Notepad, HR Notepad Configuration |
Configure the HR Notepad for use by an application. |
|
|
HR_NP_CONFIG2 |
Click the Configure link for an application on the HR Notepad Configuration - Select Application page. |
Set up the keys for storing notes. |
|
|
HR_NP_CONFIG3 |
Click the Configure Links link on the bottom of the HR Notepad Configuration - Configure Keys page. |
Configure the links that appear on application note pages. |
|
|
HR_NP_TEST_API |
Set Up HRMS, Common Definitions, Text Catalog and Notepad, Invoke HR Notepad API, Note Pad Tester |
Test the notepad configuration. |
|
|
HR_NP_NOTE_SRCH |
Click the Maintain/View Notes icon on an application page. |
Access the notepad page to search for and enter notes. |
|
|
HR_NP_NOTE |
Click the Add a New Note button or select the View or Edit this Note link for an existing note on the <application page> Notepad page. |
Enter or update a note. |
|
|
HR_NP_MESSAGE |
Click the Delete button on the <application page> Notepad page. |
Confirm the deletion of a note. |
|
|
HR_PSS_SEARCH |
Click the Transfer button on the <application page> Notepad page. |
Transfer ownership of the selected note to another person. |
Configuring the HR Notepad for Application Use
Access the HR Notepad Configuration - Applications page (Set Up HRMS, Common Definitions, Text Catalog and Notepad, Configure HR Notepad, HR Notepad Configuration).
|
Object Owner ID and Description |
Select an object owner. The system will display the description of the object owner. |
|
Select from these options:
|
|
|
Allow Deletions |
Select to permit users to delete notes. |
|
Allow Transfers |
Select to permit users who entered and therefore are the owner of a note to transfer ownership of a note to another individual. |
|
Audit |
When selected, this check box enables the Audit Changes feature for the partition. The system will automatically retain a history of all changes made to existing notes, including transfers and deletions. |
|
Configure |
Click to access to the Configure Keys page. |
Setting Up Keys for Storing Notes
Access the HR Notepad Configuration - Configure Keys page (click the Configure link for an application on the HR Notepad Configuration page).
This page is for note pad key configuration and consists of six context key rows. Each row in the grid supports one key configuration requirement.
|
Prompt Table |
Select the table that is used to provide a prompt list and validate the entry when a user enters a value into the key search field in the UI. |
|
Prompt Field |
Select the field within the prompt table that is used to provide the values in the prompt list. You must enter a value in this field if you enter a value in the Prompt Table field. |
|
Key Field Label |
Select the configurable label that will display on the page for this field. |
|
Related Display Field |
Enter the field name for the prompt table that appears in the UI as a related field for the value. This field is optional. If not specified, then there is no related-display field for the context key. For example, you do not usually specify a display field for a date or number context key. |
|
Hide Key |
Select to indicate whether this key field is exposed on the UI pages. This field is selected by default. |
|
Required |
Select to indicate that this key field is required when adding a note. This field is deselected by default. |
|
Enterable |
Select to indicate that the user is permitted to enter a value into this key field in the UI search criteria. This field is selected by default. You might deselect this field in cases which the key is automatically populated by the API and exposed on the UI, but you do not want the user to change it. |
|
Required for Query |
Select to indicate that the user must populate the key in the UI search criteria to see the list of notes that meet the search criteria, or to add a new note. This field is deselected by default. |
|
Display on Grid |
Select to display the context key value in the list of notes that meet the search criteria. You usually select this check box for any context key that has Required for Query deselected. |
|
Clear Checked Rows |
Click this button after you have selected any context key rows for which you want to clear from this configuration. The page will still display the row but the prompt table and field information will be cleared. |
Configuring Application Note Page Links
Access the HR Notepad Configuration - Configure Links page (click the Configure Links link on the HR Notepad Configuration - Configure Keys page).
Use this page to define the navigation that takes place when the user clicks one of the navigation links at the bottom of the Notepad UI.
|
Link Field Name |
Select the name of the navigational link. The prompt table for this field is a view of the four navigational fields that are provided on the Note Detail UI. If you do not add a row for a link in the prompt table, the link does not appear on the UI for the application. |
|
Menu Name |
Select the name of the menu to which the user is transferred when they click the link. The prompt table for this field is a view of all menus in the database. |
|
Menu Bar Name |
Select the name of the menu bar to which the user is transferred when they click the link. The prompt table for this field is a view of all menu bars for the menu specified in the Menu Name field. |
Access the Item/Page tab on the HR Notepad Configuration - Configure Links page.
|
Link Field Name |
Select the name of the navigational link. The prompt table for this field is a view of the four navigational fields that are provided on the Note Detail UI. If you do not add a row for a link in the prompt table, the link does not appear on the UI for the application. |
|
Bar Item Name |
Select the name of the menu bar item to which the user is transferred when they click the link. The prompt table for this field is a view of all items for the menu bar specified in the Bar Name field. |
|
Panel Item Name |
Select the name of the page to which the user is transferred when they click the link. The prompt table for this field is a view of all pages for the bar item specified in the Bar Item Name field. |
|
Mode |
Select the operation mode for the page from the values Add, Update/Display, and Correction. |
Testing the Notepad Configuration
Access the Note Pad Tester page (Set Up HRMS, Common Definitions, Text Catalog and Notepad, Invoke HR Notepad API, Note Pad Tester).
Use this page to test the Notepad configuration for an application and sub-ID, if applicable.
The application keys that appear on this page are the ones that are defined for the Object Owner ID and Sub-Id. When you first access this page, only the Object Owner ID field is enterable. After you enter the Object Owner ID, the Sub-Id field is populated with any valid sub ids for the application. The application keys that appear correspond to the application keys (up to six) that you configure on the HR Notepad Configuration - Configure Keys page.
|
API Method |
Select the method to test.
|
|
Execute API |
Click to execute the API method with the keys you entered. |
Accessing the Notepad Page
Access the <application page> Notepad page (click the Maintain/View Notes icon on an application page).
Note. The fields that appear on the notepad page are determined by the notepad configuration.
Selection Criteria
Depending upon the configuration of a page, you may need to select a person to add or view notes. Optionally, enter a Notes From and Through date.
|
Search |
Click to view a list of notes that meet the search criteria. |
|
Add New Note |
Click to access the Selected Note page, where you can create a new note. |
Existing Notes
This section displays if there are any notes that meet the search criteria. Click the link in the Subject column to open the Selected Note page and view or edit an existing note.
|
Delete |
Select one or more listed notes and click this button to remove them from the system. |
|
Transfer |
Select one or more listed notes and click this button to access the Person Search - Simple page to transfer them to another person. |
Entering or Updating a Note
Access the Selected Note page (click the Add a New Note button or select the View or Edit this Note link in the Subject column for an existing note on the <application page> Notepad page.
|
Effective Date |
The note date for new notes is the effective date that appears on the page. You cannot change the date. Note. Changing the effective date of the record that is associated with the note does not change the note effective date. As a result, the note becomes inaccessible. For example, if you create a note for a job data row with a January 1, 2009 effective date, the note effective date is also January 1, 2009. If you use correction mode to change the effective date of the job data row to January 20, 2009, the note effective date remains unchanged. When you view the notes for the January 20 row of data, you will see only January 20 notes. Without a January 1 row of data, the original note is inaccessible, and users will not see any indication that the original note ever existed. |
|
Subject |
Enter the note subject. This entry appears as the link in the Subject column of the notepad page. |
Configuring the Text Catalog
To set up the text catalog, use the Configure Text Catalog (HR_SSTEXT_CFG) and Translate Text Catalog (HR_SSTEXT_TEXT) components.
This section provides an overview of the text catalog, lists common elements, and discusses how to:
Configure the text catalog.
Designate keys for text catalog entries.
Define text catalog entries.
View text catalog entries as HTML.
Define translation for text catalog entries.
Test text retrieval.
View effective dates and context keys for a text ID.
Understanding the Text Catalog
The Text Catalog feature stores standard text that appears on the self-service pages within HRMS applications, including field labels, button names, links, page instructions, and warnings. It also includes the text and subject lines of automated email notifications. HRMS provides predefined text entries, but you can modify them by using the Text Catalog feature.
Entries in the Text Catalog feature are context-sensitive, meaning that a particular piece of text on a page can vary depending upon the page's usage or context. In this way, For example, instructional messages that appear for managers can differ from the messages that appear for workers.
Context-sensitivity is accomplished through the use of keys that enable the application to retrieve applicable text catalog entries. The keys for each application differ to meet the needs of the application.
Although you can have multiple versions of the same text, you do not have to set up a separate entry for every possible scenario. You can create one generic entry where all key values are blank, and then add entries for the situations that vary from the norm. Blank key values function as wildcards.
Warning! When the system looks for a match, it stops searching if the search keys narrow the possible choices to a single row—the lower-order search keys are ignored. If you do not set things up correctly, the system may return the wrong results. Plan ahead before making changes, particularly for complex scenarios. Random changes can lead to errors that are difficult to debug later.
You can test changes by using the Test Text Catalog page. To test an entry, enter the text ID that is associated with the text, plus any combination of key values, and click the Test button to view the text that the system retrieves for the keys values you entered.
To update a text entry, you need its ID. Use the Display Text ID option on the Configure page to find this information. When you activate this option, the text IDs appear in place of the corresponding text on self-service pages, warnings, and emails.
To view the correct text IDs, you need to create the conditions that cause the page, warning, or email to appear. For example, you might need to sign in using a particular role.
Note. You may want to activate this option, print a copy of the self-service pages, and then deactivate it. This provides a hardcopy reference of all the text IDs used on each self-service page.
Common Elements Used in this Section|
Text ID |
The unique identifier that you entered to access entries in the text catalog. |
|
The place where the entry is used: Email Body, Email Subject, Error/Warning, Field Label, Grid/Scroll Heading, Groupbox Title, Hyperlink/Button, Page Instructions, or Page Title. The only text entries that you cannot modify are translate values and error messages that appear in Windows error boxes. You can use this field to search the Maintain Text Catalog page when you don't have the text ID, but you do have the specific text. |
|
|
The date on which a particular text catalog entry becomes active. Delivered text is defined as system data in the PeopleSoft HRMS database and has an effective date of January 1, 1900. Important! To prevent future updates to PeopleSoft ePerformance from overwriting any text entries that you add or modify, use a later effective date when you add new text entries, and insert a new effective date when you modify delivered text. |
Pages Used to Work with the Text Catalog|
Page Name |
Definition Name |
Navigation |
Usage |
|
HR_SSTEXT_CFG |
Set Up HRMS, Common Definitions, Text Catalog and Notepad, Configure Text Catalog, Configure Text Catalog, General |
Configure the text catalog for an application. |
|
|
Configure Text Catalog: Key 2 Configure Text Catalog: Key 3 Configure Text Catalog: Key 4 Configure Text Catalog: Key 5 Configure Text Catalog: Key 6 |
HR_SSTEXT_CFG |
Select the Key 1, Key 2, Key 3, Key 4, Key 5, or Key 6 tab on the Configure Text Catalog page. |
Designate keys that are used to store and retrieve text catalog entries. |
|
HR_SSTEXT_TEXT |
|
Define text catalog entries, and define the values for context-sensitive keys. |
|
|
HR_SSTEXT_HTML |
Click the View/Edit as HTML link on the Maintain Text Catalog page. |
View text catalog entries as HTML. |
|
|
HR_SSTEXT_ALLKEYS |
Click the View all effective dates and context keys for this Text ID link on the Maintain Text Catalog page or the Test Text Catalog page. |
View versions and context-key entries for a particular text ID and effective date combination by clicking the view keys link for the desired effective date. |
|
|
HR_SSTEXT_LANG |
Set Up HRMS, Common Definitions, Text Catalog and Notepad, Translate Text Catalog, Descriptions |
Select and describe the languages into which a text catalog entry is translated. |
|
|
HR_SSTEXT_LANG2 |
Set Up HRMS, Common Definitions, Text Catalog and Notepad, Translate Text Catalog, Catalog Text |
Enter translations for text catalog entries |
|
|
HR_SSTEXT_TEST |
Set Up HRMS, Product Related, ePerformance, Text Catalog, Test Text Catalog, Test Text Catalog |
Test the text retrieval for a text ID, using any combination of key values. |
Configuring the Text Catalog
Access the Configure Text Catalog page: General tab (Set Up HRMS, Common Definitions, Text Catalog and Notepad, Configure Text Catalog, Configure Text Catalog, General).
Use this page to add or remove applications from the text catalog and to configure options that affect the operation of the text catalog within an application. The page shot above shows the PeopleSoft HCM applications that are delivered with the text catalog feature enabled.
|
Object Owner Identifier and Description |
Select an object owner. The system will display the description of the object owner. |
|
Display Text Id |
Select to have the system identifiers of the text entry appear instead of the corresponding text. You can use this option to find out which text ID corresponds to a particular piece of text that you want to modify. |
Designating Keys for Text Catalog Entries
Access any of the Key 1-6 tabs on the Configure Text Catalog page.
Note. The Key 2, Key 3, Key 4, Key 5, and Key 6 tabs are identical in appearance and usage to the Key 1 page (Set Up HRMS, Common Definitions, Text Catalog and Notepad, Configure Text Catalog, Configure Text Catalog and access the appropriate key tab).
|
Key 1 (2, 3, 4, 5, or 6) Prompt Table |
Select the object name of the prompt table that defines the values by which the text catalog is partitioned for an application. The values in this prompt table appear when a text catalog entry is defined and modified. You select the value that pertains to the context in which the entry appears on self-service pages or notifications. |
|
Key 1 (2, 3, 4, 5, or 6) Field Name |
Select the field in the prompt table that contains the value that appears in the prompt list for this key. |
Note. If you enter a value for the prompt table, you must also enter a value for the field name in the same row.
Defining Text Catalog Entries
Access the Maintain Text Catalog page (Set Up HRMS, Common Definitions, Text Catalog and Notepad, Maintain Text Catalog, Maintain Text Catalog).
Context Keys and Text
The context keys that appear on this page are determined by the text catalog configuration for the application, which will display up to six keys. Use the context keys to target the message or text to a particular audience or specify the conditions under which the text is appropriate.
Note. A blank value for any key is a wildcard and means that the entry appears in all contexts of the key.
For example, the page shot above shows a configuration of a button for the ePerformance application. The button text that is defined in the text box applies only to the author type of employees (E) and only when the document status is in progress (IP).
For each text ID and effective date combination, define a complete wildcard entry in which you leave all key fields blank. This entry, known as the root entry, is the default text entry that's used when no section type, author type, user role, or document status is specified.
|
Click to view and edit the HTML tags if the text will appear in an HTML area on the page. |
Text Substitution
The text strings that are substituted for specific tokens, such as %1 and %2, are different for each application that uses substitution in the text catalog. They are delivered with the application.
Token substitution in the text catalog works in the same way as in the PeopleTools Message Catalog. You supply the values for the tokens in a PeopleCode function call at runtime. The values are replaced by parameters in the PeopleCode when the text is rendered on performance documents. To use this feature, you must know PeopleCode.
If you want to update the delivered text IDs such that the substitution tokens take on a different meaning or are resequenced, you also need to make corresponding changes to the PeopleCode that calls the text catalog feature retrieval functions, since this copies supplier values to use in place of the tokens.
See Also
Enterprise PeopleTools PeopleBook: PeopleCode Developer's Guide
Viewing HTML for Text Catalog Entries
Access the Maintain Text Catalog - HTML View page (click the View/Edit as HTML link on the Maintain Text Catalog page).
|
Text Style |
Select the style to apply to the text. After you apply a style (for example, Bold or Error to a text entry, the HTML View page region shows how the text will appear on self-service pages. |
Viewing Effective Dates and Context Keys for a Text ID
Access the Text Catalog - View All Keys page (click the View all effective dates and context keys for this Text ID link on the Maintain Text Catalog page or the Test Text Catalog page).
The Versions group box lists all effective-dated versions of the selected text ID.
Click the view keys link to list each set of context keys that is associated with the selected version. Click the language link to view the text that is associated with the context keys for the indicated language.
Translating Text Catalog Entries
Access the Translate Text Catalog - Descriptions page (Set Up HRMS, Common Definitions, Text Catalog and Notepad, Translate Text Catalog, Descriptions).
Use this page to view a text catalog entry and the languages into which it is translated. The Collapse all Languages and Expand All Languages enable you to control the way the list of languages appears. You can add and remove languages on this page, but you cannot enter translation text.
Catalog Text
Access the Translate Text Catalog - Catalog Text page Set Up HRMS, Common Definitions, Text Catalog and Notepad, Translate Text Catalog, Catalog Text).
Use this page to enter translations into the text catalog. The Collapse all Languages and Expand All Languages enable you to control the way the list of languages and translation entries appears. You can add and remove languages on this page and view the text you are translating.
Testing Text Retrieval
Access the Test Text Catalog page (Set Up HRMS, Product Related, ePerformance, Text Catalog, Test Text Catalog).
This page enables you to enter parameters for testing how the entries in the text catalog appear on self-service pages, given a set of parameters that you enter.
To test the text retrieval:
Enter the text ID for the text.
(Optional) Enter values for any key fields. The content keys that appear correspond to the application keys (up to six) that you configure on the HR Notepad Configuration - Configure Keys page.
If you leave all key fields blank, the system returns the root text when you click the Test button.
If you enter values for key fields, the system searches for the text with the best fit.
(Optional) Enter values in one or more of the Substitution Text fields.
When you click the Test button, the system replaces the variable (%1, %2, %3, %4, and %5) in the text entry with the value that you enter here.
(Optional) Select a text style to see the returned text rendered in a particular HTML style.
This features helps you visualize how the text appears on the self-service page. Values are Add'l Inst (additional instructions), Bold, Error, Page Inst (page instructions), and Page Title.
Click the Test button.
The text entry that best matches the search criteria and context keys for the selected text ID appears.
Configuring Attachments
To configure attachments, use the Define Authorization (HR_ATT_AUTH), Define Authorization Entries (HR_ATT_AUTH_ENT), Define Attachments (HR_ATT_CNFG), Configure Keys (HR_ATT_KEYS_DFN), and Maintain Definitions (HR_ATT_DEFN) components.
This section provides an overview of attachments and discusses how to:
Define attachment authorizations
Define authorization entries
Define attachment configuration IDs.
Map data fields to context keys.
Configure context keys.
Configure store keys.
Maintain definitions.
Implement the attachment framework.
Understanding AttachmentsThe attachment feature enables you to attach files, notes, and URLs to a PeopleSoft Enterprise application. An administrator can add URLs, common notes, and files to a component or page and enable others to view, download and edit the attachments. Attachments include notes, PDF files, spreadsheet files, document files, URLs, and so on. You can also define the types of attachments that users can add to a specific row of application data, such as medical or adoption certificates, fitness for duty forms, and so on.
Although the types of attachments you can add to a page are essentially unlimited, attachments are categorized as one of the following:
Attachments are any previously created electronic file that the administrator wants users to be able to download.
URLs are links to dynamic files or web sites.
Notes are free-form text that the user can enter through the attachment page in the PeopleSoft application.
Note. Only attachments and URLS are defined on the Define Attachments page. Notes are created by the user through the attachment pages of the PeopleSoft application.
Note. The Define Attachments page enables an administrator to create document definitions, as well as attachments and URLs. Document definitions are types of files that users can upload to the system. For example various medical certificates or evidence of class completion.
Since many uploaded attachments should not be visible to all users, the system enables an administrator to restrict access to the attachments. The administrator uses roles to define who can add, modify or delete their own attachments for a specific row of application data.
Adding Attachments to Applications Process Flow
Here are the steps for defining attachments to use in PeopleSoft Enterprise applications:
Define attachment Authorization IDs
Specify the authorization level access required to edit or view attachments.
Define Authorization Entry IDs
For each attachment you plan to establish, specify the attachment object type, Attachment, Note, or URL, and the user roles that can access the attachment. Specify the access level of each user role by assigning an Authorization ID to the role.
Define attachment configuration IDs
Add common attachments, URLs, or document definitions and the roles that can see the attachments.
Configure keys
Integrate attachments into any application within any context. After defining the attachments, you can integrate them into any PeopleSoft Enterprise application and the context varies depending on the product that uses the framework. The Configure Keys page enables you to define which application data field maps to each of the required context keys.
Configure context keys
Context keys are populated with values corresponding to a field in the associated application. To define the contextual variations, define contextual key prompt tables or views and key prompt fields based on the application using the attachment framework. These keys can come from any number of tables and are implemented as generic character fields that are defined as record keys in the data structure at the application level to denote alternate configuration IDs that can be used under different circumstances.
Configure store keys
For attachment configuration IDs that are document definitions, you must create a store record to launch the document definition and store the attachments added by a user to a specific row of application data.
Define store keys for document definitions in order to differentiate the row of data to which the attachment belongs. Each application can decide the number of keys to use, from 1 to N, creating its own record plus a sub record in Application Designer to store common fields related to the attachments. Once the store record has been created, it must be associated to the Object Owner ID and Sub ID to automatically retrieve the key field definitions and select the store key labels.
After creating the store record, associate it to the Object Owner ID and Attachment Sub ID and then select the field labels. When you enter the name of the store record definition, the key fields are automatically retrieved in the correct order by the key position defined in the record.
Maintain definitions
The system retrieves a list of valid Configuration IDs based on the defined context keys. In addition, the system uses the Definition ID and the effective date to choose the attachment from the database.
Implement the attachment framework
To implement the attachment framework use the application class methods in the HR_ATTACHMENTS application package PeopleSoft delivers. There are two classes in the delivered application package. The Attachment_Data application class enables you to create an object containing entries for all of the link labels, configuration IDs and group boxes that contain the links to the defined attachments. The Attachment_UI application class enables you to manage the user interface for the attachments.
See Also
Enterprise PeopleTools PeopleBook: PeopleCode Developer's Guide
Enterprise PeopleTools PeopleBook: PeopleCode API Reference
Pages Used to Configure Attachments|
Page Name |
Definition Name |
Navigation |
Usage |
|
Define Authorization |
HR_ATT_AUTH |
Set Up HRMS, Common Definitions, Attachments, Define Authorization, Define Authorization |
Enter and maintain attachment authorization IDs which specify the level of user access for attachments. |
|
Define Authorization Entries |
HR_ATT_AUTH_ENT |
Set Up HRMS, Common Definitions, Attachments, Define Authorization Entries, Define Authorization Entries |
Associate attachment authorizations with user roles. |
|
Define Attachments |
HR_ATT_CNFG |
Set Up HRMS, Common Definitions, Attachments, Define Attachments, Define Attachments |
Associate attachments and their authorizations and create links on the page displayed in the target application. |
|
Configure Keys |
HR_ATT_KEYS_HDR |
Set Up HRMS, Common Definitions, Attachments, Configure Keys, Configure Keys |
Define the prompt tables and key fields used by an application. |
|
Attachments Context Keys |
HR_ATT_KEYS_C |
Click the Context Keys link on the Configure Keys page |
Enter content key prompt values. |
|
Attachments Store Keys |
HR_ATT_KEYS_S |
Click the Store Keys link on the Configure Keys page |
Enter store key values. |
|
Maintain Definitions |
HR_ATT_DEFN |
Set Up HRMS, Common Definitions, Attachments, Maintain Definitions, Maintain Definitions |
Specify the attachment types available to an application. The context keys that appear on this page are determined by the Configure Keys component and are used to retrieve a list of valid Configuration IDs. |
Defining Attachment AuthorizationsAccess the Define Authorization page (Set Up HRMS, Common Definitions, Attachments, Define Authorization, Define Authorization).
Authorization Options
|
Edit Attachments |
Select the check box to enable the user to create, update, or delete attachments. The system automatically selects the View Attachmentscheck box when you select the Edit Attachments check box and save the page. |
|
View Attachments |
Select to enable users to view attachments. |
|
Edit Notes |
Select the check box to enable the user to create, update, or delete notes. The system automatically selects the View Notescheck box when you select the Edit Notes check box and save the page. |
|
View Notes |
Select to enable users to view notes. |
|
Edit URLs |
Select the check box to enable the user to create, update, or delete URLs. The system automatically selects the View URLscheck box when you select the Edit URLs check box and save the page. |
|
View URLs |
Select to enable users to view URLs. |
Delete Options
Select an option to determine the action of the system when the user deletes a existing attachment, note, or URL. Selecting Mark as Deleted, the system still lists the object as an attachment, but the object's status is Deleted and it cannot be selected. This option enables you to track deleted attachments. Selecting Delete from database completely removes the object from the database.
Note. The options in this group box are not available unless one or more of the editing fields, Edit Attachments, Edit Notes, or Edit URLs,are selected.
Defining Authorization EntriesAccess the Define Authorization Entries page (Set Up HRMS, Common Definitions, Attachments, Define Authorization Entries, Define Authorization Entries).
|
Attachments, Notes, and URLs |
Select to allow the Role Names listed in the Define Authorization area to create attachments, notes, or URLs based on the specified Authorization ID. You must select at least one of the options in the Entry Control region. |
Define Authorization
Use the fields in the Define Authorization region to specify the operations a role can perform by associating a role with an attachment Authorization ID. Select the Role Name and then select a valid Authorization ID in each row. Only one Authorization ID can be assigned to each role, but multiple roles can share the same Authorization ID.
Defining Attachment Configuration IDsAccess the Define Attachments page (Set Up HRMS, Common Definitions, Attachments, Define Attachments, Define Attachments).
|
Description |
Enter a description for the Configuration ID. This description appears in the group boxes as a label for the link to the attachment. |
|
Attachment Type |
Select the type of attachment users can attach or access. Values are: URL, Attachment, and Document Definition. Based on your selection, the remainder of the fields on the page change. Select either Attachment or URL if you want to define common attachments or URLs such as policies, handbooks, FAQs, and so on. Select Document Definition if you want to create an entry that enables users to create their own attachments for a specific row of application data. |
|
Attachment |
Enter the file name of the attachment and then click the Add Attachment button. After uploading the file, this field displays the file name of the attachment. You can then use the View Attachment and Delete Attachment buttons to manage the content of the attachment. This field is visible only if the Attachment Type is Attachment. |
|
URL |
Enter the desired URL to attach as a link. This field is visible only if the Attachment Type is URL. |
|
Add Attachment |
Click to add the file listed in the Attachment field. This button is visible only if the Attachment Type is Attachment and a file has not yet been uploaded. |
|
View Attachment and Delete Attachment |
Use these buttons to manage the content of the file listed in the Attachment field. These buttons are visible only if the Attachment Type is Attachment and a file has been uploaded. |
Authorized Roles
Enter the roles that you want to have access to the attachment or URL. If no role is selected, all of the available roles can see the link. This region is only visible if the Attachment Type is Attachment or URL.
|
Role Name |
Select the role that you want to access the specified attachment. |
Document Definitions
Enter the list of defined authorization entries that the user can upload as an attachment. The Document Definitions region is visible only if the Attachment Type is Document Definition
|
Entry ID |
Select the authorization entry that you want users to upload to the system. The system lists the Authorization Entry IDs defined on the Define Authorization Entries page. |
|
Last Upd User (Last Updated User) |
Displays the user name that last updated the Define Attachments page. |
|
Updated on |
Displays the date the Define Attachments page was last updated. |
Mapping Data Fields to Context KeysAccess the Configure Keys page (Set Up HRMS, Common Definitions, Attachments, Configure Keys, Configure Keys).
|
Object Owner ID |
Enter the application in which a common component is used. |
|
Sub ID(Sub application ID) |
Enter a sub-application ID. Use the Sub ID field to create a definition for multiple lines of features within a single product line. |
|
Context Keys |
Click to open the Attachments Context Keys page. |
|
Store Keys |
Click to open the Attachments Store Keys page. |
Configuring Context KeysAccess the Attachments Context Keys page (click the Context Keys link on the Configure Keys page).
|
Sequence |
Specify the order of the context keys on the Maintain Definitions page. |
|
Key Prompt Table |
Select the object name of the prompt table that defines the values by which attachments are partitioned for a an application. |
|
Key Prompt Field |
Select the prompt table field that contains the value in the prompt list for a specified key. |
|
Field Label Key |
Select the label in the prompt table. |
Related Fields
Click the Related Fields tab to select the fields related to the key prompt table and key prompt field by row.
Configuring Store KeysAccess the Attachments Store Keys page (click the Store Keys link on the Configure Keys page).
|
Hide Key |
Select to indicate whether the key is displayed on the Document Definition page. |
|
Display on Grid |
Select to indicate whether the key field is displayed on the Document Definition Header page |
Maintaining DefinitionsAccess the Maintain Definitions page (Set Up HRMS, Common Definitions, Attachments, Maintain Definitions, Maintain Definitions).
|
Key Field |
Displays the list of context keys specified on the Attachments Context Keys page. |
|
Key Value, Key Date, and Key Number |
Select a valid value for the specified key field. The available field depends upon the Key Field type. For example, Cycle ID is a CHAR type field, so the Key Value field is available and the Key Date and Key Number fields do not allow you to enter data. The Budget Period Start Date is a DATE type field, which means the Key Datefield is available and the Key Value and Key Number fields do not allow you to enter data. None of these fields are available when the All Values check box is selected. |
|
All Values |
Select to specify that any value for the specified key field is valid. Selecting this field makes the Key Value field unavailable. |
Attachments
|
Configuration ID |
Select a valid configuration ID. Only active attachment configuration IDs are displayed. |
|
Sequence |
Enter a number to specify the order in which the hyperlinks to attachments are retrieved from the database. |
|
Group Box |
Select the group box where the hyperlink label is displayed. Values are: Related Links, Other Links, and None. |
Note. The context keys are not displayed the first time you open the Maintain Definitions page. You must enter the Sequence Number and then the context keys automatically display.
Implementing the Attachment FrameworkImplement the attachment framework using the application class methods in the HR_ATTACHMENTS application package PeopleSoft delivers. There are two classes in the delivered application package. The Attachment_Data application class enables you to create an object containing entries for all of the link labels, configuration IDs and group boxes that contain the links to the defined attachments. The Attachment_UI application class enables you to manage the user interface for the attachments.
Attachment_Data Application Class GetAttachmentLink Method
The GetAttachmentLink method uses the effective date and the context keys array to retrieve the configuration IDs from the database. Then these entries are loaded into a standalone rowset for further filtering by role name.
The GetAttachmentLink method accepts these parameters:
|
Input Parameter |
Description |
|
&EffDt |
Specify the effective date as a date. |
|
&Ckeys |
Specify the context key values as an array of strings. The values must be in the same order as defined on the Context Key page. |
|
%UserID |
(Optional) Use the system variable to specify the current user. |
|
%Component |
(Optional) Use the system variable to specify the component invoking the attachment framework. |
|
&Roles |
(Optional) Specify the roles as an array of strings. |
The method returns an array object that contains entries for all link labels, configuration IDs, and group boxes to which the current user has access.
There are two options to discover or retrieve the current user's roles, depending on the values passed of &Roles, %Component, or %UserID:
The system uses the %UserId and %Component variables to discover all of the valid role names for each content reference and user ID in order to perform the filtering.
Using the &Roles array of strings, only the role names in the array are considered for filtering.
Note. You must choose one of these options in order to perform further filtering by role name. The system automatically uses the &Roles array of strings if you pass all three parameters at the same time.
Attachment_Data Application Class SameAttachmentSetup Method
The SameAttachmentSetup method accepts these parameters:
|
Input Parameter |
Description |
|
&EffDt |
Specify the effective date as a date. |
|
%UserID |
(Optional) Use the system variable to specify the current user. |
|
%Component |
(Optional) Use the system variable to specify the component invoking the attachment framework. |
|
&Roles |
(Optional) Specify the roles as an array of strings. |
|
&cKeys |
Specify the current context key values as an array of strings. |
|
&oKeys |
Specify the prior context key values as an array of strings. This is the value of the field the last time the component was saved. |
The method returns a boolean value (True/False).
The system uses the &EfftDt and &cKeys to retrieve the Configuration IDs using the current context keys values. The system uses the &EfftDt and &oKeys to retrieve the Configuration IDs using the context keys values from the last time the component was saved. Using the %UserId and %Component system variables the system discovers all of the valid role names for each content reference and user ID in order to perform the filtering. Using the &Roles array of strings only the role names that are in the array are considered for the filtering. Then these entries are loaded into arrays for comparison. If the current Configuration IDs are the same as the prior Configuration IDs, then the method returns the value True. If the return is True, the product that intends to implement this functionality has the option to delete the invalid attachments or leave them in the database.
Attachment_UI Application Class Attachment_UI (Constructor) Method
The statements contained in this method provide the initialization of the class and instantiates new objects of the Attachment_UI class.
The Attachment_UI (Constructor) method accepts these parameters:
|
Input Parameter |
Description |
|
&tOwrId |
(Optional) Specify the Text Catalog Object Owner ID. |
|
&tSubId |
(Optional) Specify the Text Catalog Attachment Sub ID. |
|
&OwrId |
Specify the Object Attachment Owner ID. |
|
&SubId |
Specify the Object Attachment Sub ID. |
No return parameters are available.
Attachment_UI Application Class GetAttachmentType Method
The Configuration ID and the Effective Date are used to retrieve the attachment type from the Attachment Configuration Table (HR_ATT_CNFG_TBL.)
The GetAttachmentType method accepts these parameters:
|
Input Parameter |
Description |
|
&CnfgId |
Specify the hyperlink Configuration ID. |
|
&EffDt |
Specify the Effective Date as a date. |
The method returns the attachment type as one of the following string values:
<001> for a URL attachment type.
<002> for an ATTACHMENT attachment type.
<003> for a DOCUMENT DEFINITION attachment type.
Note. Only type 003 attachment types can be edited.
Attachment_UI Application Class OpenAttachment Method
The system uses the Configuration ID value (&hCnfgID) and the Effective Date (&hEffDt) to retrieve the attachment type from PS_HR_ATT_CNFG_TBL using the GetAttachmentType method. If the attachment type is Attachment or URL then the specified attachment file or URL is opened in a new window. Otherwise, the user is transferred to the Attachment User Interface – (Component: HR_ATT_DD). To enable the user to open the component ensure that the corresponding store key record and store key field labels are defined.
The OpenAttachment method accepts these parameters:
|
Input Parameter |
Description |
|
&tOwrId |
(Optional) Specify the Text Catalog Object Owner ID. |
|
&tSubId |
(Optional) Specify the Text Catalog Attachment Sub ID. |
|
&OwrId |
Specify the Object Owner ID. |
|
&SubId |
Specify the Object Attachment Sub ID. |
|
&hCnfgID |
Specify the hyperlink Configuration ID (use the value that the GetAttachmentLinks method returns in the array). |
|
&hEffDt |
Specify the effective date. |
|
%UserID |
Use the system variable to specify the current user. |
|
&sKeys |
Specify the Store Keys values as an array of strings. |
|
&hRole |
Specify the Role Name (use the value that the GetAttachmentLinks method returns in the array). |
|
&dOnly |
Specify true or false. Truespecifies display only mode. Falseuses the attachment setup. |
The method returns a numeric value that indicates the number of successfully added attachment records.
Attachment_UI Application Class DelAttachments Method
The DelAttachments method accepts these parameters:
|
Input Parameter |
Description |
|
&EffDt |
Specify the effective date as a date. |
|
&Ckeys |
Specify the context key values as an array of strings. |
|
&Roles |
(Optional) Specify the roles as an array of strings. |
|
%Component |
(Optional) Use the system variable to specify the component invoking the attachment framework. |
|
%UserID |
(Optional) Use the system variable to specify the current user. |
The method returns an array that contains entries for all of the hyperlink labels, Configuration IDs and group boxes that the current user can access.
Attachment_UI Application Class ExistAttachments Method
The ExistAttachments method accepts these parameters:
|
Input Parameter |
Description |
|
&OwrId |
Specify the Object Attachment Owner ID. |
|
&SubId |
Specify the Object Attachment Sub ID. |
|
&hEffDt |
Specify the effective date as a date. |
|
&hkeys |
Specify the Store Keys values as an array of strings. |
The method returns a boolean value (True/False).
Delivered Text Catalog Entries
The steps to view delivered text catalog entries for attachments are:
Navigate to the Maintain Text Catalog page. (Set Up HRMS, Common Definitions, Text Catalog and Notepad, Maintain Text Catalog)
Enter HHR in the Object owner identifier field and ATT in the Sub ID field.
Click Search to view the list of text catalogs for attachments.