 Understanding Compensation Rates
This chapter provides overviews of compensation rates, paysheets and paylines, and deduction override processing, and discusses how to:
Create paysheets automatically.
Enter hours or amounts using rapid entry paysheets.
Load paysheet transactions.
View and update paysheets and paylines.
Record one-time deductions.
Record one-time garnishments.
Record one-time tax deductions.
Set up and process payback deductions.
Process gross-ups.
Create final check paysheets.
Review paysheet balances.
Generate paysheet reports.
Understanding Compensation Rates
You base employee compensation on various rates of pay, including:
Basic compensation:
Normally paid each payroll period.
Might involve multiple components, such as regular pay and merit pay.
Normally defined as an hourly or salary amount.
Additional rates of pay:
Not necessarily paid each period.
Might include pay for working under hazardous conditions, working in a different job, or completing a certain task.
You typically assign compensation rates to an employee, a job code, or the general employee population. Each rate might represent an hourly rate, a flat amount, or an addition to the base hourly rate. Use the Compensation Rate Code table to establish compensation rate codes that identify the compensation rates you assign to employees and their job codes.
Because compensation rates are independent of earnings codes, you have the flexibility to associate any earnings code with a rate. You can also associate all employee-specific rates with each job change.
You can view totals of:
All base compensation.
All components that comprise base pay and additional pay.
Paysheets reflect total base compensation and any rate code that you specify on an Additional Pay record to indicate an alternate rate of pay. You can apply an alternate rate of pay to various earnings (such as regular, overtime, other earnings). This rate can represent earnings from a prior or future period. You can enter this rate manually on the paysheet or derive it from the compensation rate codes specifically defined for the job code, employee ID, or the general employee population.
The payroll calculation derives the necessary rates to calculate earnings.
All types of check processing, except manual checks, support additional rates. This includes:
On-cycle
Off-cycle
Online
Reversal
Reversal and adjustment
Gross-up
Final check
All rates of pay used during the Pay Calculation COBOL SQL process (PSPPYRUN) are available for reviewing, reporting, and audit trails.
See Also
PeopleSoft Enterprise Human Resources PeopleBook: Administer Compensation
Understanding Paysheets and Paylines
This section discusses:
Paysheets.
Differences between paylines and paysheets.
Paysheet page messages.
 Paysheets
Before you run payroll calculations, you must create paysheets. Paysheets contain the data required to calculate employee pay for each pay period.
To create a paysheet automatically, use the Create Paysheet COBOL SQL process (PSPPYBLD). This process gathers information about the employees for whom to process payroll from system tables and generates the pay earnings information for each payline.
To create a paysheet manually, create a blank paysheet with only the pay begin and end dates specified.
Use the paysheets in the Payroll Processing menu to enter time and any additional payroll-related information for the current pay period (such as earnings, frequency, one-time deductions, one-time garnishments, one-time taxes, accounting data, and tax periods) before you run the Pay Calculation process.
Use the rapid entry paysheet functionality to quickly input basic payroll data entry information based on hours worked, amounts, or a combination of both.
After you create paysheets, you can print them for review.
This diagram illustrates how paysheets fit into the payroll process, from setting up HRMS tables to producing payroll reports and sending data to general ledger:

Illustration showing how paysheets fit into the payroll process from setting up HRMS tables to producing payroll reports and sending data to general ledger
See Payroll Processes.
Differences Between Paylines and Paysheets
Before automated data processing, payroll departments used sheets of ruled paper to compile the information required to calculate pay and produce paychecks for the employees scheduled to be paid in a pay period. These were called paysheets, and each horizontal row of data on the paysheet, typically representing one employee, was called a line or payline. Payroll for North America uses an online version of the pencil-and-paper paysheets and paylines.
Before running the Pay Calculation process, you can make pay-related adjustments for the current pay period. Paysheet and Payline pages display the same content, but you access them differently. The Paysheet page includes many paylines. You can view only one payline at a time on the Payline page.
Use the Paysheet pages to scroll through paylines for a paysheet run, entering any required data. After the initial calculation run, use the Payline pages to enter corrections and last-minute adjustments for employees, because you can access the employee much faster through the individual payline.
If you use paysheet reports to enter payroll information, use one of the Paysheet pages. However, to review pay earnings entries for an employee or group of employees, use one of the Payline pages.
The By Paysheet - Paysheet page brings together information from many different sources in the system. The default information appears as a payline for each employee when you access the page. Paysheets are arranged by pages and lines. A paysheet contains many lines. Each employee appears on a separate line that contains standard pay information, such as the amount of regular pay, number of regular hours, and job data.
When you view a printed paysheet report, several paylines appear on the same page. When you view paysheets online, you only see one payline per page on the By Paysheet - Paysheet page. Specify the number of paylines to appear on a paysheet in the Company table. Specify the sort sequence for paysheets in the Pay Group table.
During the Create Paysheet process, the system creates one payline for each employee to be paid:
Active employees.
Employees who are on leave with pay.
Employees who were terminated or on unpaid leave for only part of the pay period.
For terminated employees or new hires who did not appear on the paysheet, create a new By Paysheet - Paysheet page to include last-minute pay data for the terminated employee, or to indicate how much to pay a new hire who you hired after creating the paysheets. If you select the Automatic Paysheet Update check box on the Pay Group Table - Paysheets page, the system creates paysheets for new hires and updates paysheets with employee job, deduction, and other changes during the Pay Calculation process.
In some cases, depending on the data provided, the system automatically creates multiple pay earnings. Otherwise, enter additional records manually before running the calculation. The system automatically creates the following:
Multiple paylines, if the employee has multiple Job records and additional Employment records.
Multiple Pay Earnings records, if the following criteria are valid:
The pay is charged to different departments and account codes as specified in the Job Data record in the Workforce Administration menu.
The employee has different rates of pay due to a pay rate change during the pay period.
The employee worked in multiple departments, states, or locations during the pay period, resulting from a Job record or location change.
Other Earnings records, if the employee has additional pay entries.
A payline consists of:
Line number.
Employee ID.
Employment record number (used for multiple jobs).
Benefit record number.
Employee name.
Manual check indicator.
A payline is associated with one or more Pay Earnings records. Each Pay Earnings record that is associated with a payline contains the following information:
Amount of regular pay.
Number of regular hours.
Additional pay.
Other earnings.
Tax information.
Job data, such as department and job code.
Note. Each employee who you scheduled to pay during a pay period must have at least one payline and one Pay Earnings record. Otherwise, the system has no information with which to calculate earnings, taxes, and deductions.
Paysheet Page Messages
Paysheet pages display messages that might appear for each pay earnings on the paysheet. The messages indicate either the status of the pay earnings, or what the pay earnings represent.
Normal Payroll Processing Messages
The following table lists the normal payroll processing messages:
|
Message |
Explanation |
|
No Message |
The standard message indicates that nothing unusual has happened. |
|
Partial Period |
Indicates that the employee was not active for the entire pay period, or that the employee's Job record was updated with an effective date that falls between the pay period begin and end dates. |
|
Pay Data Change |
Indicates that one or more of the employee's records was updated since the last time you ran the Pay Calculation process. If you haven't already recalculated the employee's pay, the system recalculates it the next time you run the Pay Calculation process. To select all employees whose pay data changed and requires recalculating, select the Calculation Required value in the Job Pay Data Change field on the Payline Update/Display page. Entering Y in the same field selects all employees whose pay was recalculated due to a change in one of their pay-related records. |
|
Pay Data Change - Partial Period |
Indicates, for employees who received a Pay Data Change message, that a change was made to their Job records with an effective date falling between the pay period begin and end dates, and they have already been recalculated. |
Reversal Message
This reversal message appears in the Payline record when you run the Reversal Processing COBOL SQL process (PSPPYREV) for a check reversal:
|
Message |
Explanation |
|
Reversal |
Indicates that the check is a reversal check. |
Reversal and Adjustment Messages
The following messages might appear when you run the Reversal batch process for a check adjustment:
|
Message |
Explanation |
|
Reversing Adjustment |
Indicates that a Pay Earnings record was adjusted. It appears in the original Pay Earnings record. |
|
Adjustment |
Indicates that the Reversal Processing process created a Pay Earnings record. It appears in the Pay Earnings record that you use to recalculate an employee's pay. |
|
Adjustment - Partial Period |
Indicates that the employees with the adjusted Pay Earnings record had changes to their Job records, with an effective date that falls between the pay period begin and end dates prior to running the Reversal/Adjustment process. |
|
Adjustment - Pay Data Change |
Indicates that at least one of the employee's adjusted records was updated since the last time you ran the Pay Calculation process. The system recalculates this employee during the next Pay Calculation process if it hasn't already. To select all employees whose pay data changed and requires recalculating, enter R in the Job Pay Data Change field on the Payline Update/Display page. Entering Y in the same field selects all employees whose pay was recalculated due to a change in one of their pay-related records. (See the previous example). |
|
Adj - PayChg - Partl Period (adjustment - pay change - partial period) |
Indicates, for an employee who received an Adjustment - Pay Data Change message, that a change was made to that Job record, with an effective date falling between the pay period begin and end dates, and has already been recalculated. |
Manual Check Message
The following table lists the manual check message:
|
Message |
Explanation |
|
Manual Check |
This message appears when you selected the Manual Check option. |
Understanding Deduction Override Processing
This section discusses:
Fields for specifying deductions.
Deduction override evaluation hierarchy.
Deduction override processing in paysheet creation.
Deduction override status indicators.
Deduction override processing in pay calculation.
Deduction override processing related to unconfirmed pay runs.
Note. If some method other than the delivered Create Paysheet process is used to create/load paysheets into the system, this other method will need to be modified to mirror the paysheet with the latest information, including setting the new deduction status indicator to I (initial).
Fields For Specifying DeductionsSpecify general deductions and benefit deductions separately. The following are the four fields used for specifying deductions:
General Deductions Taken.
General Ded Subset ID (general deduction subset ID).
Benefit Deductions Taken.
Benefit Ded Subset ID (benefit deduction subset ID).
Note. These fields are collectively referred to as deduction taken fields. Which of these fields appear on a particular page and the values available for selection vary according to the purpose of the page.
Deduction Override Evaluation HierarchyTo determine deduction overrides, the Create Paysheet and Pay Calculation processes use a deduction override evaluation process, which reads values entered in the General Deductions Taken, General Ded Subset ID, Benefit Deductions Taken, and Benefit Ded Subset ID fields on a succession of pages.
This diagram illustrates the deduction override evaluation process:

Illustration of deduction hierarchy using the deduction override evaluation process
The following list presents the order of deduction override evaluation. The value listed on each successive page overrides the value on the previous pages in this list:
Pay Calendar Table page: general and benefits deductions at the pay calendar level.
Payroll Options 2 page: general deductions at the employee level.
Override Benefits Deductions page: benefit deductions at the employee level.
Create Additional Pay component (ADDITIONAL_PAY): general and benefit deductions at the employee level for a separate check only.
One-Time Deductions page: general and benefit deduction manual overrides on the paysheet at the employee level.
Note. For off-cycle runs, select the Off-Cycle Ded Override (off-cycle deduction override) check box on the Pay Calendar Table page to enable the deduction taken fields on the Pay Calendar to be overriden by employee level overrides.
See Building Pay Calendars Manually.
Deduction Override Processing in Paysheet Creation
The Create Paysheet process enters and overrides the values in the general and benefits deduction taken fields on the paysheet from the values in the Pay Calendar table page, Payroll Options 2 page, Override Benefits Deductions page, and Create Additional Pay component (for separate check) respectively. The deduction taken fields are then accessible for manual overrides on the By Paysheet - One-Time Deductions overrides page at the employee level.
Example of Deduction Override Evaluation Processing in the Create Paysheet COBOL SQL Process (PSPPYBLD)
The details of deduction override evaluation processing in the Create Paysheet process are outlined below in the form of an example.
1. Pay Calendar Table
The default deduction taken values on the paysheet are the Pay Calendar settings as defined on the Pay Calendar Table page. This example assumes the following values:
|
General Deductions Taken |
Deduction |
|
Benefit Deductions Taken |
Subset |
|
Benefit Ded Subset ID (benefit deduction subset ID) |
ABC |
2. Payroll Data
The process reviews each employee's payroll data for overrides, as established on the Payroll Options 2 page:
|
Deductions Taken Value |
Effect on Paysheet |
|
NoOverride |
No change to the General Deductions Taken field. |
|
Deduction |
The General Deductions Taken field is overridden with Deduction. |
|
Subset with the subset ID of XYZ |
The General Deductions Taken field is overridden with Subset and the Subset ID field is overridden with XYZ. |
|
None |
The General Deductions Taken field is overridden with None. |
3. Benefit Deduction Processing Overrides
The Create Paysheet process reviews the values established on the Override Benefits Deductions page. For employees with multiple jobs that have different benefit plans, each payline is processed separately for benefit deduction overrides:
|
Deductions Taken Value |
Effect on Paysheet |
|
NoOverride |
No change to the Benefit Deductions Taken field. |
|
Deduction |
The Benefit Deductions Taken field is overridden with Deduction. |
|
Subset with the subset ID of LMN |
The Benefit Deductions Taken field is overridden with Subset and the Subset ID field is overridden with LMN. |
|
None |
The Benefit Deductions Taken field is overridden with None. |
4. Additional Pay
The Create Paysheet process pulls in the values established on the Create Additional Pay component.
If the Create Additional Pay component is not set up for a separate check (the Sep Chk # [separate check number] field is empty), the general and benefit deductions taken values for the additional pay on the paysheet default to the values that are established for the regular pay payline.
If the Create Additional Pay component is set up for a separate check (the Sep Chk # field has a value from 1 to 99) the payline for regular pay remains at the override(s) determined in the review of payroll data and benefit deduction processing override in steps two and three.
The process then reviews the Deductions Taken values on the Create Additional Pay component for the override(s) to apply on that additional pay payline only.
a. General Deductions Taken on the Create Additional Pay Component
|
General Deductions Taken Value |
Effect on Paysheet |
|
NoOverride |
No change to the General Deductions Taken field. |
|
Deduction |
The General Deductions Taken field is overridden with Deduction. |
|
Subset with a subset ID of GHI |
The General Deductions Taken field is overridden with Subset and the Subset ID field is overridden with GHI. |
|
None |
The General Deductions Taken field is overridden with None. |
b. Benefit Deductions Taken on the Create Additional Pay Component
|
Benefit Deductions Taken Value |
Effect on Paysheet |
|
NoOverride |
No change to the Benefit Deductions Taken field. |
|
Deduction |
The Benefit Deductions Taken field is overridden with Deduction. |
|
Subset with a subset ID of RST |
The Benefit Deductions Taken field is overridden with Subset and the Subset ID field is overridden with RST. |
|
None |
The Benefits Deductions Taken field is overridden with None. |
5. Paysheet One-Time Manual Overrides
The final general deduction and benefit deduction value established for the paysheet in the Create Paysheet process remains available to be manually overridden on the By Paysheet - One-Time Deductions page. Any manual override to the General Deductions Taken or Benefit Deductions Taken field on a paysheet sets the corresponding deduction status indicator to U (user update), so that the calculation process will not override this manual value.
The manual override on the By Paysheet - One-Time Deductions page overrides individual deduction codes to be taken on this check only.
Deduction Override Status Indicators
The system uses two invisible deduction status indicators to tell the Pay Calculation process whether the benefit and/or general deduction taken information has been modified after running the Create Paysheet process. The two indicators are the General Deduction Status (GENL_DED_STATUS) and Benefit Deduction Status (BEN_DED_STATUS) fields on the PAY_EARNINGS record.
The Create Paysheet process initially sets the status of both deduction status indicators to I (initial). The status of the appropriate indicator changes when you save a modification of the deduction taken fields after the initial paysheet creation.
The Pay Calculation process performs the deduction override evaluation process to determine if deduction overrides apply to the paysheets being processed. The following table shows the deduction status indicator values and the response in the Pay Calculation process:
|
Status |
Explanation |
|
I (initial) |
This value is set by the Create Paysheet process or by manually adding a paysheet. This status indicates that no modifications have been made to deduction taken values. The Pay Calculation process does not check for possible update to paysheets. |
|
U (user update) |
Deduction taken value(s) have been manually updated on the One-Time Deductions page. The Pay Calculation process does not modify the values on the paysheet. |
|
L (pay calendar update) |
Deduction taken value(s) on the Pay Calendar Table page have been modified. The Pay Calculation process checks the deductions taken values for possible update to paysheets. |
|
D (employee data update) |
Deduction taken value(s) on the Payroll Options 2 page or the Override Benefits Deductions page have been modified. The Pay Calculation process checks the deduction taken values for possible update to paysheets. |
|
A (additional pay update) |
Deduction taken value(s) on the Create Additional Pay page have been modified. The Pay Calculation process checks the deduction taken values for possible update to paysheets only for additional pays to be paid on a separate check. |
|
C (calculated) |
Update to the deduction taken value(s) on the paysheet has been processed by the Pay Calculation process. |
If you change and save the value in the General Deductions Taken, General Ded Subset ID, Benefit Deductions Taken, or Benefit Ded Subset ID field, then restore the original value, the value of BEN_DED_STATUS and GENL_DED_STATUS will still indicate that a modification has been made and processing will proceed accordingly.
Deduction Override Processing During Pay Calculation
The Pay Calculation process first uses the deduction override evaluation and the paysheet update processes to update the Benefit Deductions Taken, Benefit Ded Subset ID, General Deductions Taken, and General Ded Subset ID on the paysheets. The Pay Calculation process uses these values on the paysheet to select deductions for pay calculation.
Paysheet Update Process
During the paysheet update process in pay calculation, the program accesses the deduction status indicators to determine if the General Deductions Taken and/or Benefit Deductions Taken field(s) have been manually overridden (U). If a field has been manually overridden, the paysheet update process does not override the field. If a field has not been manually overridden, the paysheet update process performs the override evaluation process to pick up any changes that may have occurred in Payroll Data, Benefit Deduction Processing Override, or Additional Pay.
Deduction Calculation Process
After the paysheet update process has determined which deduction codes to apply, the deduction calculation process uses the selections on the General Ded Code Override (general deduction code override) page to calculate deductions. The options that are selected for each individual deduction code are the final override for that code in the deduction calculation and no changes are made to the Deductions Taken field on the paysheet.
See Also
Deduction Override Processing During Pay Unconfirmation
After a paycheck is confirmed, if you continue to make changes to the deduction taken fields on the Pay Calendar Table, Payroll Options 2, Override Benefits Deductions, or Additional Pay (for a separate check) pages, then paysheets for that paycheck would not be marked for deduction override evaluation (deduction override status indicators are not set to tell the system to process overrides).
Consequently, if this paycheck is unconfirmed later and the paycheck recalculated, benefit and general deductions for this paycheck would be calculated based on the deduction taken values on the paysheet, rather than on the updated deduction taken value on the Pay Calendar Table, Payroll Options 2, Override Benefits Deductions, or Additional Pay (for a separate check) pages.
Specifying Deduction Overrides for Additional Pay on a Separate Check
Deduction override processing applies only to additional pay that is paid on a separate check. The Create Paysheet process and the Pay Calculation process first determine whether the additional pay is to be paid on a separate check, then proceeds as follows:
Not a separate check.
If the additional pay is not to be paid on a separate check, then there is no override to the paysheet as the deductions taken value for additional pay follows the value selected for the regular pay line.
Separate check.
If the additional pay is to be paid on a separate check, then the deductions taken value on the Create Additional Pay component overrides the appropriate paysheet deductions taken value (either the original Pay Calendar default or overrides from Payroll Data and/or Benefit Deduction Processing Override) for that payline only.
Employees with Multiple Additional Pays
In the case of employees with multiple additional pays with the same separate check number and varying deductions taken values, the deductions taken value used for the paysheet is the deductions taken value from the additional pay with the lowest additional pay sequence number with the same separate check number.
For example, an employee's additional pay data is represented in the following table:
|
Additional Pay Sequence Number |
Separate Check Number |
General Deduction Taken |
Benefit Deduction Taken |
|
1 |
1 |
Subset (ABC) |
NoOverride |
|
2 |
1 |
None |
NoOverride |
For this employee's separate check number one, the general deductions taken value on the paysheet is Subset and the general deduction subset ID is ABC. The benefit deductions taken value is as specified on the Pay Calendar table.
See Also
Defining Additional Pay Earnings
Handling Employees with Multiple Jobs in the Same Organization
Creating Paysheets AutomaticallyThis section provides overviews of the Create Paysheet process and pay run IDs and discusses how to:
Run the Create Paysheet process.
Check for payroll errors.
Note. You can run the Create Paysheet process only for on-cycle pay runs. You must enter paysheets for off-cycle pay runs individually.
See Also
Understanding Deduction Override Processing
Understanding the Create Paysheet COBOL SQL Process (PSPPYBLD)
During the Create Paysheet process, the system scans all employees and selects the employees that are scheduled to be paid for the specified pay period. It recognizes them because their pay groups are assigned to a pay calendar entry that is associated with the pay run ID.
When you create paysheets, the system performs the following tasks:
Initializes input for salary or hourly rates, hours, additional earnings, tax methods, and accounting information.
Provides a data entry point for hours, additional earnings, one-time deductions, one-time garnishments, one-time taxes, and overrides to previously established employee-level data (such as the department to which it charges earnings).
Provides for earnings and hours to be divided among two or more departments, accounts, or locations.
Uses the pay calendar and holiday schedule to automatically set up the holiday earnings code and hours for pay periods that contain holidays, using the holiday earnings code from the Pay Group Table - Calc Parameters (Pay Group table - calculation parameters) page.
Establishes prorations for employees who work for only part of a pay period or have a data change (such as a pay increase or department change).
Creates multiple lines for employees who work at multiple jobs during a pay period (if you use the Multiple Job feature and established multiple jobs, or employment record numbers, for the employees).
Provides for printing turn-around or data-entry documents, which you can distribute to department managers or supervisors.
Automatically approves paysheet data, as specified by the Confirmation Required check box on the Pay Group Table - Process Control page.
Automatically creates multiple lines for Fair Labor Standards Act (FLSA) employees when the FLSA period is smaller than the pay period.
Understanding Pay Run IDs
To indicate for whom you want to create paysheets, specify a pay run ID on the Create Paysheets page. This pay run ID groups together pay calendar entries from different pay groups for payroll processing.
When you set up the payroll process tables, you assigned a pay run ID to each pay calendar entry. At this point, you already know how to organize the payroll cycles, and whether to run paysheets for multiple pay groups and companies at the same time by combining them under the same pay run ID.
All pay calendar entries that share a pay run ID generally have the same pay period end date, but not necessarily the same pay frequency. In most cases, you set up a different pay run ID for each pay period end date on the Pay Calendar Table page.
See Also
Pages Used to Create Paysheets Automatically|
Page Name |
Definition Name |
Navigation |
Usage |
|
RUNCTL_PRESHEET |
|
Run PAY034 to generate a report to verify the integrity of the payroll and benefits setup and the employee data. Before creating paysheets, run this optional report. This report scans all the tables required by the Create Paysheet process and identifies orphan records and codes. |
|
|
RUNCTL_PAYSHEET |
|
Specify a pay run ID and create a paysheet. This page is also used to confirm a pay run that processed paysheets loaded with variable compensation data. |
|
|
PAY_MESSAGES |
|
View payroll error messages that arise when creating paysheets. |
Running the Create Paysheet COBOL SQL Process (PSPPYBLD)
Access the Create Paysheets page (Payroll for North America, Payroll Processing USA, Create and Load Paysheets, Create Paysheets, Create Paysheets; or Payroll for North America, Payroll Processing CAN, Create and Load Paysheets, Create Paysheets, Create Paysheets; or Payroll for North America, Payroll Processing USF, Create and Load Paysheets, Create Paysheets, Create Paysheets).
|
Pay Run ID |
You already set up pay run IDs and associated them with pay calendar entries. Note. Use the Pay Run table to verify the accuracy of the selected group to be processed. This table displays every company and pay group calendar entry that you linked to the pay run ID. |
Checking for Payroll Errors
Access the Review Payroll Error Messages page (Payroll for North America, Payroll Processing USA, Review Processing Messages, Review Payroll Error Messages, Review Payroll Error Messages; or Payroll for North America, Payroll Processing CAN, Review Processing Messages, Review Payroll Error Messages, Review Payroll Error Messages; or Payroll for North America, Payroll Processing USF, Review Processing Messages, Review Payroll Error Messages, Review Payroll Error Messages).
|
Page |
If the error is for a specific employee, this field displays the paysheet page number. |
|
Line |
If the error is for a specific employee, this field displays the paysheet payline number. |
Message
|
Separate Check # (separate check number) |
This field appears if the error is for an employee and the error occurred on a separate check. |
|
Message ID |
The Management Information Systems department uses this to find and correct errors. |
|
Message Data |
If the error is associated with an object, such as an earnings code, this field displays the object ID. Note. The Payroll Error Messages report (PAY011) also lists errors related to employee data. |
See Also
Understanding Corrections in Pay Calculation
Entering Hours or Amounts Using Rapid Entry Paysheets
This section provides an overview of rapid entry paysheets, lists prerequisites and common elements, and discusses how to:
Use the rapid entry paysheet based on hours.
Use the rapid entry paysheet based on amounts.
Use the rapid entry paysheet based on hours or amounts.
View validation results.
Load or reset payroll data from rapid entry paysheets into paysheets.
Understanding Rapid Entry Paysheets
Rapid entry paysheets enable you to quickly input hours worked, amounts, or a combination of both for any number of employees. These are the steps to use rapid entry paysheets:
Access the Rapid Entry Paysheet page using the template that has the earnings codes that you plan to enter.
Enter employees and their earnings.
Run the validation process and view validation results.
Use the Load Paysheets PSJob process (PYLOAD) to load this information into the standard paysheets created within Payroll for North America.
Fields Displayed on the Rapid Entry Paysheet Page
The fields available for entering earnings information on the Rapid Entry Paysheet page vary according to the type of template that you select to enter the page. The following table lists the important fields that vary by template type:
|
Rapid Entry Template Type |
Fields on the Rapid Entry Paysheet Page |
|
Hours |
Up to three columns for the earnings codes defined on the template. Optional Earnings Code field for an additional earnings code. Hours: Use with the optional additional earnings code. |
|
Amounts |
Up to two columns for the earnings codes defined on the template. Optional Earnings Code field for an additional earnings code. Earnings Amount: Use with the optional additional earnings code. |
|
Hours or Amounts |
Up to three columns for the earnings codes defined on the template. |
Prerequisites
Before you can use rapid entry paysheets, you must:
Define the rapid entry paysheet templates for the type of earnings you are entering.
Define a Pay Run ID for the payroll that you're processing.
For example, if you're processing payroll for the month ending December 2009, you should have defined a Pay Run ID for this timeframe.
(Optional) If you plan to load employees into the rapid entry paysheet by groups, you must first create the groups using Group Build pages.
Common Elements Used in This Section|
Earnings Code (optional) |
Use this field to select an additional earnings code not defined on the Rapid Entry Template. Note. You can add an additional earnings code to a Rapid Entry Template based on Hours only or Amounts only. |
|
Earnings Begin Date and Earnings End Date |
Enter applicable dates in these fields. Both are required fields. Note. For FLSA employees, the beginning and end dates must fall within the same FLSA period. When adding entries to on-cycle paysheets from rapid entry paysheets, the earnings begin/end dates entered here must match the existing paysheet. If there is not a match, then a new pay earnings row will be created using these earnings beginning and ending dates. |
|
Group ID (optional) |
To load the employees in a group that has been defined in Group Build pages, select a predefined group ID. After you've entered the Group ID, click the Get Group button to populate the EmplID, Empl Rcd#, and Name fields. |
|
EmplID (employee ID) |
To load individual employees, manually enter the EmplID. |
|
Sep Chk # (separate check number) |
Enter a check number from 1 to 99 in this field if you want the earnings to be paid on a separate check. In one payroll run, the system can produce up to 99 separate checks per employee in addition to the regular paycheck. The earnings are put on the check that you specify here. If you leave this field blank, the earnings are included with regular pay in one paycheck. |
|
Gross-Up |
Select this check box to gross-up a check for this pay earnings. |
|
Validate on Save |
Select this check box to have the system validate entries for each employee when you save. After the validation process is complete, the Validation Results page displays. Note. If you do not validate entries when you save, the Load Paysheet Transaction process performs the validation. Invalid entries are not loaded and can be reviewed on the Validation Results page. The validation process will not execute a second time if you click the Save button after a Validate on Save has just been performed. If you update the Rapid Paysheet rows after the validation, then you can re-validate on save as many times as you need. |
Pages Used to Enter Hours or Amounts Using Rapid Entry Paysheets|
Page Name |
Definition Name |
Navigation |
Usage |
|
PYRE_AMT_ENTRY PYRE_HRS_ENTRY PYRE_BOTH_ENTRY |
|
Enter hours, amounts, or a combination of both for the earnings codes defined in a template. Use the Hours or Amounts combination if you want to include earnings defined as Hours Only and earnings defined as Amounts Only in the same template. |
|
|
PYRE_INVALID |
|
View employee and earning code errors relating to rapid entry paysheets. Use this page to identify errors to be corrected. You are automatically transferred to this page upon save if you have selected the Validate on Save check box. If you do not validate entries when you save, the Load Paysheet Transaction process performs the validation. Invalid entries are not loaded and can be reviewed on the Validation Results page. |
|
|
RUNCTL_PSHUP |
|
Load data from rapid entry paysheets into paysheets. |
Using the Rapid Entry Paysheet Based on Hours
Access the Rapid Entry Paysheet Creation page (Payroll for North America, Payroll Processing USA, Create and Load Paysheets, Create Rapid Entry Paysheets, Rapid Entry Paysheet Creation; or Payroll for North America, Payroll Processing CAN, Create and Load Paysheets, Create Rapid Entry Paysheets, Rapid Entry Paysheet Creation; or Payroll for North America, Payroll Processing USF, Create and Load Paysheets, Create Rapid Entry Paysheets, Rapid Entry Paysheet Creation).
Exception Hours
|
Hours |
Enter the number of hours for the additional earnings code. |
Using the Rapid Entry Paysheet Based on Amounts
Access the Rapid Entry Paysheet Creation page (Payroll for North America, Payroll Processing USA, Create and Load Paysheets, Create Rapid Entry Paysheets, Rapid Entry Paysheet Creation; or Payroll for North America, Payroll Processing CAN, Create and Load Paysheets, Create Rapid Entry Paysheets, Rapid Entry Paysheet Creation; or Payroll for North America, Payroll Processing USF, Create and Load Paysheets, Create Rapid Entry Paysheets, Rapid Entry Paysheet Creation).
Exception Amount
|
Earnings Code |
Enter dollar amounts in the columns for earnings codes defined on the template. |
|
Earnings Amount |
Use this column to enter the appropriate dollar amount that is associated with the additional earnings code. |
FLSA Employees Being Paid Bonuses
When bonuses paid to FLSA employees need to be spread over several FLSA periods, enter the earnings begin and end dates to reflect the entire period covered by the bonus. The Pay Calculation process spreads the bonus amount over the FLSA periods encompassed by the earnings begin and end dates.
See Also
Using the Rapid Entry Paysheet Based on Hours or Amounts
Access the Rapid Entry Paysheet page (Payroll for North America, Payroll Processing USA, Create and Load Paysheets, Create Rapid Entry Paysheets, Rapid Entry Paysheet Creation; or Payroll for North America, Payroll Processing CAN, Create and Load Paysheets, Create Rapid Entry Paysheets, Rapid Entry Paysheet Creation; or Payroll for North America, Payroll Processing USF, Create and Load Paysheets, Create Rapid Entry Paysheets, Rapid Entry Paysheet Creation).
Exception Amount
Enter the appropriate hours or amounts for each earnings code.
Viewing Validation Results
Access the Validation Results page (Payroll for North America, Payroll Processing USA, Create and Load Paysheets, Create Rapid Entry Paysheets, Validation Results; or Payroll for North America, Payroll Processing CAN, Create and Load Paysheets, Create Rapid Entry Paysheets, Validation Results; or Payroll for North America, Payroll Processing USF, Create and Load Paysheets, Create Rapid Entry Paysheets, Validation Results).
Note. If no errors are found, a No errors found in validation process message displays on this page.
Loading or Resetting Payroll Data from Rapid Entry Paysheets into PaysheetsSee Loading Paysheet Transactions.
Loading Paysheet TransactionsThis section provides an overview of the Load Paysheets PSJob process (PYLOAD) and discusses how to:
Use the Load Paysheets process with rapid entry paysheets.
Use the Load Paysheets process with Expenses and PeopleSoft HRMS applications.
Use the Load Paysheets process with sources other than PeopleSoft applications.
Load data into paysheets.
Review and inactivate preloaded transactions
View loaded and preloaded transactions.
Understanding the Load Paysheets PSJob Process (PYLOAD)
This section discusses:
The Load Paysheets process.
On-cycle and off-cycle processing.
Resetting transactions.
Maintaining the PSHUP_TXN record.
The Load Paysheet Process
The Load Paysheets process (PYLOAD) runs:
An Application Engine program (PYRE_PRELOAD) that validates rapid entry paysheet transactions and loads the valid transactions into the PSHUP_TXN record.
Transactions that are successfully loaded into the PSHUP_TXN record are then removed from the rapid entry transaction table (PYRE_DETAIL). Invalid transactions are marked as inactive and are available for review on the Validation Results page.
A COBOL SQL process (PSPPSHUP) that loads active transactions that are in the PSHUP_TXN record onto paysheets.
The records in PSHUP_TXN include transactions from other update sources, such as Expenses and other HRMS applications.
After transactions have been loaded to paysheets, this process changes the transaction status from Active to Inactive.
On-Cycle and Off-Cycle Processing
When you run the Load Paysheets process, you specify whether you are loading on-cycle or off-cycle data.
When you load data from rapid entry paysheets, the choice of on-cycle or off-cycle controls which transaction rows are loaded. For example, if you choose to load rapid entry paysheets for on-cycle transactions, then only on-cycle transactions are loaded. If you choose to load rapid entry paysheets for off-cycle transactions, then only off-cycle transactions are loaded.
For all other sources, the transactions do not have their own on-cycle or off-cycle designation, so all transactions for that source are loaded, and they become on-cycle or off-cycle according to the parameters you selected on the Load Paysheet Transactions page.
Reviewing and Inactivating Transactions
You can use the Update Paysheet Transactions process to review data from the PSHUP_TXN record. When you review active transactions (transactions that have not been loaded), you can manually inactivate the transaction to prevent it from being loaded. The system updates the PSHUP_TXN record with the new status and with an indicator that the status has been manually changed.
Because transactions are also made inactive when they are loaded, you can only activate an inactive transaction if the transaction was manually inactivated.
Resetting Transactions
The reset transactions process option performs differently for rapid entry paysheets than for other transaction sources:
Rapid entry paysheets.
The reset transactions process option resets rapid entry paysheets transactions from inactive to active, and then re-creates the paysheets.
Transaction sources other than rapid entry paysheets.
In the event of a pay unsheet, use the reset transactions process option to reset transactions from inactive to active, then run the Load Paysheets process again.
Note. If you want to reload transactions from sources other than rapid entry paysheets, in addition to running the reset transactions process, you must either unsheet the pay run or remove the previously loaded transactions from the paysheets. If you reset the transactions but do not delete the previously loaded transactions from the paysheets, the system views the reloaded transactions as duplicates and will not process the load.
Maintaining the PSHUP_TXN Record
Transaction records remain in the PSHUP_TXN record in the system until you delete them. When you run the load process, their status is converted from active to inactive. Only active records are loaded to paysheets.
You are responsible for deleting the data in record PSHUP_TXN according to your organization's business practices. You can archive the data that has been loaded into paysheets after a period of time that you determine based on such factors as:
The volume of transactions being processed.
Performance.
Disk storage requirements.
You can use Data Mover or PeopleSoft Archive Manager to manage the data.
Using the Load Paysheets Process with Rapid Entry Paysheets
Keep the following in mind if you're loading rapid entry paysheet records:
You must validate the earnings codes before running the Load Paysheets process; otherwise the load process will not select the rapid entry paysheets.
Use the Validate on Save check box on the Rapid Entry Paysheet page.
On-cycle paysheets must have been created prior to running an on-cycle load process.
For off-cycle processing, the Load Paysheet Transaction process will automatically create an off-cycle paysheet.
To create rapid entry paysheets for off-cycle processing, select the Off-Cycle? check box at the same time as you enter the key values for the new rapid entry paysheet. You cannot change this setting after you continue to the Rapid Entry Paysheet Creation page.
Then, when you load the off-cycle rapid entry paysheets, select Off-Cycle in the On or Off Cycle field on the left side of the Load Paysheet Transactions page.
All valid employee-level rapid entry paysheet records are deleted at the end of the load process.
For on-cycle rapid entry paysheet records, invalid rows are deleted when the on-cycle payroll is being confirmed.
For off-cycle rapid entry paysheet records, invalid rows are deleted when the calendar is closed for off-cycle processing (at the confirm of the next on-cycle payroll).
Rapid entry paysheets are the only source where the earnings begin and end dates must match the existing pay earning row for the amount to be added to that Pay Earning record.
If there is not an exact match of earnings begin and end dates, then a new pay earnings row is added to the employee's existing paysheet pay line row with the new beginning and ending earnings dates from the rapid entry paysheet.
Using the Load Paysheets Process with Expenses and PeopleSoft HRMS
Applications
You can load earnings and expense data into Payroll for North America from the following PeopleSoft applications:
Absence Management
Expenses.
Human Resources: Manage Variable Compensation.
Talent Acquisition Manager.
Sales Incentive Management.
Stock Administration.
Before you can load earnings and expense data into Payroll for North America, you must map items in the source application to payroll earnings or deduction codes. For example, if you use the Manage Variable Compensation business process of PeopleSoft Human Resources, you map each compensation plan to the appropriate earnings code. If you use Talent Acquisition Manager to pay employee referral awards, you provide an earnings code in the award schedule.
Mapping instructions and any other setup requirements that must be met before data can be loaded are discussed in the documentation for the source application.
Communication between Payroll for North America, Expenses, PeopleSoft Human Resources, Talent Acquisition Manager, and Sales Incentive Management is accomplished through the use of PeopleSoft Integration Broker messaging, which works in the background to quickly transfer data back and forth. Communication with Stock Administration is accomplished through the use of shared tables.
Expenses, Talent Acquisition Manager, Sales Incentive Management, and PeopleSoft Human Resources always initiate communication with payroll by sending data, such as awards or expense advances, to a temporary file that can be accessed by payroll. Payroll validates the data and returns records that do not pass the validation process so they can be updated and resent. A payroll clerk then uses the Load Paysheet Transactions run control page to start a batch process that loads the validated records into existing paysheets or creates new paysheets, as needed.
This diagram illustrates how data is loaded into the payroll system and validated along the way:

Illustration of how payroll data is loaded into the system and validated before the payroll clerk launches the paysheet load process
When you run the Load Paysheets process, Payroll for North America selects Job data for each active employee in the transaction file. Transactions for inactive employees are not processed.
Regular pay and hours are not loaded from Job; instead, all amounts are pulled from the transactions created in the source application. The contents of the transaction record determine whether the system creates a Pay Other Earnings record or a Tax/Deduction Override record. The system creates a new paysheet for the employee or loads data into the current paysheet, if one exists.
Transaction records remain in the system until you delete them. When you run the Load Paysheets process, their status is converted from active to inactive. Only active records are loaded to paysheets.
See Also
Integrating with PeopleSoft HRMS and Enterprise Expenses
Using the Load Paysheets Process with Sources Other than PeopleSoft
Applications
You can load paysheet data into Payroll for North America from sources outside of PeopleSoft applications, such as stock option payments, positive time reporting entries, or bonus payments.
Data Entry Requirements for Third-Party Transactions
If you plan to use the process to load third-party transactions without investing in customization, you must populate record PSHUP_TXN following the data input requirements for a paysheet update source of Other Sources.
See Data Input Requirements for Third-Party Paysheet Data.
If you have third-party transaction data in a Microsoft Excel spreadsheet, you can use the CI_PY_PSHUP_LOAD component interface to load the data into the PSHUP_TXN record. The component interface simplifies the process of loading your data and performs certain validations during the process.
See Enterprise PeopleTools PeopleBook: PeopleSoft Component Interfaces
Multiple Third-Party Source Codes
Oracle delivers one source code for other sources: OT (other). If you load transactions from multiple third parties and you need the ability to tag those transactions with separate source codes, you can add additional translate values to the PU_SOURCE field. To prevent collisions between your custom source codes and any future enhancements to Payroll for North America, your custom source codes must begin with the uppercase letter O and may be followed by at most one alphanumeric character other than the letter T. Once a new translate value is added, it should not be deleted.
The payroll system processes these O% values exactly as it processes OT values. You still populate the PSHUP_TXN record following the same set of data input requirements. Also, O% transactions, like OT transactions, are excluded when you run the Load Paysheets process without selecting a specific transaction source.
Pages Used to Load Paysheet TransactionsLoading Data into Paysheets
Access the Load Paysheet Transactions page (Payroll for North America, Payroll Processing USA, Create and Load Paysheets, Load Paysheet Transactions, Load Paysheet Transactions; or Payroll for North America, Payroll Processing CAN, Create and Load Paysheets, Load Paysheet Transactions, Load Paysheet Transactions; or Payroll for North America, Payroll Processing USF, Create and Load Paysheets, Load Paysheet Transactions, Load Paysheet Transactions).
On-Cycle or Off-Cycle Run
Use this group box or the Off-Cycle Run group box to the right to specify which transactions you want to load into paysheets. For on-cycle runs, you must use the On-Cycle or Off-Cycle Run group box; for off-cycle runs, you can use either group box.
|
Pay Run ID |
Select the pay run ID that identifies the pay calendars for which you want to load data. The system loads data for all employees in the companies and pay groups represented by the pay run ID. |
|
On or Off-Cycle |
Your selection here performs differently depending on whether you're loading rapid entry paysheet transactions or transactions from other sources. See Understanding the Load Paysheets PSJob Process (PYLOAD). |
Off-Cycle Run
For off-cycle runs, use this group box if you want to load data for a single employee. If you complete the fields in this group box, you cannot use the On-Cycle or Off-Cycle Run group box to the left.
Note. Do not use the fields in this group box when loading data from rapid entry paysheets.
|
Pay End Date |
Select the pay end date through which you want to retrieve data for the employee. The date that you select in this field appears as the pay end date on the paysheet. |
|
Empl ID (employee ID) |
Enter the employee's EmplID. (You must complete the Company, Pay Group, and Pay End Date fields before you can enter the EmplID). |
|
Empl Record (employee record number) |
Enter the employee's record number. (You must complete the Empl ID field before you can enter the employee record number). |
Calculate Options
|
Paysheet Update Source |
Select the source of the data from which you want to create paysheets. These sources are available:
Note. Leave this field blank to load data from all sources except Rapid Paysheets, Variable Compensation, What-If, and Other Sources (including any custom sources that you define with O% source codes). These types of transactions must always be loaded separately. |
|
Process Option |
Choose one of these options for creating, loading, or resetting transactions:
|
|
Separate Pay Run |
If you select Expense Interface or Variable Compensation as the paysheet update source, and you're running an off-cycle process, select this check box to create a separate pay run for expense or variable compensation payments. |
|
OK to Pay |
Select if you want the load process to automatically mark the paysheets as OK to Pay. The Pay Calculation process processes only those transactions that are marked OK to Pay. Leave this check box deselected to review the paysheets and manually mark them OK to Pay. |
Reviewing and Inactivating Preloaded Transactions
Access the Update Paysheet Transactions page (Payroll for North America, Payroll Processing USA, Create and Load Paysheets, Update Paysheet Transactions, Update Paysheet Transactions; or Payroll for North America, Payroll Processing CAN, Create and Load Paysheets, Update Paysheet Transactions, Update Paysheet Transactions; or Payroll for North America, Payroll Processing USF, Create and Load Paysheets, Update Paysheet Transactions, Update Paysheet Transactions).
Page Elements for Filtering Transactions
To populate the Transaction Data grid, search for transactions for any combination of employee ID, paysheet update source, and transaction status.
Transaction Data
This grid displays complete data from the PSHUP_TXN record so that you can review the data and optionally update its status.
|
Transaction Status |
The initial status for all transactions is Active, indicating that the transaction is ready to be loaded to paysheets. To prevent a transaction from being loaded, change its status to Inactive. The system updates the PSHUP_TXN record with the new status and with an indicator that the status has been manually changed. Because transactions are also made inactive when they are loaded, you can only change the status from Inactive back to Active if this indicator (the PU_TXN_MANUAL_CHG field) has a Y (yes) value. |
Viewing Loaded and Preloaded Transactions
Access the Paysheet Transactions Report page (Payroll for North America, Payroll Processing USA, Create and Load Paysheets, Paysheet Transactions Report, Paysheet Transactions Report; or Payroll for North America, Payroll Processing CAN, Create and Load Paysheets, Paysheet Transactions Report, Paysheet Transactions Report; or Payroll for North America, Payroll Processing USF, Create and Load Paysheets, Paysheet Transactions Report, Paysheet Transactions Report).
Use the Paysheet Transactions report to see the contents of the file that holds the transactions that are loaded into the paysheets.
|
PaySheet Update Source |
Select a source for the transactions to include in the report. Note. For rapid entry paysheet transactions, you must load the transactions to paysheets before running this report. |
|
Transaction Status |
Transactions that have an active status have not yet been loaded to paysheets; transactions with an inactive status have been loaded or manually inactivated to prevent loading. |
Viewing and Updating Paysheets and PaylinesThis section provides an overview of paysheet and payline updates and an overview of options for job pay changes and hourly rate overrides. This section then discusses how to:
View and update a paysheet.
Change default information.
View and update a payline.
Understanding Paysheet and Payline Updates
Because the Pay Calculation process uses paysheets, it is important to use caution when entering data on a paysheet. The amount of data that you enter on a paysheet is contingent upon whether it is a final or online check, and whether you automatically or manually created the paysheet.
For example, if you modify a paysheet that you created automatically, you must add only additional earnings to it, as opposed to a manual check paysheet, which requires more extensive data entry.
PeopleSoft provides several ways to access and view paysheet and payline information.
See Pages Used to View and Update Paysheets and Paylines.
The search criteria vary for the pages. On the search page, the Off Cycle check box is selected if the pay period end date that you enter is not current.
The By Payline - Payline page offers some search criteria not available for other paysheet and payline pages:
|
Job Pay Data Change |
Calculation Required: Selects all employees whose pay data changed and requires recalculating. Yes: Selects all employees whose pay was recalculated due to a change in one of their pay-related records. |
|
Select to display a list of all employees who were not active for the entire pay period, or whose Job record was updated with an effective date that falls between the pay period begin and end dates. The system activates the partial pay period flag when a new Job record is created for an employee during the pay period, assuming paysheets are built. When you select the Partial Pay Period field, the search results include only those employees for whom the partial pay period flag is activated. |
See Also
Understanding Paysheets and Paylines
Understanding Options for Job Pay Changes and Hourly Rate Overrides The employee's pay rate used in the pay calculation depends upon these factors:
Whether you select the Override Hourly Rate check box on the payline.
The Override Hourly Rate check box is deselected by default on the payline when you create the paysheets.
Whether you deselect the Automatic Paysheet Update check box on the Pay Group Table - Paysheets page.
The Automatic Paysheet Update check box is selected by default.
Whether you select or deselect the Job Pay check box on the payline.
The Job Pay check box is selected by default on the payline if you create the paysheet automatically.
The Job Pay check box is deselected by default on the payline if you create the paysheet manually, because the system assumes that you want the manual pay information to prevail over job data.
Example Pay Calculation Scenario
This section describes the results of pay calculation for the following scenario:
The employee has one row of Job data, with the action of Hire and the initial pay rate.
On December 31, 2005, you use the Paysheet Creation process to create on-cycle paysheets for the period January 1, 2006 to January 15, 2006.
The pay rate from the employee's Job data is shown on the payline after paysheet creation.
On January 1, 2006, you run a preliminary calculation.
4. On January 3, 2006, HR enters a new row of Job data:
Changed the employee's pay rate.
Reduced the employee's standard hours from 40 to 32 hours in a week.
On January 4, 2006, you run another preliminary calculation.
Note. In the examples, where the Override Hourly Rate option is selected, the change was made after the row was inserted into job data.
Pay Calculation Results
For the example scenario, this table describes the results of the Pay Calculation process for the various combinations of pay group and paysheet settings for each employee type:
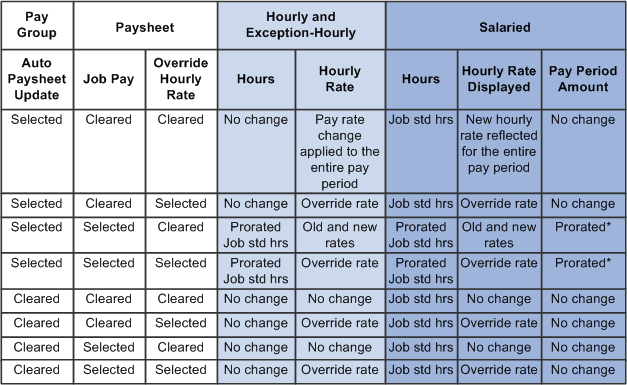
Example pay calculation results for pay rate change for various combinations of pay group and paysheet settings for each employee type
* The system calculates prorated salary for salaried employees and prorated hours for hourly employees based on the proration rule set up on the Pay Group table. If the pay rate change is effective at the beginning of the pay period, proration is 100%.
Note. The results shown in the table would apply to any preliminary calculation or final calculation performed after entering the job increase or paysheet update.
See Also
Understanding Online Updates and Final Calculation
Pages Used to View and Update Paysheets and Paylines|
Page Name |
Definition Name |
Navigation |
Usage |
|
PAY_SHEET_ADD_S |
|
View and update the paysheet to affect the Pay Calculation process. Normally, you run the Create Paysheet process before accessing this page, but it is not required. You can create one paysheet using these pages. |
|
|
PAY_SHEET_LINE_S |
|
View and update employee paylines. |
|
|
PAY_SHEET_ADD_S1 |
|
Alter default information, such as department and taxes. |
|
|
PAY_SHEET_LINE_S |
|
Access payline information by account code. |
|
|
PAY_SHEET_MULT_S |
|
Make changes to the paysheet that affect the Pay Calculation process. This page provides an abbreviated view of the By Paysheet - Paysheet page. It limits the number of items you can change for an employee, but provides less complicated data entry. |
|
|
PAY_SHEET_LN_S |
|
Identify paysheet data for review by company, pay group, and pay end date. |
|
|
PAY_SHEET_LN_S |
|
Identify paysheet data for review by company, pay group, and pay end date. |
|
|
RUNCTL_PAY_UNSHT |
|
Initiate the Payroll Unsheet SQR Report process (PAYUNSHT), typically as an emergency measure only or during testing. See Payroll Processes. |
Viewing and Updating a Paysheet
Access the By Paysheet - Paysheet page (Payroll for North America, Payroll Processing USA, Update Paysheets, By Paysheet, Paysheet; or Payroll for North America, Payroll Processing CAN, Update Paysheets, By Paysheet, Paysheet; or Payroll for North America, Payroll Processing USF, Update Paysheets, By Paysheets, Paysheet).
Note. If one of the paylines on the paysheet is a reversal payline, you cannot add or delete paylines on the page.
Paysheet Details
Payline details are displayed in this area.
|
Manual Check |
Select this check box to identify that the paysheet was prepared outside of the payroll system. If you select this check box, the Check Number, Check Date, Total Gross, and Net Pay fields become available for entry. |
Earnings
|
OK to Pay |
You must select this check box to calculate pay for this record. If you deselect the check box, the system bypasses the record and does not perform a calculation. Then, the Pay Confirmation process deletes this record. If you have an employee who is not receiving pay, select this check box to calculate deductions only. The default depends on how you set up employee types for pay groups on the Pay Group Table - Process Control page. |
|
Job Pay |
If you select this option, the Pay Calculation process automatically compares paysheet data to the Job record if the Automatic Paysheet Update check box is selected on the Pay Group table and the Override Hourly Rate check box is deselected on the paysheet. See Understanding Options for Job Pay Changes and Hourly Rate Overrides. If you deselect this check box, it disappears from the page and the Reg Hours (regular hours for hourly employees) Reg Rate Code (regular rate code), OT Rate Code (overtime rate code), Hourly Rate, Reg Salary (regular salary), Earnings Begin, Earnings End, Shift, State, and Locality fields become available for entry, as do the fields on the Additional Data page. The check box disappears from the page because the system assumes that you deselected it to enter data other than that specified in the Job record (to do a one-time override of the Job record). The system assumes that you don't want the next Pay Calculation process to replace your manual entries with the default Job Data. Note. If the Automatic Paysheet Update check box is selected on the Pay Group table, the system calculates hourly and exception hourly employees using the corresponding rate from Job data for the hours, regardless of whether Job Pay is selected on the paysheet. |
|
Override Hourly Rate |
Select this check box to override an employee's current hourly rate for this pay. If you select this check box, the Hourly Rate field becomes available for entry.
Note. The new rate replaces the rate from Job data, and
is used in the payroll calculations for this particular paysheet for hourly
and exception-hourly employees. See Understanding Options for Job Pay Changes and Hourly Rate Overrides. |
|
No Direct Deposit |
The default setting for this check box depends on the type of transaction. For off-cycle transactions, it is initially selected if the source is rapid paysheets or other (0%). For on-cycle transactions, it is initially deselected. |
|
Gross-Up |
Select this check box to gross-up a check for this pay earnings. The default is deselected. |
|
TL Records (time and labor records) |
The system automatically selects this check box when paysheets are created by the process that loads time from PeopleSoft Enterprise Time and Labor. |
|
Reg Hours (regular hours) |
Enter the number of regular hours worked (for hourly employees only). The system calculates hours by frequency. If the employee is exception hourly, this field is populated, but unavailable for entry. The default comes from Job Data. |
|
Reg Rate Code (regular rate code) |
Select a rate code to override the regular rate from the Job for regular hours. To specify a regular hours rate code, deselect the Job Pay check box and select Override Hourly Rate. |
|
OT Rate Code (overtime rate code) |
Select a rate code to override the regular rate from the Job for overtime hours. To specify an overtime hours rate code, deselect the Job Pay check box and select Override Hourly Rate. |
|
Hourly Rate and Reg Salary (regular salary) |
The default comes from Job Data. |
|
The default dates come from the pay calendar (Job Data for prorated pay). Select pay calendar begin and end dates for this payline, or split dates if a change took place mid-period. You can also enter a prior or future period, and the system automatically obtains the appropriate rate for that period. If you add a prior period payline for an earnings (such as REG) that contributes to a special accumulator when there is an existing payline for a companion earnings based on the special accumulator (such as SHF), you must change the begin and end dates for the companion earnings payline (SHF) to cover both the prior and current periods of the special accumulator earnings (REG). Note. The system automatically creates these dates, based on the pay calendar for the current pay period. Only enter them if the paysheet is used to record a manual check or to enter time for a prior or future pay period. |
|
|
Shift |
Select the appropriate shift associated with the earnings: N/A (not applicable), 1, 2, 3, Compressed, or Rotating. The default comes from Job Data. |
|
(CAN) Province |
Select the work province associated with the earnings. The default comes from Job Data. |
|
(CAN) El Period Correction (Employment Insurance period correction) |
Select this check box to allocate the insurable earnings and hours for the pay corrections to the prior pay periods for which they are paid (not the pay periods in which they are paid). Note. When you load prior period time from Time and Labor, you must distinguish between pay adjustments and pay corrections. Select this option only for pay corrections. |
|
(USA) Locality |
The system enters the work locality from the employee's tax distribution unless the employee lives and works in the same Indiana locality, in which case the system leaves the Locality field blank. |
Information in this group box can come from the Create Paysheet process, additional pay data, or from loading transactions via the Load Paysheets process. You enter additional other earnings by adding rows.
Note. If you want the earnings in the Other Earnings section of the paysheet to be distributed according to automatic tax distribution, you must set up and add the earnings as additional pay (either manually or through an interface) before paysheet creation. If you add the earnings directly to the payline, the system does not apply automatic tax distribution.
Earnings based on special accumulators are calculated depending on the paysheet's earnings begin and end dates. This is important to remember when you add such an earning for a prior period.
For example, Shift (SHF) is based on the special accumulator to which REG contributes. The system uses the paysheet begin and end dates entered for SHF to determine the REG amount to be used to calculate SHF. The paysheet shows two rows for REG:
First row: current pay period (February 15 – February 28).
Second row: previous pay period (February 1 – February 14).
When you add a payline and enter SHF as other earnings, the earnings begin and end dates must include both periods of REG—the current pay period as well as the previous pay period. In this example, the earnings begin date should be February 1 and the earnings end date should be February 28. With this setup, the system calculates SHF for both the current and previous pay periods.
Note. (USF) The Other Earnings group box can contain awards and bonuses or other earnings codes designated on the Compensation page of the Personnel Action Request.
|
Seq Nbr (sequence number) |
The sequence number on the By Paysheet - Paysheet page corresponds to the additional sequence number on the Create Additional Pay page. The system does not require you to enter a sequence number, but if you don't, the system does not update the employee's current goal balance on the Create Additional Pay page when you run the Pay Confirmation process. |
|
Rate |
Enter the rate that you want to pay for the earnings. If you leave the rate blank, the system uses the rate in Job data if the Automatic Paysheet Update check box is selected on the Pay Group table. If the Automatic Paysheet Update check box is not selected, the system uses the Hourly Rate on the payline. |
|
Source |
Displays the source of the paysheet data: RP (rapid paysheets), AM (Absence Management), ER (Talent Acquisition Manager), EX (Expenses), IM (Sales Incentive Management), ST (Stock Administration - Options and ESPP), SP (Stock Administration - ESPP refunds), WI (Stock Administration - What-If), VC (Administer Variable Compensation), and OT (other third-party sources). If you create additional O% codes to support multiple third-party sources, those codes appear for the associated transactions. When the source is AM, the paysheet data that comes from PeopleSoft Absence Management is not editable. This field is blank for paysheets that were loaded with releases prior to PeopleSoft Payroll for North America 9.1. Note. If you load transactions from multiple sources at once, the system consolidates transactions. In this situation, the source code reflects the source of the last contributing source that was processed. |
See Also
Integrating with PeopleSoft Enterprise Time and Labor
Integrating with PeopleSoft HRMS and Enterprise Expenses
Changing Default Information
Access the Additional Data page (click the Additional Data link on the By Paysheet - Paysheet page).
Note. The fields on this page are editable only if you deselected the Job Pay check box on the By Paysheet - Paysheet page. Changes to any information on this page might require that you insert an additional payline if the changes do not apply to the entire period covered by the begin and end dates on the payline.
Note. Unless otherwise noted, default values for these fields come from the Job Data.
|
Tax Periods and Pay Frequency |
The default number of tax periods is 1. The default frequency comes from the pay group. Do not change it unless the payline contains only other earnings (no regular pay). Note. The Tax Periods field and the Pay Frequency field work together on paysheets to determine how to tax earnings. The tax period refers to how many pay periods this earnings payment covers, and the frequency refers to how often the employee is paid during the year. Normally, use the paysheet defaults for the taxing period and frequency. However, you might change the way you tax earnings in some cases, such as when earnings cover a period of time longer than a standard pay period. The Tax Periods field can be used in conjunction with the annualized tax method when you want to pay an employee for more than one regular pay period on the same check. For example, a weekly-paid employee is going on vacation for three weeks, and you want to pay the employee his current regular pay plus three weeks of vacation pay in advance. By setting the Tax Periods field to 4, you're indicating that this check represents pay for four regular payroll periods, and withholding taxes will be calculated correctly as if the employee had received four separate regular weekly wage payments. (CAN) The Tax Periods field is also used in conjunction with the cumulative wages method for calculating withholding tax. When using the cumulative wages tax method, enter in the Tax Periods field the number of payroll periods that have already occurred in the calendar year, including the current payroll period. Note. (CAN) For Canadian customers, the Pay Frequency field is display-only, and you cannot override it. This maintains the integrity of the application of Canada Pension Plan (CPP) exemptions. The default comes from Job Data. |
|
Tax Method |
Select the tax method. The default comes from the paysheet. Note. This field works together with the Tax Periods field to determine how to tax earnings. Note. For all tax methods other than Specified on Paysheet, the system uses the tax method specified for the earnings code on the Earnings table, regardless of the selection in this field. You can override the tax method only when it is set up as Specified on Paysheet. |
|
(E&G) FICA Status (Federal Insurance Contributions Act status) |
(E&G) Select E (exempt), M (Medicare only), or N (subject). The default comes from Job Data. |
|
(E&G) Annual Tax Periods |
Indicates the number of tax periods for contract pay employees who are paid over less than one year. The system calculates this field from the dates on the Contract Pay page and uses it to annualize taxable gross for contract pay employees. |
|
GL Pay Type (general ledger pay type) and Combination Code |
Enter the type and code for the PeopleSoft Enterprise General Ledger account to which the system charges salaries and wages. |
Viewing and Updating a PaylineAccess the Payline page (Payroll for North America, Payroll Processing USA, Update Paysheets, By Payline, Payline; or Payroll for North America, Payroll Processing CAN, Update Paysheets, By Payline, Payline; or Payroll for North America, Payroll Processing USF, Update Paysheets, By Paylines, Payline).
Paylines can be accessed through any of the components for updating paysheets and paylines. The page elements are as defined for paysheets.
Note. You cannot delete a reversal payline.
See Also
Viewing and Updating Paysheets and Paylines
Understanding Paysheets and Paylines
Recording One-Time DeductionsThis section provides an overview of one-time deduction overrides and discusses how to enter one-time deductions.
See Also
Understanding Deduction Override Processing
Understanding One-Time Deduction Overrides
The system computes regular deductions based on deduction data at the company level and the employee level. You can make permanent or one-time changes to deduction data.
One-Time Deduction Overrides
While each One-Time Deduction record corresponds to a Pay Earnings record, the one-time deduction is based on all the pay earnings that are associated with the employee. The only exception is when you associate the one-time deduction with a pay earnings that you pay on a separate check.
For example, Jan has two Pay Earnings records:
One for her regular salary of 1,000 USD.
One for a bonus of 500 USD.
Assume Jan received the bonus for her work in the Controller's department and you don't want to charge it to her regular department, the Office of the President. Jan also decided to take an additional 10 percent from her regular pay for this pay period to apply to her loan payback.
To accommodate Jan's request:
Access her payline, using the Payline Earnings page.
In her regular Pay Earnings record, select the By Paysheet - One-Time Deductions page.
Enter the 10 percent loan payback.
Create a second Pay Earnings record for the 500 USD bonus.
Because you don't want the loan payback to affect her bonus check, enter a separate check number of 1 and a Bonus reason code.
Otherwise, the one-time deduction applies to all her Pay Earnings records.
Note. When an employee transfers mid-period, the system creates two paysheets and takes all deductions on both paysheets. To prevent the system from taking deductions on both paychecks, use the one-time deduction override option for one of the paysheets and set the deductions to None.
Permanent Deduction Overrides
To make a permanent change to deduction data, use:
The Deduction Table pages to change the basic attributes of a deduction.
One of the Benefits Table pages or the General Deduction Table page to change how the system calculates a deduction.
The General Ded Code Override page (for nonbenefit deductions) or the Override Benefits Deductions page (for benefit deductions) to override processing parameters at the employee level that are normally controlled by the Deduction table.
The Create General Deductions page to change employee-specific deduction data not governed by the Deduction table.
(CAN) Canadian One-Time Before Tax Deductions
Consultation with the Canada Revenue Agency (CRA) has prompted PeopleSoft to revise our treatment of one-time before-tax deductions associated with specific taxation methodologies.
PeopleSoft's basic methodology is to derive Pay Period Taxable Gross as: Taxable Earnings plus Taxable Benefits less Before-Tax Deductions.
The calculation methodology the system uses to derive Annual Taxable Income depends on the tax method that is used (annualized, bonus, or both annualized and bonus on a single cheque).
See (CAN) Canadian Tax Method Calculations.
See Also
Setting Up Employee General Deductions
Pages Used to Record One-Time Deductions,|
Page Name |
Definition Name |
Navigation |
Usage |
|
PAY_SHEET_ADD_D |
|
Enter a one-time deduction to take in the current pay period only, override an existing deduction, increase an existing deduction, refund a deduction amount, or increase or decrease an arrears payback. |
|
|
PAY_SHEET_LINE_D |
|
Enter a one-time deduction to take in the current pay period only, override an existing deduction, increase an existing deduction, refund a deduction amount, or increase or decrease an arrears payback. |
|
|
PAY_SHEET_LN_D |
|
Enter a one-time deduction to take in the current pay period only, override an existing deduction, increase an existing deduction, refund a deduction amount, or increase or decrease an arrears payback. |
See Also
Understanding Paysheets and Paylines
Entering One-Time Deductions
Access the One-Time Deductions page (Payroll for North America, Payroll Processing USA, Update Paysheets, By Paysheet, One-Time Deductions; or Payroll for North America, Payroll Processing CAN, Update Paysheets, By Paysheet, One-Time Deductions; or Payroll for North America, Payroll Processing USF, Update Paysheets, By Paysheets, One-Time Deductions)
Deductions
|
OK to Pay |
The default comes from the paysheet. |
|
Benefit Deductions Taken |
During the Create Paysheet process, the initial value comes from the deduction override evaluation processing. When a paysheet is manually entered, the initial value comes from the pay calendar. You can override it after the paysheet is created. Values include:
|
|
General Deductions Taken |
During the Create Paysheet process, the initial value comes from the deduction override evaluation processing. When a paysheet is manually entered, the initial value comes from the pay calendar. You can override it after the paysheet is created. Values include:
|
One-Time Deduction Data Override
|
Deduction Code and Deduction Class |
The deduction code must match the code for the deduction type that you are adjusting. To create a one-time override for both the 401(k) before-tax and after-tax deductions, create two entries: one for a deduction classification of after-tax, the other for before-tax. |
|
(CAN) Sales Tax |
For one-time deductions that attract sales tax (provincial sales tax on insurance, provincial sales tax, provincial premium tax, Quebec sales tax on insurance, Quebec sales tax, Quebec provincial tax, goods and services tax, or harmonized sales tax), you do not need to enter the sales tax classification here. The Pay Calculation process generates the sales tax amounts. If you enter a one-time sales tax deduction only, the system processes it accordingly. |
|
One-Time Code |
Select from the following:
|
|
Calculation Routine, Flat/Addl Amt (flat or additional amount) and Rate/Percent |
Define how to calculate the deduction. The available options include Calculated by Salary System, Default to Deduction Table, Flat Amount, Percentage of Federal Gross, Percent of Net Pay, Percent of Special Earnings, Percent of Total Gross, Percentage, Rate x Hours Worked, Rate x Special Hours, Rate x Total Hours, or Special Deduction Calculation. If you select Flat Amount, enter the amount in the Flat/Addl Amt field. If you select any of the options that use a percentage or a rate, enter the percentage or rate in the Rate/Percent field. If you select a calculation routine that uses a rate or percent, you can enter an additional flat dollar amount to deduct. |
Recording One-Time GarnishmentsThis section provides overviews of one-time garnishment overrides and garnishment overrides that ignore exemptions and discusses how to enter one-time garnishments.
Understanding One-Time Garnishment Deduction Overrides
This section discusses how to:
Make a one-time change in processing a garnishment.
Take only a garnishment deduction.
Process only selected garnishments.
Process a garnishment refund.
Making a One-Time Change in a Garnishment
You cannot override a garnishment deduction on the One-Time Deductions page. Although you can enter and save a garnishment deduction code on the page, the Pay Calculation process generates error message 000010, indicating that the override is invalid.
To change a garnishment, such as overriding the calculation or amount, use the One-Time Garnishment page.
Taking Only a Garnishment Deduction
To take only the garnishment deduction and no other deductions:
Select Subset in the General Deductions Taken field on the One-Time Deductions page.
Enter a deduction subset that you have defined to include only the garnishment deduction code.
Processing Selected Garnishments
Some employees have more than one garnishment. If you want to take one or more but not all of the employee's garnishment deductions, you must suspend the garnishment deductions that you don't want to take.
To process selected garnishments, use the One-Time Garnishment page and enter a garnishment override with the One-Time Code of Suspend Garnishment for each active garnishment that you don't want to process.
Processing a Garnishment Refund
To process a garnishment refund:
Enter the garnishment ID on the One-Time Garnishment page.
Select Refund Garnishment Amount as the one-time code.
Enter the amount to be refunded for the garnishment and/or for the company and payee fees.
If the employee has other garnishments, select Suspend Garnishment as the garnishment override for each of them if necessary.
(USA) Understanding Garnishment Overrides That Ignore Exemptions and
LimitationsSome U.S. garnishment orders related to support require that all of an employee's bonus or other special payment be garnished, over and above the garnishment rule limitations. The order might require that all or a defined part of a certain check be paid toward the garnishment order, without regard for the normal exemptions and allowances usually permitted. Examples of special payments include checks for bonuses, dividends, commissions, and so forth.
This section discusses how to use two special deduction calculation routines to garnish:
All of a special payment.
A specific amount without exemptions.
The entire special check while garnishing the regular check normally.
All of a check after taxes and specified other deductions.
Note. To process this type of garnishment override, the earnings to which the garnishment override applies must be on a separate check. The override is applied to all earnings on a check; it cannot be applied to only part of the earnings on a single check.
Example 1: Garnish All of the Special Payment
To process a garnishment when a court has ordered that all of a bonus or special payment check is to go to a support order:
Select Subset in the General Deductions Taken field on the One-Time Deduction page.
Enter a deduction subset that you have defined to include only your garnishment deduction code.
If the employee has other garnishments that are not to be taken, on the One-Time Garnishment page, enter a garnishment override with the One-Time Code of Suspend Garnishment for each active garnishment that you don't want to process.
On the One-Time Garnishment page, select a value in the Deduction Calculation Routine field:
If the earnings are taxable, you can select either No exempt; % of Gross (no exemptions; percent of gross) or No exempt; % DE + Amt (no exemptions; percent of disposable earnings plus amount) and enter 100 percent.
The system calculates and takes all applicable taxes and the remainder of the check then goes to the garnishment.
If the earnings are not taxable, select No exempt; % of Gross (no exemptions; percent of gross) and enter 100 percent.
Example 2: Garnish a Specific Amount Without Exemptions
To take a specific amount without regard to the limits imposed by exemptions and/or allowances:
On the One-Time Garnishment page, select No exempt; % DE + Amt (no exemptions; percent of disposable earnings plus amount) in the Deduction Calculation Routine field.
Do not enter a percentage.
Enter the amount you want to be taken.
If there is not enough net amount of the check to take the specified amount, the system performs the appropriate proration processing.
Example 3: Garnish the Regular Check Normally and Garnish the Entire Special Check
To pay an employee's regular pay from which you take the regular garnishment deduction and also a bonus from which you take the entire amount after taxes for a particular garnishment:
On the paysheet, enter the bonus as a separate check.
Enter the deduction subset and garnishment overrides as described in Example 1 for the bonus check only.
The system takes the regular garnishment from the regular paycheck and the entire amount from the bonus paycheck.
Example 4: Garnish All of a Check After Taxes and Specified Other Deductions
If you want to take all of a check after taxes and after other deduction such as medical insurance have been deducted, you could:
Use a garnishment rule that allows the deduction(s) in calculating the disposable earnings.
Use the override of No exempt; % DE + Amt and enter 100%.
If the rule does not allow the other deduction(s) you want to take, you could use the override as follows:
Set up a deduction override with a deduction subset that includes the garnishment deduction code and any others you want to process.
Set up garnishment overrides to suspend all of the garnishments except the one you want to process.
Set up an override for the garnishment you want to take using No exempt; % DE + Amt and enter a small dollar amount in the Amount box, such as $10.
Calculate the check.
Look at the net amount of the check; go back to the One-Time Garnishments page for the garnishment you want to take and add the net check amount to the $10 you entered previously.
When you calculate the check again, you should have the correct garnishment amount and a net check amount of zero.
If your first calculation resulted in some "deduction not taken" amounts, you'll have to hand calculate how much is available for the garnishment and/or for the other deductions on the check and redo your overrides to produce the results you need. You might have to repeat the process until the correct amount is calculated.
Pages Used to Record One-Time Garnishments|
Page Name |
Definition Name |
Navigation |
Usage |
|
PAY_SHEET_ADD_G |
|
Enter a one-time garnishment to take in the current pay period only, override an existing garnishment, suspend an existing garnishment, and refund an existing garnishment. |
|
|
PAY_SHEET_LINE_G |
|
Enter a one-time garnishment to take in the current pay period only, override an existing garnishment, suspend an existing garnishment, and refund an existing garnishment. |
|
|
PAY_SHEET_LN_G |
|
Enter a one-time garnishment to take in the current pay period only, override an existing garnishment, suspend an existing garnishment, and refund an existing garnishment. |
Entering One-Time Garnishments
Access the One-Time Garnishment page (Payroll for North America, Payroll Processing USA, Update Paysheets, By Paysheet, One-Time Garnishment; or Payroll for North America, Payroll Processing CAN, Update Paysheets, By Paysheet, One-Time Garnishments; or Payroll for North America, Payroll Processing USF, Update Paysheets, By Paysheets, One-Time Garnishment).
One-Time Garnishment Override
|
Garnishment ID |
Select the Garnishment Specification Data record to override. |
|
Enter the priority to override from the Garnishment Spec Data pages. |
|
|
Do not apply exemption |
This check box is visible only for tax levy garnishments. Select this check box to prevent the system from applying the exemption amount to this check. Use this check box when processing additional checks so that the exemption amount, which is automatically applied to regular checks, is not also applied to the additional checks. |
|
One-Time Code |
Select from these values:
Note. If you override or refund this garnishment, the system uses all the calculation and processing fees fields on this page to calculate the garnishment, even if they are blank. For example, if you leave the fields in the Processing Fees fields blank, the system treats them as though you entered 0. |
|
Deduction Calculation Routine |
Select the deduction calculation routine for the one-time garnishment:
|
|
DE Percent (disposable earnings percent) |
Enter the percent of disposable earnings to use in the override calculation. |
|
Flat Amount |
Enter the flat amount to use in the override calculation. |
Processing Fees
Use this group box to override the normal processing fees. If the order requires you to withhold the greater of the percent of the garnishment amount or a flat amount, enter both; the system withholds the greater of the two.
See Also
Understanding One-Time Garnishment Deduction Overrides
(USA) Understanding Garnishment Overrides That Ignore Exemptions and Limitations
Recording One-Time Tax DeductionsThis section provides an overview of one-time tax overrides and discusses how to enter one-time taxes.
Understanding One-Time Tax Overrides
The system computes regular taxes based on tax data at the company level and the employee level. To make a permanent change to tax data, use the appropriate tax page, depending on which data you change.
While each One-Time Tax record corresponds to a Pay Earnings record, the one-time deduction is based on all the pay earnings that are associated with the employee, unless you pay the pay earnings on a separate check. In this case, the one-time deduction that is associated with the pay earnings affects only the pay earnings on that separate check.
To make a one-time tax for the same tax apply to only one pay earnings, pay the pay earnings on a separate check. If you enter more than one one-time tax for the same tax on multiple pay earnings, but don't enter separate check information, the system produces an error message during the Pay Calculation process.
Pages Used to Record One-Time Taxes|
Page Name |
Definition Name |
Navigation |
Usage |
|
PAY_SHEET_ADD_O |
|
Review one-time tax considerations for a single employee, override an existing tax, increase an existing tax, and refund a tax amount. |
|
|
PAY_SHEET_LINE_O |
|
Review one-time tax considerations for a single employee, override an existing tax, increase an existing tax, and refund a tax amount. |
|
|
PAY_SHEET_LN_O |
|
Review one-time tax considerations for a single employee, override an existing tax, increase an existing tax, and refund a tax amount. |
Entering One-Time Taxes
Access the One-Time Taxes page (Payroll for North America, Payroll Processing USA, Update Paysheets, By Paysheet, One-Time Taxes; or Payroll for North America, Payroll Processing CAN, Update Paysheets, By Paysheet, One-Time Taxes; or Payroll for North America, Payroll Processing USF, Update Paysheets, By Paysheets, One-Time Taxes).
Taxes
|
Additional Taxes |
This check box determines whether the system takes, on an individual check, the additional withholding specified on the Federal Tax Data 1 page, State Tax Data 1 page, and the Canadian Income Tax Data pages. By default, this check box is selected. If you do not want to take the employee's regular additional taxes out of a check, deselect this check box. The system ignores this check box in the following situations:
|
One-Time Tax Data Override
|
(CAN) Canadian Tax Type |
Select from the available values:
|
|
One-Time Code and One-Time Tax Amount |
Select from the following one-time codes:
Note. Arrears Payback is not a valid option for one-time tax overrides. |
Note. (USA) In general, do not use the One-Time Taxes page to change taxes that have wage limits associated with them, such as FICA, state disability, and state unemployment. The system recalculates taxes with maximums every time you run the Pay Calculation process. If you make an adjustment this pay period, the system corrects it in the next pay period.
Note. (CAN) In general, do not use the One-Time Taxes page to change taxes with associated wage limits, such as CPP, Quebec Pension Plan, and Employment Insurance. The system recalculates taxes with maximums every time you run the Pay Calculation process. If you make an adjustment this pay period, the system corrects it in the next pay period.
See Also
Setting Up and Processing Payback Deductions
This section provides an overview of payback deduction processing and discusses how to:
Set up payback deduction and earnings codes.
Use payback deduction and earnings codes on the paysheet.
Understanding Payback Deduction ProcessingWhen you enter an earnings on the paysheet using a payback earnings code, the system associates that amount with the corresponding payback deduction code that you entered on the Earnings Table - Taxes page. The system attempts to recover the arrears that are associated with a payback deduction code during subsequent payrolls until it becomes zero. The actual amount that you deduct each payroll is based on the maximum arrears payback amount, which you enter for the payback deduction code on the Deduction table (or on the General Ded Code Override page at the employee level).
Setting Up Payback Deduction and Earnings CodesThis example illustrates the steps required to set up a payback deduction code and associate it with a corresponding payback earnings code. It describes how to define an earnings code for salary advance (ADV) and create a salary advance payback deduction code (ADVPB):
Define the ADVPB deduction code in the Deduction table and indicate arrears information.
Enter a flat dollar amount or a percentage to indicate the maximum amount to deduct.
Define the ADVPB deduction code in the General Deduction table with a flat dollar deduction amount of zero, unless you specify a dollar amount to take in addition to the actual payback amount, which you enter in the Deduction table.
Create the ADV earnings code in the Earnings table.
Enter ADVPB as the payback deduction code on the Earnings Table - Taxes page for the ADV earnings code.
See Establishing Earnings Codes.
Note. The system creates the advance payback as a before-tax deduction if the earnings code associated with it has the Subject to FWT (subject to federal withholding tax) check box selected. If you deselect this check box, the deduction is after-tax.
Using Payback Deduction and Earnings Codes on the PaysheetAfter you set up the Earnings and Deduction tables to reflect the salary advance earnings and advance payback deduction codes, the first employee to take advantage of the advance program is Terry, who requests a salary advance of 500 USD. Here's how you use the payback deduction and earnings codes that you set up to process Terry's advance:
During the first pay period, update Terry's paysheet to include other earnings of 500 USD, with the ADV earnings code.
The Pay Confirmation process automatically creates a payback arrears balance of 500 USD under the ADVPB deduction code because you linked that payback deduction code to the ADV earnings code.
In subsequent pay periods, the system automatically tries to recover any outstanding arrears based on the ADVPB deduction code, which you defined with a flat maximum payback amount of 50 USD.
In Terry's case, the system takes the deduction amount of 50 USD as arrears payback in the second pay period, and reduces the payback arrears balance to 450 USD. It continues to take 50 USD each pay period until the arrears balance is zero.
Processing Gross-Ups
This section provides an overview of gross-up processing and discusses how to:
Select processing options on the paysheet.
Override taxes for a gross-up.
Override deductions for a gross-up.
Understanding Gross-Up Processing
Use the gross-up process to create a check for an exact net amount, including zero net amounts, and have the system calculate the taxes and subsequent gross pay.
Gross-ups are processed along with all other paysheet transactions during on-cycle, off-cycle, or online check runs. If, during a normal on-cycle payroll run, you're processing a gross-up for an employee in addition to the regular check, you must create an additional check for the gross-up. All earnings included in the gross-up must be on a separate check; you cannot combine a gross-up with an ordinary check that's calculated gross-to-net.
A net pay gross-up is paid with an earnings code that is set up with Add to Gross Pay selected on the Earnings Code - Taxes page.
For example, you might want to give an employee a bonus of 1000 CAD net pay. The system would gross up from the net of 1000 CAD by determining which tax method is specified for the earnings and calculating the gross based on the tax variables.
In a gross-up you are indicating, in effect, that the company is paying all employer and employee taxes. That is, the employee is getting an actual net bonus of 1000 CAD, as opposed to 1000 CAD minus taxes.
A zero net gross-up is paid with an earnings code that is set up with Add to Gross Pay not selected on the Earnings Code - Taxes page.
For example, you might award a vacation cruise worth 1,500 USD to the employee of the year. The 1,500 USD would be added to the employee's taxable wage base, but you would not want the employee to pay the taxes incurred on this additional income. You could do a zero net gross up that calculates the taxes on the 1,500 USD and the additional gross incurred by the employee as a result of the company paying the taxes.
Gross-Up Steps
These are the basic steps in running a gross-up:
Add a Paysheet page.
Enter tax overrides.
Enter deduction overrides.
Run the Pay Calculation process.
Run the Pay Confirmation process.
View results of the gross-up on the Review Paycheck pages.
Note. If you want 100% of Net Pay, Total Gross, Federal Gross or Percentage of Special Earnings to be taken as a before-tax deduction on a gross-up, add this entry as a One-Time deduction on the paysheet. Do not set the employee up for 100% before-tax deduction at the employee benefits enrollment level.
Selecting Processing Options on the Paysheet
With gross-ups, you have a number of processing options with regard to taxes and deductions:
You can use any earnings code that you need.
It can be Regular, Bonus, Gifts, or any special earnings code that you've set up.
You can select any tax method.
The default tax method is usually annualized. (The earnings code itself may determine the tax method.) If you select either Annualized or Cumulative, the system uses the employee's federal and state marital status and number of exemptions.
For the U.S., if you select Supplemental or Special Supplemental, the system ignores the employee's filing status and uses the supplemental rates in the Federal/State Tax tables.
For Canada, the recommended tax methods to use would be Annualized or Bonus.
You can specify the exact tax period for the gross-up.
The system takes deductions automatically, unless you override them on the One-Time Deductions page.
These deductions will reduce the net pay.
The system may not be able to calculate additional tax amounts or percents.
When calculating gross-ups, the calculation program may go through several iterations to arrive at the requested net. If, after a number of attempts, the gross-up cannot be calculated, you receive an error message. To correct this situation, you should clear the additional tax amounts or percents on the Employee Tax Data pages.
Note. You can not override a tax amount using the Paysheet/Payline One-Time Taxes override pages. You can, however, stop a particular tax from being applied.
Example 1: Paysheet for a Net Pay Gross-Up
Access the By Paysheet - Paysheet page.
Select Gross-Up.
Use an earnings code that has Add to Gross Pay selected on the Earnings Code - Taxes page.
Enter the amount to be grossed up.
To enter the tax periods, pay frequency, and tax method that you want to use, click Additional Data.
If the tax method desired is already defined on the earnings code, it is not necessary to enter it in the Additional Data page.
If you're ready to pay the employee, select OK to Pay.
Note. (CAN) The gross-up process for Canada considers only legislated deductions (both employee and employer contributions) when determining gross pay. Nonstatutory deductions (both employee and employer contributions) are deducted from the desired net pay unless deductions taken is set to None.
Example 2: Paysheet for a Zero Net Gross-Up
Access the By Paysheet - Paysheet page.
Select Gross-Up.
Use an earnings code that does not have Add to Gross Pay selected on the Earnings Code - Taxes page.
Enter the amount to be grossed up.
Click Addl Data to display a page where you can select the appropriate tax method.
If you're ready to pay the employee, select OK to Pay.
See Also
Viewing and Updating Paysheets and Paylines
Overriding Taxes for a Gross-Up
Access the One-Time Taxes page.
Determine what taxes you want grossed up. By default, the system attempts to take all taxes normally associated with the employee. You may indicate only what taxes not to take. You cannot indicate an override amount, additional amount, or refund amount.
See Also
Recording One-Time Tax Deductions
Overriding Deductions for a Gross-Up
Access the One-Time Deductions page.
The system takes deductions automatically from a grossed-up check unless you override them. So you must determine whether you want deductions taken from net pay. If you do not want any deductions taken, go to the By Paysheet - One-Time Deductions page and select None for deductions taken.
Note. If you want 100% of Net Pay, Total Gross, Federal Gross or Percentage of Special Earnings to be taken as a before-tax deduction on a gross-up, add this entry as a one-time deduction on the paysheet. Do not set the employee up for 100% before-tax deduction at the employee benefits enrollment level.
See Also
Creating Final Check Paysheets
This section provides overviews of the Final Check Build COBOL SQL process (PSPFCBLD), the Create Final Check Paysheet process, the Final Check Extract process, and the Final Check Load Paysheets process, and discusses how to:
Create final check paysheets.
Rerun the Final Check Build process.
Generating the Final Check Requests report.
Understanding the Final Check Build Process
Before you can review paysheet and payline information for final check requests, run the Final Check Build process to create final check paysheets that are associated with the final check requests. You can create final check paysheets only for existing final check requests. You must enter at least one final check request before creating final check paysheets. You can create final check paysheets in either on-cycle or off-cycle processes.
Warning! If you create final check paysheets in an off-cycle process, create your regular paysheets before creating your final check paysheets. The Final Check Build process obtains important information from the regular paysheets.
The Final Check Build process runs three batch processes to create final check paysheets for the Pay Calculation and Pay Confirmation processes:
The Create Final Check Paysheet process creates final check paysheets for the employee.
The Final Check Extract process extracts:
Leave accruals and deduction refunds to pay to the employee.
Deductions to collect from the employee.
The Final Check Load Paysheets process loads the extracted leave accruals and deductions to the paysheets.
To ensure that the balance records reflect correct information, PeopleSoft recommends that you complete manual checks, reversals, or adjustments before processing a final check. Because the Final Check Build process uses information from regular paysheets, PeopleSoft also recommends that you first run the regular Create Paysheet process.
See Also
Defining the Final Check Process
Processing a Final Check Request
Understanding the Create Final Check Paysheet Process
The Create Final Check Paysheet process:
Creates new final check paysheets.
In creating the new final check paysheets, the system calls the Create Paysheet process to generate the standard paysheets with prorated regular earnings.
Validates earnings on the new paysheets.
Applies all validated earnings from preexisting paysheets onto the new final check paysheets.
This batch process creates the final check paysheets. It prorates regular earnings for all employees (salaried, exception hourly, and hourly) based on the pay period begin and end dates and the termination date on final check requests.
After creating the new final check paysheets, the system determines whether the earnings on the new paysheets are defined in the employee's final check program. The system deletes from the paysheet earnings that are not defined in the employee's final check program and generates a warning message.
Note. It is your responsibility to verify the regular earnings for hourly employees and to update the paysheets to reflect the actual hours worked.
After verifying the new final check paysheets, the system determines whether the employee has any preexisting uncalculated, or unconfirmed, OK to Pay paysheets (either on-cycle or off-cycle).
If so, the system determines whether the pay end date on the paysheet equals the current final check pay end date for any earnings codes that are not on the newly created final check paysheets (but are in the preexisting paysheets such as Time and Labor, Retro Pay). If these earnings codes are defined on the final check program, the system copies them to the final check paysheet and marks the preexisting paysheet as Not OK to Pay.
If the pay end date on the existing paysheet is earlier than the current pay end date of the final check paysheet, and the earnings code is defined on the final check program, the system copies all appropriate earnings from the preexisting paysheets to the final check paysheet and marks the preexisting paysheet as Not OK to Pay. If the pay end date on the paysheet is later than the current pay end date, the system generates a warning message.
Note. The system generates a warning message for every earnings code on the preexisting paysheets that is not defined in the final check program, and marks the existing paysheets as Not OK to Pay.
The Create Final Check Paysheet process copies all one-time garnishments and one-time taxes that are associated with the processed, preexisting paysheets to the final check paysheets. The system verifies one-time deductions against the final check program and copies only those one-time deductions that are in the final check program.
After creating the final check paysheets and copying the preexisting paysheets, the system validates all the earnings codes on the paysheets to determine the correct earnings amount. Depending on the payout option on the Program Earnings Definition page of the final check program, the payout amount is either the flat earnings amount on the paysheet or the difference between the goal amount and the goal balance.
If you defined a dollar override limit for an earnings code on the Earnings Definition page of the final check program and the payout amount is greater than the dollar override limit, the system overrides the payout amount with the dollar override limit and displays a message to inform you. If there are multiple occurrences of the same earnings code associated with a dollar override limit, the system prorates the dollar override limit proportionately among those earnings.
The system deselects the Job Pay check box at the earnings level on all final check paysheets. On all preexisting paysheets where the system modified information through validation when copying it to the final check paysheets, the system also deselects the Job Pay check box at either the earnings level or the other earnings level, depending on the level at which the modification was applied.
Warning! All final check paysheets are created with OK to Pay activated, regardless of how you defined the Pay Group Table - Process Control page or the Additional Pay table. Even if an earning was defined as Not OK to Pay, that earnings becomes OK to Pay when you create the final check paysheet.
Special Considerations for Time and Labor Paysheets
These processes are generally the rule for handling preexisting paysheets in the Final Check Build process. Preexisting paysheets that are created by Time and Labor, however, require special considerations.
Time and Labor enters all pay information onto the payroll paysheets as other earnings. Therefore, for salaried employees whose pay end date equals the current pay end date, the system does not enter Time and Labor REG other earnings from the current pay period into the new final check paysheets as regular earnings.
However, when processing Time and Labor REG other earnings for exception hourly and hourly employees when the pay end date equals the current pay end date, the system uses those REG other earnings and overlays the regular earnings on the new final check paysheet.
The system copies Time and Labor prior period adjustments (represented as Other Earnings records with identical earnings begin and end dates) as they are, if the earnings codes are identified in the final check program.
The system adds to the final check paysheet any earnings codes (other than regular or holiday) from preexisting, unconfirmed Time and Labor paysheets, if the pay end date is the same for both the Time and Labor paysheet and the final check paysheet. The system does not replace the earnings code amount if it already exists on the final check paysheet, but adds to it.
The system does replace holiday pay and hours earnings codes on the final check paysheet with the information from preexisting, unconfirmed Time and Labor paysheets, if the earnings code is for holiday and the Time and Labor paysheet and the final check paysheet have the same pay end date.
When copying Time and Labor paysheets onto the final check paysheets, the system selects the TL Records check box on the paysheets.
After copying preexisting Time and Labor pay earnings onto final check paysheets, the system marks the Time and Labor paysheets as final check paysheets. It does this by changing the paysheet source on the paysheets to either Batch Final Check or Online Final Check. Additionally, it marks the Time and Labor paysheet as Not OK to Pay. Any paysheet marked Not OK to Pay is an original—it was copied from a prior Time and Labor upload.
After creating the final check paysheets and copying onto them the preexisting paysheets, the system validates the earnings codes on the paysheets to arrive at the correct earnings amount.
Depending on the payout option in the final check program earnings definition, the payout amount is either the flat earnings amount as defined on the paysheet, or the difference between the goal amount and the goal balance.
If you defined a dollar override limit for an earnings code in the earnings definition of the final check program, and the payout amount is greater than the dollar override limit, the system overlays the payout amount with the dollar override limit and generates a message to inform you.
If the dollar override limit applies to multiple occurrences of the same earnings code, the system prorates the dollar override limit proportionately among those earnings.
Manual Check and Reversal Paysheets
The system does not copy manual check paysheets onto final check paysheets, and it does not mark them as Not OK to Pay. If they meet all the conditions described in this section, the system copies reversal and reversal/adjustment paysheets to the final check paysheets, marks the original paysheets Not OK to Pay, and generates a message to inform you.
PeopleSoft recommends that you complete all manual check, reversal, and reversal/adjustment processing for an employee before processing a final check paysheet. Otherwise, the balance records might not contain the correct information. This could be a problem for items that have limits, such as FICA.
Understanding the Final Check Extract Process
The Final Check Extract process:
Extracts leave accruals
Extracts deductions
This batch program extracts all leave accruals and deductions for an employee's final paycheck. The system checks the processing status on the final check request and processes only those employees whose status is Created. The system writes the extracts to a work table, which it loads to the paysheets. After extracting an employee's deductions and accruals, the system sets the processing status in both the final check request and final check extracts to Extracted. When the system loads the extracts to paysheets in the Final Check Load Paysheets process, it deletes the extracts in the work table and updates the final check request processing status to Loaded to Paysheets.
Extract Leave Accruals
The system extracts all leave accruals for which the plan type and benefit plan are defined in the final check program. The payout hours include either or both:
Fully earned and awarded leave accruals.
These are always paid if they are defined in the final check program. The system uses the following formula to determine the number of available hours to be paid:
hours carried over from previous year
+ earned year-to-date
− taken year-to-date
+ adjusted year-to-date
+ bought year-to-date
− sold year-to-date
− unprocessed hours taken
+ unprocessed hours adjusted
+ unprocessed hours bought
− unprocessed hours sold
Accrued, but not awarded, leave accruals.
Pay from these accruals (the months or hours incurred from the last leave accruals run until the present) is optional. If you do this, define a proration method for the system in the Final Check Program table.
Extract Deductions
You can refund or collect all deductions, both general and benefit, for an employee upon termination. Specify a processing rule for each deduction that you include on the Deduction Definition page of a final check program. The final check processing rule that you specify for a deduction determines whether the system refunds or collects that deduction. The processing rule also specifies how the system calculates this deduction.
If the plan type and deduction code are not defined in the final check program, the system creates a one-time deduction override extract row with a zero amount to override the deduction that it collects in the Pay Calculation process.
Final check processing extracts all deductions in which an employee is enrolled and processes each according to the final check program, regardless of whether the deduction is scheduled for processing.
Understanding the Final Check Load Paysheets Process
The Final Check Load Paysheets process:
Loads other earnings.
Loads deductions to collect to one-time deductions.
Loads deductions to refund to one-time deductions.
This batch program loads all the extracted leave accruals, deduction refunds, and deduction collections to paysheets. This process is driven by the processing status in the Final Check Extract table. It selects only those rows from the extract table for which the status is Extracted. The system adds all deductions and accruals from the Final Check Extract process to the final check paysheets. Leave accruals are added as other earnings. Deductions are added as one-time deductions (overrides or refunds).
If the system copied a one-time deduction override from a preexisting paysheet onto the final check paysheets, and the Final Check process creates another one-time deduction override for the same deduction, you receive a message informing you of the amount calculated for the deduction. In this case, make adjustments before you run the Pay Calculation process, because multiple one-time deductions for the same deduction are not allowed.
The system performs all FLSA distributions, job earnings distributions, and tax distributions for the paysheets created in the Create Paysheet process. However, for earnings associated with leave accruals that were extracted in the Final Check Extract process, this program performs only the tax distributions as defined on the Update Tax Distribution page. The system does not perform FLSA distributions and job earnings distributions. It is your responsibility to perform distributions.
After loading the paysheets for an employee, the system sets the processing status in the final check request to Loaded and deletes final check extracts from the worktable.
If a preexisting paysheet displays a company or pay group that differs from the one currently in effect for the employee, the system uses the currently effective company and pay group when copying that paysheet to the final check paysheet. It also displays a message to inform you. You can change any final check component before running the Pay Calculation process.
Pages Used to Create Final Check Paysheets|
Page Name |
Definition Name |
Navigation |
Usage |
|
RUNCTL_TERM |
|
Run the Final Check Build process to create final check paysheets. |
|
|
Request Final Check |
TERM_RQST |
|
Run the online or batch Final Check Request process. |
|
RUNCTL_PAY056 |
|
Generate the PAY056 report that lists final check requests for which an employee's final check processing status is either N (not processed) or P (loaded to paysheets). |
|
|
RUNCTL_PAYINIT |
|
Generate the PAY057 report that reconciles employees who have final checks processed, based on pay calendar information that you specify with data from their Employment records. A warning message appears in the report when an employee is not really terminated, but has a final check produced. |
Creating Final Check Paysheets
Access the Create Final Check Paysheet page (Payroll for North America, Payroll Processing USA, Create Final Checks, Create Final Check Paysheet, Create Final Check Paysheet; or Payroll for North America, Payroll Processing CAN, Create Final Cheques, Create Final Cheque Paysheet, Create Final Cheque Paysheet; or Payroll for North America, Payroll Processing USF, Create Final Checks, Create Final Check Paysheet, Create Final Check Paysheet).
On-Cycle or Off-Cycle Run
If you use this group box, the Off-Cycle Run group box becomes unavailable for entry.
|
Pay Run ID |
Select a pay run ID to create final check paysheets for the pay calendars that are associated with the ID. |
Off-Cycle Run
If you use this group box, the On-Cycle or Off-Cycle Run group box becomes unavailable for entry.
Note. The Final Check Build process gathers information from system tables about the employees for whom you processed final check requests and generates the pay earnings information for each payline.
Note. After creating final check paysheets, run the normal Pay Calculation and Pay Confirmation processes.
See Also
(USF) Setting Up and Processing Agency Interfaces
Rerunning the Final Check Build COBOL SQL Process (PSPFCBLD)
To rerun the Final Check Build process:
Select the Reprocess check box on the Request Final Check page.
Note. This check box does not appear on the page unless the employee has an unconfirmed final check paysheet.
Mark preexisting paysheets as OK to Pay.
Run the Final Check Build process again.
After reprocessing the request, the system hides the Reprocess check box.
See Also
Processing a Final Check Request
Generating the Final Check Requests Report
Access the Final Check Requests Report page (Payroll for North America, Payroll Processing USA, Create Final Checks, Final Check Requests Report, Final Check Requests Report; or Payroll for North America, Payroll Processing CAN, Create Final Cheques, Final Cheque Requests Report, Final Cheque Requests Report; or Payroll for North America, Payroll Processing USF, Create Final Checks, Final Check Requests Report, Final Check Requests Report).
|
Final Check Processing Status |
Select one of these options:
|
Reviewing Paysheet Balances
This section discusses how to review paysheets for accuracy.
Pages Used to Review Paysheet BalancesReviewing Paysheets for Accuracy
Access the Paysheet Add Balance page (Payroll for North America, Payroll Processing USA, Update Paysheets, By Add Balance Page, Paysheet Add Balance Page; or Payroll for North America, Payroll Processing CAN, Update Paysheets, By Add Balance Page, Paysheet Add Balance Page; or Payroll for North America, Payroll Processing USF, Update Paysheets, By Add Balance Page, Paysheet Add Balance Page).
Generate Paysheet Reports
This section provides overviews of multiple pay earnings on paysheet reports and preprinted paysheet forms and lists the pages used to generate paysheet reports.
See Also
PeopleSoft Enterprise Payroll for North America Reports
Understanding Multiple Pay Earnings on Paysheet ReportsWhen you read paysheet reports, the information that you see on the By Paysheet - Paysheet page is reduced to one line in a report.
If an employee has additional earnings on the paysheet, the payline number doesn't change; it is merely extended. The second pay earnings entry becomes a second line in the report and is prefaced with the employee's payline number and a hyphen (for example, 1, 1-1, 1-2, 1-3).
The first number (in this example, 1) represents the initial pay earnings information for the payline, which is entered in the Job record. Subsequent pay earnings (1-1, 1-2) refer to additional data defined by that person's Job record or Additional Pay Earnings records.
Understanding Preprinted Paysheet Forms
The standard Paysheets report (PAY009) displays all the information that is associated with paylines. Each line on this report represents a different payline or pay earnings entry, identified by employee ID. In the Company table, indicate how many lines should appear on each page. On the Pay Group table, determine how to sort the pages (by employee ID, department).
For each By Paysheet - Paysheet page, the system creates a By Paysheet - Page Balances page that includes the total number of:
Paylines
Regular hours
Regular pay
This By Paysheet - Page Balances control provides a total based on what the paysheet batch process creates. These totals are not updated by paysheet entries that you make after you create paysheets.
Pages Used to Generate Paysheet Reports|
Page Name |
Definition Name |
Navigation |
Usage |
|
RUNCTL_PAYINIT2 |
|
Generate the PAY009 report that details the results of the Create Paysheet process. |
|
|
RUNCTL_PAYINIT2 |
|
Generates paysheets for distributed earnings. PAY017 is similar to PAY009 (Print Paysheets), but it scans employee records for paylines related to distributed earnings. |