| Oracle® Enterprise Data Quality for Product Data Knowledge Studio Reference Guide Release 5.6.2 Part Number E23610-03 |
|
|
View PDF |
| Oracle® Enterprise Data Quality for Product Data Knowledge Studio Reference Guide Release 5.6.2 Part Number E23610-03 |
|
|
View PDF |
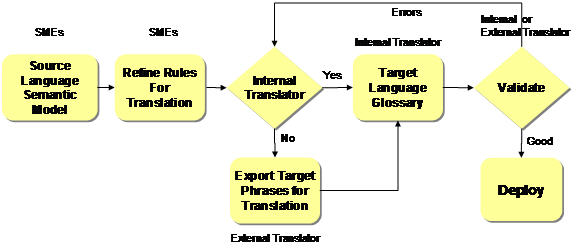
Enterprise DQ for Product is able to translate product data in batch or real time by leveraging the results of the data lens standardizations. Additionally, it is able to take a set of standardized attributes from one source language and store the corresponding target language translations in a translation glossary. This glossary file can be fully developed using the Knowledge Studio or can be exported using the export utility and sent to a translator for translation. The completed translation can be imported back in to the Knowledge Studio.
The translation glossary is used in real-time or batch to generate translated:
Structured content of attributes based on the source data lens into one or more target languages.
Descriptions into one or more target languages based on the translated attributes.
As in standardization, only the key attributes need to be parsed based on the data lens and the use case. Translation leverages all the work done in the data lens creation, recognition, and standardization phases of the project. The difference is the target language requirements.
The key to translation is to have a completed data lens with standardized attributes ready for the translation process. The translation is based on the currently selected unit conversion and standardization. You should carefully review and confirm the quality of all of the standardizations affected in your data lens prior to translation.
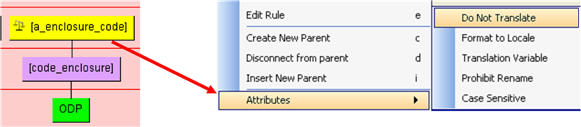
Some text does not need translation. For example, codes, numbers, and proper names. The 'Do Not Translate' rule attribute leverages the semantic model interpretation of each attribute in context. This includes rules that deal with numbers, codes, proper names, etc. This attribute will flow through the data lens without requiring an entry in the translation glossary and therefore reduce the number of rules that must be translated.
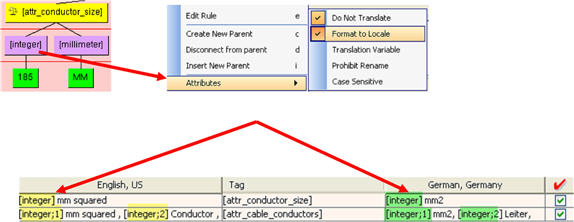
Conversely, other text does need formatting to target local syntax. For example, numbers and currency. Identifying this text in the data lens reduces translations costs for units of measure where the unit of measure is translated only once, and Knowledge Studio automatically formats the numbers based on target language requirements.
Further, there is text that should be used as translation variables. For example, colors and materials. This reduces the translations costs for phrases that require different attribute ordering. The following example is for the [attr_color] phrase that is translated only once per distinct color. The [attr_color] phrase is then given the special translation attribute of 'Translation Variable'. This informs Knowledge Studio that any higher level attribute, which uses the term of [attr_color], will reuse the translation for the individual colors.

After you have the data lens completely standardized, you must identify translation targets to activate the Translation tab.
From the Data Lens menu, click Translation Targets.

The Select Target Locales dialog allows you to choose one or more languages that you want the data lens translated into from the Available Locales list.
The list on the left is the list all available locales; the list on the right is the list of all active locales. Use the arrow buttons between the two lists to move locales between the lists and complete your selections.
The Selected Locales populate the Translation Targets list on the toolbar.
You can choose as many translation targets as necessary so that the phrases and terms defined and standardized in a single data lens can be reused to define any number of translation results.
After selecting your translation targets, you can select any of them for editing using the Translation Targets list on the toolbar, which also changes the appearance of the Initial Translation button to the selected language icon. As you maintain your phrases and terms on the Phrases tab, and your standardizations on the Standardize tab, all translation targets are updated. When you save your project, all changes to translation targets are saved.
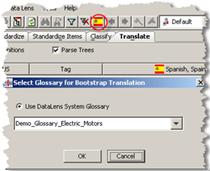
By clicking on the Initial Translation button on the toolbar, you can import a translation Smart Glossary and apply that knowledge to accelerate the translation process. You select the appropriate Translation Glossary from the list.
The Oracle DataLens Server translation glossary is located in the following directory:
…\datalens\server\data\shared\common\glossary
You can either update an existing or create a new Oracle DataLens Server Translation Smart Glossary based on the completed translation in the data lens.
From the File menu, click Create/Update Glossary.
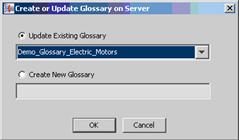
You select the appropriate action. To update, you must select the existing glossary from the list. To create a new translation glossary, you enter a descriptive name for the new glossary.
Note:
You must have selected at least one line using the Export check boxes to avoid an error.The Translation tab allows you to create translated data. There are three ways to generate translations for a translation glossary:
Manually enter translated text into the sub-tabs of the Translation tab.
Export all data for translation, and then import all translated data into the data lens.
A combination of manually entering translated data and selecting specific data for export/import.
You can create translations by entering the translation text directly into the New Phrases sub-tab. When you enter a translated phrase, select the red check box to indicate you want this translation included in the grammar, and apply it the fully translated phrase is added to the Known Phrases sub-tab.
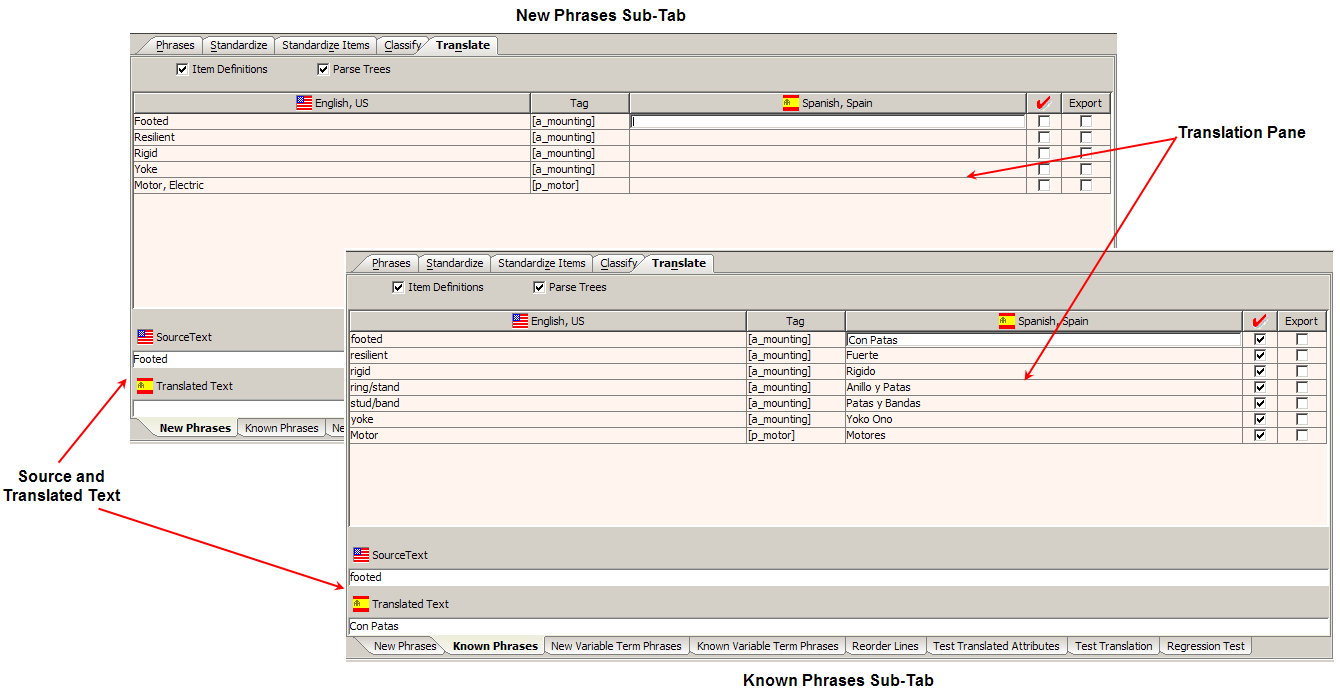
These sub-tabs contain the same information and function in a similar fashion.
Each contain the source language text in the Translation pane on the left and the translation text is on the right.
The data displayed in this pane can be changed toggling the Item Definitions and Parse Tree check boxes as follows:
Displays Item Definitions in the list, as well as phrases.
Searches the Item Definitions hierarchy for the selected text.
When the data lens is saved, the phrase translation change is written to the translation glossary in the locale directory of the knowledge base for the data lens.
The red check mark check box allows you to indicate the lines of translated text that you have reviewed on the New Phrases sub-tab, which are automatically selected on the Known Phrases sub-tab.
The Export check box can be used on either of the sub-tabs to indicate the lines of text that will be exported into a list for external translation.
External translation can be performed by simply exporting only those phrases that require translation. This process saves time and money because attributes only need to be translated once. The data lens is capable of reusing attributes that have already been translated. The translated attributes can be imported into the Knowledge Studio.
You export the phrases to be translated from the New Phrases sub-tab by selecting the Export check box for each of the phrases that you want to export. From the File menu, select Export Phrases for Translation.
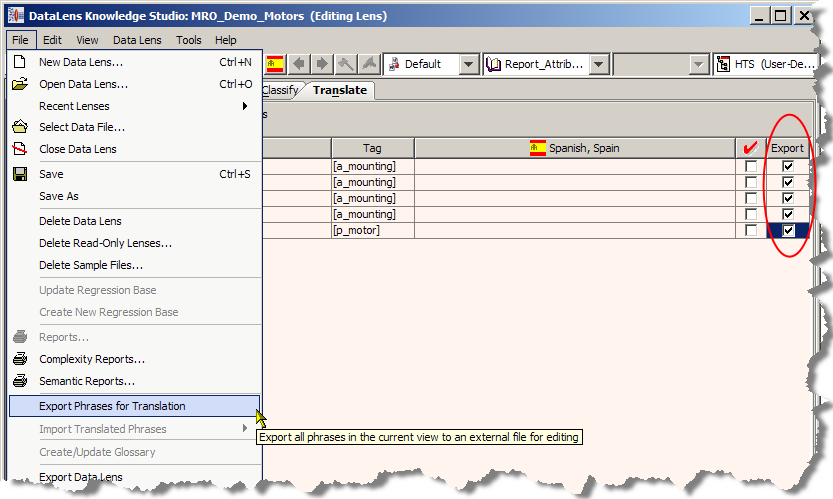
This generates a file that contains the data lens name and a .trn extension in your export directory, …\data lens name\Application Data\DataLens\export.
The exported translation file format is Unicode, a tab delimited format, and must be edited in a program that is Unicode compatible. Microsoft Excel is an example of a program that can save it as Unicode text.
The file has the following tab delimited format:
| source | phrasetag | target |
|---|---|---|
| footed | [a_mounting] |
Con Patas |
| rigid | [a_mounting] |
Rigido |
| ring/stand | [a_mounting] |
Anillo y Patas |
Once the phrases are translated, you can import them into your data lens.
The Known Phrases sub-tab must be selected as this feature is only active with this sub-tab. There are two import choices as follows:
Only the translated phrases that you have selected using the red check mark check boxes are imported.
All of the translated phrases contained in the import file are imported.
From the File menu, select Import Translated Phrases and the appropriate import choice. The default location is your export directory though you can select the exact location of the translated text file.
Once imported, the translations appear in the Known Phrases tab with the confirmed box checked, allowing a person to complete a final review for accuracy.
These fields contain the data source and translation text for that source for the selection in the Translation pane. The Source Text field cannot be edited. The Translated Text field can be edited and all changes are reflected in the Translation pane.
Export phrases and provide them to a language translator.
These sub-tabs operate like the Known Phrases sub-tab though the data that is displayed is different. The New Variable Term Phrases sub-tab displays all newly translated variables while the Known Variable Term Phrases sub-tab displays all of the translated variables that are known to the data lens.
A language translator, or other knowledgeable person, has the opportunity to complete a final attribute ordering using the Reorder Lines sub-tab to ensure that the translated phrase order is grammatically correct in the target language.
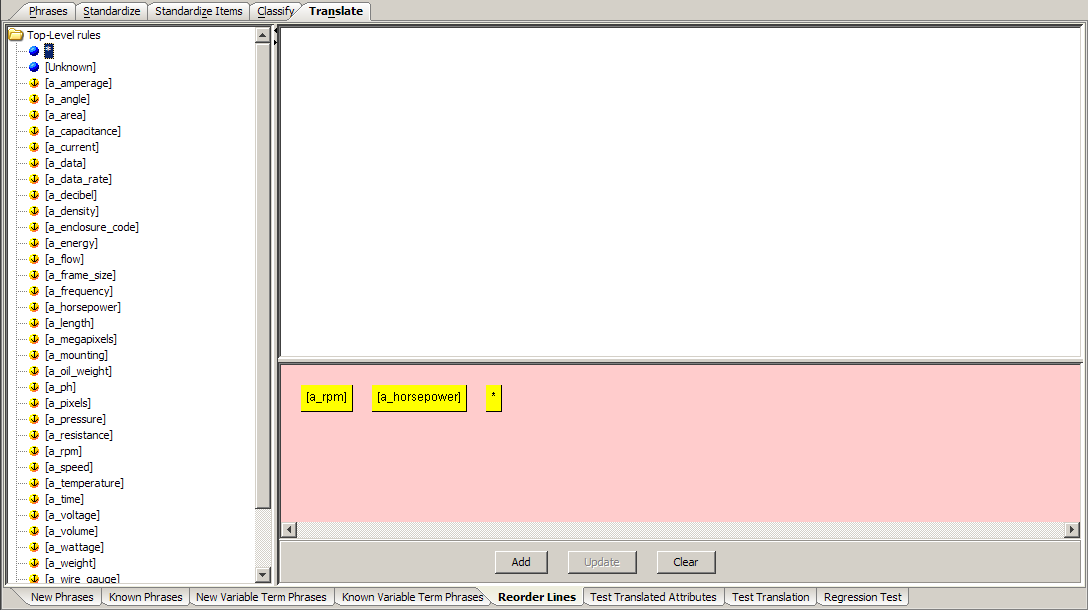
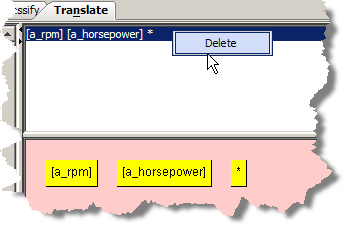
You can select a phrase from the left task pane to the Graphical Rule pane to form the reordered phrase that is appropriate for the target translation locale. When you have completed the reordered phrase, click Add to add it to the data lens.
Added reordered phrases can be cleared in the Graphical Rule pane or deleted by right-clicking on it in the right task pane and selecting Delete.
Use the translation testing sub-tabs to test your reordering modifications as described in the following section.
You can perform a final quality assurance check using the Test Translated Attributes, Test Item Translation, and Test Global Translation sub-tabs. Untranslated phrases are colorized blue while translated phrases are colored white (no color highlight).
By default, the data for both active and inactive Item Definitions is displayed. To view the data for active Item Definitions only (production data), from the View menu, select View as Production. For information about viewing inactive Item Definition data, see "Active vs. Inactive Item Definitions".
The Test Translated Attributes sub-tab allows you to review the attributes for the translated phrases for an Item Definition to validate your results. This sub-tab is analogous to the Test Attributes sub-tab of the Standardize Items tab.
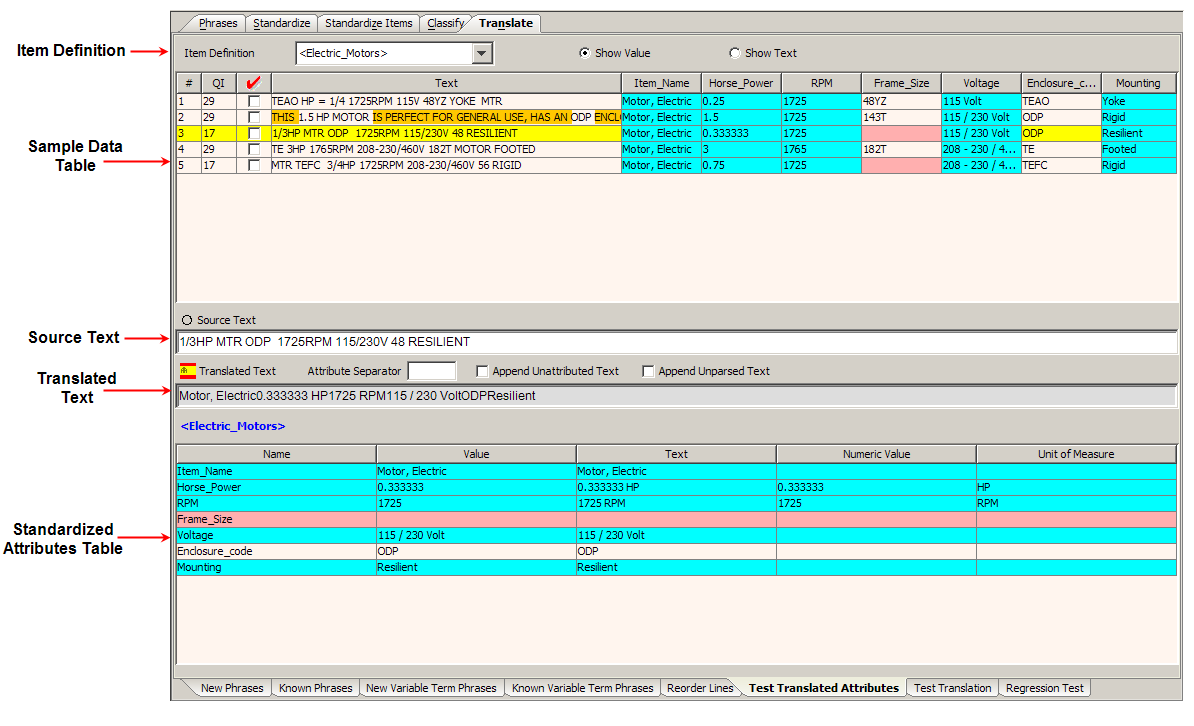
The Item Definition that was selected prior the selection of this sub-tab is displayed in the list. All of the Item Definitions in your data lens are listed for your selection.
The Show Value and Show Text options can be used to change the way the data is viewed.
This table displays the original data and the same data after it has been standardized. The columns, left to right, indicate the following:
The unique number assigned to that line of data.
A number between 0 and 100 that represents the degree to which the line has been standardized.
Data you have reviewed and marked as such by selecting the check box in that line of data.
The original data that was parsed by the data lens.
The remaining columns are dependent on the attributes for each Item Definition so these columns vary.
Each of the columns that contain data can be used to sort the table, both ascending and descending, by clicking on the column title. Clicking a column heading once sorts the table, by the items in the selected column, in ascending alphabetically order. Clicking the same column heading a second time sorts the table again in descending alphabetical order.
Selecting one of the lines in the Sample Data Table displays the Item Definition information for the selection in the Standardized Attribute Table.
This field contains the original data. This field can be edited and when you press Enter, you can review the immediate effects on the data lens.
The translated version of the original text is displayed in the field; it cannot be edited.
The Attribute Separator field allows you to enter a textual separator for use between attributes.
The Append Unattributed Text check box; selecting this box appends all text that has not been attributed to your description.
Similarly, the Append Unparsed Text check box appends unparsed text to your description.
The Test Item Translation sub-tab allows you to review the translated phrases for the Item Definition for your source language sample data to validate your results. This sub-tab is analogous to the Test Item Standardization sub-tab of the Standardize Items tab.
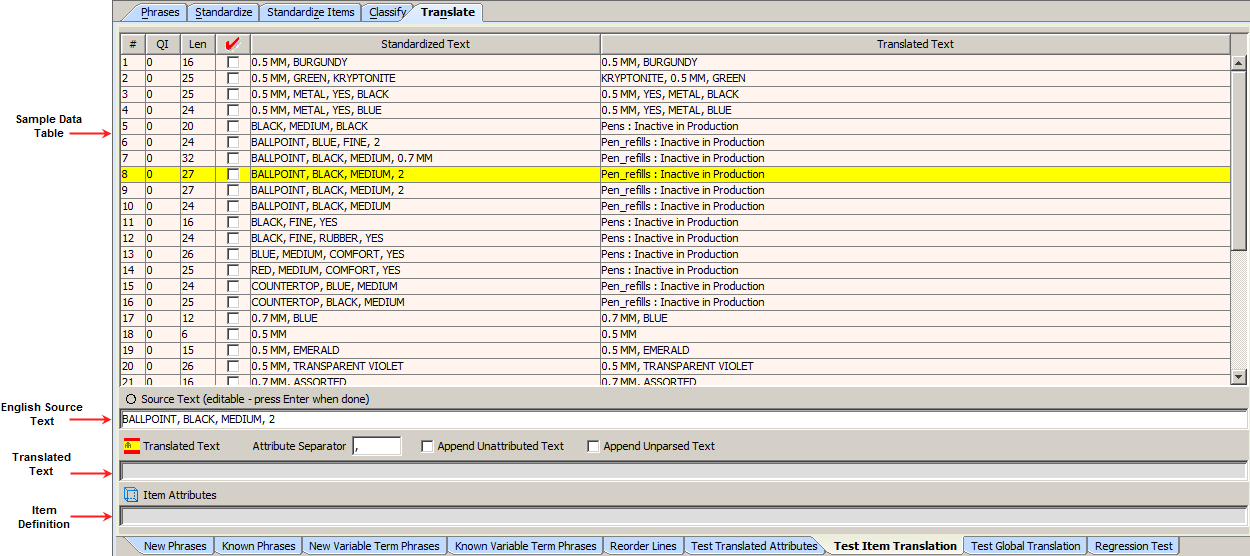
Several of the columns of this table are the same as those on the Test Translated Attributes sub-tab (see "Test Translated Attributes Sub-Tab") and this table operates the same way. The differing columns are as follows:
Indicates the character length of the original text.
Indicates the source language version of the standardized original text.
Indicates the translated version of the standardized original text.
The Test Global Translation sub-tab allows you to review the translated phrases for the Item Definition for your source language sample data to validate your results. This sub-tab is analogous to the Test Global Standardization sub-tab of the Standardize tab.
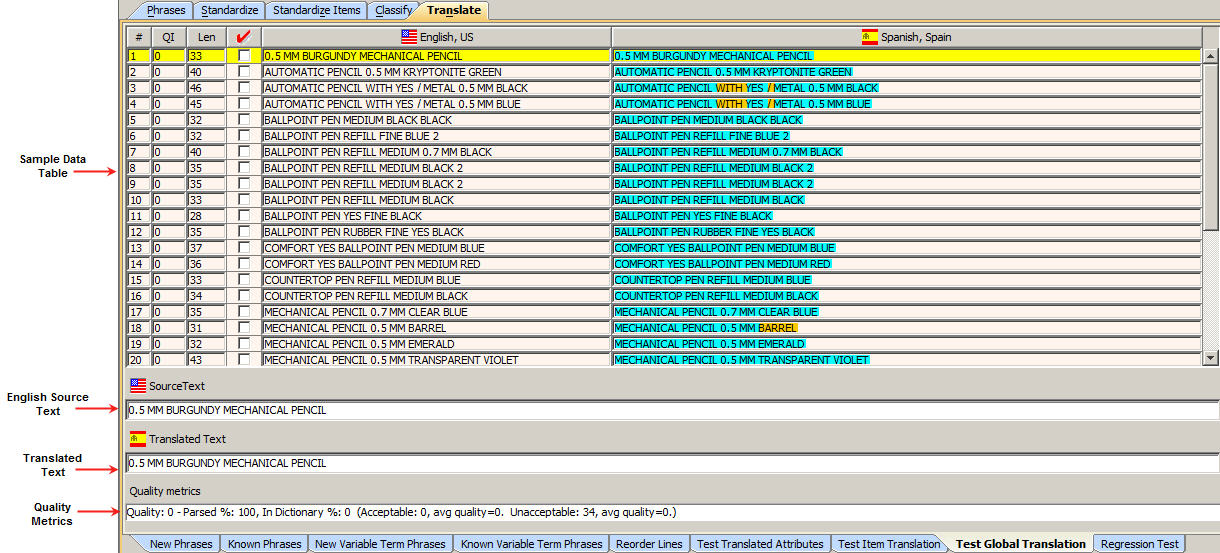
Several of the columns of this table are the same as those on the Test Translated Attributes sub-tab (see "Test Translated Attributes Sub-Tab") and this table operates the same way. The differing columns are as follows:
Indicates the character length of the original text.
Indicates the source language version of the standardized original text.
Indicates the translated version of the original text. The name of the translation language and country of origin are the column label.
This field contains the source language text. This field can be edited and when you press Enter, you can review the immediate effects on the data lens.
Regression testing is an important part of text translation so that you can be sure that the translated is as you expect.
If the tab is not active, set the Regression Testing Active data lens option. For more information, see "Ensuring Regression Testing is Active".
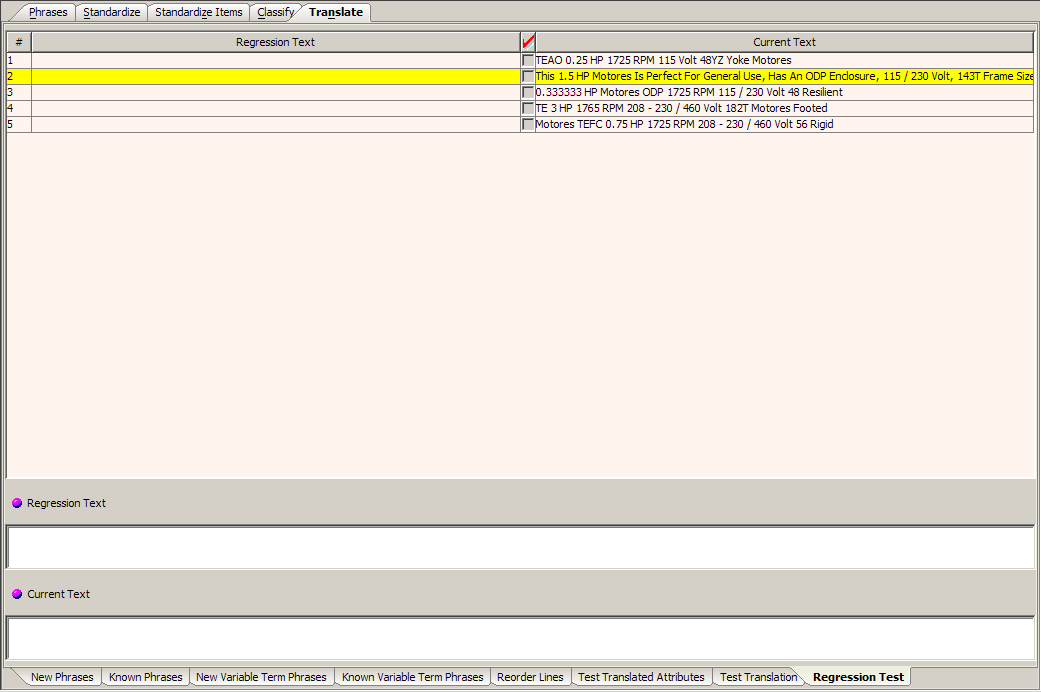
There are two regression testing panes, the 'before' and 'after' states of your sample data.
This pane contains the data that has been translated based on the rules defined in the data lens before regression testing. The text that appears on the selected line of data in the pane is also displayed in the Current Text field.
This pane contains the text that has been translated based on the rules defined in the data lens. The text that appears on the selected line of data in the pane is also displayed in the Regression Text field.
If there is no data displayed in the Before and After panes, the sample data has not been initialized; a regression base does not exist. For information about initializing the regression base, see "Creating and Updating the Regression Base".
In either the Before or After pane, the colorized text indicates the following:
The text that has been removed.
That the data has been added. All text should be reviewed for any issues and a visual comparison made between the left hand and right hand panes.
That the translation has been applied to this term and both the regression and current text will be colorized.
The red check mark or Review column indicates new or changed lines of data and the text on these lines should be reviewed. If the information in the Current Text column is correct and you want to accept the changes as valid progressions, select this check box so that the data is included in the regression testing.
The best practice in creating a regression base is to combine your sample data into a one file. For more information, see "Creating and Updating the Regression Base".
Combining files does not remove any data; it simply combines the selected sample files into a new, larger file.
Next, make single changes to your regression base sample data file, check your regression sets, and update them as appropriate. Making multiple changes can make the regressions hard to read, which increases the chance that an error is overlooked or is much harder to fix.
To create the regression base, select the Create New Regression Base option on the File menu, and then select the sample data file that you want to use for regression testing. This initializes the regression base and displays the results in the After pane.
You can update the regression base with the reviewed and accepted lines of text (as previously described in Review Column) using the Update Regression Base option on the File menu.
Note:
You should only initialize or update the regression base if you have reviewed or accepted the sample data.Translation repair allows full-line translations to refine following machine translation. The typical use of translation repair is to remove unwanted text that is inserted into the full line translations by machine translation.
For example, instead of 'la Red' you may just want 'Red', removing the definite article. It is possible that the 'la' appears in a number of places in the data that may not suit your purposes. If a problem like this is found repeatedly in your data, then you may need to use the Translation Repair Formatting feature. Alternatively, you could provide a phrase translation in the translation dictionary.
Keep the following in mind:
The repair only works at the line level.
Do not attempt to apply Translation Repair Formats without first receiving training from Oracle Consulting Services.
The Translation Repair Formats menu item is enabled if you have purchased data lens translation functionality and installed on the Oracle DataLens Server.
To use this feature, from the Data Lens menu, select Translation Repair Formats.
This opens the Edit Translation Repair Formats dialog. This dialog lists all of the substitutions that are done following the translation of full lines. Each substitution appears on one line of the dialog. These substitutions are called format rules.
For example, the format rule 's/\sEL\s/ /gi' has four parts:
Perform a search operation, denoted by s/.
Identify text strings that contain a white space followed by 'EL' followed by another white space. Examples of white space include tabs and spaces, or a
Replace the identified string with a space.
The last forward slash followed by 'gi', are the substitution modifiers. The 'g' means perform the substitution globally within the line; without this modifier only the first instance is substituted. The 'i' means ignore the case. Thus, all of the forms of 'EL' including 'El' and 'el' will be substituted with a space.
Note:
For more information on pattern search and replacement, see Appendix B, "Regular Expressions."It is important to test the results of the substitution; therefore, return to the Test Translation sub-tab and translate your sample content again. Filter your data to check that the intended translations have been made.
|
Copyright © 2001, 2011, Oracle and/or its affiliates. All rights reserved. Legal Notices |
|