| Oracle® Enterprise Data Quality for Product Data Oracle DataLens Server Administration Guide Release 5.6.2 Part Number E23614-02 |
|
|
View PDF |
| Oracle® Enterprise Data Quality for Product Data Oracle DataLens Server Administration Guide Release 5.6.2 Part Number E23614-02 |
|
|
View PDF |
The Oracle DataLens Server includes a set of administrative web pages that allow both local or remote administration of the Oracle DataLens Server. All the administration for the Oracle DataLens Server topology is handled using the web pages accessed on the Administration Server.
The Oracle DataLens production servers can be accessed using a web page. The production server web page provides information on the status of the license, data directories, software versions, and log files. Each production server provides separate informational web page as previously described.
The Enterprise DQ for Product supports the Microsoft Internet Explorer browser version 7 or greater.
On the server, browse to:
http://localhost:2229/datalens
Or remotely browse to
Where server is the name of your Oracle DataLens Server.
The Oracle Enterprise Data Quality for Product Data login screen is displayed
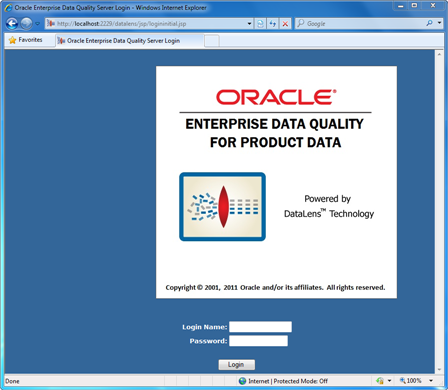
Enter a login name and password and click Login.
Upon a successful login to the server, you are allowed to enter the Oracle DataLens Server home page. This page contains a welcome message, shows the type of server configuration and a menu to the left showing links to the Oracle DataLens Server Administrator Web pages.
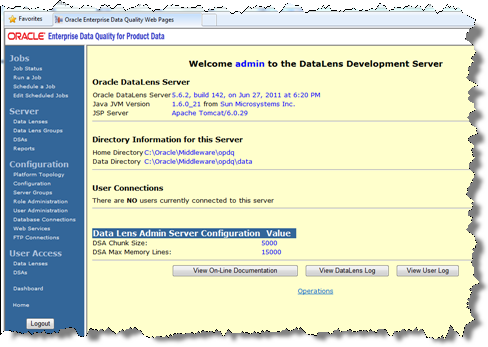
This home page displays the name of the user currently logged into the Data Server Administrator, as well as, the type of server that was installed.
If logging onto an Oracle DataLens Transform Server, then this home page is the only page that is available.
If logging in as a user without Administrator privileges, then the Web pages are all read-only. There is no way to change the server configuration without logging in as a user with Administrator privileges.
Note:
If you are logging in as the administrator, you may need to refresh the screen in order to see all of the administrative selections.These menus are available only to the Administration Server.
The versions of the software used by the server are displayed.
Any users connected to the Oracle DataLens Server from the Knowledge Studio or the Application Studio will be listed as part of the User Connections.
This home page displays information about the configuration and operation of the Oracle DataLens Server. The configuration and installation directories are displayed here. These directories are changed during the Oracle DataLens Server installation. If they need to be changed after the server has been installed, then the web.xml file will need to be manually manipulated. For more information, see Appendix A, "Configuration Files.".
The Oracle DataLens Server home directory is defined with the environmental variable, OPDQ_HOME, which is created and set during the installation process. For more information, see Oracle Enterprise Data Quality for Product Data Oracle DataLens Server Installation Guide.
This directory contains the configuration files, system information, and the Oracle DataLens log files used by the server. The installation WAR file, datalens.war, is located in the home directory if a WebLogic Application Server was installed. When a Tomcat Application Server is installed, the WAR file is located as follows:
On Linux and Unix -
OPDQ_HOME/tomcat/webapps
On Windows -
OPDQ_HOME\tomcat\webapps
This will show what users are currently connected to the server from the Enterprise DQ for Product Client applications such as the Knowledge Studio and the Application Studio.
This is useful if an administrator needs to bring the server down, or make backups or make substantial changes to the server configuration and wants to know what users may be currently working and using the server. The administrator should also check the server jobs to check what users are running real-time or batch jobs against the server as well.
Data Service Application Chunk Size
This size is used to:
determine how many records are sent to a single step in a DSA one time
determine how many records are delegated to a separate Oracle DataLens Server as a single group from an executing DSA
determine how many records are read from a database at one time from a DSA
For information about setting this value, see "Configuration Options".
Data Service Application Max Memory Lines
This size defines how many lines of data to keep in memory between the steps of a DSA. If the number of lines of data is greater than this parameter, then the data is written to disk between each step of the DSA, thus hinder performance.
For information about setting this value, see "Server.cfg".
The following sections explain how to find the EDQP documentation and log files.
Click the View On-Line Documentation button on home page to display a link to the Enterprise DQ for Product on-line documentation.
Click the View DataLens Log button on home page to display the contents of the Oracle DataLens log file. This file is automatically backed up when the file size reaches one megabyte in size. The older files are saved with a version number in the home directory. The file is listed in historical order, with the latest information at the bottom of the file.
This file lists any errors that have happened, as well as a complete list of all the administrative commands that have been issued on the server.
The following is an example of the time-stamped history in the log file:
DLS Log file
INFO 22 Dec 2009 11:26:49 [main] - Initialized Logging facility to check log.cfg every 20 seconds
INFO 22 Dec 2009 11:26:50 [main] - The DataLens Administrator is starting.
INFO 22 Dec 2009 11:26:50 [main] - Version 5.6.02, build 9,488, on Dec 22, 2009 at 9:43 AM
INFO 22 Dec 2009 11:26:50 [main] - Data Service Application chunk size=5000, max memory lines=5000
INFO 22 Dec 2009 11:26:54 [main] - Writing profile to database: LVALLAD-T60
INFO 22 Dec 2009 11:42:46 [main] - Initialized Logging facility to check log.cfg every 20 seconds
Click the View User Log button on home page to display the contents of the Oracle DataLens individual user log file. This log is a record of changes made by the individual users of the system.
The following is an example of the time-stamped history in the log file:
22 Dec 2009 12:04:27 - DB Connection MySQL added by: admin
22 Dec 2009 12:05:47 - User Added: lvallad (Lorna Vallad) by: admin
22 Dec 2009 12:06:23 - User Added: dleeper (David Leeper) by: admin
14 Jan 2010 09:04:12 - Data Service Application Retail_Capabilities_Showcase, revision 1, Checked In by lvallad
14 Jan 2010 09:04:13 - Data Service Application Retail_Capabilities_Showcase, revision 1, deployed to Development by lvallad
14 Jan 2010 09:32:24 - DB Connection MySQLData added by: admin
14 Jan 2010 09:37:16 - Data Lens Demo_Retail_Manufacturers, revision 1, Checked In by lvallad
14 Jan 2010 09:37:16 - Data Lens Demo_Retail_Manufacturers, revision 1, deployed to Development by lvallad
14 Jan 2010 09:38:40 - Data Service Application Retail_Capabilities_Showcase, revision 2, Checked In by lvallad
14 Jan 2010 09:38:41 - Data Service Application Retail_Capabilities_Showcase, revision 2, deployed to Development by lvallad
14 Jan 2010 09:38:44 - Data Lens Demo_Retail_Apparel, revision 1, Checked In by lvallad
The Operations link is available only from the home page. The individual Oracle DataLens Servers only have the home page available when logging on using the Oracle DataLens Server Administration Web pages. This makes the operations available to any of the servers in the pod.
This toggles informational output in SOAP format from external HTTP request to the server. This is useful for verifying or debugging information being sent from a client application to the Oracle DataLens Server.
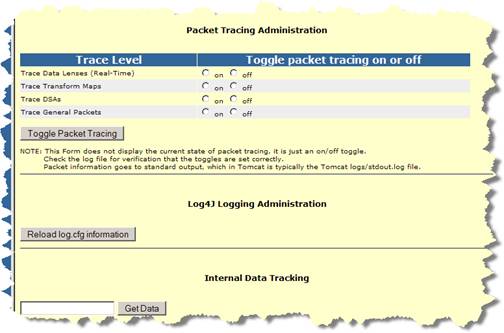
Description of the illustration image005.jpg
Note:
For additional information before using the Debugging Options, contact Oracle Consulting Services.These options configure the Enterprise DQ for Product server related elements including:
Platform topology administration
Configuration of server constants
Server and server group administration
Role administration
User administration
Database connection administration
Web services administration
FTP connection administration
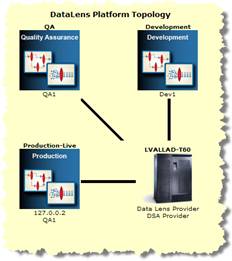
This is where the server configuration options are changed for the Administration Server, all other Oracle DataLens Servers, and the Server Groups. This also provides a view of the Oracle DataLens Platform Topology.
The administration of Oracle DataLens Servers and the Administration Server are controlled from the Administration Server.
In the following topology, there are the following servers:
1 Admininstration server
1 Development server
1 QA server
2 Production servers
It is more important for the QA server group to match the Production server group so realistic stress testing, load balancing, and performance monitoring can occur.
The initial page will look like the following, depending on the number of Oracle DataLens Server Groups that are part of the Oracle DataLens topology.
Description of the illustration image006.jpg
This initial screen shows the Oracle DataLens Administrator Server (LVALLAD-T60), with the Oracle DataLens Server Groups radiating out. This screen is generated dynamically based on the individual topology of your particular server configuration. The names of the Oracle DataLens Servers are listed in the Server Group in which they belong.
Note:
In the preceding server topology, the server named LVALLAD-T60 is the administrator server. In some cases, the administrator server is also a development server thus is called a combo server. In this case, the topology will list the capabilities of the combo server below the icon as shown in the following.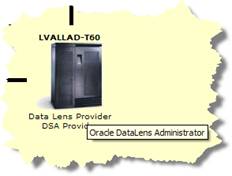
Description of the illustration image007.jpg
The use of a combo server as a development server is not the recommended configuration. In this example, this combo server can be used for development testing of data lenses and DSAs.
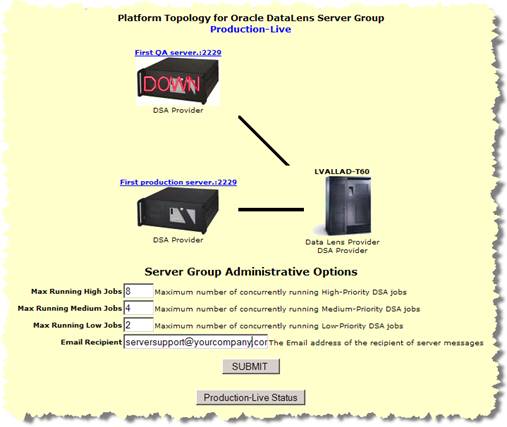
Clicking on one of the server group icons advances you to the Platform Topology page for that particular Server Group as shown in the following when clicking on the Development Server Group.
Description of the illustration image008.jpg
The server in the center of the diagram is always the Oracle DataLens Administration Server (LVALLAD-T60 in this example). The other servers in the topology are Oracle DataLens Servers. Clicking on any server will take you to the administration page for that server.
The controls on the selected Server group page are used as follows:
This is the maximum number of high-priority jobs that will be run simultaneously on this server group.
This is the maximum number of medium-priority jobs that will be run simultaneously on this server group.
This is the maximum number of low-priority jobs that will be run simultaneously on this server group.
This is the email address of the administrator that is notified when warnings or errors occur at a server group level from the Oracle DataLens Server.
Clicking this button allows you to idle or start the server group depending on its state.
You may occasionally need to stop and re-start the Batch Service. This is the best way to stop processing on the servers. The server group will wait until all current requests have finished processing before idling the servers in the group. Any requests that come in after the server group has been idled will be denied access.
Click the Idle this Server Group button to set the server group to an idle state.
Upon successful completion of the stop request, the button changes to Restart this Server Group. If there are jobs running, and you need to stop the server, the currently running jobs will finish and the server will be idled.
Select an Oracle DataLens Server by clicking on the image of the Oracle DataLens Server from the Platform Topology Web page to get to the configuration information for the Oracle DataLens Server. If you select an Oracle DataLens Server image for a particular server, you are advanced to the configuration page for that particular Oracle DataLens Server. For this example, the configuration information for the LVALLAD-LAP Oracle DataLens Server is being changed.
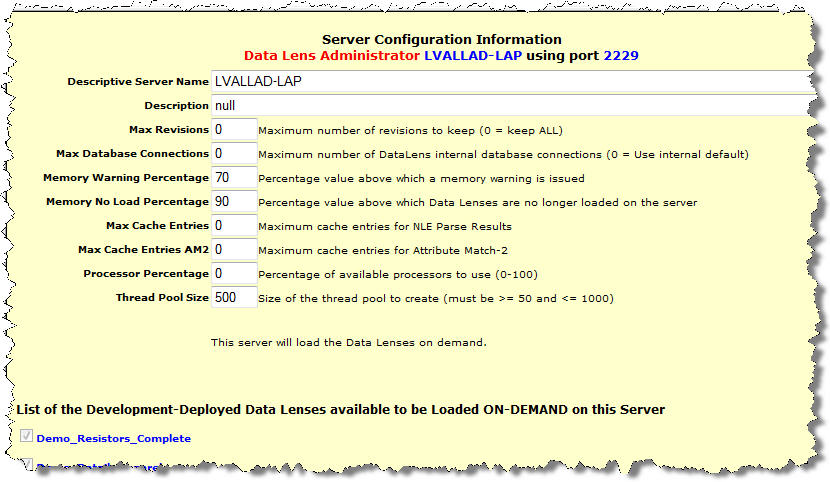
You can modify the values on this page as follows:
The number of versions of a data lens or DSA in the repository. The copies have revision history information with dates, comments and the user that changed them. Any revision that is stored in the repository can be checked out using the Knowledge Studio or Application Studio in case you want to revert to a previous version. Any version can be deployed as described in "Server". This is only applicable to Oracle DataLens Administration Server.
This is the maximum number of connections that the Oracle DataLens Server will use to connect to the internal database.
This is a value from 0 to 100. If the memory currently being used by Web Server and the Oracle DataLens Server exceeds this value, then a warning is issued to the main Admin and Server Group email recipients. For more information, see "Configuration" and "Server Groups".E
This is a value from 0 to 100. If the memory currently is being used by the Application Server and the Oracle DataLens Server exceeds this value, then no more data lenses will be loaded into memory on this particular server. Email alerts are sent to the main Admin and Server Group email recipients. For more information, see "Configuration" and "Server Groups".
This is an integer value. It sets the maximum number of parsed lines of data that a data lens will cache. This cache is a Least Recently Used Cache, so when the maximum is reached, the least recently used entry is dropped and the newly parsed data is added as an entry. The default value, zero, indicates that caching will occur to the maximum amount of memory percentage set by the Maximum Memory Percent for adding to Global Parse Cache Numeric Constant. For more information about this constant, see "Configuration".
This is an integer value. It sets the maximum number of entries in the Attribute Match 2 Cache. This cache is a Least Recently Used Cache, so when the maximum is reached, the least recently used entry is dropped and the new data retrieved from a database query is added as an entry. The default value, zero, indicates that no caching will occur; the higher the value the more memory is allotted for caching.
Note:
The behavior of this value is the opposite of the Max Cache Entries value.This is a value from 0 to 100. It sets how DSA processing distribution is distributed across all CPUs in the server by percentage. If this value is set to 0, processing distribution is off; this is the default. If the value is > 0, processing is distributed to CPUs as calculated by the defined percentage value rounding to the nearest whole number though never less than 1. For example, if the server contains eight CPUs and you set the value to 87, processing is distributed to seven of the eight CPUs. To distribute processing to all eight CPUs, you would set this value to 100.
This is an integer value from 50 to 1000. It sets the thread pool boundary on the number of threads in the pool that can be running on the Oracle DataLens Server. Because the server can run numerous jobs simultaneously and each job can start multiple threads to distribute the work across processors, a thread pool is created so that the server does not run out of threads. The default value is 500. Any value less than 50 is set to 50; any value greater than 1000 is set to 1000.
The following algorithm is intended to aid you in calculating the thread pool size value:
(Number of jobs running simultaneously * (Number of Lens Transform Maps in the DSA) + (Number of DB Update Transform Maps in the DSA) + (a few spare)
The following additional two values appear if the server is an Oracle DataLens Transform Server:
This is the alias for the selected Oracle DataLens Transform Server.
The server group that will be used by the selected Oracle DataLens Transform Server.
The set of check boxes for all the data lenses that are deployed to the Oracle DataLens Servers enables the system administrator further control over which data lenses are loaded on each particular Oracle DataLens Server. This is the most important consideration because the bulk of the processing usually takes place in the data lenses, and the data lenses take up the most memory on the server as well.
This is not applicable to the Oracle DataLens Administration Server because data lenses are loaded on demand. In other words, data lenses are loaded when needed for job processing.
Note:
If all of the servers in a server group are set to deploy all of the data lenses, then the Oracle DataLens Administration Server will manage the load-balancing of datalens job processing across all the servers in the server group. Otherwise, you can use these settings for manual load-balancing.Click the Configuration link to modify the various Admin server options as follows:
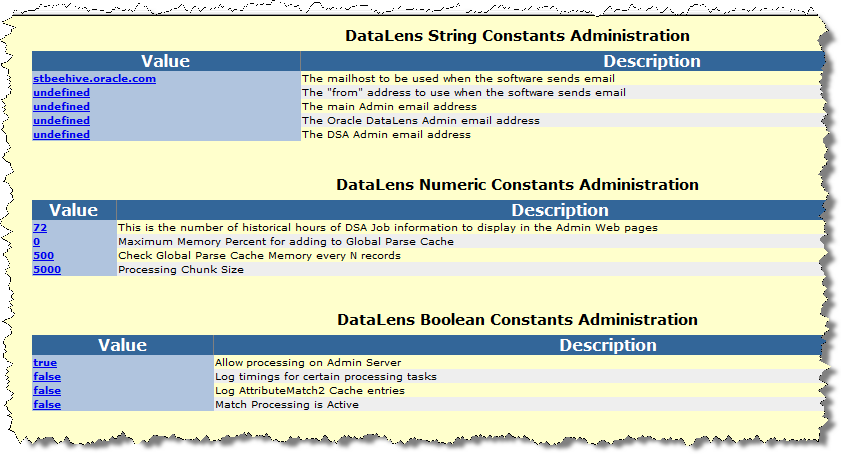
Each of these settings is a configuration parameter that is set globally. Select any of the values to change the current settings as described in the following sections.
| Value | Description | What It Does |
|---|---|---|
stbeehive.oracle.com |
The mailhost to be used when the software sends email |
The SMTP mail server to be used when EDQP sends email to defined recipients. This value is validated so ensure that is accurate to avoid an error. |
undefined |
The "from" address to use when the software sends email |
The sending email address that will be used when EDQP sends email to defined recipients and should be the Administrator of your Oracle DataLens Administration Server. This value is not validated so ensure that you have entered the text string correctly. For example, admin@yourcompany.com.
Some email programs can misdirect this type of email to a junk or spam folder so you should ensure that this address is added to your safe email sender list. |
undefined |
The main Admin email address |
The main Oracle DataLens Administration Server Administrator's email address and will likely be the same as the above constant value. All administrative change alerts are emailed to this recipient including user and role changes, DSA and data lens check-ins and check-outs, and server group changes. For example, admin@yourcompany.com.
An email alias can be used to alert a group of administrators. This value is not validated so ensure that you have entered the text string correctly. |
undefined |
The Oracle DataLens Admin email address |
The data lens Administrator's email address. This recipient receives alerts about actions to data lenses only. This value is not validated so ensure that you have entered the text string correctly. For example, dl_admin@yourcompany.com. |
undefined |
The DSA Admin email address |
The DSA Administrator's email address. This recipient receives alerts about actions to DSAs only. This value is not validated so ensure that you have entered the text string correctly. For example, dsa_admin@yourcompany.com. |
| Value | Description | What It Does |
|---|---|---|
72 |
This is the number of historical hours of DSA Job information to display in the Admin Web pages |
This is the number of historical hours of DSA Job information to display in the Administration Web pages though all history is logged for review. This value can be changed to dynamically view more or less hours of history. For example, setting to 720 will give you about 30 days of history. To view the transactional history, click the Job Status link. |
0 |
Maximum Memory Percent for adding to Global Parse Cache |
Sets the portion of the total global Java Heap memory allocated for the Global Parse Cache. This total includes the memory already allocated at server startup for DSA, data lens, user, and role information needed for processing. The difference between the memory allocated at server startup and the threshold value is the Global Parsing Cache. The heap memory above this threshold is available for run time processing for each DSA step (all Transformation and Decision Maps).. Setting this value to zero turns it off, which turns off the Check Global Parse Cache Memory option. This global constant is most useful when your data contains the literally the same strings of repeating data. This global constant and the next are used in conjunction to tune your data so the values set will be unique to your environment. If memory allocation errors occur, see "Troubleshooting". |
500 |
Check Global Parse Cache Memory every N records |
Sets the frequency, every N records, to check how close the Maximum Memory Percent for adding to Global Parse Cache constant is to its defined value. Setting this value too low can use valuable memory and processing while setting it to high can result in exceeding the allocated memory. |
5000 |
Processing Chunk Size |
Sets the number of records (lines of data) that are processed within each DSA step. For example, if 45,000 lines are sent into a DSA step for processing when this value is set to the default of 5,000 then the server will create chunks of 5000 records to process. The server processes each chuck one record at a time until all of the records are processed. |
The two Global Parse Cache Numeric Constants, and the Max Cache Entries String Constant previously described, are controlled by the Java Heap as follows:
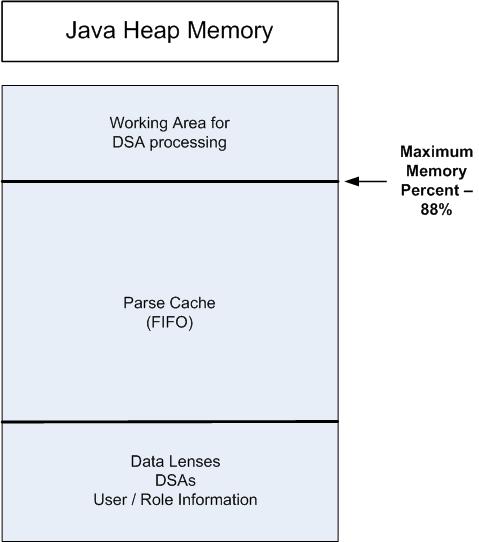
Following is an explanation of how these cache and memory settings operate together:
If Max Cache Entries = 0 and Maximum Memory Percent = 0, then NLE Parse Results caching is turned off.
If Maximum Memory Percent > 0, then the following are true:
The default Maximum Memory Percent is 88, which means that by default Global Parse Caching is on with unlimited entries. In conjunction, setting Max Cache Entries has the following two meanings:
| Value | Description | What It Does |
|---|---|---|
true |
Allow processing on Admin Server |
Allow job processing on the Oracle DataLens Administration Server. To ensure good performance of this server, job processing should take place on production and development servers. When this is the case, this value should be set to false.
If set to |
false |
Log timings for certain processing tasks |
Log timings for certain processing tasks. This value should only be changed at the direction of Oracle Consulting Services. |
false |
Log AttributeMatch2 Cache entries |
Log AttributeMatch2 Cache entries. This value should only be changed at the direction of Oracle Consulting Services. |
false |
Match Processing is Active |
Allow matching component processing on Oracle DataLens Servers.
This value should only be set to When this value is changed, all Oracle DataLens Servers must be restarted to enable match processing. |
Server Groups allow Oracle DataLens Servers to be grouped together for use in the following scenarios.
Development
Production
Quality Assurance Testing
Each Server in the group will participate in automatic server load balancing within the group. The servers can also be used for round robin checking from client applications to determine which server in the group is running and available to handle requests.
The Oracle DataLens Servers do not have a "type" until they are assigned to a server group. The type of server will depend on the type of group that the server is assigned to.

Description of the illustration image011.jpg
Server Groups can be created, edited, and deleted. The groups that are created can be seen graphically from the Platform Topology Web pages.
Note:
The Oracle DataLens Administration Server resides in a hidden Admin Group that cannot be modified.Additionally, a temporary "default" group is used if an Oracle DataLens Transform Server is created prior to creating any server groups. This default group is always a Development Group.
Click the Create A New Server Group button to get the following screen.
Description of the illustration image012.jpg
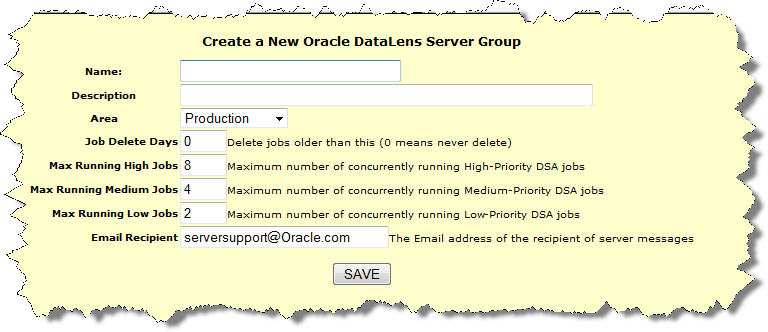
Enter the name of the new server group and give it a description.
Select a type. There are 3 choices in the drop-down menu
Production - This group will contain the servers used in a production environment to process data.
Development - This group will contain the servers used in a development environment to test new changes to data lenses, and DSAs.
QA - This group will contain the servers used in a Quality Assurance environment to test the work done by the developers, prior to their use in a production group.
Set the parameters for this server group. These parameters can be increased as new servers are added to the group.
Select Save to create the new Server Group
The following sections explain how to create or delete an Oracle DataLens Server.
Note:
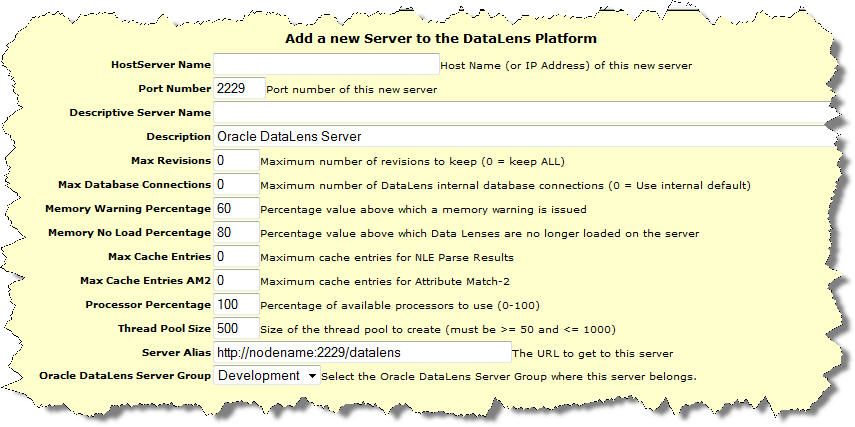
You must create a Server Group before can create an Oracle DataLens Server. For more information, see "Adding a New Server Group".In the server group administration page (as shown previously), click the Add a new Oracle DataLens Server button.
Description of the illustration image013.jpg
This will add a new Oracle DataLens Server to the Oracle DataLens topology. The server must be physically installed onto the hardware prior to adding the server to the topology. Once the server has been physically installed on a machine and started, then it is ready to be added as follows:
Enter the Network name or IP address of this new server as the server name.
Change the port number if not 2229.
Give the server a Description.
Select the configuration options (use the defaults if you are unsure of what to use). For more information about each of these options, see "Configuration Information".
The server alias is a URL that will work within the network environment to take a user to the server Web page for this new server.
Select one of the Server Groups you have created.
Click Submit to create the new server in the Oracle DataLens Server topology.
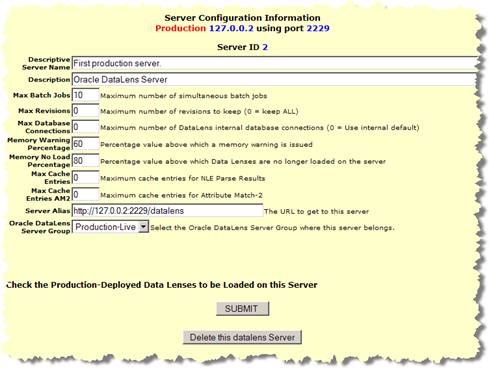
From the Configuration page, select Platform Topology, and then select the server group and then select the particular server to be deleted from the topology.
Description of the illustration image014.jpg
Click the Delete this datalens Server to delete the server from the Oracle DataLens topology.
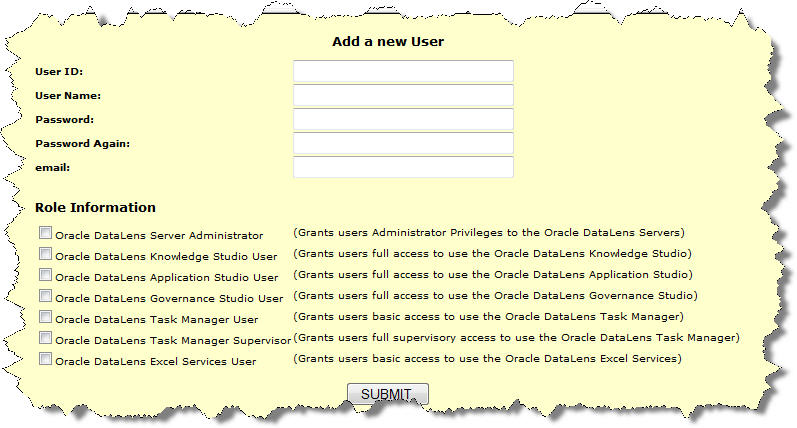
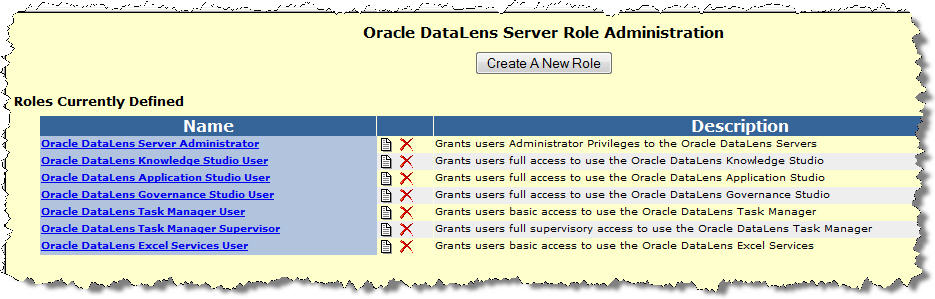
Selecting the Role Administration link takes you to the following page.
Description of the illustration image015.jpg
This allows you to add additional roles that can be assigned to users of the Oracle DataLens Server. These roles allow users to be conveniently grouped together for similar permissions. The roles can be created, edited, renamed, and deleted.
When creating a new role, the following page is displayed:
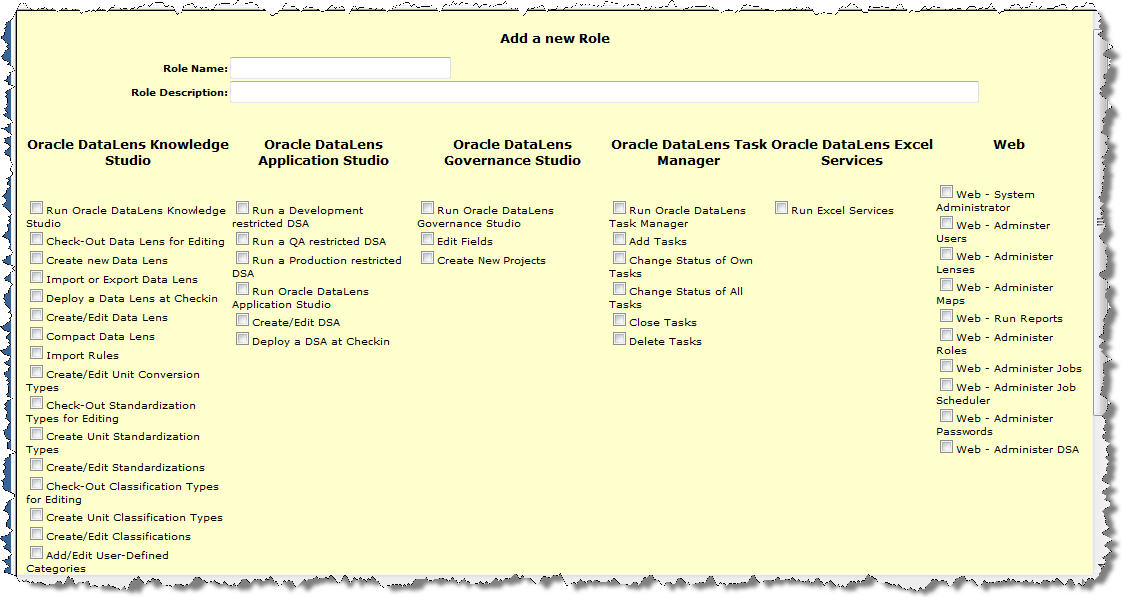
Select the permissions that you would like to be included in the new role and they will be part of the role when you select Submit.
When editing a role, the same page is also displayed. Add or delete permissions that you want included in the role and click the Submit button when done.
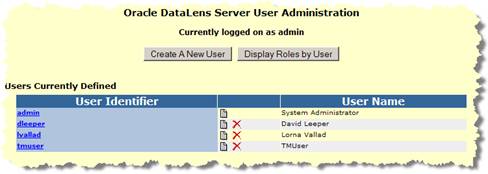
Selecting the User Administration link takes you to the following page.
Description of the illustration image017.jpg
Additional users need to be added for use with the Enterprise DQ for Product client software and to enable logging into the Administration Web pages. These users need to be created before the Enterprise DQ for Product clients may be used.
This allows you to add additional users that can login to the Oracle DataLens Administration Web pages and change the passwords of existing users. These new users can be deleted as well.
Note:
User names and passwords are case-sensitive.User admin is a special super-user that has access to parts of the Oracle DataLens Administration Web pages that other users do not have access. This user cannot be deleted, although you can change the default password.
Users are created and assigned one or more roles, using the following screen.
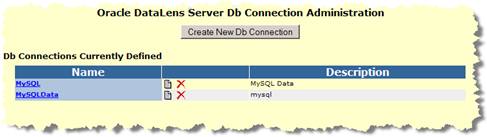
This page allows the administrator to create named database connections that can be used by DSAs across the Oracle DataLens Server topology.
The initial page will be empty; following is a page after several Db connections have been defined.
Description of the illustration image019.jpg
The names are those that can be used by any of the Jobs that need access to a database.
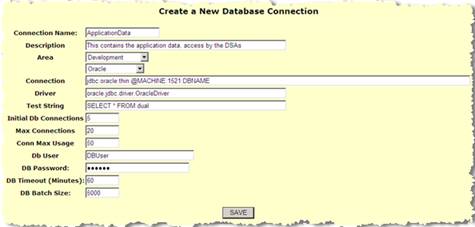
To create a new database connection the following page is used.
Description of the illustration image020.jpg
Create a named connection to be used in all the DSAs.
Select an area. Different user logins can be used for different areas. In fact, entire different databases can be used for different areas.
Select a Database Type to pre-populate the Connection and Driver fields. There is default connection information for
User Defined - This allows the user to enter any connection information for alternate databases
Oracle
MySQL
SQL Server 2000
SQL Server 2005
PostgreSQL
DB2
Use the default setting if unsure what values to use for the other options on this page.
Save the connection information and it will be added to the list of database connections.
Select the new connection that you have created to edit the connection and test that the connection definition is working properly.
Note:
This single page shows all the connection information for all the areas for which connection has been defined.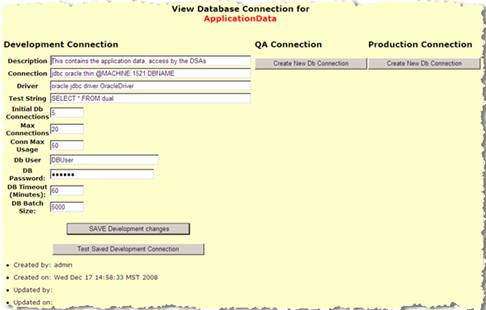
Description of the illustration image021.jpg
New connections for the other areas can also be created here for this same named database connection using the Create buttons.
There is also a Test Saved Development Connection button to check the saved database connection.
If your databases connection has been successfully defined, then a confirmation message is displayed.
If the connection definition has not been successfully defined, then an error message will be output, indicating the problem with the database connection.
Note:
You can edit theDbConnectionTemplates.xml file to add additional databases or modify the defaults for creating new database connections.Named WSDL connections can be created and configured for use in a DSA and its Transformation Maps (used by a DSA Step). These connections can be configured differently for QA, Development and Production servers, but all sharing a common name. This allows the Web Services to be different in different environments, but the DSAs will never need to change based on the deployment environment.
Note:
The web service that is being called must only return a single string. All transforms in the Application Studio are expected to return a single string. This includes the web service calls.Web services that return multiple fields (such as in the following example), return the multiple fields as character-separated data (such as a vertical bar) within the single string. In the Application Studio, you could then use the Get Field add-in function to extract the individual fields in the returned data.
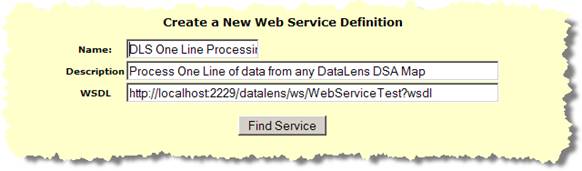
In the following example, the WSDL creation wizard is used to create a named WSDL connection to the Enterprise DQ for Product Web Service to process a single line of data.
Click the Web Services link
Description of the illustration image022.jpg
Description of the illustration image023.jpg
Enter the name and description.
Enter a valid WSDL
Click the Find Service button.
Description of the illustration image024.jpg
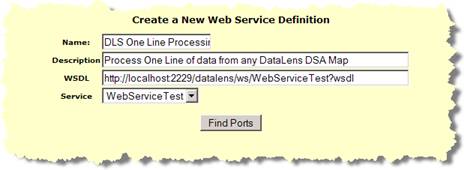
Select the service that you want from the Service drop-down selection box.
Click the Find Ports button.
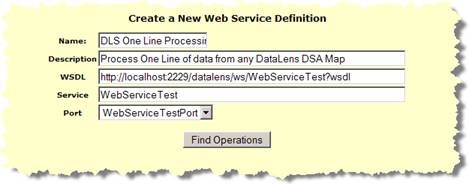
Description of the illustration image025.jpg
Select the Port that you want from the Port drop-down list box.
Click the Find Operations button.
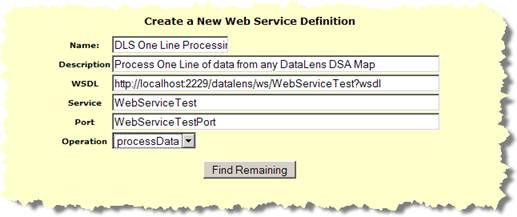
Description of the illustration image026.jpg
Select the Operation that you want from the Operation drop-down list box.
Click the Find Remaining button.
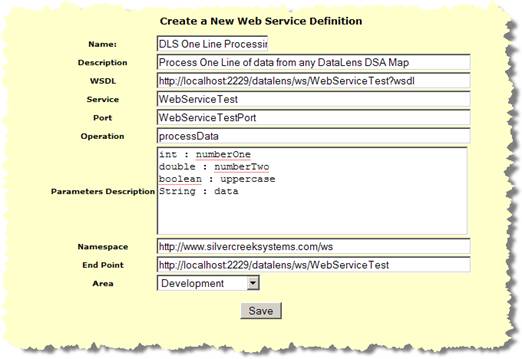
Description of the illustration image027.jpg
In this example, the parameters are populated automatically from the Web Service and a sample line was added for testing.
The Namespace and End Point parameters are automatically populated.
Select the Area.
Note:
It is useful to add a sample line for testing that you can cut and paste from for testing, as follows:Click the Save button.
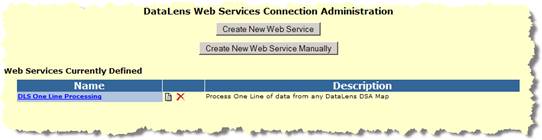
Description of the illustration image028.jpg
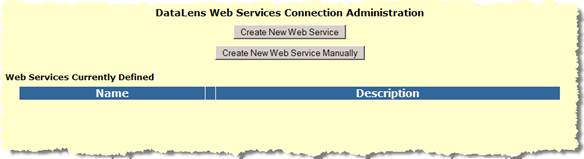
The Web Service Administration page is displayed with all Web Services.
Select one of the currently defined Web Service definition to test that service.
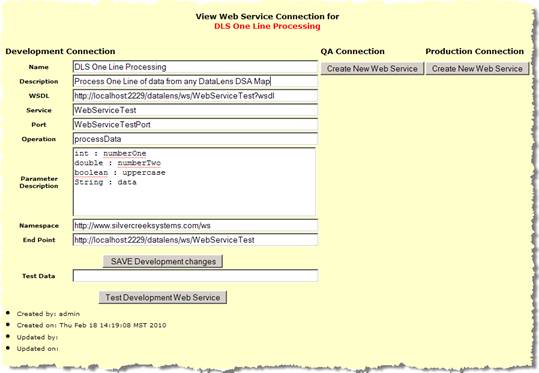
Description of the illustration image029.jpg
Enter the test data into the Test Data input field. Using this example, you would enter 1 17.0 TRUE "Test Web Service" into this field. The test data is space delimited and must follow the parameter input requirements defined in the Parameter Description field.
Click the Test Development Web Service button to test the connection by processing the data with the Enterprise DQ for Product Web Service.
A successful test results in messages similar to the following:
SUCCESSFUL test of the Web Service
Results
1 times 17.0 = 17, test web service
The Web Service is now ready for use by DSAs.
Named FTP connections can be created for use in DSAs and from DSA Transformation Maps (used by a DSA Step). The result data from a DSA job can be sent directly to one of these named FTP connections. Jobs run from the real-time programming interface can specify an FTP connection for the output.
Click the FTP Connections link.

Description of the illustration image030.jpg
Select the Create a New Ftp Connection button.
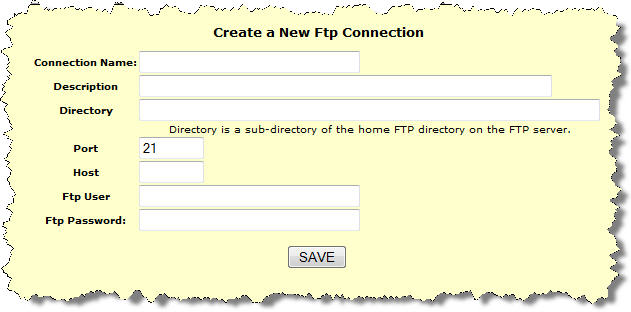
Enter a name for the connection.
Specify a directory where the files will be placed in the remote FTP directory. This directory must be a sub-directory of the FTP connection destination directory, when connecting to the FTP host.
Enter the Port and Host.
Enter the user and password.
Save the new FTP connection definition.
The new connection is listed in the Ftp connections page.

Description of the illustration image032.jpg
The Test button can be used to test this new connection. During the test, a small file will be placed in the remote ftp directory. This is the test configuration page.
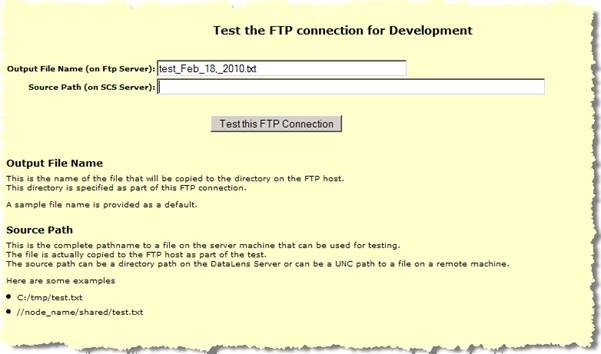
Description of the illustration image033.jpg
Select the Test button to test the connection. The source path needs to be a file on the server, or a UNC path of a file on the network (as shown previously).
If the FTP test is successful, then a confirmation message is displayed.
These options control the user access to the Enterprise DQ for Product applications such as the Knowledge Studio, Application Studio, and Governance Studio. This will also control the user access to the Web pages as well.
These pages allow the administrator to control exactly which users have access to which data lens and DSA, with specified levels of access for each user. This is in addition to the role-based permissions that these users are already assigned.
These three all work the same and DSAs are used in the examples in this section. A list of all the DSAs in the repository with a brief description is displayed.
Description of the illustration image034.jpg
Select the hyperlinked name of the DSA to get to the user access page as shown follows:
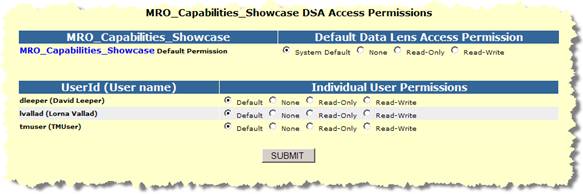
Description of the illustration image035.jpg
The access each user is been granted is displayed. You can change permissions for any user and then click Submit to save the changes.
Note:
If the DSA or data lens names do not display properly (as is sometimes the case with double-byte characters), ensure that your Windows region and language options are set properly. For more information, see Windows Help.Click the Dashboard link.
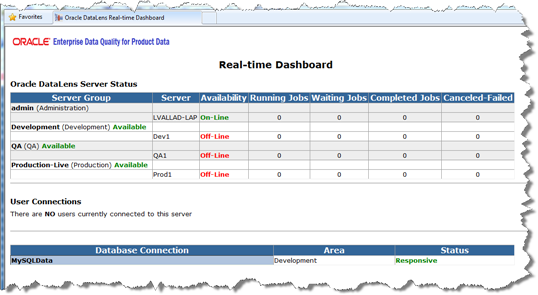
This spawns a separate page that is used for Oracle DataLens Server monitoring. This page can be left up in a system command center for a company or enterprise to keep a constant monitor on the state of the Oracle DataLens Server. The page will refresh every minute.
Any problems with the Oracle DataLens Server are highlighted in RED.
There are three users connected to the Administration Server from an Enterprise DQ for Product application, such as the Knowledge Studio.
There is one database connection that is unresponsive. Any DSAs using these unresponsive database connections will prevent the applications from connecting to the database.
The Server is where the data lenses and DSAs are stored for use by the Oracle DataLens Administration Server. This contains information on the different versions of the data lenses and DSAs as well as instances of the versions themselves. Only users of the Knowledge Studio, as well as users using the Administration Web pages for the Administration Server can directly manipulate these data lenses. There is no direct access to the repository from the Oracle DataLens Servers.
These data lenses are loaded to the server from the Knowledge Studio.
Server Data Lenses and Server DSAs are those that are being versioned by the Oracle DataLens Server for shared use by different team members. This prevents possible problems with more than one user updating a data lens at the same time and possibly losing work. This also provides a single location for backing up the valuable data lenses. Server data lenses can be checked out for edit or read by users of the Knowledge Studio.
Data lenses are the basic unit of knowledge building.
DSAs define the application of knowledge, data lenses, to record level data for the purposed of cleansing, attribute extraction, classification, and item level matching.
Once these are in the repository, any of the data lenses and DSAs can be edited and upgraded when needed.
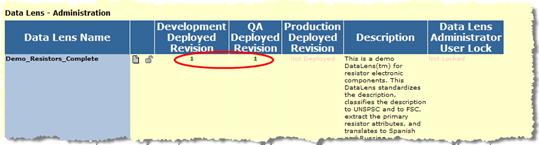
This page shows information about all current data lenses in the server in the Administration Server.

Description of the illustration image037.jpg
Additional fields in this table include the following:
This is the name of the data lens, with a hyperlink to the complete history information for this data lens. The history area is where the specific versions of the repository Data lenses are deployed to the server (see the following.)
| Edit | Fine-grained control over the version of the data lens to be deployed to the Administrator or Production servers. | |
| Delete | This will permanently delete the data lens from the Server Repository. | |
| Lock | This will lock the data lens with a named user. | |
| Unlock | This will remove the user lock from the data lens. | |
| Rename | Rename the data lens, keeping all the revision information. |
The revision number of the deployed data lens to the Development (or the Administration/development) Server.
Black text means the Development-deployed revision is the last version that was checked into the repository.
Red text means the Development-deployed revision is not the latest version in the repository.
The revision number of the deployed data lens to the Quality Assurance data directory.
The revision number of the deployed data lens to the Production data directory.
The initial description of the data lens when it was first checked into the repository. For more information, view the history of the data lens. This description can be updated from the Application Studio application.
This shows the Knowledge Studio user that has locked this data lens for exclusive access. "Not Locked" means that the data lens is available for checkout by any Knowledge Studio user.
Typically, the user locks on the repository Data lenses are created by users of the Knowledge Studio. Occasionally, these locks will need to be overridden by the server administrator.
A user might be on vacation and left a data lens locked that is needed by another user.
A user might have inadvertently started editing a data lens in the Knowledge Studio and failed to get a user lock first. This user would not want to check out the data lens to get the lock because that would overwrite the work the user has done on the data lens so far. The administrator must be careful in this case because the data lens that the user started on (and did not check out) might not have been the latest version.
This hyperlink from the Data Lens - Administration page will display the complete history of the data lens listed from the most recent to the oldest.
Click the View History button in the second column to get to the following page.
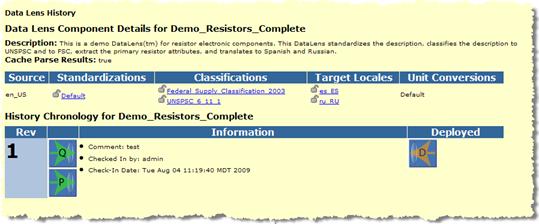
Description of the illustration image043.jpg
This is the language that the data lens uses as the "from" translation language.
This is a list of the alternate standardizations that the data lens uses. In this case there is only the default standardization being used, so this column is blank.
This is a list of the Classifications that the data lens uses. In this case there are two separate classifications that are being used by the data lens.
This is a list of the languages that can be translated to.
This is a list of the numeric conversions that have been defined for this data lens.
The second table on the View History page is the version information and the deploy/undeploy icons as follows:
The particular revision, starting from one, listed in reverse order so the latest revision is always at the top of the list. In this example there is only 1 revision.
Select an icon to deploy a particular version of this data lens to the Administrator or Oracle DataLens Server. This means this data lens will be listed as a data lens available for loading on the Administrator or Oracle DataLens Server. In this example, there is not have a QA Server Group, so the QA deployment icon is not enabled.
This shows the revisions of the data lenses including:
Comments on what the Knowledge Studio user did to the data lens on this particular revision
The name of the Knowledge Studio user that made the revision.
The date/time that the revision was checked into the server
These icons show which versions of the data lens are deployed to the Administrator and/or Oracle DataLens Server area.
Undeploy from Development
This will undeploy a data lens from the Development Server, which means it will not be listed as a data lens to be loaded as well. This button is only available for version 8 in the example, because that is the version that is deployed to the Administration Server.
Undeploy from Production
This will undeploy a data lens from the Oracle DataLens Server, which means it will not be listed as a data lens to be loaded as well. This button is not available in the preceding example, because this data lens is not currently deployed to the Oracle DataLens Server.
Undeploy from QA
If there is a QA server group defined, then there will be a button to undeploy or deploy to the QA area.
From the history page of the data lens, select the Deploy data_lens_name to Development icon.
Now the data lens is deployed to the development area and is ready for use in the development group as in the following:
Description of the illustration image044.jpg
It is recommended that data lens only be deployed to the development area. Data lens deployment to the QA and Production areas can be done more easily by using the package deployment of DSAs, and the packages give a level of version tracking that cannot be done by manual data lens deployment.
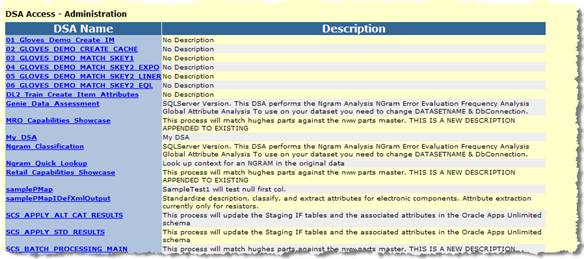
This page shows information about all current DSAs in the repository on the server.
This page works the same as the Data Lenses page. See the preceding description for details on this page.
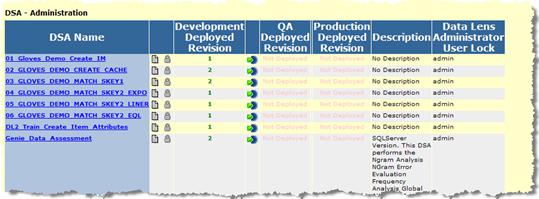
Description of the illustration image045.jpg
To view the packages that were used to deploy to the Production area, select the View Production Packages link from the main page for a particular DSA.

Description of the illustration image046.png
This will show the Production Packages as follows:

Description of the illustration image047.jpg
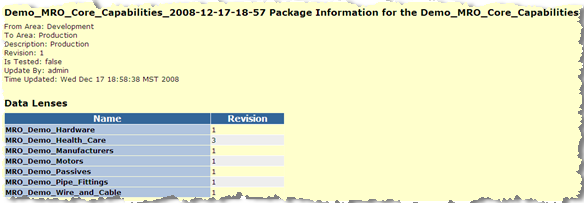
Drilling down into the details for this package using the view settings button gives the following details.
Description of the illustration image049.png
This reports that this package uses revision 1 of Demo_MRO_Core_Capabilities with a set of data lenses.
If there is more than one package for the DSA, then the package menu lists all the package versions as follows:

Description of the illustration image050.jpg
There are two new icons that are enabled when there is more than a single package. These are:
This marks the current package that is deployed to production.
Details for a particular DSA can be obtained from the history page for a particular DSA.
Note:
Deploy and un-deploy icons are also available. Oracle recommends that only the Deploy to Development icon be used. For deployment to QA or Production, Oracle recommends that packages be used rather than these deploy icons, to be able to track versions in the QA or Production server groups.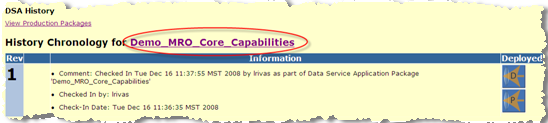
Description of the illustration image052.png
Click the DSA name link to view the DSA details as follows:
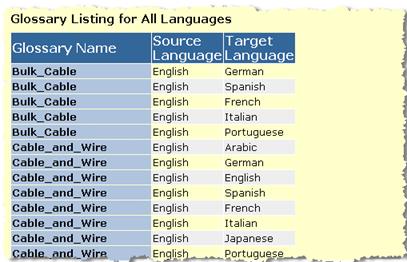
Click the Language Glossaries link to access information about the available translation Smart Glossaries.
This table is a listing of all the glossaries that are available to the Oracle DataLens Server topology. There is the glossary name with the source and target languages for the translation.
Click the Reports link to access all reporting functions.
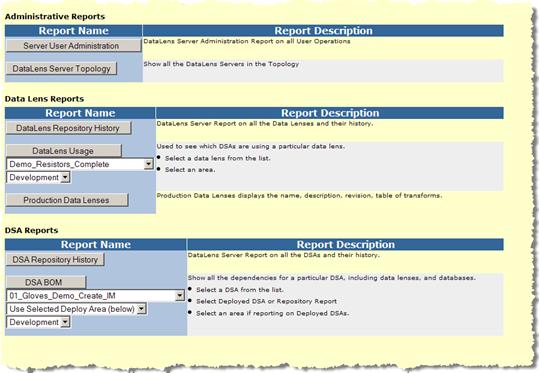
Description of the illustration image055.jpg
These are generic reports on the state of the Oracle DataLens Server Platform Topology.
This will show all the user activity on the Oracle DataLens Server.
This shows all the servers in the Oracle DataLens Platform Topology, with the capabilities of each server.
This shows all the transformations that the data lens can perform along with a complete repository history.
This is useful to see where a particular data lens is being used in the data lens topology for the selected deployment area.
A detailed listing of all the data lenses that are deployed to Production.
This shows a complete repository history of all the DSAs on the Administration Server.
This is useful to see what Data Lenses and database connections are used by a particular DSA. This can be listed from the repository or any of the selected deployment areas.
The administrator can view the status of DSA jobs and can change the state of the jobs on the Oracle DataLens Server.
To view a list of the DSA jobs that have been run, click the Job Status link.
The page is separated into three types of DSA jobs.
Those Active Jobs currently running
Those Pending DSA jobs currently waiting in the queue
The Job History with information on DSA jobs that have finished, have been cancelled, or have failed.
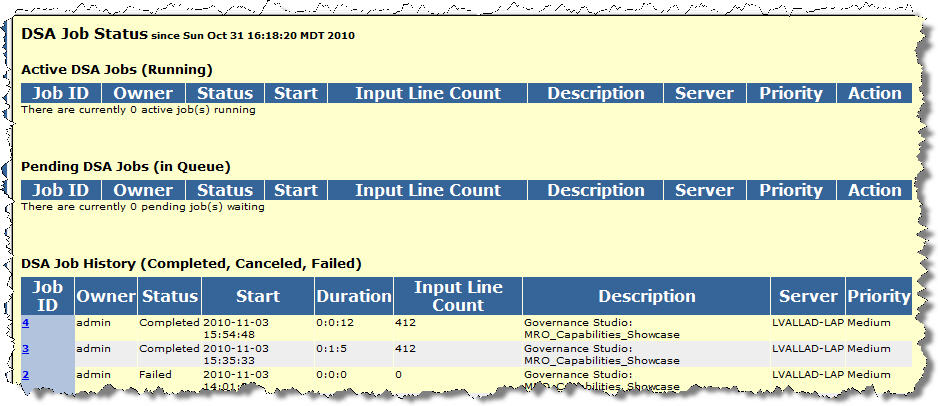
The server will interleave multiple jobs so the jobs can run concurrently and a single very large batch job will not take control of the server.
The maximum number of concurrent jobs is controlled as part of the server configuration as described in "Configuration".
An administrator can do two things with currently active batch jobs. The first is to look at the details of the job and the other is to cancel the job.
The Job Id is assigned by the system during job submission and is comprised of the username followed by a job number.
This field shows the User Id of the person who submitted the job.
This field shows the status of the job. Status definitions are as follows:
Running
The job is currently running.
Pending
The job has not started, but will start as soon as a slot becomes available. Only two jobs can run concurrently on the Oracle DataLens Server. Jobs submitted while two jobs are already running will get a status of "Pending" and will start in order of submission as the others jobs finish processing.
Finished
The job has successfully finished processing.
Cancelled
The Administrator canceled the job during processing or before processing started.
Failed
The job failed. This status means that something went wrong during the submission or processing of the data. Failed jobs will yield an entry in the Oracle DataLens Server Log.
Shows the date and time the job started in YYYY-MM-DD HH:MM:SS format.
This shows the total time in hours/minutes/seconds for a completed job.
This field shows the number of records processed so far for the DSA job. If a job is in "Running" status, this number will update when you click the browser's refresh button.
The description the user entered when submitting the job. Additionally, jobs that are run from the Governance Studio or Services for Excel are identified as such.
The server that the job was sent to for processing. In a server group with more than one server, there may be multiple servers handling the request.
The priority that the job was given.
Low priority
Jobs are large batch-type jobs processing tens of thousands and millions of lines of data.
Medium priority
Jobs are jobs where the results should be obtained while any low priority job is running.
High priority
Jobs are jobs with just a few lines to process, or jobs run from an interactive user environment, where the results need to be returned immediately.
This is available for running or pending jobs. Two action buttons are available.
Cancel
This allows the administrator to cancel a running or pending job. The job may be on the incorrect data set or may just be too large for the user to run during the day when other users are also accessing the server.
Priority
This allows the administrator to change the priority of a running or pending job.
Select the hyperlink in the Job ID column for details on the currently running, pending or completed job.
By selecting the Job ID link in one of the Jobs tables, you can see the details of the selected job as shown in following the example:
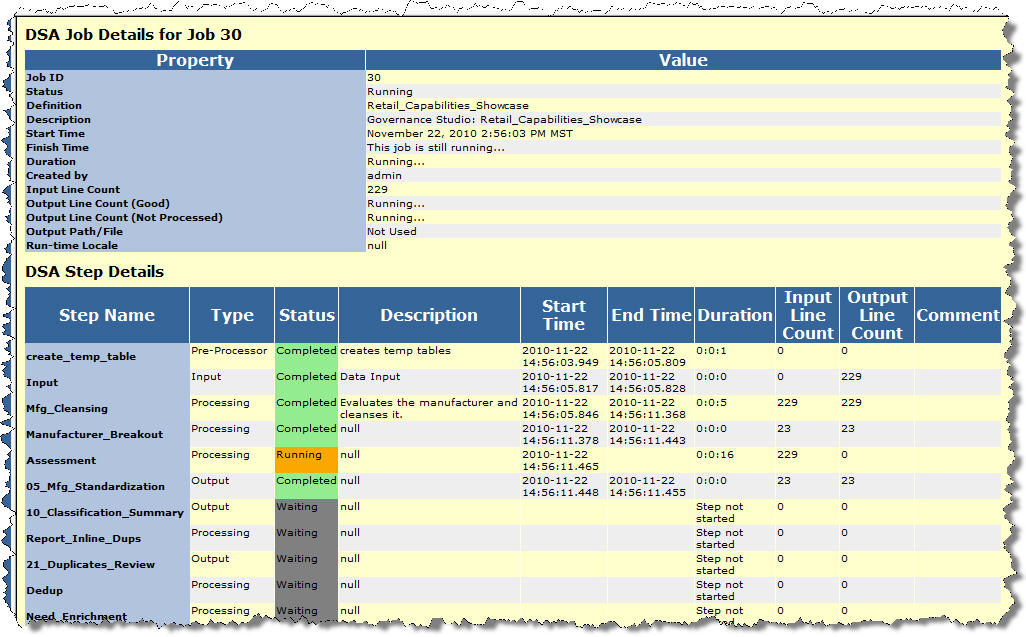
This page contains the details of this currently running, pending, or historical (completed, canceled, or failed) DSA job. The data displayed is dependent on your selection on the DSA Job Status page, Active, Pending, or History.
This particular job is running and 229 lines of input data. You can easily see which steps have completed, are running, or waiting to run.
The administrator can look at the details of the job to get information and statistics on these finished jobs. In the configuration screen, the number of days of archived information can be controlled.
You can view the details of the job by clicking on the hyperlink with the job name to get the same details as shown in the preceding currently running jobs.
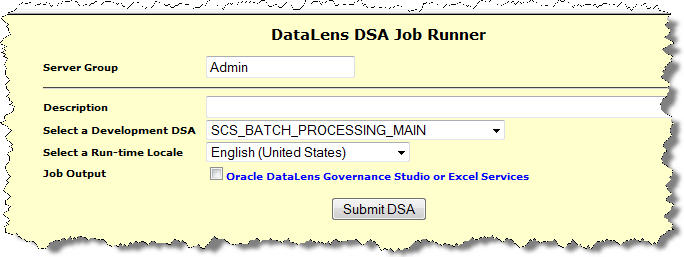
This allows an administrator to run a DSA job directly from the Administration Web pages. You must have the Web - Administer Job Scheduler permissions to access these menus.
Following is an example of running a job using the Run a Job main menu item.

Description of the illustration image058.jpg
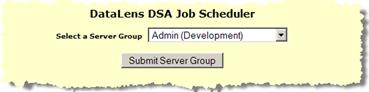
Select the Oracle DataLens Server Group that you want to process your DSA job.
Click the Submit Server Group button.
Description of the illustration image059.jpg
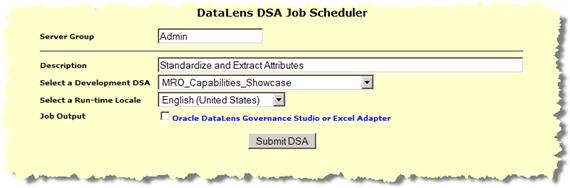
Enter a description for your job.
Select the Data Service Application (DSA) from the drop-down list.
Select the Run-Time Locale from the other drop-down list.
Select the Job Output check box if you want the results returned to the Governance Studio or Services for Excel.
Click the Submit DSA button.
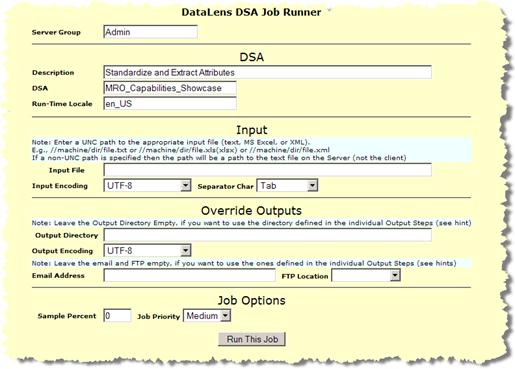
Description of the illustration image060.jpg
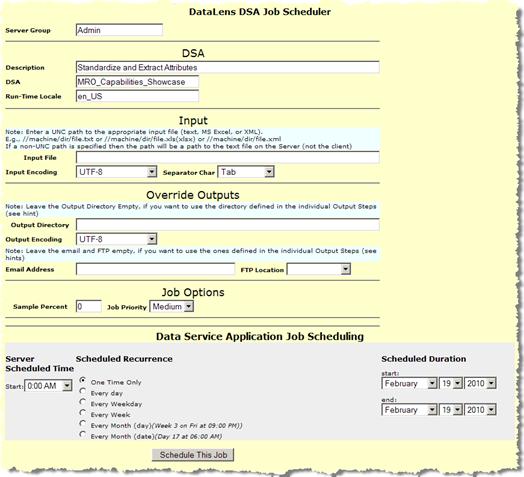
Change the Separator character from the Tab character if needed
Change the Output encoding if needed.
Enter the Output Directory
Input File - Add the Full UNC pathname to a file on your network. Make sure that the directory with the file is shared and available on the network. A non-UNC pathname will write to a directory on the Admin Server.
Input File Encoding - Choose the input file encoding used.
Note:
UTF-8 also includes ASCII so most text files will work with this encodingSeparator Char - Select the type of field separator used in the input text file.
Output Directory - Add the full UNC pathname to a directory on your network to hold the output file. Make sure that this directory is shared and available on the network. A non-UNC pathname will write to a directory on the Admin Server.
Output File Encoding - Select the file encoding for the output file.
Email Address - Optionally add an email address to send the results to.
FTP Location - Optionally add a FTP location to send the results to.
Sample Percent - Enter a value for the percentage of the input file to sample, rather than using the entire file. The default of 0 will process the entire input file.
If you have a huge file but only want to run a small test, change the sample percent to 1. This will randomly sample your input file, only sending 1% of the contents of the file to the server for processing.
Job Priority - Change the job priority if needed. Large jobs should be sent with a priority of Low and small jobs where you want the results immediately should be sent with a priority of high. If there are not multiple simultaneous jobs running on the server, then this will not matter.
Click the Run This Job button.
This will run the job and take you to the Data Service Application Job Status page that job statistics for the currently running job. For more information, see Job Status.
The finished job will output the results into the output directory and give the results a name as follows:
JobId-ProcessMapName-StepName.txt
For Example, a job was output to the C:\tmp directory with a file called 6-samplePMapIDef-output.txt.
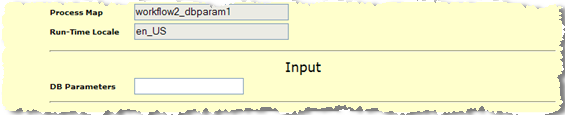
If your job is a database job, then the input file screen will be replaced with a database parameter screen as shown below.
Description of the illustration image061.png
Enter a "|" separated list of database parameters.
This allows an administrator to run a DSA job directly from the Administration Web pages. You must have the Web - Administer Job Scheduler permissions to access these menus.
Click the Schedule a Job link to set a job to execute.
Description of the illustration image062.jpg
Select the Oracle DataLens Server Group that you want to process your DSA job.
Click the Submit Server Group button.
Description of the illustration image063.jpg
Enter a description for your job.
Select the Data Service Application from the drop-down list.
Select the Run-Time Locale from the other drop-down list.
Select the Job Output check box if you want the results returned to the Governance Studio.
Click the Submit DSA button.
Description of the illustration image064.jpg
Provide the requested information, which is the same as previously described in "Run a Job".
Scheduled Time - Select the time of day for the job to be run.
Scheduled Recurrence - Select the time period to run this job.
One Time Only - The job is only run a single time.
Every Day - The job is run every day at the scheduled time
Every Weekday - The job is run every weekday (no weekends), starting with the initial run day.
Every Week - The job is run once per week on the day that the initial job is run.
Every Month (day) - The job is run on the particular day every month (2nd Wednesday for example).
Every Month (date) - The job is run on a particular day every month (the 23rd for example).
Scheduled Duration (Start) - The specific day, month and year that the job is to start.
Scheduled Duration (End) - The specific day, month and year that the job is to end. Leave blank if the job scheduling has no termination date.
Data Options - These are the same as were documented for running a job immediately.
Click the Schedule This Job button to schedule the job.
This schedules the job and advances you to the Scheduled Job Administration page that lists the jobs that are currently scheduled.
Description of the illustration image065.jpg
The job scheduler will run the jobs on a particular Oracle DataLens Server Group. The actual server that is selected in the server group is randomly selected by the Admin server as part of the round-robin server selection process.
All the servers in the group are potential candidates to be the server that is selected to run the DSA This means that it is important that all the servers in the group be setup to Load Data Service Applications. This is done with the Administration Web pages in the Platform Topology pages.
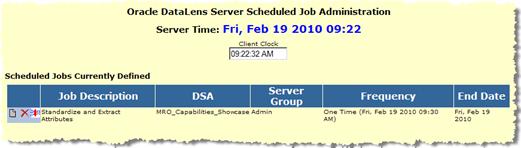
Click the Edit Scheduled Jobs link to modify a job that is scheduled to run.
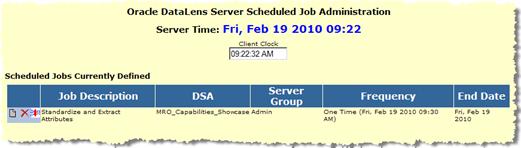
Description of the illustration image066.jpg
Select the Delete Scheduled Job icon to delete a scheduled job. A confirmation query is displayed so that you can ensure that you want to delete the selected job.
Select the View Settings and Edit Job icon to change the parameters for a scheduled job.
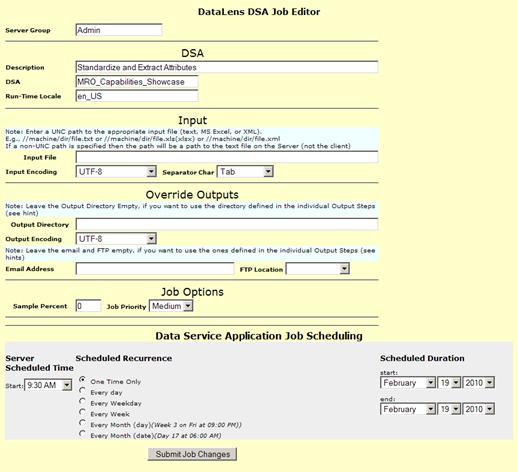
Description of the illustration image069.jpg
All the parameters for your scheduled job can be changed, as previously described in this section, with the exception of the following:
Server Group
DSA
Run-Time Locale
If you need to change the preceding parameters, you should create and schedule a new job.
Most of the troubleshooting information comes from log files. Look at the Log information from the Oracle DataLens Administration Web pages home page. Usually the information is needed, will be in this log. If there is a problem bringing up the server, so that this log cannot be accessed from the Web pages. For more information, see Appendix B, "Logging."
If you are running a Tomcat Application Server and non-English characters are not being displayed correctly, it is likely that the URI Encoding is incorrectly set in the C:\Oracle\Middleware\opdq\tomcat\conf\server\server.xml file. Edit this file and ensure that the URIEncoding flag is set to UTF-8 as in the following example:
<Connector port="2229" protocol="HTTP/1.1"
   minSpareThreads="25" connectionTimeout="20000" URIEncoding="UTF-8"/>
The following sections provide solutions to issues found on Windows platforms.
If memory allocation problems are experienced on client machines, an additional environment variable must be created for use by the EDQP Java Web Start client.
To add the necessary system environment variable and invoke it:
Right-click Computer, and then select Properties.
Click Advanced system settings.
Click Environment Variables.
From the System variables section, click New.
Enter JAVAWS_VM_ARGS as the Variable name.
Enter the Variable value to set the memory allocation values for the client using the following syntax:
-Xms256m -Xmx2048m
Where 256 is the minimum and 2048 is the maximum.
Set these minimum and maximum memory values as appropriate for your client system.
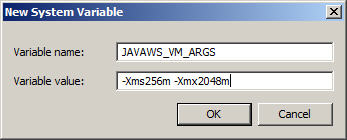
Click OK to close all dialogs.
Invoke the increased memory allocation for the EDQP client applications, by initiating a connection and downloading the client software by browsing to:
http://server:2229/datalens/datalens.jnlp
Where server is the hostname of the Oracle DataLens Server.
Note:
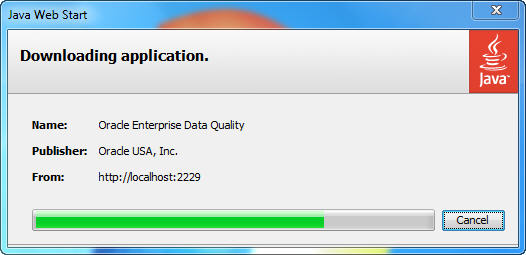
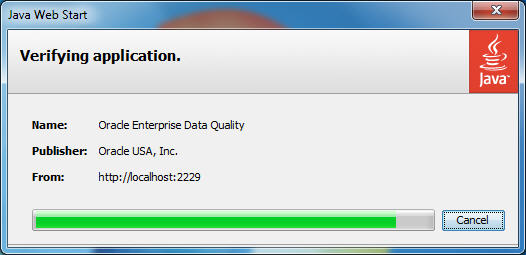
If you have setup a different port number for your application server other than 2229, you must use that port number in the following URL when browsing to the Oracle DataLens Server to download the client applications.The application download and verification begins.
Note:
If you receive a File Download message indicating that the.jnlp file is not associated with a program, you do not have the supported JRE installed. Click Cancel, install the supported JRE, and then return to Step 8.After the verification completes, the installation begins. Enterprise DQ for Product files are digitally signed by a trusted source so the following security warning is displayed:
Two ports on the Admin server need to be accessible from the Oracle DataLens Servers. These are
2229 - The IANA assigned port for the Oracle DataLens Server.
1527 - The port that is needed to connect to the data lens configuration information.
The following are the steps needed (on Windows) to open up these ports on the firewall if needed.
From the Windows control panel, start the Windows Firewall.
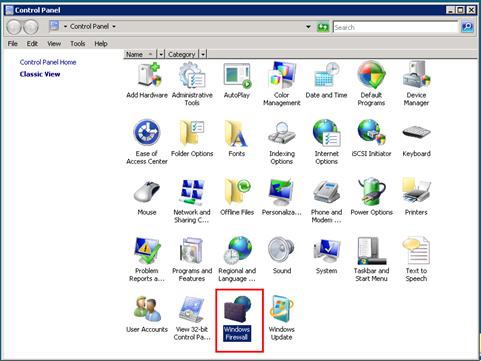
Description of the illustration image070.jpg
Select the Allow a program through the Windows Firewall link.
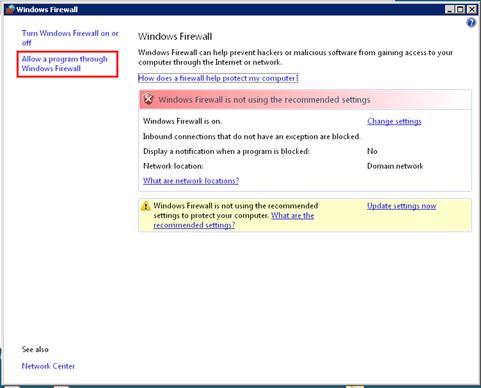
Description of the illustration image071.jpg
Select the Add port… button.
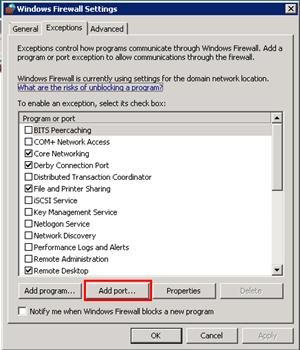
Description of the illustration image072.jpg
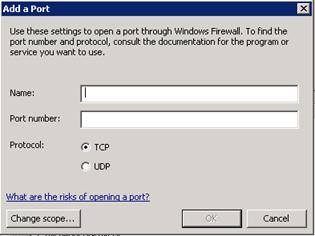
Enter PDQCMS Configuration Port in the Name: field and 1527 in the Port number: field.

Description of the illustration image073.jpg
Select the Add port… button again.
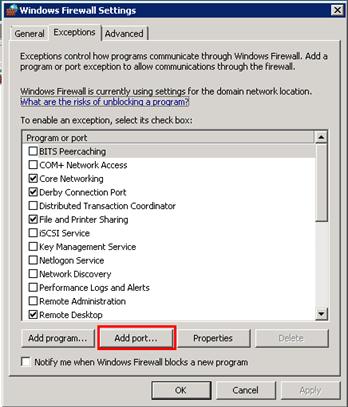
Description of the illustration image074.jpg
Enter PDQCMS in the Name: field and 2229 in the Port number: field.
Description of the illustration image075.jpg
Select OK and the Oracle DataLens Servers will be able to communicate with the Administration Server.
|
Copyright © 2001, 2011, Oracle and/or its affiliates. All rights reserved. Legal Notices |
|