| Oracle® Argus Dossier User's Guide Release 6.0.1 E15945-02 |
|
|
PDF · Mobi · ePub |
| Oracle® Argus Dossier User's Guide Release 6.0.1 E15945-02 |
|
|
PDF · Mobi · ePub |
Dossier is a tool that works within the Argus Safety application and enables you to generate period reports. This chapter includes discussions of the following:
The complete Dossier report process has several steps:
The task of configuring Dossier is performed by the administrator. It is the first step in the Dossier report process and is initiated as soon as the administrator determines there is a need for a specific report. Normally, this will be as soon as a product is approved for market. Dossier configuration includes the following:
The administrator enters product details using the existing application. This includes entering the following:
Product Family
Product Name
Product Formulations
Product Licensing Information
The administrator configures the reports by entering the following:
Report Name
Product Name
Inclusion Criteria
Line Listings,
Summary Tabulations
User-defined Summaries
Datasheet Information
Report Scheduling Information
The administrator configures the report templates as follows:
Writes the template scripts defining the report content
Determines whether the report template contains one or more sections
Uses authoring tools to verify the content of the template
Assigns each section of the template to one or more groups for the authoring cycle
Assigns the template to one or more groups for the review cycle.
Assigns groups as the template owner (who can perform any action and can publish the report)
After the report templates are configured, the system does the following:
Sends an e-mail message to the assigned authors and reviewers on the date the report is to be generated (scheduled date and time)
Generates the periodic report and creates an entry on the Reports -> Period Reports section of the Argus application
Places an entry on the Worklist -> Reports section of the Argus application for the assigned users (in any role)
Notifies the administrator and users that the periodic report has been generated and is ready for review.
Once a report has been generated and the users notified of its existence, the assigned authors and reviewers perform their associated tasks. You can check out documents and edit them manually using the Microsoft Word application on your local desktop. Once the document has been edited, you can check the document in and mark it Ready for Review.
The task of the reviewers is to verify that the report content is correct and complete. Once a report is complete, the reviewer submits it for approval and final build.
Once all the sections of a report are approved and complete, you can generate a merged PDF for the final report. Once the PDF is created, users can view it.
This section provides information about logging in and out of Argus Safety.
Before logging in to Argus Safety, verify that the Argus Safety Administrator has created an account for you and that you have the correct system username and password.
Open Microsoft Internet Explorer and enter the Uniform Resource Locator (URL) for Argus Safety Web in the Address field.
When the Argus Safety Login dialog box opens:
Enter your username in the Username field.
Enter your password in the Password field.
Select the appropriate database from the Database drop-down list.
Click Login.

The system opens the Argus Personal Status Page.

This section provides information about the following:
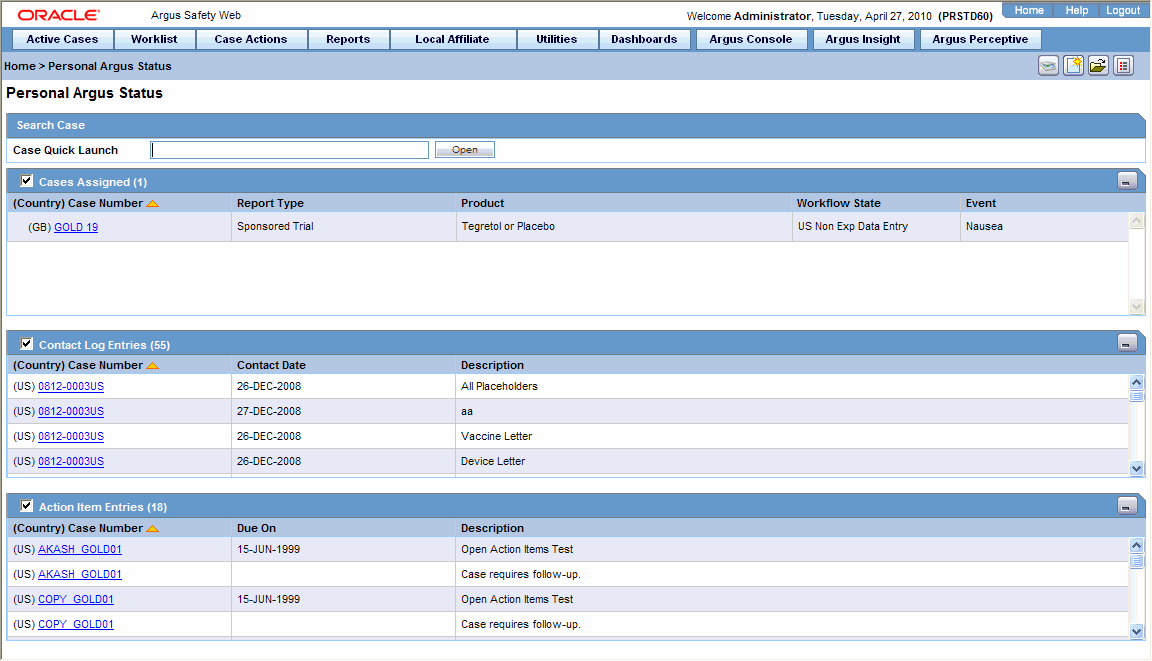
If configured to do so, the Argus Personal Status page displays a list of user-specific assigned cases, contact log entries, and action items. This page may also be referred to as the Home page. In most cases, it will be the first page you see each day when you log on to Argus. It includes the following sections.
Search Case - This section enables you to search for cases.
Cases Assigned - This section contains a list of assigned cases
Cases Log Entries
Action Item Entries
If you move away from the Home page and need to return to it, click the tab at the top of the page.
You can search for a case in either of two ways:
Type the case number in the Quick Launch field on the Argus Personal Status page
Locate and select a case from the list of cases that displays on the screen.
To search for a specific case from the Home page:
Type the case number in the Case Quick Launch field and click Open.
The system opens the Case Form for the case you selected.

To locate a specific case in a list of cases:
Open the Argus Personal Status page.

Locate the appropriate case in the case lists and click the name link.
When using the Argus Personal Status page, note the following:
Each section and header column is sorted in ascending order by Case Number.
If the check box for a section is not selected, the system disables the section and places it at the bottom of the screen. Click the check box to enable the section and return it to its default position.
The system opens the selected case.
This section provides information about fields and controls used throughout Dossier.
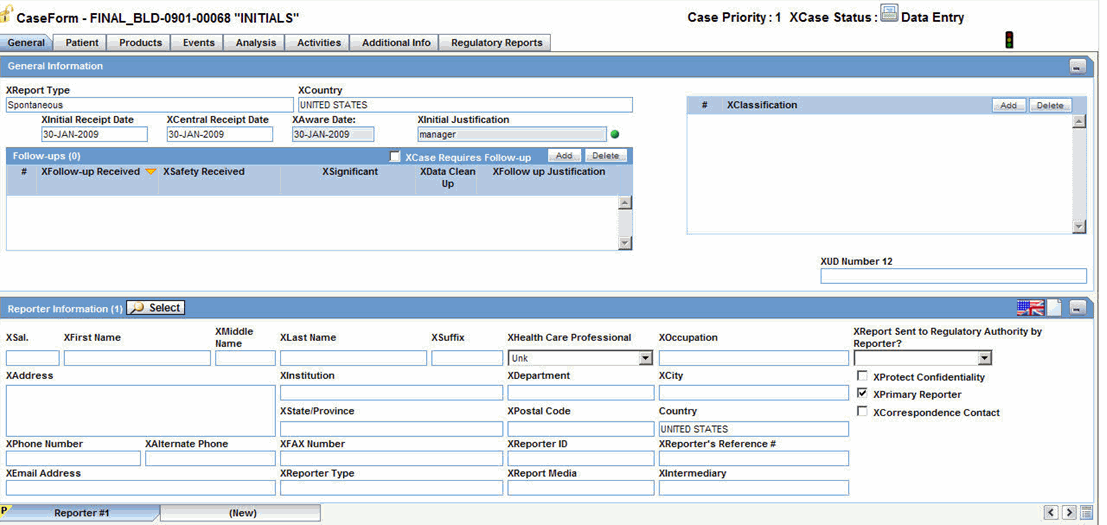
Throughout the Argus application, required fields are identified by a red flag and have an orange border. You must enter values in such fields.
The following is an illustration of a required field.

The following tables lists and describes common controls used throughout the Argus application.
| Button | Function |
|---|---|
| Save | Click Save to save changes associated with a section |
| Cancel | Click Cancel to abort changes associated with a section. |
| Click Print to print information associated with a sub-section. | |
| Add | Click Add to add an item in a section. |
| Delete | Click Delete to remove an item from a section. |
| Copy | Click Copy to create a new editable copy of an item in a section. |
| OK | Click OK to confirm an action associated with a section. |
| Yes | Click Yes to confirm an action associated with a section. |
| No | Click No to cancel an action associated with a section. |
| Help | Click Help to open the online documentation. |
The Quick Launch Toolbar is on the top right side of the page and enables you to navigate through the application more quickly by clicking icons associated with certain actions rather than selecting from a drop-down list. The following is an illustration of the Quick Launch Toolbar.
The items that appear on the Quick Launch Toolbar depend on your location in the Argus application. When you place the cursor over the icon, the system displays a tool tip that describes the function of the icon. The following table lists and describes the function of each of the icons.

| Icon | Tool Tip | Description | Shortcut Key |
|---|---|---|---|
| New Case from Image | Displays a new case from an image. | CTRL+ALT+G | |
| Open Case | Displays the Case Search dialog which is similar to performing Case Actions - Open Case. | CTRL+ALT+O | |
| New Case | Displays the Initial Case Entry dialog. This is similar to performing Case Actions - New Case. | CTRL+ALT+N | |
| Close Case | Performs the same functionality as the Case Actions - Close Case option. | CTRL+ALT+C | |
| Print Case | Displays the Case Print dialog which is similar to performing Case Actions - Print Case option. | CTRL+ALT+P | |
| Save Case | Displays the Case Routing dialog, which is similar to performing Forward Routing from the Case Activities - Routing Comments section. | CTRL+ALT+S | |
| Forward Case | Displays the Case Routing dialog which is similar to performing Forward Routing from the Case Activities - Routing Comments section. | CTRL+ALT+> | |
| Return Case | Displays the Case Routing dialog which is similar to performing Return Routing from the Case Activities - Routing Comments section. | CTRL+ALT+< | |
| Lock Case | Displays the Case Lock or Case Unlock dialog. This is similar to performing Locking or Unlocking Cases in the Activities Tab. | CTRL+ALT+L | |
| Medical Review | Displays the Medical Review dialog which is similar to performing Case Actions - Medical Review option. | CTRL+ALT+M | |
| Worklist | Displays the Worklist dialog which is similar to performing Worklist - XXX option.
Note: XXX is defined within the User Configuration for the default Worklist option. If there is no default Worklist option defined, then Worklist - New is displayed. |
CTRL+ALT+W | |
| Coding Review | Displays the Coding Review dialog which is similar to performing Case Actions - Coding Review option. | CTRL+ALT+Q | |
| Draft Report | Displays the Report List of All the Expedited Reports which is similar to performing a View Draft Report action. | CTRL+ALT+R | |
| E2B Check | Performs the function that prints the E2B Report - DTD Length Check Warnings and E2B report - DTD Validation. | CTRL+ALT+E | |
| Validation Check | Performs a validation check. | CTRL+ALT+V |