JavaScript is required to for searching.
Skip Navigation Links
Exit Print View
Sun Server X2-4 (formerly Sun Fire X4470 M2)

Installation Guide for Windows Operating System

search filter icon
search icon

Document Information

Using This Documentation

Part I  Windows Server Installations

1.  Assisted OS Installation With Oracle Hardware Installation Assistant

Oracle Hardware Installation Assistant Task Overview

How to Obtain Oracle Hardware Installation Assistant

Oracle Hardware Installation Assistant Documentation Resources

2.  Getting Started

Supported Windows Server Operating Systems

Windows Installation Prerequisites

Windows Server Installation Task Overview

SAS PCIe HBAs Requiring LSI Mass Storage Driver for Windows Server 2008 SP2

3.  Installing Windows Server 2008

Before You Begin

Installing Windows Server Using Local or Remote Media

Install Windows Server 2008 (SP2 or R2) Using Local or Remote Media

Windows Server Installation Using a PXE Network Boot

Before You Begin

Install Windows Server 2008 (SP2 or R2) Using PXE Network Boot

4.  Post Installation of Windows Server 2008

Before You Begin

Installing Critical Device Drivers and Supplemental Software

Installing Supplemental Software

Configuring Support for TPM

Configuring Intel NIC Teaming

5.  Getting Server Firmware and Software

Firmware and Software Updates

Firmware and Software Access Options

Available Software Release Packages

Accessing Firmware and Software

Installing Updates

Part II  Windows Server System Administrator References

A.  Supported Installation Methods

Console Outputs

Installation Boot Media

Installation Targets

B.  Supported Operating Systems

Supported Operating Systems

C.  BIOS Defaults for New Installations

Verification of BIOS Factory Defaults

D.  Incorporating Device Drivers Into Windows Server 2008 WIM Images for Windows Deployment Services

Getting Started

Procedures for Incorporating Drivers Into WIM Image(s)

Index

Installing Windows Server Using Local or Remote Media

The procedure in this section describes how to boot the Windows Server 2008 (SP2 or R2) operating system from local or remote media. It assumes that you are booting the Windows installation media from one of the following sources:

Install Windows Server 2008 (SP2 or R2) Using Local or Remote Media

  1. Ensure that the installation media is available to boot.
    • For Distribution CD/DVD. Insert the Windows 2008 Distribution media (CD labeled number 1 or the single DVD) into the local or remote USB CD/DVD-ROM drive.
    • For ISO image. Ensure that the ISO images are available and that the Oracle ILOM Remote Console application is aware of the first ISO image location.

      For additional information about how to set up the installation media, see Table A-2.

  2. Reset or power on the server.

    Note - The following steps use Oracle ILOM 3.1 command syntax. If you are using Oracle ILOM 3.0, refer to the Oracle ILOM 3.0 Documentation Collection at http://www.oracle.com/pls/topic/lookup?ctx=ilom30.


    For example:

    • From the Oracle ILOM web interface, select Host Management > Power Control in the navigation tree. Then, select Power Cycle from the Select Action list box and click Save.
    • From the local server, press the Power button (approximately 1 second) on the front panel of the server to power off the server, then press the Power button again to power on the server.
    • From the Oracle ILOM CLI, type: reset /System

    The BIOS screen appears.


    Note - The next events occur very quickly; therefore, focused attention is needed for the following steps. Watch carefully for these messages as they appear on the screen for a brief time. You might want to enlarge the size of your screen to eliminate scroll bars.


  3. In the BIOS power-on self-test screen, press F8 to specify a temporary boot device for the Windows installation.

    The Please Select Boot Device menu appears.


    Note - The dialog that appears in your installation might differ depending on the type of disk controller installed in your server.
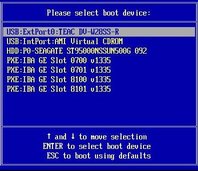


    image:Select Boot Device dialog
  4. In the Please Select Boot Device menu, select the menu option according to the Windows media installation method you elected to use, then press Enter.

    For example:

    • If you elected to use the Windows local delivery method, select TEAC as the physical DVD device (or select CD/DVD if this option is shown in boot device dialog).
    • If you elected to use the Oracle ILOM Remote Console delivery method, select Virtual CDROM.
  5. When prompted with Press any key to boot from CD, press any key.

    The Windows installation wizard starts.

    Continue the Windows installation wizard until the Installation Type dialog appears.
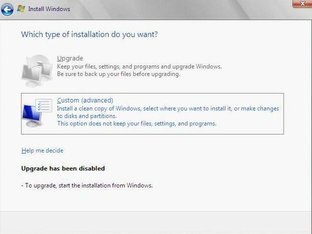

    image:Installation Type screen
  6. In the Installation Type dialog, click Custom (advanced).

    The Where Do You Want to Install Windows dialog appears.
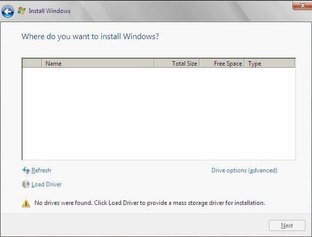

    image:Where to install Windows screen
  7. In the Where Do You Want to Install Windows dialog, perform one of the following tasks in the table below to specify a storage target for the Windows Server operating system edition.
    For Windows Server Edition
    Task
    Windows Server 2008 SP2 (or subsequent Windows 2008 SP release)
    Perform one of the following:
    • If you do not see any storage targets listed and have a Sun Storage SAS PCIe RAID HBA option configured on your server, click Load Driver then proceed to Step 8.

      - or -

    • If you see the storage target where you want to install the operating system but want to change the default partition settings associated with that target, select the target, click Drive Options, then proceed to Step 9.

      - or -

    • If you see the storage target where you want to install the operating system and do not want to change the default partition settings for that target, select the target and click Next, then proceed to Step 10.

    Windows Server 2008 R2 (or subsequent Windows 2008 R2 release)
    Perform one of the following:
    • If you see the storage target where you want to install the operating system but want to change the default partition settings associated with that target, select the target, click Drive Options, then proceed to Step 9.

      - or -

    • If you see the storage target where you want to install the operating system and do not want to change the default partition settings for that target, select the target and click Next, then proceed to Step 10.

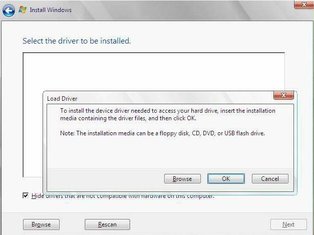
  8. (Load HBA Storage Driver) In the Load Drive dialog, do the following:
    image:Load Driver dialog
    1. Ensure the storage driver(s) are accessible according to the installation method chosen (described in Appendix A, Supported Installation Methods).

      For example:

      • Floppy Disk Local. Storage driver(s) on a floppy disk in floppy drive A on the server.
      • Floppy Disk Remote. Storage driver(s) on a floppy disk in a floppy drive mounted as a device from the Oracle ILOM Remote Console.
      • Floppy Image. Storage driver floppy.img file is mounted as a device from the Oracle ILOM Remote Console.
      • Non-floppy Media. Storage driver(s) are on a local physical storage media (USB flash drive or CD/DVD) or virtual media mounted from the Oracle ILOM Remote Console.
    2. In the Load Driver dialog, click Browse to navigate to the appropriate driver media folder.

      For systems configured wit the SAS PCIe HBA option card SG-SAS6-R-INT-Z, navigate to the following directory to load the appropriate LSI driver: windows/w2k8/drivers/64bit/hba/lsi/megaraid

      For a system configured with either of these SAS PCIe HBA option cards—SG-SAS6-INT-Z or SG-SAS6-EXT-Z, navigate to the following directory to load the appropriate driver: windows/w2k8/drivers/64bit/hba/lsi/mpt2
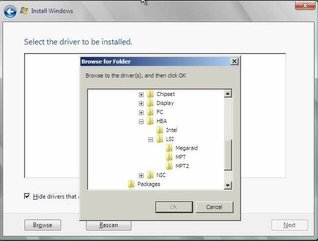

      image: Browse folder dialog for HBA
    3. In the Browse for Folder dialog, select the appropriate driver, then click OK to load the driver.

      The selected driver appears in the Select the Driver to Be Installed dialog. Example dialogs follow showing a selected mass storage driver for a SAS PCIe HBA.
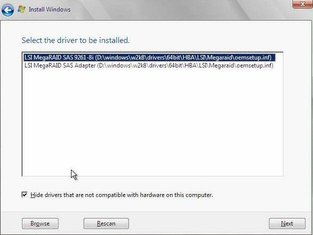
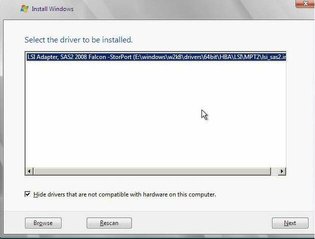
      image:HBA option selection of LSI MegaRAID SAS 9261-8i driver to be installed dialog
      image:HBA option selection of LSI Adapter, SAS2 2008 Falcon-Star Port driver to be installed dialog.
    4. In the Select the Driver to Be Installed dialog, click Next to install the driver.

      The Where Do You Want to Install Windows dialog appears.
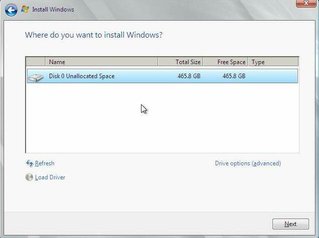

      image:Drive Target Selected
    5. In the Where Do You Want to Install Windows dialog, do one of following:
      • Select the storage target listed and click Next to install the operating system, then proceed to Step 10.

        - or -

      • Select the storage target listed and click Drive Options (Advanced) to view and change the default partition settings, then proceed to Step 9.

        The partition settings for the selected target appear at the bottom of the Where Do You Want to Install Windows dialog.
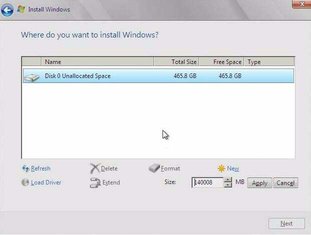
  9. (Partition Drive, advanced) In the lower portion of the Where Do You Want to Install Windows dialog, do the following:
    image:Partition Drive Options
    1. Click Delete to delete the selected storage target existing partition configuration.

      A confirmation window appears.

    2. Click OK to confirm the partition deletion.
    3. Click New to create a new partition on the selected storage target.
    4. In the Size scroll box, increase or decrease the partition size as needed, then click Apply.

      The partition is created.

    5. Click Next to install the operating system to the selected storage target.
  10. The Windows installation program begins and will reboot the server multiple times during the installation process.
  11. When the Windows installation is complete, Windows starts and prompts you to change the user password.
  12. In the user password dialog, click OK and set up the initial user login account.

    Note - Windows Server 2008 enforces stronger password schemes for user accounts. Password standards include restrictions on length, complexity, and history. For more details, click the Accessibility link at the account creation page.


    After the initial user account is created, the Windows Server 2008 desktop appears.

  13. Proceed to Chapter 4, Post Installation of Windows Server 2008 to perform the post installation tasks.