| Skip Navigation Links | |
| Exit Print View | |

|
Sun Server X2-8 (formerly Sun Fire X4800 M2) Service Manual Sun Server X2-8 (formerly Sun Fire X4800 M2) Documentation Library |
| Skip Navigation Links | |
| Exit Print View | |

|
Sun Server X2-8 (formerly Sun Fire X4800 M2) Service Manual Sun Server X2-8 (formerly Sun Fire X4800 M2) Documentation Library |
Sun Server X2-8 Service Manual Overview
Controlling Server Power Remotely
Removing and Installing Components
Preparing for Service and Operation
Removal and Installation Procedures
Removing and Installing a Power Supply (CRU)
Removing and Installing a Hard Drive (CRU)
Removing and Installing a Hard Drive Filler
How to Remove a Hard Drive Filler
Replacing the Hard Drive Backplane (FRU)
Adding, Removing, and Installing a CMOD (CRU)
CPU Module (CMOD) Designation and Population Rules
Removing and Installing a CMOD Filler
How to Replace the CMOD Battery (CRU)
Removing and Installing DIMMs (CRU)
Removing and Installing a RAID Expansion Module (CRU)
Removing and Installing a Fabric Expansion Module (CRU)
Replacing a CPU and Heatsink Assembly (FRU)
Removing and Installing a Fan Module (CRU)
Replacing a Fan Module Controller Board (FRU)
Removing and Installing a NEM or a NEM Filler (CRU)
Removing and Installing a PCIe EM (CRU)
Removing and Installing the Service Processor Module (CRU)
Removing and Installing the Multiport Cable
Removing and Installing the Subassembly Module (FRU)
Sun Server X2-8 Service Procedures and Information
Firmware Information and Procedures
How to Access the BIOS Setup Utility
Component LED Locations and Functions
Sun Server X2-8 Specifications
How to Request Physical Media Online
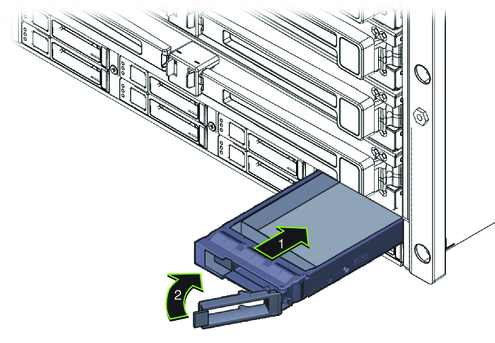
Use this procedure to install a hard drive (HD) filler.
 | Caution - Airflow and temperature control–related issues. Do not leave a hard drive slot unoccupied. Hard drive slots must contain either a drive or an HD filler. |
The HD filler is designed specifically to occupy empty drive slots for the purpose of maintaining server cooling. It does not contain electronics, and is not a hard drive carrier.
An animation of the procedure to install a hard drive filler is available. See animation showing hard drive installation.
 | Caution - Possible component damage. The handle does not extend to a 90–degree angle. Do not extend the handle beyond its limitation. |
