JavaScript is required to for searching.
Skip Navigation Links
Exit Print View
Developing Oracle Java CAPS Projects     Java CAPS Documentation
search filter icon
search icon

Document Information

Developing Java CAPS Projects

Connecting to a Repository

To Connect to a Repository

Creating a Repository-Based Project

To Create a Top-level Repository-Based Project

Opening a Repository-Based Project

To Open a Top-level Repository-Based Project

Adding and Connecting Project Components

Project Nesting

Using the Connectivity Map Editor

Linking Services and Destinations

To Link Services and Destinations

Adding and Setting Up Schedulers

To Add a Scheduler to the Project

To Configure the Schedule

To Configure the Time Zone

Project Context Menu

Project Component Context Menu

Connectivity Map Editor Toolbar

Project Component Overview

Project Components

External Applications

Services

Message Destinations

Connectors

Definitions

Mapping Entities

Business Processes

Collaborations

Message Destinations

External Applications

Web Service Applications

Web Connectors

WLM Connectors

Collaboration Definitions

Object Type Definitions

Web Service Definitions

XML Schema Definitions

Constants and Variables

Connectivity Maps

Deployment Profiles

Index

Adding and Setting Up Schedulers

Figure 3 Scheduler Icon

image:Image of a Scheduler icon.

A Scheduler allows a service to be performed at a prescribed interval. It is treated as an external application, and must be deployed to a Scheduler External System in the runtime Environment.

As with other Project components, scheduler names can contain alphanumeric characters (letters and numbers), dashes, and underscores. The following special characters also can be used in scheduler names: <, >, &.

Note that:

To Add a Scheduler to the Project

  1. If this is the first scheduler to be added to the Project, select the Scheduler icon from the External Application menu in the Connectivity Map Editor. This adds the icon to the editor's toolbar.
  2. Drag the Scheduler icon from the toolbar onto the canvas and link it to the appropriate service. The connector icon appears as a red dot, indicating that it is not configured.
  3. Configure the schedule and the time zone as described in the following procedures.
  4. Click the Generate Connectivity Map icon to add the scheduler to the Project in the Repository.

To Configure the Schedule

  1. Select the appropriate schedule type, either from the Projects window or by accessing the Properties dialog. Selecting the type displays the properties for that type. For example, Weekly on day displays entry fields for the day of the week and the time.
  2. Click in the value field to edit the value (a drop-down menu may be displayed).

    Figure 4 Scheduler Properties Dialog: Schedule
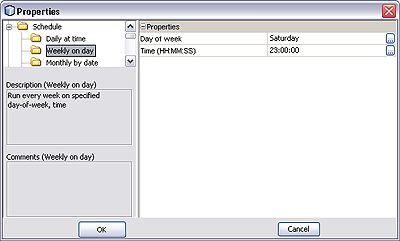
    image:Screen capture of Scheduler Properties dialog. Details described in content.

To Configure the Time Zone

  1. Select Time Zone to display the Time Zone entry field.
  2. Click in the value field to display the menu, and select the time zone with which you want the Scheduler to be synchronized.

    Figure 5 Scheduler Properties Dialog: Time Zone

    image:Screen capture of Scheduler Properties dialog. Details described in content.