| Skip Navigation Links | |
| Exit Print View | |

|
Oracle Java CAPS Adapter for DB2 Tutorials Java CAPS Documentation |
| Skip Navigation Links | |
| Exit Print View | |

|
Oracle Java CAPS Adapter for DB2 Tutorials Java CAPS Documentation |
Oracle Java CAPS Adapter for DB2 Tutorials
About the Oracle Java CAPS Adapter for DB2 Sample Projects
Sample Input Trigger Files and Output Files
Operations Used in the DB2 Sample Projects
About the Oracle Java CAPS Business Process Manager Project
Associating Business Process Manager Operators
Deploying JCD-Based Operations in the Business Process Manager
About the Java Collaboration Definition Sample Project
Importing Non-JBI Based Sample Projects
To Import a Non-JBI Based Sample Project
Creating the Java Collaboration Definition-Based Project for the Oracle Java CAPS Adapter for DB2
Create the Inbound and Outbound DTD OTDs
Creating the Collaboration Definitions (Java)
Create the Java Collaborations
Using the Java Collaboration Editor to create Business Rules
Creating the Business Rules for the jcdDelete Collaboration
Create the jcdDelete Collaboration Business Rules
jcdDelete Collaboration Java Code
Creating the Business Rules for the jcdInsert Collaboration
Create the jcdInsert Collaboration Business Rules
jcdInsert Collaboration Java Code
Creating the Business Rules for the jcdPsSelect Collaboration
Using the Collaboration Editor's Java Source Editor
Create the jcdPsSelect Collaboration Business Rules
Creating the Business Rules for the jcdTableSelect Collaboration
Create the jcdTableSelect Collaboration Business Rules
jcdTableSelect Collaboration Java Code
Creating the Business Rules for the jcdUpdate Collaboration
Create the jcdUpdate Collaboration Business Rules
jcdUpdate Collaboration Java Code
Creating the Connectivity Maps
Adding Connectivity Maps to a Project
Add the Connectivity Maps to the Project
Populating and Binding the Connectivity Maps using the Connectivity Map Generator
Populate the Connectivity Maps using the Connectivity Map Generator.
Configuring the Adapter Properties
Configuring the Connectivity Map Properties
Configure the Connectivity Map Properties
File1 Inbound Adapter Properties
File2 Outbound Adapter Properties
DB21 Outbound Adapter Properties
Configuring the Environment Properties
Configure the Environment Properties
File Adapter Environment Properties
DB2 Adapter Environment Properties
Creating the Deployment Profile
Building and Deploying the Project
Deploying the Project from NetBeans
Creating the BPEL-Based Project for the Oracle Java CAPS Adapter for DB2
Creating the Business Processes
Create the bpDelete Business Process
Create the bpInsert Business Process
Create the bpPsSelect Business Process
Create the bpTableSelect Business Process
Create the bpUpdate Business Process
Using Business Process Designer to Create Business Rules
Creating the bpDelete Business Rules
Create the bpDelete Business Rules
Creating the bpInsert Business Rules
Create the bpInsert Business Rules
Creating the bpPsSelect Business Rules
Create the bpPsSelect Business Rules
Creating the bpTableSelect Business Rules
Create the bpTableSelect Business Rules
Connectivity Maps provide the canvas for assembling and configuring a Project's components. The Oracle Java CAPS Adapter for DB2 Projects use five Connectivity Maps, one for each Collaboration.
Creating a Connectivity Map involves three processes:
Adding Connectivity Maps to a Project
Populating the Connectivity map with the required components
Binding the Connectivity Map Collaboration or BPEL Process to the External Applications
The Connectivity Map Designer includes a Connectivity Map Generator. The Connectivity Map Generator can read the Collaboration Definition or Business Process, and can automatically populate the Connectivity map with the necessary components, and bind the components. We will use the Connectivity Map Generator for this sample project.
This section contains the following topics:
The DB2 Project uses five Connectivity Maps.
The new Connectivity Map appears and adds a node on the Project tree labeled CMap1.
cmInsert
cmPsSelect
cmTableSelect
cmUpdate
In a Connectivity Map, Adapters are associated with External Applications. For example, to establish a connection to an external DB2 server, you must first select the DB2External Application to use in the Connectivity Map. Along with the External Applications, Connectivity Maps also contain Services, Queues, Topics, Web Service External Applications, and so forth. Once the Connectivity Map contains the Collaboration or Business Process and the other components, you can bind the components to create the appropriate connections.
This process can be done manually by dragging the necessary components to the Connectivity Map canvas and binding the components, or you can use the Connectivity Map Generator. The connectivity Map Generator uses the information contained in the Java Collaboration Definition or Business Process, and assembles the Connectivity Map automatically.
Note - The following steps walk you through populating the Connectivity Maps for the prjDB2_JCD Project. These steps are the same for the prjDB2_BPEL Project. Simply substitute the appropriate Business Processes with the corresponding Java Collaborations, such as bpDelete for jcdDelete.
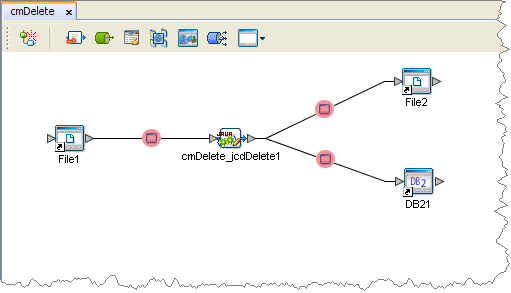
The Connectivity Map Generator assembles the Connectivity Map.

In the Connectivity Map, the nodes in the connections between the Collaboration and the External Applications represent the application adapters. The adapters are highlighted in red in the new Connectivity Map to indicate that the Connectivity Map properties have not been set.
Generate the cmInsert using the jcdInsert Collaboration
Generate the cmPsSelect using the jcdPsSelect Collaboration
Generate the cmTableSelect using the jcdTableSelect Collaboration
Generate the cmUpdate using the jcdUpdate Collaboration
Next Steps
For your next step, see Creating an Environment.