15 Creating Summary Folders Manually
This chapter explains how you create summary folders manually by using Discoverer Administrator (instead of by using Automated Summary Management), and contains the following topics:
-
"What are the prerequisites for creating summary folders manually in Discoverer?"
-
"How to create summary folders based on external summary tables"
-
"How to edit database storage properties of summary combinations for a summary folder"
-
"How to view the status of the summary tables/materialized views for a summary folder"
15.1 What is manual summary folder creation?
Manual summary folder creation is the process of creating summary folders yourself, instead of using Discoverer's Automated Summary Management (ASM) functionality (for more information, see Chapter 14, "Managing Summary Folders"). It is recommended that you use ASM to create summary folders. However, you might choose to create summary folders yourself, if you want to:
-
manually select the combination of EUL items (for example, when you know the items to use in the summary folder)
-
use query performance statistics to choose from a selection of summary folder suggestions (based on queries that have been run)
-
use a summary table or view created or maintained by an external application (for example, an external summary table)
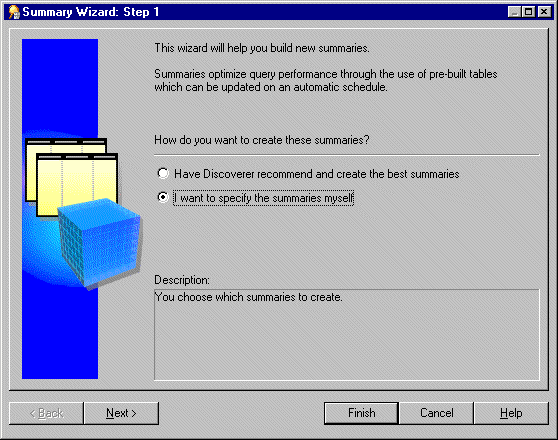
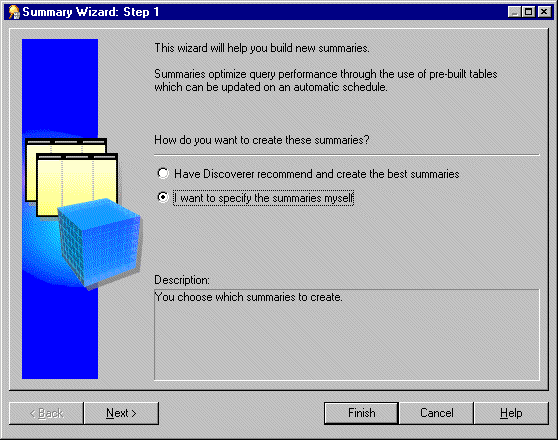
You choose whether to create summary folders using ASM or manually in the first step of the Summary Wizard. To create summary folders manually you select the option I want to specify the summaries myself and complete one of the following tasks:
For information about summary folders and how Discoverer creates and maintains them automatically see Chapter 14, "Managing Summary Folders".
15.2 What are the prerequisites for creating summary folders manually in Discoverer?
To create summary folders, the following requirements must be met:
-
The database must support PL/SQL.
-
The DBMS_JOB package must be installed for scheduling summary folder creation and refresh. For more information see "How to confirm that DBMS_JOB is installed for summary management".
-
The User ID that you intend to use to create the summary folders must have the following database privileges:
-
CREATE TABLE
-
CREATE VIEW
-
CREATE PROCEDURE
-
SELECT ON V_$PARAMETER
-
CREATE/DROP/ALTER ANY MATERIALIZED VIEW (Oracle databases Enterprise Edition release 9.2.0.7 or later)
-
GLOBAL QUERY REWRITE (Oracle Enterprise Edition databases)
For more information, see "How to use SQL*Plus to grant the privileges required to create summary folders".
-
-
The User ID that you intend to use to create the summary folders must have sufficient quota in their default tablespace. For more information, see "How to determine and reset tablespace quotas".
-
If a database user was created in Discoverer 3.1 against an Oracle Enterprise Edition database, it must have additional privileges granted to enable them to create summary folders (for more information, see "What are the prerequisites for creating summary folders with ASM?").
-
If you want Discoverer to use external summary tables, the EUL owner:
-
must have SELECT WITH GRANT access to the external summary tables
-
must have been granted SELECT WITH GRANT access explicitly (that is, not through a database role)
-
15.3 What are summary combinations?
Summary combinations are groupings of items that make up a summary folder. A summary combination maps directly to a materialized view or summary table in the database. Discoverer creates materialized views or summary tables based on the summary combinations you create. Each summary combination defines a different way of combining two or more items in a summary folder. If a Discoverer Plus user executes a query with a combination of items that closely matches those specified in a particular combination, the query will be run against a summary table or materialized view instead of the detail data, resulting in improved response times.
For example, you might create a summary folder against two folder items, Product Key and Product Type.
You might want the summary folder to be used only when the Product Key and Product Type items are used together.
For this example you would not add any summary combinations but accept the default combination, as follows:
| Combinations | Combination 1 (default) |
|---|---|
| Product Key | selected |
| Product Type | selected |
Alternatively, you might want the summary folder to be used for any of the following combinations:
-
Product Key and Product Type (Combination 1)
-
Product Key (Combination 2)
-
Product Type (Combination 3)
For this example you would add two summary combinations and select the check box next to the items that you want to use as follows:
| Combinations | Combination 1 (default) | Combination 2 | Combination 3 |
|---|---|---|---|
| Product Key | selected | selected | not selected |
| Product Type | selected | not selected | selected |
You can define as many combinations as you need for each summary folder using the Summary Wizard.
Figure 15-1 The relationship between summary combinations, summary folders and summary tables/materialized views

The diagram above illustrates that for every summary combination, Discoverer creates a materialized view or summary table in the database.
If you add multiple summary combinations, Discoverer (where possible) builds the higher level combinations (that is, combinations with a greater number of items) by using the lower level combinations (that is, combinations with fewer items). This improves performance because:
-
the detail tables do not have to be queried so often
-
summary folders are refreshed more quickly
For example, a summary folder might contain two summary combinations:
-
month, region and revenue
-
year, region and revenue.
Discoverer aggregates the data for the revenue by month and region by accessing the detail data directly. Discoverer then uses data aggregated for the first combination to aggregate the data for the second combination, saving both processing and CPU overhead.
Note: Summary combinations are only available when Discoverer manages the refresh of a summary folder.
15.4 What to consider when defining summary combinations?
There are three things to consider when defining summary combinations:
-
how much database space is required to store summary data?
-
how quickly do you want a query to run?
-
how often is a query run?
The key to good summary folder design is to create the most appropriate summary combinations for the pattern of system usage.
Typically you will want queries that are run most often to run the most quickly, even if this requires more database space. Similarly, it is usually desirable for queries that run less frequently to use less database space, even if this means the queries run more slowly.
When creating summary combinations, look for:
-
summary combinations for popular and frequent queries
If you are creating a summary combination for a popular query, include all the items and joins used in the query. Note that such a summary combination might require considerable database space.
-
summary combinations that meet ad hoc, less frequent queries
Summary combinations for a more ad hoc environment (where queries are far less predictable) are typically based on different combinations of keys in the main fact table.
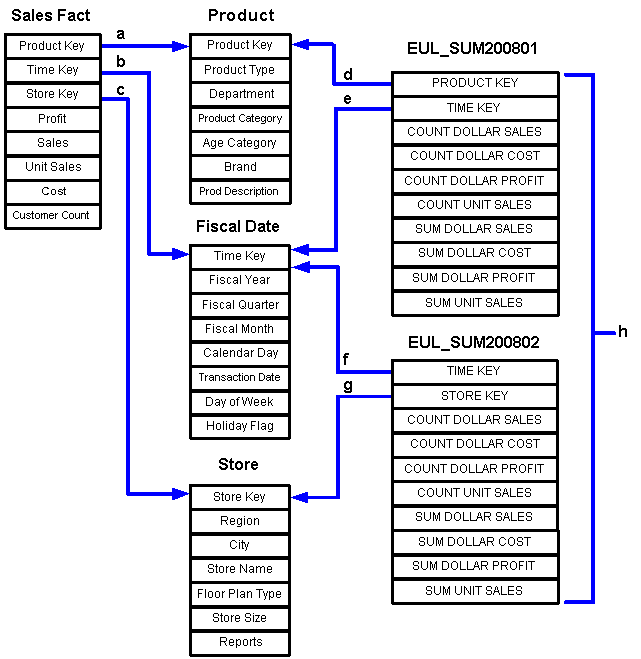
For example, in the summary tables below, the columns EUL_SUM200801 and EUL_SUM200802 are mapped to appropriate items in the Sales Fact folder.
Key to the figure above:
a. join from the Sales Fact table to Product table using the Product Key
b. join from the Sales Fact table to Fiscal Date table using the Time Key
c. join from the Sales Fact table to Store table, using the Store Key
d. join from the summary table EUL_SUM200801 to the Product table using the Product Key
e. join from the summary table EUL_SUM200801 to the Fiscal Date table using the Time Key
f. join from the summary table EUL_SUM200802 to the Fiscal Date table using the Time Key
g. join from the summary table EUL_SUM200802 to the Store table using the Store Key
h. EUL_SUM200801 and EUL_SUM200802 represent summary tables that Discoverer creates in the database
Depending on the query, Discoverer joins a summary table to one or more of the dimension tables (that is, Store, Product, or Fiscal Date). The dimension table must be joined to the fact table by items defined in the EUL, and the summary table must contain the foreign key items in the fact folder.
For example, if a user requests Product Category, Month and SUM(Dollar Profit), Discoverer will join EUL_SUM200801 to Product and Fiscal Date to obtain results. Discoverer knows about the foreign and primary keys between the Sales Fact table and Product and Fiscal Date, and can apply them to EUL_SUM200801.
15.5 Guidelines for setting up summary combinations
We suggest that you build summary combinations in stages. Concentrate first on frequent queries, then on less frequent queries, and finally create a catch all summary combination. Guidelines for setting up summary combinations are as follows:
| Query coverage | Number of items | Notes |
|---|---|---|
| Frequent queries | 3-4 | Create many summary combinations that combine only three or four axis items (dimension values). This minimizes space and maximizes performance gain. |
| Less frequent queries | 5-7 | Create less summary combinations that combine, for example five to seven axis items. More space is required but large performance gains are still realized. The more items you create in a summary combination the wider the variety of queries that is served. |
| A catch all | all | When you choose to specify summaries yourself, create one summary combination that contains all of the items in a summary folder (the total number must be less than the number of items in the source folder(s)). Although the speed of the query results is slower, performance is still better than if the detailed tables are queried. Discoverer Administrator creates this summary combination automatically |
Include the following in summary combinations:
-
data point items
Additional data point items take up little extra room in the summary tables.
-
aggregates (with the possible exception of STDEV and VARIANCE, which are rarely used)
Multiple aggregates do not require much space and can improve performance significantly. Remember that AVG requires the inclusion of SUM and COUNT, which Discoverer uses to calculate the average.
-
You do not have to include items at all levels of a hierarchy in a summary combination. If you include items at the bottom level, queries that use items higher up in the hierarchy can still use the summary table. However, for this to work the summary folder must contain a foreign key to the folder that contains the hierarchy. Creating a summary combination for all levels in a hierarchy achieves only a marginal performance gain. For example, the hierarchy from Year to Quarter only saves a 4:1 aggregation because quarters are added up to years.
15.6 When will an expression use a summary folder?
An expression will use a summary folder except under specific conditions. For this reason it is useful to be able to identify when an expression will use a summary folder. The following examples show when an expression will use a summary folder:
-
if the summary folder contains the item SUM(Salary) and SUM(Comm)
-
if the expression is a COUNT(DISTINCT, X)
| Expression | Use summary table | Notes |
|---|---|---|
| SUM(Salary + Comm) | No | This expression will not use a summary folder even though SUM(Salary) and SUM(Comm) are available as summarized items. This occurs because SUM(Salary + Comm) is not relationally equal to SUM(Salary) + SUM(Comm). Because the results could be wrong, the expression will not be used. |
| SUM(Salary) * 12 | Yes | As SUM(Salary) is calculated it uses the summary folder. |
| NVL(SUM(Comm),0) | Yes | Expressions that use SQL functions such as NVL(SUM(Comm),0) will use a summary because SUM(Comm) is available in a summary. |
| SUM(NVL(Comm,0)) | No | An expression such as SUM(NVL(Comm,0)) will not use a summary, because no direct match exists between a part of the expression and the available summarized item, SUM(Comm). |
| COUNT(DISTINCT, <folder_name.item_name>) | Yes | An expression such as COUNT(DISTINCT, STORE.STORE_NAME), will use a summary folder only if the summary folder contains the item that the COUNT(DISTINCT) expression is based on, rather than the COUNT(DISTINCT) expression itself. For example, if you consider a query that includes:count(distinct Store.Store name), sum(Sales Facts.Sales), count(Sales Facts.Sales)
The summary folder should include: Store.Store name, sum(Sales Facts.Sales), count(Sales Facts.Sales). |
In essence, an expression will only use a summary folder when the expression or parts of it and the summarized expression are relationally equal.
15.7 How to create summary folders based on items in the EUL
Use this option to manually select combinations of EUL items that you want to include in a summary folder.
You might select this option if, for example:
-
you have switched off the Collect Query Statistics privilege (for more information, see "How to specify the tasks a user or role (responsibility) can perform")
-
you want to manually select the combinations of EUL items that make up a summary folder
To create summary folders based on items in the EUL.
-
Select Insert | Summary to display "Summary Wizard: Step 1 dialog".
-
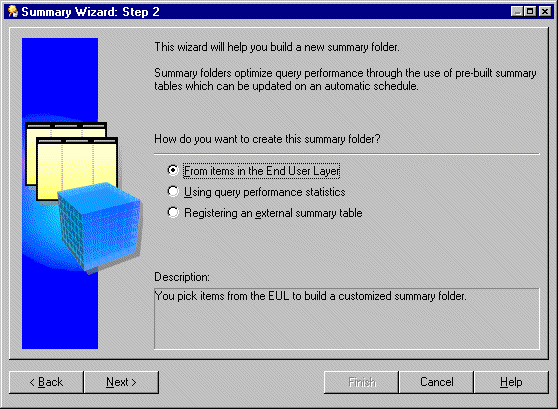
Select the I want to specify the summaries myself option and click Next to display "Summary Wizard: Step 2 dialog".
-
Select From items in the End User Layer to create a summary folder.
This option is only available if the summary folders feature is enabled. For more information, see "How to configure the database for summary folders".
-
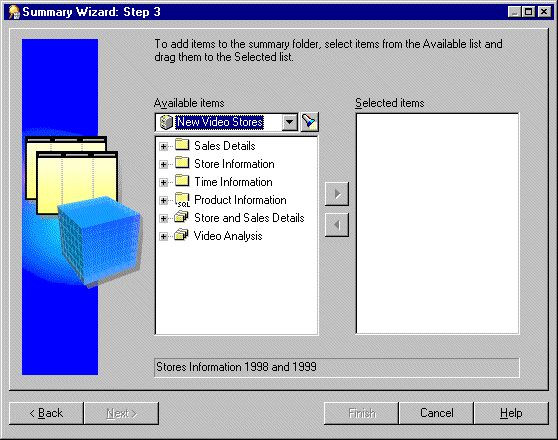
Click Next to display the "Summary Wizard: Step 3 dialog (add items to summary folder)".
-
Move the items that you want to include in the new summary folder from the Available items list to the Selected items list.
You can select more than one item at a time by holding down the Ctrl key and clicking another item.
Remember to include:
-
all aggregate functions for each data point item - for more information, see "Guidelines for setting up summary combinations".
-
items from complex folders (where necessary) - for more information, see "What are the conditions for query rewrite by Discoverer?".
-
derived items (where necessary) - for more information, see "What are the conditions for query rewrite by Discoverer?".
Note: You can select any items and math functions. However, if you select items from different folders, a join must already exist between the folders.
-
-
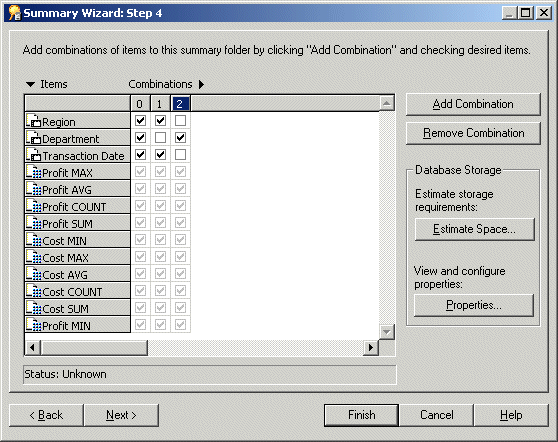
Click Next to display the "Summary Wizard: Step 4 dialog (add combinations of items)" to define the summary combinations in the new summary folder.
The Summary Wizard: Step 4 dialog enables you to define the summary combinations in the new summary folder.
By default, all the items you selected in the Summary Wizard: Step 3 are included in the first summary combination (in column 0).
-
Click Add Combination to add a new summary combination.
The summary combination appears in a new numbered column.
-
Select the relevant check boxes to include items in the summary combination.
-
Add as many summary combinations as necessary
For more information, see "What are summary combinations?"
Tips:
-
If you are not sure whether the performance gains offered by using the specified summary combinations are outweighed by the amount of tablespace they occupy, click Estimate Space.
-
You can view and edit database storage properties for a selected summary combination by clicking Properties. For more information, see "How to edit database storage properties of summary combinations for a summary folder".
-
To remove an unwanted summary combination, select the relevant column number and click Remove Combination.
-
-
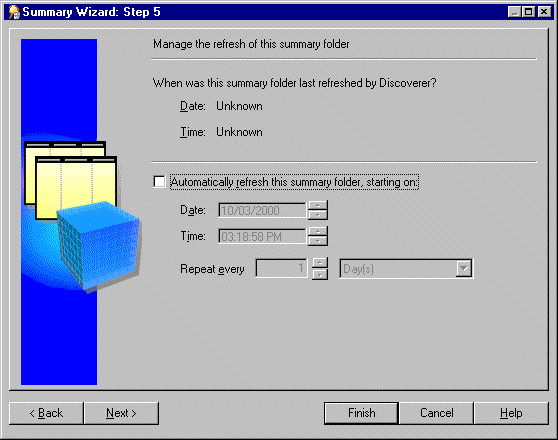
Click Next to display the "Summary Wizard: Step 5 dialog (refresh summary folder)" to specify a refresh schedule for the summary folder.
-
Select the Automatically refresh this summary folder check box to specify the date, time and frequency that Discoverer will automatically refresh this summary folder.
Tip: Do not select this check box if the data is static and will not change, or if you want to refresh the summary folder manually. For more information about manually refreshing summary folders, see "How to manually refresh a summary folder".
-
Set the date and time you want Discoverer to start the first refresh.
-
Set the Repeat every fields for the refresh interval you want.
The refresh period you specify here is the period that will elapse before Discoverer refreshes and updates the data. This refresh pattern will continue until you change the settings.
-
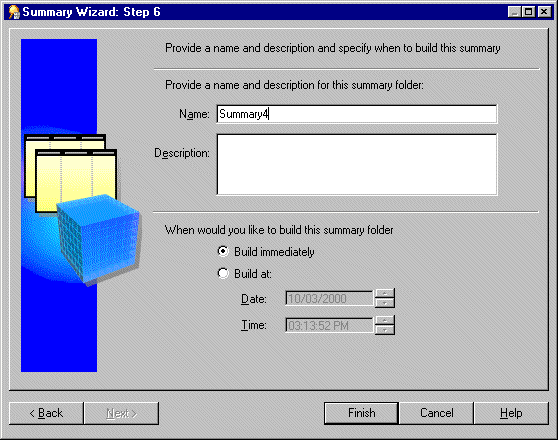
Click Next to display the "Summary Wizard: Step 6 dialog (name summary folder)".
-
Specify a name and description for the summary folder.
-
Specify when you want to build this summary folder as follows:
-
select the Build immediately option if you have smaller summary tables, or if you want to build the summary tables immediately.
-
Select the Build at option if you have larger summary tables that are best built at off-peak hours. Enter the time and date you want to build the summary tables.
-
-
Click Finish.
When Discoverer builds the summary folder, it creates:
-
a summary folder and summary tables (Oracle Standard Edition databases)
-
a summary folder and materialized views (Oracle Enterprise Edition databases)
The build process generates the summary data and marks the summary table/materialized view as Ready to use.
When the process completes Discoverer displays the new summary folder in the "Workarea: Summaries tab".
15.8 How to create summary folders based on users' queries
Query performance statistics are automatically generated when the Collect Query Statistics privilege is switched on for users (for more information, see "How to specify the tasks a user or role (responsibility) can perform").
You can create a new summary folder based on query performance statistics rather than choosing the items yourself. Discoverer suggests the summary folder items for you based on the query performance statistics that are generated from Discoverer end user queries.
You might select this option if you know that you want to create one or more summary folders based upon specific queries and you do not necessarily want Discoverer to create any other summary folders.
To create summary folders based on query performance statistics:
-
Choose Insert | Summary to display "Summary Wizard: Step 1 dialog".
-
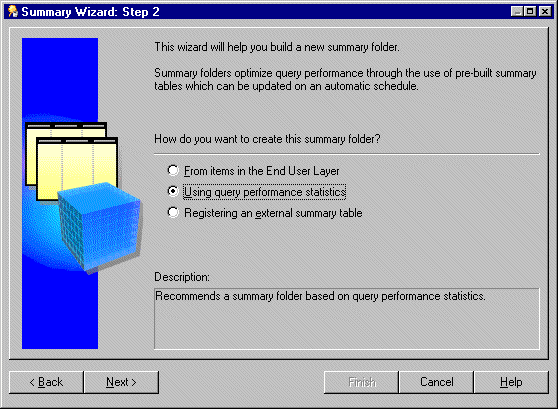
Select the I want to specify the summaries myself option and click Next to display "Summary Wizard: Step 2 dialog".
-
Select the Using query performance statistics option.
This option creates a summary table or materialized view. It is only available if the summary management feature is enabled. For more information see "How to configure the database for summary folders".
-
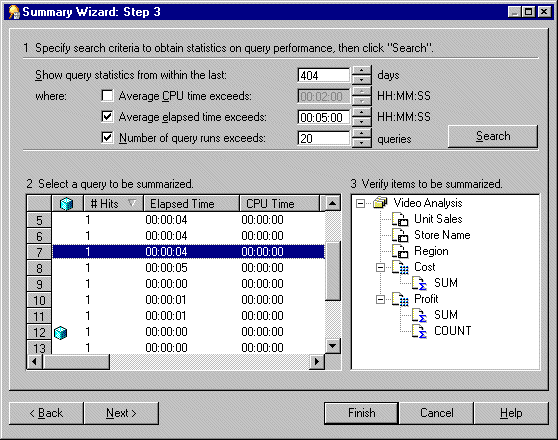
Click Next to display the "Summary Wizard: Step 3 dialog".
The Summary Wizard: Step 3 dialog is divided into three sections as follows:
Section number Purpose Section 1 Specify search criteria to obtain statistics on query performance. This section enables you to specify search criteria to obtain statistics on query performance.
Section 2 Select a query to be summarized. This section shows queries that meet the search criteria.
Section 3 Verify items to be summarized. This section shows a selected query's folders, joins and items.
-
Specify the values in Section 1 that you want to use to search for previously run queries.
-
Click Search.
If the search time is significant, Discoverer displays a progress bar.
All the queries that match the threshold values in Section 1 are displayed in Section 2. To narrow or expand this list further, re-specify the threshold values.
If a query in the list uses items that are already summarized, a cube icon appears beside the query.
To sort the display order of items in a column in Section 2, click the relevant column heading.
-
Select the row that represents the query you want to summarize from the list in Section 2.
The query's folders, joins, and items appear in Section 3.
-
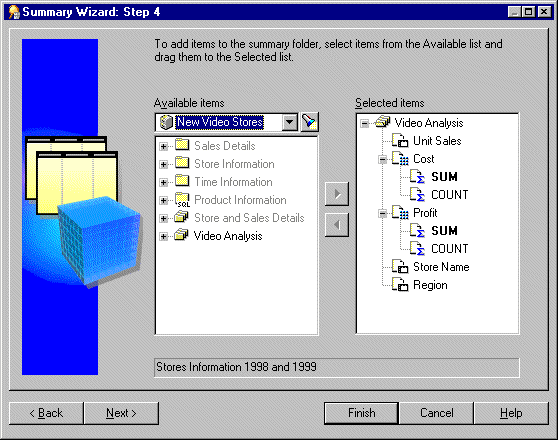
Click Next to display the "Summary Wizard: Step 4 dialog (add items to summary folder)".
The Summary Wizard: Step 4 dialog enables you to select items to include in the summary folder. By default, the Selected items list contains the items from the query you selected on the previous page of the Summary Wizard.
-
Move the items that you want to include in the new summary folder from the Available items list to the Selected items list.
You can select more than one item at a time by holding down the Ctrl key and clicking another item.
Remember to include:
-
all aggregate functions for each data point item (for more information, see "Guidelines for setting up summary combinations")
-
items from complex folders, where necessary (for more information, see "What are the conditions for query rewrite by Discoverer?")
-
derived items, where necessary (for more information, see "What are the conditions for query rewrite by Discoverer?")
Note: You can select any items and math functions. However, if you select items from different folders, a join must already exist between the folders.
-
-
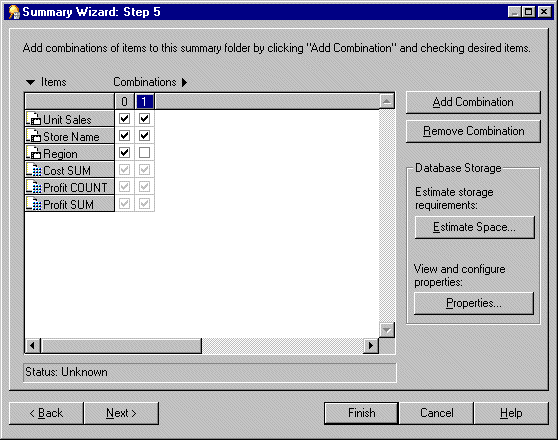
Click Next to display the "Summary Wizard: Step 5 dialog (add combinations of items)".
The Summary Wizard: Step 5 dialog enables you to define the summary combinations in the new summary folder.
By default, all the items you selected in Summary Wizard: Step 4 are included in the first summary combination (in column 0).
-
Click Add Combination to add a new summary combination.
The summary combination appears in the new numbered column.
-
Select the relevant check boxes to include items in the new summary combination.
-
Add as many summary combination as necessary.
For more information, see "What are summary combinations?".
-
Click Estimate Space to help you decide whether the performance gains offered by using the specified summary combinations are outweighed by the amount of tablespace they occupy.
-
Click OK.
Note: You can view and edit database storage properties for a selected Summary Combination by clicking Properties. For more information, see "How to edit database storage properties of summary combinations for a summary folder".
Tip: To remove an unwanted summary combination, select the relevant column number and click Remove Combination.
-
Click Next to display the "Summary Wizard: Step 4 dialog (refresh summary folder)" to specify a refresh schedule for the summary folder.
-
Select the Automatically refresh this summary folder check box to specify the date, time and frequency of automatic refresh for this summary.
Tip: Do not select the check box if the data is static and will not change, or if you want to refresh the summary folder manually. For more information about manually refreshing summary folders, see "How to manually refresh a summary folder".
-
Set the Date and Time you want Discoverer to start the first refresh.
-
Set the Repeat every fields for the refresh interval you want.
The refresh period you specify here is the period that will elapse before Discoverer refreshes and updates the data. This refresh pattern will continue until you change the specification.
-
Click Next to display the "Summary Wizard: Step 7 dialog (name summary folder)".
-
Specify a name and description for the summary folder.
-
Specify when you want to build this summary folder.
-
Click Finish.
When Discoverer builds the summary folder, it creates:
-
a summary folder and summary tables (Oracle Standard Edition databases)
-
a summary folder and materialized views (Oracle Enterprise Edition databases)
The build process generates the summary data and marks the summary table/materialized view as 'Ready to use'.
-
When the process is complete Discoverer displays the new summary folder in the "Workarea: Summaries tab".
The business area named Query Statistics that is supplied with Discoverer includes a workbook that analyzes the following:
-
query usage
-
the items most frequently used in queries
-
the folders containing the items
-
query execution times
15.9 How to create summary folders based on external summary tables
This section describes how to create a new summary folder based on summary tables created by an application other than Discoverer. Summary tables created by an application outside Discoverer are called external summary tables. Note that this task also applies to creating summary folders based on external views.
To create summary folders based on external summary tables:
-
Choose Insert | Summary to display "Summary Wizard: Step 1 dialog".
-
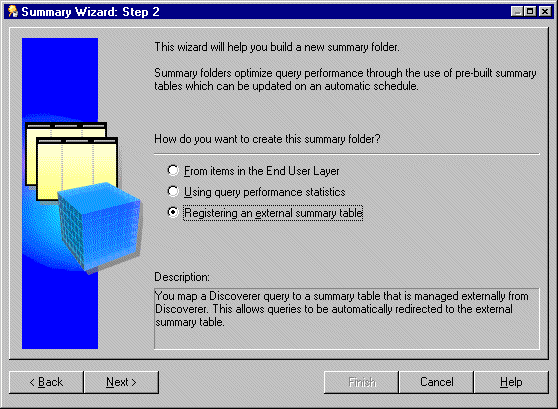
Select the option I want to specify the summaries myself and click Next to display "Summary Wizard: Step 2 dialog".
-
Select the Registering an external summary table option.
The result of completing this task is that the database will create a materialized view from the summary table created by the external application.
Note that Discoverer will continue to create summary tables under the following conditions:
-
If you run Discoverer against an Oracle Standard Edition database.
For more information, see "What is different about summary folders that are based on external summary tables?".
-
If you map an external view to EUL items against an Oracle Enterprise Edition database.
For more information, see "What is different between mapping external summary tables and views to EUL items, with Oracle Enterprise Edition databases?".
-
-
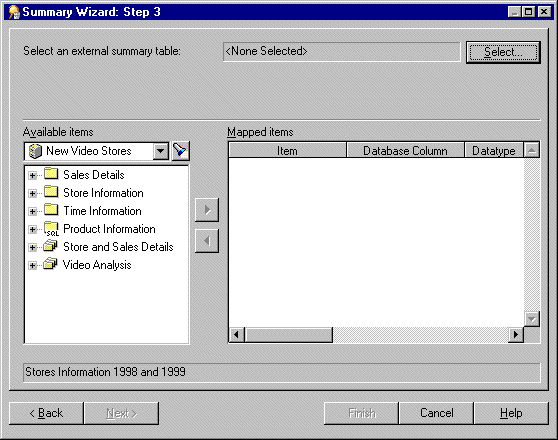
Click Next to display the "Summary Wizard: Step 3 dialog".
-
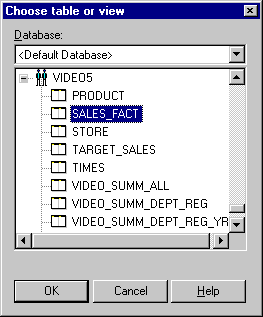
Click Select to display the "Choose user or table/view dialog".
-
Select the database (from the drop down list) that contains the external summary table that you want to register.
Note: When connected to an Enterprise Edition database, Oracle prevents a user from registering an external summary over a database link. This is because the database does not allow a materialized view to be created over a database link. However, this may be achieved by creating a view in the database that the EUL is in and referencing the external summary in the view. This view may then be registered within Discoverer as an external summary.
-
Select the external summary table that you want to register with Discoverer Administrator.
-
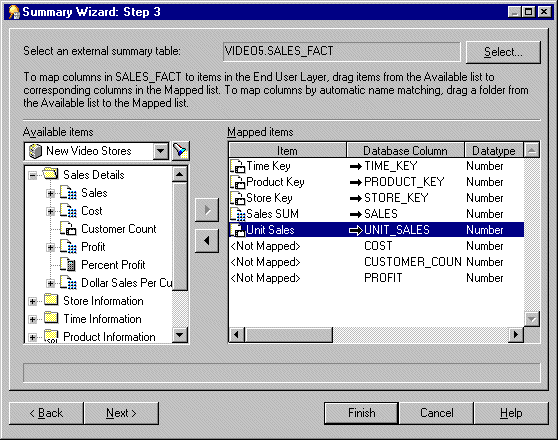
Click OK to display all the database columns found in the external summary table in the mapped items list.
You now map each database column in the external summary table to a corresponding item in the EUL.
-
For each database column, drag the corresponding item from the Available items list onto the database column in the Mapped items list
Tip: If several items from the same folder correspond to columns in the external summary table, you can drag and drop the folder onto an item in the Mapped items list. Discoverer Administrator attempts to map the correct items to the database columns using the item names. Note that you will have to map items to any columns for which Discoverer Administrator cannot identify corresponding items.
Tip: To remove the mapping between a database column in the external summary table and an item in the EUL, select the relevant row in the Mapped items list and click the left arrow button.
-
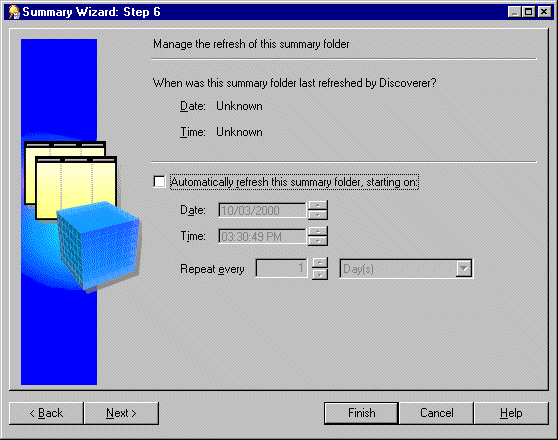
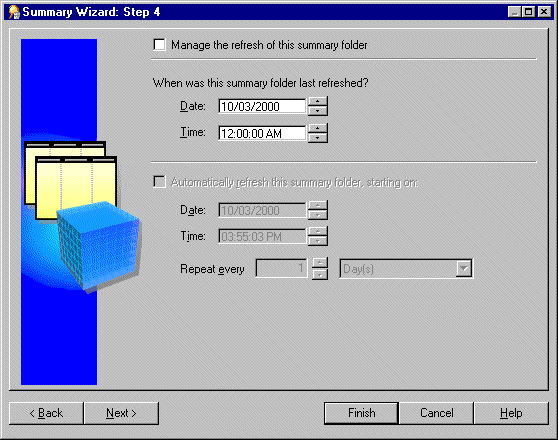
Click Next to display the "Summary Wizard: Step 4 dialog (refresh summary folder)" to specify a refresh schedule for the summary folder.
-
Select the Manage the refresh of this summary check box if you want Discoverer to manage the refresh of this external summary table.
-
Select the Automatically refresh this summary folder check box to specify the date, time and frequency of automatic refresh for this summary.
Tip: Do not select the check box if the data is static and will not change, or if you want to refresh the summary folder manually. For more information about manually refreshing summary folders, see "How to manually refresh a summary folder".
-
Set the Date and Time you want Discoverer to start the first refresh.
-
Set the Repeat every fields for the refresh interval you want.
The refresh period you specify here is the period that will elapse before Discoverer refreshes and updates the data. This refresh pattern will continue until you change the specification.
-
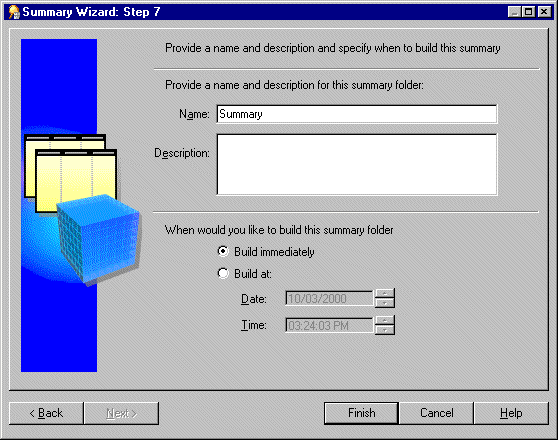
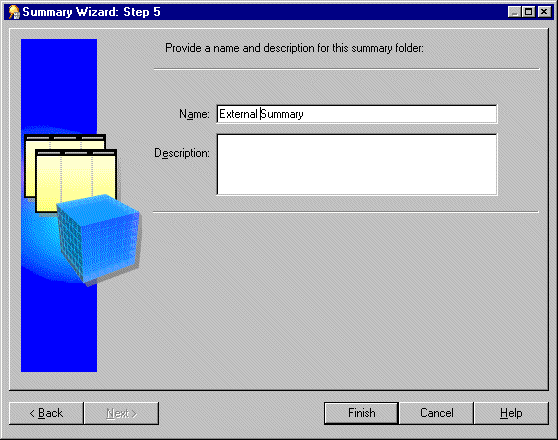
Click Next to display "Summary Wizard: Step 5 dialog (name summary folder)".
-
Specify a name and description for the summary folder
-
Click Finish to create the summary folder in the business area and register the external summary table with Discoverer.
When the process is complete, Discoverer displays the new summary folder in the "Workarea: Summaries tab".
-
Summary combinations are only available when Discoverer manages the refresh of a summary folder. When Discoverer uses external summary tables, summary combinations are not available.
-
Discoverer might display the message 'Cannot create summary against external table. A summary already exists' (for more information, see "Why can you register only one materialized view against a single external summary table in Oracle Enterprise Edition databases?").
15.10 How to manually refresh a summary folder
This section describes how you can refresh a summary folder. You might need to refresh a summary folder if the database has changed.
To manually refresh a summary folder:
-
Select the summary folder that you want to refresh in the "Workarea: Summaries tab".
-
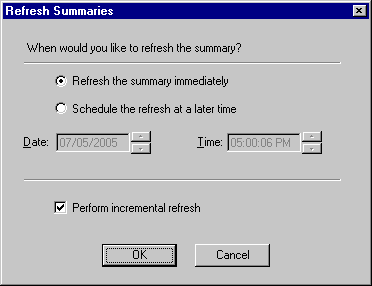
Choose Tools | Refresh Summaries to display the "Refresh Summaries dialog".
Note: Discoverer does not display the Refresh Summaries dialog for externally managed summary folders.
-
Specify when you want to refresh the selected summary folder as follows:
-
select the Refresh the summary immediately option if you want to refresh the summary folder immediately
-
select Schedule the refresh at a later time option if you want to refresh the summary folder at a specified time
-
-
If you selected Schedule the refresh at a later time, specify the date and time when you want the refresh to begin.
-
To perform an incremental refresh, select the check box.
You might want to perform an incremental refresh when the detail data in the database tables has changed little since the last refresh. Performing an incremental refresh saves time, as it updates only those changes committed to the database since the last refresh.
For further information on the conditions required for incremental refresh, see Oracle Database Data Warehousing Guide.
-
Sometimes you will want to refresh a summary folder when a process outside Discoverer has completed (for example, the loading of data into a data warehouse). You can refresh a summary folder from a batch command file using the Discoverer's command-line interface option (for more information, see "/refresh_summary").
For more information about refreshing summary folders, see:
15.11 How to edit the properties of summary folders
This section describes you how to edit the properties of a summary folder.
To edit the properties of a summary folder:
-
Select one or more summary folders in the "Workarea: Summaries tab"
-
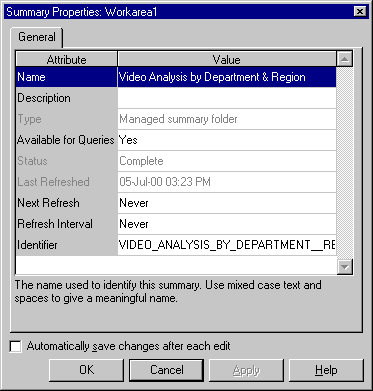
Choose Edit | Properties to display the "Summary Properties dialog".
Tip: You can select more than one summary folder at a time by holding down the Ctrl key and clicking another summary folder. If all the selected folders have the same value for a particular property, that value is shown. If the selected folders have different values for a particular property, no value is shown for the property. Any changes you make here are applied to all selected summary folders.
-
Make your changes as required.
-
Click OK to save the changes you have made.
15.12 How to edit summary folders
You might want to edit a summary folder to:
-
change its name or description
-
view or edit its properties
-
refresh it
-
alter its composition (for example, change items or combinations)
-
view or modify database storage properties
-
investigate the composition of a broken summary folder and remove broken folders
-
You can edit summary folders, regardless of whether they are valid or broken.
To edit a summary folder:
-
Display the "Workarea: Summaries tab".
-
Select the + symbol next to a business area to display its available summary folders.
-
(optional) Choose View, and then Validate Summaries to display diagnostic summary folder information, if required.
-
Click the summary folder and choose Edit | Edit...
-
Edit the summary folder as required.
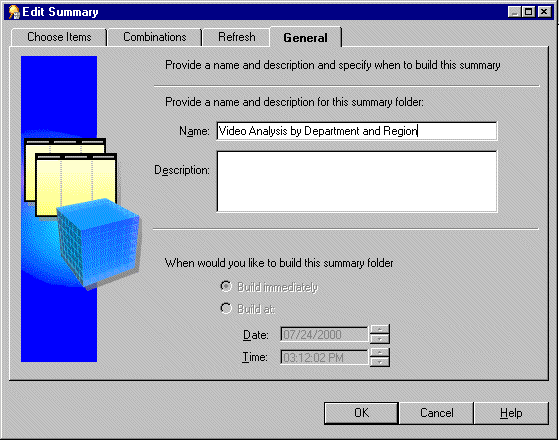
The Edit Summary dialog is divided into four tabs. Each tab corresponds to a step of the Summary Wizard as follows:
-
"Edit Summary dialog: Choose Items tab" - use this tab to specify the items in a summary folder.
-
"For more information, see:" - use this tab to edit, add, or delete summary combinations. You can also use this tab to view and configure database storage properties of materialized views or summary tables (depending on database version).
Note: The Combinations tab is not displayed for summary folders that are based upon external summary tables.
-
"Edit Summary dialog: Refresh tab" - use this tab to set the refresh and refresh interval of the summary folder.
-
"Edit Summary dialog: General tab" - use this tab to edit the name, description and to view the build time of the summary folder.
-
-
Click OK.
-
If a summary folder is broken, you can view the status of folders within the summary folder by choosing View | Validate Summaries. If Discoverer detects a problem with a folder within a summary folder, an error message is displayed beside the folder.
-
If a summary folder remains broken following an edit, any modifications made in Discoverer are not written to the materialized view or summary table. Where a summary folder is valid following an edit, any modifications made in Discoverer are also written to the materialized view/summary table.
15.13 How to edit database storage properties of summary combinations for a summary folder
You can use Discoverer Administrator to control how summary combinations are stored in the database by editing the database storage properties.
Note: Database storage properties are not available for summary folders that are based on external summary tables. For more information, see "What is different about summary folders that are based on external summary tables?".
To edit the database storage properties of summary combinations for a summary folder:
-
Select a summary folder from the "Workarea: Summaries tab".
-
Choose Edit | Edit... to display the Edit Summary dialog.
-
Display the "For more information, see:".
-
Select the summary combination with database storage properties that you want to edit.
-
Click Properties to display the Database Storage Properties dialog (see "Database Storage Properties dialog: List of tabs").
-
Display the appropriate tab and edit the properties as required.
For more information about the Database Storage Properties dialog tabs, see:
15.14 How to delete summary folders
This section describes how you can delete a summary folder. When you delete a summary folder, the underlying summary tables or materialized views are also deleted.
To delete a summary folder:
-
Select the summary folder that you want to delete from the "Workarea: Summaries tab".
Tip: You can select more than one summary folder at a time by holding down the Ctrl key and clicking another summary folder.
-
Choose Edit | Delete to display the "Confirm Delete dialog".
You can review the objects that might be affected by deleting this summary folder.
-
(optional) To see the potential impact of the deletion:
-
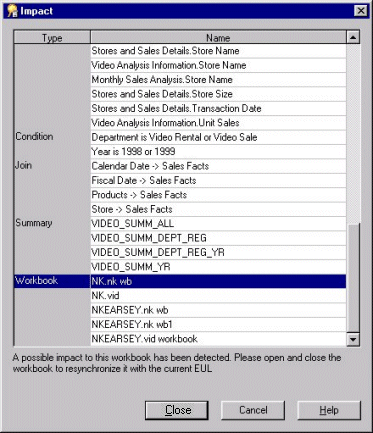
Click Impact to display the "Impact dialog".
The Impact dialog enables you to review the other EUL objects that might be affected when you delete a summary folder.
Note: The Impact dialog does not show the impact on workbooks saved to the file system (that is, in
.disfiles). -
(optional) Select a row to view text at the bottom of the list, indicating what affect the current action will have on the EUL object.
-
When you have finished reviewing the impact of deleting the summary folder, click Close to close the Impact dialog.
-
-
If you still want to delete the selected summary folder click Yes.
Discoverer Administrator deletes the selected summary folder from the EUL and drops the summary table/materialized view from the database.
15.15 How to view the status of the summary tables/materialized views for a summary folder
This section describes how you can view the status of the summary table/materialized view for a summary folder.
To view the status of the summary table/materialized view for a summary folder:
-
Select the summary folder that contains the summary table or materialized view you are interested in from the "Workarea: Summaries tab".
-
Choose Edit | Edit... to display the Edit Summary dialog
-
Display the "For more information, see:".
-
Select the numbered column heading for the summary combination that corresponds to the summary table materialized view you are interested in.
Discoverer displays the status of the summary table/materialized view in the status bar at the bottom of the dialog.
-
When you have finished viewing the status of the summary table/materialized view (represented by the summary combination), click OK to close the Edit Summary dialog.
-
The status is not available for summary folders that are based upon external summary tables.
-
To see additional diagnostic information in the "Workarea: Summaries tab" use the View | Validate Folders option. This displays any errors that exist within the folders of a summary folder.
For more information about validating folders and summary status messages, see:
