Release 11g (11.1.1)
Part Number E13880-02
Contents
Previous
Next
| Oracle Fusion Middleware Administrator's Guide for Oracle Business Intelligence Publisher Release 11g (11.1.1) Part Number E13880-02 | Contents | Previous | Next |
This chapter covers the following topics:
Oracle BI Publisher supports digital signatures on PDF output documents. Digital signatures enable you to verify the authenticity of the documents you send and receive. Oracle BI Publisher can access your digital ID file from a central, secure location and at runtime sign the PDF output with the digital ID. The digital signature verifies the signer's identity and ensures that the document has not been altered after it was signed.
For additional information on digital signatures, see the following sources:
Digital ID Introduction by Verisign
http://www.verisign.com/support/tlc/per/whitepaper.htm
http://www.verisign.com/stellent/groups/public/documents/gui des/005326.pdf
Digital Signature by Adobe
http://www.adobe.com/security/digsig.html
Digital Signatures in PDF and Acrobat
http://www.acrobatusers.com/articles/2006/07/digital_ signatures/index.php
Before you can implement digital signatures with Oracle BI Publisher output documents, you need the following:
A digital ID obtained from a public certificate authority or from a private/internal certificate authority (if for internal use only). You must copy the digital ID file to a secure location of the file system on the server that is accessible by the BI Publisher server. See Obtaining Digital Certificates for more information.
Use of digital signatures with Oracle BI Publisher output documents has the following limitations:
Only a single digital ID can be registered with BI Publisher.
Only reports submitted through BI Publisher's Schedule Report Job interface can include the digital signature.
The digital signature is enabled at the report level; therefore, all layouts assigned to the same report share the digital signature properties.
To obtain a digital certificate, do one of the following:
Purchase one from a certificate authority, such as Verisign, and save it to your computer. This method is recommended because it is easier to verify (and, therefore, trust) the authenticity of the certificate that you purchase. Next, use Microsoft Internet Explorer 7 or later to create a PFX file based on the certificate you purchased. See Creating PFX Files.
Create a self-signed certificate using a software program, such as Adobe Acrobat, Adobe Reader, OpenSSL, or OSDT. This method is less preferred because anyone can create a self-signed certificate. Therefore, it is more difficult to verify and trust the authenticity of the certificate.
Typically, when you create a self-signed certificate using a software program, the program saves the certificate as part of a PFX file. If this is the case, you do not need to create another PFX file (as described in Creating PFX Files).
To create a self-signed certificate using Adobe Reader:
Open Adobe Reader.
On the Document menu click Security Settings.
Select Digital IDs on the left.
On the toolbar, click Add ID.
Follow the steps in the Add Digital ID wizard. For assistance, refer to the documentation provided with Adobe Reader.
When prompted, save your self-signed certificate as part of a PFX file to an accessible location on your computer.
After you create your self-signed certificate as part of a PFX file, you can use the PFX file to sign PDF documents by registering it with BI Publisher. See Implementing a Digital Signature.
If you obtained a digital certificate from a certificate authority, you can create a PFX file using that certificate and Microsoft Internet Explorer 7 or later.
Note: If you created a self-signed certificate using a software program such as Adobe Reader, it is likely that the program created the certificate in a PFX file. If this is the case, you don’t have to create another PFX file. You can use the one you have.
To create a PFX file with Microsoft Windows Explorer 7 or later:
Ensure your digital certificate is saved on your computer.
Open Microsoft Internet Explorer.
On the Tools menu, click Internet Options and then click the Content tab.
Click Certificates.
In the Certificates dialog, click the tab that contains your digital certificate and then click the certificate.
Click Export.
Follow the steps in the Certificate Export Wizard. For assistance, refer to the documentation provided with Microsoft Internet Explorer.
When prompted, select Use DER encoded binary X.509 as your export file format.
When prompted, save your certificate as part of a PFX file to an accessible location on your computer.
After you create your PFX file, you can use it to sign PDF documents. See Implementing a Digital Signature.
The following steps provide an overview of the tasks required to set up and sign your output PDF documents with a digital signature:
Register the digital ID in the BI Publisher Administration page.
Specify the Roles that are authorized to sign documents.
(Optional for PDF templates) Add a signature field to the PDF template in which to place the digital signature at runtime. See Adding or Designating a Field for Digital Signature, Oracle Fusion Middleware Report Designer’s Guide for Business Intelligence Publisher for instructions on designating a specific field in a PDF template for the digital signature.
Enable Digital Signature for the report in the Report Properties dialog and specify the position to place the digital signature on the completed document. This can be a signature field (for PDF templates), general location (top left, top center, or top right), or you can specify x and y coordinates.
Log in to BI Publisher as a user with an authorized role and submit the report through the BI Publisher scheduler, choosing PDF output. When the report completes it will be signed with your digital ID in the specified location of the document.
BI Publisher supports the identification of a single digital ID file. Register the digital ID in the BI Publisher Administration page as follows:
On the Administration tab, under Security Center, click Digital Signature.
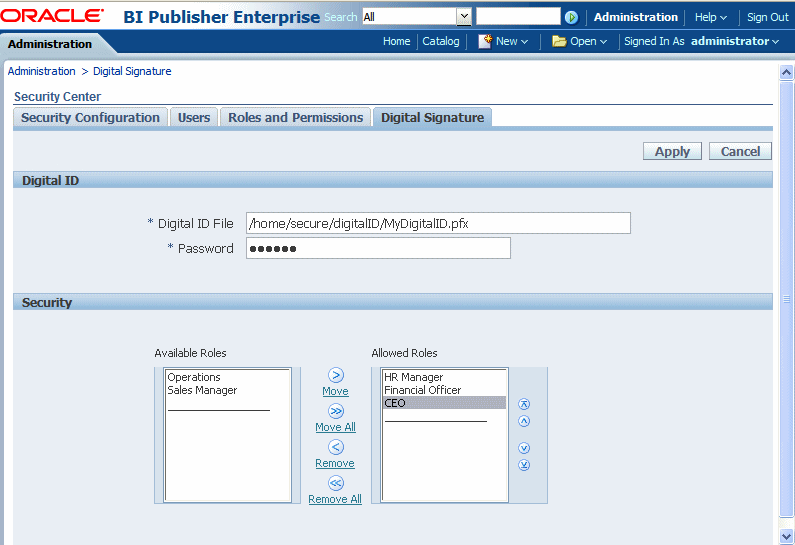
On the Digital Signature subtab, enter the file path to the digital ID file and enter the password for the digital ID.
Enable the Roles that will have the authority to sign documents with this digital ID. Use the shuttle buttons to move Available Roles to the Allowed Roles list.
Click Apply. The following figure shows the Digital Signature subtab:

You must specify the location for the digital signature to appear in the completed document. The methods available depend on whether your template type is PDF or RTF.
If your template is PDF, you have the following options:
specify a template field in which to put the digital signature
use the Report Properties dialog to specify a location (x,y coordinates) for the signature to appear in your final document
If your template is RTF:
use the Report Properties dialog to specify a location (x,y coordinates) for the signature to appear in your final document
See the chapter: Creating a PDF Template, topic: "Adding or Designating a Field for a Digital Signature" in the Oracle Fusion Middleware Report Designer's Guide for Oracle Business Intelligence Publisher for instructions on including a field in your PDF template for the digital signature.
When you specify a location in the document to place the digital signature, you can either specify a general location (Top Left, Top Center, or Top Right) or you can specify x and y coordinates in the document. You can also specify the field height and width. This is done through properties on the Runtime Configuration page. Therefore you do not need to alter the template to include a digital signature.
In the catalog, navigate to the report.
Click the Edit link for the report to open the report for editing.
Click Properties and then click the Formatting tab.
Scroll to the PDF Digital Signature group of properties.
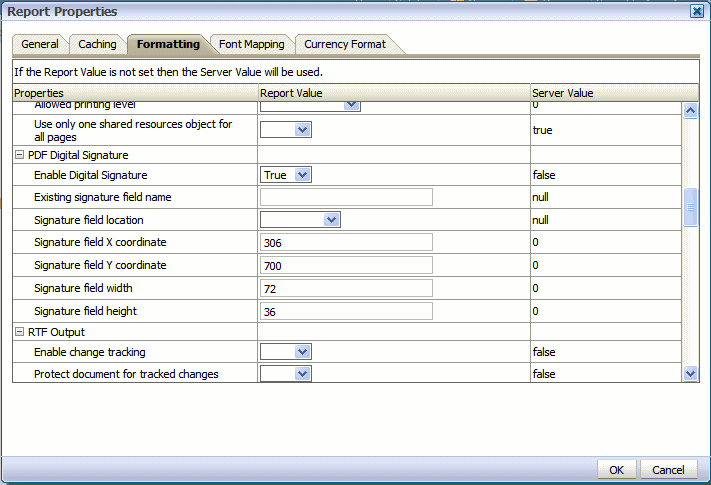
Set Enable Digital Signature to True.
Specify the location in the document where you want the digital signature to appear by setting the appropriate properties as follows (note that the signature is inserted on the first page of the document only):
Existing signature field name – does not apply to this method.
Signature field location – provides a list containing the following values:
Top Left, Top Center, Top Right
Select one of these general locations and BI Publisher will place the digital signature in the output document sized and positioned appropriately.
If you set this property, do not enter X and Y coordinates or width and height properties.
Signature field X coordinate – using the left edge of the document as the zero point of the X axis, enter the position in points to place the digital signature from the left.
For example, to place the digital signature horizontally in the middle of an 8.5 inch by 11 inch document (that is, 612 points in width and 792 points in height), enter 306.
Signature field Y coordinate – using the bottom edge of the document as the zero point of the Y axis, enter the position in points to place digital signature from the bottom.
For example, to place the digital signature vertically in the middle of an 8.5 inch by 11 inch document (that is, 612 points in width and 792 points in height), enter 396.
Signature field width – enter in points the desired width of the inserted digital signature field. This applies only if you are setting the X and Y coordinates.
Signature field height – enter in points the desired height of the inserted digital signature field. This applies only if you are setting the X and Y coordinates.
The following figure shows a report configured to place the digital signature at specific x and y coordinates in the document:

Users assigned a role with the digital signature privilege can attach the digital signature to their generated reports configured to include the digital signature. The digital signature can only be inserted on scheduled reports.
Log in to BI Publisher as a user with a role granted digital signature privileges.
In the catalog, navigate to the report that has been enabled for digital signature and click Schedule.
Complete the fields in the Schedule Report Job page, selecting PDF output, and then submit the job.
The completed PDF will display the digital signature.
![]()
Copyright © 2010, 2011, Oracle and/or its affiliates. All rights reserved.