5 HTML Conversion Templates
This section covers the following main topics:
5.1 About Templates
A template is a set of formatting instructions you can associate with a source document. When you check a document into Content Server, you either associate it with a default conversion template, or you can create a new customized template.
The following template options are available:
-
HTML Conversion templates: These are the newest template types, which can be configured in a cross-platform editor.
-
Classic HTML Conversion templates: These were previously known as GUI templates. There is no direct migration path from the GUI templates to the HTML Conversion templates. If you select a Classic HTML Conversion template, you may also select a Classic HTML Conversion layout.
-
Script templates: These run with default settings, and can be edited with a text editor.
After you have chosen a template type to associate with your document, and named the template, you can edit the template. There are two template editing utilities for customizing the appearance of native documents converted to an HTML format. These template editors are used to control the look and feel of the web pages you create.
-
The HTML Conversion Editor is used to edit the HTML Conversion Templates.
-
The Classic HTML Conversion Editor is used to edit the Classic HTML Conversion Templates and Classic HTML Conversion Layouts.
To turn a source document into a web page, you can use the default settings to perform a conversion. Alternatively, you can create a template, associate it with the document, and then edit the template, using one of the two template editor options.
The following sections describe tasks common to both template editors:
5.1.1 Creating a New HTML Conversion Template
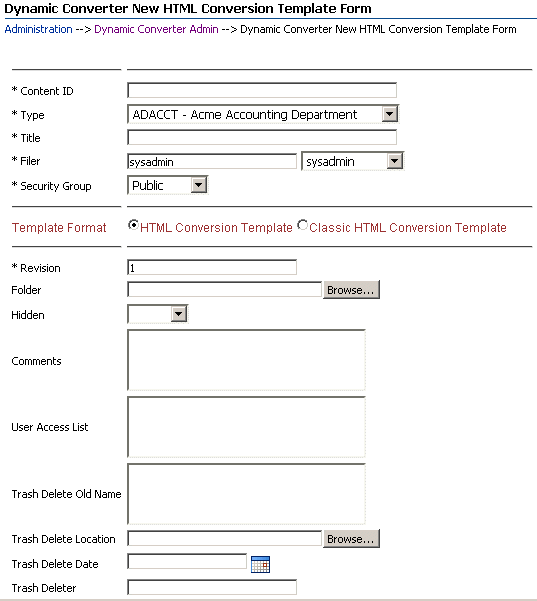
Use the Dynamic Converter New HTML Conversion Template Form to create a new HTML Conversion Template. To access this page, click Create New Template on the Dynamic Converter Admin page (see "Dynamic Converter Admin Page").
Note:
See the Content Server User Guide for more information about checking content into the Content Server.To create a new HTML Conversion template, complete the following steps:
-
Open the Dynamic Converter Admin page (see "Dynamic Converter Admin Page").
-
Click Create New Template.
The New HTML Conversion Template form is displayed (see Figure 5-1, "New HTML Conversion Template Form").
-
Select the template format: HTML Conversion Template or Classic HTML Conversion Template.
-
Specify all other required metadata for the template.
Note:
The template type is set by default to HTML Conversion Template. The Classic HTML Conversion Template is the former GUI Template. -
When you have completed the form, click Check In to check the HTML Conversion template file into the Content Server.
After checking a new HTML Conversion template into the Content Server, you can edit it using the Template Editor (see "Editing an Existing HTML Conversion Template").
5.1.2 Editing an Existing HTML Conversion Template
The HTML Conversion Template Editor requires Internet Explorer on a Windows XP or greater system. To edit an existing HTML Conversion Template or a Classic HTML Conversion template (that is, one that is already checked into the Content Server), complete the following steps:
-
Open the Dynamic Converter Admin page (see "Dynamic Converter Admin Page").
-
Click Edit Existing Template.
The Edit Templates Page is displayed (see "Edit Templates Page").
-
Select a template from the list of HTML Conversion templates in the Content Server.
If a known HTML Conversion template is not included in the list of available templates, then it was most likely not assigned the correct HTML Conversion Template type when it was checked into the Content Server (see "Checking In a Template"). You then need to open the content information page of the checked-in template and update its template type.
The Edit Template button does not become available until you specify the name of an existing template.
-
Click the Edit Template button. The HTML Conversion Template Editor is downloaded to your machine. With some browsers, such as Firefox, you may be prompted for how to handle the file dc_hcmapedit.jnlp. The correct way to open this file is with Java(TM) Web Start Launcher (default).
The Template Editor is started. If you have not run the editor before, it is installed first and you may need to confirm a few prompts.
You can now edit the HTML Conversion template in the Template Editor.
You can also edit an existing HTML Conversion template from the Template Selection Rules page (see "Template Selection Rules Page").
Note:
The Template Editor comes with its own extensive help system, which can be called from the application's user interface.5.2 HTML Conversion Template Editor
This section provides a description of the HTML Conversion Template Editor. More detail can be found in the Dynamic Converter Template Editor Guide.
The HTML Conversion Editor allows you to set various options that affect the content and structure of the output. The HTML Conversion Editor is Java-based and can run in any browser instance where a JRE is present.
The following topics are covered in this section:
5.2.1 Formatting Different File Types
The top item in the left-hand navigation pane of the HTML Conversion Editor allows you to set up custom formatting for different file types. Each file type uses a layout, either the default layout, or one created under Output Page Layouts. The exported files will use the same template as the root conversion.
These file types have slightly different options for formatting:
-
Text/Word Processing - Allows you to set options for bullets, footnotes and endnotes, handling character styles and embedded graphics, and setting pagination.
-
Spreadsheets - Allows you to set up section formatting and labeling, display gridlines, and size embedded graphics.
-
Presentations - Allows you to set up section formatting and labeling, and size slides.
-
Images - Allows you to set up section formatting and labeling, and size images.
-
Archives - Allows you to display either Filenames (the names of files and folders in the archive will be output) or Decompressed files (the filenames will be output as links to the exported files). The exported files use the same template as the root conversion.
-
Database - Allows you to set up section formatting and labeling, and set the number of records per page.
5.2.2 Adding Document Properties
This item allows you to add predefined and custom properties. You can assign default values, metatag names, and output format to these properties
By default, no document properties are defined. In order to include them in the output from the conversion, each desired document property must first be defined here. They must then be added to the output from the conversion by inserting them into page layouts defined in the Output Page Layouts item.The most common predefined properties are as follows:
-
Primary author
-
Title
-
Subject
-
Keywords
-
Content
Several more less common predefined properties are also available.
For a custom property, you can create a descriptive name, and then assign default values, metatag names, and output formats.
5.2.3 Adding Text Elements
Text elements allow the user to insert strings into the output. Each text element is defined as a name-value pair with an optional output format that will be used to format the text.
If an output format is not specified, the text will be inserted into the output as-is, with no additonal markup.
5.2.4 Adding Navigation Elements
Navigation elements allow you to have navigation links generated in the output. There are three kinds of navigation elements:
-
Document Navigation - This allows you to link to various items in the source document based on the document's structure. A common example of how one would use this type of navigation is to create links to all the paragraphs marked with outline level 1 (such as "Heading 1" paragraphs) in the document. Before using this form of navigation, link mapping rules must first be added. Link mapping rules establish which parts of the input document will be used to create links.
-
Page Navigation - This provides a way to link to certain key pages in the output (first page, next page, etc). It also provides a way to link to external pages.
-
Section Navigation - This provides navigation for multi-section documents, such as spreadsheets and presentations.
Once you have added one of these, the left hand side of the editor displays expanded levels. You can specify information about the link, link set markup and formatting, and create link mapping rules. Link mapping rules allow you to match on a paragraph outline level or paragraph style name in order to generate navigation based on these two aspects of the source document. Once you define rules, click back on the Link Mapping Rules page to determine the sequence of the rules. The mapping rules are ordered so that the first rule that matches is the one that is applied.
5.2.5 Configuring HTML Settings
There are six major categories that you can configure:
-
HTML Settings - Allows you to set the HTML DOCTYPE and Language string.
-
CSS options - Allows you to specify whether Cascading Style Sheet ("CSS") formatting will be used, and if so, the method of CSS presentation. By default, the CSS is embedded in the HTML of each output file. You may also choose to output CSS styles in a separate file. The external stylesheet option allows you to specify a stylesheet with user-generated styles that will be referenced by the conversion.
-
Character set - Allows you to specify which character set should be used in the output file. Source documents that contain characters from many character sets will look best only when this option is set to Unicode or UTF-8. You may also select a character to be used when a character cannot be found in the output character set (unmappable).
-
Graphics output - Allows you to specify the format of the graphics produced by the technology: GIF, JPG, PNG, or none. Other options in this section allow you to specify quality and sizing of the graphic output.
-
Link options - This option allows you to specify how the browser should select which frame or window in which to open source document links. This value is used for the target attribute of the links the technology generates. This target value will be applied to all such links encountered in the source document.
-
Output formatting - This option causes the technology to write new blank lines to the output strictly to make the generated HTML more readable and visually appealing. While setting this option will make it easier to read the generated markup in a text editor, it does not affect the browser's rendering of the document. You can also include information about source document style names and how they are mapped, and the user can see what format has been mapped to a particular paragraph or text sequence by mousing over it.
5.2.6 Adding Output Markup Items
Markup items are HTML fragments that may be inserted directly into the output HTML as part of a page layout (see "Adding Output Page Layouts"). Each markup item is a name/value pair. The name is what will appear in the screens for editing page layouts. The value is a block of HTML that will be inserted into the output HTML wherever the markup item appears in a page layout.
Click the Add button and specify a Name to use for referencing this piece of markup. Then enter the HTML into the Markup text box.
5.2.7 Adding Output Text Formats
Output text formats define text and formatting attributes of output document text. This allows you to standardize the look of the output despite differing formatting styles used by the various authors of the source documents. Text formats are only applied to text from word processing files. They cannot be used to change the formatting of text that is rendered as part of any graphics generated by the conversion. They are also not applied to text inside spreadsheets.
-
Click the Add button to display the Markup tab. Then specify a Name to use for referencing this format.
-
Under Tag name, enter the HTML paragraph level tag to put around paragraphs using this format. Note that any tag name may be entered here, whether it is legal or not. Only the tag name should be entered, not the surrounding angle brackets ("<" and ">"). The paragraph tag ("p") is the default.
-
Under Custom Attributes, you can enter attributes that apply to the tag whose name was specified by the Tag name option above. To set the name and value of the new attribute, just click on them in the Custom Attributes table.
-
Custom Markup allows you to enter HTML and/or regular text that will be inserted before and/or after every paragraph using this format.
-
Other formatting options on the Markup tab include inserting new lines into the HTML before the paragraph to make it easier to view the HTML of the output of the conversion (only written if the Format HTML source for readability option is set on the Output Pages screen); specifying that a new output page is created every time this format is applied to a paragraph; and whether or not the first instance of this format should start a new page (to help avoid empty or mostly empty pages at the beginning of the output).
-
On the Formatting tab, you can choose how to specify the formatting for paragraphs. If you click on the Use external CSS class option, a text field becomes available in which you must enter the name of a class from an external CSS file. The URL of the external CSS file is specified with the External user stylesheet option set on the Output Pages page.
If you do not specify an external stylesheet, you can choose to format the document by observing the original source document formatting or forcing other formatting options. Character, Paragraph and Border formatting for an array of options can be set to one of four values:
-
Always off - Forces the attribute to always be off when formatting the text.
-
Always on - Forces the attribute to always be on when formatting the text.
-
Inherit (default) - Takes the state of the attribute from the source document. In other words, if the source document had the text rendered with bold, then the technology will create bold text.
-
Do not specify - Leave the formatting unspecified.
-
5.2.8 Adding Format Mapping Rules
Once you have defined text formats, you must define rules to map output text formats to output text.
-
Select Format Mapping Rules and click Add Format Mapping Rule.
-
In the Format drop-down box, select one of your defined text formats.
-
In the Match on drop down box, you may select one of the following paragraph formatting options for the rule to check:
-
Outline level - Match the outline level specified in the source document. Application-predefined "heading" styles typically have corresponding outline levels applied as part of the style definition.
-
Style name - Match the paragraph or character style name.
-
Is footnote - Match any footnote.
-
Is endnote - Match any endnote.
-
Is header - Match any document header text.
-
Is footer - Match any document footer text.
-
-
For the Paragraph outline level, if Match on above is set to Outline level, then this defines which outline level to match. This option cannot be set/is ignored for all other matching rules.
-
If Match on above is set to Style name, then this defines which source document paragraph or character style name to match. When matching on style names, you must supply a style name here, and no default value is provided. The name must exactly match the style name from the source document. Style name matching is done in a case-sensitive manner. This option cannot be set/is ignored for all other matching rules.
-
When you have finished defining rules, you can go back to the Format Mapping Rules page and click on Move Up or Move Down to arrange the sequence in which the rules are checked. The mapping rules should be ordered so that the first rule that matches is the one, and only one, that is applied.
5.2.9 Adding Output Page Layouts
The Output Page Layouts section allows you to define the content of a set of output files. Page layouts are used to organize how the various pieces of the output are arranged.
-
Click Add to add a new output page layout. On the next page, enter a name to use to refer to this layout (required). Once this has been done, click on the left side of the editor. The name you have just entered is displayed in the tree view. Click on this to expand the levels underneath.
-
Click the box in front of Include navigation layout if you want to generate a single file containing markup and links to the document content specified in the page layout. This allows the user to create a "table of contents" page. You will need to define a navigation element under the Navigation Layout.
-
The first item under the name of your output page layout is <title> Source. This lets you select where to get the value to use for the HTML <title> tag. Select Section Name, Text Element, Property, or Output Text Format (the last three must be previously defined). Click back on the <title> Source page to order the sequence of these sources.
-
The Navigation Layout triggers the creation of a separate file with nothing but links to the actual document content. In order to generate this, you must have previously defined either a Document Navigation, Page Navigation, or Section Navigation element under Generated Content (see "Adding Navigation Elements"). In the expanded level under Navigation Layout, you can further select Markup Items to be placed in the Head and/or Body of the navigation page.
-
The top level of the Page Layout section lets you set pagination options. The six options under Page Layout let you define how output documents are arranged. These six options are as follows:
-
Head - Items placed in the HTML <head> of each output file.
-
Page Top - Items to be placed at the top of each output page. For example, links to the first page, previous page and next page in the output.
-
Before Content - Items to be output before the document content.
-
Before Section - Items inserted before each section of a multi-section document. Note that this is not applicable to word-processing documents.
-
After Content - Items to be output after the document content.
-
Page Bottom - Items placed at the top of each output page; for example, a copyright notice.
After selecting items to display for these six options, click at the top level of each one to set the order in which they will appear .
-
5.2.10 Previewing Your Content
The HTML Conversion Editor provides two options for previewing your content. They are both located in the Tools menu at the top of the interface.
-
View XML Structure - Click this option to display the XML structure viewer, which shows a text-based XML version of your chosen template options.
-
Set preview document - Click this option to enter the Content ID of the source document, and then click Preview Conversion. Your browser will open and display how the current template settings would affect the converted output.
5.3 Classic HTML Conversion Template Editor
The following topics are covered in this section:
You can select Classic HTML Conversion Editor on the Edit Templates page. The first time the Edit Template button is clicked on the Edit Templates page (see "Edit Templates Page") or Template Selection Rules page (see "Template Selection Rules Page"), the Classic HTML Template Editor is downloaded onto the client machine. The Classic HTML Conversion Template Editor is an ActiveX control that must be run on Microsoft Windows with Internet Explorer 4.0 or higher present.
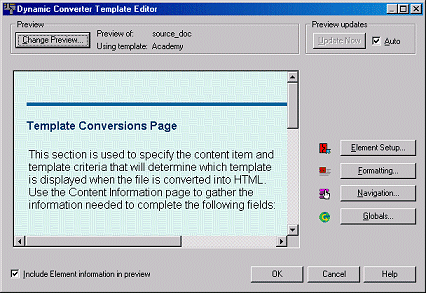
When you specify the name of a recognized Classic HTML Conversion template on the Edit Templates page or Template Selection Rules page, the Edit Template button is activated. Click this button to open the Template Editor. The Template Editor features a template preview area and four editing buttons: Element Setup, Formatting, Navigation, and Globals. Each button opens a property sheet that contains numerous settings for your template; all of which can be edited in a graphical user interface.
Each source document that you plan to convert to a web page using Dynamic Converter contains individual formatting attributes. You may have prepared styles in your source documents and assigned those styles to a specific typeface or font. Or, you may have manually formatted the content inside each source document (for example, headings in 14-point bold, sub-headings in 12-point italic, etc.). Classic HTML Conversion templates in Dynamic Converter can recognize both.
Classic HTML Conversion templates and the Template Editor can recognize styles as well as manually formatted documents. Once an element is assigned to these individual parts of your source document, you can then begin modifying the appearance and functionality of those elements using the Template Editor. When source documents are converted into web pages, it is the elements (stored in the template) that ultimately control how the web page will appear.
The Template Editor includes a very useful screentip Element, where you can place your cursor above a piece of text in the preview document and see the element that has been assigned to that text.
Many of the settings in the Template Editor apply to a single element. The more you define each element, the more control you have exert over the converted web page; all without ever touching the source document.
Note:
The Template Editor comes with its own extensive help system, which can be called from the application's user interface.5.3.1 Template Elements
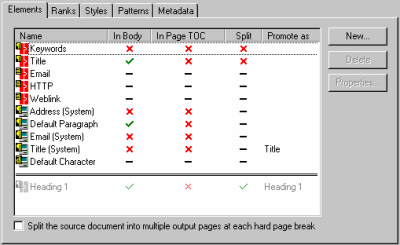
Nearly every source document has a title, a heading, and body text. Each one will likely have a unique font size and weight. The Template Editor can be used to assign unique elements to each piece of text and save that information in the Classic HTML Conversion template.
Elements are created from ranks, styles, or patterns:
-
Rank: Used by the Template Editor to identify the structure of the content of a document based on the hierarchy of that content. Ranks can be used with patterns in Element Setup to prepare a template for editing.
-
Style: A set of formatting characteristics with an assigned name that defines how text appears in a document. Styles can be assembled together to make up a style sheet or Cascading Style Sheet (CSS).
-
Pattern: A set of text attributes in a source document that the Template Editor can identify and associate with an element. If a manually-formatted source document has headings in Arial, 18-point, bold, you can base a pattern on these attributes and associate this pattern with an element. You can then use this element to format the content associated with the pattern.
You will find that styles in your source documents are the most useful and manageable for conversion purposes. As such, you should first try to implement styles in your source documents and perhaps distribute a style sheet to your content contributors.
Dynamic Converter templates are designed to be interchangeable with other Content Server related products, such as Content Publisher. The features that apply to reference pages in a web publication do not apply and will not work in Dynamic Converter. (An example of this would be adding a table of contents for multiple source documents.)
Note:
The Template Editor includes a separate and comprehensive online Help system (which is downloaded with the Template Editor). Each dialog box and property sheet in the Template Editor includes a Help button that describes that particular Element. To access these topics, click Help.5.3.2 Sample Classic HTML Conversion Templates
Dynamic Converter comes with a number of sample Classic HTML Conversion templates that you can check into Content Server and begin using with the Template Editor right away.
5.3.3 Migrating From Script Templates to Classic HTML Conversion Templates
The script templates (see Chapter 7, "Script Templates") in earlier versions of Dynamic Converter were hand-coded text files that contain elements, macros, pragmas, indexes, and Idoc Script. A basic script template might look something like this:
<HTML>
<BODY>
<P>Here is the document you requested.
{## INSERT ELEMENT=Property.Title} by
{## INSERT ELEMENT=Property.Author}
<P>Below is the document itself
{## INSERT ELEMENT=Body}
</BODY>
</HTML>
Dynamic Converter now also supports XML-based Classic HTML Conversion templates designed for use with the GUI-driven Template Editor (see "Classic HTML Conversion Template Editor").
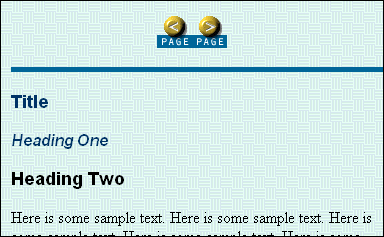
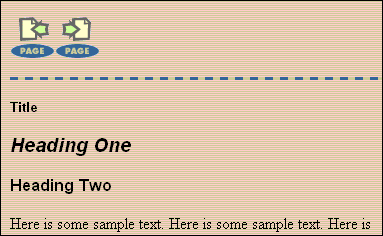
A basic Classic HTML Conversion template might look something like this in the Template Editor:
As a result of these differences, there is no automated upgrade process from the previous script templates to the current version Classic HTML Conversion templates. We can, however, recommend a migration path so that you can begin using the powerful Classic HTML Conversion templates in Dynamic Converter.
5.3.3.1 Updating an Old Template
To update a script template from an earlier version of Dynamic Converter to the Classic HTML Conversion template format, complete the following steps:
-
Open the Dynamic Converter Admin page (see "Dynamic Converter Admin Page").
-
Click Template Selection Rules on the Dynamic Converter Admin page.
The Template Selection Rules page is displayed (see "Template Selection Rules Page").
-
Highlight the rule associated with your previous template (the script template) and then scroll down to the "Template and layout for selected rule" area.
Note:
Rules that were created in an earlier version of Dynamic Converter (prior to version 6.1) will appear as a numbered rule in this version of Dynamic Converter. You can continue using that rule or delete it and re-create the rule in Dynamic Converter 11gR2 (you cannot rename a rule).You may want to modify the criteria assigned to your previous rule using the additional metadata fields available in Dynamic Converter. See "Assigning Metadata Criteria to a Rule".
-
From the Available Templates menu, select the Classic HTML Conversion template that you created in Step 2 (templates are listed by content ID).
-
Click Edit Template to open the Classic HTML Conversion Template Editor.
-
In the Template Editor, click Change Preview to select a source document (by content ID) to preview your template with.
-
Re-create the settings from your previous script template using the Template Editor (see "Classic HTML Conversion Template Editor"). This will likely be the most time-consuming part of the migration process. You may want to open another web browser and preview a dynamically converted document that used the previous template, so that you can compare the templates as you work. Click OK to close the Template Editor when you are finished making changes.
-
Enter the content ID of your previous script template in the Layout field (so that you can turn a former script template into a layout template that is used with the Classic HTML Conversion template).
-
Click Update to associate your new Classic HTML Conversion template and layout template with your template selection rule.
-
Search for the layout template (former script template) in the Content Server, check it out, and open it in a text editor.
Make the following changes:
-
Insert the following token at the top of your file, before the first <HTML> tag:
<!--TRANSIT - CUSTOMLAYOUT(TOP)-->
-
Insert the following token between the HTML <HEAD> tags:
<!--TRANSIT - CUSTOMLAYOUT(HEAD)-->
-
Insert the following token in the HTML <BODY> tag::
%%TRANSIT-BODYATTRIBUTES%%
-
Replace your existing Insert Body Element tag with the following token (this token will replace most of your previous element settings):
<!-- TRANSIT - CUSTOMLAYOUT(BODY) -->
-
Remove all references to elements, macros, pragmas, and indexes.
-
Leave Idoc Script tags in place (those that call outside files or services).
-
-
Save your new layout template and check it into the Content Server.
Note:
Unlike script templates, layout templates in the Content Server do not require the HCST file extension.
5.3.3.2 Sample of Newly Converted Template (From a Pre-6.0 Version)
To update an earlier Dynamic Converter script template (prior to version 6.0) to the current version Classic HTML Conversion template, you will need to recreate your original template settings in the Template Editor (see "Classic HTML Conversion Template Editor") and then turn your previous script template into a layout template. While all Idoc Script tags can remain, you will need to remove the syntax for elements, macros, pragmas, and indexes. These values are replaced with template tokens, in particular the CUSTOMLAYOUT(BODY) token, which represents nearly all of the settings made in the Template Editor.
The following example illustrates a very simple script template created in an earlier version of Dynamic Converter (prior to version 6.0) that is turned into a layout template in the current version. All element formatting, of course, must be recreated in the new Template Editor. (Bold text indicates a tag that is replaced.)
Example 5-1 Original Script Template (Example)
<html>
<head>
<title>
{## insert element=property.title suppress=tags}
</title>
<$defaultPageTitle="Converted Content"$>
<$include std_html_head_declarations$>
</head>
<body>
<$include body_def$>
<$include std_page_begin$>
<$include std_header$>
<table border="0" cellpadding="0" cellspacing="0" width="100%">
<tr><td>
{## INSERT ELEMENT=Property.Title}
</td></tr>
<tr><td>
{## INSERT ELEMENT=Body}
</td></tr>

/table>
<$include std_page_end$>
</body>
</html>
Example 5-2 Migrated Layout Template (Example)
<!-- TRANSIT - CUSTOMLAYOUT(TOP) -->
<html>
<head>
<!-- TRANSIT - CUSTOMLAYOUT(HEAD) -->
<$defaultPageTitle="Converted Content"$>
<$include std_html_head_declarations$>
</head>
<body %%TRANSIT-BODYATTRIBUTES%%>
<$include body_def$>
<$include std_page_begin$>
<$include std_header$>
<table border="0" cellpadding="0" cellspacing="0" width="100%">
<tr><td>
<!-- TRANSIT - CUSTOMLAYOUT(BODY) -->
</td></tr>
</table>
<$include std_page_end$>
</body>
</html>
