3 Becoming Familiar with the Interface
A profound benefit of managing content is the ability to quickly find the information you need and complete the tasks your job requires. Oracle Content Server provides a simple interface using standard web applications and common navigational tools to provide access to the tasks necessary to contribute and find content.
This chapter provides an overview of the standard Oracle Content Server web pages and describes how to use and customize the navigation features of the interface, in the following topics:
3.1 Customizable Interface
The Oracle Content Server interface can be highly customized, so your content server web pages might look different than those described throughout this guide. For example, you may see special colors, icons, and logos, or your system administrator may choose to add, change, or hide functions on certain pages. For user documentation specific to your content server system, contact your system administrator.
3.2 Portal Navigation Bar
The portal navigation bar on the left side of all Oracle Content Server web pages is your primary navigation tool. You can personalize it with functions you use often, such as predefined searches and links to your favorite Web sites.
Note:
The portal navigation bar is part of the frame-based Trays layout option, and is the default navigation tool for Oracle Content Server. If you select Top Menus on the User Profile page, then the portal navigation functionality is located above the main content area as a series of menus. For more information, see Section 3.7.6, "User Profile Page."| Link | Description |
|---|---|
| Home | Displays the Home Page. |
| Library | Displays the content server's Library Folders hierarchy. You can drill down, or browse through, folders in this hierarchy to find specific files. |
| Search | Displays the Search Tray. From this page, you can perform metadata and full-text searches to find specific files. |
| Microsoft Login | If you are logged in to your Microsoft network, click this link to log in to Oracle Content Server.
This link is present only if your organization is using Microsoft Network security to log in to Oracle Content Server. Many browsers, such as Mozilla Firefox, support logging in with this security, after some configuration. Your Oracle Content Server instance may be integrated with your enterprise sign-on system. For more information, ask your system administrator. |
| My Oracle Content Server | Expands to display links to personal check-in pages and personal search pages. |
| Browse Content | Expands to display a Browse Content Tray for finding content and any other special folders configured by the system administrator. |
| Search | Expands to provide several options for metadata searching and includes a tab for viewing persistent search results as you work with them.
For more information, see Section 4.3, "Searching with Database Metadata Search," and Section 4.8, "Working with Search Results." |
| Content Management | Expands to display several links for managing content, such as Content Check-In Form, Checked-Out Content Page (or Checked-Out Content for user Page), Work In Progress Page, Active Workflows Page, and Expired Content Page. |
3.3 Toolbar
The toolbar at the top of all Oracle Content Server web pages contains some of the same navigation links as the Portal Navigation Bar, and also provides access to the online help system.

Note:
If any Content Profiles have been created and enabled for display on your instance by your system administrator, the Search and New Check In links are changed to lists, listing the profiles.| Link | Description |
|---|---|
| Oracle Content Server | Displays the Home Page. |
| User profile link | Displays the User Profile Page and provides information needed for Editing Your User Profile. The link is either a user name or the user's full name. |
| Logout | Logs out of Oracle Content Server. This option is available only if the optional ExtranetLook component is installed. |
| Help | Displays the online help system. |
| Refresh Page | Updates the current page. |
| Search | Displays the Advanced Search Page or optionally displays links to Content Profiles search pages set up by the system administrator. From the Advanced search or content profile search page, you can perform metadata and full-text searches to find specific files. |
| New Check In | Displays the Content Check-In Form, which is used to check new files into the content server. |
| Quick Search | Enables you to perform searches from any page. |
3.4 Home Page
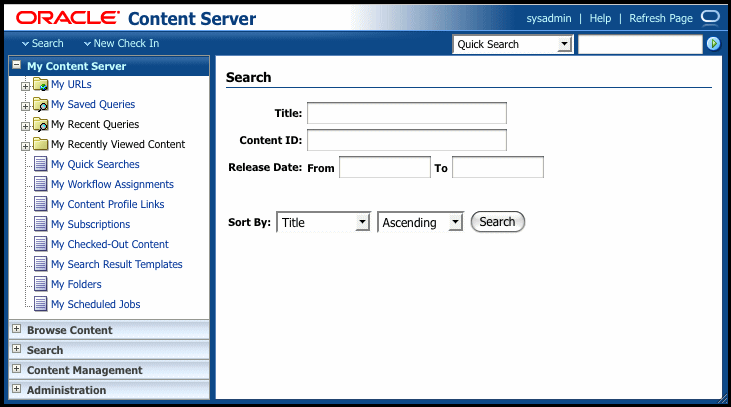
The home page typically includes the tray navigation, the top toolbar, and other page content and functions as determined by your system administrator. If you set up a default saved query, the results are displayed on this page (you may have to scroll down to view them). The home page opens when you first log in. To return to the home page anytime, click the Oracle Content Server link in the upper left.
3.5 Actions Menus
Actions menus have options that change depending on the context.

There are three types of actions menus:
-
Page actions menus
These menus pull down from below the page heading and list options that apply to the entire page. A page can have multiple actions menus. For example, on a search results page the Change View menu lists options for changing the view of the search results, and the Query Actions menu lists options for searching within the existing search and saving it.
-
Table Actions menus
These menus are displayed above a table of content items, and the menus list options that you can apply to multiple items selected in the table. For example, if the Upload Files Window or Download Files Screen is available, you can select multiple items from a search result list and use the table Actions menu to download them.
-
Item Actions menus
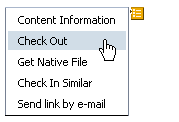
These menus expand from the contextual menu in the Action column next to a content item and list actions that pertain only to the associated content item. For example, among the options in the Actions menu for an item in a search result are links to check out the item and to view the item's content information.
3.6 Pop-Up Calendar
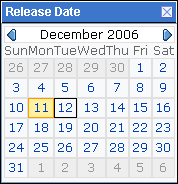
The Pop-up Calendar component is automatically installed with Oracle Content Server. Click the calendar icon to the right of all editable date metadata fields to open the Pop-Up Calendar Screen:
-
Release Date (Content Check In page and Search page)
-
Expiration Date (Content Check In page and Search page)
The calendar enables you to quickly select dates and easily move between previous and future months and years. It also eliminates date formatting and typographical errors because date fields are automatically populated with the user-selected date.
This section covers the following topics:
3.6.1 Pop-Up Calendar Screen
Click a calendar icon to the right of a date metadata field to open an interactive calendar screen that displays the current date (month, day, year) by default.
3.6.2 Setting Release and Expiration Dates
You can use the Pop-up Calendar to populate the Release Date and Expiration Date metadata fields on the Content Check In and Search pages. You can also enter dates directly.
Note:
You can change the user locale to control date format. For information about changing the locale, see Section 3.7.2, "Editing Your User Profile."To select a date using the Pop-up Calendar:
-
Access the Content Check-In Form or a Search page. By default, the Release Date metadata field shows the current date.
-
Click the calendar icon next to the Release Date or Expiration Date metadata field. The Pop-Up Calendar Screen opens.
-
Select the month, day, and year. The selected date is entered into the metadata field.
-
Close the Pop-up Calendar screen.
3.6.3 Updating Expiration Dates
To update the Expiration Date metadata field:
-
Select a content item.
-
Click the calendar icon next to the Expiration Date metadata field. The Pop-Up Calendar Screen opens.
-
Select the month, day, and year. The selected date is entered into the metadata field.
-
Close the Pop-up Calendar screen.
3.7 Personalizing the Interface
This section covers the following topics:
3.7.1 About Personalization
When you log in to Oracle Content Server, the system retrieves information about you that is stored in your user profile. While much of the information in your user profile (such as your user name and security permissions) can be changed only by the system administrator, there are several items you can change yourself:
-
You can change personal information, such as your full name, password, and e-mail address on the User Profile Page.
-
You can add links to the My Oracle Content Server Tray. Links provides quick access to things you use most often, such as predefined searches and your favorite Web sites.
-
You can personalize the way you search for and display content by specifying the default search form used on the Advanced Search page accessed from the Quick Search Field, and creating new Search Result Templates for displaying different types of content in different ways.
3.7.2 Editing Your User Profile
Use the following procedure to edit your user profile information:
-
Click the
user_namelink at the top of the main menu bar.The User Profile Page opens.
-
Edit your full name, password, and e-mail address as necessary. Please note the following considerations:
-
If you are changing your password, you must enter the new password in both the Password and Confirm Password fields.
If you are using an enterprise authentication system, the Password field might not be available.
-
Do not change your user type or user locale; these fields should be changed only by a system administrator.
-
Select the Override check box next to the User Locale field to temporarily override the locale setting and to save your language choices.
-
-
Select an option for e-mail notification format, either HTML or text.
-
Enable or disable the upload and download applets.
Note:
The check boxes for the upload and download applets are displayed only if the system administrator enabled them. -
Select a layout, skin, search template, and search form type.
The documentation shows the user interface with the Trays menu selected.
-
Click Update.
3.7.3 Creating a Custom Search Result Template
Use the following procedure to create a custom search result template:
-
Navigate to the Search Result Templates for user Page.
-
From a search results page, choose Customize from the Actions menu.
-
Open the My Oracle Content Server Tray and click My Search Result Templates. The Search Result Templates for user Page opens.
-
-
Click the Add Template icon in the Actions column next to the provided List template on which you want to base your custom template. The Create Custom Template page opens.
-
If your custom template is not based on the provided Headline View template, skip to the next step. If your custom template is based on the Headline View template, select a metadata field to display as a column from the Available Fields box, and click the right arrow. The selected metadata field is added to the Columns field. You must select and move each field separately.
To reorder the column display, use the up and down arrows next to the Columns field. Click the up arrow to move the selected column to the left in the results template. Click the down arrow to move the selected column to the right in the results template.
-
Select a metadata field to display in the Description column from the Available Fields box, and click Move Here beneath the Description box. The metadata field is added to the Description box. You must select and move each field separately.
To reorder the column display, use the up and down arrows next to the Main Information field. Click the up arrow to move the selected item up in the Description column. Click the down arrow to move the selected column down in the Description column.
Important:
To display the selected fields, you must also display the Description metadata field as a column. -
Click Save.
3.7.4 Editing Saved Queries
Use the following procedure to edit links to saved queries in your My Saved Queries tray:
-
Click the My Saved Queries link in the My Oracle Content Server Tray.
The Saved Queries Page opens.
-
To display the results of a query on the home page, select the Default option for that query, and select the Show Default Query check box.
-
To set the number of content items displayed on the home page for the selected default query, enter a number in the Results on Portal Page field, and select the Show Default Query check box.
-
Click Update.
Note:
For information on how to save a query link in your portal navigation bar, see Section 4.10.2, "Saving a Query."3.7.5 Saving Personal URLs
Use the following procedure to save links to Web sites in your portal navigation bar:
-
Click the My URLs link in the My Oracle Content Server Tray in the portal navigation bar.
The Personal URLs for User Name page opens.
-
Enter a descriptive name in the Title field. This name appears as the link in your portal navigation bar.
-
Enter a complete web address in the URL field; for example:
http://www.oracle.com
-
Click Update.
3.7.6 User Profile Page
Your user profile enables you to change information about yourself and provides access to other user functions. To access the user profile page, click the user_name link at the top of the main menu bar
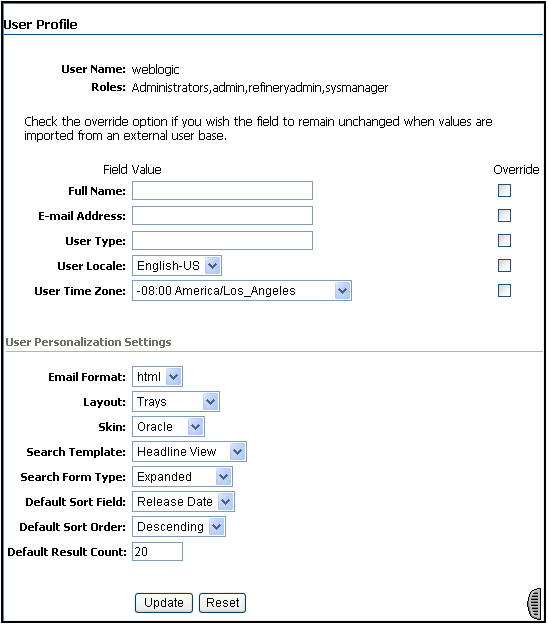
| Element | Description |
|---|---|
| User Name field | The user currently logged in. This field cannot be modified. |
| Roles field | The roles assigned to your user login. Roles determine what access you have to content and system functions. This field cannot be modified. |
| Full Name field | The full name identifies the user in a more easily recognized way. |
| E-mail Address field | The e-mail address that is used for subscription notifications and workflow notifications. |
| User Type field | An identifier used by the system administrator to place users in groups. This field should not be changed. |
| User Locale field | Specifies the language and date and time format displayed on content server pages. If the system administrator has enabled multiple locale options, you can select the locale that you prefer.
Select the Override check box next to this field to temporarily override the locale setting and to save your language choices. |
| Email Format field | html: Formats subscription and workflow notification e-mails in HTML format.
text: Formats subscription and workflow notification e-mails in plain-text format. |
| Layout field | Specifies the user interface of Oracle Content Server.
Trays: Trays is the default layout when Oracle Content Server is installed. Features include expanding trays in the Portal Navigation Bar, including a Search tray and Results tab. Trays is a frame-based layout. Top Menus: Trays are removed from the Portal Navigation Bar and replaced by menus located above the content area. The Top Menus layout does not use frames. |
| Skin field | Skins provide predefined color and icon choices for each layout.
Oracle (Default): Predominantly blue and khaki Oracle 2: Predominantly blue and gold |
| Search Template field | Specifies the default template used to present search results.
Classic: Each item includes a thumbnail image or content type icon and multiple lines of metadata. Headline: Each item is shown on a single line with no thumbnail and minimal metadata. Thumbnail: Each item shown with a thumbnail image or content type icon and minimal metadata arranged in multiple columns. Custom Search Template: A variable for a search template that your administrator may have made. A custom search template enables you to select a customized search result view, if this exists in your Oracle Content Server instance, including Classic, Thumbnail, and Headline formats for displaying search results. If the The search result view can be changed dynamically using the Content Actions menu on a search results page. When selected on a search results page, the view is saved as the default view for subsequent search results. |
| Search Form Type | Sets the default search form on the Advanced Search page.
Expanded Form: Displays all search field options on a single page. Query Builder Form: Offers available search fields for selection from lists, and enables fields for direct edit of the query text. |
| Default Sort Field | Sets the default field by which to sort search results. |
| Default Sort Order | Sets the default order in which search results are displayed. |
| Default Result Count | Sets the maximum number of content items listed on a search results field. |
| Update button | Saves any changes that were made on this page. |
| Reset button | Resets the fields on this page to the previously saved settings. |
3.7.7 My Oracle Content Server Tray
The My Oracle Content Server tray places links to various system functions specific to you in your portal navigation bar. To expand this tray to access the links in this tray, click My Oracle Content Server on the Portal Navigation Bar.
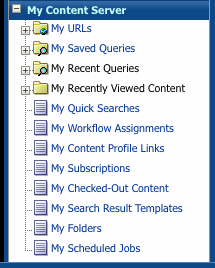
| Element | Description |
|---|---|
| My URLs icon | Expands the folder to display links to any URLs you have saved using the Personal URLs for User Name page. Saved URLs can include web addresses to internal content or external sites. |
| My URLs link | Displays the Personal URLs for User Name page, where you can save links to Web sites in your portal navigation bar. |
| My Saved Queries icon | Expands the folder to display links to any searches you have saved using the Save Search action on a search results page. |
| My Saved Queries link | Displays the Saved Queries Page, where you can remove searches from your My Saved Queries folder. |
| My Recent Queries icon | Expands the folder to display links to the most recent queries you have performed. |
| My Recent Queries link | Displays the My Recent Queries page, where you can view a list of the most recent search queries you have made and resubmit a query. |
| My Recently Viewed Content icon | Expands the folder to display links to the most recently viewed content items you have viewed. |
| My Recently Viewed Content link | Displays the My Recently Viewed Content list of the most recent Content Information Pages you have viewed. To open the Content Information Page for an item, select the item from the list. |
| My Quick Searches | Displays a list of the most recent quick searches you have performed. |
| My Workflow Assignments | Displays a list of all content items currently in a workflow for which you have responsibility. |
| My Content Profile Links | Displays a list of your defined content profile links. |
| My Subscriptions | Displays a list of all content items to which you are subscribed. |
| My Checked-Out Content | Displays a list of all content currently checked out by you. |
| My Search Result Templates | Displays the Search Result Templates, from which you can build custom search results views based on the provided Classic, Headline, and Thumbnail templates. |
| My Folders | Displays a list of folders for you. |
| My Scheduled Jobs | Displays a list of jobs requiring your attention. |
3.7.8 Search Result Templates
Search Result templates determine what content item information is listed on a search results page and how that information is displayed. You can create custom search result templates using the Search Result Templates for user Page to identify the information and specify display options. Custom templates are based on one of three provided default templates:
3.7.9 Classic View Template
The Classic template lists content items sequentially in single rows, based on the default sort field and order set on the User Profile Page.
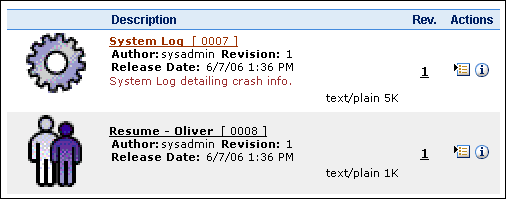
| Column | Description |
|---|---|
| Content icon or Thumbnail image | Displays an icon based on the content type. Optionally, if your system administrator has set up Oracle Content Server to create a thumbnail image of the content, then it displays the thumbnail image. |
| Description | Displays the following information:
Title and Content ID: The title and unique identifier of the content item, linked to display a web-viewable version of the content, if it is available. If no web-viewable version is available, it is linked to the native file. The title and content ID are displayed in all custom search result templates based on the Classic View, even if those fields are not specifically selected from the Classic View Template section of the Create/Edit Classic View Search Result Template Page. Author: The person who checked in the content item. Revision: Identifies the revision number of the content item. Release Date: The date the content item was released. Comments: Comments entered when the item was checked in, if any. Content Format: The format of the native file. |
| Rev. | Displays the revision number of the content item. |
| Actions | Displays the Actions menu for an item and the Content Info icon.
Actions icon: Click this icon to open a menu of actions that can be applied to the selected content item. Content Info icon: Click this icon to display the Content Information Page. |
3.7.10 Headline View Template
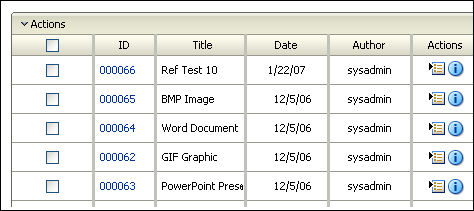
The Headline template by default lists items in a single line, with a minimum of information to maximize the result list. The list is arranged based on the sort field and order set on the User Profile Page. The quantity listed per page is based on returned results and the number specified as the default result count on the User Profile page.

| Column | Description |
|---|---|
| ID | A unique identifier of the content item, linked to a web-viewable version of the content item, if it is available. If no web-viewable version is available, it is linked to the native file. |
| Title | Displays the title of the content item without any associated link. |
| Date | Displays the date the content item was released. |
| Author | Displays the user name of the person who last checked in the content item. |
| Actions | Displays the Actions menu for an item and the Content Info icon.
Actions icon: Click this icon to open a menu of actions that can be applied to the selected content item. Content Info icon: Click this icon to display the Content Information Page of the selected content item. |
3.7.11 Thumbnail View Template
The Thumbnail template by default lists items in a grid from left-to-right and top-to-bottom and displays an icon based on the content type, or a thumbnail image of the content if your system administrator has set up Oracle Content Server to create one. This template is particularly suited for displaying images and other graphic content. The grid is arranged based on the sort field and order set on the User Profile Page.
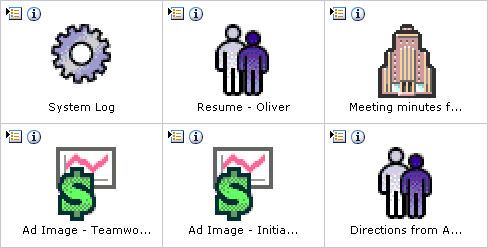
| Item | Description |
|---|---|
| Icons | Displays the Actions menu for an item and the Content Info icon.
Actions icon: Click this icon to open a menu of actions that can be applied to the selected content item. Content Info icon: Click this icon to display the Content Information Page of the selected content item. |
| Thumbnail Icon or Image | Displays an icon based on the content type or a thumbnail image of the content if your system administrator has set up Oracle Content Server to create one, linked to a web-viewable version of the content item, if it is available. If no web-viewable version is available, it is linked to the native file. |
| Title | Displays the title of the content item without any associated link. To maintain the grid structure, long titles are truncated to a single line. Rolling the mouse over the title expands the text to display the full title. |
3.8 Creating and Editing Custom Search Result Templates
You can personalize how search results are displayed by selecting an option from the list on the User Profile Page, or from the Search Results Page. There are three templates available by default, and you have the option to create new views based on the three provided templates. In this way, you can customize the metadata information you want to see on a search result. You can even specify different search results templates to be used for different saved queries.
For more information about custom search result templates, see Section A.3, "Creating and Editing Custom Search Result Templates."
