A.1 Oracle IRM Desktop Options Dialog
The following tabs and dialogs are used to set options in Oracle IRM Desktop:
Open the Oracle IRM Desktop Options dialog by right-clicking the Oracle IRM icon in the system tooltray and selecting Options, or by opening the Microsoft Windows Control Panel and double-clicking the Oracle IRM Desktop Options icon.
A.1.1 General Tab
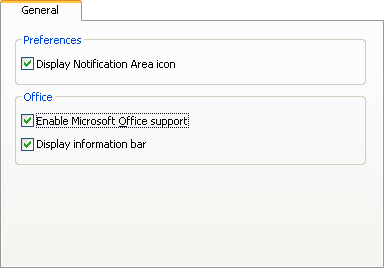
Use the General tab for setting the main preferences.
Open the tab by selecting General on the Oracle IRM Desktop Options dialog.
| Element | Description |
|---|---|
| Display Notification Area icon (checkbox) | Normally checked. Unless you are a Citrix user, uncheck to remove the Oracle IRM icon from the row of icons in the bottom right corner of the screen. When double-clicked, this icon opens the Oracle IRM Desktop options dialog. You can also open this dialog from the Windows Control Panel. Citrix users must not uncheck this box. |
| Enable Microsoft Office support (checkbox) | Normally checked. Uncheck to disable the integration of sealing options directly into your Microsoft Office applications. Unchecking this option disables the opening of sealed Microsoft Office files. |
| Display information bar (checkbox) | Normally checked. Uncheck to never show the Oracle IRM messages area in Microsoft Office documents. If checked, the information bar for a specific document can be closed by clicking the black cross on the right of the bar in that document. |
A.1.2 Desktop Sealing Tab
The desktop sealing feature integrates Oracle IRM sealing options into Windows Explorer:
-
Seal To, Reseal To and Unseal options are added to the File menu.
-
Options to create new sealed documents are added to the New submenu.
-
Oracle IRM information is added to the file properties available through Windows Explorer. If you select a file and open its Properties dialog, there is an Oracle IRM tab that shows, for example, which context the document is sealed to.
-
A pop-up description is displayed when you move your mouse pointer over the name of a sealed document (if Windows Explorer is configured to show such pop-ups).
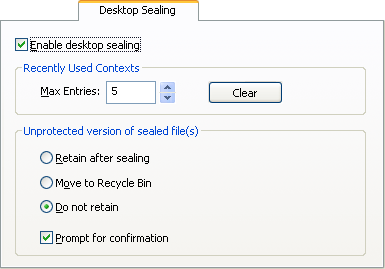
Open the tab by selecting Desktop Sealing on the Oracle IRM Desktop Options dialog.
| Element | Description |
|---|---|
| Enable desktop sealing (checkbox) | Normally checked. Uncheck to disable desktop sealing. |
| Recently Used Contexts | Max Entries: Default value is 5. Enter a number (between 0 and 20) to specify how many recently used contexts are offered when you use the Seal To and Reseal To menu options. When you seal or reseal a file, you need to specify which context you want to seal to. The recently used context list makes it easier to complete this task. Use the Clear button to remove the current value. |
| Unprotected version of sealed file(s) | Use to determine what happens to the original files when sealed versions of them are created. The default is that such files are retained in an unprotected state.
Retain after sealing: The original files will not be removed after a sealed version has been created. The original files will be in an unprotected state. This is the default. Move to Recycle Bin: The original files will be moved to the Windows Recycle Bin after a sealed version has been created. The moved files can be recovered from the Windows Recycle Bin until the bin has been emptied. The file in the Windows Recycle Bin is in an unprotected state. If selected, the Prompt for confirmation checkbox becomes available and is unchecked. Do not retain: The original files will be removed after a sealed version has been created. This is a normal file system deletion, not a complete destruction of the file, so if you are concerned that this does not provide adequate security, you may want to consult your system administrator about further action. If selected, the Prompt for confirmation checkbox becomes available and is checked. Prompt for confirmation: Available if the Move to Recycle Bin option or the Do not retain option has been chosen. Select this checkbox if you want to see a prompt before an original file is deleted or moved after a sealed version has been created. The default status changes depending on which of the above options has been selected. |
A.1.3 Servers Tab
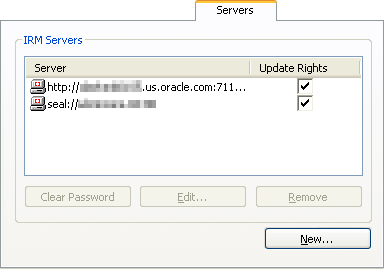
The Servers tab shows a list of the servers to which sealed documents are or can be synchronized. Most of the time the list is managed automatically. In rare circumstances, you might add or remove a server manually. For example, if you know that your account has been deleted on a server, you can use the settings to remove the server from the list.
Open the tab by selecting Servers on the Oracle IRM Desktop options dialog.
| Item | Description |
|---|---|
| [Oracle] IRM Servers | Lists the servers that are available for your sealed documents to be synchronized with.
Server: The address (URL) of the server. Update Rights: Normally checked. Any checked servers will be affected if you manually check in your rights. See Update Rights Tab. Uncheck a server if you do not want your rights to be checked in for that server. Clear Password: For the highlighted server, clears the stored username and password entered from this instance of Oracle IRM Desktop. You will need to clear the password if you have more than one user identity on the server and you wish to change from one identity to another (perhaps because the different identities have different document access rights associated with them). This is applicable only if you selected the Remember My Password checkbox on the Oracle IRM Server Credentials dialog. When you select the Clear Password button, you see a message that tells you either that the stored password has been cleared, or that no password is stored for the server. After the password has been cleared, you will be prompted to supply a username and password the next time that you need to contact the server, for example when opening a sealed document. Edit: Opens the Add Server Dialog, allowing you to change the URL of the item highlighted in the [Oracle] IRM Servers list. Remove: Removes the highlighted server from the list. There may be servers that cannot be removed, because of the way they have been configured. New: Opens the Add Server Dialog, through which you can add the URL of a server that you want added to the list. |
A.1.4 Update Rights Tab
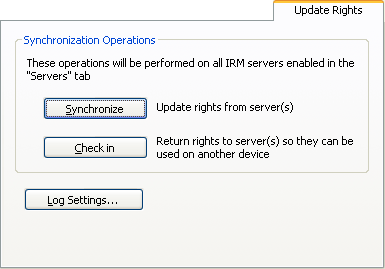
The Update Rights tab lets you synchronize your rights on remote servers with your locally cached rights. This tab also lets you give up your locally cached rights so that the server can reissue them to you on another device.
Your locally cached rights allow you to keep working with sealed documents even when you are disconnected from the network and cannot contact the server. Typically, your cached rights allow you to keep using documents for several days before being required to contact the server.
Open the tab by selecting Update Rights on the Oracle IRM Desktop options dialog.
| Item | Description |
|---|---|
| Synchronize (button) | Updates the locally cached rights with those on the servers, where the Update Rights checkbox has been checked on the Servers tab. |
| Check in (button) | Gives up the locally cached rights for sealed documents managed by the servers whose Update Rights checkboxes have been checked on the Servers tab. |
| Log Settings (button) | Opens the Synchronization Log Configuration Dialog, through which you can select which synchronization message categories are written to the Windows event log. |
A.1.5 Search Tab
If enabled, searches of documents (in, for example, Windows Explorer) can find content in sealed documents that match the search criteria.
For the Microsoft Windows 2008, Windows Vista, and Windows 7 operating systems, the "advanced" indexed search facility must also be set up. If this is not done for these operating systems, the results of searches will exclude some file locations. For other operating systems, you do not need to set up the indexed search facility, although doing so will make searching more efficient.
Searches for content will attempt to match the search criteria in sealed documents as well as unsealed documents (presuming that you did not specify specific file types in which to search). The success of a search depends on whether you have the right to search the content of specific sealed documents in the folder. If the criteria are matched by content in a sealed document that you have the right to search, the sealed document is included in the search results.
You do not need to enable the search facility simply to search for the file names of sealed files.
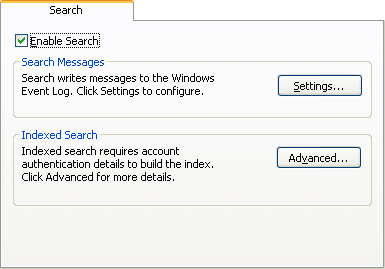
Open the tab by selecting Search on the Oracle IRM Desktop Options dialog.
| Item | Description |
|---|---|
| Enable Search (checkbox) | Normally checked. Uncheck if you do not want sealed documents to be included in the results of searches. Checking this box will enable the logging and indexing features described below. |
| Search Messages | If searching is enabled, searches generate a log showing the history of successful and unsuccessful searches involving sealed documents. (Unsuccessful searches are typically a result of not having the right to search.)
Settings: Click to open the Search Log Configuration Dialog, through which you can choose whether the log is displayed, clear the contents of the log, view the log, and set the log location. |
| Indexed Search | You can configure the search component to enable the Microsoft Indexing Service to support sealed documents. Indexing can make searches more efficient, and is essential when searching within the Microsoft Windows 2008, Windows Vista, and Windows 7 operating systems.
Advanced: Click to open the Indexing Service Configuration Dialog, through which you can add details for the Oracle IRM Servers that will handle the indexing. |
A.1.6 Email Tab
The Oracle IRM Desktop email features integrate sealing options into the Microsoft Outlook or Lotus Notes mail clients. This enables you to create sealed messages and reply threads in those clients as easily as you can create regular email.
Users of other email clients can create and receive sealed email, but the option is not integrated into the mail client. Typically, you would select New from the File menu in Windows Explorer to create a new sealed message. You could then use the attachment functionality of any email client to send the sealed email message. Similarly, sealed email that you receive appears as an attachment that you open in the normal way.
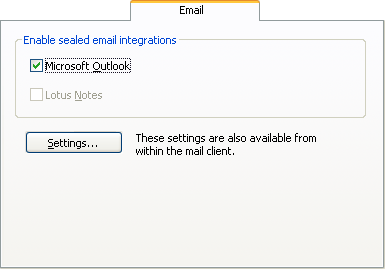
Open the tab by selecting Email on the Oracle IRM Desktop options dialog.
| Item | Description |
|---|---|
| Enable sealed email integrations | Shows the supported mail clients and whether they are currently enabled for use with Oracle IRM Desktop. Mail clients not available on your computer are shown dimmed. Enabled mail clients are shown checked. To disable a mail client, uncheck it. |
| Settings (button) | Click to open the Sealed Email Options Dialog, through which you can:
|
A.1.7 About Tab
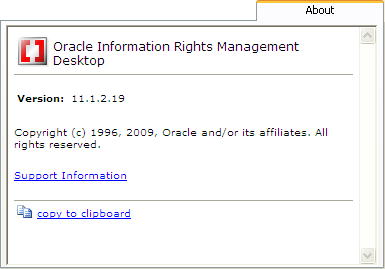
The About tab provides information about Oracle IRM Desktop, such as its version number and copyright information.
The tab also provides a Support Information link that you can use to collect information to assist support staff with problem diagnosis. If asked to provide further information about your Oracle IRM configuration, click the Support Information link and send the resultant file to your support representative.
Open the tab by selecting About on the Oracle IRM Desktop Options dialog. The About tab is also available from several other places, including the Oracle IRM Desktop Options dialog, the Oracle IRM Desktop Control Panel, and the Oracle IRM Desktop icon in the display notification area (system tray).
| Element | Description |
|---|---|
| Information area | Information about Oracle IRM Desktop. |
| Support Information (link) | Opens the Oracle IRM Desktop Support Information Dialog, through which information can be collected that is useful to support staff. |
| Copy to clipboard (link) | Copies the version and copyright information to the clipboard, from where it can be pasted into a text application. |
A.1.8 Add Server Dialog
Use the Add Server dialog to specify the URL of an Oracle IRM server.
Open the dialog by selecting the New or Edit buttons on the Servers tab of the Oracle IRM Options dialog, or on the Indexing Service Configuration dialog.

| Item | Description |
|---|---|
| Input box | Enter the URL of an Oracle IRM server.
For connection to an 11g server, the URL will be in the form For connection to a 10g server, the URL will be in the form |
| Validate (button) | Attempts to contact the server specified in the input box and validate the URL against the one configured on the Oracle IRM Server. This may not be the same URL entered here, and if successful the URL may be updated to match the one configured on the server. Success or failure is reported in a message dialog. If this option is not used, the URL is validated on clicking OK. |
A.1.9 Search Log Configuration Dialog
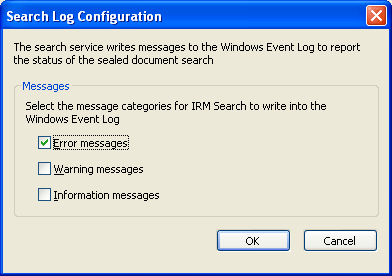
The search service writes messages to the Windows event log to report the status of the sealed document search.
Use the Search Log Configuration dialog to select which search message types are written to the Windows event log.
Open the dialog by selecting the Settings button on the Search tab of the Oracle IRM Desktop Options dialog.
| Item | Description |
|---|---|
| Messages | For each message type that you want to appear in the Windows event log, make sure that its checkbox is checked. |
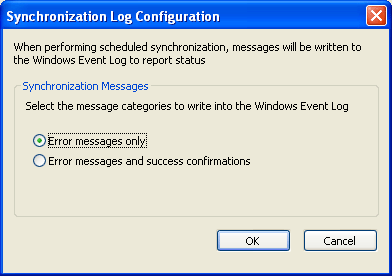
A.1.10 Synchronization Log Configuration Dialog
The synchronization manager writes messages to the Windows event log to report its status.
Use the Synchronization Log Configuration dialog to select which synchronization message categories are written to the Windows event log.
Open the dialog by selecting the Log Settings button on the Update Rights tab of the Oracle IRM Desktop Options dialog.
| Item | Description |
|---|---|
| Synchronization Messages | Select either Error messages only or Error messages and success confirmations. |
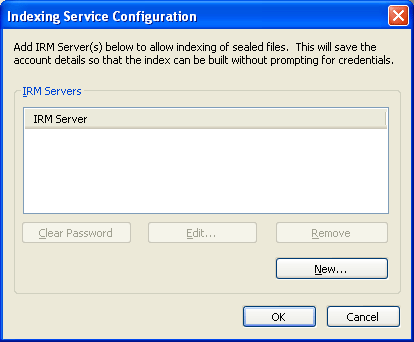
A.1.11 Indexing Service Configuration Dialog
You can configure the Oracle IRM Desktop search feature to use the Microsoft indexing service to support sealed documents. Indexing makes searches more efficient, and is essential for searching within the Microsoft Windows 2008, Windows Vista, and Windows 7 operating systems.
The ability to create an index is subject to the rights of the account that the indexing service uses when requesting the right to search documents. This could be a user account, or could be an account created on the server specifically for the indexing service. For example, if you are setting up an index on a file server rather than an end user system, you might want the indexing service to have its own account on the server so that it can create indexes even if it is not running under a user account. You would need to consult the server administrator to arrange for an account and the associated Search right. See About Rights. The configuration is machine-wide, and only accounts using basic (username/password) authentication can be used as Search accounts.
When the indexing service tries to index sealed documents, it refers to the server for search rights. If successful, the sealed documents are indexed. Note that, if the indexed folders contain sealed documents that are authorized by different servers, you need to add each of the servers to the list in this dialog.
Note:
Search indexes created as described in this section are not restricted to the account holding the Search right: they can be read by anyone with access to the host computer.Open the dialog by selecting the Advanced button on the Search tab of the Oracle IRM Desktop options dialog.
| Item | Description |
|---|---|
| [Oracle] IRM Server (list area) | This list is initially empty. When populated, the list shows the URL, authentication type, and username of servers that manage the rights for the sealed documents that you want to be included in the search index. To add a server to the list, click the New button. |
| Clear Password (button) | For the highlighted server, clears the stored username and password entered from this instance of Oracle IRM Desktop. You will need to clear the password if you have more than one user identity on the server and you wish to change from one identity to another (perhaps because the different identities have different search and document access rights associated with them). When you select the Clear Password button, you see a message that tells you either that the stored password has been cleared, or that no passwords are stored for the server. After the password has been cleared, you will be prompted to supply a username and password the next time that you perform a search or index operation that involves a sealed document. |
| New (button) | Click to open the Oracle IRM Server URL dialog. Through this you can enter the URL of a server that controls the rights for the sealed documents that you want to be able to index. |
| Edit (button) | Applies to the server currently highlighted in the list. Click to reopen the Oracle IRM Server URL dialog, through which you can change the details for the server. |
| Remove (button) | Click to remove the currently highlighted server from the list. |