98 Configuring a Database Login
In a relational database project, TopLink retrieves the table information from the database, for each descriptor. Each TopLink Workbench project contains an associated database. You can create multiple logins for each database.
This chapter includes the following sections:
Table 98-1 lists the configurable options for a database login.
98.1 Introduction to Database Login Configuration
Table 98-1 lists the configurable options for a database login.
Table 98-1 Configurable Options for Database Login
| Option to Configure | Oracle JDeveloper |
TopLink Workbench |
Java |
|---|---|---|---|
|
Relational database (see Section 98.2, "Configuring a Relational Database Platform at the Session Level") |
|||
|
Database login connection options (see Section 98.3, "Configuring Database Login Connection Options") |
|||
|
Sequencing (see Section 98.4, "Configuring Sequencing at the Session Level") |
|||
|
JDBC options (see Section 98.6, "Configuring JDBC Options") |
|||
|
User name and password (see Section 97.2, "Configuring User Name and Password") |
|||
|
Table qualifier (see Section 98.5, "Configuring a Table Qualifier") |
|||
|
Advanced options (see Section 98.7, "Configuring Advanced Options") |
|||
|
Password encryption (see Section 97.3, "Configuring Password Encryption") |
|||
|
External connection pooling (see Section 97.4, "Configuring External Connection Pooling") |
|||
|
Properties (see Section 97.5, "Configuring Properties") |
|||
|
Oracle Database proxy authentication (see Section 98.8, "Configuring Oracle Database Proxy Authentication") |
98.2 Configuring a Relational Database Platform at the Session Level
For each database session, you must specify the database platform (such as Oracle Database). This platform configuration overrides the platform at the project level, if configured.
For more information, see the following:
98.2.1 How to Configure a Relational Database Platform at the Session Level Using TopLink Workbench
To specify the database platform options for a relational server (or database) session login, use this procedure:
-
Select a relational server (or database) session in the Navigator. Its properties appear in the Editor.
-
Click the Login tab. The Login tab appears.
-
Click the Connection subtab. The Connection subtab appears.
-
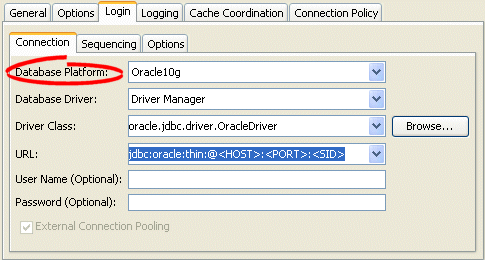
Figure 98-1 Login Tab, Connection Subtab, Database Platform Option
Description of "Figure 98-1 Login Tab, Connection Subtab, Database Platform Option"
Select the database platform from the menu of options. This menu includes all instances of DatabasePlatform in the TopLink classpath.
98.3 Configuring Database Login Connection Options
You configure connection information at the session level for a POJO TopLink application. This information is stored in the sessions.xml file. The TopLink runtime uses this information whenever you perform a persistence operation using the session in your POJO TopLink application.
This connection configuration overrides the connection information at the project level, if configured. For more information about project-level configuration, see Section 20.5, "Configuring Development and Deployment Logins".
This connection configuration is overridden by the connection information at the connection pool level. For more information, see Section 101.5, "Configuring Connection Pool Connection Options".
98.3.1 How to Configure Database Login Connection Options Using TopLink Workbench
To specify the connection options for a relational server (or database) session login, use this procedure:
-
Select a relational server (or database) session in the Navigator. Its properties appear in the Editor.
-
Click the Login tab. The Login tab appears.
-
Click the Connection subtab. The Connection subtab appears.
Figure 98-2 Login Tab, Connection Subtab, Database Driver
Description of "Figure 98-2 Login Tab, Connection Subtab, Database Driver"
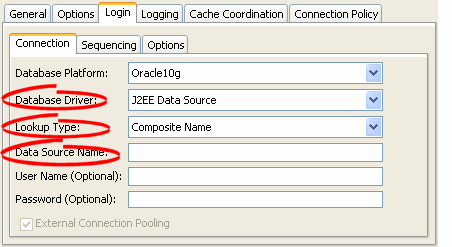
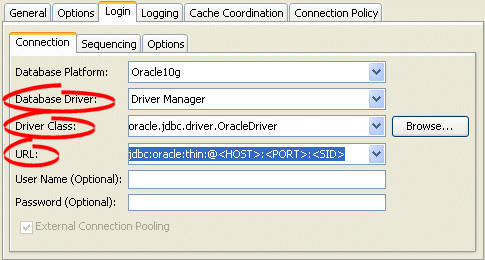
Use the following information to enter data in the driver fields on the tab:
| Field | Description |
|---|---|
| Database Driver | Specify the appropriate database driver:
Note: If you select J2EE Datasource, you must use external connection pooling. You cannot use internal connection pools with this Database Driver option (for more information, see Section 97.4, "Configuring External Connection Pooling"). |
| Driver ClassFoot 1 | Configure this field when Database Driver is set to Driver Manager. Select from the menu of options. This menu includes all JDBC drivers in the TopLink classpath. |
| Driver URLFootref 1 | Configure this field when Database Driver is set to Driver Manager. Select from the menu of options relevant to the selected Driver Class, and edit the URL to suit your data source. |
| Data Source NameFoot 2 | Configure this field when Database Driver is set to J2EE Datasource. Specify any valid JNDI name that identifies the Java EE data source preconfigured on your target application server (example: jdbc/EmployeeDB).
By convention, all such names should resolve to the JDBC subcontext (relative to the standard |
| Lookup TypeFootref 2 | Configure this field when Database Driver is set to J2EE Datasource. Specify the lookup method for determining the JNDI name:
|
Footnote 1 Applicable only when Database Driver is set to Driver Manager.
Footnote 2 Applicable only when Database Driver is set to J2EE Datasource.
98.4 Configuring Sequencing at the Session Level
You configure TopLink sequencing at the session or project level to tell TopLink how to obtain sequence values: that is, what type of sequences to use.
In a CMP project, you do not configure a session directly: in this case, you must configure sequences at the project level (see Section 20.3, "Configuring Sequencing at the Project Level"). In a POJO project, you can configure a session directly: in this case, you can use session-level sequence configuration to override project-level sequence configuration, on a session-by-session basis, if required.
You can configure sequencing at the session level using Oracle JDeveloper.
Using TopLink Workbench (see Section 98.4.1, "How to Configure Sequencing at the Session Level Using TopLink Workbench"), you can configure table sequencing (see Section 18.2.2.1, "Table Sequencing") and native sequencing (Section 18.2.2.5, "Native Sequencing with an Oracle Database Platform" and Section 18.2.2.6, "Native Sequencing with a Non-Oracle Database Platform"), and you can configure a preallocation size that applies to all sequences (see Section 18.2.3, "Sequencing and Preallocation Size").
Using Java (see Section 98.4.2, "How to Configure Sequencing at the Session Level Using Java"), you can configure any sequence type that TopLink supports (Section 18.2.2, "Sequencing Types"). You can create any number and combination of sequences. You can create a sequence object explicitly or use the default sequence that the platform creates. You can associate the same sequence with more than one descriptor and you can configure a separate preallocation size for each descriptor's sequence.
After configuring the sequence type at the session (or project) level, to enable sequencing, you must configure a descriptor with a sequence field and a sequence name (see Section 23.3, "Configuring Sequencing at the Descriptor Level").
For more information about sequencing, see Section 18.2, "Sequencing in Relational Projects".
98.4.1 How to Configure Sequencing at the Session Level Using TopLink Workbench
To specify the sequencing information for a relational server (or database) session, use this procedure:
-
Select the session object in the Navigator.
-
Click the Login tab in the Editor.
-
Click the Sequencing subtab. The Sequencing subtab appears.
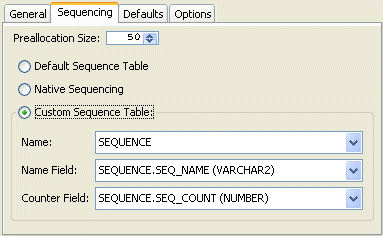
Use the following information to enter data in each field of the Sequencing subtab to configure the persistence type:
| Field | Description |
|---|---|
| Preallocation Size | Select the default preallocation size (see Section 18.2.3, "Sequencing and Preallocation Size"). Default is 50. The preallocation size you configure applies to all sequences. |
| Default Sequence Table | Select this option to use table sequencing (see Section 18.2.2.1, "Table Sequencing") with default sequence table name SEQUENCE, default sequence name field SEQ_NAME, and default sequence count field SEQ_COUNT. |
| Native Sequencing | Select this option to use a sequencing object (see Section 18.2.2.5, "Native Sequencing with an Oracle Database Platform" or Section 18.2.2.6, "Native Sequencing with a Non-Oracle Database Platform") created by the database platform. This option applies to supported database platforms (see Section 96.1.3.1, "Database Platforms"). |
| Custom Sequence Table | Select this option to use table sequencing (see Section 18.2.2.1, "Table Sequencing") with a sequence table name, sequence name field, and sequence count field name that you specify. |
| Name | Select the name of the sequence table. |
| Name Field | Select the name of the column used to store the sequence name. |
| Counter Field | Select the name of the column used to store the sequence count. |
98.4.2 How to Configure Sequencing at the Session Level Using Java
Using Java, you can perform the following sequence configurations:
98.4.2.1 Using the Platform Default Sequence
After you configure your login with a platform (see Section 98.2, "Configuring a Relational Database Platform at the Session Level"), you can use the default sequence that the platform provides.
If you associate a descriptor with an unspecified sequence, the TopLink runtime will create an instance of DefaultSequence to provide sequencing for that descriptor. For more information, see Section 23.3.2.3, "Configuring the Platform Default Sequence".
You can access the default platform sequence directly as Example 98-1 shows. For example, by default, a DatabasePlatform creates a table sequence using the default table and column names (see Section 18.2.2.1, "Table Sequencing").
Example 98-1 Accessing the Platform Default Sequence
// assume that dbLogin owns a DatabasePlatform
TableSequence tableSeq2 = ((TableSequence)dbLogin.getDefaultSequence()).clone();
tableSeq2.setName("EMP_SEQ");
tableSeq2.setPreallocationSize(75);
dbLogin.addSequence(tableSeq2);
To avoid having to clone the platform default sequence, you can use the DefaultSequence class–a wrapper for the platform default sequence–as Example 98-2 shows. The new sequence named EMP_SEQ will be of the same type as the platform default sequence.
Example 98-2 Using the DefaultSequence Class
login.addSequence(
    new DefaultSequence("EMP_SEQ", 75)
);
You can override the default platform sequence, as Example 98-3 shows. In this example, dbLogin owns a DatabasePlatform that provides a default sequence of type TableSequence. After setting the default sequence to type UnaryTableSequence, when you use the DefaultSequence class, it will access the new default sequence type. In this example, the sequence named EMP_SEQ will be of type UnaryTableSequence and have a preallocation size of 75.
Example 98-3 Overriding the Platform Default Sequence
// assume that dbLogin owns a DatabasePlatform
Sequence unaryTableSequence = new UnaryTableSequence();
unaryTableSequence.setPreallocationSize(40);
dbLogin.setDefaultSequence(unaryTableSequence);
dbLogin.addSequence(
    new DefaultSequence("EMP_SEQ", 75) // UnaryTableSequence
);
98.4.2.2 Configuring Multiple Sequences
In addition to using the platform default sequence (see Section 98.4.2.1, "Using the Platform Default Sequence"), you can explicitly create sequence instances and configure a Login with any combination of sequence types, each with their own preallocation size, as Example 98-4 shows. In this example, the sequence named EMP_SEQ will provide sequence values exclusively for instances of the Employee class and ADD_SEQ will provide sequence values exclusively for instances of the Address class. The sequence named PHONE_SEQ will use the platform default sequence with a preallocation size of 30 to provide sequence values for the Phone class.
Example 98-4 Configuring Multiple Sequences Explicitly
login.addSequence(new TableSequence("EMP_SEQ", 25));
login.addSequence(new DefaultSequence("PHONE_SEQ", 30));
login.addSequence(new UnaryTableSequence("ADD_SEQ", 55));
login.addSequence(new NativeSequence("NAT_SEQ", 10));
If login owned a DatabasePlatform (whose default sequence type is TableSequence), you could configure your sequences using the platform default sequence type, as Example 98-5 shows. In this example, sequences EMP_SEQ and PHONE_SEQ share the same TableSequence table: EMP_SEQ and PHONE_SEQ represent rows in this table.
98.4.2.3 Configuring Query Sequencing
You can configure the query that TopLink uses to update or read a sequence value for any sequence type that extends QuerySequence.
In most applications, the queries that TopLink automatically uses are sufficient. However, if your application has special sequencing needs–for example, if you want to use stored procedures for sequencing–then you can configure the update and read queries that the TopLink sequence uses.
Example 98-7 illustrates how to specify a stored procedure that updates a sequence and returns the new sequence value with a single SQL select query. In this example, the stored procedure is named UPDATE_SEQ. It contains one input argument–the name of the sequence to update (SEQ_NAME), and one output argument–the value of the sequence after the updated (SEQ_COUNT). The stored procedure increments the sequence value associated with the sequence named SEQ_NAME and returns the new sequence value in the output argument named SEQ_COUNT.
Example 98-6 Using a Stored Procedure for both Sequence Update and Select
ValueReadQuery seqReadQuery = new ValueReadQuery();
StoredProcedureCall spCall = new StoredProcedureCall();
spCall.setProcedureName("UPDATE_SEQ");
seqReadQuery.addNamedArgument("SEQ_NAME");
seqReadQuery.addNamedOutputArgument("SEQ_COUNT");
seqReadQuery.setCall(spCall);
((QuerySequence)login.getDefaultSequence()).setSelectQuery(seqReadQuery);
Example 98-7 and Example 98-8 illustrate how to specify separate stored procedures for sequence update and select actions.
In Example 98-7, the stored procedure is named UPDATE_SEQ and it contains one input argument: the name of the sequence to update (SEQ_NAME). The stored procedure increments the sequence value associated with the sequence named SEQ_NAME.
Example 98-7 Using a Stored Procedure for Sequence Updates Only
DataModifyQuery seqUpdateQuery = new DataModifyQuery();
StoredProcedureCall spCall = new StoredProcedureCall();
spCall.setProcedureName("UPDATE_SEQ");
seqUpdateQuery.addNamedArgument("SEQ_NAME");
seqUpdateQuery.setCall(spCall);
((QuerySequence)login.getDefaultSequence()).setUpdateQuery(seqUpdateQuery);
In Example 98-8, the stored procedure is named SELECT_SEQ and it takes one argument: the name of the sequence to select from (SEQ_NAME). The stored procedure reads one data value: the current sequence value associated with the sequence name SEQ_NAME.
Example 98-8 Using a Stored Procedure for Sequence Selects Only
ValueReadQuery seqReadQuery = new ValueReadQuery();
StoredProcedureCall spCall = new StoredProcedureCall();
spCall.setProcedureName("SELECT_SEQ");
seqReadQuery.addArgument("SEQ_NAME");
seqReadQuery.setCall(spCall);
login.((QuerySequence)getDefaultSequence()).setSelectQuery(seqReadQuery)
You can also create a QuerySequence directly and add it to your login, as Example 98-9 shows.
98.5 Configuring a Table Qualifier
Some databases (such as Oracle Database and DB2) require that all tables be qualified by an identifier. This can be the creator of the table or database name on which the table exists. When you specify a table qualifier, TopLink uses this qualifier for all of the tables it references. Specify a table qualifier only if required and only if all of the tables have the same qualifier.
98.5.1 How to Configure a Table Qualifier Using TopLink Workbench
To specify a table qualifier, use this procedure:
-
Select a relational server (or database) session in the Navigator. Its properties appear in the Editor.
-
Click the Login tab. The Login tab appears.
-
Click the Options subtab. The Options subtab appears.
Figure 98-5 Login Tab, Options Subtab, Table Qualifier Field
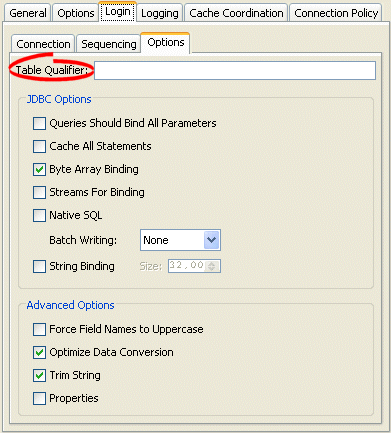
Description of "Figure 98-5 Login Tab, Options Subtab, Table Qualifier Field"
In the Table Qualifier field enter the identifier used to qualify references to all tables in this database.
98.6 Configuring JDBC Options
Most JDBC drivers support the run-time configuration of various options to customize driver operation to meet user needs. TopLink provides direct support (in API, Oracle JDeveloper and TopLink Workbench) for many of the most important options, as this section describes, as well as more advanced options (see Section 98.7, "Configuring Advanced Options").
You can also configure additional options by specifying properties (see Section 97.5, "Configuring Properties").
Note:
Not all drivers support all JDBC options. Selecting a combination of options may result in different behavior from one driver to another. Before selecting JDBC options, consult your JDBC driver documentation.98.6.1 How to Configure JDBC Options Using TopLink Workbench
To specify the JDBC options for a relational server (or database) session login, use this procedure:
-
Select a relational server (or database) session in the Navigator. Its properties appear in the Editor.
-
Click the Login tab. The Login tab appears.
-
Click the Options subtab. The Options subtab appears.
Figure 98-6 Login Tab, Options Subtab, JDBC Options
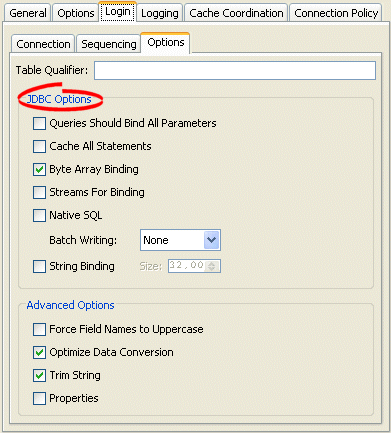
Description of "Figure 98-6 Login Tab, Options Subtab, JDBC Options"
Use this table to enter data in the fields on the Options subtab to select the JDBC options to use with this session login:
| Option | Description |
|---|---|
| Queries Should Bind All ParametersFoot 1 | By default, TopLink binds all of the query's parameters.
Deselect this option if you do not want TopLink to bind parameters. |
| Cache All StatementsFootref 1 | When selected, TopLink caches each prepared statement so that when reexecuted, you avoid the SQL preparation time which improves performance. |
| Byte Array BindingFootref 1 | Select this option if you query binary large object (BLOB) data. |
| Streams for BindingFootref 1 | Select this option if you use a JDBC driver that is more efficient at handling BLOB data using java.io.InputStream and java.io.OutputStream. |
| Native SQL | By default, TopLink generates SQL using JDBC SQL grammar. Select this option if you want TopLink to use database-specific SQL grammar, for example, if your database driver does not support the full JDBC SQL grammar. |
| Batch WritingFoot 2 | Select this option if you use a JDBC driver that supports sending groups of INSERT, UPDATE, and DELETE statements to the database in a single transaction, rather than individually.
Select JDBC to use the batch writing capabilities of your JDBC driver. Select TopLink to use the batch writing capabilities that TopLink provides. Select this option if your JDBC driver does not support batch writing. Note: if you are using Oracle 9 Database platform, and you want to use TopLink batch writing in combination with optimistic locking, then you must enable parameter binding. |
| String BindingFootref 1 | Select this option if you query large java.lang.String objects.
You can configure the maximum |
Footnote 1 For more information, see Section 12.11.5, "How to Use Parameterized SQL (Parameter Binding) and Prepared Statement Caching for Optimization".
Footnote 2 If you are using the MySQL4 database platform (see Section 96.1.3, "Data Source Platform Types"), use JDBC batch writing (do not use TopLink batch writing). For more information, see Section 12.11.3, "How to Use Batch Writing for Optimization".
98.6.2 How to Configure JDBC Options Using Java
To enable prepared statement caching for all queries, configure at the Login level, as Example 98-10 shows. For more information, see Section 12.11.5, "How to Use Parameterized SQL (Parameter Binding) and Prepared Statement Caching for Optimization".
Example 98-10 Prepared Statement Caching at the Login Level
databaseLogin.cacheAllStatements();
databaseLogin.setStatementCacheSize(100);
Parameter binding is enabled by default in TopLink. To disable binding, configure at the Login level, as Example 98-11 shows. For more information, see Section 12.11.5, "How to Use Parameterized SQL (Parameter Binding) and Prepared Statement Caching for Optimization".
To enable JDBC batch writing, use Login method useBatchWriting, as Example 98-12 shows:
98.7 Configuring Advanced Options
Most JDBC drivers support the run-time configuration of various options to customize driver operation to meet user needs. TopLink provides direct support (in API, Oracle JDeveloper and TopLink Workbench) for many of the most important options (see Section 98.6, "Configuring JDBC Options"), as well as more advanced options, as this section describes.
You can also configure additional options by specifying properties (see Section 97.5, "Configuring Properties").
Note:
Not all drivers support all JDBC options. Selecting a combination of options may result in different behavior from one driver to another. Before selecting JDBC options, consult your JDBC driver documentation.98.7.1 How to Configure Advanced Options Using TopLink Workbench
To specify the advanced options for a relational server (or database) session login, use this procedure:
-
Select a relational server (or database) session in the Navigator. Its properties appear in the Editor.
-
Click the Login tab. The Login tab appears.
-
Click the Options subtab. The Options subtab appears.
Figure 98-7 Login Tab, Options Subtab, Advanced Options
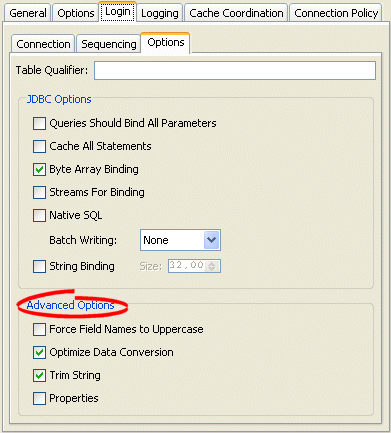
Description of "Figure 98-7 Login Tab, Options Subtab, Advanced Options"
Use this table to enter data in the fields on the Options subtab to select the advanced options to use with this session login:
| Option | Description |
|---|---|
| Force Field Names to Uppercase | By default, TopLink uses the case of field names as returned by the database. If your application expects field names to be uppercase but the database does not return consistent case (for example, if you accessing different databases), enable this option. |
| Optimize Data Conversion | By default, TopLink optimizes data access by accessing the data from JDBC in the format the application requires. If you are using an older JDBC driver that does not perform data conversion correctly and conflicts with this optimization, disable this optimization. |
| Trim String | By default, TopLink discards the trailing blanks from CHAR field values. To read and write CHAR field values literally (including any trailing blanks), disable this option. |
| Properties | Check this option to enable the use of properties for this DatabaseLogin (see Section 97.5, "Configuring Properties"). |
98.7.2 How to Configure Advanced Options Using Java
Use the following methods of DatabaseLogin to configure advanced options:
-
setShouldForceFieldNamesToUpperCase–By default, TopLink uses the case of field names as returned by the database. If your application expects field names to be uppercase but the database does not return consistent case (for example, if you accessing different databases), use this method. -
setShouldOptimizeDataConversion–By default, TopLink optimizes data access by accessing the data from JDBC in the format the application requires. If you are using an older JDBC driver that does not perform data conversion correctly and conflicts with this optimization, set this tofalse. -
setShouldTrimStrings–By default, TopLink discards the trailing blanks fromCHARfield values. To read and writeCHARfield values literally (including any trailing blanks), set this tofalse. -
setProperties–Set this totrueto enable the use of properties for thisDatabaseLogin(see Section 97.5, "Configuring Properties").
98.8 Configuring Oracle Database Proxy Authentication
You can configure a database login to use Oracle Database proxy authentication with an Oracle Database platform in JSE applications and JEE applications using OC4J native or managed non-JTA (you set this using tx-level=local) data sources with Oracle JDBC driver release 10.1.0.2.0 or later and external connection pools only.
There is no Oracle JDeveloper or TopLink Workbench support for this feature. To configure TopLink to use Oracle Database proxy authentication, you must use Java (see Section 98.8.1, "How to Configure Oracle Database Proxy Authentication Using Java").
For more information, see Section 96.1.4.2, "Oracle Database Proxy Authentication".
You can use TopLink support for Oracle Database proxy authentication by doing the following:
-
Providing Authenticated Writes for Database Auditing Purposes with a Client Session
-
Providing Authenticated Reads and Writes with a Database Session
Providing Authenticated Reads and Writes of Secured Data Through the Use of an Exclusive Isolated Client Session
In this configuration, the client session is an isolated client session (see Section 87.5, "Isolated Client Sessions") that uses an exclusive proxy connection. You must acquire the client session using a ConnectionPolicy that specifies the proxy authentication user credentials.Reads and writes of secured data are performed through the proxy-authenticated connection. Reads of nonsecured data occur through nonproxy-authenticated connections.
If you are using Oracle Virtual Private Database (VPD) (see Section 87.5.1, "Isolated Client Sessions and Oracle Virtual Private Database (VPD)"), use this configuration to set up VPD support entirely in the database. That is, rather than making the isolated client session execute SQL (see Section 92.2, "Using PostAcquireExclusiveConnection Event Handler" and Section 92.3, "Using PreReleaseExclusiveConnection Event Handler"), the database performs the required set up in an after login trigger using the proxy session_user.
Providing Authenticated Writes for Database Auditing Purposes with a Client Session
In this configuration, isolated data or exclusive connections are not required. You must acquire client session using a ConnectionPolicy that specifies the proxy authentication user credentials.
Writes are performed through the proxy-authenticated connection. Reads occur through nonproxy-authenticated connections. This enables the database auditing process to access the user that performed the write operations.
Providing Authenticated Reads and Writes with a Database Session
In this configuration, you use a DatabaseSession object with a proxy-authenticated login. All reads and writes occur through the proxy-authenticated connection.
Note:
Oracle recommends that you exclusively use server and client sessions in a three-tier environment.Do not use database sessions in a three-tier environment. Ensure that a database session is used by a single user and not accessed concurrently.
98.8.1 How to Configure Oracle Database Proxy Authentication Using Java
You configure Oracle Database proxy authentication by customizing your session in your Java code, such as through a SessionCustomizer when using the sessions.xml file. You can wrap a configured TopLink DatasourceLogin JNDIConnector with a TopLink proxy connector instance (from oracle.toplink.platform.database.oracle) appropriate for your JDBC driver and to configure proxy authentication properties.
Regardless of whether you are using the Oracle JDBC Thin driver or OCI driver, use the OracleJDBC10_1_0_2ProxyConnector and the property constants defined in oracle.jdbc.OracleConnection.
The properties to set are shown in Tables a through d.
Note:
Property constant names and values are consistent between the two classes except forPROXYTYPE_ constants (such as PROXYTYPE_USER_NAME). In OracleOCIConnectionPool these are of type String and in OracleConnection they are of type int. If you are using the Oracle JDBC Thin driver and OracleJDBC10_1_0_2ProxyConnector, you must always set these properties as a String. For example:
login.setProperty(
    "proxytype", Integer.toString(OracleConnection.PROXYTYPE_USER_NAME));
To configure TopLink to use Oracle Database proxy authentication, do the following:
-
Decide on the proxy type you want to use and create appropriate users and roles.
-
User Name Authentication:
To authenticate a proxy user
sarahby user name only, create the user account on Oracle Database using the following:alter user sarah grant connect through dbadminuser with roles clerk, reports;In this case, you will need to set the proxy properties shown in Table 98-2.
-
User Name and Password Authentication:
To authenticate a proxy user
sarahby user name and password, create the user account on Oracle Database using the following:alter user sarah grant connect through dbadminuser authenticated using password with roles clerk, reports;In this case, you will need to set the proxy properties shown in Table 98-3.
-
Distinguished Name Authentication:
To authenticate a proxy user
sarahby globally unique distinguished name, create the user account on Oracle Database using the following:create user sarah identified globally as 'CN=sarah,OU=americas,O=oracle,L=city,ST=ca,C=us'; alter user sarah grant connect through dbadminuser authenticated using distinguished name with roles clerk, reports;In this case, you will need to set the proxy properties shown in Table 98-4.
-
Certificate Authentication:
To authenticate a proxy user
sarahby encrypted distinguished name, create the user account on Oracle Database using the following:alter user sarah grant connect through dbadminuser authenticated using certificate with roles clerk, reports;In this case, you will need to set the proxy properties shown in Table 98-2.
-
-
Configure your session login using Java code. Do this through a
SessionCustomizerwhen using thesessions.xmlfile.The following example demonstrates how you can wrap the already specified
JNDIConnectorwith the appropriate TopLink proxy authentication connector. You can set the server session's default connection policy to the same proxy authenticated login.If you use Oracle VPD (Section 87.5.1, "Isolated Client Sessions and Oracle Virtual Private Database (VPD)"), you should set the connection policy to use exclusive connections, and the descriptor for secured data to isolated (Section 119.13, "Configuring Cache Isolation at the Descriptor Level").
Login login = server.getDatasourceLogin();
// Make sure that external connection pooling is used
login.setUsesExternalConnectionPooling(true);
// Wrap JNDIConnector with OracleJDBC10_1_0_2ProxyConnector
login.setConnector(
    new OracleJDBC10_1_0_2ProxyConnector(
        ((JNDIConnector)login.getConnector()).getName()));
ConnectionPolicy policy = server.getDefaultConnectionPolicy();
policy.setPoolName(null);
policy.setLogin(login);
// If using Oracle VPD support, set the connection policy to exclusive

policy.setShouldUseExclusiveConnection(true);
Note that you may experience problems when using a data source provided by the application server. In this case, instead of using
login.setConnector(new OracleJDBC10_1_0_2ProxyConnector
                          (((JNDIConnectorlogin.getConnector()).getName()));
create the data source, as follows:
oracle.jdbc.pool.OracleDataSource ds = new oracle.jdbc.pool.OracleDataSource(); ds.setUser("MyMainUser"); ds.setPassword("MyPassword"); ds.setUrl("jdbc:oracle:thin:@MyServer:1521:MyDb"); login.setConnector( new OracleJDBC10_1_0_2ProxyConnector(ds)); -
Acquire a proxy-authenticated client session through specifying a
ConnectionPolicywith this user's credentials.ConnectionPolicy policy = (ConnectionPolicy)server.getDefaultConnectionPolicy().clone(); Login login = (Login)policy.getLogin().clone; // Set proxy properties into connection policy's login login.setProperty("proxytype" , OracleOCIConnectionPool.PROXYTYPE_USER_NAME); login.setProperty(OracleOCIConnectionPool.PROXY_USER_NAME ,"sarah"); policy.setLogin(login); Session session = server.acquireClientSession(policy);
