9 Working with the Instance Control Menu
This chapter describes the TimesTen instance control menu. The instance control menu displays options to control various aspects of your TimesTen instance targets.
Topics include:
Viewing the instance control menu
To view the instance control menu, ensure that you are on the TimesTen instance target page. For information on navigating to the TimesTen instance target page, see "Navigating to the TimesTen target page".
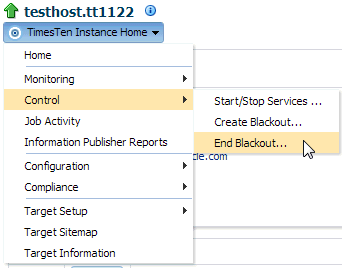
From the TimesTen Instance Home menu, select Control.
The TimesTen instance control menu displays. Click a specific option to view TimesTen instance controls. A description of each option follows:
Start/stop services
The start/stop services page enables you to start and stop the TimesTen daemon and TimesTen server services. This page also displays statistics of TimesTen databases that are part of your current TimesTen instance. The start/stop services page contains two regions:
Note:
In order to start and stop the TimesTen daemon of a TimesTen instance, you must set preferred credentials for your TimesTen instance target. For more information, see "Setting preferred credentials for a target".Service
The service region enables you to start and stop the TimesTen daemon and TimesTen server services. You can select a row and then click Start or Stop to control the TimesTen services. If you stop the TimesTen daemon and a TimesTen database is loaded into memory, Enterprise manager displays a dialog that recommends that you close all connections to your TimesTen database and unload the database from memory. This dialog enables you to filter the Database region to only view the TimesTen databases with active connections and that are loaded into memory.
The services region enables you to perform similar control operations as the ttDaemonAdmin utility. The Status, Process ID, and Port columns are populated with information from the ttStatus utility. For more information about the utilities, see "ttDaemonAdmin" and "ttStatus" in the Oracle TimesTen In-Memory Database Reference.
The port column of the Service table shows you the ports on which the TimesTen daemon and TimesTen server listen. If these ports conflict with another application, consider changing the TimesTen ports with the ttmodinstall utility. For more information on the ttmodinstall utility, see "ttmodinstall" in the Oracle TimesTen In-Memory Database Reference.
Database
The database region displays statistics of TimesTen databases that are part of your current TimesTen instance. The database table is populated with information from the ttStatus utility. You can select a row in the table and then click the Details button to view all the connections to the selected TimesTen database. For more information about the ttStatus utility, see "ttStatus" in the Oracle TimesTen In-Memory Database Reference.
Create blackout
Create a blackout to suspend all data collection activity on a target that is monitored by Enterprise Manager. Consider creating a blackout to perform maintenance on a TimesTen instance target. For more information on creating a blackout, see "Creating a Blackout" in the Oracle Enterprise Manager Cloud Control Administrator's Guide.
End blackout
A blackout ends automatically after the set blackout duration expires. In some cases you may want to end a blackout before the blackout duration expires. To end a blackout, ensure that you are on the TimesTen instance target page and that a blackout is active for your TimesTen instance target. For information on navigating to the TimesTen instance target page, see "Navigating to the TimesTen target page".
-
From the TimesTen Instance Home menu, select Control, then select End Blackout.
The Blackouts confirmation page displays. Locate the Yes button.
-
Click Yes.
The information dialog displays with the text "The End Blackout request has been successfully submitted. Target status changes require time to reflect this latest submission."
Figure 9-5 Successful End Blackout request

Description of "Figure 9-5 Successful End Blackout request"
You have successfully ended the blackout of your TimesTen instance target. Enterprise Manager can take several minutes to resume data collection activities on your TimesTen instance target.


