| Oracle® Real User Experience Insight User's Guide Release 11.1 for Linux x86-64 Part Number E22309-01 |
|
|
PDF · Mobi · ePub |
| Oracle® Real User Experience Insight User's Guide Release 11.1 for Linux x86-64 Part Number E22309-01 |
|
|
PDF · Mobi · ePub |
This chapter describes how user activity can be monitored within OAM-based traffic. The monitoring of Web traffic where user access control is managed through a SSO mechanism is also explained.
RUEI can be configured to identify user IDs within Oracle Access Manager (OAM) traffic. OAM version 10.1.4.x (or higher) is supported. In order to monitor OAM-based traffic, do the following:
Select the required application, and click the Users section.
Click Add new source. The dialog shown in Figure 8-25 appears.
Within the Search type menu, select the "Oracle Access Manager" option.
Within the Source value field, specify the name of cookie used to track user identification within the monitored OAM-based traffic. By default, this is ObSSOcookie. When ready, click Save. If your OAM server uses a customized cookie implementation, you should consult your OAM administrator. Information on the customization of OAM cookies is available from the Oracle Access Manager Administrator Guide.
Select Configuration, then Applications, and then Session tracking. The currently defined cookie settings are displayed. An example is shown in Figure 12-2.
Click Add new cookie. The dialog shown in Figure 12-3 appears.
Within the Cookie type menu, select the "OAM" option.
Within the Cookie name field, specify the cookie used to track user identification within the monitored OAM-based traffic. By default, this is ObSSOcookie. When ready, click Save.
The procedure to configure your OAM server to work with RUEI is described in the Oracle Real User Experience Installation Guide.
Reporting of OAM-Based Traffic
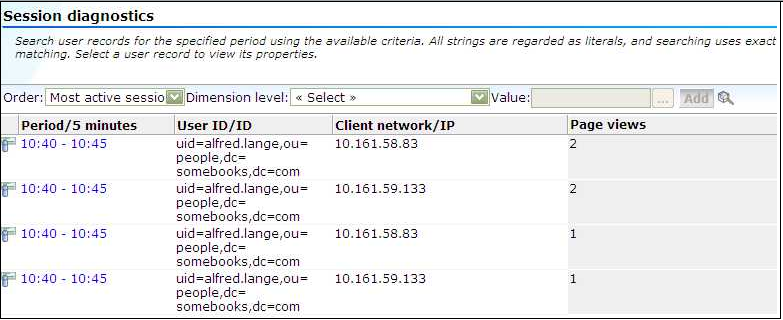
The reporting of user IDs within the Data Browser is based on Distinguished Name (DN). An example is shown in Figure 11-1.
Figure 11-1 Example of Reported OAM Traffic

Single sign-on (SSO) is a method of access control that enables a user to log in once and gain access to the resources of multiple software systems without being prompted to log in again. Because different applications and resources support different authentication mechanisms, SSO has to internally translate and store different credentials compared to what is used for initial authentication. SSO offers the following benefits:
Reduces password fatigue from different user name and password combinations.
Reduces time spent re-entering passwords for the same identity.
Reduces IT costs by lowering the number of IT help desk password-related calls.
SSO uses centralized authentication servers that all other applications and systems utilize for authentication purposes, and combines this with techniques to ensure that users are not actively required to enter their credentials more than once.
In order to facilitate the correct monitoring of SSO-enabled applications, you need to configure the authentication server(s) used within your environment. This is done through the creation of an SSO profile.
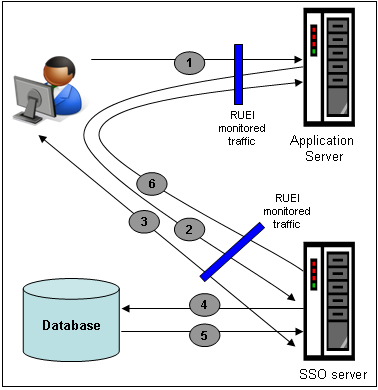
SSO servers manage user profiles and provide a login page to authenticated users. Applications then interact with SSO servers to validate temporary tokens. Figure 11-2 illustrates how application authentication works when enabled by an SSO server.
Figure 11-2 Authentication Flow Within SSO-Enabled Application Traffic

The authentication flow shown in Figure 11-2 takes the following sequence:
The user attempts to access a protected URL. The application server checks for the existence of an authentication cookie for the requested application. If found, it means that the user is already logged on, and no further authentication is required.
The user is re-directed by the application server to the SSO server. The application server also provides an application URL to the SSO server so that it knows where to go after user logon. Note the SSO server also checks whether the user is already authenticated (by another application) by validating any existing authentication cookie.
In the event the user is not recognized based on an existing authentication cookie, the SSO server requests credentials from the user via the login page, and these are specified by the user in a user name and password combination.
The user's credentials are verified against their entry in the SSO server database. Once validated, the authentication is preserved by an SSO cookie. The name of this cookie must be specified when creating a SSO profile.
The SSO server fetches the user's attributes. The attributes that are actually fetched are implementation-specific, and are not relevant to RUEI.
The SSO server passes the fetched attributes to the partner application server, using the URL provided to it in step 2. Note that a token argument is added to this URL. The name of this token argument must be specified when creating SSO profiles. The application server will probably also issue its own cookie to the user. This is configured as part of the application or suite definition.
Finally, note the network lines over which steps 1, 2, and 5 pass must be within the scope of RUEI monitored traffic.
It is important to understand that SSO profiles and applications, although closely related, are reported as separate entities within RUEI. For this reason, SSO profile and application definitions should be mutually exclusive. That is, each should be based on separate domains and cookies. Otherwise, the monitored traffic is reported as application-related traffic, and the potential benefits to enhanced reporting are not realized.
To define a SSO profile, do the following:
Select Configuration, the Applications, then Single Sign-On, and Click New SSO profile. The dialog shown in Figure 11-3 appears.
Specify a name for the SSO profile. This must be unique across suites, services, applications, and SSO profiles. Note that SSO profiles cannot be renamed later.
Use the remaining fields to specify the scope of the SSO profile. This is defined in terms of partial page URLs. Note that as you enter this information, you can see the effect of your definition through the Filter preview column.
Note:
It is advised that filter definitions be mutually exclusive across SSO profiles, applications, suites, and services. Otherwise, this can lead to unpredictable results. See Section 12.8, "Controlling Rule Ordering Within RUEI" for information about how you can influence the order in which matching rules are applied.The highest level filter is the domain. You can specify a partial URL instead of, or to refine, a domain. It is not possible to specify a profile name and leave all other fields blank. That is, a blank filter. Note that a wildcard character (*) cannot be specified within the Find Port field, and network traffic arriving on a non-standard port (that is, other than ports 80/443), is not associated with the SSO profile unless the port number is explicitly stated. Only one port number can be specified. If you want to specify additional ports, these should be specified as additional filters after the new SSO profile has been created.
Be aware that while the use of a wildcard character is supported, all other specified characters are interpreted as literals. Note it is not possible to specify the wildcard character and no other information for domain and URL combinations. See Section 12.8, "Controlling Rule Ordering Within RUEI" for information about how you can control the order in which filters are applied.
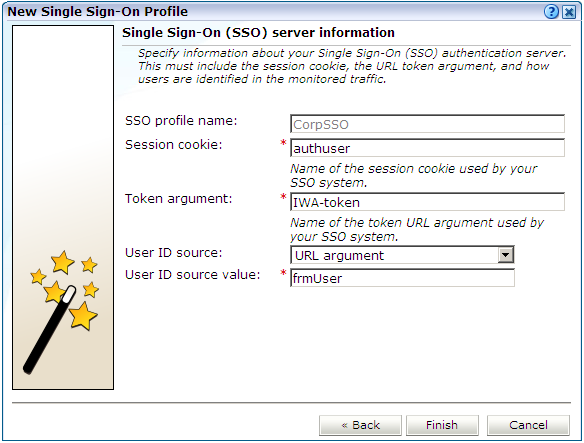
When ready, click Next. The dialog shown in Figure 11-4 appears.
Figure 11-4 Single Sign-On Server Information Dialog

Use this dialog to specify information about the SSO authentication server you are using. You need to specify the session cookie name, the URL argument which contains the authentication token, and how users are identified in the monitored traffic. Normally, this is defined in terms of a URL argument and value. However, it can also be specified in terms of cookies, request or response headers, or XPath expressions.
When ready, click Finish. An overview of the SSO profile definition you have specified is displayed. An example is shown in Figure 11-5.
This overview provides a summary of the defined SSO profile and allows you, if necessary, to modify its definition. This is explained in the following section.
You can check the effect your user identification definition has by viewing the XLS User Information report in the Clients category. For more information on reports, see Chapter 2, "Working With Reports".
After defining an SSO profile, you can modify it via its overview. The following tabs are available:
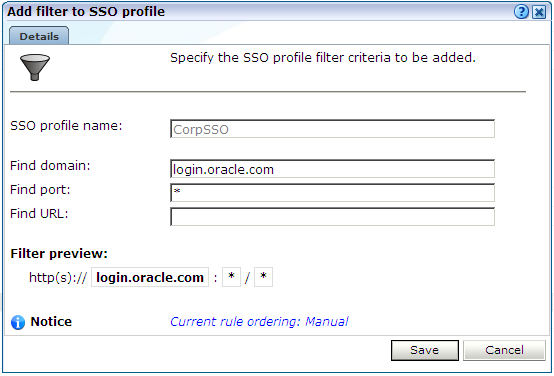
Identification: specifies the scope of the SSO server in terms of one or more partial page URL matches. Pages are assigned to the SSO server when a defined filter matches a page's URL. To add a new filter, click Add new filter. Click an existing filter to modify it. A dialog similar to the one shown in Figure 11-6 appears.
Figure 11-6 Edit SSO Profile Filter Dialog

The note at the bottom of the dialog indicates the current rule ordering scheme. This is explained in Section 12.8, "Controlling Rule Ordering Within RUEI".
Configuration: specifies the authentication token and cookie used.
Users: specifies how user IDs are identified within the application. When not defined, the SSL client certificate is used (when available).
When verifying the correct operation and reporting of your SSO-enabled applications, the important aspect to inspect is the correct identification of users. It is recommended that you regularly review the reporting of within the Data Browser (All sessions > User Id > Sessions and page views). For example, an unexpectedly high level of unidentified (anonymous) users.
Also, you should verify that URLs within SSO-enabled applications are not reported within application-related data. This can indicate that there is a problem.