4 Using an Android Application on the SQLite Mobile Client
The following sections uses the simple_sync_android project to describe the steps to include the SQLite Mobile Client within your signed application.
Note:
This chapter assumes that you know how to use Eclipse to build an Android project and how to appropriately develop and sign an Android application.-
Section 4.2, "Import the Oracle Database Mobile Server Android Project into Eclipse"
-
Section 4.3, "Build Oracle Database Mobile Server Android Project"
4.1 Prerequisites
The following are the prerequisites for enabling synchronization for a SQLite application:
-
Install Eclipse IDE with the ADT plug-in, as detailed at the following site:
http://developer.android.com/sdk/eclipse-adt.html#installing
-
Install the latest Android SDK, as detailed at the following site:
http://developer.android.com/sdk/index.html
-
Install the Mobile Development Kit.
4.2 Import the Oracle Database Mobile Server Android Project into Eclipse
Import the Oracle Database Mobile Server simple_sync_android sample Android project into your Eclipse Workspace.
The following steps show how to import the mobile server sample Android project.
-
In Eclipse, with your Workspace open, select File->Import and choose Existing Projects into Workspace. Click Next.
Figure 4-1 Import Existing Projects into Eclipse Workspace
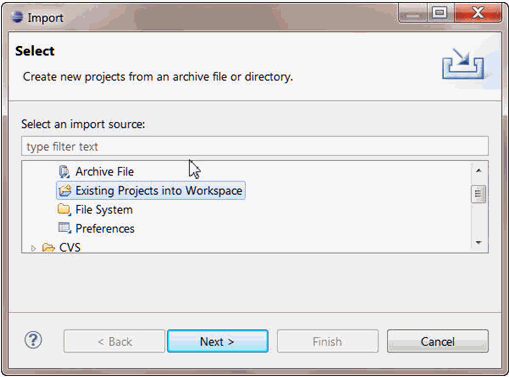
Description of "Figure 4-1 Import Existing Projects into Eclipse Workspace"
-
Set the root directory to point to the Android project within the Oracle Database Mobile Server MDK. Enable the Select Root Directory button and browse for the
simple_sync_androidproject, which is located in the following directory:<MDK_ROOT>\Mobile\Sdk\samples\Sync\android\simple_sync_android
where the
<MDK_ROOT>is replaced with the full path where the Oracle Database Mobile Server MDK is installed.Figure 4-2 demonstrates setting the root directory. After which, all projects in the specified root directory are displayed in the Projects window.
Figure 4-2 Select Root Directory for Eclipse Project
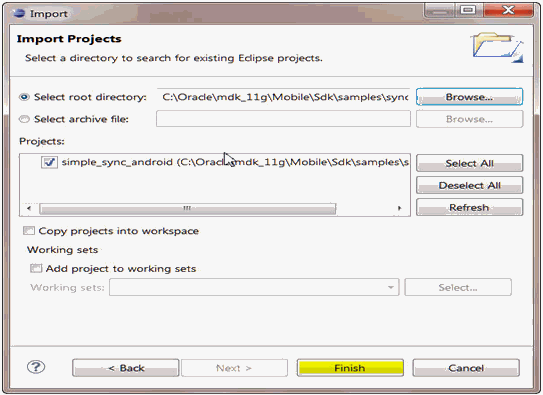
Description of "Figure 4-2 Select Root Directory for Eclipse Project"
-
Select the
simple_sync_androidproject and click Finish. Thesimple_sync_androidproject is now imported into your Eclipse Workspace.
4.3 Build Oracle Database Mobile Server Android Project
The following details how to build your Android project using the Oracle Database Mobile Server simple_sync_android sample project.
-
Set required environment variables. The project references Oracle Database Mobile Server synchronization classes, which are located within the
osync_android.jarlibrary file. Set theMOBILE_SYNC_ANDROID_LIBenvironment variable to point toosync_android.jarfile with the following steps:-
Highlight the
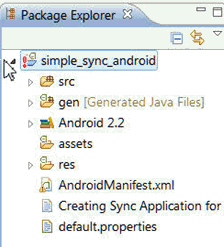
simple_sync_androidproject in the Project Explorer window, as shown in Figure 4-3. -
Select 'Alt Enter' to display the Project Properties window.
-
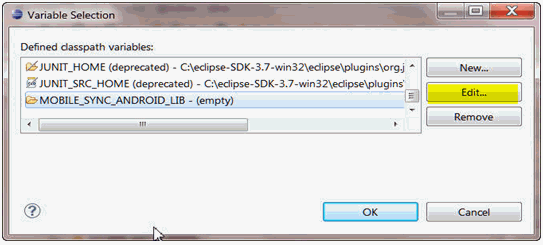
As shown in Figure 4-4, select the Java Build Path in the left pane. Then, select the Libraries tab in the Build Path window. Select
MOBILE_SYNC_ANDROID_LIBto configure the location of the JAR file. TheMOBILE_SYNC_ANDROID_LIBvariable provides the library directory where theosync_android.jarfile is located, which is required to build your project. Click Edit.Figure 4-4 Properties for simple_sync_android Project
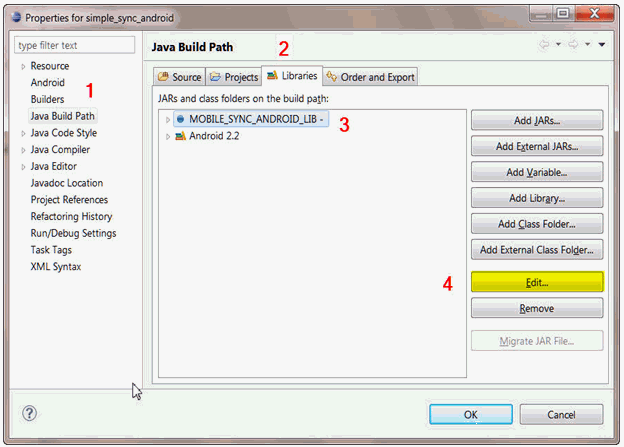
Description of "Figure 4-4 Properties for simple_sync_android Project"
-
In the "Edit Variable Entry" dialog, click the Variable button.
Figure 4-5 Edit the MOBILE_SYNC_ANDROID_LIB Variable
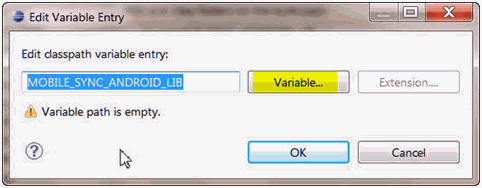
Description of "Figure 4-5 Edit the MOBILE_SYNC_ANDROID_LIB Variable"
-
Click Edit.
-
Enter
<MDK_ROOT>/Mobile/Sdk/android/lib/osync_android.jarin the Path field.Figure 4-7 Add Path to the MOBILE_SYNC_ANDROID_LIB Environment Variable
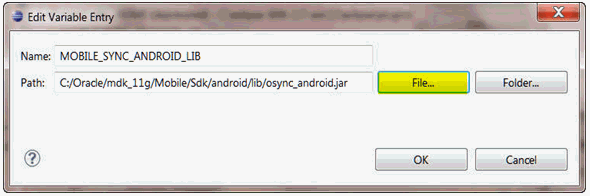
Description of "Figure 4-7 Add Path to the MOBILE_SYNC_ANDROID_LIB Environment Variable"
-
When finished, click OK.
-
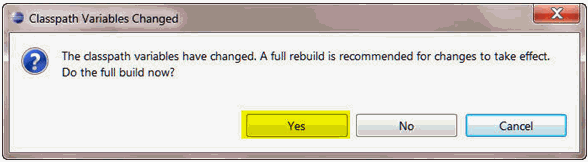
In the "Classpath Variables Changed" dialog, select Yes to rebuild the project.
-
-
Build the
simple_sync_androidproject to link in theosync_android.jarfile with the Oracle Database Mobile Server synchronization libraries. -
Execute and debug the
simple_sync_androidproject with the Android emulator.-
Right click on the
simple_sync_androidproject. -
Click Run As and select Android Application.
Figure 4-9 Executing the Android Application
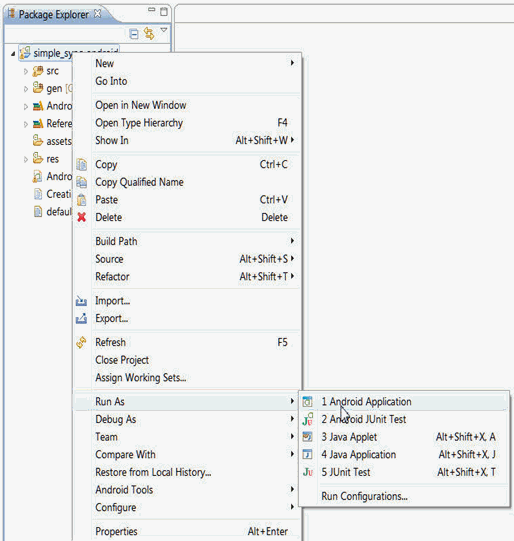
Description of "Figure 4-9 Executing the Android Application"
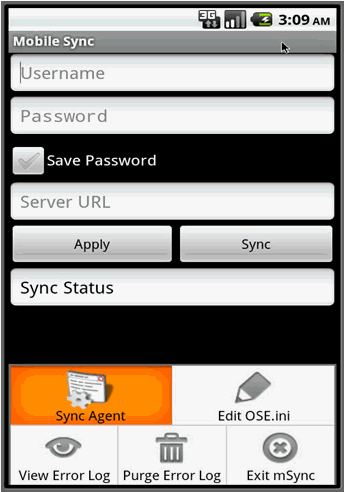
The Android emulator is started, where you can execute the sample as the Mobile Sync application.
Figure 4-10 Test Project with Android Emulator
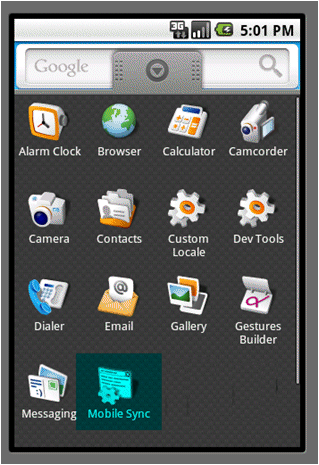
Description of "Figure 4-10 Test Project with Android Emulator"
-
-
When you execute the Mobile Sync application, synchronization is initiated. Enter your user name, password and mobile server URL in the Sync UI, as shown in Figure 4-11. Click Sync to start the synchronization.
-
Examine the
MainAct.javacode. The sample consists of the UI layout code that is located in theres\layoutsubdirectory. The main application Java class file isMainAct.java, which contains all of the logic for initializing synchronization structures and invoking the synchronization methods. You can examine this file for more details on the sequence of calls for the synchronization APIs.