2 Preparing for Oracle Database Appliance Installation and Deployment
This chapter provides a checklist of tasks that you can complete before delivery of Oracle Database Appliance. These tasks are:
See Also:
-
Oracle Database Appliance Setup Poster for an overview of Oracle Database Appliance setup tasks
-
Oracle Database Appliance Owner's Guide to obtain more detailed hardware installation instructions and safety guidelines
Registering Your Support Identifier on My Oracle Support
Add your hardware Support Identifier (SI) to your My Oracle Support account profile. Your hardware SI is supplied when you purchase Oracle Database Appliance. If you have acquired new software licenses then you must also register your new software SIs. The SI registration process can take up to 24 hours to complete.
Note:
You cannot obtain support or software from Oracle without registered SIs.Planning Oracle Database Appliance Configuration Options
You can deploy Oracle Database Appliance either as a bare metal or a virtualized system. For bare metal installations, decide how many CPU cores to enable and what database configuration options you need, if any. For Oracle Database Appliance Virtualized Platform installations, there are a number of additional options to consider. See the following sections to plan your system appropriately:
-
Selecting Oracle Database Appliance Virtualized Platform Options
This section describes the use of options such as shared disks and virtual local area networks.
-
Selecting Database Configuration Options
This section describes the use of single instance, Oracle Real Application Clusters (Oracle RAC), and Oracle RAC One Node databases and sizing templates to configure your initial database. This information is relevant to you if you plan to configure an initial database during deployment on bare metal or virtualized systems.
Selecting Oracle Database Appliance Virtualized Platform Options
Before you implement virtual machines you must decide how and where they will run. Based on your requirements, you might provide high-availability options, reduce interference between competing virtual machines for CPU and network access, and provide more storage space and enable automatic startup for virtual machines. Some of these options require additional network configuration outside of the Oracle Database Appliance servers.
By default you have one local repository on each node and the maximum size is dependent on the hardware:
-
350 GB on Oracle Database Appliance X5-2 Virtualized Platform
-
350 GB on Oracle Database Appliance X4-2 Virtualized Platform
-
350 GB on Oracle Database Appliance X3-2 Virtualized Platform
-
250 GB on Oracle Database Appliance Version 1
When you create virtual machines in the default repositories, the virtual machines can only run on the node where they are located and therefore have no failover capability.
To obtain the most flexible shared machine environment, use a shared repository with Virtual Local Area Networks (VLANs). Shared repositories provide high-availability options, more storage, and reduce the use of internal storage. VLANs help you partition network traffic for your virtual machines.
When you use a shared repository hosted on shared disks, the virtual machines consume space in Oracle Automatic Storage Management (Oracle ASM) disk groups, DATA and RECO. On shared disks, virtual machines can start automatically whenever the repository becomes available, can run on a preferred node, and can start or failover to the other node if the preferred node is unavailable.
Oracle Database Appliance Virtualized Platform supports multiple VLANs on the same network interface card (NIC) port. Each VLAN is essentially an independent logical network operating with other VLANs over the same physical connection. Use VLANs to minimize the number of required physical connections and NICs while concurrently separating traffic. Each VLAN is assigned a distinct VLAN identification (ID). The network switch uses VLAN IDs to segregate traffic among the different VLANs operating on the same link. When a VLAN is configured, the VLAN functions exactly like a separate physical connection.
Note:
Virtual LANs need to be configured in the physical switches before you use them.Selecting Database Configuration Options
These tasks will guide you through selecting your database configuration items:
Before continuing, print the checklist tables found in "Information Checklist Tables". Use the checklists to record decisions and information that you collect for your planned Oracle Database Appliance configuration.
Selecting Database Deployment Options
Oracle Appliance Manager installs the Oracle Database software on mirrored disks that are internal to Oracle Database Appliance. During the initial deployment with the Oracle Appliance Manager configurator, you can create a database or defer database creation to a later time. If you plan to create an initial database during deployment, prepare to select one of the following options:
-
Enterprise Edition: Oracle Database 12c Release 1 Enterprise Edition (no automated failover), with the following characteristics:
-
Single-instance Oracle Database Enterprise Edition home
-
Oracle Database software installation on both nodes through the use of internally mirrored disks
-
-
Oracle Real Application Clusters (Oracle RAC) One Node: Oracle RAC One Node 12c Release 1, with the following characteristics:
-
Oracle RAC One Node has a designated Oracle Database Appliance home node
-
Oracle RAC One Node software installed on both servers
-
Automated failover
-
Enterprise Edition license required
-
Oracle RAC One Node license on each server required
Exception: If you designate one server as a backup server, then you can use that server without a license in accordance with the 10-day rule.
See Also:
Oracle Software Investment Guide for information about the 10-day rule, available at
-
-
Oracle RAC: Oracle Real Application Clusters 12c Release 1, with the following characteristics:
-
Oracle RAC home
-
Oracle RAC software installed on both servers
-
Enterprise Edition license required
-
Oracle RAC license on each server required (not eligible for the 10-day rule)
-
Selecting Database Templates
Oracle Database Appliance software includes preconfigured templates that incorporate Oracle best practices with optimization for different classes of databases. Due to differences in CPU counts, memory size, and other resources available with different Oracle Database Appliance models, some templates are not supported on all models.
Each database template has different workload profile and performance characteristics based on the following:
-
memory requirements, calculated from the System Global Area (SGA) plus Program Global Area (PGA) sizes
-
processing requirements, calculated from the number of processes
-
logging requirements, based on log buffer size and online redo log size
To determine which templates to use for the databases you deploy, use the guidelines from Appendix B (Database Sizing for Oracle Database Appliance) in Oracle Database Appliance Administration and Reference Guide. Then refer to Table 2-1 to check if a particular template is available on your Oracle Database Appliance hardware model. Templates that do not have a corresponding "X" in a model column are not available on that model.
Table 2-1 Database Template Names and Characteristics
| Template Name | V1 | X3-2 | X4-2 | X5-2 |
|---|---|---|---|---|
|
Odb-01s |
X |
X |
X |
X |
|
Odb-01 |
X |
X |
X |
X |
|
Odb-02 |
X |
X |
X |
X |
|
Odb-04 |
X |
X |
X |
X |
|
Odb-06 |
X |
X |
X |
X |
|
Odb-12 |
X |
X |
X |
X |
|
Odb-16 |
X |
X |
X |
|
|
Odb-24 |
X |
X |
||
|
Odb-32 |
X |
|||
|
Odb-36 |
X |
Note:
Oracle strongly recommends that you use these templates because they implement best practices and are configured specifically for Oracle Database Appliance.While Oracle recommends using Oracle Appliance Manager to create databases, if you choose to use Oracle Database Configuration Assistant (DBCA) then you can and should use an Oracle Database Appliance template to create your databases.
On Oracle Database Appliance Virtualized Platform, if you only plan to deploy one Oracle Database, then use a template for your ODA_BASE that has the same name as the template you choose for your Oracle Database. However, you do not have to select database templates with the same size category as the ODA_BASE template. For example, use a small ODA_BASE template to host two very small databases and a large ODA_BASE template to host either one large with one small database or one medium database with one small and two very small databases. When choosing your template sizes, note that the total requirements for your selected database templates must not exceed the capacity of your ODA_BASE template.
Calculating Required Cores
Once you have selected the templates for your planned databases, use the tables in Appendix B (Database Sizing for Oracle Database Appliance) of the Oracle Database Appliance Administration and Reference Guide to determine the total number of CPUs they require to support them.
Gathering System Requirement Information
You need to collect information before deploying Oracle Database Appliance. Print the tables and use them to enter values as you find and finalize them.
Information You Will Need
This section describes the type of information you will need to collect as you prepare to install and deploy Oracle Database Appliance. Once you understand what you need, you can print and collect the details for your specific system using that checklist tables provided in the next section, "Information Checklist Tables".
Storage administration is integrated into Oracle Database Appliance. No additional storage configuration is required.
Oracle Database Appliance includes integrated storage for operational files (operating system, Oracle Grid Infrastructure home, Oracle Database homes, tools), user data (database files), and log files (database redo logs). Operational files are stored on mirrored internal system disks in each server. Data and database redo log files are stored on disks as follows:
-
On Oracle Database Appliance X5-2, Oracle Database Appliance X4-2, and Oracle Database Appliance X3-2, data files are stored in the storage shelf and the optional storage expansion shelf
-
On Oracle Database Appliance X5-2, Oracle Database Appliance X4-2, and Oracle Database Appliance X3-2, database redo log files are stored on solid-state drives (SSDs) in the storage shelf and the optional storage expansion shelf
-
On Oracle Database Appliance Version 1, data files are stored in the shared storage bay and database redo log files are stored on solid-state drives (SSDs) in the shared storage bay. There is not an option to add a storage expansion shelf.
Oracle Database Appliance X5-2 contains four 400 GB SSDs, which will be configured as an ASM disk group with ACFS to be used as an additional database cache. Also, on Oracle Database Appliance X5-2, the 200 GB SSDs are used for attribute caching for ACFS along with the database redo logs.
Note:
Oracle Database Appliance X4-2 ships with 900GB shared disks and Oracle Database Appliance X5-2 ships with 4TB shared disks. Disk hardware capacity is measured using 1 KB = 1,000 bytes whereas software storage requirements are based on 1 KB = 1,024 bytes. This means that a disk with a rated capacity of 900 GB has only about 838 GB of space for software storage, and a 4TB disk is actually 3.725 TB.Ensure that the names and addresses that you provide for configuration are configured in your Domain Name System (DNS) servers. With Patch Set 1 and later, the addresses that you provide are configured in the /etc/hosts file to provide IP name and address resolution, even if a DNS server is not available.
If you are deploying Oracle Database Appliance X4-2 or Oracle Database Appliance X5-2, then you have the option to connect to either a copper or a fiber public network. To connect to a fiber network on Oracle Database Appliance X5-2 you must also replace the InfiniBand cards with 10GbE SFP+ fiber cards. Ensure that your network planning is based on the correct type of public network.
Oracle recommends using a DNS server so that you can use the features of Single Client Access Name (SCAN). If you deploy without a DNS server but later create a DNS server and add SCAN, then you must specify additional VIP addresses as described in Oracle Database Appliance Release Notes for Linux x86-64.
A correctly configured Oracle Database Appliance requires at least six public addresses on the same subnet for the nodes: a public and a virtual IP name and address for each node, and two addresses that resolve to the SCAN for the cluster. All names must conform to the RFC 952 standard, which permits alphanumeric characters and hyphens ("-"), but does not allow underscores ("_").
Provide an IP address for the public interface for each node. This interface is bond0, or Eth1 on Oracle Database Appliance Virtualized Platform, (a bond of Eth2 and Eth3), which is used for the host IP address for the node.
If you select a Custom installation, then provide names and addresses for the following optional interfaces that you need:
-
bond1(Ethernet bond) This applies to all Oracle Database Appliance platforms -
bond2(Ethernet bond) This applies to Oracle Database Appliance Version 1 only -
xbond0(for high capacity transfers, such as backups) This applies to Oracle Database Appliance Version 1 only
Use bond1 and bond2 for management, backup, disaster recovery, or other options where you require a network interface. Be prepared to provide a netmask and a gateway for each interface as both are required when configuring network connections for Oracle Database Appliance.
Questions to Ask Your Oracle Database Appliance Administrator
-
Is a network time protocol (NTP) service configured for each server, so that the local system time for each server is synchronized?
If you have NTP servers, and you want to synchronize time between Oracle Database Appliance nodes using NTP, then be prepared to provide the addresses for the servers. Otherwise, the Oracle Grid Infrastructure software provides time synchronization between nodes using Cluster Time Synchronization Service (CTSS).
-
Will the public IP address cables be plugged in to redundant switches to avoid a single point of failure for Oracle Database Appliance?
-
What root password should you use for Oracle Database Appliance? Root passwords should comply with your system security requirements.
Questions to Ask Your Network Administrator
Confirm with your network administrator that the addresses to be configured for Oracle Database Appliance meet these three criteria:
-
They are static IP addresses.
-
They are on the same subnet as all other IP addresses, virtual IP (VIP) addresses (used for Real Application Clusters communication), and SCAN addresses.
-
They include the following:
-
One public IP address configured on the DNS server for each node and resolvable to that node before installation.
-
A VIP address for each node configured on the DNS server that is not currently in use.
-
SCANs for Oracle Database Appliance with the following characteristics:
-
Configured on the DNS server before installation so that the two IP addresses are associated with the name provided as the SCAN, and both addresses are returned in random order to the requester by the DNS server
-
Configured on the DNS server before installation to resolve to addresses that are not currently in use
-
Have names that do not begin with a numeral
-
Caution:
Do not change the IP addresses and subnet for the private network.See Also:
-
Oracle Database Appliance Owner's Guide for information about replacing the InfiniBand cards with 10GbE SFP+ fiber cards.
-
Oracle Single Client Access Name (SCAN), a technical paper on Oracle Technology Network, for a comprehensive introduction to SCAN:
http://www.oracle.com/technetwork/database/clustering/overview/scan-129069.pdf
Information Checklist Tables
If you wish, print the checklist tables that match your system and use them to help you record progress and save information that you gather for your system requirements.
Checklist for System Details
The following table is a checklist for system information that you will need. Use the final column (the Value column) to record the selected values as you work through the checklist.
Table 2-2 Checklist for System Details Configuration
| System Information | Description | Value |
|---|---|---|
|
Oracle Database Appliance System Name |
Provide the name for the cluster running on Oracle Database Appliance. This name is also used as the default root word for Oracle Database Appliance network addresses. The name should comply with the host name specifications described in the RFC 952 standard. For example, the name should be alphanumeric and not begin with a numeral. The name you choose will become the default first part of the names for the following:
|
_______________________ |
|
Type of Configuration |
Typical, which is recommended by Oracle Custom, which allows you to override default values for any or all of the following: |
_______________________ _______________________ _______________________ _______________________ _______________________ _______________________ |
|
Mode |
Bare metal or virtualized platform |
_______________________ |
|
Region |
Select the region where you plan to operate the Oracle Database Appliance system. |
_______________________ |
|
Timezone |
Select the time zone where you plan to operate the Oracle Database Appliance system. |
_______________________ |
|
Initial Database Details (if you want to create one during deployment) |
|
_______________________ _______________________ _______________________ _______________________ _______________________ ____________________GB |
Note:
Do not use a host name with more than 13 characters. Although the total length of the host name can be 15 characters, Oracle Appliance Manager appends two additional characters,-c,to your host name. Additionally, Oracle recommends that you use all lower case characters for the host name.Note:
You will need to provide a new password for the root user during deployment. However, there is no entry for this password in the preceding table because this is not a value that you should write down.Checklist for Custom Node Network Address Configuration
By default, names for network interfaces are derived from the Oracle Database Appliance system name, which you provide during installation. Also, when using the Oracle Appliance Manager configurator, the addresses for the public IP addresses can be automatically assigned in a sequence starting with the address you provide for the public IP address for Node 0. The other IP addresses generated are, in order, the public address for Node 1, the virtual IP address for Node 0, the virtual IP address for Node 1, and the SCAN addresses.
Use the following checklist table to identify the IP addresses required for Oracle Database Appliance and any default network addresses. You can retain the default values or use addresses provided by your system administrator to perform a Custom configuration. When using your own values, you may wish to print this table and use the "Your Values As Applicable" column to record these values. Ensure that all addresses with an "X" in the "Same Subnet" column are on the same subnet as each other.
Table 2-3 Minimum IP Address Requirements for Oracle Database Appliance
| Type of IP | Bare Metal Minimum IP Address Counts and Default Values | Virtualized Platform Minimum IP Address Counts and Default Values | Your Values As Applicable | Same Subnet |
|---|---|---|---|---|
|
Host Public Addresses |
2 |
2 (for ODA_BASE) |
__________________ __________________ |
X |
|
Host Private Addresses |
4 192.168.16.24 192.168.16.25 192.168.17.24Foot 1 192.168.17.25Footref 1 |
2 192.168.16.24 (for Dom0) 192.168.16.25 (for Dom0) 192.168.16.27 (for ODA_BASE) 192.168.16.28 (for ODA_BASE) |
Not applicable: the private addresses are defined during deployment and should not be changed |
X |
|
2 |
2 |
__________________ __________________ |
X |
|
|
2 |
2 |
__________________ __________________ |
X |
|
|
Oracle Integrated Lights Out Manager (ILOM) |
2 |
2 |
__________________ __________________ |
|
|
User Virtual Machine |
Not Applicable |
At least 1 for each Virtual Machine |
__________________ __________________ __________________ __________________ __________________ __________________ |
Footnote 1 These IP addresses are not used on Oracle Database Appliance X5-2 when using InfiniBand
Creating an Oracle Appliance Manager Deployment Plan
Use the standalone Oracle Database Appliance configurator to create an offline deployment plan and validate your network settings before the actual deployment. However, if you prefer to configure your system at the time you deploy it, you can wait and use the online configurator that is part of the base Oracle Database Appliance software.
About the Standalone Oracle Database Appliance Configurator
The standalone Oracle Appliance Manager configurator is a Java-based tool that enables you to generate your deployment plan and validate your network settings before the actual deployment.
If you want to use this tool before deployment, then you must download and run the configurator on a local client system which can be a Linux, UNIX, MAC, or Windows system.
At the end of an offline configurator session, you can save your deployment plan in a configuration file. When you are ready to deploy, copy this configuration file to Oracle Database Appliance and run the online Oracle Appliance Manager configurator to import and deploy your saved plan. You can also print the file's content and use the printout as a checklist for setting up your external network configuration.
Prior to saving your configuration file, Oracle recommends that you test your network settings. However, this will only work correctly if your client system is connected to same network that you will use for Oracle Database Appliance.
Running the Standalone Oracle Database Appliance Configurator
To run the standalone Oracle Database Appliance configurator:
-
Download the standalone Oracle Appliance Manager configurator that matches your version of Oracle Database Appliance software.
All versions of the configurator are available from the Overview page by clicking the "Oracle Database Appliance Manager Configurator" link at
http://www.oracle.com/technetwork/database/database-appliance/overview/index.html -
Start the configurator using the command
config.baton a Windows client, or the command./config.shon a Linux or UNIX client.The Oracle Appliance Manager Welcome page appears.
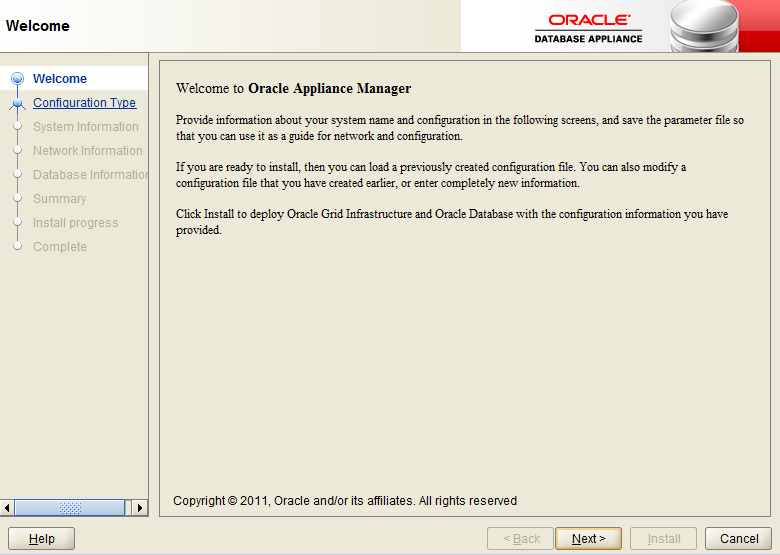
Description of the illustration oam_welcome.png
Click Next.
-
On the Configuration Type page, select the options for configuration type, environment, and hardware model. You can optionally load an existing configuration file by clicking Browse.
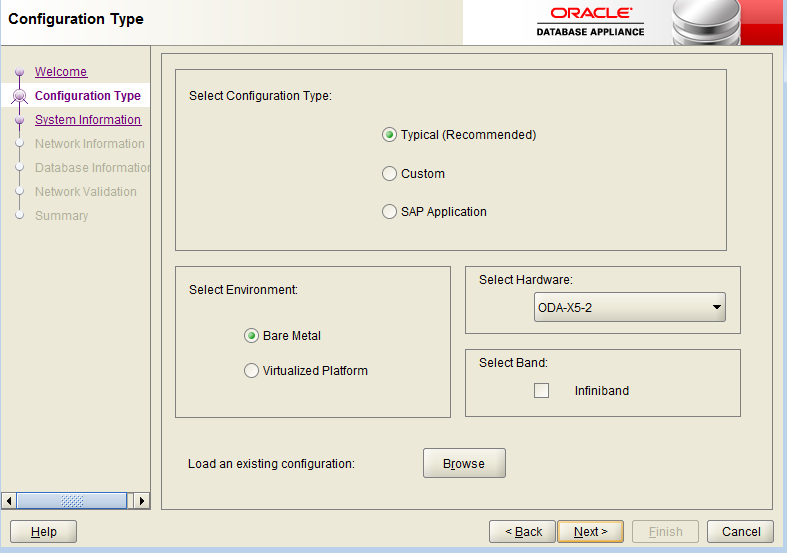
Description of the illustration oam_configtype.png
Oracle recommends the typical configuration except for SAP databases and applications, in which case select SAP Application. Choose the Custom option to configure additional or alternate network interfaces or to override the default values for one or more of the following:
-
Database block size, language, territory, backup file location, or disk redundancy level for the DATA and RECO disk groups
To see the default values for your version of Oracle Database Appliance software before choosing the Typical or Custom option, run the configurator using the Custom option.
If you are installing Oracle Database Appliance Virtualized Platform, then select Virtualized Platform, or leave the default value, Bare Metal, as the environment option. If you are installing on X3-2, X4-2, or X5-2 hardware, then select ODA-X3-2, ODA-X4-2 or ODA-X5-2 respectively, or leave the default value, ODA V1, as the hardware option.
If you are using InfiniBand as the interconnect between the two Oracle Database Appliance servers, select the Infiniband checkbox. This option is only available for Oracle Database Appliance X5-2 systems.
The Browse option is not useful during the initial run because there are no configuration files to load.
In this example, Typical, Virtualized Platform, and ODA-X5-2 are the selected options.
Note:
The SAP Application option is only valid with the Bare Metal option.Click Next.
-
-
On the System Information page, provide the system name, and select the correct value from the lists for your region and time zone.
In the New Root Password and New Root Password (confirm) fields, enter a new password for the
rootuser. This password is encrypted in the configuration file and will be temporarily decrypted to reset the password during deployment.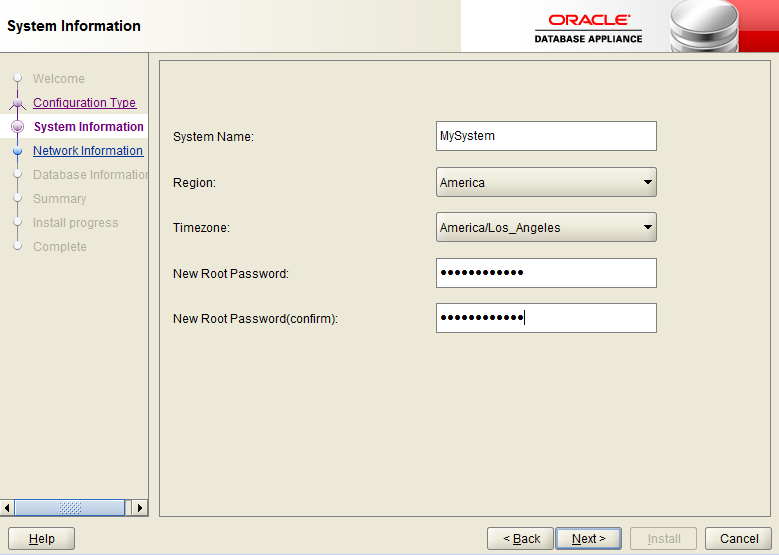
Description of the illustration oam_sysinfo.png
Click Next.
-
On the Network Information page, provide your domain name, DNS server addresses, public and VIP addresses for your two nodes, SCAN name and addresses, and Netmask and Gateway addresses.
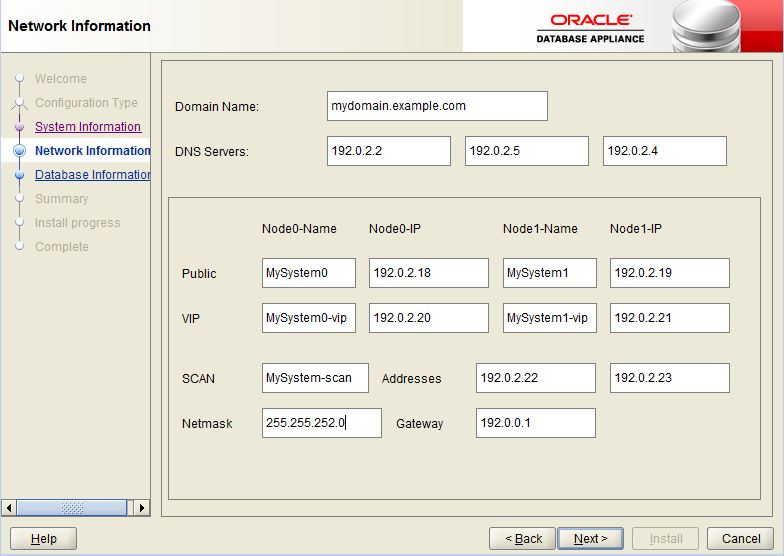
Description of the illustration oam_gennet.png
As you enter data on this page, some fields will automatically fill with values derived from earlier entries. For example, if the address that you provide for the Node 0 public IP address is 192.0.2.18, then the node addresses are assigned as follows:
-
Node 1 public IP address: 192.0.2.19
-
Node 1 virtual IP (VIP) address: 192.0.2.21
-
SCAN addresses (two addresses resolving to the SCAN VIP name): 192.0.2.22, 192.0.2.23
See Also:
"Checklist for Custom Node Network Address Configuration" earlier in this chapter for information about requirements for nonstandard public IP addressesClick Next.
-
On the Database Information page, select whether you want to create an initial database. If you check the box to create a database, then you can also provide your database details. These details include the database name, which you must enter, and the following options, selected from the available list values:
-
Is Container Database: leaving the default value, false, will build a non-container database
-
Database Type: the default type is OLTP, or you can select DSS or In-Memory
-
Database Class: see "Selecting Database Templates" for guidelines to help you choose the appropriate template, noting that not all options are available for all models of Oracle Database Appliance; the default class is odb-06
-
Database Deployment: select one of the following, where RAC is the default:
-
Data File Size (GB): if you indicated that you want to build a container database, then you need to provide a database data file size in the final field on the page. (This field does not accept input unless the Is Container Database selection is True.) If you do not want to create an initial database, then do not check the Create Initial Database check box.
-
Data Files on Flash Storage: select true if you plan to store your entire database in flash storage (400 GB SSDs); otherwise, leave the selection false. This option is only available on Oracle Database Appliance X5-2 systems.
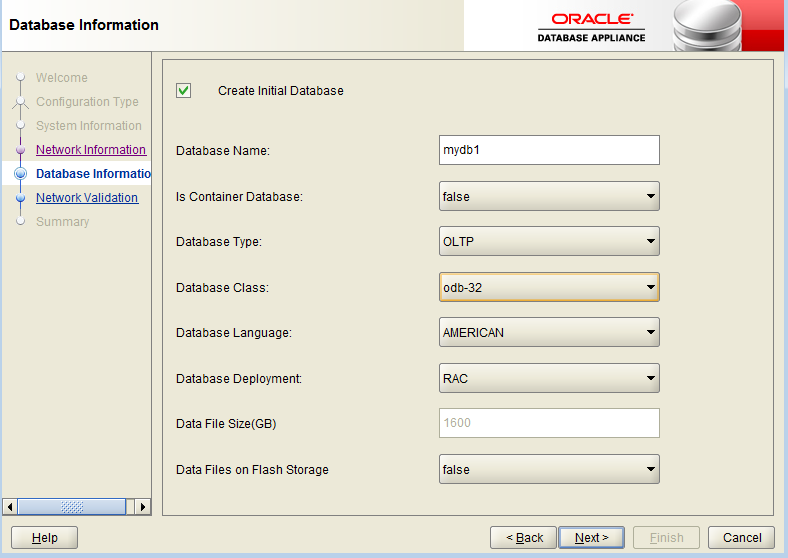
Description of the illustration oam_dbinfo.png
Click Next.
-
-
On the Network Validation page, either validate the network settings and save the validation output in a file or bypass the validation step by selecting the Skip Network Validations check box.
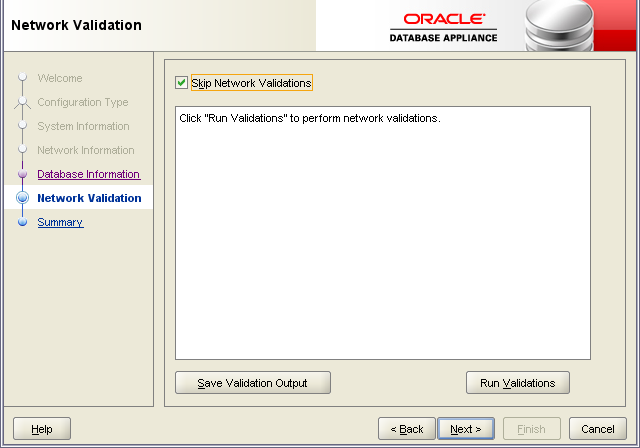
Description of the illustration oam_netval.png
Oracle recommends that you validate your network before deploying your configuration. However, unless you are running Oracle Appliance Manager configurator on server attached to the network subnet configured for your appliance, the validation will fail. In such a case, select Skip Network Validations check box, and then click Next to proceed to the next page. If you run the validation, then review the results. After you review the results, if you are ready to proceed, then click Next. If the validation fails, then save the validation output to review these results with your network administrator. To save the configuration information that you have entered and correct the network addresses later, select Skip Network Validations and click Next to continue to the next page.
-
On the Summary page, review the configuration options that you have selected. Click Save to save the configuration file, or click Back to modify your selections.
You can print the contents of the configuration file and use the printout to review your configuration entries for deployment planning purposes. You might also use the configuration file during the actual deployment, as described in "Task 5: Deploy Your Configuration (All Platform Deployments)".
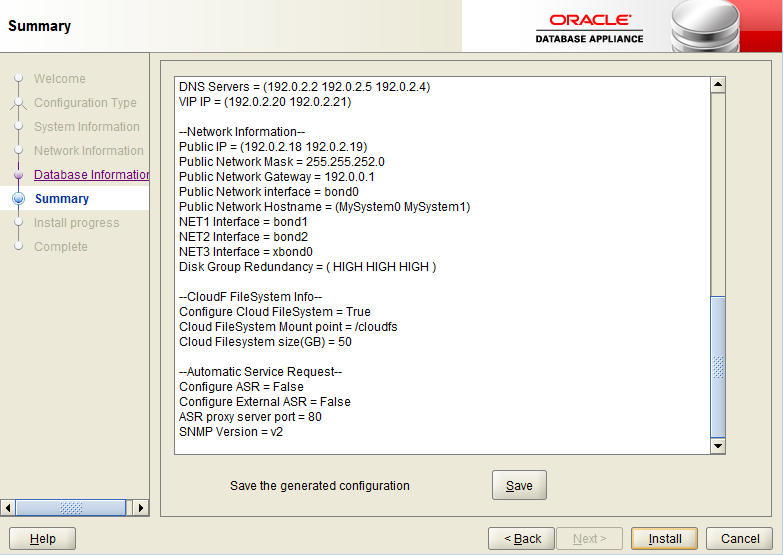
Description of the illustration oam_summary.png
If you are running the configurator on Oracle Database Appliance and have completed the preliminary steps to configure your initial network and install the End-User Bundle or deploy ODA_BASE, then you can click Install to deploy the configuration that you just created. If you are not ready to complete the deployment, then first click Save and then click Finish. Remember the name and location of the file you save as you might wish to copy the file to your Oracle Database Appliance, as described in Chapter 4, "Deploying Oracle Software on Oracle Database Appliance." If you need to make corrections before deployment, then rerun the standalone Oracle Appliance Manager configurator, load your configuration file, make the changes, and save the file again.