| Oracle® Clinical Administrator's Guide Release 4.6.2 E18818-02 |
|
|
PDF · Mobi · ePub |
| Oracle® Clinical Administrator's Guide Release 4.6.2 E18818-02 |
|
|
PDF · Mobi · ePub |
Both Oracle Clinical and the Remote Data Capture (RDC) option use the discrepancy system, which is described in Oracle Clinical Conducting a Study. This section describes the tasks for configuring the discrepancy management system:
Mapping Database Roles to User Roles (Oracle Clinical and RDC)
Customizing Layout Definitions (Oracle Clinical only)
Customizing Profiles (Oracle Clinical only)
Customizing Flexfields (Oracle Clinical only)
Configuring Role-Specific Discrepancy Management for RDC (RDC only)
Configuring Study and Site Security for Discrepancy Management (Oracle Clinical and RDC)
Setting Up Data Clarification Forms (DCFs) (Oracle Clinical only)
Creating Reusable Standard Text for Discrepancies and DCFs (Oracle Clinical and RDC)
See the Oracle Clinical Remote Data Capture Onsite Administrator's Guide for information on setting up Study/Site discrepancy management privileges.
This section applies to all RDC users and to Oracle Clinical users who need to work with discrepancies in Oracle Clinical's Maintain Discrepancy Database window.
User roles are important because:
RDC uses them to define access privileges; see the Oracle Clinical Remote Data Capture Onsite Administrator's Guide for more information.
You can customize RDC discrepancy management, news, and activities for different user roles; see the Oracle Clinical Remote Data Capture Onsite Administrator's Guide for more information.
You can customize the layout of the Maintain Discrepancy Database window for different roles; see "Customizing Layout Definitions".
You can customize profiles for different roles; see"Customizing Profiles".
For these customizations and access privileges to be available to a user, the user must have a database role that is mapped to the relevant user role in the User Group Roles installation reference codelist.
There are five default user roles. You can create additional roles if necessary, and map them in the User Group Roles reference codelist to make them available for customizing features in RDC and Oracle Clinical discrepancy management; see "Creating Custom Database Roles".
Table 3-1 shows the default mapping of database roles to user group roles. The Long Value is not used.
Table 3-1 Default Values for the USER GROUP ROLES Codelist
| Database Role (Short Value) | User Group Name (Long Value) | Description |
|---|---|---|
|
RXC_DMGR |
DM |
Data management role |
|
RXC_SUPER |
DM |
Data management role |
|
RXC_CRA |
CRA |
CRA role |
|
RXC_SITE |
SITE |
Site user |
|
RXC_BIOS |
BIOSTAT |
Biostatistics role |
|
RXC_QC |
QUALITY CONTROL |
Quality control role |
|
RXC_INV |
INV |
Investigator |
Note:
The USER GROUPS reference codelist is used in Oracle Clinical discrepancy management only. It contains a subset of the User Group Roles in the USER GROUP ROLES reference codelist and determines which of them are available for use in Oracle Clinical discrepancy management; see Chapter 3, "Configuring Discrepancy Management."In the USER GROUPS installation reference codelist, you specify which of the roles mapped to database roles in the USER GROUP ROLES reference codelist will be available for use in customizing aspects of the discrepancy management system in Oracle Clinical, including profiles and layouts for use in the Maintain Discrepancy Database window.
The position of a database role in the codelist is important if users have more than one database role. In the case of a user with more than one role, the system uses the database role closest to the top (seq=1) in the codelist as the default; for example, as the default profile when the user opens the Maintain Discrepancy Database window.
The long value is not used.
Table 3-2 Default Values for the USER GROUPS Codelist
| Seq | Short Value (Database Role) | Long Value (User Group Name) | Description |
|---|---|---|---|
|
1 |
DM |
— |
Data managers |
|
2 |
CRA |
— |
Clinical research associates |
|
3 |
BIOSTAT |
— |
Biostatistics group |
|
4 |
QUALITY CONTROL |
— |
Quality control department |
Note:
User groups is a misleading term here. This codelist is used only in discrepancy management (including data clarification forms). The term used for groups of users who have access to the same studies, programs, or projects is group user account.You control user group discrepancy function privileges and layout definitions in the User Group Admin window. From the Admin menu, select Discrepancy Mgmt, then select User Group Administration.
The window displays a list of existing user group names and their mapped database roles. Select a user group name to view its defined function privileges and layouts.
In the Function Privileges display, you can add or remove privileges for the selected user group. If a group lacks a particular privilege, the system prevents members of that group from performing the function. (The system reference codelist DISCREPANCY FUNCTIONS controls the list of values; you cannot modify it.)
To add a privilege:
Click in an empty row. An ellipsis (…) appears.
Click the ellipsis. The list of values appears.
Select a privilege and click OK. The system adds the privilege.
To remove a privilege, select it and then select Delete Record from the Data menu.
The following table describes the function privileges.
Table 3-3 Function Privileges for Discrepancy Management
| Name | Privilege Granted and Method of Use |
|---|---|
|
UPD DATA ENTRY |
Enables the Update Patient Data Special menu item in the Discrepancy Database window, and allows updates while in the Data Entry subsystem. |
|
BRWS DATA ENTRY |
Enables the Browse Patient Data Special menu item in the Discrepancy Database window for read-only access to patient data. |
|
MANUAL |
Enables the Add Manual button in the Maintain Discrepancy Database window, which allows users to create manual discrepancies and manual header discrepancies. |
|
DCF PRINT DRAFT |
Displays the Draft option in the DCF Print Options window; enables the user to print a draft version of a Data Clarification Form (DCF) report. |
|
DCF PRINT COPY |
Enables the Copy option in the DCF Print Options window; enables the user to print a copy of a DCF. |
|
DCF PRINT FINISH |
Enables the Final option in the DCF Print Options window; enables the user to print a final version of a DCF report. |
|
DCF REPRINT |
Enables the Reprint option in the DCF Print Options window; enables the user to reprint a final version of a DCF report. |
|
CREATE DCF |
Enables the Create DCF option in the group selection menu in the Maintain Discrepancy Database form. |
If you define one or more custom layouts for the Discrepancy Database window (see "Customizing Layout Definitions", assign it to a user group to allow the user group to use it. Users can select the layout they want to use from the User Group Layouts item in the Special menu of the Discrepancy Database window.
To assign a layout to a user group:
Click in an empty row. An ellipsis (…) appears.
Click the ellipsis. The list of values appears.
Select a layout and click OK. The system adds the layout.
To remove a layout, select it and then select Delete Record from the Data menu.
This section applies to Oracle Clinical only; not RDC.
Oracle Clinical provides the Layout Definitions utility for creating different representations of the Maintain Discrepancy Database window for different user groups. You can then assign layouts to different user groups. A user group can have more than one layout, and a layout can be used by multiple user groups.
A layout definition specifies which discrepancy details appear in the Master, or upper section, of the Maintain Discrepancy Database window in multi-record view, and which appear in the Detail, or lower section. The layout also determines the display location of each discrepancy detail, relative to the others in the same section of the window.
The Master section of the Maintain Discrepancy Database window in multi-record view is displayed above all the discrepancies. The system populates the fields in the upper section with values from the discrepancy that is highlighted in the lower section. All the fields in the Master section are visible without scrolling.
Of the discrepancy details that remain in the lower section of the window, put those that are most useful at the top of the list, so that they are displayed farthest left in the window. They, too, will be visible without scrolling.
To open the Layout Definitions window, from the Admin menu, select Discrepancy Mgmt Admin, then select Layout Definitions. You can also open this form directly from the User Group Admin form by clicking the Layout Definitions button. Users can create their own temporary layout directly in the multi-record view of the Maintain Discrepancy Database window; see "Changing Discrepancy Display Layout and Filtering the Data Displayed" in Oracle Clinical Conducting a Study.
To view the definition of an existing layout, select its name in the top section, labeled "Layout."
To create a new layout:
Enter a name for the new Layout in the top section, labeled "Layout." If no line is available, select Data, then select Insert Record.
One by one, select the fields you want to move into the other section and move them, using the sideways arrows:
Use the Left arrow to move the selected field into the Master, or upper, section of the window in multi-record view.
The system allows only eight fields in the Master section, specifically: Patient, Visit, Subevent Number, DCM Name, Review Status, DCF ID, CRF Page, and Investigator. To maximize the number of fields visible without scrolling, put all eight fields into the Master section.
Use the Right arrow to move the selected field from the Master section into the Detail, or lower, section of the window.
Use the Up and Down arrows to adjust the display order of the items. The topmost item in either the Master or Details list appears farthest left in the appropriate section of the Maintain Discrepancy Database window. The second item from the top appears second to the left, and so on.
In the Details section, the display order determines which fields are visible without scrolling. The number of fields that are visible without scrolling depends on the size of the fields you select.
Click OK to save your changes or click Back to return without saving your changes.
Users have access to the same utility for customizing the layout of the Maintain Discrepancy Database form. For a more comprehensive description of this utility, see "Using the Maintain Discrepancy Database Window" in Oracle Clinical Conducting a Study.
Customizing profiles applies to Oracle Clinical only; not RDC.
To open the Maintain Discrepancy Database form, a user must have a user role with a defined profile. Profiles control access to discrepancy records and fields, review status codes, data entry, layout definitions, and printing and tracking Data Clarification Forms (DCFs).
You can create master profiles for different user roles; individual users can modify their profile when they open the Maintain Discrepancy Database form.
This section includes the following topics:
For information about user roles, see "Mapping Database Roles to User Roles".
To open the Profile Administration window:
Navigate to Admin, Discrepancy Mgmt Admin, and then select Profile Administration.
The Profile Administration window has two viewing modes: multi-view and single-view. The window opens in multi-view mode by default.
In multi-view mode, you can view all the profiles currently defined. In single-view mode, you view one profile at a time. In either mode, you can create new profiles and specify the criteria for each profile.
Click the View Mode button in the upper right corner of the form to toggle between multi-view and single-view mode.
You can refine a profile group's view by specifying default profile criteria values in the Profile Administration form. Many of the fields have lists of values. If you do not specify a particular criterion, the system allows a user with that profile to query all possible values. If you do not lock a profile criterion (see the following section), users can override the Master profile's default settings.
Profile users can customize their profiles, and thereby modify their views of the discrepancy database. You control the extent to which they can modify a profile by locking or unlocking each criterion. The locks are boxes that, in single-view mode reside between each criterion name and its field, and in multi-view mode reside to the right of each criterion's field. (See Figure 3-1 and Figure 3-2 for examples of each view mode, with diagonal arrows indicating the box positions.) The lock prevents users from modifying the default profile settings. If you do not lock a profile criterion, a profile user can override the profile's default setting.
In multi-view mode, for criteria like Accessible Data Only? where toggle boxes control viewing, the Lock box is to the right of the criteria names. (See Figure 3-1.)
In single-view mode, for criteria like Accessible Data Only? where toggle boxes control viewing, the Lock box is to the left of each criterion's toggle box. (See Figure 3-2.)
Example 3-1 Profile Administration Form in Multi-View Mode
Figure 3-1 shows a region of the Profile Administration form in multi-view mode. (Many of the intervening criteria fields have been scrolled out of view to include the Accessible Data Only? column in the illustration.) The diagonal arrows point to the Lock box columns for the Creation Ts To column's Lock box, near the top-center of the capture, and the Accessible Data Only? Lock box on the right. The table following Figure 3-1 describes how the settings in Figure 3-1 control profile criteria viewing for the four listed profiles.
Figure 3-1 Sample Multi-View Region of the Profile Administration Form
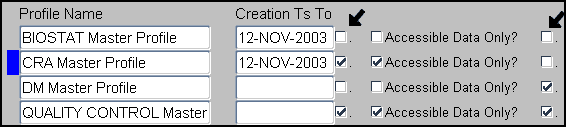
Table 3-4 Legend for Figure 3-1
| Profile Name | Creation Ts To Access Criterion Access | Accessible Data Only? Criterion Access |
|---|---|---|
|
BIOSTAT Master Profile |
Only records dated before 12-NOV-2003 appear by default, but users can change this date because it is not locked. |
Because the left box is not selected, both data types appear by default. But users can limit their view to accessible data because the criterion is not locked (the Lock box to its right is not selected). |
|
CRA Master Profile |
Only records dated before 12-NOV-2003 appear, and users cannot change this date because it is locked. |
Because the left box is not selected, only accessible data appears by default. But users can include inaccessible data in their view because the criterion is not locked. |
|
DM Master Profile |
All data appears, regardless of creation date, because the creation date is not specified. But because the criterion is not locked, users can filter by creation date if they choose. |
Both data types appear by default, and because this setting is locked, users cannot change it. |
|
QUALITY CONTROL Master Profile |
All data appears, regardless of creation date, because the creation date is not specified. Because the criterion is locked, users cannot filter their view by creation date. |
Only accessible data appears by default, and because this setting is locked, users cannot change it. |
Example 3-2 Profile Administration Form in Multi-View Mode
Figure 3-2 shows a portion of the single-view Profile Administration window. The arrows point to the Lock boxes for, from left to right, the (Creation Ts) To criterion, the Last Modified By criterion, and the Accessible Data Only? criterion.
Figure 3-2 Sample Single-View Region of the Profile Administration Window

In single-view mode, for criteria like Accessible Data Only? where toggle boxes control viewing, the Lock box is to the left of the toggle box.
In addition to defining access to discrepancy details in the Profile Criteria fields, you can further limit data access by entering SQL statements in the SQL Text section. To prevent users from bypassing the SQL statements, check the locking box for each entry. (In single-view mode, the locking box is to the right of the SQL Text label. In multi-view mode, the locking box is to the left of the SQL Text column's fields.) Your SQL statements have a size limit of 2000 characters.
You can limit a profile's view of discrepancy records according to the records' current review status classifications. Select a profile in the Profile Administration form, then click the Review Status button to open the Discrepancy Review Status Codes dialog box. (To define the codes you see in this box, see "Defining the Possible Review Statuses for Discrepancies".) The dialog box contains rows with three columns: the Selected? box column, the Status Name column and the Locked? box column.
Each Selected? box controls a profile's default access to records that have that review status classification code. Select a code's Selected? box to include discrepancy records; deselect it to prevent viewing records with its code.
Users can override each of these settings in their personal profiles unless you lock them. If you lock a review status code, profile users cannot override the profile's default setting.
Table 3-5 describes the outcome for the four possible combinations of Selected? and Locked? boxes.
Table 3-5 Selecting and Locking Review Status Profile Criteria
| Selected? | Locked? | Result |
|---|---|---|
|
Unchecked |
Unchecked |
Not viewed by default, but profile user can reveal it. |
|
Checked |
Unchecked |
Viewed by default, but the profile user can hide it. |
|
Unchecked |
Checked |
Not viewed by default, and profile user cannot reveal it. |
|
Checked |
Checked |
Viewed by default, and profile user cannot hide it. |
If the values in the DISCREPANCY REV STATUS CODE reference codelist change, you can update all profiles with the new values by clicking the Add Review Status button. (To edit the codelist, see "Defining the Possible Review Statuses for Discrepancies".)
You can control a profile's access to discrepancy review status types and individual discrepancy fields by setting its privileges. By default, a new profile has no update privileges; you must add review status codes, and then discrepancy field values to each master profile. To open the Privileges for DM Master Profile window, from the Admin menu, select Discrepancy Mgmt Admin, and then select Profile Administration. Select a master profile, then click the Privileges button.
In the Update Discrepancy records… Review Status column, add the discrepancy record review status types that you want to be accessible by users of the currently selected profile. You can select from an list of values. (To define the review status codes that appear in this dialog box, see "Defining the Possible Review Statuses for Discrepancies".)
Note:
Adding an update code does not make its discrepancy fields accessible. You must also specify each field. See the following section.In the Update Discrepancy Fields panel there are two columns: Field Name and Privilege. Add the field names for fields that users of this profile can update. You can select them from an list of values. In each corresponding Privilege field, add the type of privilege. If you do not add a field name, users of the profile cannot update the data in the Maintain Discrepancy Database form. You can select from lists of values for both fields. Table 3-6 shows the corresponding field names for each field status value. (The Update Discrepancy Fields section contains the list of fields the profile has access to change if the current discrepancy record's review status is on the Update Discrepancy Records list. The only allowable value for the Privilege field is Update.)
| Field Status Value | Field in the Maintain Discrepancy Database Form or Description |
|---|---|
|
REVIEW STATUS |
Review Status |
|
RESOLUTION STAT |
Resolution Status |
|
COMMENT TEXT |
Comment Text |
|
INT COMMENTS |
Internal Comments |
|
RESOLUTION TEXT |
Resolution Text |
|
ASSOCIATED ID |
Associate a discrepancy for passive review field |
|
CRF PAGE NUMBER |
CRF Page Number |
|
FLEXFIELD1 |
User-definable field (See "Customizing Flexfields".) |
|
FLEXFIELD2 |
User-definable field (See "Customizing Flexfields".) |
The Can Change Review Status To section contains the allowable values for the review status if it can be updated. The Own Manual Only flag identifies allowable values for the Review Status field for manual discrepancy records owned by the same group as the current user. For example, you could specify that users of the CRA profile could only close discrepancies that they manually created.
The Maintain Discrepancy Database window includes two editable fields that have the default labels Flexfield1 and Flexfield2. You can use them to store information you need. You can change their labels, make the fields mandatory if you want, and create a dynamic or static list of values for each field:
Static List of Values. By default, the fields get their list of values from a database view that references the local reference codelists DISC_FLEX1_VALUES and DISC_FLEX2_VALUES. You can populate these reference codelists to create lists of values for the two fields.
Dynamic List of Values. Alternatively, you can reprogram the view to reference another Oracle Clinical table or even an Oracle table outside Oracle Clinical, such as an adverse event code maintained in a different Oracle system. In each field you can display any column value or concatenation of column values.
The views, DISCREP_FLEX1 and DISCREP_FLEX2, respectively, are created during installation as follows:
create or replace view discrep_flex1 as
select   ref_codelist_value_short_val VALUE,
            long_value DESCRIPTION
from reference_codelist_values
where ref_codelist_name = 'DISC_FLEX1_VALUES'
and active_flag='Y';
Use these local reference codelists to customize the label for Flexfield1 or Flexfield2, to enable the field, to make the field mandatory or not, and to specify whether or not there is a list of values for the field.
Table 3-7 DISC_FLEX1 and DISC_FLEX2 Settings
| Short Value | Long Values | Description |
|---|---|---|
|
|
|
Set the long value to |
|
|
|
Set the long value to Y to require users to enter text in this field. Set to N to make the field optional. |
|
|
text |
Enter freeform text as the long value. This text becomes the field label in the Discrepancy Database window. |
|
|
|
Set the long value to |
If you set LOV_VALIDATE to Y in DISC_FLEX1, you can create a static list of values by entering each allowed value in a row in this codelist. When a user displays the list of values in the Discrepancy Database window, the system displays the short value and description for each row you enter here. (Alternatively, create a dynamic list of values; see "Customizing Flexfields".)
The long value is used as the description in the Flexfield1 (or 2) field's list of values. The short value is stored in the FLEX_FIELD1 (or 2) column in the DISCREPANCY_ENTRIES table in the database. The default value has no effect.
Table 3-8 DISC_FLEX1_VALUES and DISC_FLEX2_VALUES Codelists
| Field Name | Description |
|---|---|
|
Seq |
Determines the order of the values in the list of values for the flexfield. |
|
Short Value |
Is the stored value when the user selects the row from the list of values. |
|
Long Value |
Can duplicate the short value; is not displayed in the list of values. |
|
Active box |
Select the Active check box to have the entry appear in the list of values. |
|
Default |
Identifies which value is the default value. |
|
Description |
Provides additional information about the value; the information displays in the list of values. |
To customize Flexfield1 to ask the creator of a manual discrepancy record if the record is finished, and test the response entry against a list of three values, you would set the flexfield1 codelist values to the values in the following two tables, with the three values defined in the second. (Values that differ from the default values are in italics.)
Table 3-9 DISC_FLEX1 Settings to Make a Finished? Prompt
| Seq | Short Value | Long Value | Active | Default | Description |
|---|---|---|---|---|---|
|
1 |
ENABLED |
Y |
Selected |
Flexfield1 Displayed |
|
|
2 |
REQUIRED |
N |
Selected |
Flexfield1 Required |
|
|
3 |
PROMPT |
Finished? |
Selected |
Flexfield1 Prompt |
|
|
4 |
LOV_VALIDATE |
Y |
Selected |
Flexfield1 list of values Validate |
This section includes the following topics:
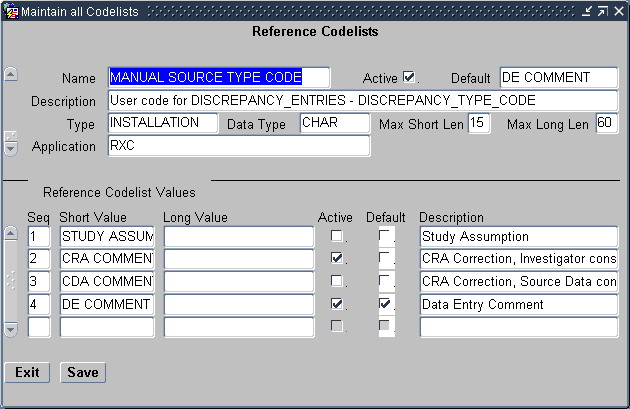
You define reason codes to separate discrepancies into categories. Reasons provide an explanation of why the discrepancy exists.They are called Reasons in RDC and Category in Oracle Clinical.
When a user creates an Operator Comment (a manual field or section discrepancy in RDC Onsite), the system prompts the user to select a reason code from a list of reasons that is populated by the MANUAL SOURCE TYPE CODE reference codelist in Oracle Clinical. The user can also enter an additional explanation for the discrepancy.
You can add and remove values in the reference codelist (see Figure 3-3):
For each reason you add, enter a value in the Short Value field and the Description field.
Set one reason to Default. The first time the user creates a manual discrepancy during a login session, the system inserts the default reason. The user can select a different reason. For subsequent manual discrepancies, RDC Onsite displays the last entered reason. The user can always select a different reason.
Oracle Clinical stores the short value in the database.
Table 3-11 Values for MANUAL SOURCE TYPE CODE Reference Codelist
| Seq | Short Value | Long Value | Description |
|---|---|---|---|
|
1 |
STUDY ASSUMP |
Study assumption |
|
|
2 |
CRA COMMENT |
CRA Correction, Investigator consulted |
|
|
3 |
CDA COMMENT |
CRA Correction, Source Data consulted |
|
|
4 |
DE COMMENT |
Data Entry Comment |
|
|
5 |
SOURCE DATA REV |
Source Data Review |
The system creates a univariate discrepancy when the data entered does not match the requirements defined in the underlying question, such as data type or length. You cannot change these underlying causes, but you can change the reason text or define more than one reason associated with a single underlying cause, from which the user can choose.
The system automatically populates the reason code and description when it raises the discrepancy.
To define reason codes and descriptions for univariate discrepancies:
Open Oracle Clinical.
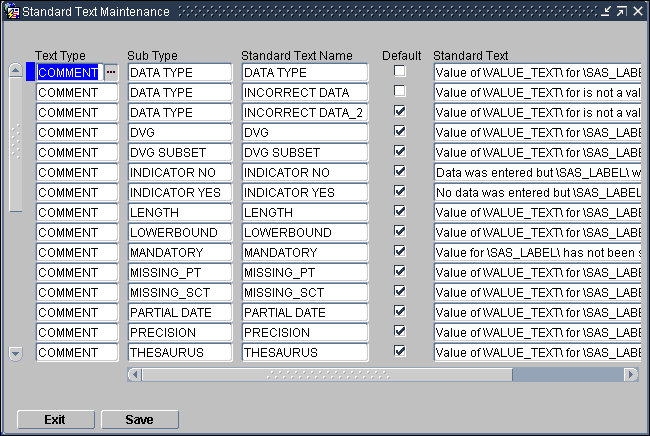
Select Admin, Discrepancy Mgmt Admin, and then select Standard Text Maintenance. See Figure 3-4.
You use the fields in the Standard Text Maintenance form to define descriptions for each type of univariate discrepancy as follows:
Text Type — Select COMMENT to specify descriptions for univariate discrepancies.
Sub Type — Select from the list of valid univariate discrepancy types. RDC Onsite uses the text in the Sub Type field to populate the Reason field when a discrepancy of that type is raised.
Standard Text Name — Ordinarily, you specify a name to match the Sub Type. However, if you want to specify more than one description for a discrepancy type, use this field to specify a unique identifier.
Default — If you choose to create a selection of multiple descriptions for a certain discrepancy type, select which description is the default value. RDC Onsite uses the default value the first time a discrepancy of that type is raised. The user can always select one of the alternative descriptions provided.
Standard Text — Specify the description that you want RDC Onsite to display for the discrepancy type raised. Note that you can use variables to include the data value of the discrepant response as well as the definitional components of the question; for example:
Value of \VALUE_TEXT\ for \SAS_LABEL\ is not a valid \DATA_TYPE\.
where VALUE_TEXT is the data response entered, SAS_LABEL is the SAS label defined for the Question, and DATA_TYPE is the data type defined for the Question.
Oracle Clinical raises multivariate discrepancies when user-defined validation procedures detect invalid or inconsistent data. You specify the reason for multivariate discrepancies in the procedure definition; see Oracle Clinical Creating a Study for details. Oracle Clinical displays the reason; RDC Onsite does not.
When a user takes action on a discrepancy, the discrepancy goes to a new review status. For system-generated discrepancies (univariate and multivariate), the system assigns the default review status. For manual discrepancies, the user selects the review status.
Both the Oracle Clinical and RDC discrepancy management systems use the DISCREPANCY REV STATUS CODE installation reference codelist to define all the discrepancy statuses possible to use in your discrepancy management workflow.
RDC Onsite uses the text string in the Description field to display the status of a discrepancy in any discrepancy management-related window, form, page, or report. Oracle Clinical uses the text string in the Short Value field to display the status of a discrepancy.
You can edit the review status codes available and sequence the order in which they appear in lists of values. If you add a status, you must do the following as well:
In Oracle Clinical, update all profiles with the new status by clicking the Add Review Status button; see "Customizing Profiles".
In RDC, add the new status' short value to each DISCREPANCY STATUS ROLE codelist. In addition, if you want users of a particular role to be able to route discrepancies to the status, add the status to the relevant DISCREPANCY ACTIONS ROLE codelist. See "Configuring Discrepancy Display by User Role" and"Configuring the Actions Allowed on Discrepancies".
Table 3-12 lists the entries in the DISCREPANCY REV STATUS CODE codelist following the initial installation of Oracle Clinical.
Table 3-12 Default Entries for the DISCREPANCY REV STATUS CODE Codelist
| Short Value | Long Value | Description |
|---|---|---|
|
CRA REVIEW |
Null |
Under CRA Review |
|
INV REVIEW |
Null |
Under Investigator Review |
|
RESOLVED |
IRRESOLVABLE |
Not assigned to any person or process. Setting a discrepancy's status to RESOLVED does not cause the system to close the discrepancy. That happens only when the data is no longer discrepant, either because the data has been updated to a nondiscrepant value or because the validation procedure or question attribute that flagged the value as discrepant has been changed in such a way that the existing value is no longer considered discrepant. |
|
IRRESOLVABLE |
IRRESOLVABLE |
Irresolvable (That is, closed. Cannot be resolved.) |
|
TMS EVALUATION |
TMS EVALUATION |
TMS Evaluation |
|
UNREVIEWED |
Null |
Not yet reviewed |
|
TMS IN PROGRESS |
TMS IN PROGRESS |
TMS in Progress - Set/Reset by system |
|
DM REVIEW |
Null |
Under DM Review |
|
INT DM REV |
Null |
Internal - Under DM Review |
|
INT CRA REV |
Null |
Internal - Under CRA Review |
There are additional statuses that are not included in the reference codelist:
OBSOLETE: When the data is no longer discrepant—either because the data is updated or because the validation procedure or question attribute that flagged the data as discrepant is changed in such a way that the data is no longer discrepant—the system automatically updates the system status to OBSOLETE.
CLOSED: The system sets a discrepancy's status to Closed when it is resolved by either updating the data to a nondiscrepant value or changing the validation procedure or question attribute in such a way that the existing data is no longer discrepant. The discrepancy's system status changes to Obsolete and the discrepancy is removed from its DCF (if any) and no longer appears as current in discrepancy reports.
PASSIVE REVIEW is a status that allows you to reduce the number of discrepancy queries and the number of discrepancies on a DCF by associating one or more discrepancies with a primary discrepancy. You can then include all the discrepancies in a single query. When you create the DCF, do not include discrepancies marked as Passive Review in the printed DCF.
For example, if you have a page with three lab results and all three lab results are missing, you would have three discrepancies such as:
AST lab units missing, please provide.
ALT lab units missing, please provide.
RBC lab units missing, please provide.
You could send three queries, but to save time, money, and paper you could choose to send only one query such as: Page 7 all lab units are missing, please provide.
To do this, mark the second two discrepancies for passive review associated with the first discrepancy as the primary discrepancy. Then create a DCF, include all three discrepancies in the DCF, but mark the primary discrepancy's status as For Distribution and the other discrepancies' status as Not For Distribution. When you print the DCF, only the primary discrepancy appears, but all three are included in the electronic DCF. When the answer to the query returns, you can update the data for all three discrepancies.
When entering and modifying values in the DISCREPANCY REV STATUS CODE reference codelist, you must follow these rules:
The codelist must contain at least one short value entry with a long value of IRRESOLVABLE, which indicates that a user must specify a resolution reason when setting a discrepancy to this status. By default, the codelist contains the short values RESOLVED and IRRESOLVABLE, which are each assigned the long value IRRESOLVABLE.
The codelist must contain a short value entry of UNREVIEWED. The Active check box corresponding to the value must always be selected. The UNREVIEWED value is the system-coded default status of any newly created discrepancy, except multivariate discrepancies, whose initial review status is defined in the Details block of the Oracle Clinical validation procedure that generates the discrepancy.
The Description field must be entered for each short value. In RDC, the system uses this value to display the status of discrepancies in any discrepancy management-related windows, forms, tasks tabs, or reports. In Oracle Clinical, the system uses the short value to describe the status of a discrepancy.
The Active check box must be selected for each review status that you want to allow for a certain user role. In other words, if you set an entry in a DISCREPANCY STATUS role codelist to active, then you must also set the corresponding entry in the DISCREPANCY REV STATUS CODE codelist to active.
Conversely, if you set an entry in the DISCREPANCY REV STATUS CODE codelist to inactive, you must also set the corresponding entry in each DISCREPANCY STATUS role codelist to inactive. If not, users receive an error message that problems exist with the discrepancy management system.
Users can manually resolve discrepancies. When doing so, the user must also provide an explanation — a reason — for resolving the discrepancy. The user must select a resolution reason from the list that you define in the DISCREPANCY RESOLU TYPE CODE installation reference codelist.
Enter values in the Description field and the Short Value field. The system displays the text string that you specify in the Description field to display the list of resolution reasons to the user. The corresponding short value is stored in the database.
Note:
Oracle reserves the CND BLK DELETED value as the resolution for a manual discrepancy associated with a conditional block that was deleted. The value is hard-coded. Do not add this value to the DISCREPANCY RESOLU TYPE CODE codelist.Table 3-13 lists the default entries in the DISCREPANCY RESOLU TYPE CODE codelist.
Table 3-13 Values for the DISCREPANCY RESOLU TYPE CODE
| Short Value | Long Value | Description |
|---|---|---|
|
CRA VERIFY |
CONFIRMED |
CRA Correction |
|
CRA VERIFY-INV |
CONFIRMED |
CRA Correction, Investigator consulted |
|
CRA VERIFY-SRC |
CONFIRMED |
CRA Correction, Source Data consulted |
|
INV VERIFY |
CONFIRMED |
Investigator Correction |
|
STUDY ASSUMP |
CONFIRMED |
Study Assumption |
|
NO ACTION REQD |
CONFIRMED |
No Action Required |
|
ELIMINATED |
IRRESOLVABLE |
Data value changed. Disc no longer applicable. |
|
OVERRULED |
NON DISCREPANT |
Disc not considered a validation error. |
|
DATA MODIFIED |
IRRESOLVABLE |
Data value changed. Disc no longer applicable. |
|
INV-NO INFO |
IRRESOLVEABLE |
Investigator queried. No further information available. |
If you add a value, select a long value from the following:
NULL: No value entered.
CONFIRMED
IRRESOLVABLE: Used for values which correspond to manually closed discepancies. This makes the RESOLUTIONTYPE CODE and COMMENT available when user selects an IRRESOLVABLE status.
NOT DISCREPANT. Used for manual discrepancies only; indicates that the discrepancy was raised for a comment, not because there was a problem with the data.
The OCL_STATE local reference codelist includes several parameters that control discrepancy database and DCF functions, as well as many other parameters. The following table describes the discrepancy management parameters.
Table 3-14 Settings in the OCL_STATE Codelist for Discrepancy Database Functions
| Short Value (Parameter Name) | Long Value (Settings) | Description |
|---|---|---|
|
|
|
The single-record mode of the Maintain Discrepancy Database form's Characteristics panel has a button that toggles the three long value settings. Choose the value to display by default. |
|
|
|
If set to Y, changes to comment and resolution text entries in DCFs automatically propagate to the discrepancy database |
|
|
|
The system does not use this setting. |
|
|
|
If set to Y, the system automatically populates the CRF Page Number field of the Maintain Discrepancy Database form. |
This section includes the following topics:
You use the reference codelists in Oracle Clinical to define your discrepancy management system for both Oracle Clinical and RDC Onsite.
To configure most settings for your discrepancy management system, you use the installation reference codelists in Oracle Clinical.
To access the installation reference codelists:
Open Oracle Clinical.
Select Admin, Reference Codelists, and then select Installation Codelists.
See Chapter 7, "Reference Codelists" for general information on setting reference codelist values.
This section includes the following topics, which apply only to RDC:
RDC uses the DISCREPANCY STATUS role installation reference codelists to determine how discrepancies with a particular status are displayed for users with a particular role. There is a different reference codelist for each default user role: CRA, DM, INV, and SITE. You can create a DISCREPANCY STATUS reference codelist for additional roles; see "Adding Reference Codelists for Custom Roles".
Use these codelists to ensure that discrepancies are displayed appropriately for users of different roles. For example, a discrepancy with a review status of Under CRA Review should appear as ACTIVE to a CRA, but as OTHER to an investigator.
Note:
These reference codelists do not determine what actions a user can perform on discrepancies or their underlying patient data. The DISCREPANCY ACTIONS role codelists determine what routing and resolution actions each user role can take on a discrepancy.Note:
If you create additional roles for use in discrepancy management you must create a new reference codelist called DISCREPANCY STATUS role for each of them and set it up the same way that these reference codelists are set up.Every status defined in the DISCREPANCY REV STATUS CODE codelist must be included in the DISCREPANCY STATUS role codelist for each role, with a long value that determines how the discrepancy is presented (or not) to the user. The possible long values are:
ACTIVE: (For open discrepancies) The current user can take action against this discrepancy.
OTHER: (For open discrepancies) The discrepancy is assigned to a user with a different role. For RDC Onsite, you can prevent users from taking action on OTHER discrepancies with the reference codelist DISCREPANCY NO OTHER UPDATE; see "Preventing Update to OTHER Discrepancies".
CLOSED: (For closed discrepancies) System-closed discrepancies cannot be re-opened by users with any role. If the discrepancy was manually closed by a user, any user with UPDATE or UPD_DISCREP privilege can re-open the discrepancy.
HIDDEN: (For open discrepancies) The current user cannot view or take action against this discrepancy. This functionality is intended only for section-type discrepancies. If a user selects a univariate or multivariate discrepancy, the Action drop-down list excludes any action that would route the discrepancy to a status that is HIDDEN for any role.
There is another technique for hiding any type of discrepancy (section, univariate, multivariate) at a particular status (for example Internal DM Review) from a particular user role (for example SITE). In this example, simply uncheck the Active check box for the status Internal DM Review in the codelist DISCREPANCY STATUS SITE.
Note:
If you change the long value to HIDDEN for a status that has already been applied to univariate or other types of discrepancies, these existing discrepancies are hidden to users with the relevant role, even though only section discrepancies are intended to allow hiding.Note:
Long values must be in uppercase.RDC uses the settings of these codelists to indicate to the current user whether a CRF, patient, or individual response is associated with a discrepancy and if so, whether it is a discrepancy that requires action by the current user. The table below describes the colors that RDC uses for this purpose. RDC uses these colors to highlight the patient icon, the CRF icon, and the individual fields in a CRF that have one or more discrepancies.
Note that:
HIDDEN discrepancies are not highlighted in any color because they are not visible to particular user roles.
RDC uses green to highlight the fields in a CRF that have a discrepancy that was manually closed by the user. Fields with a system-closed discrepancy are not highlighted.
Table 3-15 Colors Used to Indicate Discrepancy Access Status
| Color | Access Status | Implication |
|---|---|---|
|
Red |
ACTIVE |
The CRF contains at least one open discrepancy that requires attention by the user role to which the current user is assigned. |
|
Yellow |
OTHER |
The CRF contains only open discrepancies that require the attention of a user role different from the one to which the current user is assigned. |
|
White |
CLOSED |
The CRF contains no visible open discrepancies. Three conditions may be true for a white CRF or patient icon:
|
When entering and modifying values in a DISCREPANCY STATUS role codelist, you must follow these rules:
Each DISCREPANCY STATUS role codelist must include all short values that appear in the DISCREPANCY REV STATUS CODE codelist, and must not contain any values not in that codelist. When you add a short value to one codelist, you must add the same short value to the other codelist. (An exception is the CLOSED status, described below).
Each codelist must contain the short value CLOSED, which has a corresponding long value CLOSED. This is the status that is used for any system-resolved discrepancy, that is, a data discrepancy that was resolved as the result of an update to a non-discrepant value.
The RESOLVED and IRRESOLVABLE short values must have a long value of CLOSED for all roles.
If a review status is CLOSED for one user role it must be either CLOSED or HIDDEN for all other user roles. Note also that for any review status that appears as CLOSED in a DISCREPANCY STATUS role codelist, the DISCREPANCY REV STATUS CODE codelist must represent the review status with a long value of IRRESOLVABLE.
Do not change any long value with a default value of CLOSED.
Note:
Both RDC Classic and RDC Onsite use these reference codelist values. RDC Classic does not support the CLOSED display status for any review status except RESOLVED and IRRESOLVABLE.The setting of the Active check box determines whether discrepancies of that status are visible to users with the relevant role. If the Active check box is not selected, users with the role cannot see discrepancies of that status. If the Active check box is selected, users with the role can see discrepancies of that status. The way discrepant values are displayed depends on the long value.
Note:
Either disabling the Active check box or setting the long value to HIDDEN has the effect of hiding discrepancies of the relevant status from users with the relevant role. However, use of the text string 'HIDDEN' only works for hiding section discrepancies. The technique of unchecking the Active check box can be used to hide any type of discrepancy: section, manual field, univariate, or multivariate.If an entry in a DISCREPANCY STATUS role codelist is active, then the corresponding entry in the DISCREPANCY REV STATUS CODE codelist must also be active. If not, the discrepancy configuration is invalid. RDC Onsite will display an error message to alert users to the problem.
The Description field is optional for all entries.
The setting of the Default check box has no effect. The default status of a new discrepancy is always UNREVIEWED.
Table 3-16 provides a comparison of how each default discrepancy status is displayed by default for each user role.
Table 3-16 User Roles and the Default RDC Onsite Discrepancy Access Statuses
| Short Value – Oracle Clinical Discrepancy Review Status | Long Value – RDC Onsite Display | |||
|---|---|---|---|---|
| CRA | DM | INV | SITE | |
|
UNREVIEWED |
ACTIVE |
ACTIVE |
ACTIVE |
ACTIVE |
|
CRA REVIEW |
ACTIVE |
OTHER |
OTHER |
OTHER |
|
INV REVIEW |
OTHER |
OTHER |
ACTIVE |
OTHER |
|
DM REVIEW |
OTHER |
ACTIVE |
OTHER |
OTHER |
|
TMS EVALUATION |
OTHER |
OTHER |
OTHER |
OTHER |
|
TMS IN PROGRESS |
OTHER |
OTHER |
OTHER |
OTHER |
|
RESOLVED |
CLOSED |
CLOSED |
CLOSED |
CLOSED |
|
IRRESOLVABLE |
CLOSED |
CLOSED |
CLOSED |
CLOSED |
|
CLOSED |
CLOSED |
CLOSED |
CLOSED |
CLOSED |
|
INT CRA REV |
ACTIVE |
OTHER |
HIDDEN |
HIDDEN |
|
INT DM REV |
OTHER |
ACTIVE |
HIDDEN |
HIDDEN |
|
INT RESOLVED |
CLOSED |
N/A |
CLOSED |
CLOSED |
This codelist contains discrepancy status groupings for the CRA role.
Table 3-17 Values for the DISCREPANCY STATUS CRA Reference Codelist
| Seq | Short Value | Long Value | Active Check Box |
|---|---|---|---|
|
1 |
UNREVIEWED |
ACTIVE |
Y |
|
2 |
CRA REVIEW |
ACTIVE |
Y |
|
3 |
INV REVIEW |
OTHER |
Y |
|
4 |
DM REVIEW |
OTHER |
Y |
|
5 |
TMS EVALUATION |
OTHER |
Y |
|
6 |
TMS IN PROGRESS |
OTHER |
Y |
|
7 |
RESOLVED |
CLOSED |
Y |
|
8 |
IRRESOLVABLE |
CLOSED |
Y |
|
9 |
CLOSED |
CLOSED |
Y |
|
10 |
INT CRA REV |
ACTIVE |
Y |
|
11 |
INT DM REV |
OTHER |
Y |
This codelist contains discrepancy status groupings for the Data Management role.
Table 3-18 Values for the DISCREPANCY STATUS DM Reference Codelist
| Seq | Short Value | Long Value | Active Check Box |
|---|---|---|---|
|
1 |
UNREVIEWED |
ACTIVE |
Y |
|
2 |
CRA REVIEW |
OTHER |
Y |
|
3 |
INV REVIEW |
OTHER |
Y |
|
4 |
DM REVIEW |
ACTIVE |
Y |
|
5 |
TMS EVALUATION |
OTHER |
Y |
|
6 |
TMS IN PROGRESS |
OTHER |
Y |
|
7 |
RESOLVED |
CLOSED |
Y |
|
8 |
IRRESOLVABLE |
CLOSED |
Y |
|
9 |
CLOSED |
CLOSED |
Y |
|
10 |
INT CRA REV |
OTHER |
Y |
|
11 |
INT DM REV |
ACTIVE |
Y |
This codelist contains discrepancy status groupings for the INVESTIGATOR role.
Table 3-19 Values for the DISCREPANCY STATUS INV Reference Codelist
| Seq | Short Value | Long Value | Active Check Box |
|---|---|---|---|
|
1 |
UNREVIEWED |
ACTIVE |
Y |
|
2 |
CRA REVIEW |
OTHER |
Y |
|
3 |
INV REVIEW |
ACTIVE |
Y |
|
4 |
DM REVIEW |
OTHER |
Y |
|
5 |
TMS EVALUATION |
OTHER |
Y |
|
6 |
TMS IN PROGRESS |
OTHER |
Y |
|
7 |
RESOLVED |
CLOSED |
Y |
|
8 |
IRRESOLVABLE |
CLOSED |
Y |
|
9 |
CLOSED |
CLOSED |
Y |
|
11 |
INT CRA REV |
HIDDEN |
Y |
|
12 |
INT DM REV |
OTHER |
Y |
|
11 |
INT RESOLVED |
CLOSED |
N |
This codelist contains discrepancy status groupings for the SITE role.
Table 3-20 Values for the DISCREPANCY STATUS SITE Reference Codelist
| Seq | Short Value | Long Value | Active Check Box |
|---|---|---|---|
|
1 |
UNREVIEWED |
ACTIVE |
Y |
|
2 |
CRA REVIEW |
OTHER |
Y |
|
3 |
INV REVIEW |
OTHER |
Y |
|
4 |
DM REVIEW |
OTHER |
Y |
|
5 |
TMS EVALUATION |
OTHER |
Y |
|
6 |
TMS IN PROGRESS |
OTHER |
Y |
|
7 |
RESOLVED |
CLOSED |
Y |
|
8 |
IRRESOLVABLE |
CLOSED |
Y |
|
9 |
CLOSED |
CLOSED |
Y |
|
10 |
INT CRA REV |
HIDDEN |
Y |
|
11 |
INT DM REV |
HIDDEN |
Y |
|
12 |
INT RESOLVED |
CLOSED |
N |
In RDC Onsite, a user changes the review status of a discrepancy by selecting an option from the list in the Action field. You use the DISCREPANCY ACTIONS role codelists to define the set of routing and resolution actions that each user role can take against discrepancies with a particular status.
Each DISCREPANCY ACTIONS role codelists specifies allowed actions for one of the default user roles:
Only RDC uses the set of DISCREPANCY ACTIONS role codelists. You can create a DISCREPANCY ACTIONS reference codelist for additional roles; see "Adding Reference Codelists for Custom Roles".
Note:
RDC disallows routing of all but section discrepancies to a HIDDEN status as follows: at run time, if the user selects a univariate or multivariate discrepancy, the Action drop-down list excludes any action that would route the discrepancy to a status that is HIDDEN (that is, has a long value of HIDDEN in the DISCREPANCY STATUS role codelist) for any role.However, the same restriction does not apply if you use the alternative method for hiding discrepancies from one or more user roles. That is, simply uncheck the Active check box in the DISCREPANCY STATUS role codelist for the 'blinded' user role.
To enable users of the relevant role to route discrepancies to a particular status:
In the Short Value field, enter the name of the discrepancy status—as it appears in the DISCREPANCY REV STATUS CODE codelist—to which you want users of the role specified in the reference codelist name to be able to route discrepancies.
Note:
The codelist must contain one and only one row with 'CLOSED' as a short value.In the Long Value field, enter the Actions drop-down item text that should appear for users with the role.
Be sure the Active check box is checked.
Note:
To remove the item from the Actions drop-down list, uncheck the Active check box.The Description field is optional.
Save your work.
When entering and modifying values in a DISCREPANCY ACTIONS role reference codelist, you must follow these rules:
Each DISCREPANCY ACTIONS role codelist must contain a subset of the short values (the statuses) defined in the DISCREPANCY REV STATUS CODE codelist. The long value specifies an action that the user can take against a discrepancy. The corresponding short value, which must match a short value in the DISCREPANCY REV STATUS CODE codelist, identifies the status RDC Onsite assigns to the discrepancy when the user selects the action.
CLOSED should not appear as a short value in any DISCREPANCY ACTIONS role codelist.
You must specify text in the Long Value field. RDC Onsite displays this text in the Action drop-down list.
This codelist contains discrepancy actions for the CRA role. The initial short and long values are:
This codelist contains discrepancy actions for the DATA MANAGER role. The initial short and long values are:
This codelist contains discrepancy actions for the INVESTIGATOR role. The initial value is:
DM REVIEW — Send to Data Mgt
This codelist contains discrepancy actions for the SITE role. The initial value is:
DM REVIEW — Send to Data Mgt
Only RDC Onsite uses the DISCREPANCY NO OTHER UPDATE installation codelist.
You can use the DISCREPANCY NO OTHER UPDATE codelist to specify which user roles do not have access to and cannot update discrepancies that appear to them with a status of OTHER; see "Configuring Discrepancy Display by User Role".
By default, the DISCREPANCY NO OTHER UPDATE codelist has no values. All users can update discrepancies with a status of OTHER. To prevent users from updating OTHER discrepancies, you add one or more user roles to the codelist.
To prevent users with a particular role from updating OTHER discrepancies:
Open the DISCREPANCY NO OTHER UPDATE codelist.
Enter the role name in the Short Value field. The value you enter must be exactly the same as one of the long values in the USER GROUP ROLES reference codelist. For example, CRA, INV, or SITE.
Caution:
The system does not check the validity of your entries. You must be careful to specify only valid user roles. If the values do not match exactly, users with the role will still be able to update OTHER discrepancies.Select the Active check box. An active entry indicates the user role cannot update OTHER discrepancies.
Save your work.
The Seq, Long Value, Default, and Description fields are not used by RDC Onsite.
You can grant this privilege to any number of roles.
To allow the update of OTHER discrepancies for a role that you added to the DISCREPANCY NO OTHER UPDATE codelist, you can either:
Delete the record by using the command on the Data menu.
Make the value inactive by clearing its Active check box.
Oracle Clinical ships with Discrepancy Actions and Discrepancy Status reference codelists for these roles: DM, CRA, INV, and SITE. If you have defined additional roles, you can create additional Discrepancy Actions and Discrepancy Status reference codelists for these roles.
Note:
To create a custom role, create a new database role and map it to a User Group Role; see "Creating and Modifying Database Roles" and "USER GROUP ROLES Installation Codelist".Log in to SQL*Plus as RXC and run a script that includes the following statements to create a new Discrepancy Actions and a new Discrepancy Status reference codelist for your custom role:
exec opa_install.insertrc('DISCREPANCY ACTIONS custom_user_group_role', 'Y','60','15','INSTALLATION','CHAR','Discrepancy actions for custom_user_group_role','','','RXC');

exec opa_install.insertrc('DISCREPANCY STATUS custom_user_group_role', 'Y','6','15','INSTALLATION','CHAR','Discrepancy status groupings for custom_user_group_role','','','RXC');
The new reference codelists then appear in the Oracle Clinical user interface and you can add appropriate values.
Once you open either the Maintain Access to Studies form or the Maintain Access to Sites within a Study form, you can use the standard menu commands, toolbar icons, or shortcut keys to:
Query for one or more records. You can use the % sign as a wildcard search character.
Add a new record or update existing records.
Delete one or more records.
Switch to a different study or site.
For the Study field, Site field, and User field, you can type directly into the field. You can also open a list of valid values and select from the list.
To add or modify the privileges for an RDC Onsite user:
Open either RDC Administration or Oracle Clinical.
In RDC Administration, navigate to Maintain.
In Oracle Clinical, navigate to Admin, Users and Roles.
Open the correct form:
To grant privileges to a user for a particular study, select Study Security.
To grant privileges to a user for a particular site, select Site Security.
Query for a particular record or query all records and navigate to the record you want to update. Alternatively, press F6 to insert a blank row and add a new record.
Click the Privilege column for the user whose privileges you want to update. The dialog box for configuring privileges opens. See Figure 3-5.
Select the privileges to assign to the user:
To select one privilege, click that privilege.
To select several privileges, Ctrl-click each privilege. Ctrl-click also toggles the selection on and off.
To select a range, Shift-click the first and last privilege in the range.
Click OK to save the privileges for the selected user. Add or modify privileges for other users, as appropriate. Save your changes when finished.
Note:
A user granted access to a study can see the study in RDC only if the study has at least one site with an investigator assigned and has at least one patient enrolled. Similarly, a user can see a site only if the site has an investigator and patient enrolled.Table 3-23 Function Privileges for Discrepancy Management
| Name | Privilege Granted and Method of Use |
|---|---|
|
UPD DATA ENTRY |
Enables the Update Patient Data menu item under the Special menu, and allows updates while in the Data Entry subsystem. |
|
BRWS DATA ENTRY |
Enables the Browse Patient Data menu item under the Special menu for read-only access to patient data. |
|
MANUAL |
Enables the Add Manual button in the Maintain Discrepancy Database window, which allows users to create manual discrepancies and manual header discrepancies. |
|
DCF PRINT DRAFT |
Displays the Draft option in the DCF Print Options window; enables the user to print a draft version of a Data Clarification Form (DCF) report. |
|
DCF PRINT COPY |
Enables the Copy option in the DCF Print Options window; enables the user to print a copy of a DCF. |
|
DCF PRINT FINISH |
Enables the Final option in the DCF Print Options window; enables the user to print a final version of a DCF report. |
|
DCF REPRINT |
Enables the Reprint option in the DCF Print Options window; enables the user to reprint a final version of a DCF report. |
|
CREATE DCF |
Enables the Create DCF option in the group selection menu in the Maintain Discrepancy Database form. |
For a user with the requisite function profile privilege(s) assigned, the system permits the user to update the discrepancies under the following circumstances:
If there are no privileges assigned to any site and to the study, the user has the UPD_DISCREP privilege.
If any privilege is assigned to the user at the current site, then the UPDATE or UPD_DISCREP must be assigned to the user at the site level for the user to update a discrepancy.
If the user is not assigned any privileges at the current site-level, but is assigned one or more privileges at the study-level or another site within the study, then the user must be assigned the UPDATE or UPD_DISCREP at the study level.
For a user with the requisite function profile privilege(s) assigned, the system permits that user to navigate to data entry and either browse data or update data under the following circumstances. If the user is not able to either browse or update data, the system does not permit navigation to data entry.
In contrast to other study- and site-level security settings, only the site-level BROWSE and/or UPDATE privileges, in conjunction with the function profile privileges, affect a user's ability to browse or update data.
To update data:
UPDATE is assigned at the site-level and UPD DATA ENTRY is assigned as a function profile privilege
no privileges are assigned at any site in the study and UPD DATA ENTRY is assigned as a function profile privilege
If update data is not permitted, to browse data:
BROWSE is assigned at the site-level and either UPD DATA ENTRY or the BRWS DATA ENTRY is assigned as a function profile privilege
UPDATE is assigned at the site-level and BRWS DATA ENTRY is assigned as a function profile privilege
no privileges are assigned at any site in the study and BRWS DATA ENTRY is assigned as a function profile privilege
Oracle Clinical includes a utility for printing and tracking Data Clarification Forms (DCFs) as a way of resolving discrepancies in a clinical trial's response data. Setting up DCFs for your organization requires that you define DCF status codes and lay out the DCF report.
This section includes the following topics:
There are several Installation Reference Codelists that affect DCF Statuses. You can modify them if you want to for your organization's needs.
DCF STATUS CODES The DCF Status reflects the stage in the review process of the DCF as a whole. Oracle Clinical comes with many review statuses defined in this reference codelist. You can make them inactive if you do not want to use them or create new ones, with the following limitations:
You cannot make these statuses inactive: Sent, Received, and Closed.
Do not make status Created inactive unless you also make it optional in the DCF OPTIONAL STATUS CODES reference codelist.
Do not make statuses Incomplete, Part Received, or Received inactive if you want the system to automatically update the DCF Status when users update the status of individual DCF Pages.
If you add a status, you must set its DISPLAY_SN, which determines the order in which the statuses can be set. If you adjust the DISPLAY_SN, you may need to adjust the DCF LOCK CONDITIONS and the DCF OPTIONAL STATUS CODES installation reference codelists, both of which refer to DCF Statuses by their number in the DCF STATUS CODES installation reference codelist.
DCF OPTIONAL STATUS CODES This installation reference codelist refers to the DCF Statuses listed in the DCF STATUS CODES reference codelist. The number in the Short Value column refers to the display number of the status in the DCF STATUS CODES codelist. (Note that the description is incorrect for numbers 7 and 8, which should be Incomplete and Part Received.)
All status codes referenced and active in this codelist are optional. All that are inactive or not entered here are mandatory, meaning that a DCF must be assigned to that status before it can be assigned a subsequent status, as defined in the Seq column. As shipped, only CREATED, SENT and CLOSED are mandatory (no rows exist with short values 2, 6, or 12).
To make a status mandatory if it is included in this reference codelist, uncheck its Active box.
DCF LOCK CONDITIONS This installation reference codelist determines what actions can be taken on discrepancies and DCFs where the DCF has a particular status. The Long Value refers to the number of the status in the DCF STATUS CODES codelist. As shipped, the codelist sets the following behavior, in order:
Discrepancies belonging to a DCF whose status is Final (#4) or higher cannot be deleted.
Discrepancies belonging to a DCF whose status is Ready (#5) or higher cannot be modified.
DCFs whose status is Ready (#5) or higher cannot be deleted (unless the status exceeds or equals a status with a DISPLAY_SN of 1000; see last point).
DCFs whose status is Ready (#5) or higher cannot be modified.
DCFs whose status is #1000 or higher cannot be closed. Oracle recommends that you do not change DCF_CLOSE.
To stop enforcing any of these rules, set the Long Value to a high value. To change the DCF Status that prevents any of the actions described in the Short Value column, change the number in the Long Value column to the number in the DCF STATUS CODES codelist of the status you prefer.
Laying out the DCF's contents and arranging its fields includes the following tasks:
See the "Default DCF Layout Diagram" for a geographic representation of the DCF's default values and their placements.
OPA views dcf_rpt_master and dcf_rpt_detail control much of the content and the appearance of DCFs. Local codelist DCF REPORT LABELS controls the report's label text. DCFs also include several unchangeable parameters, such as the Revision # and other values that print along the bottom of each DCF page.
Replacing the DCF Placeholder Graphic
Oracle Clinical includes a placeholder graphic file located, typically, in your installation's ..\OPArelease_number\oc directory, and named rxcdcf.bmp. You can replace rxcdcf.bmp with your own graphic file, but you must name it rxcdcf.bmp. Oracle recommends that your graphic does not exceed 200 pixels in height.
Modifying Codelist DCF REPORT LABELS The labels for the value fields of the DCF views correspond to their position on the report. The following table describes each of the columns on the report. For field labels, it identifies the codelist member in the DCF REPORT LABELS local codelist and their default table and column values.
Table 3-24 DCF Labels and Field Mappings
| Default Field Label from DCF_REPORT_LABELS | Default Data Value from DCF_RPT_MASTER and DCF_RPT_DETAIL | ||
|---|---|---|---|
| Short Value | Long Value | Table.Column | Description |
|
line1_left |
To: |
ocl_sites.name |
Site name's short value |
|
line3_left |
Date: |
sysdate |
Date of this DCF's creation: mm/dd/yyyy |
|
line3_right |
Reviewer |
oracle_accounts.firstname (and) .lastname |
Reviewer's initials |
|
line2_left |
Investigator: |
ocl_investigators.first_name (and) .lastname |
Investigator's first and last name. |
|
line1_right |
Patient #: |
patient_positions.patient |
Patient position |
|
line2_right |
Patient Initials: |
patient_positions.reported_first_name (and) .reported_last_name |
Patient's initials |
|
q_field1 |
Form Name/Visit Name: |
dcms.description |
Mapped to view value qline1_1 |
|
q_field2 |
Page #: |
discrepancy_entries.crf_page_number |
CRF page numberMapped to view value qline1_2 |
|
q_field3 |
Date: |
discrepancy_entries.creation_ts |
Discrepancy time stamp date: mm/dd/yyyyMapped to view value qline1_3 |
|
q_field4 |
Questions/Comments: |
dcf_discrepancies.comment_text |
Mapped to view value qline1_4 |
|
q_field5 |
Resolution: |
dcf_discrepancies.resolution_text |
Mapped to view value qline1_5 |
|
mstr_sort_orderFoot 1 |
line1_right |
patient_positions.patient |
Controls the default sort order of view DCF_RPT_MASTER |
|
dtl_sort_order1 |
q_line1_1 |
dcm.description |
Controls the default sort order of view DCF_RPT_DETAIL |
|
rpt_orientation1 |
|
Landscape or Portrait Controls the default action of the Print button in the DCF form. |
|
Footnote 1 Not a label
Table 3-25 and Table 3-26 describe all of the parameters in the two DCF report views. The view scripts for the DCF are in file rxcviews.sql. You can map other discrepancy values to the DCF parameters, or comment out the parameters to remove them from the DCF output. Note that if you remap parameters, you may have to change their labels (See "Modifying Codelist DCF REPORT LABELS".)
Caution:
Do not change parameter values that have a_DNC suffix.Table 3-25 View DCF_RPT_MASTER Parameters
| Parameter | Default Data Value (Table.Column) | Comments |
|---|---|---|
|
dcf_id_dnc |
data_clarification_forms.dcf_id |
A system-generated number. |
|
title1 |
clinical_studies.short_title |
Prints the study's title. |
|
title2 |
'Data Clarification Form' |
Prints the text string Discrepancy Clarification Form. |
|
line1_left |
ocl_sites.name |
Site name's short value |
|
line3_left |
sysdate |
Date of this DCF's creation: MM/DD/YYYY |
|
line3_right |
oracle_accounts.firstname and .lastname |
DCF creator's account name |
|
line2_left |
ocl_investigators.first_name (and) .lastname |
Investigator's first and last name. |
|
line1_right |
patient_positions.patient |
Patient position |
|
line2_right |
patient_positions.reported_first_name (and) reported_last_name |
Patient's initials |
|
header_text |
header_text |
Prints the discrepancy's header text. Define header text in the Standard Text Maintenance form. |
|
footer_text |
footer_text |
Prints the discrepancy's footer text. Define footer text in the Standard Text Maintenance form |
|
clinical_study_id_dnc |
clinical_studies.clinical_study_id |
|
|
current_status_dnc |
data_clarification_forms.current_status |
|
|
site_id_dnc |
data_clarification_forms.site_id |
|
|
investigator_id_dnc |
ocl_investigators.first_name (and) .last_name |
Investigator's initials |
|
owning_user_dnc |
data_clarification_forms.owning_user |
Table 3-26 describes the values of the DCF_RPT_DETAIL view, and its default data values. In DCF report printouts, the system draws a rectangular border around the output of this view, and may include more than one discrepancy's details.
Table 3-26 View DCF_RPT_DETAIL Parameters
| View Parameter | Default Data Value (Table.Column) | Comments |
|---|---|---|
|
dcf_id_dnc |
data_clarification_forms.dcf_id |
|
|
q_line1_1 |
dcms.description |
Value for q_field1 label |
|
q_line1_2 |
discrepancy_entries.crf_page_number |
Value for q_field2 label |
|
q_line1_3 |
received_dcms.dcm_date |
Value for q_field3label |
|
q_line1_4 |
dcf_discrepancies.comment_text |
Value for q_field4label |
|
q_line1_5 |
dcf_discrepancies.resolution_text |
Value for q_field5label |
|
q_line2_1 |
clinical_planned_events.description |
|
|
discrepancy_entry_id_dnc |
discrepancy_entries.discrepancy_entries |
|
|
status_dnc |
dcf_discrepancies.status |
|
|
disc_type |
discrepancy_entries.de_sub_type_code |
|
|
disc_rev |
discrepancy_entries.discrepancy_rev_status |
Defining DCF Headers and Footers
You can define standard text headers and footers in the Standard Text Maintenance form (see "Creating New Standard Text"). You can define any number of standard headers and footers and designate one header and one footer as the default. When you create a DCF, the system assigns it the default header and footer. You can use the list of values in the Header and Footer fields to choose a different standard header or footer.
You can also modify the standard text of the header or footer by clicking the Text button in the main DCF screen and editing the displayed text.
The following diagram shows the relative position of the labels (in bold font), and the default data values of a default DCF printout. The section between the rxcdcf.bmp graphic and the ruled rectangle contains most of the data defined in the DCF_RPT_MASTER view. The DCF_RPT_DETAIL view populates the contents in the rectangle. A DCF can accommodate the descriptions of more than one discrepancy on each page. The legend for the DCF layout diagram precedes the diagram itself.
| Default field label > Default field label short value> | To: line1_left |
ocl_sites.name |
<=Default data value for the field |
| rxcdcf.bmp |
status_dnc dcf_discrepancies.status |
title1 clinical_studies.short_title |
|||
|---|---|---|---|---|
title2 |
||||
To: line1_left |
ocl_sites.name |
Patient#: line1_right |
patient_positions.patien |
|
Investigator: line2_left |
ocl_investigators.first_name (and) .lastname |
Patient Initials: line2_right |
patient_positions.reported_first_name (and) .reported_last_name |
|
Date: line3_left |
sysdate |
Reviewer: line3_right |
oracle_accounts.firstname (and) .lastname | |
header_text |
||||
| Form Name/Visit Name q_field1 | Page #q_field2 |
Questions/Comments q_field4 |
Resolution q_field5 |
|
Date q_field3 |
||||
dcf_id_dnc data_clarification_forms.dcf_id |
q_line1_2 discrepancy_entries.crf_page_number |
q_line1_4 dcf_discrepancies.comment_text |
q_line1_5 dcf_discrepancies.resolution_text |
|
q_line1_1 dcms.description |
q_line1_3 received_dcms.dcm_date |
|||
| Closed: | status_dnc dcf_discrepancies.status |
|||
| Disc ID: | discrepancy_entry_id_dnc discrepancy_entries.discrepancy_entries |
|||
| Type: | disc_type discrepancy_entries.de_sub_type_code |
|||
footer_text |
||||
| Page x of x | DCF ID: discrepancy_entry_id_dnc |
discrepancy_entries.discrepancy_entries |
Revision #: | (0 for DRAFT and FINAL, and incremented for each reprint by the system) |
This section includes the topics:
The standard text utility allows you to create uniform, reusable text for discrepancy comments and error messages and for DCF headers and footers. Using standard text saves time and promotes consistency. There are four types of standard text, used as follows by the system:
Comment. Displayed as an error message during Data Entry and Data Entry Update for univariate discrepant responses; also displayed in the Comment field in the Maintain Discrepancy Database window for univariate discrepancies. Oracle Clinical ships with a set of default univariate error messages, one for each type of univariate discrepancy. You can edit the existing default and/or create alternatives to be available for use in Data Entry, Data Entry Update, and discrepancy management; see "Customizing Default Standard Text Entries".
Comment-type standard text is also available by pressing F9 in the Comment field of the Maintain Discrepancy Database window. Comment text is displayed in the Create DCF window List of Values to help the user choose which discrepancy to include in a DCF when creating a DCF by discrepancy number.
Internal Comment. In the Maintain Discrepancy Database window, users can enter an original comment in free form text or, by pressing F9 in the Inter Com field, choose from the internal comments you define here.
Resolution. In the Maintain Discrepancy Database window, users can enter an original comment in free form text when they resolve a discrepancy or, by pressing F9 in the Res Com field, choose from the resolution comments you define here.
Header and Footer Text on DCFs. The header and footer text you define appears on each page of a DCF. See "Defining DCF Headers and Footers".
For each type of standard text definition, you can include replacement parameters, or variables. When the system displays the standard text, it substitutes the actual value of the parameter; see "Inserting Replacement Parameters".
To create new standard text entries:
From the Admin menu, select Discrepancy Mgmt, then select Standard Text Maintenance.
The Standard Text Maintenance form opens, with columns for Text Type, Sub Type, Standard Text Name, a Default box, and a line for the standard text string.
Choose a text type. The text type identifies where the system uses the definition: In DCF headers or footers or discrepancy comments and Data Entry. The choices are: Comment, Footer, Header, Internal Comment, Resolution. For further information, see the introduction in "Creating Reusable Standard Text for Discrepancies and DCFs".
Choose a subtype only if you are creating an alternative univariate error text (you must have chosen a Text Type of Comment as well). See "Customizing Default Standard Text Entries". Choose the subtype corresponding to the univariate error type for which you are creating a standard text.
For discrepancy comments, internal comments, and resolution comments, and DCF headers and footers, do not enter a subtype. If you do, the text will not be available for use even though it is successfully saved.
Name the entry in the Standard Text Name field. Each standard text definition must have a unique name. Users see the name and the text definition in the list of values for Comments, Internal Comments, and Resolution Comments of the Maintain Discrepancy Database.
Toggle the Default box. For the COMMENT type, the box controls which standard text value the system displays during Data Entry and DE Update. For HEADER and FOOTER types, a check identifies the default when a new DCF is created. Only one entry can be checked as default for each text type/subtype combination.
Write the text in the Standard Text field.
You can embed variables in your standard text that the system replaces with values from individual records. Press F9 to see the list of values, select and insert a variable. For further information, see "Inserting Replacement Parameters" and, for examples of how the system replaces variables with actual values, Table 3-29, "Examples of Alternative Standard Text for Univariate Errors".
Standard text definitions can contain standard replacement parameters, or variables. You can insert one of the replacement parameters shown in Table 3-27 into your standard text. When the system displays the standard text, it displays the actual value of the parameter. The replacement parameters are in UPPERCASE and are delimited by backslashes (\); for example, \SAS_LABEL\.
To insert a parameter in a standard text string, put your cursor in the location in the text where you want to insert the variable, press F9 or click the ellipsis (…) to display the list of values, and select it from the list of values. Table 3-27, "Replacement Parameters" describes each available variable and its source table or view and column.
Table 3-27 Replacement Parameters
| Parameter Name | Description | Source |
|---|---|---|
|
assoc_id |
Associated ID for the discrepancy |
discrepancy_management.associated_id |
|
crf_page_no |
CRF Page number for the discrepancy |
discrepancy_management.crf_page_number |
|
data_type |
Data Type of the question |
dcm_questions.question_data_type_code |
|
date_time_format |
Precision for date and time |
dcm_questions.date_time_type_code |
|
dcm_name |
DCM Name for the discrepancy |
discrepancy_management.name |
|
dcm_prompt |
DCM Prompt of the question |
discrepancy_management.default_prompt |
|
dcm_subset |
DCM Subset name for the discrepancy |
discrepancy_management.dcm_subset_sn |
|
decimal_places |
Decimal places for a numeric question |
dcm_questions.decimal_places |
|
descriptor1 |
First descriptor for question group |
dcm_question_groups.repeat_descr1_label |
|
descriptor2 |
Second descriptor for question group |
dcm_question_groups.repeat_descr2_label |
|
discrete_values |
Comma-delimited list of values |
discrete_values.discrete_value_value |
|
dvg_name |
DVG Name of the question |
discrete_value_groups.name |
|
length |
Length of the question |
dcm_questions.length |
|
lower_bound |
Lower bound of the question |
dcm_questions.lower_bound |
|
repeat_sn |
Repeat sequence number for the discrepancy |
responses.repeat_sn |
|
sas_label |
SAS Label of the question |
discrepancy_management.sas_label |
|
sas_name |
SAS Name of the question |
dcm_questions. sas_name |
|
upper_bound |
Upper Bound of the question |
dcm_questions.upper_bound |
|
value_text |
Value Text of discrepancy responses. |
value_text or responses.exception_value_text |
You can modify the default standard text in the Standard Text Maintenance form. From the Admin menu, select Discrepancy Mgmt Admin, then select Standard Text Maintenance. The window is populated with the default values for each type of univariate error message shipped with Oracle Clinical. Table 3-28 lists the default standard text definitions for Oracle Clinical.
Table 3-28 Default Univariate Discrepancy Messages
| Discrepancy Type | Default Text |
|---|---|
|
data type |
|
|
dvg |
|
|
dvg subset |
|
|
length |
|
|
lowerbound |
|
|
mandatory |
|
|
missing_pt |
|
|
missing_sct |
|
|
partial date |
|
|
precision |
|
|
thesaurus |
|
|
upperbound |
|
The following table illustrates how you can use standard text definitions with different replacement parameters to create appropriate alternative error messages for DVG univariate discrepancies.
The system generates a different error message from same standard text definition by populating the replacement parameters with values from the question definition and entered data. The first column contains standard text definitions using replacement parameters. The second column shows the error message that would appear during data entry if the operator entered "X" as a response to the question PATIENT_SEX, which has a DVG containing the values M(ale) and F(emale). The third column shows the error message that would result from the same standard text if an operator entered "X" for the question SMOKING, which has a DVG containing the values Y(es) and N(o).
Table 3-29 Examples of Alternative Standard Text for Univariate Errors
| Standard Text | Sex Example | Smoking Example |
|---|---|---|
|
Value '\VALUE_TEXT\' for question \SAS.LABEL\ is not in expected list '\DISCRETE_VALUES\.' |
Value 'X' for question SEX is not in expected list 'M,F.' |
Value 'X' for question\SMOKING\ is not in expected list 'Y,N.' |
|
Value of \VALUE_TEXT\ does not exist in Discrete Value Group \DVG_NAME\.' |
Value of X does not exist in Discrete Value Group PATIENT_SEX. |
Value of X does not exist in Discrete Value Group Yes/No. |
|
Value of \VALUE_TEXT\ for \SAS.LABEL\ is invalid. |
Value of X for SEX is invalid. |
Value of X for SMOKING is invalid. |
|
Copyright © 1996, 2011, Oracle and/or its affiliates. All rights reserved. Legal Notices |
|