| Oracle® Clinical Remote Data Capture Onsite User's Guide Release 4.6.2 Part Number E18822-01 |
|
|
View PDF |
| Oracle® Clinical Remote Data Capture Onsite User's Guide Release 4.6.2 Part Number E18822-01 |
|
|
View PDF |
RDC Onsite lets you generate the following types of custom reports:
Patient Data Reports (PDRs)
Blank Casebook Reports
A Patient Data Report includes all the CRFs and data entered against one patient. Optionally, you can include discrepancy details and audit history, and choose to include only certain CRFs based on report parameters such as visit date, casebook, and CRF status. RDC Onsite generates a separate report for each patient you specify.
A Blank Casebook Report lets you create hard copies of all the planned CRFs in the casebook you specify. You can generate a generic blank casebook, which includes no CRF header information and no response data. You can also generate a patient-specific blank casebook, which includes header information specific to the selected patient, but does not include response data.
All reports are PDF files. You can use any application that opens PDF files, such as Adobe Reader, to print the report or save a copy of the report to your PC.
You can use these reports for electronic submissions and as a printout for off-line discussion and review. In addition, you can use the reports to track your progress during the clinical study.
This chapter includes the following topics:
To open the Reports page, click the Reports tab.
When you open the Reports page, RDC Onsite displays all the report jobs, if any, that you have submitted for processing. Figure 11-1 shows a sample Reports page.
RDC Onsite lists the reports in a table format of rows and columns. You can search for a specific report by job name. In addition, you can click a column heading to sort the reports by that column. Clicking the column heading again toggles the sort from ascending to descending order. Both searching and sorting can help you find a report that you want to view or print.
From the Reports page, you can:
Generate a new Patient Data Report
Generate a Blank Casebook Report for the study or for a single patient
Search for reports that have already been generated
Monitor reports currently in progress
View reports
Print reports
Tip:
Some reports may require extended time to run. You can continue to work in RDC Onsite while a report generates in the background. You can return to the Reports page at any time to view and print your report.A Patient Data Report includes all the CRFs and data entered against a patient. You can generate a Patient Data Report for one or more patients. For each patient that you select, RDC Onsite submits a separate job request and generates a separate report.
Optionally, you can include discrepancy details and an audit history in the report. You can also choose to include only certain CRFs in the report based on parameters such as visit date, casebook, and CRF status.
You can use Patient Data Reports for electronic submissions and as a printout for off-line discussion and review.
Note:
CRFs are included in the Patient Data Report that satisfy the criteria you specify in the Report Parameters. Any CRFs that are hidden based on your user role are excluded.To generate a Patient Data Report from the Reports page:
Click the Reports tab to open the Reports page.
Click New Patient Data Report.

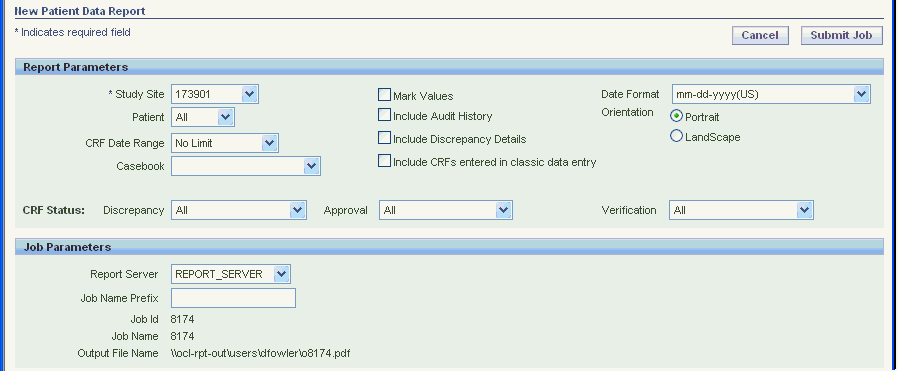
Select the report parameters that RDC Onsite uses to generate the Patient Data Report.
You must select a Study Site, which is a required parameter. The other report parameters are optional. You can use the other parameters to include or exclude information in the Patient Data Report. See Table 11-1 for a description of each report parameter.
Select the job parameters for the report.
Select the name of the Report Server.
Enter up to 8 characters for the Job Name Prefix. RDC Onsite automatically uses a unique number as the name of a report job, and then adds your specified prefix to the beginning of the job name. You can use the prefix value to easily search for your reports in the list on the Reports page.
RDC Onsite displays the Job Id, Job Name, and the Output File Name for your reference.
Click Submit Job to continue. RDC Onsite prompts for confirmation that you want to generate the report.
Click Yes to generate the Patient Data Reports.
Once you submit your request to generate the Patient Data Report, you can return to the Reports page to monitor the progress of your report job. You can also stop a job in progress or check error details if the report generation failed. See "Monitoring the Status and Progress of Your Report Jobs" for more information.
After RDC Onsite successfully generates the report, you can click the link in the View Report column on the Reports page to open and print your report. See "Printing a Report" for more information.
In addition to the Reports page, you can generate a Patient Data Report from the Home page, the Casebooks page, and the Review CRFs page.
When you generate reports from these other pages, you cannot customize the content of the report because you cannot specify any of the report parameters. (See Table 11-1 for a description of the report parameters.)
When you generate a Patient Data Report from the Home, Casebooks, or Review CRFs pages, the report:
Does not include discrepancy details and audit history.
Uses a default job name prefix. You cannot override this value.
Includes CRFs entered using Oracle Clinical or RDC Classic if the DCI Form is available. (The report includes these CRFs even if the CRFs have not been migrated.)
If you generate a Patient Data Report from the Reports tab, you choose whether the report includes or excludes all the items listed above.
When you generate a Patient Data Report from the Home page or the Casebooks page, RDC Onsite:
Submits a separate report job and generates a separate report for each patient that you select
Orders the report by casebook visit
Uses the following format to add a prefix to the report job name: PT_patient_
Note that if you specify CRF search criteria on the Casebooks page, the report includes only the CRFs that satisfy the search criteria.
To generate a Patient Data Report from the Home page or the Casebooks page:
Open the Home page or the Casebooks page.
Select one or more patients. RDC Onsite submits a separate report job and generates a separate report for each patient that you select.
Click the Select patients and... field and then select Generate Patient Data Report from the list.

Click Go to immediately submit your request to generate the report. RDC Onsite confirms that the report job was submitted. You can click the Reports tab to view the status of your request.
After RDC Onsite successfully generates the report, you can click the link in the View Report column on the Reports page to open and print your report.
When you generate a Patient Data Report from the Review CRFs page, RDC Onsite:
Includes only the CRFs that you select in the report
Generates a single report; the report may be across patients
Places the CRFs in the same order as displayed on the Review CRFs page
Uses the following format to add a prefix to the report job name: CRFS_
The key difference in generating a report from the Review CRFs page is that you must select each CRF to include in the report. The report orders your selected CRFs according to how they are ordered on the Review CRFs page. Although the CRFs do not follow the order of the casebook they were entered against, they do reflect the page numbers from the casebook.
To generate a Patient Data Report from the Review CRFs page:
Open the Review CRFs page.
Select one or more CRFs that you want to include in the report.
Click the Select CRFs and... field and then select Generate Patient Data Report from the list.
Click Go to immediately submit your request to generate the report. RDC Onsite confirms that the report job was submitted. You can click the Reports tab to view the status of your request.
After RDC Onsite successfully generates the report, you can click the link in the View Report column on the Reports page to open and print your report.
You generate a Blank Casebook Report to create hard copies of all the planned CRFs in a casebook. You specify the casebook to use for the report.
When you generate a Blank Casebook Report, you have two options:
You can generate a generic blank casebook. The CRFs in the report include no CRF header information and no response data.
You can generate a patient-specific blank casebook.
In this case, the CRFs in the report include header information specific to the selected patient, but do not include response data. In addition, if the selected casebook is for a flexible study, the report includes all CRFs, whether they are expected for the patient or not.
With this option, you can print a casebook for a particular patient.
To generate a Blank Casebook Report:
Click the Reports tab to open the Reports page.
Click New Blank Casebook Report.

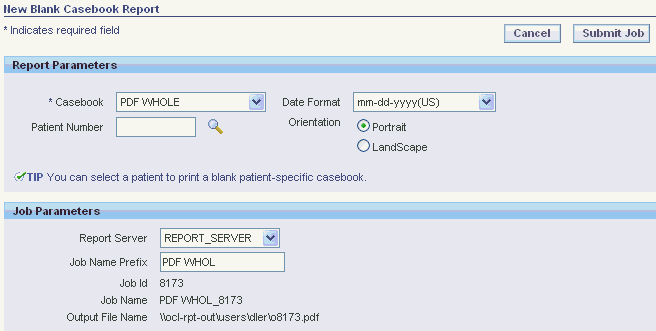
Click the Casebook field, and then select a casebook from the list. You must select a casebook. The Blank Casebook Report consists of all the planned CRFs for the selected casebook.
Specify whether you want to create a generic or a patient-specific Blank Casebook Report as follows:
To generate a generic blank casebook, do not specify a value in the Patient Number field. The CRFs in the report include no header data and no response data.
To generate a patient-specific blank casebook, click the Patient Number field and enter the ID of the patient. Alternatively, you can click the Magnifying Glass icon and select a patient ID from the list.
In this case, the CRFs in the report include header data specific to the selected patient, but do not include response data. In addition, if the selected casebook is for a flexible study, the report includes all CRFs, whether they are expected for the patient or not.
Select the Date Format to use. Your options are US, Standard, European, and Swedish.
Select the Orientation of the report. Your options are Portrait or Landscape. This value affects only the cover page of the report. The orientation of a CRF is always defined by its layout regardless of your selection.
Select the job parameters for the report.
Select the name of the Report Server.
Enter up to 8 characters for the Job Name Prefix. RDC Onsite automatically uses a unique number as the name of a report job, and then adds your specified prefix to the beginning of the job name. You can use the prefix value to easily search for your reports in the list on the Reports page.
RDC Onsite displays the Job Id, Job Name, and the Output File Name for your reference.
Click Submit Job. RDC Onsite prompts for confirmation before continuing.
Click Yes to generate the Blank Casebook Report.
Once you submit your request to generate the Blank Casebook Report, you can return to the Reports page to monitor the progress of your report job. You can also stop a job in progress or check error details if the report generation failed. See "Monitoring the Status and Progress of Your Report Jobs" for more information.
After RDC Onsite successfully generates the report, you can click the link in the View Report column on the Reports page to open and print your report. See "Printing a Report" for more information.
You can search for a report job by name, search for report jobs currently in progress, search for report jobs already completed, or search for all report jobs. RDC Onsite displays the results of your search on the Reports page.
Note:
RDC Onsite searches for and displays only the report jobs that you have submitted. These jobs include jobs you submitted from RDC Classic and Oracle Clinical. In addition, the Reports page only lists report jobs. It does not list print jobs, scheduled jobs, or jobs under preview.By default, RDC Onsite displays the most recent report job at the top of the list. You can click a column heading to re-sort the list based on the text in the column. You can click the column heading again to toggle between an ascending and descending sort.
To search for one or more report jobs:
Click the Reports tab to open the Reports page.
Search for the report job you want to view.

Using the options in the Search pane, you can:
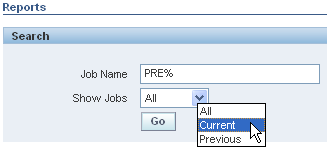
Click Job Name and then type the name of the report job. You can use the percent sign (%) as a wildcard character in the search.
Click Show Jobs and then select one of the following options from the list:
Click All to search for both current and previous jobs.
Click Current to search only for the jobs currently being run.
Click Previous to search only for the jobs that already finished running.
Specify no additional search information. In this case, RDC Onsite searches for all the report jobs that you have submitted (the default).
Click Go to execute the search. RDC Onsite refreshes the Reports Jobs list and displays the results of your search.
For each report job, RDC Onsite displays valuable information about each job including its name, start time, end time, and status.
You can use this information to monitor jobs currently in progress. See "Monitoring the Status and Progress of Your Report Jobs" for more information.
Your other options include:
To view details about the job, click its link in the Job Name column. See "Viewing the Details of a Report Job" for more information.
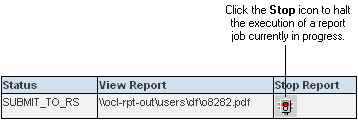
To stop a job currently in progress, click the Stop icon in the Stop Report column. The icon appears only if the job is still running. See "Stopping a Report Job in Progress" for more information.
To open and view the report, click its link in the View Report column. The link is active only if RDC Onsite successfully generated the report. Once you open the report, you have options to print the report and save the report to your computer. See "Printing a Report" for more information.
Certain reports may require extended time to run. You can continue to work in RDC Onsite while the report runs in the background.
In addition, you can monitor the progress of report jobs, stop a report job currently in progress, or display details about the report job.
To monitor the status and progress of report jobs:
Click the Reports tab to open the Reports page. RDC Onsite lists all the report jobs that you have submitted starting with the most recent jobs.
Search the list to find the report jobs you want to monitor. For each report job, RDC Onsite displays the following information:
Job Name — Displays the name of the report job. You can click the link to view additional details for the job.
Start Time — Displays the date and time that RDC Onsite started to generate the report. No time is listed if you stopped the generation of the report.
End Time — Displays the date and time that RDC Onsite finished generating the report. No time is listed if RDC Onsite failed to generate the report or you stopped the generation of the report.
Status — Displays the progress of the report generation:
RS_FAILURE: The report server failed to generate the report.
RS_SUBMITFAILED: The submit request to the report server failed.
SCHEDULED: Your request to generate the report has been scheduled for a specific day, date, and time.
STARTED: The report server has started to generate the report.
STOPPED: You stopped the generation of the report.
SUBMIT_TO_RS: Your request to generate a report was submitted to the report server.
SUCCESS: The report was successfully generated.
View Report — Displays the path name of the report file. You can click the link to open, view, and print the report. The link is active only if the report generated successfully.
Stop Report — Displays a Stop icon that you can click to halt the execution of a report job currently in progress. The Stop icon does not display if the job is complete.
You can stop the execution of a report job currently in progress. You cannot stop a job after it is complete.

To stop a report job currently in progress:
Click the Reports tab to open the Reports page.
Search for all report jobs that are currently running.
Click Show Jobs and then select Current.
Click Go.
Click the Stop icon in the Stop Report column for the job you want to stop. The Stop Job confirmation dialog box opens.
Click Yes to stop the job. RDC Onsite confirms the action in the confirmation dialog box.
Alternatively, you can click a Job Name link to open another page and view details about the selected report job. If the report job is currently in progress, the page includes a Stop button so you can cancel the generation of the report.
There may be times when you need additional information on the status or progress of a report job. You may need to troubleshoot why RDC Onsite did not generate the report or why the process failed.
The Reports: Job Details page, as shown in Figure 11-2, provides a summary of the job executed. By viewing the details for a report job, you can:
View the command line that RDC Onsite sent to the report server.
Click a link to open the log file for the report job. Note that RDC Onsite:
Creates the log file and provides an active link to the file only after the status of the job has changed to STARTED.
Does not create the log file if the job is still being submitted to the report server (Status = SUBMIT_TO_RS) or if the submit request to the report server failed (Status = RS_SUBMITFAILED).
To view additional details about a report job:
Click the Reports tab to open the Reports page.
Click a link in the Job Name column. As shown in Figure 11-2, the Reports: Job Details page displays the following information for the selected job:
The job name, and the starting time, ending time, and status of the report generation. The Reports page displays the same information.
The error text, the command line executed, and the path name of the log file. You can click the active link to open the log file for the job. This information is helpful when troubleshooting why a report failed to generate.
Note that RDC Onsite provides an active link to the log file only after the status of the job has changed to STARTED. In addition, RDC Onsite does not create the log file if the job is still being submitted to the report server (Status = SUBMIT_TO_RS) or if the submit request to the report server failed (Status = RS_SUBMITFAILED).
The name of the report server.
The path name of the report file. You can click the link to open, view, and print the report. The link is active only if the report generated successfully.
A Stop button, if the job is currently running. You can click the button to halt the execution of a report job currently in progress. The Stop icon does not display if the job is complete.
The Patient Data Reports and the Blank Casebook Reports are PDF files. You can view a report using any application that opens PDF files, such as Adobe Reader. In addition, you can print the report or save a copy of the report to your PC.
To print a report:
Click the Reports tab to open the Reports page.
Search for the report you want print.
Click the link in the View Report column to open and print the report.