| Oracle® Clinical Remote Data Capture Onsite Administrator's Guide Release 4.6.2 Part Number E18823-01 |
|
|
View PDF |
| Oracle® Clinical Remote Data Capture Onsite Administrator's Guide Release 4.6.2 Part Number E18823-01 |
|
|
View PDF |
During your installation of, or upgrade to RDC Onsite, you configured the database connections on your reports servers and application servers. This chapter reviews the information in case you need to set up additional database connections.
There are two parts to establishing database connections. First, you must update the tnsnames.ora file to include the database. Second, you must use the OPAAdmin application to set up the necessary database connections to be used with RDC Onsite.
This chapter includes the following topics:
To establish the SQL*Net connections between the Web Server computer and the databases you have already created, modify the tnsnames.ora file to include entries for all the databases and Web Servers.
The tnsnames.ora file is located at ORACLE_AS10gR3_HOME.
You use the OPAAdmin application:
To define the database connections used by RDC Onsite.
To specify the default database to be used by RDC Onsite.
See Section 6.1.2, "Customizing the RDC Onsite URL" for information about how to connect to non-default databases.
The OPAAdmin application saves the information that you enter for each database into the OpaConfig.xml file on the Application Server.
The default user name for logging in to the OPAAdmin application is opaconfig. You specified the default password for the opaconfig user when you installed Oracle Clinical.
To change the password for the opaconfig user, reset a forgotten password, or create additional users, see Section A.3, "Managing Users and Passwords for the OPAAdmin Application."
To log in to the OPAAdmin application and set up database connections:
Open a Web browser and enter your URL to the OPAAdmin application:
https://server.domain/opaadmin/opaConfig.do
where server.domain is the server and domain of the target Application Server 10gR3 (AS10gR3).
Enter the user name and password to log in to the OPAAdmin application.
The default user name is opaconfig. You specified the default password when you installed Oracle Clinical.
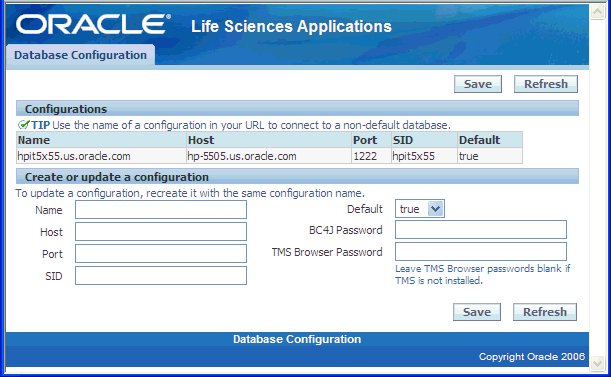
Once you log in, the OPAAdmin application displays the Database Configuration page.

Complete the following fields:
Name = Name of this database
Host = Host name of this database
Port = Port number of this database
SID = System ID (SID) for this database
Set the Default field as follows:
If you want this database to be the default database that RDC Onsite users will access, select true.
If you do not want this database to be the default, select false.
Enter the password for the existing BC4J_INTERNAL account. If you do not know this password, reset it in the database.
Enter the password for the TMS_BROWSER account only if TMS is installed. Otherwise, leave the TMS Browser Password field blank.
Save your changes.
You use Oracle Enterprise Manager 10g Application Server Control to manage the user accounts that can run the OPAAdmin application. As shown in Figure A-1, you can:
Change the password for the opaconfig user
Create additional users and passwords
Change the passwords for other OPAAdmin users
Delete users
The Users page in Oracle Enterprise Manager 10g Application Server Control provides the options that let you change user passwords, add users, and delete users for the OPAAdmin application.
To access the Users page:
Open a Web browser and enter your URL to the Oracle Application Server Forms and Reports Services Welcome page:
computer-name.company-name.com
Click the Log on to Oracle Enterprise Manager 10g Application Server Control link to open the Application Server Home page.
Log in as user ias_admin with the password you set when you installed the Application Server.
Select the appropriate instance.
Click the opa OC4J instance.
Click the Applications tab.
Click the opaadmin link.
Click the Administration tab.
Expand the Security administration task, and then select the Go to Task icon for Security Provider.
Click the Realms tab.
Locate the jazn.com security realm, and then click the number in its Users column. The system opens the Users page for the OPAAdmin application. See Figure A-1.
To change the password for the opaconfig user:
Log in to Oracle Enterprise Manager 10g Application Server Control.
Navigate to the Users page. See Section A.3.1, "Navigating to the Users Page for the OPAAdmin Application" for details.
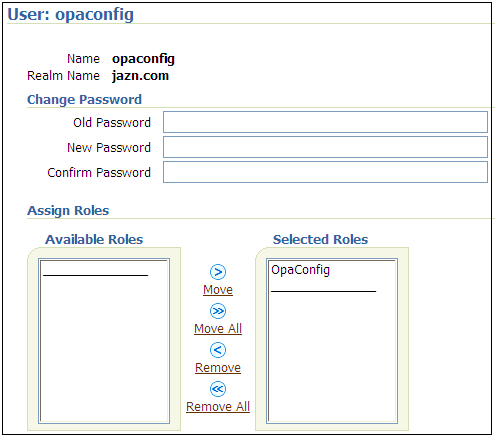
Click the opaconfig user name.
Enter the old password, enter the new password, and then confirm your new password.
Click Apply. Note that the user name remains opaconfig.
If you have forgotten the password for the opaconfig user, you must return to the Users page, delete the opaconfig user, and then re-create the opaconfig user and password.

Restart the opa OC4J instance.
To create a new user with access to the OPAAdmin application:
Log in to Oracle Enterprise Manager 10g Application Server Control.
Navigate to the Users page. See Section A.3.1, "Navigating to the Users Page for the OPAAdmin Application" for details.
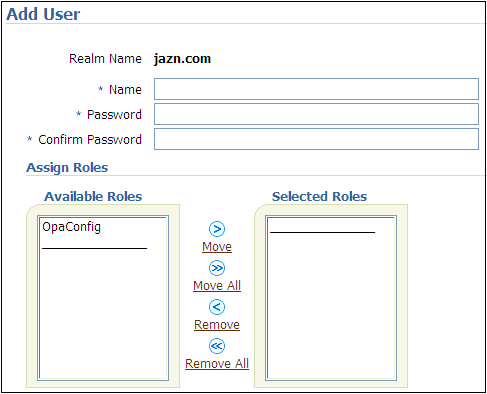
Click Create to add a new user.
Enter a name for the user.
Enter the password for the user account.
Enter the password again to confirm.
Select OpaConfig in the Available Roles column, and then click Move to assign the privileges and properties of the OpaConfig role to the user.

Click OK.
Restart the opa OC4J instance.
To reset a forgotten password for any OPAAdmin user:
Log in to Oracle Enterprise Manager 10g Application Server Control.
Navigate to the Users page. See Section A.3.1, "Navigating to the Users Page for the OPAAdmin Application" for details.
Click the Trash icon to delete the user.
Click Create to re-create the user and new password.
Click Apply.
Restart the opa OC4J instance.
To revoke a user's access to the OPAAdmin application:
Log in to Oracle Enterprise Manager 10g Application Server Control.
Navigate to the Users page. See Section A.3.1, "Navigating to the Users Page for the OPAAdmin Application" for details.
Click the Trash icon for the user you want to delete.
Click Yes on the Confirmation page.
Restart the opa OC4J instance.