| Oracle® Traffic Director Administrator's Guide 11g Release 1 (11.1.1.7.0) Part Number E21036-04 |
|
|
PDF · Mobi · ePub |
| Oracle® Traffic Director Administrator's Guide 11g Release 1 (11.1.1.7.0) Part Number E21036-04 |
|
|
PDF · Mobi · ePub |
This section describes how you can set up a load-balanced service using Oracle Traffic Director with the minimum necessary configuration. The purpose of this section is to reinforce and illustrate the concepts discussed earlier in this chapter and to prepare you for the configuration tasks described in the remaining chapters.
This section contains the following topics:
Section 1.8.2, "Creating the Load Balancer for the Example Topology"
Section 1.8.3, "Verifying the Load-Balancing Behavior of the Oracle Traffic Director Instance"
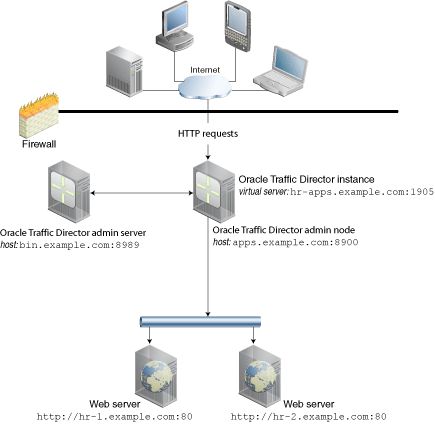
In this example, we will create a single instance of Oracle Traffic Director that will receive HTTP requests and distribute them to two origin servers in the back end, both serving identical content.
Figure 1-4 shows the example topology.
Figure 1-4 Oracle Traffic Director Deployment Example

The example topology is based on the following configuration:
Administration server host and port: bin.example.com:8989
Administration node host and port: apps.example.com:8900
Virtual server host and port to receive requests from clients: hr-apps.example.com:1905
Host and port of origin servers (web servers in this example):
hr-1.example.com:80
hr-2.example.com:80
In the real world, both origin servers would serve identical content. But for this example, to be able to see load balancing in action, we will set up the index.html page to which the DocumentRoot directive of the web servers points, to show slightly different content, as follows:
For hr-1.example.com:80: "Page served from origin-server 1"
For hr-2.example.com:80: "Page served from origin-server 2"
Load-balancing method: Round robin
This section describes how to set up the topology described in Section 1.8.1, "Example Topology."
Install Oracle Traffic Director on the hosts bin.example.com and apps.example.com, as described in the Oracle Traffic Director Installation Guide.
On bin.example.com create the administration server instance by using the configure-server CLI command.
> $ORACLE_HOME/bin/tadm configure-server --port=8989 --user=admin
 --instance-home=/production/otd/

This command will create an Administration Server. The password that is
 provided will be required to access the Administration Server.
Enter admin-user-password>
Enter admin-user-password again>
OTD-70214 The Administration Server has been configured successfully.
The server can be started by executing: /production/otd/admin-server/bin/startserv
The Administration Console can be accessed at https://bin.example.com:8989 using user name 'admin'.
Start the administration server.
> /production/otd/admin-server/bin/startserv

Oracle Traffic Director 11.1.1.7.0 B01/14/2013 09:08
[NOTIFICATION:1] [OTD-80118] Using [Java HotSpot(TM) 64-Bit Server VM, Version 1.6.0_29] from [Sun Microsystems Inc.]
[NOTIFICATION:1] [OTD-80000] Loading web module in virtual server [admin-server] at [/admin]
[NOTIFICATION:1] [OTD-80000] Loading web module in virtual server [admin-server] at [/jmxconnector]
[NOTIFICATION:1] [OTD-10358] admin-ssl-port: https://bin.example.com:8989 ready to accept requests
[NOTIFICATION:1] [OTD-10487] successful server startup
On the apps.example.com host, run the configure-server command to register the host with the remote administration server as an administration node.
> $ORACLE_HOME/bin/tadm configure-server --user=admin --port=8989
 --host=bin.example.com --admin-node --node-port=8900
 --instance-home=/home/otd-instances

This command will create an Administration Node and register it with the remote Administration Server: https://bin.example.com:8989.
Enter admin-user-password>
OTD-70215 The Administration Node has been configured successfully.
The node can be started by executing: /home/otd-instances/admin-server/bin/startserv
Start the administration node.
> /home/otd-instances/admin-server/bin/startserv

Oracle Traffic Director 11.1.1.7.0 B01/14/2013 09:08
[NOTIFICATION:1] [OTD-80118] Using [Java HotSpot(TM) 64-Bit Server VM, Version 1.6.0_29] from [Sun Microsystems Inc.]
[NOTIFICATION:1] [OTD-80000] Loading web module in virtual server [admin-server] at [/jmxconnector]
[NOTIFICATION:1] [OTD-10358] admin-ssl-port: https://apps.example.com:8900 ready to accept requests
[NOTIFICATION:1] [OTD-10487] successful server startup
On the administration server (bin.example.com), create a configuration named hr-config, by using the create-config CLI command.
> $ORACLE_HOME/bin/tadm create-config --user=admin --port=8989
 --listener-port=1905 --server-name=hr-apps.example.com
 --origin-server=hr-1.example.com:80,hr-2.example.com:80 hr-config

Enter admin-user-password>
OTD-70201 Command 'create-config' ran successfully.
Create an instance of the configuration hr-config on the administration node apps.example.com, by running the create-instance CLI command from the administration server.
> $ORACLE_HOME/bin/tadm create-instance --user=admin --port=8989
 --config=hr-config apps.example.com

Enter admin-user-password>
OTD-70201 Command 'create-instance' ran successfully.
Start the Oracle Traffic Director instance that you just created on apps.example.com, by running the start-instance CLI command from the administration server.
> $ORACLE_HOME/bin/tadm start-instance --config=hr-config

CLI204 Successfully started the server instance.
Note:
The steps in this procedure use only the CLI, but you can perform step 6 onward by using the administration console as well.
We have now successfully created an Oracle Traffic Director configuration, instantiated it on an administration node, and started the instance.
The Oracle Traffic Director instance that we created and started earlier is now listening for HTTP requests at the URL http://hr-apps.example.com:1905.
This section describes how you can verify the load-balancing behavior of the Oracle Traffic Director instance by using your browser.
Note:
Make sure that the web servers hr-1.example.com:80 and hr-2.example.com:80 are running.
If necessary, update the /etc/hosts file on the host from which you are going to access the Oracle Traffic Director virtual server, to make sure that the browser can resolve hr-apps.example.com to the correct IP address.
Enter the URL http://hr-apps.example.com:1905 in your browser.
A page with the following text is displayed:
"Page served from origin-server 1"
This indicates that the Oracle Traffic Director instance running on the apps.example.com administration node received the HTTP request that you sent from the browser, and forwarded it to the origin server hr-1.example.com:80.
Send another HTTP request to http://hr-apps.example.com:1905 by refreshing the browser window.
A page with the following text is displayed:
"Page served from origin-server 2"
This indicates that Oracle Traffic Director sent the second request to the origin server hr-2.example.com:80
Send a third HTTP request to http://hr-apps.example.com:1905 by refreshing the browser window again.
A page with the following text is displayed:
"Page served from origin-server 1"
This indicates that Oracle Traffic Director used the simple round-robin load-distribution method to send the third HTTP request to the origin server hr-1.example.com:80.