| Oracle® Communications Service Broker Installation Guide Release 6.0 Part Number E23522-02 |
|
|
View PDF |
| Oracle® Communications Service Broker Installation Guide Release 6.0 Part Number E23522-02 |
|
|
View PDF |
The Service Broker installer is an Oracle Universal Installer. This chapter describes how to use the Oracle Universal Installer in graphical mode or from the command line to install the Oracle Communications Service Broker software.
Running the installer installs a domain server software and the Administration Console software. It installs all components necessary to run the standalone Administration Console or Web Administration Console server.
The installer can also install a JDK with a JVM if you choose this option.
The server software installed can be used to run a signaling server, a processing server or a unified server. The role of a server is defined only when you start the server.
The Service Broker software is installed in the Oracle home directory. See "Choosing an Oracle Home" for more information.
When you run the installer, you choose a Service Broker product type to install, such as the Service Controller or Policy Controller. To install multiple products, run the installer multiple times. Choose the same Oracle home directory for the additional installations - this will retain a single instance of the Administration Console and server software. The software associated with the additional products is added to the existing installation.
The Oracle Universal Installer can run in either graphical mode or console mode. To run the installer, you must be logged in to the operating system as a non-root user. For general information about using the Oracle Universal Installer, see Oracle Universal Installer and OPatch User's Guide.
An Oracle home is the parent directory on a host computer into which the Service Broker software is installed.
The Oracle home location is defined in an environment variable.
Each Oracle home has a name and a directory path associated with it, which you specify during installation:
The name identifies the program group associated with a particular home and the Oracle services installed on this home. The Oracle home name must be between 1 to 127 characters long, and can include only alphanumeric characters and underscores.
The path is the full path to an Oracle home directory where products are installed.
In the Service Broker documentation, the Oracle home directory is referred to as Oracle_home.
If you run the installer for the first time on a host, Oracle recommends that you designate an Oracle_home location that is either an empty directory or a non-existing directory for the installer to create.
Service Broker uses the Oracle Universal Installer, which supports the installation of multiple Oracle home directories on the same host. However, if you run the installer multiple times, Oracle recommends that you choose the same Oracle home directory for the additional installations.
An Oracle_home inventory or local inventory directory contains only information relevant to a particular Oracle_home. Each Oracle_home directory contains an inventory subdirectory.
The Oracle central inventory directory contains installation logs corresponding to all installations performed on a particular host. The installation logs for an installation are identified by the timestamp in the log file names.
When you install the first Oracle product in a host, the installer prompts you to specify the location of the central inventory directory. The location of the directory is defined in the following files:
The location of the Oracle Central Inventory is defined in the following files:
Linux:
/etc/oraInst.loc
Solaris:
/var/opt/oracle/oraInst.loc
You can run the Service Broker installer by using a graphical user interface (graphical mode), using the console interface (console mode), or by using a command-shell script with response files (silent mode).
You can use the graphical mode to walk through the installation by providing information in the dialog boxes when prompted. This method is useful when performing a small number of installations.
If your operating system cannot display the graphical installer, you must use the installer in console mode or silent mode. This method is most useful when installing a large number of servers on multiple hosts. By using the response files, you can also automate the installation of a server or an Administration Console.
A JDK must be installed on every host that runs a server, a stand-alone Administration Console, or the Web Administration Console.
The installation package comes with two JDKs:
Oracle JRockit
Sun Java JDK (with the HotSpot JVM)
You can also choose to reuse a supported JDK that is already installed on your host.
See "Supported Configurations" for information about supported JDKs.
To install Service Broker using the Oracle Universal installer in graphical mode:
In a command shell, navigate to the installer directory:
installer_directory/operating_system/Disk1/install
Where:
installer_directory is the directory to which you extracted the product installation archive.
operating_system is the identifier for the operating system you are using, such as sparc or linux.
Enter the following command to launch the installer:
./runInstaller
The Oracle Universal Installer is launched in graphical mode.
The installer displays a series of windows that prompt you for the information described in Table 4-1. Follow the instructions in the table.
Table 4-1 Installer Windows in Graphical Mode
| In this window | Perform the following action |
|---|---|
|
Welcome |
Click Next to proceed with the installation. You may cancel the installation at any time by clicking Cancel. |
|
Specify Inventory directory and credentials |
This window is displayed only during the first installation of Oracle products on a system. Specify the full path of the Oracle inventory directory. Choose the operating system group that has write permissions to the inventory directory. Then, click Next. |
|
Select a Product to Install |
Choose the Service Broker product to install from these options:
See Oracle Communications Service Broker Concepts Guide for information about each product option. |
|
Specify Home Details |
Specify the directory that will serve as the parent directory for all Service Broker products installed on the target system. In this documentation, the home directory is referred to as Oracle_home. See "Choosing an Oracle Home" for details about the home directory. If you already have a home directory on your system, you can select that directory (recommended) or create a new home directory. To select an existing home directory:
To create a new Oracle_home directory:
Click Next to continue. |
|
Product update registration page |
(Optional) Register your installation with My Oracle Support. By registering, Oracle Support notifies you immediately of any security updates that are specific to your installation. To register your installation:
To decline registration:
For more information about the advantages of registering your installation with My Oracle Support, see Oracle Configuration Manager Installation and Administration Guide. Click Next to continue. |
|
Java Installation Option |
Specify whether to install a JDK. If you do not install a JDK, you are prompted for the path to an existing JDK. In a production system, you should install one of the certified versions of the JDK provided by the installer. For a test and development system, you can use a different, supported JDK. Also for test and development environments, multiple Service Broker installations can share a single JDK if they reside on the same machine. See "System Requirements" for details about supported JDKs. To install a JDK:
To use an already installed JDK:
|
|
Java Selection |
This window is only displayed if you selected to install a JDK. Specify which JVM to install:
Click Next to continue. |
|
Java Installation |
This window is only displayed if you selected not to install a JDK. Specify the path to an existing Java installation:
|
|
Summary |
This window displays a summary of the installation, including general information about the installation type, directories, the product components to be installed, the approximate installed size of each component, and the total size of all components to be installed. Click Install. |
|
Install |
This window is displayed while the components are being installed. The window displays the status of the installation. You can cancel the installation at any time by clicking the Stop installation button. |
|
Execute Configuration scripts |
This window is displayed only during the first installation of Oracle products on a system. As indicated, run the configuration script, orainstRoot.sh, in a new console as the root user. The script configures permissions for the Oracle inventory directory. When the script completes the configuration, click the OK button in the Execute Configuration scripts window. |
|
End of Installation |
This window describes the outcome of the installation. Click the Exit to exit the installation program. Click Yes to confirm your choice. |
When the installation is completed, the directory structure described in "Directory Structure After Installation" is created on your server.
The console installer enables you to install the product from a command line. When using the console installer, you can specify the installation parameters in one of two ways:
By entering the parameters in response to installer prompts. See "Passing Console Installer Parameters Interactively" for instructions.
By entering all parameters at the command line when invoking the console installer script. See "Passing Console Installer Parameters at the Command Line" for instructions.
The following sections provide more information about each console installer operating mode.
In interactive mode, you supply installation parameters to the console installer by responding to on-screen prompts.
To install Service Broker using the console-based installer in interactive mode:
In a command shell, navigate to the installer directory:
installer_directory/operating_system/Disk1/install
Enter the following command to launch the installer:
./consoleInstaller.sh
The Oracle Universal Installer is launched in console mode.
At the Please select a product to install prompt, enter the number corresponding to the Service Broker product you want to install from the following options:
1 to install the Online Mediation Controller
2 to install the Policy Controller
3 to install the Service Controller
4 to install the Social Voice Controller (SVC) only
5 to install the Virtual Private Network (VPN) only
6 to install the co-deployed Policy Controller and Online Mediation Controller
7 to install the co-deployed Service Controller and Online Mediation Controller
8 to install the co-deployed VPN and SVC
Enter the name of the Oracle home directory in which you want to install the software. The Oracle home name serves as the alias for the parent directory of the Service Broker products. For example:
Please enter an Oracle Home name for the installation: OHOME1
In this documentation, the home directory is referred to as Oracle_home. See "Choosing an Oracle Home" for details about the home directory.
If you already have a home directory on your system, you can select that directory or create a new home directory.
Enter the full directory path to the Oracle_home. For example:
Please enter the full installation path: /home/oracle
At the next prompt, enter your My Oracle Support email address or other email address at which you want to receive information on security issues.
Choose whether you want to receive security updates through My Oracle Support by entering Y for yes, or N for no.
At the Java Installation Option prompt, enter Y to install the JDK as part of the installation, or N to choose an existing JDK. If you do not install a JDK, you are prompted for the path to an existing JDK.
In a production system, you should install one of the certified versions of the JDK provided by the installer.
For a test and development system, you can use a different, supported JDK. Also for test and development environments, multiple Service Broker installations can share a single JDK if they reside on the same machine.
See "System Requirements" for details about supported JDKs.
If you did not elect to install the JDK, specify the full directory path to the existing JDK on the system.
If you elected to install the JDK, choose the JDK type by entering 1 to install the Java JDK (with the HotSpot JVM), or 2 to install Oracle JRockit JDK.
The installer verifies that there are sufficient system resources for the installation and, if so, proceeds with the installation.
The installer displays the progress of installation and status messages on screen. When complete, it writes the details of the installation procedure to the log file indicated in the on-screen output. If the installation succeeded, the directory structure described in "Directory Structure After Installation" is created on your server.
If this is the first Oracle product installation on this machine, when prompted, follow the on-screen instructions to run the orainstRoot.sh script located in your Oracle inventory directory. You must run the script as the root user.
Instead of supplying parameters to the installer interactively (as described in "Passing Console Installer Parameters Interactively"), you can pass them as command-line options when invoking the installer script.
Run the installer by using the following syntax:
./consoleInstaller.sh -silent INSTALL_TYPE INSTALL_JVM JVM_TYPE ORA_HOME_NAME
INSTALL_PATH SECURITY_UPDATES_VIA_MYORACLESUPPORT DECLINE_SECURITY_UPDATES
JAVA_HOME MYORACLESUPPORT_USERNAME MYORACLESUPPORT_PASSWORD
For information on the parameters, see table Table 4-2.
For example:
./consoleInstaller.sh -silent 1 1 1 OHOME1 ~/OHOME1 false true
The example command installs the Service Controller solution with Oracle JRockit in the OHOME1 directory. It declines security updates. Note that it excludes the JAVA_HOME, MYORACLESUPPORT_USERNAME, MYORACLESUPPORT_PASSWORD arguments, which are not needed given the other argument values provided.
If specified, optional arguments must appear in the order shown.
If this is the first Oracle product installation on this machine, after you run the installer script, you are prompted to run the orainstRoot.sh script as the root user. The script is located in your Oracle inventory directory. Follow the on-screen instructions to run the script.
You can install Service Broker using Oracle Universal Installer in silent mode.
You can specify the necessary installation parameters, such as what to install, the home directory, and so on, in one of two ways:
By editing the parameters in the silentInstaller.sh installer file. Typically, this is the method you will use. The file includes all the mandatory parameters and the most frequently used parameters. Default values are given.
See "Installing in Silent Mode Without a Response File" for instructions.
By editing the installation response file. This file includes the same parameters as the silentInstaller.sh file, plus additional parameters that you can set. The response file, along with the -silent parameter, is given as input to the runInstaller utility.
See "Installing in Silent Mode With a Response File" for instructions.
In either case, you use the parameters described in "Installation Parameters" to specify parameters of the installation.
To install Service Broker in silent mode without using a response file:
In a command shell, navigate to the following directory:
installer_directory/operating_system/Disk1/install/
Open the silentInstaller.sh file for editing, and modify the installation parameters as required. Table 4-2 lists the installation parameters.
Enter the following command to launch the installer:
./silentInstaller.sh
The installation progress is output to the console.
If this is the first Oracle product installation on this machine, when prompted, follow the on-screen instructions to run the orainstRoot.sh script located in your Oracle inventory directory. You must run the script as the root user.
The directory structure described in "Directory Structure After Installation" is created on your server.
The installer response file provides parameters that correspond to those in silentInstaller.sh file, along with additional parameters. The installer response file is used with the runInstaller utility.
To install Service Broker in silent mode using a response file:
In a command shell, navigate to the following directory:
installer_directory/operating_system/Disk1/stage/Response/
Edit the installer response file appropriate for your Service Broker implementation, from the following choices:
codeploy_pcomc.Complete.rsp to install both the Policy Controller and Online Mediation Controller
codeploy_scomc.Complete.rsp to install co-deployed Service Controller and Online Mediation Controller
codeploy_vpnsvc.Complete.rsp to install co-deployed VPN and Social Voice Communicator (SVC)
onlinemediation_controller.Complete.rsp to install the Online Mediation Controller
policy_controller.Complete.rsp to install the Policy Controller
service_controller.Complete.rsp to install the Service Controller
socialvoice_communicator.Complete.rsp to install SVC
virtualprivate_network.Complete.rsp to install VPN
Table 4-2 describes the basic parameters in the installer response file. For information on additional parameters in the response file, see the comments contained within the response file.
Note that the TOPLEVEL_COMPONENT setting in the files, which determines the product type of the installation, is preset to the value corresponding to the file's product type, as listed above.
Save the file after making your changes.
Navigate to the installer directory:
installer_directory/operating_system/Disk1/install
Enter the following command to launch the installer:
./runInstaller -silent -responseFile full_path_to_response_file
For example, to install the Policy Controller solution:
./runInstaller -silent -responseFile installer_directory/linux/Disk1/stage/Response/rcc_policy_controller.Custom.rsp
The installation progress is output to the console.
If this is the first Oracle product installation on this machine, when prompted, follow the on-screen instructions to run the orainstRoot.sh script located in your Oracle inventory directory. You must run the script as the root user.
The directory structure described in "Directory Structure After Installation" is created on your server.
Table 4-2 lists the installation parameters accepted by the silent installer.
Table 4-2 Installation Parameters
| Parameter | Description |
|---|---|
|
|
Specifies the Service Broker product to install. Mandatory The values for the parameter differ by installation method. In the silentInstaller.sh script, use one of the following values:
Example:
In a response file, specify the component using the syntax: {“component","version"} where component is the Service Broker product to install and version is its version. The component may be one of the following:
Example:
|
|
|
Specifies whether to install one of the bundled JDKs or to use an already installed JDK. Mandatory In a production system, you should install one of the certified versions of the JDK provided by the installer. For test environments, you can use an already installed, supported JDK. Also for test environments, multiple Service Broker installations can share a single JDK if they reside on the same machine. Use:
Example:
|
|
|
The type of JVM to install. Mandatory if the value of Use:
Example:
|
|
|
The path to the directory of your Java JDK. Mandatory if the value of The path should be the same as the environment variable Example:
|
|
|
The name of the Oracle home directory. Mandatory If you have previously installed an Oracle product using the Oracle Universal Installer, you already have an Oracle home defined. If you want to reuse the existing Oracle home, enter its name here. When you use an existing Oracle home name, the value you specify for ORACLE_HOME is overridden with the existing Oracle home directory path. Example:
The default Oracle home is |
|
|
The path to use as your Oracle_home directory. Mandatory Specify the directory that will serve as the central support directory for all Oracle products installed on the target system. Example:
The default path is |
|
|
Indicates whether you want to receive security updates related to Oracle products. Mandatory Enter true to decline security updates, or false to receive security updates. Example:
|
|
|
Indicates whether you want to receive security updates through your Oracle My Oracle Support account. Mandatory Enter true to receive security updates via My Oracle Support, or false to decline security updates. If you have not registered with Oracle Support, go to the following My Oracle Support Web site and register to obtain a My Oracle Support account:
Example:
|
|
|
Specifies your My Oracle Support email address or other email address where you wish to be notified of updates. Mandatory if Example:
|
|
|
Specifies the password for your Oracle support account. Mandatory if Example:
|
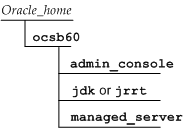
Figure 4-1 illustrates the high-level directory structure that is created during installation.
Table 4-3 describes each directory and its contents.
Table 4-3 Installed Directories and Content Descriptions
| Directory | Description |
|---|---|
|
Oracle_home |
Base directory for your installation. Oracle_home is specified during the installation. |
|
Oracle_home |
Contains binaries for the Administration Console, and the start scripts and modules related to the Administration Console. |
|
Oracle_home |
Contains binaries for the Processing Server or Signaling Server, and the start scripts and modules related to the server. |
|
Oracle_home |
Contains the Java JDK (with the HotSpot JVM). This directory is created only if you specified to install the Java JDK during the installation. |
|
Oracle_home |
Contains the Oracle JRockit JDK. This directory is created only if you specified to install the Oracle JRockit JDK during the installation. |
You can deinstall Service Broker or any of its components by running the Oracle Universal Installer. When you deinstall, the installer removes all files and folders that it originally installed, but does not remove any files and folders that you created or modified, such a domain directories and configuration files.
See "Deinstalling Using Graphical Mode" for instructions on deinstalling Service Broker or one of its components using Oracle Universal Installer in graphical mode.
See "Deinstalling Using Silent Mode" for instructions on deinstalling Service Broker or one of its components using Oracle Universal Installer in silent mode.
To deinstall Service Broker or any of its components using the Oracle Universal Installer in graphical mode:
In a command shell, navigate to the installer directory:
installer_directory/operating_system/Disk1/install
Enter the following command to launch the installer:
./runInstaller
The Oracle Universal Installer is launched in graphical mode.
In the Welcome window, click Deinstall Products.
The Inventory window displays all Oracle homes on the host.
In the Contents tab, select the Oracle home or product within the Oracle home that you want to deinstall.
Selecting the Oracle home removes all products within that Oracle home. Alternatively, expand the Oracle home and select individual components within that home to deinstall.
Tip:
To save a text copy of the inventory tree and selected components before you remove components, click Save As. Navigate to a directory where you want to save the tree, enter the file name to use, and click Save.Click Remove.
The Confirmation window opens.
Click Yes to confirm your selection.
The installer deinstalls the selected components.
Click Close to dismiss the Inventory window.
To deinstall Service Broker or one of its components in silent mode, you run the runInstaller utility, specifying the -deinstall option.
The simplest way to specify the components to deinstall is on the command line. However, you can alternatively specify the components to deinstall in an installer response file. The installer response files are located in the installation directory for your platform:
installer_directory/operating_system/Disk1/stage/Response/
See "Installing in Silent Mode With a Response File" for more information about the installer response files.
Table 4-4 describes the parameter-value pairs that you set, either on the command line or in the installer response file.
Table 4-4 Parameters for Deinstalling Components
| Name | Description |
|---|---|
|
|
Specify the component to deinstall. Mandatory Use the following syntax: {“component","version"} where component is the Service Broker product to remove and version is its version. The component value may be one of the following:
Examples:
|
|
|
Specify the full path to the Oracle home directory to remove. Optional Use the following syntax: {path_to_Oracle_home} Example:
|
You can use the runInstaller script to get a list of the installed components and their versions:
In a command shell, navigate to the installer directory:
installer_directory/operating_system/Disk1/install
Enter the following command:
./runInstaller -deinstall
The installed components are listed in the output.
To deinstall Service Broker or one of its components:
In a command shell, navigate to the installer directory:
installer_directory/operating_system/Disk1/install
Enter one of the following commands to launch the installer.
To specify the components to deinstall on the command line, enter:
./runInstaller -deinstall -silent DEINSTALL_LIST={"component","version} REMOVE_HOMES={path_to_Oracle_home}
where component, version, and path_to_Oracle_home are specified as described in Table 4-4.
For example:
./runInstaller -deinstall -silent DEINSTALL_LIST={"service_controller","6.0.0.1.0"} REMOVE_HOMES={/home/oracle/OHome1}
To use an installer response file in which the components to deinstall are specified, enter:
./runInstaller -deinstall -silent -responseFile full_path_to_response_file
|
Copyright © 2010, 2012, Oracle and/or its affiliates. All rights reserved. Legal Notices |
|