| Skip Navigation Links | |
| Exit Print View | |

|
System Administration Guide: Security Services Oracle Solaris 10 8/11 Information Library |
| Skip Navigation Links | |
| Exit Print View | |

|
System Administration Guide: Security Services Oracle Solaris 10 8/11 Information Library |
1. Security Services (Overview)
Part II System, File, and Device Security
2. Managing Machine Security (Overview)
3. Controlling Access to Systems (Tasks)
4. Controlling Access to Devices (Tasks)
5. Using the Basic Audit Reporting Tool (Tasks)
6. Controlling Access to Files (Tasks)
7. Using the Automated Security Enhancement Tool (Tasks)
Part III Roles, Rights Profiles, and Privileges
8. Using Roles and Privileges (Overview)
9. Using Role-Based Access Control (Tasks)
How to Plan Your RBAC Implementation
How to Create and Assign a Role by Using the GUI
How to Create a Role From the Command Line
How to Assign a Role to a Local User
How to Make root User Into a Role
How to Change the Password of a Role
How to Change the Properties of a Role
How to Create or Change a Rights Profile
How to Change the RBAC Properties of a User
How to Add RBAC Properties to Legacy Applications
10. Role-Based Access Control (Reference)
Part IV Cryptographic Services
13. Oracle Solaris Cryptographic Framework (Overview)
14. Oracle Solaris Cryptographic Framework (Tasks)
15. Oracle Solaris Key Management Framework
Part V Authentication Services and Secure Communication
16. Using Authentication Services (Tasks)
19. Using Oracle Solaris Secure Shell (Tasks)
20. Oracle Solaris Secure Shell (Reference)
21. Introduction to the Kerberos Service
22. Planning for the Kerberos Service
23. Configuring the Kerberos Service (Tasks)
24. Kerberos Error Messages and Troubleshooting
25. Administering Kerberos Principals and Policies (Tasks)
26. Using Kerberos Applications (Tasks)
27. The Kerberos Service (Reference)
Part VII Oracle Solaris Auditing
28. Oracle Solaris Auditing (Overview)
29. Planning for Oracle Solaris Auditing
30. Managing Oracle Solaris Auditing (Tasks)
After you have set up roles with default Oracle Solaris rights profiles, and assigned the roles to users, the roles can be used. A role can be assumed on the command line. In the Solaris Management Console, a role can also be used for administering the system locally and over the network.
Before You Begin
The role must already be assigned to you. The name service must be updated with that information.
% roles
Comma-separated list of role names is displayed
% su - rolename
Password: <Type rolename password>
$
The su - rolename command changes the shell to a profile shell for the role. A profile shell recognizes security attributes (authorizations, privileges, and set ID bits).
$ /usr/ucb/whoami
rolename
You can now perform role tasks in this terminal window.
For the procedure, see How to Determine the Privileged Commands That a Role Can Run.
Example 9-10 Assuming the Primary Administrator Role
In the following example, the user assumes the role of Primary Administrator. In the default configuration, this role is equivalent to superuser. The role then checks to see which privileges are available to any command that is typed in the profile shell for the role.
% roles
sysadmin,oper,primaryadm
% su - primaryadm
Password: <Type primaryadm password>
$ /usr/ucb/whoami Prompt has changed to role prompt
primaryadm
$ ppriv $$
1200:   pfksh
flags = <none>
        E (Effective): all
        I (Inheritable): basic
        P (Permitted): all
        L (Limit): all
For information about privileges, see Privileges (Overview).
Example 9-11 Assuming the root Role
In the following example, the user assumes the root role. The role was created in How to Make root User Into a Role
% roles
root
% su - root
Password: <Type root password>
# /usr/ucb/whoami Prompt has changed to role prompt
root
$ ppriv $$
1200:   pfksh
flags = <none>
        E: all
        I: basic
        P: all
        L: all
For information about privileges, see Privileges (Overview).
Example 9-12 Assuming the System Administrator Role
In the following example, the user assumes the role of System Administrator. In contrast to the Primary Administrator role, the System Administrator has the basic set of privileges in its effective set.
% roles
sysadmin,oper,primaryadm
% su - sysadmin
Password: <Type sysadmin password>
$ /usr/ucb/whoami Prompt has changed to role prompt
sysadmin
$ ppriv $$
1200:   pfksh
flags = <none>
        E: basic
        I: basic
        P: basic
        L: all
For information about privileges, see Privileges (Overview). For a short description of the capabilities of the role, see System Administrator Rights Profile.
To change information in the Solaris Management Console GUI requires administrative capabilities. A role gives you administrative capabilities. If you want to view information, you must have the solaris.admin.usermgr.read authorization. The Basic Solaris User rights profile includes this authorization.
Before You Begin
An administrative role that can change the properties of users or roles must have already been assigned to you. For example, the Primary Administrator role can change the properties of users or roles.
% /usr/sbin/smc &
For detailed instructions, see Using the Solaris Management Tools With RBAC (Task Map) in System Administration Guide: Basic Administration.
Navigate to the toolbox that contains the tool or collection in the appropriate name service scope and click the icon. The scopes are files (local), NIS, NIS+, and LDAP. If the appropriate toolbox is not displayed in the navigation pane, choose Open Toolbox from the Console menu and load the relevant toolbox.
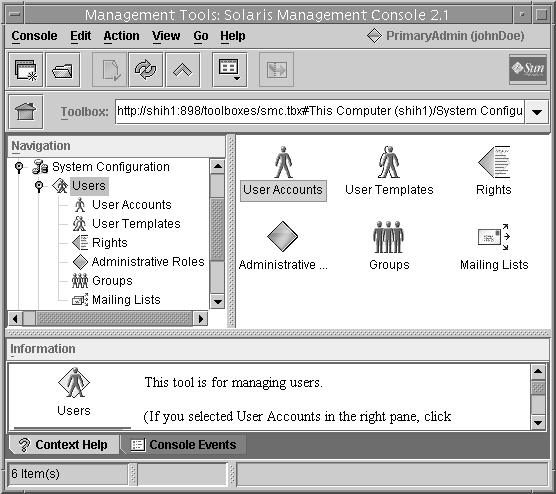
Navigate to the tool or collection and click the icon. The tools for managing the RBAC elements are in the Users tool, as shown in the following figure.

The Role option menu in the dialog box displays the roles that are assigned to you. Choose a role and type the role password.