24 Assembling and Deploying Oracle CEP Applications
This chapter describes how to assemble and deploy Oracle Complex Event Processing (Oracle CEP) applications manually, by using the Oracle CEP IDE for Eclipse, and by using Oracle CEP Visualizer.
24.1 Overview of Application Assembly and Deployment
The term application assembly refers to the process of packaging the components of an application, such as the Java files and XML configuration files, into an OSGI bundle that can be deployed to Oracle CEP. The term application deployment refers to the process of making an application available for processing client requests in an Oracle CEP domain.
This section describes:
Note:
Oracle CEP applications are built on top of the Spring Framework and OSGi Service Platform and make extensive use of their technologies and services. See Appendix A, "Additional Information about Spring and OSGi," for links to reference and conceptual information about Spring and OSGi.
24.1.1 Applications
In the context of Oracle CEP assembly and deployment, an application is defined as an OSGi bundle (see http://www2.osgi.org/javadoc/r4/org/osgi/framework/Bundle.html) JAR file that contains the following artifacts:
-
The compiled Java class files that implement some of the components of the application, such as the adapters, adapter factory, and POJO that contains the business logic.
-
One or more Oracle CEP configuration XML files that configure the components of the application. The only type of component that is required to have a configuration file is the complex event processor; all other components (adapters and streams) do not require configuration files if the default configuration of the component is adequate. You can combine all configuration files into a single file, or separate the configuration for individual components in their own files.
The configuration files must be located in the
META-INF/wlevsdirectory of the OSGi bundle JAR file if you plan to dynamically deploy the bundle. If you have an application already present in the domain directory, then the configuration files need to be extracted in the same directory. -
An EPN assembly file that describes all the components of the application and how they are connected to each other.
The EPN assembly file must be located in the
META-INF/springdirectory of the OSGi bundle JAR file. -
A
MANIFEST.MFfile that describes the contents of the JAR.
24.1.2 Application Dependencies
The OSGI bundle declares dependencies by specifying imported and required packages. It also provides functionality to other bundles by exporting packages. If a bundle is required to provide functionality to other bundles, you must use Export-Package to allow other bundles to reference named packages. All packages not exported are not available outside the bundle.
You define dependencies at design time.
This section describes:
For more information, see:
24.1.2.1 Private Application Dependencies
Some dependencies are satisfied by a component bundled in and deployed with an application. For example, standard JAR files or property files.
For more information, see:
24.1.2.2 Shared Application Dependencies
Some dependencies are satisfied by a component deployed to the Oracle CEP server application library directory. These components are not bundled in and deployed with a specific application. Instead, they are accessible to any application that imports one or more of the packages that the application library exports.
For more information, see:
24.1.2.3 Native Code Dependencies
In some cases, you may create an application library that depends on native code libraries that you cannot or may not choose to package as application libraries.
In this case, you can put native code libraries in the operating system path (bootclasspath) of the Oracle CEP server when it is started, so that the native code libraries can be loaded by library bundles that need to call this native code.
For more information, see:
-
"Configuring the Oracle CEP Server Boot Classpath" in the Oracle Fusion Middleware Administrator's Guide for Oracle Complex Event Processing
24.1.3 Application Libraries
The Oracle CEP application library gives you a convenient location to deploy shared libraries and gives you complete control over the order in which shared libraries are deployed at Oracle CEP server start up time.
An application library is an OSGi bundle that contains a Java archive (JAR) of compiled Java classes and any other required artifacts.
You can use application libraries for a variety of purposes such as drivers or foreign stages (partial or complete Oracle CEP applications that are useful to other downstream applications).
Although you can add a library to a project as a simple embedded JAR file, there are advantages to using an application library, including:
-
Simplifying application assembly and maintenance activities such as deploying an updated version of the library.
-
Encouraging re-use.
-
Reducing server disk space consumption.
You deploy application libraries to either of the following Oracle CEP server directories:
For more information, see:
24.1.3.1 Library Directory
By default, the Oracle CEP server library directory is:
DOMAIN_DIR/servername/modules
Where:
-
DOMAIN_DIR: is the domain directory such as/oracle_cep/user_projects/domains/mydomain. -
servername: is the server instance, such asmyserver.
For example:
/oracle_cep/user_projects/domains/mydomain/myserver/modules
The libraries in this directory are deployed after the components in the library extensions directory but before any Oracle CEP applications.
If your library is a driver (such as a JDBC driver), you must put it in the library extensions directory as Section 24.1.3.2, "Library Extensions Directory" describes.
To configure the root of the application library directory path, see Section 24.3.1, "How to Define the Application Library Directory Using Oracle CEP IDE for Eclipse".
24.1.3.2 Library Extensions Directory
By default, the Oracle CEP server library extensions directory is:
DOMAIN_DIR/servername/modules/ext
Where:
-
DOMAIN_DIR: is the domain directory such as/oracle_cep/user_projects/domains/mydomain. -
servername: is the server instance, such asmyserver.
For example:
/oracle_cep/user_projects/domains/mydomain/myserver/modules/ext
The libraries in this directory are deployed first along with the Oracle CEP server core modules.
If your library is a driver (such as a JDBC driver), you must put it in the library extensions directory so that it is activated in the correct order. For example, to override an older version with a newer version or to provide access to an alternative driver. For more information, see "Configuring Access to a Different Database Driver or Driver Version" in the Oracle Fusion Middleware Administrator's Guide for Oracle Complex Event Processing.
If your library is not a driver, you may put it in the library directory as Section 24.1.3.1, "Library Directory" describes.
To configure the root of the application library extensions directory path, see Section 24.3.1, "How to Define the Application Library Directory Using Oracle CEP IDE for Eclipse".
24.1.3.3 Creating Application Libraries
Oracle CEP provides a bundler.sh utility you can use to create an OSGi bundle wrapper around an arbitrary Java Archive. The resultant bundle JAR may be deployed to an OSGi container where the Java packages/classes found within the bundle may be imported and utilized by other deployed bundles. An example use case is the packaging of third-party JDBC drivers.
The utility reads the specified source JAR file and creates a target JAR file that includes the content of the source JAR and a manifest with the appropriate bundle-related entries specified. All Java packages found in the source archive will be exported by the target bundle.
Optionally, a bundle activator can be generated that instantiates one or more classes found within the JAR and registers each object as an OSGi service. This feature provides the ability for component bundles to access and manipulate multiple versions of specific factory classes at runtime.
If you wish to manually configure the activator implementation, you can use the Oracle CEP IDE for Eclipse.
For more information, see:
-
Section 24.3.2, "How to Create an Application Library Using bundler.sh"
-
Section 24.3.3, "How to Create an Application Library Using Oracle CEP IDE for Eclipse"
-
"How to Access a Database Driver Using an Application Library Built With bundler.sh" in the Oracle Fusion Middleware Administrator's Guide for Oracle Complex Event Processing
24.1.4 Deployment and Deployment Order
After you have assembled the application, you deploy it by making it known to the Oracle CEP domain using the deployment tool appropriate for your needs. For detailed instructions, see Section 24.5, "Deploying Oracle CEP Applications."
The Oracle CEP server deploys components in the following order at Oracle CEP server start up time:
-
Deploy libraries in the library extensions directory (
DOMAIN_DIR/servername/modules/extdirectory). -
Deploy libraries in the library directory (
DOMAIN_DIR/servername/modulesdirectory). -
Deploy Oracle CEP applications.
The Oracle CEP server deploys libraries from both the library extensions directory and library directory based on the lexical order of the library names. Lexical ordering includes the relative directory name plus JAR file name.
For example:
-
modules/a.jarwill start beforemodules/b.jar -
modules/0/my.jarwill start beforemodule/my.jarsince0/my.jarcomes beforemy.jarin lexical order
Using this convention, you can control the order in which Oracle CEP server deploys JAR files simply by organizing JAR files into appropriately named subdirectories of either the library extensions directory or library directory.
Once the application is deployed to Oracle CEP, the configured adapters immediately start listening for events for which they are configured, such as financial data feeds and so on.
For more information, see Section 24.1.3, "Application Libraries".
24.1.5 Configuration History Management
When you deploy an application to the Oracle CEP server, the Oracle CEP server creates a configuration history for the application. Any configuration changes you make to rules or Oracle CEP high availability adapter configuration are recorded in this history are recorded in this history. You can view and roll-back (undo) these changes using the Oracle CEP Visualizer or wlevs.Admin tool.
For more information, see:
-
"Configuration History Management" in the Oracle Fusion Middleware Visualizer User's Guide for Oracle Complex Event Processing
-
"Commands for Managing Configuration History" in the Oracle Fusion Middleware Administrator's Guide for Oracle Complex Event Processing
24.2 Assembling an Oracle CEP Application
Assembling an Oracle CEP application refers to bundling the artifacts that make up the application into an OSGi bundle JAR file as http://www2.osgi.org/javadoc/r4/org/osgi/framework/Bundle.html describes. These artifacts include:
-
compiled Java classes
-
Oracle CEP component configuration files that configure application components (such as the processors or adapters)
-
EPN assembly file
-
MANIFEST.MFfile
See Appendix A, "Additional Information about Spring and OSGi," for links to reference and conceptual information about Spring and OSGi.
This section describes:
-
Section 24.2.1, "Assembling an Oracle CEP Application Using Oracle CEP IDE for Eclipse"
-
Section 24.2.2, "Assembling an Oracle CEP Application Manually"
-
Section 24.2.3, "Assembling Applications With Foreign Stages"
-
Section 24.2.4, "Assembling a Custom Adapter or Event Bean in Its Own Bundle"
24.2.1 Assembling an Oracle CEP Application Using Oracle CEP IDE for Eclipse
You can use Oracle CEP IDE for Eclipse to easily assemble your Oracle CEP application.
For more information, see:
If your application depends on foreign stages, see Section 24.2.3, "Assembling Applications With Foreign Stages".
24.2.2 Assembling an Oracle CEP Application Manually
Optionally, you can assemble your Oracle CEP application manually.
For simplicity, the following procedure creates a temporary directory that contains the required artifacts, and then jars up the contents of this temporary directory. This is just a suggestion and you are not required, of course, to assemble the application using this method.
Note:
See the HelloWorld example source directory for a sample build.xml Ant file that performs many of the steps described below. The build.xml file is located in ORACLE_CEP_HOME\ocep_11.1\samples\source\applications\helloworld, where ORACLE_CEP_HOME refers to the main Oracle CEP installation directory, such as d:\oracle_cep.
To assemble an Oracle CEP application manually:
-
Open a command window and set your environment as described in "Setting Your Development Environment" in the Oracle Fusion Middleware Getting Started Guide for Oracle Complex Event Processing.
-
Create an empty directory, such as
output:prompt> mkdir output
-
Compile all application Java files into the
outputdirectory. -
Create an
output/META-INF/springdirectory. -
Copy the EPN assembly file that describes the components of your application and how they are connected into the
output/META-INF/springdirectory.See Section 4.3, "Creating EPN Assembly Files" for details about this file.
-
Create an
output/META-INF/wlevsdirectory. -
Copy the XML files that configure the components of your application (such as the processors or adapters) into the
output/META-INF/wlevsdirectory.You create these XML files during the course of creating your application, as described in Section 1.1, "Overview of the Oracle CEP Programming Model."
-
Create a
MANIFEST.MFfile that contains descriptive information about the bundle. -
If you need to access third-party JAR files from your Oracle CEP application, see Section 24.2.2.2, "Accessing Third-Party JAR Files."
-
Create a JAR file that contains the contents of the
outputdirectory.Be sure you specify the
MANIFEST.MFfile you created in the previous step rather than the default manifest file.You can name the JAR file anything you want. In the Oracle CEP examples, the name of the JAR file is a combination of Java package name and version, such as:
com.bea.wlevs.example.helloworld_1.0.0.0.jar
Consider using a similar naming convention to clarify which bundles are deployed to the server.
See the Apache Ant documentation at
http://ant.apache.org/manual/Tasks/jar.htmlfor information on using thejartask or the Java SE documentation athttps://download.oracle.com/javase/6/docs/technotes/tools/windows/jar.htmlfor information on using thejarcommand-line tool. -
If your application depends on foreign stages, see Section 24.2.3, "Assembling Applications With Foreign Stages".
24.2.2.1 Creating the MANIFEST.MF File
The structure and contents of the MANIFEST.MF file is specified by the OSGi Framework. Although the value of many of the headers in the file is specific to your application or business, many of the headers are required by Oracle CEP.
In particular, the MANIFEST.MF file defines the following:
-
Application name—Specified with the
Bundle-Nameheader. -
Symbolic application name—Specified with the
Bundle-SymbolicNameheader.Many of the Oracle CEP tools, such as the
wlevs.Adminutility and JMX subsystem, use the symbolic name of the bundle when referring to the application. -
Application version—Specified with the
Bundle-Versionheader. -
Imported packages—Specified with the
Import-Packageheader.Oracle CEP requires that you import the following packages at a minimum:
Import-Package:
 com.bea.wlevs.adapter.defaultprovider;version="11.1.1",
 com.bea.wlevs.ede;version="11.1.1",
 com.bea.wlevs.ede.api;version="11.1.1",
 com.bea.wlevs.ede.impl;version="11.1.1",
 org.osgi.framework;version="1.3.0",
 org.springframework.beans.factory;version="2.5.6",
 org.apache.commons.logging;version="1.1.0",
 com.bea.wlevs.spring;version="11.1.1",
 com.bea.wlevs.util;version="11.1.1",
 org.springframework.beans;version="2.5.6",
 org.springframework.util;version="2.0",
 org.springframework.core.annotation;version="2.5.6",
 org.springframework.beans.factory;version="2.5.6",
 org.springframework.beans.factory.config;version="2.5.6",
 org.springframework.osgi.context;version="1.2.0",
 org.springframework.osgi.service;version="1.2.0"
If you have extended the configuration of an adapter, then you must also import the following packages:
 javax.xml.bind;version="2.0",
 javax.xml.bind.annotation;version=2.0,
 javax.xml.bind.annotation.adapters;version=2.0,
 javax.xml.bind.attachment;version=2.0,
 javax.xml.bind.helpers;version=2.0,
 javax.xml.bind.util;version=2.0,
 com.bea.wlevs.configuration;version="11.1.1",
 com.bea.wlevs.configuration.application;version="11.1.1",
 com.sun.xml.bind.v2;version="2.0.2"
-
Exported packages—Specified with the
Export-Packageheader. You should specify this header only if you need to share one or more application classes with other deployed applications. A typical example is sharing an event type JavaBean.If possible, you should export packages that include only the interfaces, and not the implementation classes themselves. If other applications are using the exported classes, you will be unable to fully undeploy the application that is exporting the classes.
Exported packages are server-wide, so be sure their names are unique across the server.
The following complete MANIFEST.MF file is from the HelloWorld example, which extends the configuration of its adapter:
Manifest-Version: 1.0
Archiver-Version:
Build-Jdk: 1.6.0_06
Extension-Name: example.helloworld
Specification-Title: 1.0.0.0
Specification-Vendor: Oracle.
Implementation-Vendor: Oracle.
Implementation-Title: example.helloworld
Implementation-Version: 1.0.0.0
Bundle-Version: 11.1.1.4_0
Bundle-ManifestVersion: 1
Bundle-Vendor: Oracle.
Bundle-Copyright: Copyright (c) 2006 by Oracle.
Import-Package: com.bea.wlevs.adapter.defaultprovider;version="11.1.1",
 com.bea.wlevs.ede;version="11.1.1",
 com.bea.wlevs.ede.impl;version="11.1.1",
 com.bea.wlevs.ede.api;version="11.1.1",
 org.osgi.framework;version="1.3.0",
 org.apache.commons.logging;version="1.1.0",
 com.bea.wlevs.spring;version="11.1.1",
 com.bea.wlevs.util;version="11.1.1",
 net.sf.cglib.proxy,
 net.sf.cglib.core,
 net.sf.cglib.reflect,
 org.aopalliance.aop,
 org.springframework.aop.framework;version="2.5.6",
 org.springframework.aop;version="2.5.6",
 org.springframework.beans;version="2.5.6",
 org.springframework.util;version="2.0",
 org.springframework.core.annotation;version="2.5.6",
 org.springframework.beans.factory;version="2.5.6",
 org.springframework.beans.factory.config;version="2.5.6",
 org.springframework.osgi.context;version="1.2.0",
 org.springframework.osgi.service;version="1.2.0",
 javax.xml.bind;version="2.0",
 javax.xml.bind.annotation;version=2.0,
 javax.xml.bind.annotation.adapters;version=2.0,
 javax.xml.bind.attachment;version=2.0,
 javax.xml.bind.helpers;version=2.0,
 javax.xml.bind.util;version=2.0,
 com.bea.wlevs.configuration;version="11.1.1",
 com.bea.wlevs.configuration.application;version="11.1.1",
 com.sun.xml.bind.v2;version="2.0.2"
Bundle-Name: example.helloworld
Bundle-Description: WLEvS example helloworld
Bundle-SymbolicName: helloworld
24.2.2.2 Accessing Third-Party JAR Files
When creating your Oracle CEP applications, you might need to access legacy libraries within existing third-party JAR files. You can ensure access to this legacy code using any of the following approaches:
-
Section 24.2.2.2.1, "Accessing Third-Party JAR Files Using Bundle-Classpath"
-
Section 24.2.2.2.2, "Accessing Third-Party JAR Files Using -Xbootclasspath"
24.2.2.2.1 Accessing Third-Party JAR Files Using Bundle-Classpath
The recommended approach is to package the third-party JAR files in your Oracle CEP application JAR file. You can put the JAR files anywhere you want.
Note:
This approach gives you little control over the order in which JAR files are loaded and it is possible that dependency conflicts may occur. For this reason, Oracle recommends that you use the Oracle CEP server application library approach instead. For more information, see Section 24.1.3, "Application Libraries".
However, to ensure that your Oracle CEP application finds the classes in the third-party JAR file, you must update the application classpath by adding the Bundle-Classpath header to the MANIFEST.MF file. Set Bundle-Classpath to a comma-separate list of the JAR file path names that should be searched for classes and resources. Use a period (.) to specify the bundle itself. For example:
Bundle-Classpath: ., commons-logging.jar, myExcitingJar.jar, myOtherExcitingJar.jar
If you need to access native libraries, you must also package them in your JAR file and use the Bundle-NativeCode header of the MANIFEST.MF file to specify their location in the JAR.
For more information, see Section 4.7.1, "How to Add a Standard JAR File to an Oracle CEP Project".
24.2.2.2.2 Accessing Third-Party JAR Files Using -Xbootclasspath
If the JAR files include libraries used by all applications deployed to Oracle CEP, such as JDBC drivers, you can add the JAR file to the server's boot classpath by specifying the -Xbootclasspath/a option to the java command in the scripts used to start up an instance of the server.
Note:
This approach gives you little control over the order in which JAR files are loaded and it is possible that dependency conflicts may occur. For this reason, Oracle recommends that you use the Oracle CEP server application library approach instead. For more information, see Section 24.1.3, "Application Libraries".
The name of the server start script is startwlevs.cmd (Windows) or startwlevs.sh (UNIX), and the script is located in the server directory of your domain directory. The out-of-the-box sample domains are located in ORACLE_CEP_HOME/ocep_11.1/samples/domains, and the user domains are located in ORACLE_CEP_HOME/user_projects/domains, where ORACLE_CEP_HOME refers to the main Oracle CEP installation directory, such as d:\oracle_cep.
Update the start script by adding the -Xbootclasspath/a option to the java command that executes the wlevs_2.0.jar file. Set the -Xbootclasspath/a option to the full pathname of the third-party JAR files you want to access system-wide.
For example, if you want all deployed applications to be able to access a JAR file called e:\jars\myExcitingJAR.jar, update the java command in the start script as follows. The updated section is shown in bold (in practice, the command should be on one line):
%JAVA_HOME%\bin\java -Dwlevs.home=%USER_INSTALL_DIR% -Dbea.home=%BEA_HOME%
    -Xbootclasspath/a:e:\jars\myExcitingJAR.jar
    -jar "%USER_INSTALL_DIR%\bin\wlevs_2.0.jar" -disablesecurity %1 %2 %3 %4 %5 %6
24.2.3 Assembling Applications With Foreign Stages
When assembling applications that depend on foreign stages, be aware of classpath dependencies. Consider the application dependency graph that Figure 24-1 shows.
Figure 24-1 Foreign Stage Dependency Graph
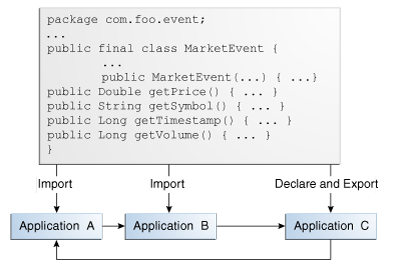
Description of "Figure 24-1 Foreign Stage Dependency Graph"
In this example, Application A depends on Application B, Application B depends on Application C, and Application C depends on Application A. Application C declares and exports an event type class for Java Bean event type MarketEvent. Applications A and B import the MarketEvent class that Application C provides.
Note the following:
-
When you redeploy a foreign stage, you must redeploy all foreign stages that depend on that application or foreign stage.
For example, if you redeploy Application B, you must also redeploy Application A.
-
If there is a classpath dependency between one foreign stage and another, when you deploy the foreign stage that declares and exports the shared class, you must redeploy all foreign stages that import the shared class.
For example, if you redeploy Application C, you must also redeploy Application A and B because Application A and B have a classpath dependency on Application C (
MarketEvent).
For more information, see:
24.2.4 Assembling a Custom Adapter or Event Bean in Its Own Bundle
Typically, custom adapters and event beans are bundled in the same application JAR file that contains the other components of the EPN, such as the processor, streams, and business logic POJO.
However, you might sometimes want to bundle the adapter in its own JAR file and then reference the adapter in other application bundles. This is useful if, for example, two different applications read data coming from the same data feed provider and both applications use the same event types. In this case, it makes sense to share a single adapter and event type implementations rather than duplicate the implementation in two different applications.
There is no real difference in how you configure an adapter and an application that uses it in separate bundles; the difference lies in where you put the configuration.
This section describes:
-
Section 24.2.4.1, "How to Assemble a Custom Adapter in its Own Bundle"
-
Section 24.2.4.2, "How to Assemble a Custom Event Bean in its Own Bundle"
24.2.4.1 How to Assemble a Custom Adapter in its Own Bundle
You can assemble a custom adapter and its dependent classes in its own bundle.
To assemble a custom adapter in its own bundle:
-
Create an OSGI bundle that contains only the custom adapter Java class, the custom adapter factory Java class, and optionally, the event type Java class into which the custom adapter converts incoming data.
In this procedure, this bundle is called
GlobalAdapter. -
In the EPN assembly file of the
GlobalAdapterbundle:-
Register the adapter factory as an OSGI service as Section 14.4.1, "Registering the Custom Adapter Factory" describes.
-
If you are also including the event type in the bundle, register it as Section 2.8, "Sharing Event Types Between Application Bundles" describes.
-
Do not declare the custom adapter component using the
wlevs:adapterelement.You will use this element in the EPN assembly file of the application bundle that actually uses the adapter.
-
If you want to further configure the custom adapter, follow the usual procedure as Section 14.5, "Configuring the Custom Adapter Component Configuration File" describes.
-
If you are including the event type in the
GlobalAdapterbundle, export the JavaBean class in theMANIFEST.MFfile of theGlobalAdapterbundle using theExport-Packageheader as Section 4.7.4, "How to Export a Package" describes.
-
-
Assemble and deploy the
GlobalAdapterbundle as Section 24.5, "Deploying Oracle CEP Applications" describes. -
In the EPN assembly file of the application that is going to use the custom adapter, declare the custom adapter component as Section 14.4.2, "Declaring the Custom Adapter Components in your Application" describes.
You still use the
providerattribute to specify the OSGI-registered adapter factory, although in this case the OSGI registration happens in a different EPN assembly file (of theGlobalAdapterbundle) from the EPN assembly file that actually uses the adapter. -
If you have exported the event type in the
GlobalAdapterbundle, you must explicitly import it into the application that is going to use it.You do this by adding the package to the
Import-Packageheader of theMANIFEST.MFfile of the application bundle as Section 24.2.2.1, "Creating the MANIFEST.MF File" describes.
24.2.4.2 How to Assemble a Custom Event Bean in its Own Bundle
You can assemble a custom event bean and its dependent classes in its own bundle.
To assemble a custom event bean in its own bundle:
-
Create an OSGI bundle that contains only the custom event bean Java class and the custom event bean factory Java class.
In this procedure, this bundle is called
GlobalEventBean. -
In the EPN assembly file of the
GlobalEventBeanbundle:-
Register the custom event bean factory as an OSGI service as Section 15.3.1, "Registering the Custom Event Bean Factory" describes.
-
Do not declare the custom event bean component using the
wlevs:adapterelement.You will use this element in the EPN assembly file of the application bundle that actually uses the adapter.
-
If you want to further configure the custom event bean, follow the usual procedure as Section 15.4, "Configuring the Custom Event Bean Component Configuration File" describes.
-
-
Assemble and deploy the
GlobalEventBeanbundle as Section 24.5, "Deploying Oracle CEP Applications" describes. -
In the EPN assembly file of the application that is going to use the custom event bean, declare the custom event bean component as Section 15.3.2, "Declaring the Custom Event Bean Components in your Application" describes.
You still use the
providerattribute to specify the OSGI-registered custom event bean factory, although in this case the OSGI registration happens in a different EPN assembly file (of theGlobalEventBeanbundle) from the EPN assembly file that actually uses the adapter. -
If you have exported the event type in the
GlobalEventBeanbundle, you must explicitly import it into the application that is going to use it.You do this by adding the package to the
Import-Packageheader of theMANIFEST.MFfile of the application bundle as Section 24.2.2.1, "Creating the MANIFEST.MF File" describes.
24.3 Managing Application Libraries
The Oracle CEP application library gives you a convenient location to deploy shared libraries and gives you complete control over the order in which shared libraries are deployed at Oracle CEP server start up time.
This section describes how to manage an Oracle CEP server application library, including:
-
Section 24.3.1, "How to Define the Application Library Directory Using Oracle CEP IDE for Eclipse"
-
Section 24.3.2, "How to Create an Application Library Using bundler.sh"
-
Section 24.3.3, "How to Create an Application Library Using Oracle CEP IDE for Eclipse"
-
Section 24.3.4, "How to Update an Application Library Using Oracle CEP IDE for Eclipse"
-
Section 24.3.5, "How to View an Application Library Using the Oracle CEP Visualizer"
For more information, see Section 24.1.3, "Application Libraries".
24.3.1 How to Define the Application Library Directory Using Oracle CEP IDE for Eclipse
Before you can use the Oracle CEP server application library, you must update your Oracle CEP IDE for Eclipse design time configuration with the location of the application library directory.
For information on default application library configuration, see:
For more information, see Section 24.3, "Managing Application Libraries".
To define an application library directory using Oracle CEP IDE for Eclipse:
-
Launch the Oracle CEP IDE for Eclipse.
-
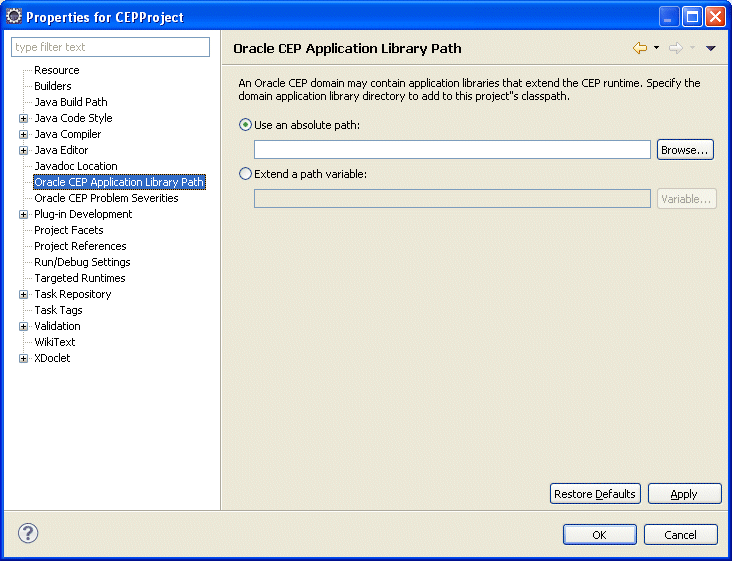
Right-click the project and select Properties.
The Preferences dialog appears as shown in Figure 24-2.
Figure 24-2 Preferences Dialog: Application Library Path
Description of "Figure 24-2 Preferences Dialog: Application Library Path"
-
Select Oracle CEP Application Library Path.
-
Specify the application library path as Table 24-1 describes.
24.3.1.1 How to Configure an Absolute Path
You can specify the application library path as an absolute file path. It may be more convenient in a team environment to specify the application library path based on a path variable as Section 24.3.1.2, "How to Extend a Path Variable" describes.
To configure an absolute path:
-
Click the Browse button to open a file system browser.
-
Use the file system browser to choose a directory.
Note:
The directory must reside within an Oracle CEP server domain. For more information, see Section 5.2, "Creating Oracle CEP Servers".
-
Click OK.
-
Click Apply.
-
Click OK.
24.3.1.2 How to Extend a Path Variable
You can specify the application library path by extending a path variable. This is the most flexible approach and is appropriate for team environments. Alternatively, you can specify the application library with an absolute path as Section 24.3.1.1, "How to Configure an Absolute Path" describes.
-
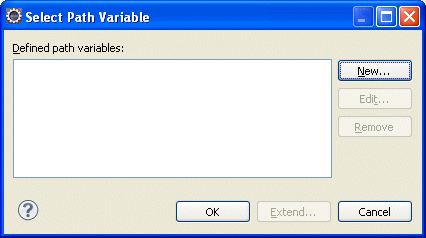
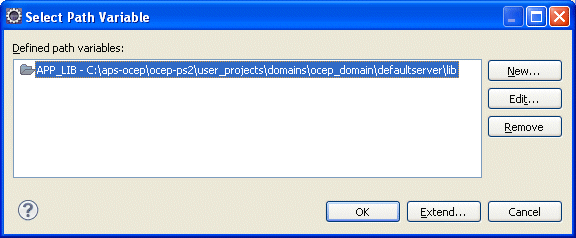
Click the Variable button.
The Select Path Variable dialog appears as Figure 24-3 shows.
-
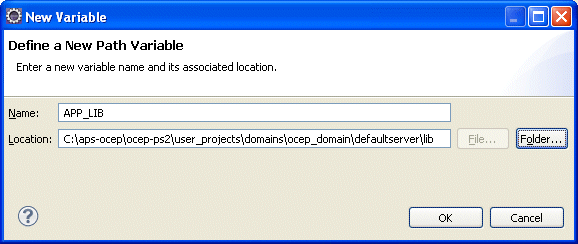
Click New.
The New Variable dialog appears as Figure 24-4 shows.
-
Configure the New Variable dialog as Table 24-2 describes.
Table 24-2 Oracle CEP Application LIbrary Path Variable
Option Description Name
Enter a name for the variable.
Location
Click the Folder button to open a file system browser and choose the root directory to use as the application library directory.
NOTE: The directory must reside within an Oracle CEP server domain. For more information, see Section 5.2, "Creating Oracle CEP Servers"
-
Click OK.
The new variable appears in the Select Path Variable dialog as Figure 24-5 shows.
Figure 24-5 Select Path Variable: With Variable
Description of "Figure 24-5 Select Path Variable: With Variable"
-
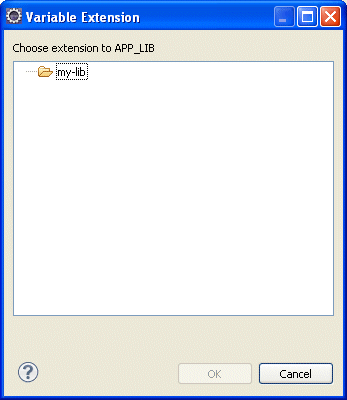
Optionally, select the variable and click Extend.
The Variable Extension dialog appears as Figure 24-6 shows. This dialog shows any directories below the root directory you specified for this variable.
-
Select a sub-directory and click OK.
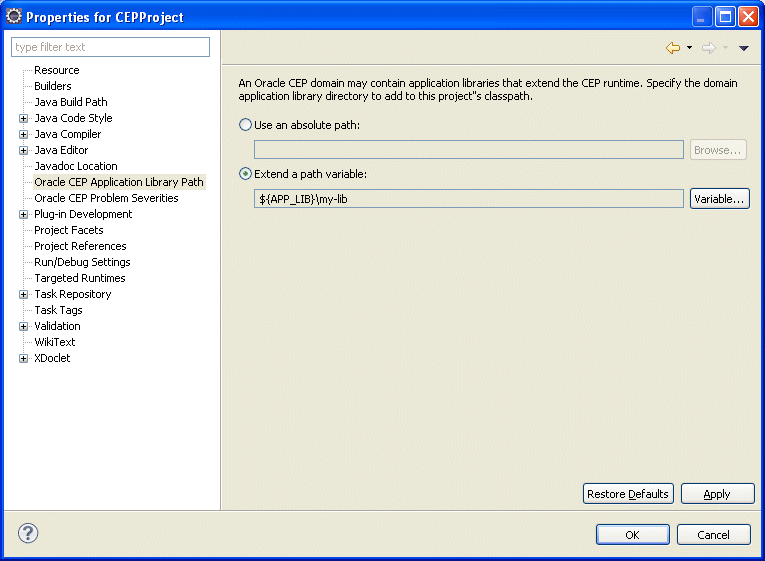
The application library path is specified relative to the path variable you defined as Figure 24-7 shows.
Figure 24-7 Preferences Dialog: Application Library Path With Path Variable
Description of "Figure 24-7 Preferences Dialog: Application Library Path With Path Variable"
-
Click Apply.
-
Click OK.
24.3.2 How to Create an Application Library Using bundler.sh
This procedure describes how to create an OSGi bundle using the bundler utility.
This is the preferred method. If you wish to manually configure the activator implementation, see Section 24.3.3, "How to Create an Application Library Using Oracle CEP IDE for Eclipse".
If you are creating an application library for a new JDBC driver, see "How to Access a Database Driver Using an Application Library Built With bundler.sh" in the Oracle Fusion Middleware Administrator's Guide for Oracle Complex Event Processing.
For more information, see Section 24.1.3.3, "Creating Application Libraries".
To create an application library using bundler.sh:
-
Set up your environment as described in "Setting Your Development Environment" in the Oracle Fusion Middleware Getting Started Guide for Oracle Complex Event Processing.
-
Execute the
bundler.shscript to create an OSGi bundle containing your driver.The
bundler.shscript is located in theORACLE_CEP_HOME/ocep_11.1/bindirectory, whereORACLE_CEP_HOMEis the directory in which you installed the Oracle CEP server.Example 24-1 lists the
bundler.shcommand line options and Table 24-3 describes them.Example 24-1 bundler.sh Command Line Options
bundler -source JAR -name NAME -version VERSION
[-factory CLASS+] [-service INTERFACE+] [-fragmenthost HOST]
[-stagedir PATH] [-targetdir PATH]
[+import PACKAGE|REGEX+] [-imods REGEX;MODS+] [-import PACKAGE+]
[+export PACKAGE|REGEX+] [-emods REGEX;MODS+]
[-dimport PACKAGE+] [-explode] [-verbose]
Table 24-3 bundler.sh Command Line Options
Argument Description -sourceJARThe path of the source JAR file to be bundled.
-
nameNAMEThe symbolic name of the bundle. The root of the target JAR file name is derived from the name value.
-
versionVERSIONThe bundle version number. All exported packages are qualified with a version attribute with this value. The target JAR file name contains the version number.
-
factoryCLASS+An optional argument that specifies a space-delimited list of one or more factory classes that are to be instantiated and registered as OSGi services. Each service is registered with the OSGi service registry with name (
-name) and version (-version) properties.This argument is incompatible with the
-fragmenthostargument.-
serviceINTERFACE+An optional argument that specifies a space-delimited list of one or more Java interfaces that are used as the object class of each factory object service registration. If no interface names are specified, or the number of interfaces specified does not match the number of factory classes, then each factory object will be registered under the factory class name.
-fragmenthostHOSTAn optional argument indicating that the resultant bundle is a fragment bundle and specifies the symbolic name of the host bundle.
This argument is incompatible with the
-factoryargument.-stagedirPATHAn optional argument that specifies where to write temporary files when creating the target JAR file.
Default:
./bundler.tmp-targetdirPATHAn optional argument that specifies the location of the generated bundle JAR file.
Default: current working directory (
.).+importPACKAGE|REGEX+A space-delimited list of one or more packages or regular expressions that select the packages to exclude from the manifest
Import-Packageattribute.By default, all dependent packages will be imported (except
java.*).-imodsREGEX;MODS+The import modifiers will be applied to the packages matching regular expression.
-importPACKAGEAdditional packages to include on the manifest
Import-Packageattribute.Note that any specified import modifiers will not be applied.
+exportPACKAGE|REGEX+A space-delimited list of one or more packages or regular expressions that select the packages to exclude from the manifest
Export-Packageattribute.By default, all bundle packages will be exported.
-emodsREGEX;MODS+The export modifiers will be applied to the packages matching regular expression.
-dimportPACKAGE+Packages to include on the manifest
DynamicImport-Packageattribute.-explodeThis optional flag specifies that the content of the source JAR should be exploded into the target JAR file.
By default, the source JAR is nested within the target JAR file and the generated bundle manifest will contain an appropriate
Bundle-Classpathattribute.-verboseAn optional flag to enable verbose output.
Example 24-2 shows how to use the
bundler.shto create an OSGi bundle for an Oracle JDBC driver.Example 24-2 Using the Bundler Utility
bundler.sh \
    -source C:\drivers\com.oracle.ojdbc14_11.2.0.jar \
    -name oracle11g \
    -version 11.2.0 \
    -factory oracle.jdbc.xa.client.OracleXADataSource oracle.jdbc.OracleDriver \
    -service javax.sql.XADataSource java.sql.Driver \
    -targetdir C:\stage
The source JAR is an Oracle driver located in directory
C:\drivers. The name of the generated bundle JAR is the concatenation of the-nameand-versionarguments (oracle10g_11.2.0.jar) and is created in theC:\stagedirectory. The bundle JAR contains the files that Example 24-3 shows.Example 24-3 Bundle JAR Contents
   1465 Thu Jun 29 17:54:04 EDT 2006 META-INF/MANIFEST.MF
1540457 Thu May 11 00:37:46 EDT 2006 com.oracle.ojdbc14_11.2.0.jar
   1700 Thu Jun 29 17:54:04 EDT 2006 com/bea/core/tools/bundler/Activator.class
The command line options specify that there are two factory classes that will be instantiated and registered as an OSGi service when the bundle is activated, each under a separate object class as Table 24-4 shows.
Table 24-4 Factory Class and Service Interfaces
Factory Class Service Interface oracle.jdbc.xa.client.OracleXADataSourcejavax.sql.XADataSourceoracle.jdbc.OracleDriverjava.sql.DriverEach service registration will be made with a
nameproperty set tooracle11gand aversionproperty with a value of11.2.0. Example 24-4 shows the Oracle CEP server log messages showing the registration of the services.Example 24-4 Service Registration Log Messages
... INFO: [Jun 29, 2006 5:54:18 PM] Service REGISTERED: { version=11.2.0, name=oracle11g, objectClass=[ javax.sql.XADataSource ], service.id=23 } INFO: [Jun 29, 2006 5:54:18 PM] Service REGISTERED: { version=11.2.0, name=oracle11g, objectClass=[ java.sql.Driver ], service.id=24 } INFO: [Jun 29, 2006 5:54:18 PM] Bundle oracle11g STARTED ... -
Copy the application library JAR to the appropriate Oracle CEP server application library directory:
-
If your bundle is a driver, you must put it in the library extensions directory.
-
If your bundle is not a driver, you may put it in the library directory.
For more information, see Section 24.1.3, "Application Libraries".
-
-
Stop and start the Oracle CEP server.
See "Starting and Stopping Oracle CEP Servers" in the Oracle Fusion Middleware Administrator's Guide for Oracle Complex Event Processing.
24.3.3 How to Create an Application Library Using Oracle CEP IDE for Eclipse
This procedure describes how to create an OSGi bundle for your driver using the Oracle CEP IDE for Eclipse and deploy it on the Oracle CEP server.
This is the preferred method. If do not wish to manually configure the activator implementation, see Section 24.3.2, "How to Create an Application Library Using bundler.sh".
If you are creating an application library for a new JDBC driver, see "How to Access a Database Driver Using an Application Library Built With Oracle CEP IDE for Eclipse" in the Oracle Fusion Middleware Administrator's Guide for Oracle Complex Event Processing.
To create an application library using Oracle CEP IDE for Eclipse:
-
Using the Oracle CEP IDE for Eclipse, create a new Oracle CEP project.
For more information, Section 4.2, "Creating Oracle CEP Projects".
-
Right-click your project folder and select New > Folder.
-
Enter
libin the Folder name field and click Finish. -
Outside of the Oracle CEP IDE for Eclipse, copy your JDBC JAR file into the
libfolder. -
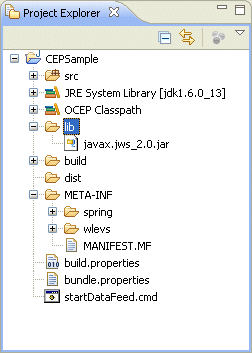
Inside the Oracle CEP IDE for Eclipse, right-click the
libfolder and select Refresh.The JAR file appears in the
libfolder as Figure 24-8 shows.Figure 24-8 Oracle CEP IDE for Eclipse lib Directory
Description of "Figure 24-8 Oracle CEP IDE for Eclipse lib Directory"
-
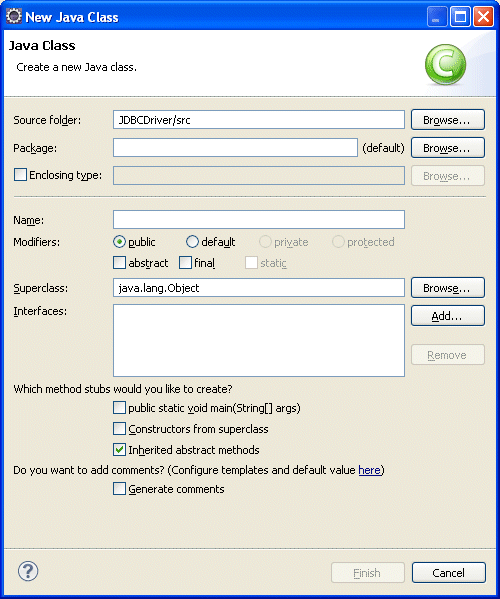
Right-click the src directory and select New > Class.
The Java Class dialog appears as Figure 24-9 shows.
-
Configure the New Java Class dialog as Table 24-5 shows.
Table 24-5 New Java Class Parameters
Parameter Description Package
The package name. For example,
com.foo.Name
The name of the class. For example,
MyActivator.Leave the other parameters at their default values.
-
Click Finish.
A new Java class is added to your project.
-
Edit the Java class to implement it as Example 24-5 shows.
Be sure to set the
NAMEandVERSIONso that they supersede the existing version of JDBC driver. In this example, the existing version is:-
oracle10g -
10.0.0
To supersede the existing version, the
MyActivatorclass sets these values to:-
oracle11g -
11.2.0
Example 24-5 MyActivator Class Implementation
package com.foo; import java.util.Dictionary; import java.util.Properties; import javax.sql.XADataSource; import java.sql.Driver; import org.osgi.framework.BundleActivator; import org.osgi.framework.BundleContext; import org.osgi.framework.ServiceRegistration; public class MyActivator implements BundleActivator { private static final String NAME="oracle11g"; private static final String VERSION="11.2.0"; private String[] factories = {"oracle.jdbc.xa.client.OracleXADataSource","oracle.jdbc.OracleDriver"}; private String[] interfaces= {"javax.sql.XADataSource","java.sql.Driver"}; private ServiceRegistration[] serviceRegistrations = new ServiceRegistration[factories.length]; public void start(BundleContext bc) throws Exception { Dictionary props = new Properties(); props.put("name", NAME); props.put("version", VERSION); for (int i=0; i<factories.length; i++) { Object svc = bc.getBundle().loadClass(factories[i]).newInstance(); serviceRegistrations[i] = bc.registerService(interfaces[i], svc, props); } } public void stop(BundleContext bc) throws Exception { for (int i=0; i<serviceRegistrations.length; i++) { serviceRegistrations[i].unregister(); } } } -
-
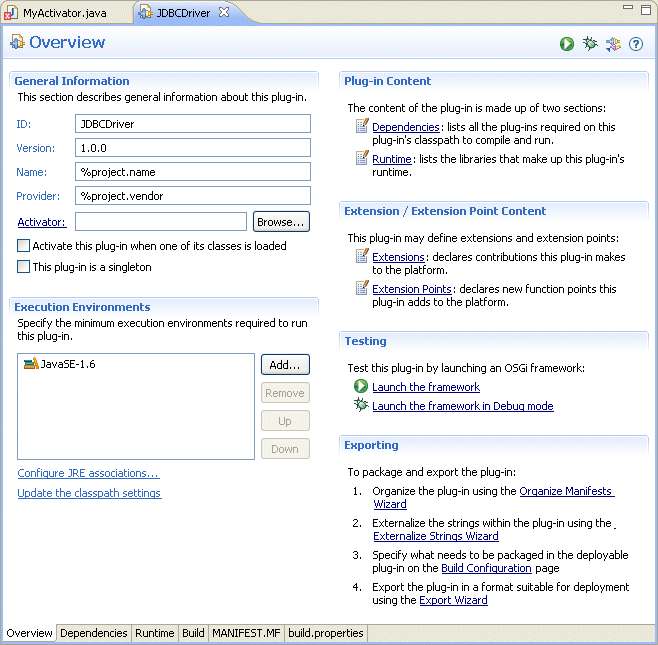
Right-click the
META-INF/MANIFEST.MFfile and select Open With > Plug-in Manifest Editor.The Manifest Editor appears as Figure 24-10 shows.
Figure 24-10 Manifest Editor: Overview Tab
Description of "Figure 24-10 Manifest Editor: Overview Tab"
-
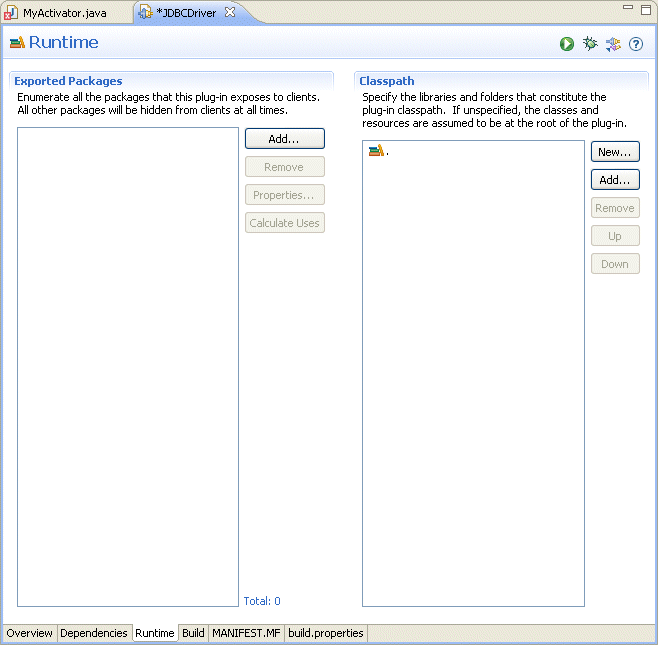
Click the Runtime tab.
The Runtime tab appears as Figure 24-11 shows.
Figure 24-11 Manifest Editor: Runtime Tab
Description of "Figure 24-11 Manifest Editor: Runtime Tab"
-
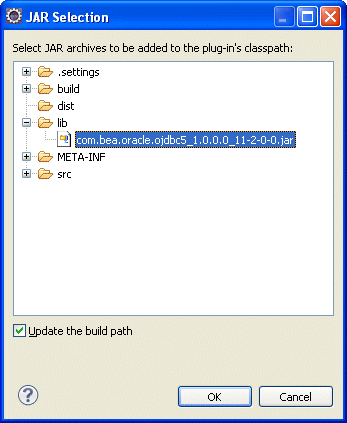
In the Classpath pane, click Add.
The JAR Selection dialog appears as Figure 24-12 shows.
-
Expand the lib directory and select your database driver JAR file.
-
Click OK.
-
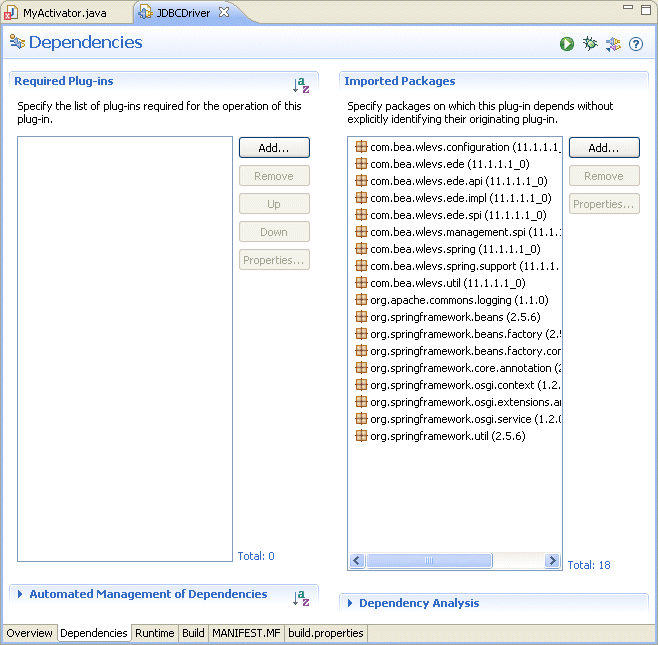
Click the Dependencies tab.
The Dependencies tab appears as Figure 24-13 shows.
Figure 24-13 Manifest Editor: Dependencies Tab
Description of "Figure 24-13 Manifest Editor: Dependencies Tab"
-
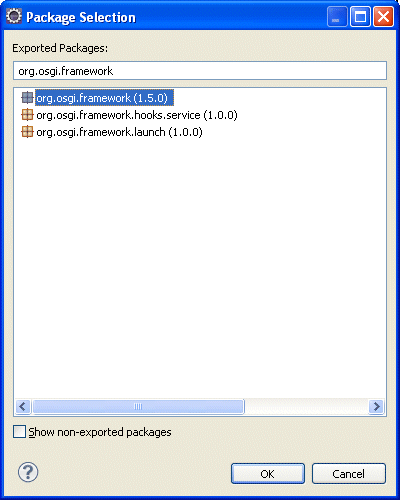
In the Imported Packages pane, click Add.
The Package Selection dialog appears as Figure 24-14 shows.
-
In the Exported Packages field, enter
org.osgi.framework.The list box shows all the packages with that prefix as Figure 24-14 shows.
-
Select
org.osgi.frameworkin the list box and click OK. -
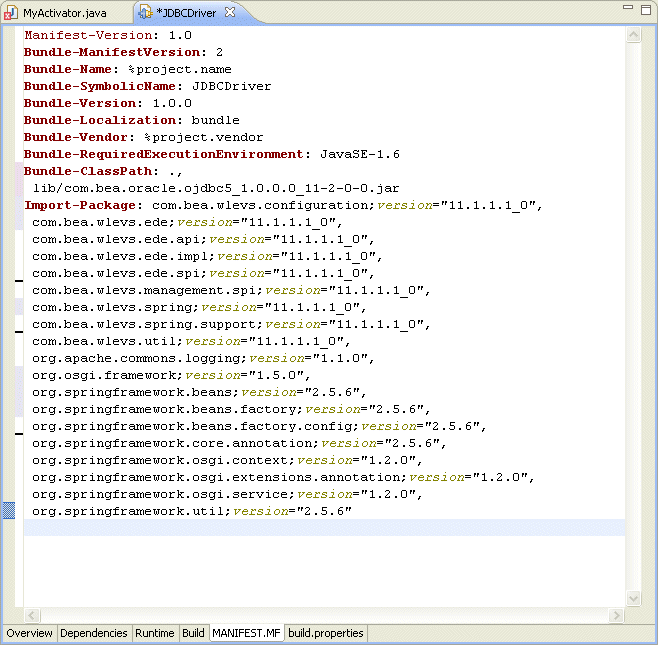
Click the MANIFEST.MF tab.
The
MANIFEST.MFtab appears as Figure 24-15 shows. -
Un-JAR your JAR to a temporary directory as Example 24-6 shows.
-
Open your JAR
MANIFEST.MFfile and copy its Export-Package entry and paste it into the Manifest Editor as Example 24-7 shows.Example 24-7 Adding Export-Package to the Manifest Editor
Manifest-Version: 1.0 Bundle-ManifestVersion: 2 Bundle-Name: %project.name Bundle-SymbolicName: JDBCDriver Bundle-Version: 1.0.0 Bundle-Localization: bundle Bundle-Vendor: %project.vendor Bundle-RequiredExecutionEnvironment: JavaSE-1.6 Bundle-ClassPath: . Import-Package: com.bea.wlevs.configuration;version="11.1.1.4_0", ... Export-Package: oracle.core.lmx;version=1.0.0.0_11-1-0-7,oracle.core.l vf;version=1.0.0.0_11-1-0-7,oracle.jdbc;version=1.0.0.0_11-1-0-7,orac le.jdbc.aq;version=1.0.0.0_11-1-0-7,oracle.jdbc.connector;version=1.0 .0.0_11-1-0-7,oracle.jdbc.dcn;version=1.0.0.0_11-1-0-7,oracle.jdbc.dr iver;version=1.0.0.0_11-1-0-7,oracle.jdbc.internal;version=1.0.0.0_11 -1-0-7,oracle.jdbc.oci;version=1.0.0.0_11-1-0-7,oracle.jdbc.oracore;v ersion=1.0.0.0_11-1-0-7,oracle.jdbc.pool;version=1.0.0.0_11-1-0-7,ora cle.jdbc.rowset;version=1.0.0.0_11-1-0-7,oracle.jdbc.util;version=1.0 .0.0_11-1-0-7,oracle.jdbc.xa;version=1.0.0.0_11-1-0-7,oracle.jdbc.xa. client;version=1.0.0.0_11-1-0-7,oracle.jpub.runtime;version=1.0.0.0_1 1-1-0-7,oracle.net.ano;version=1.0.0.0_11-1-0-7,oracle.net.aso;versio n=1.0.0.0_11-1-0-7,oracle.net.jndi;version=1.0.0.0_11-1-0-7,oracle.ne t.ns;version=1.0.0.0_11-1-0-7,oracle.net.nt;version=1.0.0.0_11-1-0-7, oracle.net.resolver;version=1.0.0.0_11-1-0-7,oracle.security.o3logon; version=1.0.0.0_11-1-0-7,oracle.security.o5logon;version=1.0.0.0_11-1 -0-7,oracle.sql;version=1.0.0.0_11-1-0-7,oracle.sql.converter;version =1.0.0.0_11-1-0-7 -
Add a
Bundle-Activatorelement to the Manifest Editor as Example 24-8 shows.The value of the
Bundle-Activatoris the fully qualified class name of yourActivatorclass.Example 24-8 Adding a Bundle-Activator Element to the Manifest Editor
Manifest-Version: 1.0 Bundle-Activator: com.foo.MyActivator Bundle-ManifestVersion: 2 Bundle-Name: %project.name Bundle-SymbolicName: JDBCDriver Bundle-Version: 1.0.0 Bundle-Localization: bundle Bundle-Vendor: %project.vendor Bundle-RequiredExecutionEnvironment: JavaSE-1.6 Bundle-ClassPath: . Import-Package: com.bea.wlevs.configuration;version="11.1.1.4_0", ... Export-Package: oracle.core.lmx;version=1.0.0.0_11-1-0-7, ... ... -
Add a
DynamicImport-Packageelement to the Manifest Editor as Example 24-9 shows.Example 24-9 Adding a DynamicImport-Package Element to the Manifest Editor
Manifest-Version: 1.0 Bundle-Activator: com.foo.MyActivator Bundle-ManifestVersion: 2 Bundle-Name: %project.name Bundle-SymbolicName: JDBCDriver Bundle-Version: 1.0.0 Bundle-Localization: bundle Bundle-Vendor: %project.vendor Bundle-RequiredExecutionEnvironment: JavaSE-1.6 Bundle-ClassPath: . DynamicImport-Package: * Import-Package: com.bea.wlevs.configuration;version="11.1.1.4_0", ... Export-Package: oracle.core.lmx;version=1.0.0.0_11-1-0-7, ... ... -
Export your Oracle CEP application to a JAR file.
For more information, see Section 4.5.1, "How to Export an Oracle CEP Project".
-
Copy the bundler JAR to the appropriate Oracle CEP server application library directory:
-
If your bundle is a driver, you must put it in the library extensions directory.
-
If your bundle is not a driver, you may put it in the library directory.
For more information, see Section 24.1.3, "Application Libraries".
-
-
Stop and start the Oracle CEP server.
See "Starting and Stopping Oracle CEP Servers" in the Oracle Fusion Middleware Administrator's Guide for Oracle Complex Event Processing.
24.3.4 How to Update an Application Library Using Oracle CEP IDE for Eclipse
When you add, replace, or remove a JAR file in the application library extension or application library directory or their user-defined subdirectories, you must make this change in two places:
-
On the local Oracle CEP server you used to create a server runtime in the Oracle CEP IDE for Eclipse.
-
On the production Oracle CEP server to which you deploy dependent applications.
These changes need not be performed simultaneously: you must make the change to the local Oracle CEP server before making code changes to projects that depend on the application library change; you must make the change to the production Oracle CEP server before you deploy applications that depend on the application library change.
For more information, see Section 24.3, "Managing Application Libraries".
To update an application library using Oracle CEP IDE for Eclipse:
-
Add a new or revised bundle to the application library extension or application library directory on the production Oracle CEP server.
This is the server to which you will deploy applications that depend on this application library.
To control library deployment order, organize your libraries in appropriately named subdirectories.
For more information, see:
-
Stop and start the production Oracle CEP server.
The Oracle CEP server refreshes itself from the updated application library extension or application library directory.
For more information, see:
-
"Starting and Stopping an Oracle CEP Server in a Standalone-Server Domain" in the Oracle Fusion Middleware Administrator's Guide for Oracle Complex Event Processing
-
"Starting and Stopping an Oracle CEP Server in a Multi-Server Domain" in the Oracle Fusion Middleware Administrator's Guide for Oracle Complex Event Processing
-
-
Add the same new or revised bundle to the application library extension or application library directory on your Oracle CEP IDE for Eclipse targeted runtime Oracle CEP server.
-
Start the Oracle CEP IDE for Eclipse.
-
Right click a project and select Refresh Targeted Runtimes.
The Oracle CEP IDE for Eclipse refreshes this project from the updated application library extension or application library directory on your Oracle CEP IDE for Eclipse targeted runtime Oracle CEP server.
-
If necessary, update your application's dependencies.
For example, if you added a new bundle or changed the version of an existing bundle.
For more information, see Section 24.1.2, "Application Dependencies".
-
Assemble and deploy your application to the production Oracle CEP server.
For more information, see Section 24.5, "Deploying Oracle CEP Applications".
The dependencies you defined for this application in the Oracle CEP IDE for Eclipse at development time will be satisfied by the components you installed in the application library of your production Oracle CEP server at run time.
24.3.5 How to View an Application Library Using the Oracle CEP Visualizer
Using the Oracle CEP Visualizer, you can view the application libraries deployed to the Oracle CEP server.
You can view libraries from both the library extensions directory and libraries directory.
Note:
You cannot deploy an application library to an Oracle CEP server using the Oracle CEP Visualizer. You may only deploy Oracle CEP applications to an Oracle CEP server using the Oracle CEP Visualizer.
For more information, see:
-
"How to View the Application Libraries Deployed to an Oracle CEP Server" in the Oracle Fusion Middleware Visualizer User's Guide for Oracle Complex Event Processing
24.4 Managing Log Message Catalogs
This section describes how to manage log message catalogs that you can use to localize an Oracle CEP application, including:
For more information, see:
-
"Configuring Logging and Debugging for Oracle CEP" in the Oracle Fusion Middleware Administrator's Guide for Oracle Complex Event Processing
-
Appendix H, "Schema Reference: Locale Message Catalog l10n_msgcat.dtd"
24.4.1 Using Message Catalogs With Oracle CEP Server
A message catalog is a single XML file that contains a collection of text messages, with each message indexed by a unique identifier. You compile these XML files into classes using weblogic.i18ngen during the build process. (See weblogic.i18ngen Utility for more information). The methods of the resulting classes are the objects used to log messages at runtime.
Message catalogs support multiple locales or languages. For a specific message catalog there is exactly one default version, known as the top-level catalog, which contains the English version of the messages. Then there are corresponding locale-specific catalogs, one for each additional supported locale.
The top-level catalog (English version) includes all the information necessary to define the message. The locale-specific catalogs contain only the message ID, the date changed, and the translation of the message for the specific locale.
The message catalog files are defined by one of the following XML document type definition (DTD) files:
-
msgcat.dtd- Describes the syntax of top-level, default catalogs. -
l10n_msgcat.dtd- Describes the syntax of locale-specific catalogs.
The DTDs are stored in ORACLE_CEP_HOEM/modules/com.bea.core.i18n.generator_1.4.0.0.jar.
You can create a single log message catalog for all logging requirements, or create smaller catalogs based on a subsystem or Java package. Oracle recommends using multiple subsystem catalogs so you can focus on specific portions of the log during viewing.
For simple text catalogs, we recommend creating a single catalog for each utility being internationalized
This section describes:
For more information, see:
24.4.1.1 Message Catalog Hierarchy
All messages must be defined in the default, top-level catalog.
Catalogs that provide different localizations of the base catalogs are defined in msgcat subdirectories named for the locale (for example, msgcat/de for Germany). You might have a top-level catalog named mycat.xml, and a German translation of it called ..de/mycat.xml. Typically the top-level catalog is English. However, English is not required for any catalogs.
Locale designations (for example, de) also have a hierarchy as defined in the java.util.Locale documentation. A locale can include a language, country, and variant. Language is the most common locale designation. Language can be extended with a country code. For instance, en\US, indicates American English. The name of the associated catalog is ..en\US\mycat.xml. Variants are vendor or browser-specific and are used to introduce minor differences (for example, collation sequences) between two or more locales defined by either language or country.
24.4.1.2 Guidelines for Naming Message Catalogs
Because the name of a message catalog file (without the .xml extension) is used to generate runtime class and property names, you should choose the name carefully.
Follow these guidelines for naming message catalogs:
-
Do not choose a message catalog name that conflicts with the names of existing classes in the target package for which you are creating the message catalog.
-
The message catalog name should only contain characters that are allowed in class names.
-
Follow class naming standards.
For example, the resulting class names for a catalog named Xyz.xml are XyzLogLocalizer and XyzLogger.
The following considerations also apply to message catalog files:
-
Message IDs are generally six-character strings with leading zeros. Some interfaces also support integer representations.
Note:
This only applies to log message catalogs. Simple text catalogs can have any string value.
-
Java lets you group classes into a collection called a package. Oracle recommends that a package name be consistent with the name of the subsystem in which a particular catalog resides. Consistent naming makes OSGi imports easier to define.
-
The log Localizer "classes" are actually
ResourceBundleproperty files.
24.4.1.3 Using Message Arguments
The message body, message detail, cause, and action sections of a log message can include message arguments, as described by java.text.MessageFormat. Make sure your message contents conform to the patterns specified by java.text.MessageFormat. Only the message body section in a simple text message can include arguments. Arguments are values that can be dynamically set at runtime. These values are passed to routines, such as printing out a message. A message can support up to 10 arguments, numbered 0-9. You can include any subset of these arguments in any text section of the message definition (Message Body, Message Detail, Probable Cause), although the message body must include all of the arguments. You insert message arguments into a message definition during development, and these arguments are replaced by the appropriate message content at runtime when the message is logged.
The following excerpt from an XML log message definition shows how you can use message arguments. The argument number must correspond to one of the arguments specified in the method attribute. Specifically, {0} with the first argument, {1} with the second, and so on. In Example 24-10, {0} represents the file that cannot be opened, while {1} represents the file that will be opened in its place.
Example 24-10 Message Arguments
<messagebody>Unable to open file, {0}. Opening {1}. All arguments must be in body.</messagebody>

    <messagedetail> File, {0} does not exist. The server will restore the file
    contents from {1}, resulting in the use of default values for all future
    requests. </messagedetail>

    <cause>The file was deleted</cause>

    <action>If this error repeats then investigate unauthorized access to the
    file system.</action>
An example of a method attribute is as follows:
-method="logNoFile(String name, String path)"
The message example in Example 24-10 expects two arguments, {0} and {1}:
-
Both are used in the
<messagebody> -
Both are used in the
<messagedetail> -
Neither is used in
<cause>or<action>
Note:
A message can support up to 10 arguments, numbered 0-9. You can include any subset of these arguments in any text section of the message definition (message detail, cause, action), although the message body must include all of the arguments
In addition, the arguments are expected to be of String type, or representable as a String type. Numeric data is represented as {n,number}. Dates are supported as {n,date}. You must assign a severity level for log messages. Log messages are generated through the generated Logger methods, as defined by the method attribute.
24.4.1.4 Message Catalog Formats
The catalog format for top-level and locale-specific catalog files is slightly different. The top-level catalogs define the textual messages for the base locale (by default, this is the English language). Locale-specific catalogs (for example, those translated to Spanish) only provide translations of text defined in the top-level version. Log message catalogs are defined differently from simple text catalogs.
24.4.1.4.1 Log Message Catalog
Example 24-11 shows a log message catalog, MyUtilLog.xml, containing one log message. This log message illustrates the usage of the messagebody, messagedetail, cause, and action elements.
Example 24-11 Log Message Catalog
<?xml version="1.0"?>
<!DOCTYPE message_catalog PUBLIC "weblogic-message-catalog-dtd"
"http://www.bea.com/servers/wls90/dtd/msgcat.dtd">
<message_catalog
  l10n_package="programs.utils"
  i18n_package="programs.utils"
  subsystem="MYUTIL"
  version="1.0"
  baseid="600000"
  endid="600100"
  <log_message
    messageid="600001"
    severity="warning"
    method="logNoAuthorization(String arg0, java.util.Date arg1,int arg2)"
    <messagebody>
      Could not open file, {0} on {1,date} after {2,number} attempts.
    </messagebody>
    <messagedetail>
      The configuration for this application will be defaulted to
      factory settings. Custom configuration information resides
      in file, {0}, created on {1,date}, but is not readable.
    </messagedetail>
    <cause>
      The user is not authorized to use custom configurations. Custom
     configuration information resides in file, {0}, created on
     {1,date}, but is not readable.The attempt has been logged to
     the security log.
    </cause>
    <action>
      The user needs to gain approriate authorization or learn to
      live with the default settings.
    </action>
  </log_message>
</message_catalog>
For more information, see Appendix G, "Schema Reference: Message Catalog msgcat.dtd".
24.4.1.4.2 Simple Text Catalog
Example 24-12 shows a simple text catalog, MyUtilLabels.xml, with one simple text definition.
Example 24-12 Simple Text Catalog
<?xml version="1.0"?>
<!DOCTYPE message_catalog PUBLIC "weblogic-message-catalog-dtd"
    "http://www.bea.com/servers/wls90/dtd/msgcat.dtd">
<message_catalog>
  l10n_package="programs.utils"
  i18n_package="programs.utils"
  subsystem="MYUTIL"
  version="1.0"
  <message>
    messageid="FileMenuTitle"
    <messagebody>
      File
    </messagebody>
  </message>
</message_catalog>
For more information, see Appendix G, "Schema Reference: Message Catalog msgcat.dtd".
24.4.1.4.3 Locale-Specific Catalog
Example 24-13 shows a French translation of a message that is available in ..\msgcat\fr\MyUtilLabels.xml.
Example 24-13 Locale-Specific Catalog
<?xml version="1.0"?>
<!DOCTYPE message_catalog PUBLIC
   "weblogic-locale-message-catalog-dtd"
   "http://www.bea.com/servers/wls90/dtd/l10n_msgcat.dtd">
<locale_message_catalog
  l10n_package="programs.utils"
  subsystem="MYUTIL"
  version="1.0">
  <message>
    <messageid="FileMenuTitle">
    <messagebody> Fichier </messagebody>
  </message>
</locale_message_catalog>
When entering text in the messagebody, messagedetail, cause, and action elements, you must use a tool that generates valid Unicode Transformation Format-8 (UTF-8) characters, and have appropriate keyboard mappings installed. UTF-8 is an efficient encoding of Unicode character-strings that optimizes the encoding ASCII characters. Message catalogs always use UTF-8 encoding.
For more information, see Appendix H, "Schema Reference: Locale Message Catalog l10n_msgcat.dtd".
24.4.1.5 Message Catalog Localization
Catalog subdirectories are named after lowercase, two-letter ISO 639 language codes (for example, ja for Japanese and fr for French). You can find supported language codes in the java.util.Locale Javadoc.
Variations to language codes are achievable through the use of uppercase, two-letter ISO 3166 country codes and variants, each of which are subordinate to the language code. The generic syntax is lang\country\variant.
For example, zh is the language code for Chinese. CN is a country code for simplified Chinese, whereas TW is the country code for traditional Chinese. Therefore zh\CN and zh\TW are two distinct locales for Chinese.
Variants are of use when, for instance, there is a functional difference in platform vendor handling of specific locales. Examples of vendor variants are WIN, MAC, and POSIX. There may be two variants used to further qualify the locale. In this case, the variants are separated with an underscore (for example, Traditional_Mac as opposed to Modern_MAC).
Note:
Language, country, and variants are all case sensitive.
A fully-qualified locale would look like zh\TW\WIN, identifying traditional Chinese on a Win32 platform.
Message catalogs to support the above locale would involve the following files:
-
\*.xml- default catalogs -
\zh\*.xml- Chinese localizations -
\zh\TW\*.xml- Traditional Chinese localizations -
\zh\TW\WIN\*.xml- Traditional Chinese localizations for Win32 code sets
Specific localizations do not need to cover all messages defined in parent localizations.
24.4.2 How to Parse a Message Catalog to Generate Logger and TextFormatter Classes for Localization
After you create your message catalog XML file, you can use the weblogic.i18ngen utility to create Logger and TextFormatter classes.
use the weblogic.i18ngen utility to parse message catalogs (XML files) to produce Logger and TextFormatter classes used for localizing the text in log messages. The utility creates or updates the i18n_user.properties properties file, which is used to load the message ID lookup class hashtable weblogic.i18n.L10nLookup.
Any errors, warnings, or informational messages are sent to stderr.
In order for user catalogs to be recognized, the i18n_user.properties file must reside in a directory identified in the Oracle CEP server classpath.
Oracle recommends that the i18n_user.properties file reside in the Oracle CEP server classpath. If the i18n_user.properties file is in targetdirectory, then targetdirectory should be in the Oracle CEP server classpath.
To parse a message catalog to generate Logger and TextFormatter classes:
-
Create your message catalog XML file.
See Section 24.4.1, "Using Message Catalogs With Oracle CEP Server".
-
Set up your development environment.
See "Setting Your Development Environment" in the Oracle Fusion Middleware Getting Started Guide for Oracle Complex Event Processing.
-
Execute the
weblogic.i18ngenutility using the following syntax:java weblogic.i18ngen [options] [filelist]
Where:
-
options: see Table 24-6. -
filelist: Process the files and directories in this list of files. If directories are listed, the command processes all XML files in the listed directories. The names of all files must include an XML suffix. All files must conform to themsgcat.dtdsyntax.weblogic.i18ngenprints the fully-qualified list of names (Java source) tostdoutfor those files actually generated.
Table 24-6 weblogic.i18ngen Utility Options
Option Description -buildGenerates all necessary files and compiles them.
The
-buildoption combines the-i18n,-l10n,-keepgenerated, and-compileoptions.-dtargetdirectorySpecifies the root directory to which generated Java source files are targeted. User catalog properties are placed in
i18n_user.properties, relative to the designatedtargetdirectory. Files are placed in appropriate directories based on thei18n_packageandl10n_packagevalues in the corresponding message catalog. The default target directory is the current directory. This directory is created as necessary.If this argument is omitted, all classes are generated in the current directory, without regard to any class hierarchy described in the message catalog.
-nParse and validate, but do not generate classes.
-keepgeneratedKeep generated Java source (located in the same directory as the class files).
-ignoreIgnore errors.
-i18nGenerates internationalizers (for example,
LoggersandTextFormatters).-l10nGenerates localizers (for example, LogLocalizers and TextLocalizers).
-compileCompiles generated Java files using the current CLASSPATH. The resulting classes are placed in the directory identified by the -d option. The resulting classes are placed in the same directory as the source.
Errors detected during compilation generally result in no class files or properties file being created. i18ngen exits with a bad exit status.
-nobuildParse and validate only.
-debugDebugging mode.
-datesCauses
weblogic.i18ngento update message timestamps in the catalog. If the catalog is writable and timestamps have been updated, the catalog is rewritten.Note:
Utilities can be run from any directory, but if files are listed on the command line, then their path is relative to the current directory.
-
-
Translate your log messages and generate the required localized resource bundles.
-
Ensure that the
i18n_user.propertiesfile is in the Oracle CEP server classpath. -
Import the following packages in your Oracle CEP application:
-
weblogic.i18n.logging -
weblogic.logging
-
-
Assemble and deploy your application, including your log message resource bundles.
24.5 Deploying Oracle CEP Applications
After you assemble your Oracle CEP application, you deploy it to an Oracle CEP server domain.
This section describes:
-
Section 24.5.1, "How to Deploy an Oracle CEP Application Using Oracle CEP IDE for Eclipse"
-
Section 24.5.2, "How to Deploy an Oracle CEP Application Using Oracle CEP Visualizer"
-
Section 24.5.3, "How to Deploy an Oracle CEP Application Using the Deployer Utility"
For more information, see:
-
"Deploying an Application to an Oracle CEP Standalone-Server Domain" in the Oracle Fusion Middleware Administrator's Guide for Oracle Complex Event Processing
-
"Deploying an Oracle CEP Application to a Multi-Server Domain" in the Oracle Fusion Middleware Administrator's Guide for Oracle Complex Event Processing
24.5.1 How to Deploy an Oracle CEP Application Using Oracle CEP IDE for Eclipse
You can deploy an Oracle CEP application using Oracle CEP IDE for Eclipse.
Using the Oracle CEP IDE for Eclipse, you can deploy an application to either a stand-alone or multi-server domain.
Note:
If you are using foreign stages, beware of the rules governing deployment and redeployment of dependent stages as Section 24.2.3, "Assembling Applications With Foreign Stages" describes.
To deploy an Oracle CEP application using Oracle CEP IDE for Eclipse:
-
Assemble your Oracle CEP application.
-
Use the Oracle CEP IDE for Eclipse to deploy your application.
See Section 5.3.6, "How to Deploy an Application to an Oracle CEP Server".
24.5.2 How to Deploy an Oracle CEP Application Using Oracle CEP Visualizer
The simplest way to deploy an Oracle CEP application to an Oracle CEP server domain is to use the Oracle CEP Visualizer.
Using the Oracle CEP Visualizer, you can deploy an application to either a stand-alone or multi-server domain.
Note:
If you are using foreign stages, beware of the rules governing deployment and redeployment of dependent stages as Section 24.2.3, "Assembling Applications With Foreign Stages" describes.
To deploy an Oracle CEP application using Oracle CEP Visualizer:
-
Assemble your Oracle CEP application.
-
Start the Oracle CEP Visualizer.
See Section 5.3.9, "How to Start the Oracle CEP Visualizer from Oracle CEP IDE for Eclipse".
-
Use the Oracle CEP Visualizer to deploy your application.
See "Deploying an Application" in the Oracle Fusion Middleware Visualizer User's Guide for Oracle Complex Event Processing.
24.5.3 How to Deploy an Oracle CEP Application Using the Deployer Utility
The following procedure describes how to deploy an application to Oracle CEP using the Deployer command-line utility.
Using the Deployer, you can deploy an application to either a stand-alone or multi-server domain.
For more information, see "Deployer Command-Line Reference" in the Oracle Fusion Middleware Administrator's Guide for Oracle Complex Event Processing.
Note:
If you are using foreign stages, beware of the rules governing deployment and redeployment of dependent stages as Section 24.2.3, "Assembling Applications With Foreign Stages" describes.
To deploy an Oracle CEP application using the Deployer utility:
-
Assemble your Oracle CEP application.
-
Open a command window and set your environment as described in "Setting Your Development Environment" in the Oracle Fusion Middleware Getting Started Guide for Oracle Complex Event Processing.
-
Update your
CLASSPATHvariable to include thewlevsdeploy.jar JARfile, located in theORACLE_CEP_HOME/ocep_11.1/bindirectory where,ORACLE_CEP_HOMErefers to the main Oracle CEP installation directory, such as/oracle_cep.Note:
If you are running the Deployer on a remote computer, see "Running the Deployer Utility Remotely" in the Oracle Fusion Middleware Administrator's Guide for Oracle Complex Event Processing.
-
Be sure you have configured Jetty for the Oracle CEP instance to which you are deploying your application.
For more information, see "Configuring Jetty for Oracle CEP" in the Oracle Fusion Middleware Administrator's Guide for Oracle Complex Event Processing.
-
In the command window, run the Deployer utility using the following syntax to install your application (in practice, the command should be on one line):
prompt> java -jar wlevsdeploy.jar -url http://host:port/wlevsdeployer
    -user user -password password -install application_jar_file
where
-
hostrefers to the hostname of the computer on which Oracle CEP is running. -
portrefers to the port number to which Oracle CEP listens; default value is9002.This port is specified in the
DOMAIN_DIR/config/config.xmlfile that describes your Oracle CEP domain, whereDOMAIN_DIRrefers to your domain directory.The port number is the value of the
<Port>child element of the<Netio>element:<Netio> <Name>NetIO</Name> <Port>9002</Port> </Netio> -
userrefers to the username of the Oracle CEP administrator. -
passwordrefers to the password of the Oracle CEP administrator. -
application_jar_filerefers to your application JAR file, assembled into an OSGi bundle as described in Section 24.2, "Assembling an Oracle CEP Application." This file must be located on the same computer from which you execute the Deployer utility.For example, if Oracle CEP is running on host
ariel, listening on port9002, username and password of the administrator iswlevs/wlevs, and your application JAR file is calledmyapp_1.0.0.0.jarand is located in the/applicationsdirectory, then the command is (in practice, the command should be on one line):prompt> java -jar wlevsdeploy.jar -url http://ariel:9002/wlevsdeployer -user wlevs -password wlevs -install /applications/myapp_1.0.0.0.jar
After the application JAR file has been successfully installed and all initialization tasks completed, Oracle CEP automatically starts the application and the adapter components immediately start listening for incoming events.
The Deployer utility provides additional options to resume, suspend, update, and uninstall an application JAR file, as well as deploy an application to a specified group of a multi-server domain. For more information, see "Deployer Command-Line Reference" in the Oracle Fusion Middleware Administrator's Guide for Oracle Complex Event Processing.
Note:
You may only deploy to a group if the server is part of a multi-server domain (that is, if clustering is enabled). You may not deploy to a group if the server is part of a standalone-server domain (that is, if clustering is disabled). For more information, see "Overview of Oracle CEP Multi-Server Domain Administration" in the Oracle Fusion Middleware Administrator's Guide for Oracle Complex Event Processing.
Oracle CEP uses the
deployments.xmlfile to internally maintain its list of deployed application OSGi bundles. This file is located in theDOMAIN_DIR/servernamedirectory, whereDOMAIN_DIRrefers to the main domain directory corresponding to the server instance to which you are deploying your application andservernamerefers to the actual server. See Appendix B, "Deployment Schema deployment.xsd" for information about this file. This information is provided for your information only; Oracle does not recommend updating thedeployments.xmlfile manually. -
