8 Working With Dynamic Lists
This sections covers the following topics:
8.1 About Dynamic Lists
Lists can take many forms. If you have spent much time in a word processor or a web page editor, then you are probably familiar with the two basic kinds: the bulleted list and the numbered list (see "Adding Numbered and Bulleted Lists"). On a Site Studio Web site, there are two more types of lists that you can work with: dynamic list and static lists. These offer more advanced editing capabilities in Contributor.
A dynamic list is a flexible and powerful feature in Site Studio Contributor. The list itself is created by the site designer and then turned over to you, the contributor, so that you can edit and manage the list.
The look-and-feel of the dynamic list varies, depending on how it was originally set up by the designer. It may be a simple bulleted list with links to different web pages, or it could be a list of links on the side of the web page, used by site visitors to navigate the Web site.
The dynamic list performs a search of the content server and displays the files that result from that search on a web page. The search is usually for contributor data files or native documents matching specific criteria (for example, all files stored in the "Products" section). On the web page, you (the contributor) or a site visitor sees a list of related files. These files can be different types of groupings, such as press releases, knowledge base articles, or FAQs.
Regardless of how the list was set up, you (the contributor) are responsible for adding items, removing items, and editing items in the list.
8.2 Dynamic Lists in Contributor
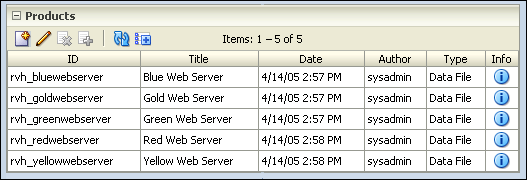
On a web page, a dynamic list may look like a bulleted list of links, a list of related topics, a part of the site navigation, and so on. It can take many forms, depending on how it was set up. When editing a dynamic list in Contributor, however, you see a list in the form of a table with columns and rows (Figure 8-1).
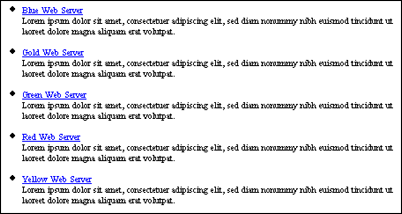
It is set up this way so that you can easily identify the files (and their properties) that are in the list. The way it looks in Contributor may vary quite a bit from how it looks on the actual web page. It may, for example, be presented as a bulleted list (Figure 8-2).
As such, you may want to frequently preview the list to see what your changes look like on the actual Web site (see "Previewing a Web Page").
Each dynamic list in a contribution region has a separate editing section in the Contributor editor. At the top of the section is the dynamic list toolbar (Figure 8-3), which you use to add to, and edit, the list.
Note:
Some dynamic list features may not appear, depending on how the list was set up by the designer. If you have questions, contact your site designer or site manager for assistance.| Toolbar Option | Description |
|---|---|
| Launches a wizard that enables you to add an item to the dynamic list (see "Dynamic List Wizard (Create New)"). | |
| Opens the content item in the dynamic list in its associated application for editing (Contributor for contributor data files, Microsoft Word for .doc native documents, and so on). | |
| Excludes the currently selected item from the dynamic list. An excluded item is colored differently and shows 'No' in the "Included" column. | |
| Includes the currently selected item in the dynamic list. | |
| Refreshes the list of items in the dynamic list. | |
| Shows all excluded items in the dynamic list in a column called "Included." The excluded items are colored differently and show 'No' in the "Included" column. | |
| Hides all excluded items in the dynamic list. |
8.3 Adding a New File to a Dynamic List
You can add a new file (either a new contributor data file or a new native document) to a dynamic list. When you do this, Site Studio Contributor creates an empty file with no content, checks it into the content server, and displays it in the list. You can then edit the file.
This method works best for adding a contributor data file to the list, but you can also use this approach to add native documents. Once the file is added, you can edit it immediately to create the content you want to display there.
A "new" file is an empty file that you create as you add it to the list. After you add the file, you can create the content that appears on your Web site. One thing to keep in mind as you add files to a dynamic list is that the files result in new web pages on the Web site. This is similar to what happens when you link to a new file using the Link wizard (see "Creating a Link to an Existing File on the Content Server").
To add a new file to a dynamic list, perform these tasks:
-
Open the dynamic list in the Contributor editor.
-
Click the Create New Item icon (Figure 8-4) in the dynamic list toolbar.
The dynamic list wizard is launched (see "Dynamic List Wizard (Create New)").
-
Select the type of file to add to the dynamic list: New Contributor data file or New native file. If you choose to add a new native document, select the file format from the list.
Note:
The site designer controls what file types and file formats can be checked in. You may, for example, not be allowed to check in native document, or you may only be allowed to check in only Microsoft Word files. -
Click Next.
Note:
You can step through the wizard faster by clicking the blue arrow to the left of the option you want to use. This automatically selects the option and moves the wizard to the next step.The standard content check-in page on the content server is displayed.
-
Enter the appropriate information to check the item into the content server. Some of the information is automatically provided. If a field name is marked red, then the field is required (that is, the item cannot be checked in if the field is empty). Click Next when you have finished.
-
The content item is checked in and a check-in confirmation is displayed.
Note:
If you receive a message "Unable to locate the content item...," then you may have added a file that is not recognized by the list. Contact your site designer or site manager for details. -
If the site designer has chosen to enable this, you may be given the option to edit the content item immediately or to exit the wizard without editing the file (you can then edit it at a later time). Make your choice and click Finish.
-
If you chose to edit a contributor data file now, it opens in a Contributor editor window.
If you chose to edit a native document now, it opens in its associated application (for example, Microsoft Word for .doc files). You may need to confirm the installation of a small program that enables this "check-out-and-open" functionality.
If you chose to not edit the file now, you return to the dynamic list in the Contributor editor.
8.4 Adding an Existing File to a Dynamic List
You can add an existing file to a dynamic list. An "existing" file is a file that has content and is ready to be viewed on the site. The file may be located on the file system (that is, your local computer) or on the content server
When you add an existing file from your file system, Site Studio Contributor uploads the file and checks it into the content server with the required metadata so that it appears in the dynamic list. This method works best for adding a native document to the list, but you can also use this approach to add a contributor data file.
One thing to keep in mind as you add files to a dynamic list is that the files result in new web pages on the Web site. This is similar to what happens when you link to a newly created file using the Link wizard (see "Creating a Link to a New Content File").
This section covers the following topics:
8.4.1 Adding a File From the File System
To add a file to a dynamic list, perform these tasks:
-
Open the dynamic list in the Contributor editor.
-
Click the Create New Item icon (Figure 8-5) in the dynamic list toolbar.
The dynamic list wizard is launched (see "Dynamic List Wizard (Create New)").
-
Select Existing local file as the file type you want to add to the dynamic list.
Note:
The site designer controls what file types can be checked in. If you do not see this option, the site designer does not allow local files to be checked into the content server. -
Click Next.
Note:
You can step through the wizard faster by clicking the blue arrow to the left of the option you want to use. This automatically selects the option and moves the wizard to the next step.The standard content check-in page on the content server is displayed.
-
Enter the appropriate information to check the item into the content server. Some of the information is automatically provided. If a field name is marked red, then the field is required (that is, the item cannot be checked in if the field is empty). Do not forget to specify a primary file (use the Browse button to navigate to a file on your local computer and select it).
Click Next when you have finished.
-
The content item is checked in and a check-in confirmation is displayed.
-
If the site designer has chosen to enable this, you may be given the option to edit the content item immediately or to exit the wizard without editing the file (you can then edit it at a later time). Make your choice and click Finish.
-
If you chose to edit the file now, it opens in its associated application (for example, Microsoft Word). You may need to confirm the installation of a small program that enables this "check-out-and-open" functionality.
If you chose to not edit the file now, you return to the dynamic list in the Contributor editor.
8.4.2 Adding a File From the Content Server
To add an existing file from the content server, you must change the file's metadata values so that they match the dynamic list (or contact the site designer or site manager to have the criteria of the list changed). The required steps are slightly different in that you must perform them outside of Contributor.
If you have a file (contributor data file or native document) that does not appear in the dynamic list, then one of these things must happen:
-
You must change the metadata of the file so that it matches the criteria in the dynamic list.
-
You must contact the site designer or site manager to have the dynamic list modified (that is, have its query changed) so that it picks up this file and related files in the future.
8.5 Editing the Files in a Dynamic List
There are several ways to edit the files that appear in a dynamic list:
-
You can edit the file as soon as you add it to the list (see "Adding an Existing File to a Dynamic List").
-
You can browse to the web page containing the file, enable contribution mode, and edit the page like you would any other on a Site Studio Web site (see "Editing the Content in a Contribution Region").
-
Or, you can click the Edit Target icon in the dynamic list toolbar (Figure 8-6).
If you click the Edit Target icon to edit a contributor data file, then the file opens in a new browser, which is automatically opened to edit. Edit the file as you normally would in Contributor and click the Update icon when finished.
If you click the Edit Target icon to edit a native document, then the file opens in its associated application (for example, Microsoft Word). Edit the file as you normally would in that application, and then save and close your work.
8.6 Excluding and Including Files in a Dynamic List
A dynamic list is set up so that it searches for files on the content server that meet certain criteria and displays these files on a web page. There may be times, however, when you must exclude a file that appears in the list; for example, a native document that has become obsolete.
When you exclude a file from a dynamic list, it is removed from all dynamic lists on the Web site, even though the file itself remains on the content server and any hard-coded links to it will continue to work. After you exclude a file from the list, you can easily add it back.
This section covers the following topics:
8.6.1 Displaying Excluded Items
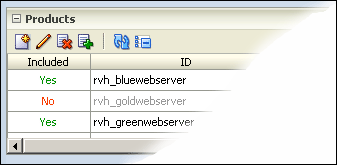
When you first open the contribution region for editing, the dynamic list editor only displays the included files. You can display all included and excluded files by clicking the Show Excluded Items icon (Figure 8-7). This adds a column called "Included," which shows the display status of all files in the dynamic list (Figure 8-9). You can hide the excluded items again by clicking the Hide Excluded Items icon (Figure 8-8).
8.6.2 Excluding Files From a Dynamic List
If you exclude files from a dynamic list, they are no longer displayed in the dynamic list (and hence on the Web site). To exclude files from a dynamic list, perform these tasks:
-
Click the row (the one containing the file you want to exclude) in the dynamic list.
-
Click the Exclude from List icon (Figure 8-10) in the dynamic list toolbar.
Alternatively, you can also right-click the item in the list and choose Exclude Item in the context menu.
This returns you to the dynamic list where you can see that your file has been excluded from the list. An excluded item is colored differently and shows 'No' in the "Included" column (Figure 8-9).
8.6.3 Including Files in a Dynamic List
If you excluded files from a dynamic list, you can re-include them, so they are displayed in the dynamic list again (and hence on the Web site). To include files in a dynamic list, perform these tasks:
-
Make sure that all excluded items in the dynamic list are shown (see "Displaying Excluded Items").
-
Click the Include in List icon (Figure 8-11) in the dynamic list toolbar.
Alternatively, you can also right-click the item in the list and choose Include Item in the context menu.
The dynamic list now shows all included and excluded files. Excluded items are colored differently and show 'No' in the "Included" column.
For information on adding existing files that do not appear in the dynamic list, see "Adding an Existing File to a Dynamic List".
8.6.4 Refreshing a Dynamic List
When you add and remove files (contributor data files and native documents) in a dynamic list, you do not immediately see a difference in the list because the content server needs time to index its files. To see what the list looks like with newly added files or removed files, you must refresh the list.
To refresh a dynamic list, perform these tasks:
-
Click in the dynamic list to make it editable.
-
Click the Refresh icon (Figure 8-12) in the dynamic list toolbar.
Any updated results display in the list (which may take a few seconds while the file is being indexed).
8.7 Viewing the Content Information Page for a File in the List
You can view the content information page for each file in the dynamic list (contributor data file or native document). You may find this useful, for example, if you want to know the metadata for any given file in the list, which, in turn, can tell you what the search criteria are for the dynamic list.
To view the content information page for a file in a dynamic list, perform these tasks:
-
Click the row (the one containing the file you want to use) in the dynamic list.
-
Click the Content Information icon (Figure 8-13) in the Dynamic List toolbar (or double-click the row in the list).
Alternatively, you can also right-click the item in the list and choose Document Info in the context menu.
The content information page for the selected item is displayed. When you are finished viewing the page, close the window to return to Contributor.


