5 Integration into E-mail Clients
This section covers these topics:
-
Section 5.5, "Showing or Hiding the WebCenter Content Servers Hierarchy"
-
Section 5.7, "Modifying the Column Settings in the Content Pane"
5.1 About E-mail Client Integration
After installing the Desktop client software on your computer, you can check in e-mail messages and their attachments to a content server directly from Microsoft Outlook or Lotus Notes and share them with others in your organization. You can drag and drop e-mails directly into content folders on a server, or you can use a special content check-in form (Oracle WebCenter Content Server only).
Checked-in e-mail messages are not intended to be checked out, modified, and checked back in. E-mail messages are checked in to a content server for the express purpose of preserving them exactly as they were received. You can open a checked-in e-mail message from a server to view it in your default e-mail application. You can even make changes if you want, but you cannot check it back in to the server. You can, however, send the message to other people or save a copy on your local computer.
For more information on managing e-mail on content servers, see Chapter 12, "Working with Managed E-mail."
5.2 Integration into Microsoft Outlook
The Desktop client software can work with Microsoft Outlook 2002 (XP) through 2010. After installing the integration software, you can interact with content servers and the files on them directly from Microsoft Outlook.
Desktop adds various integration features to Microsoft Outlook:
5.2.1 WebCenter Content Servers Hierarchy in Mail Folders
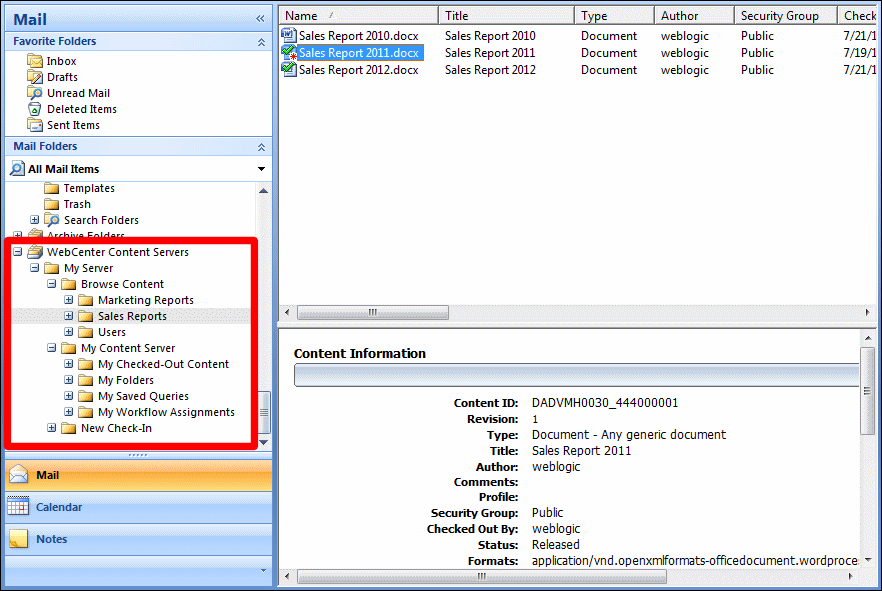
The Desktop client software adds a hierarchical folder structure called WebCenter Content Servers to the mail folders list in Microsoft Outlook (Figure 5-1). For more information on the integration hierarchy in your e-mail application, see Chapter 8, "Understanding the Integration Hierarchy."
Note:
The WebCenter Content Servers hierarchy is not displayed in the mail folders list by default. You must specifically enable it. For more information, see Section 5.5, "Showing or Hiding the WebCenter Content Servers Hierarchy."
Figure 5-1 Integration Hierarchy in Microsoft Outlook 2007
Description of "Figure 5-1 Integration Hierarchy in Microsoft Outlook 2007"
5.2.2 Integration Items in Outlook 2002, 2003, and 2007
The Desktop client software adds two integration items to the Microsoft Outlook 2002, 2003, and 2007 interfaces:
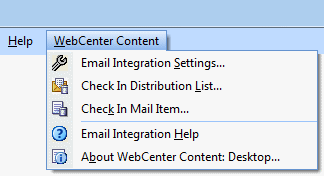
The Desktop client software adds a menu called WebCenter Content to the menu bar in Microsoft Outlook 2002, 2003, and 2007 (Figure 5-2).
Figure 5-2 WebCenter Content menu in Microsoft Outlook 2007
Description of "Figure 5-2 WebCenter Content menu in Microsoft Outlook 2007"
The WebCenter Content menu contains the following menu items:
-
Email Integration Settings...: This option opens a dialog where you can set a number of configuration options for the e-mail client integration.
-
Check In Distribution List...: This option opens a dialog where you can check an e-mail distribution list in to a content server. For more information, see Section 12.9, "Working with Distribution Lists."
-
Check In Mail Item...: This option opens a dialog where you can check the currently selected e-mail message in to a content server. For more information, see Section 12.5.1, "Checking In E-mail Messages Using the Check In Mail Item Feature."
-
Email Integration Help: This option launches the Desktop online help in your standard web browser.
-
About WebCenter Content: Desktop...: This option opens a dialog that provides version information about the Desktop client software.
Oracle WebCenter Content Toolbar
The Desktop client software adds a toolbar called Oracle WebCenter Content to Microsoft Outlook 2002, 2003, and 2007. If you do not see the toolbar, you can display it by selecting View, then Toolbars, and then Oracle WebCenter Content.
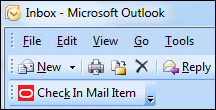
The toolbar items depend on the application context. In the main Outlook window, the Oracle WebCenter Content toolbar contains the following option:
-
Check In Mail Item: This option opens a dialog where you can check the currently selected e-mail message in to a content server. (You can also use the WebCenter Content menu to do this.) For more information, see Section 12.5.1, "Checking In E-mail Messages Using the Check In Mail Item Feature."
Figure 5-3 Check In Mail Item Option in Microsoft Outlook 2007
Description of "Figure 5-3 Check In Mail Item Option in Microsoft Outlook 2007"
In an e-mail editing window (new message or forward message), the Oracle WebCenter Content toolbar contains the following option:
-
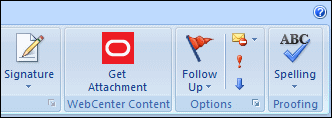
Get Attachment: This option opens a dialog where you can select a file on a content server to be attached to the current e-mail message or hyperlinked in the message. For more information, see Section 12.7, "Attaching Content Files on a Server to E-Mail."
Figure 5-4 Get Attachment Option in MIcrosoft Outlook 2007
Description of "Figure 5-4 Get Attachment Option in MIcrosoft Outlook 2007"
5.2.3 Integration Items in Outlook 2010
The Desktop client software adds integration items to three ribbons in the Microsoft Outlook 2010 interface:
The Desktop client software adds a ribbon called WebCenter Content to the Microsoft Outlook 2010 interface (Figure 5-5).
Figure 5-5 WebCenter Content Ribbon in Microsoft Outlook 2010

Description of "Figure 5-5 WebCenter Content Ribbon in Microsoft Outlook 2010"
The WebCenter Content ribbon includes the following groups:
-
Check In: This ribbon group contains the following option:
-
Check In Mail Item: This option opens a dialog where you can check the currently selected e-mail message in to a content server. For more information, see Section 12.5.1, "Checking In E-mail Messages Using the Check In Mail Item Feature."
-
Check In Distribution List: This option opens a dialog where you can check an e-mail distribution list in to a content server. For more information, see Section 12.9, "Working with Distribution Lists."
-
-
Misc: This ribbon group contains the following options:
-
Email Integration Settings: This option opens a dialog where you can set a number of configuration options for the e-mail client integration.
-
Help Contents: This option launches the Desktop online help in your standard web browser.
-
About WebCenter Content: Desktop: This option opens a dialog that provides version information about the Desktop client software.
-
The Desktop client software adds a Get Attachment item to the Insert ribbon in Microsoft Outlook 2010 (Figure 5-6). This item opens a dialog where you can select a file on a content server to be attached to the current e-mail message or hyperlinked in the message. For more information, see Section 12.7, "Attaching Content Files on a Server to E-Mail."
Figure 5-6 Integration Item in Insert Ribbon in Microsoft Outlook 2010

Description of "Figure 5-6 Integration Item in Insert Ribbon in Microsoft Outlook 2010"
The Desktop client software also adds a Get Attachment item to the Message ribbon in Microsoft Outlook 2010 (Figure 5-7). This item opens a dialog where you can select a file on a content server to be attached to the current e-mail message or hyperlinked in the message. For more information, see Section 12.7, "Attaching Content Files on a Server to E-Mail."
Figure 5-7 Integration Item in Message Ribbon in Microsoft Outlook 2010

Description of "Figure 5-7 Integration Item in Message Ribbon in Microsoft Outlook 2010"
5.3 Integration into Lotus Notes
The Desktop client software can work with the Lotus Notes e-mail client version 6.5.2, 7.x, and 8.5 (with Lotus Domino mail databases based on release 6 or 7 mail templates; release 8 mail templates are currently not supported). After installing the integration software, you can interact with content servers and the files on them directly from the Lotus Notes client.
Desktop adds various integration features to Lotus Notes:
5.3.1 WebCenter Content Servers Hierarchy in Mail Pane
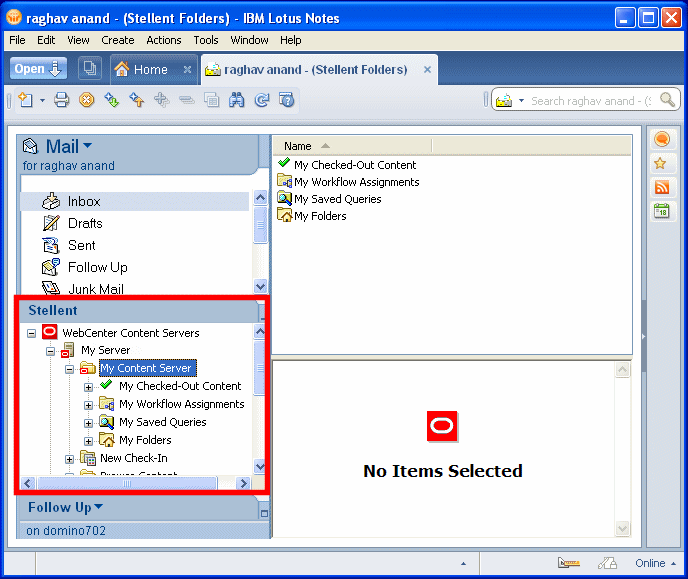
The Desktop client software adds a hierarchical folder structure called WebCenter Content Servers to the mail pane in Lotus Notes (Figure 5-8). For more information on the integration hierarchy in your e-mail application, see Chapter 8, "Understanding the Integration Hierarchy."
Note:
The WebCenter Content Servers hierarchy is not displayed in the mail folders list by default. You must specifically enable it. For more information, see Section 5.5, "Showing or Hiding the WebCenter Content Servers Hierarchy."
Figure 5-8 Integration Hierarchy in Lotus Notes 8.5
Description of "Figure 5-8 Integration Hierarchy in Lotus Notes 8.5"
5.3.2 Integration Items in Actions Menu
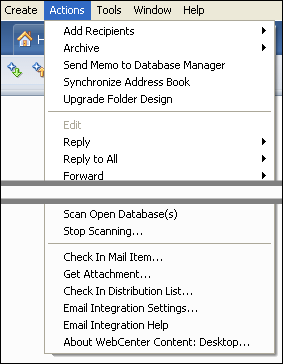
The Desktop client software adds a number of new items to the Actions menu in Lotus Notes (Figure 5-9).
Figure 5-9 Actions Menu in Lotus Notes 8.5
Description of "Figure 5-9 Actions Menu in Lotus Notes 8.5"
The standard Actions menu in Lotus Notes includes the following integration items:
-
Check In Mail Item...: This option opens a dialog where you can check the currently selected e-mail message in to a content server. For more information, see Section 12.5.1, "Checking In E-mail Messages Using the Check In Mail Item Feature."
-
Get Attachment...: This option opens a dialog where you can select a file on a content server to be attached to the current e-mail message or hyperlinked in the message. For more information, see Section 12.7, "Attaching Content Files on a Server to E-Mail."
-
Check In Distribution List...: This option opens a dialog where you can check an e-mail distribution list in to a content server. For more information, see Section 12.9, "Working with Distribution Lists."
-
Email Integration Settings...: This option opens a dialog where you can set a number of configuration options for the e-mail client integration.
-
Email Integration Help: This option launches the Desktop online help in your standard web browser.
-
About WebCenter Content: Desktop...: This option opens a dialog that provides version information about the Desktop client software.
5.4 Content Pane and Preview Pane
The integration with your e-mail application (Microsoft Outlook or Lotus Notes) works much as you would expect. You can drag and drop e-mail messages into content server folders, copy and paste e-mail, create shortcuts, and so on.
When you select an object in the WebCenter Content Servers hierarchy in the mail pane, the contents of that object are displayed on the right, in the content pane. It may, for example, show a list of all files in the current content folder. You may also see a preview pane, which shows additional information about the selected item in the content pane (for example, the content information page for a file on the content server).
If you do not see the preview pane, you can enable it. For more information, see Section 5.6, "Showing or Hiding Panes."
Managed content files listed in the content pane may have a symbol in their file icon to indicate their content management status. For example, if the file is currently checked out by yourself, this is visualized using a green check mark, as shown in Figure 5-10. For a full explanation of all content management status icons, see Section 9.7, "Content File Status."
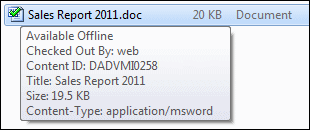
Also, if you hover your mouse cursor over a managed file in the content pane, a screen tip is displayed providing content management information about that file, as shown in Figure 5-11.
5.5 Showing or Hiding the WebCenter Content Servers Hierarchy
You can choose to show or hide the WebCenter Content Servers hierarchy in your e-mail application. The WebCenter Content Servers hierarchy is not displayed by default.
Note:
In Lotus Notes, you can do this only if you have design rights to the Notes database. If you need any assistance, contact your Lotus Notes administrator.
To show or hide the WebCenter Content Servers hierarchy in Microsoft Outlook or Lotus Notes:
-
Launch your e-mail application.
-
Microsoft Outlook: Open the WebCenter Content menu or ribbon and then choose Email Integration Settings....
Lotus Notes: Open the Actions menu and then choose Email Integration Settings....
The Email Checkin Settings dialog opens (see Section A.22, "Email Checkin Settings Dialog").
-
Select or clear the Show WebCenter Content Servers check box to show or hide the integration hierarchy in your e-mail application.
-
Click OK.
-
If you changed the check box status, a reminder is displayed saying that you must restart the e-mail application for the change to take effect. Click OK to continue.
-
Click OK to return to the e-mail application.
Important:
Any changes will not take effect until you restart the e-mail application.
5.6 Showing or Hiding Panes
Some of the panes your e-mail application can be turned on and off:
5.6.1 Showing or Hiding the Folders Pane
The folders pane shows the mail folders tree in your e-mail application. If you do not see the folders pane, you can enable it:
-
Microsoft Outlook: To show the mail folders pane, open the View menu and then choose Navigation Pane.
5.6.2 Showing or Hiding the Preview Pane
If you select an item in the Oracle Content Server hierarchy in the mail folders tree, the preview pane in your e-mail application shows information about the selected item (for example, the content information page of a file on the content server). You may turn the preview pane on or off. The preview pane remains enabled or disabled for each specific server connection, which includes every folder in it. If you open a folder from a different server connection, you will only see the preview pane if it was enabled for that server.
To show or hide the preview pane in Microsoft Outlook or Lotus Notes, right-click in an unused area of the content pane, choose View in the context menu, and then Preview Pane.
5.7 Modifying the Column Settings in the Content Pane
When you select an object in the WebCenter Content Servers hierarchy, the content pane shows the contents of that object (for example, a list of files in the current content folder). In details view, the content pane includes a number of columns that show metadata information about the files or folders (for example, their title and content ID). You can modify the metadata columns to be displayed as well as their default width and order.
To change the column display settings:
-
Go to any folder on the content server in the WebCenter Content Servers hierarchy for which you want to change the column display settings.
-
Right-click any of the column headings in the content pane, and choose Column Settings....
The Column Settings dialog opens (see Section A.6, "Column Settings Dialog").
-
Make changes to the column display, order, and width settings as desired.
-
Click OK when you are done. (The changes take effect immediately and they apply to the entire content server.)
Note:
You can also change the width of a column by dragging its right handle.
