3 Integration into Windows Explorer
This section covers these topics:
-
Section 3.2, "Accessing Desktop Integration in Windows Explorer"
-
Section 3.3, "Desktop Integration Features in Windows Explorer on Windows 7 and Vista"
-
Section 3.4, "Desktop Integration Features in Windows Explorer on Windows XP"
-
Section 3.5, "WebCenter Content Servers Hierarchy in Navigation Pane"
-
Section 3.14, "Modifying the Column Settings in the Content Pane"
3.1 About Windows Explorer Integration
The integration of Oracle WebCenter Content Server, Oracle Content Server, Oracle Content Database, or other WebDAV-based content servers into Windows Explorer provides a convenient way to manage files on those servers using a familiar work environment. You do not need to work with the files on the content server in a web browser or other, proprietary client interface (although this option remains available). Instead, you can interact with content servers and the files on them using a 'folders tree' in Windows Explorer.
After you install the Desktop client software on your computer, the folders hierarchy in Windows Explorer includes a top-level node called WebCenter Content Servers, which provides an interface through which you can connect to servers and work with the files on them. You can manage files and folders on a content server using custom context menus, while taking advantage of much of standard Windows functionality, such as drag-and-drop, copy-and-paste, and shortcuts.
Note:
There is no access to Oracle WebCenter Content Server administrative functions through the desktop integration interface. All Desktop administrative functions are performed through the Oracle WebCenter Content Server web browser interface. See also Appendix D, "Desktop Administration."
3.2 Accessing Desktop Integration in Windows Explorer
You can access content servers in Windows Explorer using any of the following methods:
-
Double-click the WebCenter Content Servers icon on your Windows desktop (Figure 3-1).
-
Navigate to the top-level WebCenter Content Servers node in the Windows Explorer folders list. In Windows 7, this node is also included in your favorite folders list as a shortcut. See Section 3.5, "WebCenter Content Servers Hierarchy in Navigation Pane"for more information.
-
Double-click a shortcut to a particular content server, content folder, or content item.
3.3 Desktop Integration Features in Windows Explorer on Windows 7 and Vista
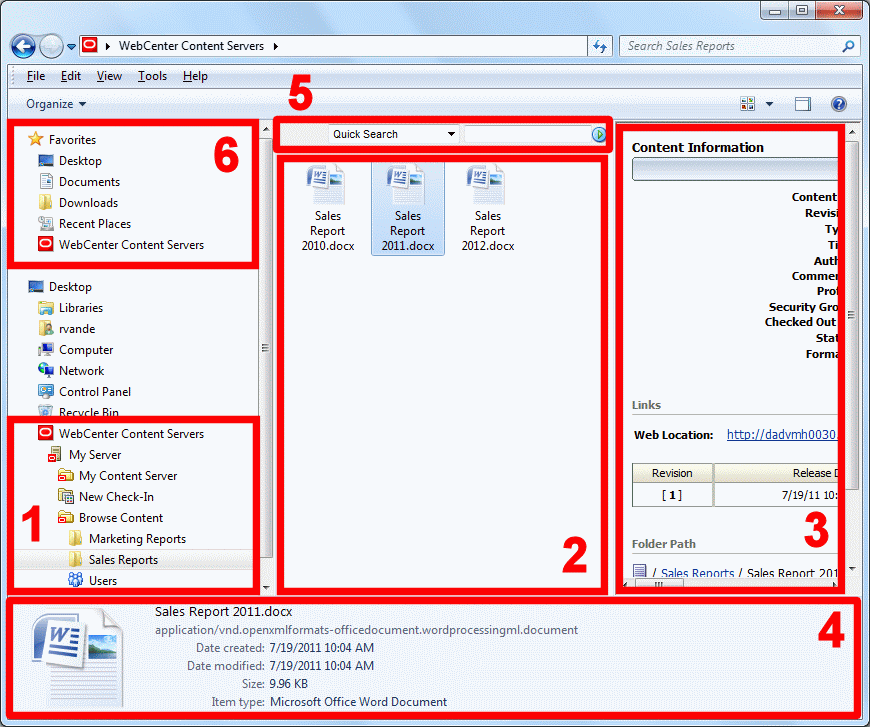
After you install the Desktop client software on your computer running Microsoft Windows 7 or Vista, it integrates into Windows Explorer in several ways. As shown in Figure 3-2, Desktop offers content management features in Windows Explorer in different areas:
Figure 3-2 Desktop Integration Features in Windows Explorer on Windows 7

Description of "Figure 3-2 Desktop Integration Features in Windows Explorer on Windows 7"
3.4 Desktop Integration Features in Windows Explorer on Windows XP
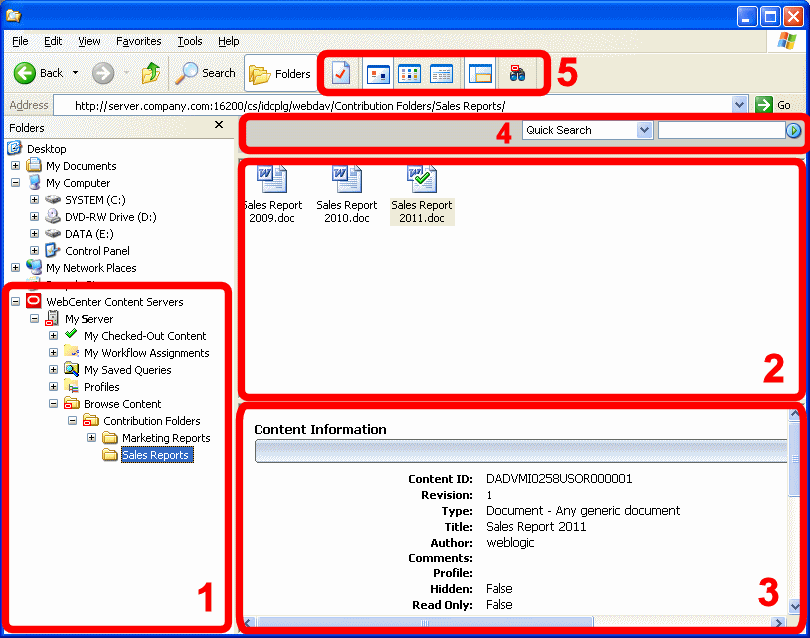
After you install the Desktop client software on your computer running Microsoft Windows XP, it integrates into Windows Explorer in several ways. As shown in Figure 3-3, Desktop offers content management features in Windows Explorer in different areas:
Figure 3-3 Desktop Integration Features in Windows Explorer on Windows XP

Description of "Figure 3-3 Desktop Integration Features in Windows Explorer on Windows XP"
3.5 WebCenter Content Servers Hierarchy in Navigation Pane
The Desktop client software adds a hierarchical folder structure called WebCenter Content Servers to the navigation pane in Windows Explorer (Figure 3-2). For more information on this integration hierarchy in Windows Explorer, see Chapter 8, "Understanding the Integration Hierarchy."
You work with content managed on a content server in much the same way you do with other folders and files on your computer. You can copy files, drag and drop files into folders, right-click objects to open context menus, and so on. However, some tasks typically performed on files or folders on your local computer may have a somewhat different effect when performed on files and folders managed by a content server. For example, copying a new file to a content folder does not put it on your local computer, but rather uploads and saves it on the content server. In addition, the context menus of files may include items specific to content management, such as Check In, Check Out, Copy Links, and so on. For more information, see Chapter 10, "Working with Managed Content Files in Windows Explorer."
The user logins and security controls on a content server also apply to files and folders that are managed through the integration hierarchy in Windows Explorer. For example, if you have only read permission for a content item, you will be able to open a copy of the native file, but you will not be able to check a new revision of the file in to the content server (which requires write permission). Similarly, when you create a new folder in the folder hierarchy on the server, each person who has the rights to view that folder will see it on their local computer. The files you add to the folder will also be available to each user on the content server, again according to their security permissions.
3.6 Content Pane
The integration with Windows Explorer works much as you would expect in Microsoft Windows. You can drag and drop files into content server folders, copy and paste files (using various methods), create shortcuts, and so on.
When you select an object in the WebCenter Content Servers hierarchy in the navigation pane, the contents of that object are displayed on the right, in the content pane. It may, for example, show a list of all files in the current content folder. Unpublished content items on an Oracle WebCenter Content Server instance are shown in a different color, typically green (see Section 10.18, "Showing or Hiding Unpublished Content Files").
Content Management Status Icon
Managed content files listed in the content pane may have a symbol in their file icon to indicate their content management status. For example, if the file is currently checked out by yourself, this is visualized using a green check mark, as shown in Figure 3-4. For a full explanation of all content management status icons, see Section 9.7, "Content File Status."
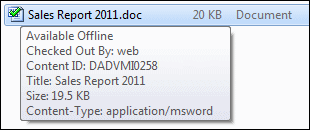
If you hover your mouse cursor over a managed file in the content pane, a screen tip is displayed providing content management information about that file, as shown in Figure 3-5.
3.7 Preview Pane
When you select an object in the WebCenter Content Servers hierarchy in the navigation pane, the contents of that object are displayed on the right, in the content pane. It may, for example, show a list of all files in the current content folder. You may also see a preview pane, which provides additional information about the selected item in the content pane (for example, the content information page for a file on the content server).
If you do not see the preview pane, you can enable it (see Section 3.13.2, "Showing or Hiding the Preview Pane").
3.8 Details Pane
When you select an object in the Oracle Content Server hierarchy in the navigation pane on Windows 7, you may see a details pane, which provides more technical details about the selected object (for example, the MIME type, modification date, and size of a file on the content server).
If you do not see the details pane, you can enable it (see Section 3.13.3, "Showing or Hiding the Details Pane").
3.9 Quick Search Integration
The Desktop client software adds Oracle WebCenter Content Server's Quick Search feature to Windows Explorer, which enables you to quickly search for content on an Oracle WebCenter Content Server instance. The Quick Search feature is shown above the content pane (Figure 3-6) when you are anywhere within a server's integration tree. If you do not see it, right-click in an unused area of the content pane (that is, away from any of the items listed in it) and choose Show Quick Search. Please note that Quick Search visibility is controlled for each server in the integration hierarchy separately.
Figure 3-6 Quick Search Integration in Windows Explorer on Windows 7

Description of "Figure 3-6 Quick Search Integration in Windows Explorer on Windows 7"
The Quick Search integration in Windows Explorer exactly mimics the Quick Search feature in Oracle WebCenter Content Server's web browser interface. The search results are displayed in the content pane. For more information about this feature, see Section 10.3, "Searching for Content Files" and also the Oracle WebCenter Content User's Guide for Content Server.
Note:
The Quick Search integration in Windows Explorer requires the Desktop component 11g Release 1 (11.1.1.6) on the Oracle WebCenter Content Server instance. It is not available with earlier component versions.
3.10 Favorites List
The Desktop client software adds the top-level WebCenter Content Servers node to the favorites list of Windows Explorer in Windows 7, which enables you to quickly open the integration hierarchy in the content pane. You can also add your own favorite content folders on a server to the list for easy access.
3.11 Buttons in Standard Buttons Toolbar
The Desktop client software adds some buttons to the Standard Buttons toolbar in Windows Explorer on Windows XP. Please note that these buttons are visible only if you are in the WebCenter Content Servers hierarchy.
Figure 3-7 Windows Explorer Button Bar in Windows XP
Description of "Figure 3-7 Windows Explorer Button Bar in Windows XP"
| Button | Description |
|---|---|
|
Click this button to open the properties dialog of the selected server, folder, or content item. For more information, see Section A.3, "Server Properties Dialog," Section A.7, "Folder Properties Dialog," and Section A.16, "Content Item Properties Dialog." |
|
|
Click this button to display the items in the content pane in icons view. For more information, see Section 3.12, "Content Pane View Modes." |
|
|
Click this button to display the items in the content pane in list view. For more information, see Section 3.12, "Content Pane View Modes." |
|
|
Click this button to display the items in the content pane in details view. For more information, see Section 3.12, "Content Pane View Modes." |
|
|
Click this button to show or hide the Desktop preview pane. For more information, see Section 3.7, "Preview Pane." |
|
|
Click this button to open a search form on the current content server, where you can specify criteria and search for items on that server based on these criteria. For more information, see Section A.17, "Content Query Capture Dialog." Please note that this button is available only for Oracle WebCenter Content Server instances, not for other WebDAV servers (including Oracle Content DB). You can also search a content server by right-clicking it anywhere in its integration tree node and choosing Search.... |
3.12 Content Pane View Modes
When you select an object in the integration hierarchy, the content pane shows the contents of that object (for example, a list of files in the current content folder on the server). How the information is displayed depends on the view mode: icons, lists, details, etc.
Desktop supports all view modes offered by the operating system. If a view includes applications icons, then these will include overlaid symbols to indicate the content management status of the object. See Section 9.7, "Content File Status" for further details.
3.13 Showing or Hiding Panes
Some of the panes in Windows Explorer can be turned on and off:
3.13.1 Showing or Hiding the Navigation Pane
The navigation pane in Windows Explorer includes the WebCenter Content Servers integration hierarchy. If you do not see the navigation pane, you can enable it:
-
Windows 7 and Windows Vista: Open the Organize menu, then choose Layout, and then Navigation Pane.
-
Windows XP: Open the View menu, then choose Explorer Bar, and then Folders. Alternatively, you can also click the Folders button in the toolbar.
3.13.2 Showing or Hiding the Preview Pane
If you select an item in the WebCenter Content Servers hierarchy in the mail folders tree, the preview pane in your e-mail application shows information about the selected item (for example, the content information page of a file on the content server). You may turn the preview pane on or off. The preview pane remains enabled or disabled for each specific server connection, which includes every folder in it. If you open a folder from a different server connection, you will only see the preview pane if it was enabled for that server.
To show or hide the preview pane in Windows Explorer, do the following:
-
Windows 7 and Windows Vista: Open the Organize menu, then choose Layout, and then Preview Pane. Alternatively, you can also click the preview pane icon in the toolbar.
-
Windows XP: Open the View menu and then choose Preview Pane. Alternatively, you can also click the preview pane icon in the toolbar.
3.13.3 Showing or Hiding the Details Pane
The details pane in Windows 7 shows more technical details about the selected item in the content pane (for example, the MIME type, modification date, and size of a file on the content server).
To show or hide the details pane in Windows Explorer, open the Organize menu, then choose Layout, and then Details Pane.
3.14 Modifying the Column Settings in the Content Pane
When you select an object in the integration hierarchy, the content pane shows the contents of that object (for example, a list of files in the current content folder). In details view, the content pane includes a number of columns that show metadata information about the files or folders (for example, their security group or author). You can modify the metadata columns to be displayed as well as their default width and order.
To change the column display settings:
-
Log in to the content server for which you want to change the content display.
-
Set the content pane view mode to details view. For more information, see Section 3.12, "Content Pane View Modes."
-
Right-click any of the column headings in the content pane.
-
Windows 7 and Windows Vista: Choose More... to open the Choose Details dialog.
-
Windows XP: Choose Column Settings... to open the Column Settings dialog (see Section A.6, "Column Settings Dialog").
-
-
Make changes to the column display, order, and width settings as desired.
-
Click OK when you are done. (The changes take effect immediately and they apply to the entire content server.)
Note:
You can also change the width of a column by dragging its right handle.
