2 Setting Up Oracle Communicator
This chapter describes installation and set-up of Oracle Communicator. Topics include:
Install Oracle Communicator
In order to install Oracle Communicator, you must run the installation program. Your service provider will point you to the installation program.Start the installation program, and follow the on-screen instructions.
Get Started
After you install and start the application, Create a New Account and register; you may need to provide a username and a password for authentication.
Create a New Account
Before you can start using Oracle Communicator, you must create an account. The account will contain information about you and your contact information. You may create multiple accounts (in the same way as you can have several email accounts).
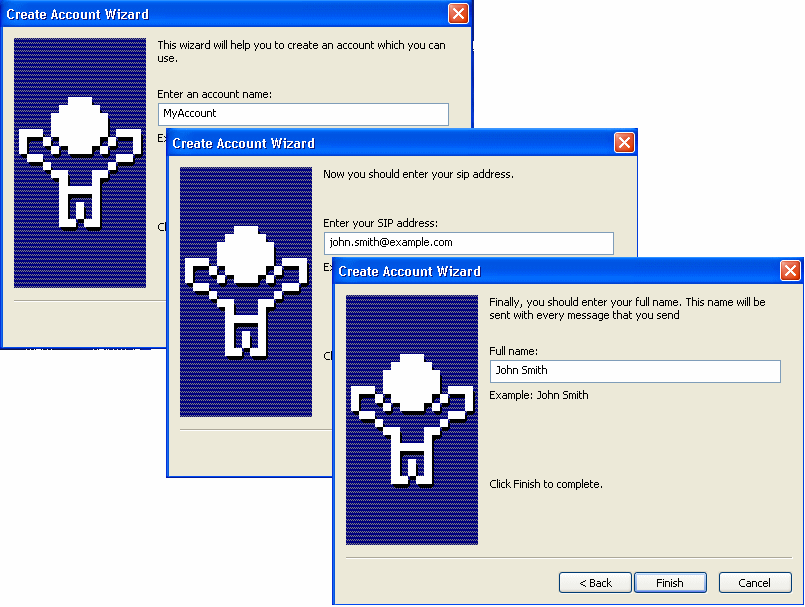
When you start Oracle Communicator for the first time, you do not have any accounts. The Create Account Wizard dialog is launched automatically.
Create Account Wizard
On the first page of the Create Account Wizard dialog, enter a name for your account. Enter an account name that you can remember, such as your name or Work or similar, and click Next.
The second page of the wizard requires you to enter a SIP address. Enter you SIP address and click Next.
Your SIP address usually looks very similar to an e-mail address. It is possible that your SIP address is in fact the same as your e-mail address. Contact your service provider or network administrator if you don't know your SIP address.
On the third and last page of the Create Account Wizard dialog, in the Full name text box, enter the name you want others to see when you communicate with them. This name will be included in the communication dialog when you send messages. Click the Finish button.
Select an Account
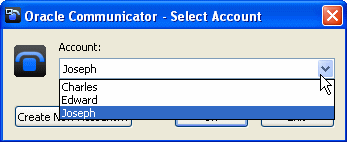
When you start Oracle Communicator, you will see the Select Account dialog.
Select Account Dialog
Select the account you want to use in the Account drop-down list box and click OK. The selected account will be used. If you click Cancel, the application will close.
If you want the application to automatically select this Account, select the checkbox Automatically sign in with this account. You will not see this dialog the next time you start the application since the account will be selected automatically. If you have signed in with an account automatically, but would like to use another account, you can sign out from the current account.
You can also create a new account by clicking the Create New Account button. If there is no account available, which is the case the first time the application runs, you must create an account before you see the Select Account dialog. The Create Account wizard is displayed automatically when starting the application the first time.
Authenticate
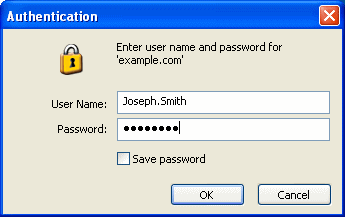
Authentication secures your information when using Oracle Communicator. You authenticate by providing your username and your password. Your username is usually your SIP address but might also be another name (provided by your service provider).
Authentication Dialog
If you enter an incorrect combination of username and password, authentication fails and you cannot access Oracle Communicator. You will then be asked again to authenticate.
By clicking Cancel in the Authentication dialog, you give up the authentication attempt and the action you tried to perform will fail.
By checking the Save password checkbox in the Authentication dialog, you can save your username and password. Then you don't need to authenticate yourself again when you open Oracle Communicator. The username and password are saved locally on your computer.
Note:
If you save your password, anyone using the same computer can log in as you. For security purposes, you should not save your password on a shared computerIf you save your password, you can unsave it in the future from the Preferences dialog.
Register to a Server
Registering to a server means starting Oracle Communicator and logging in. When registered to a server, you become available for communication and can see the presence of your Contacts. Your own presence will be updated to show that you are now available on the SIP service on which you registered (such as a PC).
You authenticate yourself when logging on; this protects your SIP address from unauthorized use.
Menus
Most commands and actions can be reached through the menu bar; note that the buttons look different depending on the theme you have chosen.
-
Settings menu contains Preferences among some other menu items
-
History enables you to control the History settings
-
Create New Group menu is used to create new groups
-
Contacts Menus include icons that enable you to Add, Search, and Hide Contacts
New Application Versions
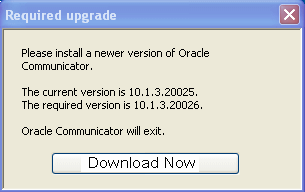
When your service provider makes a new application version available, you may automatically be notified when you start Oracle Communicator. The message will appear in a message dialog telling you where you can find the new version. Click on the button in the message dialog to go to the web page where you can download the new version. Follow the instructions given there to download and install the new version. The update can be required or recommended.
Required upgrades prevent you from running Oracle Communicator until you upgrade. It is important that you update because new versions include fixes of earlier errors, and can contain new functionality.
If a version is Recommended, you have a choice to install or defer the upgrade. When you see a new version message, you can take one of the following actions:
-
Click the More Information button to be taken to an upgrade page that gives you information and instructions.
-
Click Close to ignore the upgrade alert until the next time you start Oracle Communicator.
-
Click the Don't remind me of this upgrade again checkbox to discontinue being reminded of this particular upgrade. When another upgrade is available, you will be notified.
Terminology
Here are some common terms used in Oracle Communicator:
-
Administrator—An administrator is a person who sets up your Oracle Communicator environment for you. The Administrator provides the functionality you can use (such as network connectivity and calling features). The Administrator also provides the information you need to log on to and use Oracle Communicator, and answers your questions.
-
Contact—A Contact is someone you add to your Contact List. By adding them, you subscribe to their presence information.
-
Instant Message—A text message that you can send to a Contact, or receive from a Contact.
-
Presence Information—The presence status (presence icons) and presence message.
-
Presence Message—Your optional presence message can be used to further describe your availability.
-
Presence Server—The place to which you register; provided by your service provider.
-
Presence Status—Your presence status (presence icons) indicates your availability to others.
-
Register—In order to use the functionality in Oracle Communicator, you must first register (create an account and password).
-
Service Provider—A Service Provider is a person, department, or outside company that provides the underlying connectivity that you use when using Oracle Communicator.
-
SIP Address—An address that works for many different kinds of communication. The address is SIP service-independent and looks like an e-mail address (for example: your.name@example.com).
-
User ID or User Identity—The User ID is unique and identifies your account to your service provider. The User ID, together with your Password, will be used for authentication when you register or try to access a service. For convenience you can choose to save the User ID and Password in your client, but this lessens security.
Settings
You decide how your Oracle Communicator looks and behaves. These attributes are controlled through Settings, which you control.
Preferences
In the Preferences dialog in the Settings menu, you can change your settings for how Oracle Communicator should look and behave on your PC. You can set the following preferences:
After making your changes click Apply or OK. Click Cancel if you want to close the Preferences dialog without applying your changes.
Account Preferences
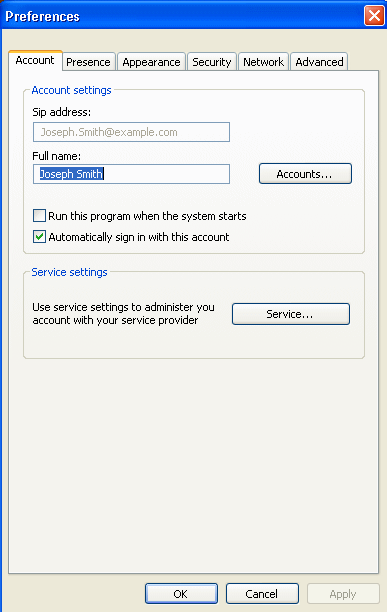
To change you account preferences click Preferences in the Settings menu and then click the Account tab.
On the first page you can change your account and service settings.
After making your changes click Apply or OK. Click Cancel if you want to close the Preferences dialog without applying your changes.
SIP Address
The SIP Address text box shows what SIP address is used in this account. If you want to use another SIP address you must create a new account.
Full Name
In the Full name text box you can change the name that is included in all messages you send and calls you make. The recipient will see this name or the Display name if she or he has set one for you.
Accounts
Click the Accounts... button to see the list of accounts you have created. You can delete accounts by selecting the desired account, and clicking the Delete button. Click the Close button when you are finished.
Deleting Accounts
To delete an account, click on the account name to select it, then click the Delete button.
Automatic Start
Check the Run this program when the system starts checkbox if you want Oracle Communicator to start automatically when you start your PC.
Automatically Signing In
Check the Automatically sign in with this account checkbox if you want the application to automatically use this user ID when Oracle Communicator starts. Automatically signing in with this account is the default setting.
Service Settings (Optional)
The Service button is a link to your service provider's web pages where you can change your service settings. This button may or may not appear, depending on what your service provider has set up for you. What service settings you can change depend on the services provided to you. Contact your service provider for more information.
Presence Preferences
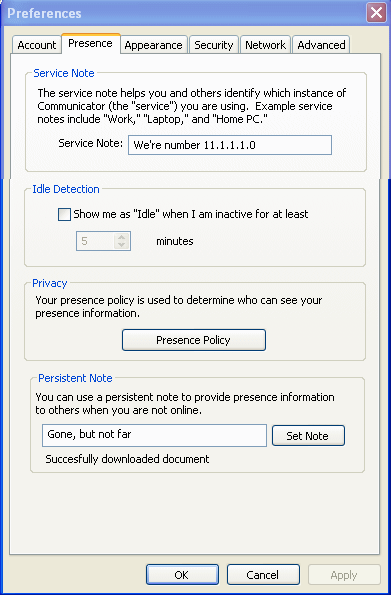
To change you presence preferences click Preferences in the Settings menu and then click the Presence tab.
After making your changes click Apply or OK. Click Cancel if you want to close the Preferences dialog without applying your changes.
Service Note
The optional text that is written in the Service Note box specifies what you want to call this client, for example PC at home, PC at work, laptop, and so on. This text is shown in others' Contact Lists.
Idle Detection
By enabling this feature (checking the checkbox), it is possible to automatically change your presence status to Idle when there is no activity on your PC for the specified time (in minutes). This tells your Contacts that you were available on this machine, but have not been active on it for the specified amount of time.
Appearance Preferences
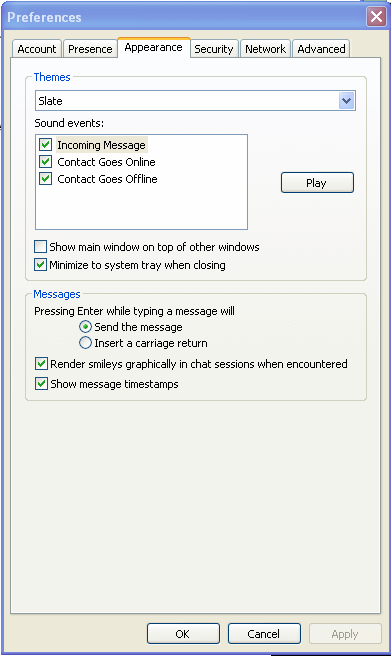
To change the appearance preferences click Preferences in the Settings menu and then click the Appearance tab.
After making your changes click Apply or OK. Click Cancel if you want to close the Preferences dialog without applying your changes.
Themes
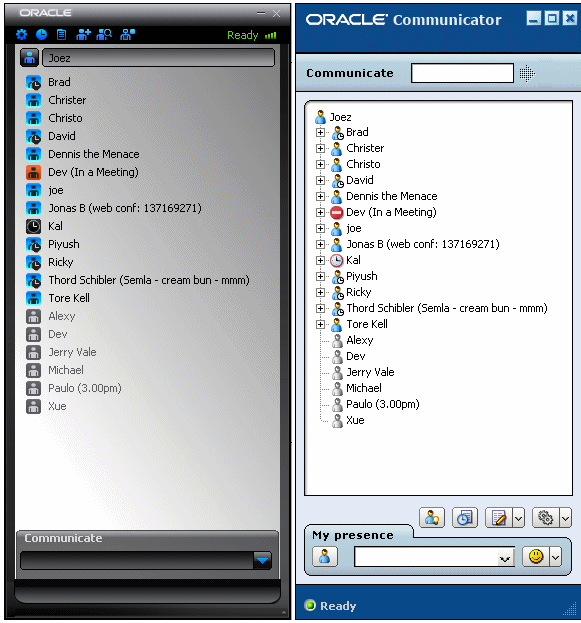
The theme determines how Oracle Communicator's main dialog and communication dialog will look and sound. You can change your theme to any theme included in the Themes drop-down menu.
Show main window on top of all other windows
This setting will cause Oracle Communicator's Main window to always stay on top of all other windows on you desktop when it is not minimized.
Minimize to system tray when closing
This setting will cause Oracle Communicator's Main window to minimize to the system tray instead of shutting down when you click the Close button at the right top of the window. To shut down the application when this setting in activated you must right-click the application icon in the system tray and select Exit.
Messages
Choose what should happen when the Enter key is pressed when writing a message. Either send the message or insert a new line in the message.
In the Render smileys graphically checkbox you can choose to render smileys graphically or just as text :-) in the Message area in the Communication dialog.
In the Show message timestamps checkbox you can choose to show message timestamps when a message is sent.
Security Preferences
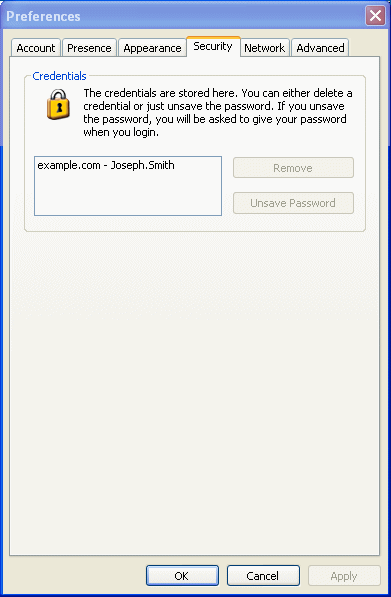
To change the security preferences click Preferences in the Settings menu and then click the Security tab.
After making your changes click Apply or OK. Click Cancel if you want to close the Preferences dialog without applying your changes.
Credentials
When you are required to authenticate yourself, you can choose to save your password (Saving your password is the default setting.). What you actually save are your credentials; a username and a password. Saving credentials decreases security. You can unsave a password or remove the whole credential if you like. To do so, click on one of the credentials in the list and click Unsave Password if you do not want the password to be saved for this credential; click Remove to remove the credential altogether.
Note:
Changes you make to your password or credentials will take effect the next time you log in.Network Preferences
Important:
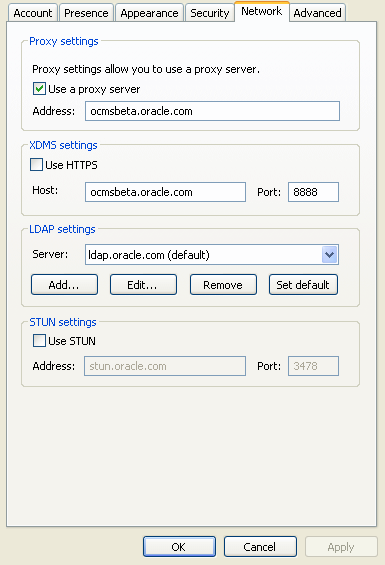
Your system administrator may have provided you with a customized installer that will prepopulate the network settings. If that is the case, you do not need to modify the settings on this tab.To change the network preferences click Preferences in the Settings menu and then click the Network tab.
After making your changes click Apply or OK. Click Cancel if you want to close the Preferences dialog without applying your changes.
Proxy Settings
Check the Use a proxy server checkbox and fill in the Address: field if you want to use a proxy server. Proxy servers are used in many organizations, depending on the way the system is set up. Your service provider will provide proxy server information, if needed.
LDAP Settings
Your organization may use LDAP services for looking up people and groups. If so, set your LDAP server here. Your service provider will provide the information you must use here. Buttons in the LDAP settings field include: Add..., Edit..., Remove, and Set default. These buttons, and the fields they contain, should only be used if you are sure of the information, or if you are instructed to use them by your service provider.
Check the Use STUN checkbox, fill in the Host: and Port: fields if you want to use STUN. Your service provider will give you this information if needed.
Advanced Preferences
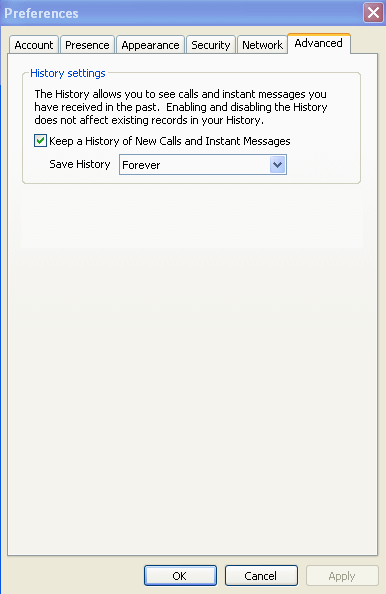
To change the advanced preferences, click Preferences in the Settings menu and then click the Advanced tab.
History Settings
The History contains a record of communications you've had. You can also use it to contact someone with whom you've communicated in the past.
You can control whether or not these records are kept (and, if they are kept, the length of time for which they are kept) in the Advanced Preferences tab. On that tab, Keep a History of New Calls and Instant Messages is selected by default. If this box is checked, a record of communications will be saved in your History. You can also set the time period for which you want to retain these records (Forever, Until I sign out, For 14 Days, For 30 Days).
Themes
The theme determines how Oracle Communicator's Main window and Communication dialog will appear. To change the themes, from the Settings menu, click Preferences, and then click the Appearance tab.
Select a theme; your changes will be saved and the same theme will be used the next time you start Oracle Communicator. Available themes depend on your service provider.
