10 Configuring Alerts and Contacts
This chapter describes how to define alert notifications and contacts in Oracle SOA Suite for healthcare integration. You can specify that certain people are alerted by email or text (SMS) when certain healthcare-related runtime or design-time events occur.
This chapter includes the following topics:
10.1 Overview of Alerts and Contacts
In healthcare integration, administrators and support personnel need to know when certain events occur, such as changes to the healthcare configuration or errors that affect processing. Oracle SOA Suite for healthcare integration addresses this by allowing you to define contact information and associate each contact with specific events for which alerts are generated. For example, if an error occurs during message processing or delivery, an email or text alert can be sent to the appropriate people so the issue can be handled immediately.
The alert notification feature for healthcare integration works in conjunction with the built-in notification framework of Oracle User Messaging Service (UMS) and Oracle SOA Suite human workflow services.
10.2 Configuring Contacts and Alerts
Contacts and alerts are configured using the Oracle WebLogic Administration Console, Oracle Enterprise Manager, and the healthcare integration user interface. You configure the email server and sender address information, as well as enable all notifications, from Oracle Enterprise Manager. You define the individual contacts and subscribe them to alerts using the healthcare integration user interface.
Configuring contacts and alerts involves the following steps:
-
Section 10.2.1, "Deploying the SMPP Driver for SMS Notifications"
-
Section 10.2.2, "Configuring Workflow Notification Properties"
For information about configuring User Messaging Service, see "Configuring Oracle User Messaging Service" in the Oracle Fusion Middleware Administrator's Guide for Oracle SOA Suite.
10.2.1 Deploying the SMPP Driver for SMS Notifications
If you are using SMS (text) notifications, you need to specify the target servers for the SMPP driver for the User Messaging Service. Perform this task on the Oracle WebLogic Administration Console.
-
In a web browser, launch Oracle WebLogic Administration Console and log in. The URL is:
http://hostname:port_number/consoleThe hostname is the name of the computer on which WebLogic Server resides, and the port number is the port on which WebLogic Server listens (by default, 7001).
-
In the Domain Structure navigator, click Deployments.
-
In the Deployments list that appears, select usermessagingdriver-smpp.
The Settings for usermessagingdriver-smpp page appears.
-
Click the Targets tab.
The Target Assignments list appears.
Figure 10-1 Targets Tab for usermessagingdriver-smpp Settings
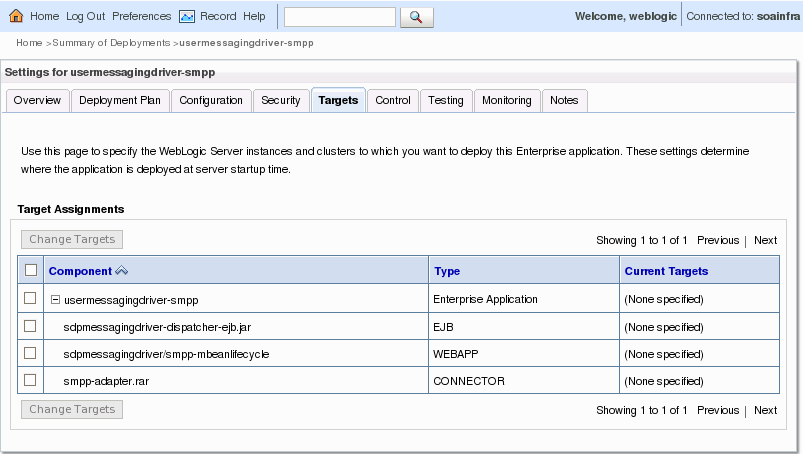
Description of "Figure 10-1 Targets Tab for usermessagingdriver-smpp Settings"
-
In the Target Assignments table, click the check box next to Component to select all driver components, and then click Change Targets.
The Change Targets Assistant appears.
Figure 10-2 Target Deployments for usermessagingdriver-smpp
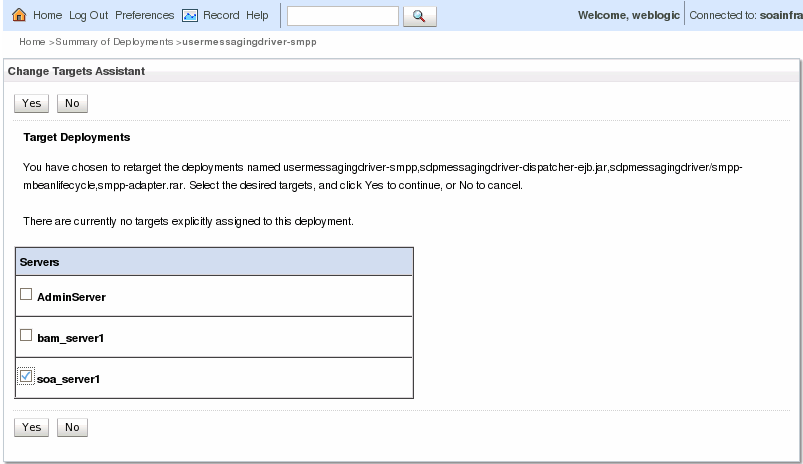
Description of "Figure 10-2 Target Deployments for usermessagingdriver-smpp"
-
Select the SOA Manager Server you are using for healthcare integration, and then click Yes.
Confirmation messages appear at the top of the page letting you know whether the targets were changed successfully.
10.2.2 Configuring Workflow Notification Properties
Workflow notification properties enable the notification feature for all notification types, and also define email addresses for the sending email account for the notifications.
To configure the workflow notification properties
-
In a web browser, launch Oracle Enterprise Manager and log in. The URL is:
http://hostname:port_number/emThe hostname is the name of the computer on which WebLogic Server resides, and the port number is the port on which WebLogic Server listens (by default, 7001).
-
In the left navigation panel, expand SOA and select soa-infra.
-
On the soa-infra page, click the SOA Infrastructure menu, point to SOA Administration, and select Workflow Config.
-
On the Workflow Notification Properties page, set the Notification Mode to All.
-
In the Notification Service section, configure the following email addresses:
-
Email: From Address -- The email address from which you want to send email notifications.
-
Email: Actionable Address -- The email address for actionable incoming messages. This is not required.
-
Email: Reply To Address -- The email address to include in the Reply To field of the outgoing email notification header.
Figure 10-3 SOA Infrastructure Workflow Notification Properties
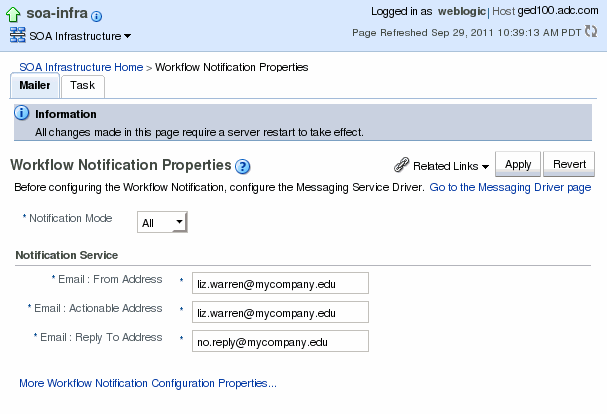
Description of "Figure 10-3 SOA Infrastructure Workflow Notification Properties"
-
-
Click Apply, and then click Yes on the confirmation dialog.
Note:
Whenever you add a document definition to an endpoint, the backend process of Oracle SOA Suite for healthcare integration deploys the document. So, an email is sent for the document deployment, and no notification is sent for the document addition.
10.2.3 Configuring Oracle User Messaging Service
Oracle UMS provides the underlying infrastructure for notifications. In order to use email notifications, you need to configure email driver information for the UMS; in order to use SMS (text) notifications, you need to configure SMPP driver information.
To configure Oracle User Messaging Service
Note:
For more information about this task and the properties you can configure, see "Configuring Oracle User Messaging Service" in the Oracle Fusion Middleware Administrator's Guide for Oracle SOA Suite.
-
In the left navigation panel of Oracle Enterprise Manager, expand User Messaging Service.
-
Right-click usermessagingdriver-email and select Email Driver Properties.
Figure 10-4 Email Driver Properties Page for UMS
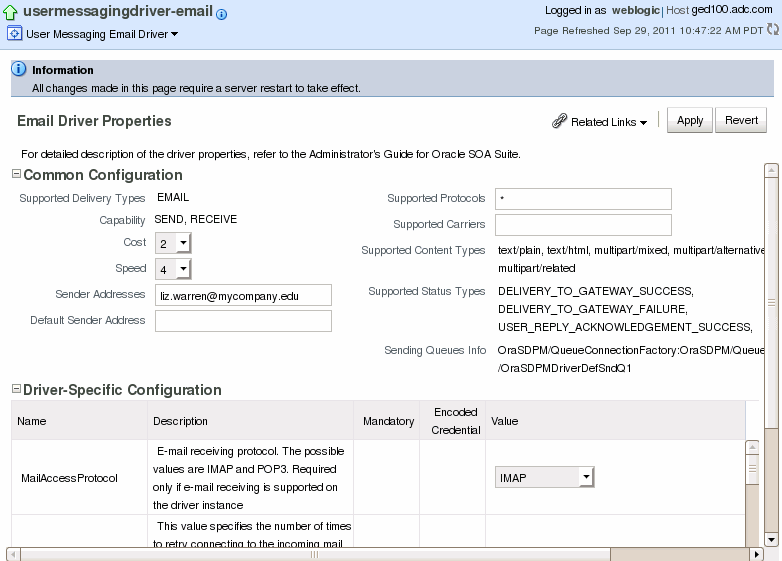
Description of "Figure 10-4 Email Driver Properties Page for UMS"
-
Configure the email driver properties for your email server.
-
After you configure the email properties, right-click usermessagingdriver-smpp under User Messaging Service in the left navigation pain
-
Select SMPP Driver Properties.
-
Configure the SMPP driver properties.
-
After you configure all the workflow and email driver properties, restart the server to load all the changes.
10.2.4 Defining Alerts and Contacts
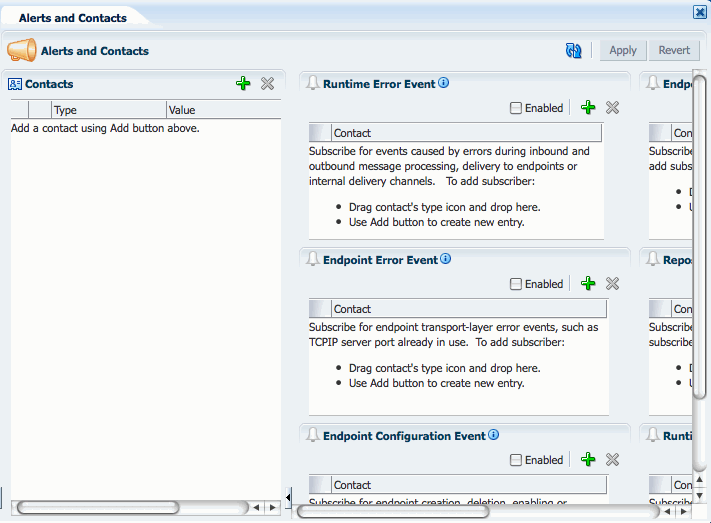
In the healthcare integration user interface, you can define contacts and then subscribe each contact to multiple alerts for different types of events. The events that can generate an alert are listed in Table 10-1.
-
In a web browser, launch the Oracle SOA Suite for healthcare integration user interface. The URL is:
http://host_name:port_number/healthcareThe hostname is the name of the computer on which the WebLogic Managed Server resides; and port number is the port number on which the Managed Server listens.
-
Under the Designer tab, click the Administration tab and then double-click Alerts and Contacts.
-
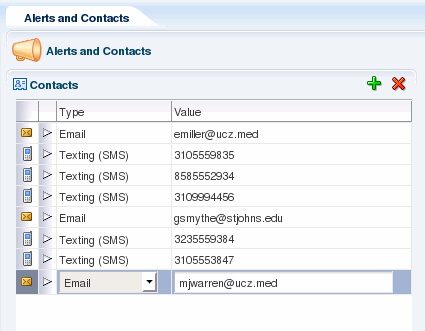
In the Contacts section, click Add a Contact (the plus icon in the upper right).
-
Enter the following information:
-
Type: Select the type of alert to send. Choose from Email or Texting (SMS).
-
Value: The email address or text number to which alerts should be sent. Make sure the type of value you enter here corresponds to the type you selected.
-
-
Repeat the previous two steps for each contact your need to add.
-
Click Apply to save the contact information.
-
In the Events section on the right, select the Enabled check box for all events for which you want to send alerts.
-
To subscribe contacts to events, do one of the following:
-
For each contact you create, drag and drop the contact from the contacts list into one or more of the enabled events listed on the right side. Table 10-1 lists and describes each event for which you can configure alerts.
-
Click Add an Alert for this Event next to the event name, and then select a contact from the drop down list that appears in the event section.
Figure 10-7 Alert Events With Contacts Assigned
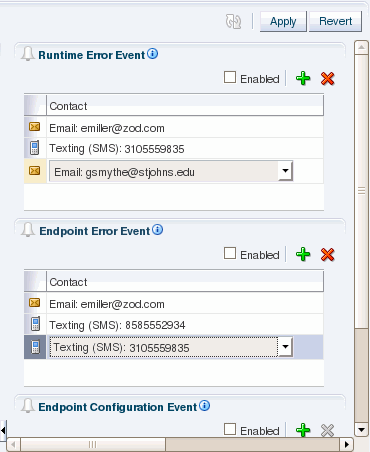
Description of "Figure 10-7 Alert Events With Contacts Assigned"
Each time an event occurs, the specified message type (email or text) is sent to the contacts listed for that event.
Tip:
Due to the length of some runtime error messages, you might want to avoid subscribing text (SMS) contacts to runtime events.
-
Table 10-1 Healthcare Integration Alert Events
| Event | Description |
|---|---|
|
Runtime Error |
Triggers an alert when an error occurs during inbound or outbound message processing, delivery to endpoints, or delivery to internal delivery channels. |
|
Endpoint Error |
Triggers an alert when an error occurs in the endpoint transport layer; for example, the TCP/IP server port is already in use. |
|
Endpoint Configuration |
Triggers an alert when changes are made to an endpoint's configuration, including enabling and disabling an endpoint. |
|
Endpoint Document Usage Change |
Triggers an alert when changes are made for a document definition associated with an endpoint. |
|
Repository Import and Export |
Triggers an alert when data is imported into or exported from the healthcare integration repository. |
|
Runtime Settings Modification |
Triggers an alert when changes are made to the any of the runtime properties listed on the Runtime Settings page. |
10.3 Viewing the Alerts Assigned to a Contact
You can view all of the alerts that are assigned to a specific contact from the Contacts list on the Alerts and Contacts page.
-
Under the Designer tab of the healthcare integration user interface, click the Administration tab and then double-click Alerts and Contacts.
-
In the Contacts list, click the arrowhead icon to the left of the contact whose alert information you want to view.
A list of alert subscriptions appears.
Figure 10-8 Alert Subscriptions for a Contact
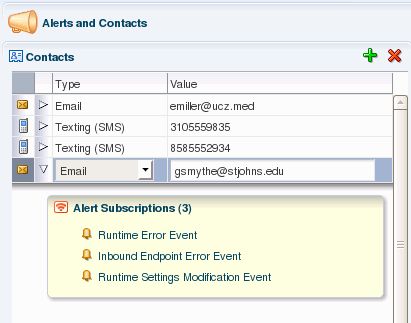
Description of "Figure 10-8 Alert Subscriptions for a Contact"
-
When you are done viewing the alerts, click the contact's arrowhead again to close the alert subscriptions list.
10.4 Removing Contacts
Once you create a contact, you can remove it from the contact list if it is no longer needed. If a contact no longer needs to receive alerts for an event, you can unsubscribe the contact from that event.
-
Under the Designer tab of the healthcare integration user interface, click the Administration tab and then double-click Alerts and Contacts.
-
In the Contacts list, select the contact to delete, and then click Delete Currently Selected Contact (the red X in the upper right of the Contacts list).
-
If the contact is subscribed to any alerts, a confirmation dialog appears. Click OK to remove the contact.
The contact is removed from the Contacts list and is also removed from any events to which it was subscribed.
To Unsubscribe a Contact from an Alert
-
Under the Designer tab of the healthcare integration user interface, click the Administration tab and then double-click Alerts and Contacts.
-
Select the contact in the event list from which you want to remove the contact.
-
Click Delete Currently Selected Alert (the red X in the upper right of the event list.).
The contact is removed from the list.
10.5 Viewing a History of Alerts Sent
You can view a history of the alerts that have been sent to each contact from the Oracle Enterprise Manager Human Workflow Engine pages.
To view a history of alerts sent
-
In a web browser, launch Oracle Enterprise Manager and log in. The URL is:
http://hostname:port_number/emThe hostname is the name of the computer on which WebLogic Server resides, and the port number is the port on which WebLogic Server listens (by default, 7001).
-
In the left navigation panel, expand SOA and select soa-infra.
-
On the soa-infra page, click the SOA Infrastructure menu, point to Service Engines, and select Human Workflow.
-
On the Human Workflow Engine page, click the Notification Management tab.
