6 Working with View Object Query Results
This chapter describes how to interactively test ADF view objects query results using the Business Component Browser provided in JDeveloper. This chapter also explains how to use the Business Components API to access view object instances in a test client outside of JDeveloper.
This chapter includes the following sections:
-
Section 6.2, "Creating an Application Module to Test View Instances"
-
Section 6.3, "Testing View Object Instances Using the Business Component Browser"
-
Section 6.4, "Testing View Object Instances Programmatically"
6.1 Introduction to View Object Runtime Behavior
JDeveloper includes an interactive application module testing tool that you can use to test all aspects of its data model without having to use your application user interface or write a test client program. Running the Business Component Browser can often be the quickest way of exercising the data functionality of your business service during development.
Note:
When you want to test an application module programmatically, you can write a test client. For more information, see Section 6.4.2, "How to Create a Command-Line Java Test Client."Using the Business Component Browser, you can simulate an end user interacting with your application module data model before you have started to build any custom user interface of your own. Even after you have your UI pages constructed, you will come to appreciate using the Business Component Browser to assist in diagnosing problems when they arise. You can reproduce the issues in the Business Component Browser to discover if the issue lies in the view or controller layers of the application, or is instead a problem in the business service layer application module itself.
6.2 Creating an Application Module to Test View Instances
Before you can test view objects that you create in your data model project, you must create an application module where you will define instances of the view objects you want to test. The application module is the transactional component that the Business Component Browser (or UI client) will use to work with application data. The set of view objects used by an application module defines its data model, in other words, the set of data that a client can display and manipulate through a user interface.
To test the view objects you added to an application module, use the Business Component Browser, which is accessible from the Application Navigator. For details about using the Business Component Browser, see Section 6.3, "Testing View Object Instances Using the Business Component Browser."
6.2.1 How to Create the Application Module with Individual View Object Instances
To create an application module that will define instances of individual view objects, use the Create Application Module wizard, which is available in the New Gallery.
Create the desired view objects, as described in Section 5.2.1, "How to Create an Entity-Based View Object" and Section 5.2.3, "How to Create an Expert Mode, Read-Only View Object."
To create an application module to test individual view object instances:
-
In the Application Navigator, right-click the project in which you want to create the application module and choose New.
-
In the New Gallery, expand Business Tier, select ADF Business Components and then Application Module, and click OK.
-
In the Items list, select Application Module to launch the Create Application Module wizard.
-
In the Create Application Module wizard, in the Name page, provide a package name and an application module name. Click Next.
-
On the Data Model page, include instances of the view objects you have previously defined and edit the view object instance names to be exactly what you want clients to see. Then click Finish.
Instead of accepting the default instance name shown in the Data Model page, you can change the instance name to something more meaningful (for example, instead of the default name
OrderItems1you can rename it toAllOrderItems).
6.2.2 How to Create the Application Module with Master-Detail View Object Instances
You can also use the Create Application Module wizard to create a hierarchy of view objects for an application module, based on master-detail relationships that the view objects represent.
Create hierarchical relationships between view objects, as described in Section 5.6, "Working with Multiple Tables in a Master-Detail Hierarchy."
To create an application module based on view object relationships:
-
In the Application Navigator, right-click the project in which you want to create the application module and choose New.
-
In the New Gallery, expand Business Tier, select ADF Business Components and then Application Module, and click OK.
-
In the Items list, select Application Module to launch the Create Application Module wizard.
-
In the Create Application Module wizard, select the Data Model node.
-
In the Available View Objects list on the left, select the instance of the view object that you want to be the actively coordinating master.
The master view object will appear with a plus sign in the list indicating the available view links for this view object. The view link must exist to define a master-detail hierarchy.
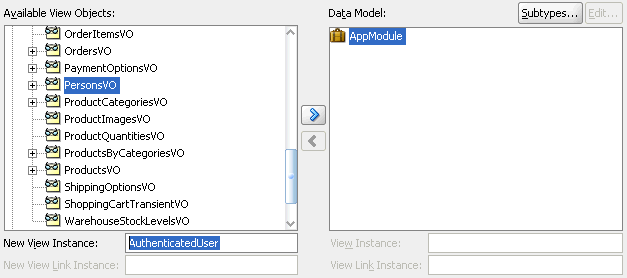
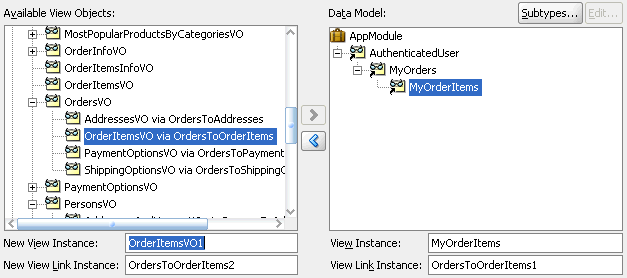
For example, Figure 6-1 shows
PersonsVOselected and renamedAuthenticatedUserin the New View Instance field. -
Shuttle the selected master view object to the Data Model list
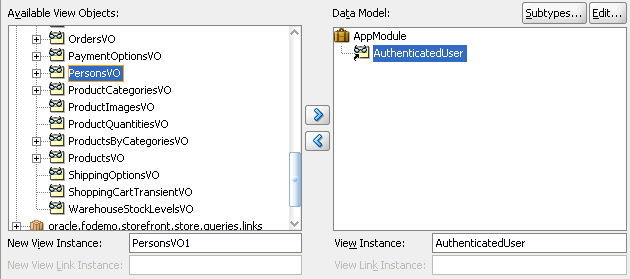
For example, Figure 6-2 shows the newly created master view instance
AuthenticatedUserin the Data Model list after you add it to the list. -
In the Data Model list, leave the newly created master view instance selected, so that it appears highlighted. This will be the target of the detail view instance you will add. Then locate and select the detail view object beneath the master view object in the Available View Objects list.
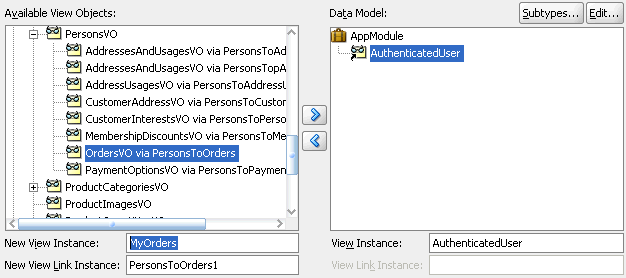
For example, Figure 6-3 shows the detail
OrdersVOindented beneath masterPersonsVOwith the nameOrdersVO via PersonsToOrders. The name identifies the view linkPersonsToOrders, which defines the master-detail hierarchy betweenPersonsVOandOrdersVO. The detail view instance is renamed toMyOrders. -
To add the detail instance to the previously added master instance, shuttle the detail view object to the Data Model list below the selected master view instance.
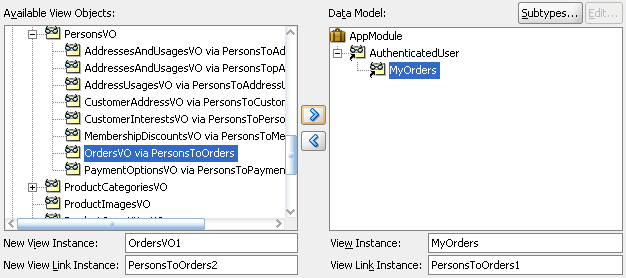
Figure 6-4 shows the newly created detail view instance
MyOrdersis a detail of theAuthenticatedUserin the data model. -
To add another level of hierarchy, select the newly added detail in the Data Model list, then shuttle over the new detail which itself has a master-detail relationship with the previously added detail instance.
Your data model can contain as many levels of hierarchy as your view object relationships support. For example, Figure 6-5 shows the Data Model list with instance
AuthenticatedUser(renamed forPersonsVO) as the master ofMyOrders(renamed forOrdersVO via PersonsToOrders), which in turn is a master forMyOrderItems(renamed fromOrderItemsVO via OrdersToOrderItems). The detail view objectMyOrderItemsis the last level of the hierarchy possible because this view object is itself not a master for another view object.
6.3 Testing View Object Instances Using the Business Component Browser
Using the Business Component Browser, you can simulate an end user interacting with your application module data model before you have started to build any custom user interface of your own. Even after you have your UI pages constructed, you will come to appreciate using the Business Component Browser to assist in diagnosing problems when they arise. You can reproduce the issues in the Business Component Browser to discover whether the problem lies in the view or controller layers of the application, or whether there is instead a problem in the business service layer application module itself.
6.3.1 How to Run the Business Component Browser
To test the view objects you added to an application module, use the Business Component Browser, which is accessible from the Application Navigator.
To test view objects in an application module configuration:
-
In the Application Navigator, expand the project containing the desired application module and view objects.
-
Right-click the application module and choose Run.
Alternatively, choose Debug when you want to run the application in the Business Component Browser with debugging enabled. JDeveloper opens the debugger process panel in the Log window and the various debugger windows. For example, when debugging using the Business Component Browser, you can view status message and exceptions, step in and out of source code, and manage breakpoints.
For information about receiving diagnostic messages specific to ADF Business Component debugging, see Section 6.3.8, "How to Enable ADF Business Components Debug Diagnostics".
-
In the Select Business Components Configuration dialog, choose the desired application module configuration from the Business Component Configuration Name list to run the Business Component Browser.
By default, an application module has only its default configurations, named
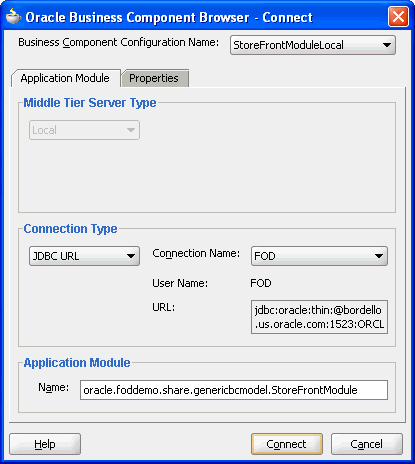
AppModuleNameLocalandAppModuleNameShared. For example, Figure 6-6 shows theStoreFrontModuleLocalconfiguration used by the application module to connect to the database.If you have created additional configurations for your application module and want to test it using one of those instead, just select the desired configuration from the Business Component Configuration Name dropdown list on the Configuration dialog before clicking Connect.
-
Click Connect to start the application module using the selected configuration.
-
To execute a view object in the Business Component Browser, expand the data model tree and double-click the desired view object node.
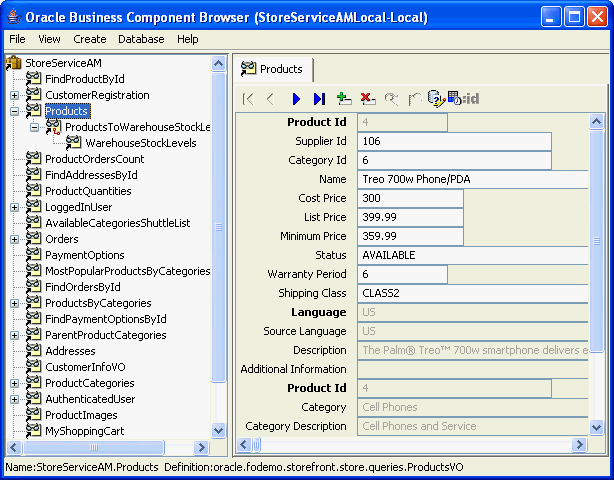
Note that the view object instance may already appear executed in the testing session. In this case, the Business Component Browser data view page on the right already displays query results for the view object instance. The fields in the Business Component Browser data view page of a read-only view object will always appear disabled since the data it represents is not editable. For example, in Figure 6-7, data for the view instance
Productsappears in the Browser. Fields like Product Id, Language, and Category appear disabled because the attributes themselves are not editable. -
Right-click a node in the data model tree at the left of the Business Component Browser to display the context menu for that node. For example, on a view object node you can reexecute the query if needed, to remove the view object from the data model tree, and perform other tasks.
-
Right-click the tab of an open data viewer to display the context menu for that tab, as shown in Figure 6-8. For example, you can close the data viewer or open it in a separate window.
6.3.2 How to Test Entity-Based View Objects Interactively
You test entity-based view objects interactively in the same way as read-only ones. Just add instances of the desired view objects to the data model of some application module, and then test that application module using the Business Component Browser.
You'll find the Business Component Browser invaluable for quickly testing and debugging your application modules. Table 6-1 gives an overview of the operations that the Business Component Browser toolbar buttons perform when you display an entity-based view object.
Table 6-1 Business Component Browser Toolbar Buttons
| Button | Operation | Usage |
|---|---|---|
|
|
Move to ... row |
Changes the current row displayed by the Business Component Browser. Moves to the first, previous, next, or last row. |
|
|
Insert a new row |
Creates and inserts a new row. |
|
|
Delete the current row |
Deletes the current row. |
|
|
Save changes to the database |
Posts and commits changes that you made in the ADF Business Components cache. |
|
|
Discard all changes since last save |
Discards changes that you made in the ADF Business Components cache and restores the original values, rolling back any changes posted to the database. |
|
|
Specify view criteria |
Displays the Business Component View Criteria dialog that you can use to create and apply view criteria to the master view object instance. |
|
|
Validate row |
Validates the current row by applying validation rules defined for all entity object instances. Disabled unless at least one field is editable. |
|
|
Edit bind variables |
Displays the Bind Variable dialog that you can use to enter values for bind parameters used in the view object query. Disabled unless the view object query uses bind parameters in the query statement. |
To test the entity-based view objects you added to an application module, use the Business Component Browser, which is accessible from the Application Navigator.
To test entity-based view objects using an application module configuration:
-
Select the application module in the Application Navigator and choose Run from the context menu.
-
Click Connect on the Select Business Component Browser Configuration dialog and use the desired configuration for testing.
-
To execute an entity-based view object in the Business Component Browser, expand the data model tree and double-click the desired view object node.
Unlike the fields of a read-only view object, the fields displayed in the data view page will appear enabled, because the data it represents is editable.
-
You can use the editable fields to update individual values and perform validation checks on the entered data.
In the case of a view instance with referenced entities, you can change the foreign key value and observe that the referenced part changes.
-
You can use the toolbar buttons to perform row-level operations, such as navigate rows, create row, remove row, and validate the current row.
For further discussion about simulating end-user interaction in the data view page, see Section 6.3.5, "How to Simulate End-User Interaction in the Business Component Browser".
6.3.3 How to Update the Business Component Browser to Display Project Changes
Normally, changes that you make to the data model project will not be picked up automatically by running the Business Component Browser. You can, however, force the Business Component Browser to reload metadata from the data model project any time you want to synchronize the displayed data model and the data model project. This option is an alternative to quitting the Business Component Browser, editing your project, and rerunning the Business Component Browser to view the latest changes.
Using the Reload Application option saves time, especially as you work iteratively between the Business Component Browser and JDeveloper. For example, while running the Business Component Browser you might determine the need to modify the data model with a new view instance or you might find that a view instance is missing an LOV attribute definition. You can return to JDeveloper and use the Business Components overview editors to make the changes that alter the data model metadata. Then, after you recompile the project (a necessary step), you can return to the Business Component Browser to reload the updated metadata from the project's class path.
To reload the data model metadata in the running Business Component Browser:
-
In the Application Navigator, right-click the application module and choose Run.
-
Test the data model and determine any changes you want to make. Do not exit the Business Component Browser.
-
In JDeveloper, make the desired changes and recompile the data model project. (For example, you can right-click the data model project in the Application Navigator and choose Make to complete the recompile step.)
Although the metadata changes that you make are not involved in compiling the project, the compile step is necessary to copy the metadata to the class path and to allow the Business Component Browser to reload it.
-
Return to the Business Component Browser and click the Reload the Application Metadata button above the data model tree. The Business Component Browser closes all open windows.
Alternatively, you can choose Reload Application from the File menu of the Business Component Browser.
-
Reopen the desired windows and view your changes.
6.3.4 What Happens When You Use the Business Component Browser
When you launch the Business Component Browser, JDeveloper starts the tool in a separate process and the Business Component Browser appears. The tree at the left of the dialog displays all of the view object instances in your application module's data model. After you double-click the desired view object instance, the Business Component Browser will display a data view page to inspect the query results. For example, Figure 6-7 shows the view instance Products that has been double-clicked in the expanded tree to display the data for this view instance in the data view page on the right.
The data view page will appear disabled for any read-only view objects you display because the data is not editable. But even for a read-only view object, the tool affords some useful features:
-
You can validate that the UI hints based on the Label Text control hint and format masks are defined correctly.
-
You can also scroll through the data using the toolbar buttons.
-
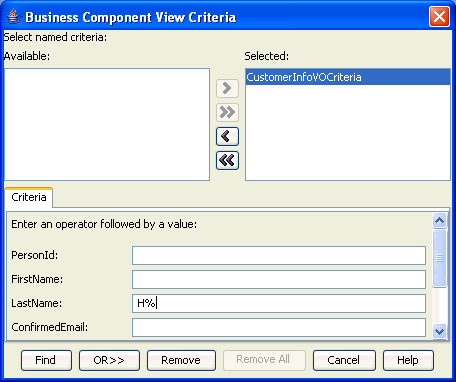
You can enter Query-by-Example criteria to find a particular row whose data you want to inspect. By clicking the Specify View Criteria button in the toolbar, the View Criteria dialog displays the list of available Query-by-Example criteria.
For example, as shown in Figure 6-9, you can select a view criteria like
CustomerInfoVOCriteriaand enter a query criteria like "H%" for aLastNameattribute and click Find to narrow the search to only those users with a last name that begins with the letterH.
The Business Component Browser becomes even more useful when you create entity-based view objects that allow you to simulate inserting, updating, and deleting rows, as described in Section 6.3.2, "How to Test Entity-Based View Objects Interactively."
6.3.5 How to Simulate End-User Interaction in the Business Component Browser
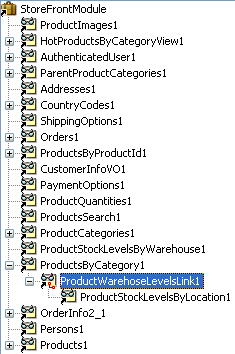
When you launch the Business Component Browser, the tree at the left of the display shows the hierarchy of the view object instances that the data model of your application module defines. If the data model defines master-detail view instance relationships, the tree will display them as parent and child nodes. A node between the master-detail view instances represent the view link instance that performs the active master-detail coordination as the current row changes in the master. For example, in Figure 6-10 the tree is expanded to show the master-detail relationship between the master ProductByCategory1 view instance and the detail ProductStockLevelsByLocation1 view instance. The selected node, ProductWarehousesLevelsLink1, is the view link instance that defines the master-detail relationship.
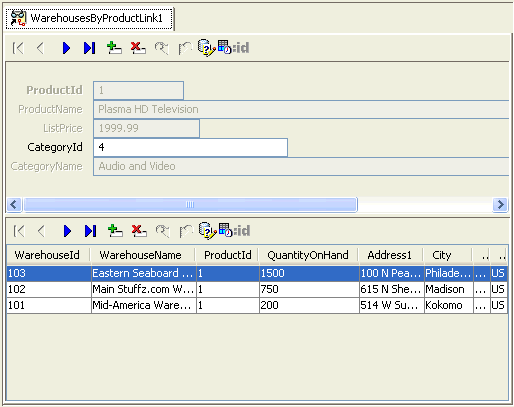
Double-clicking the view link instance executes the master object and displays the master-detail data in the data view page. For example, in Figure 6-11, double-clicking the ProductWarehousesLevelsLink1 view link instance in the tree executes the ProductsByCategory master view instance in the top portion of the data view page and the ProductStockLevelsByLocation1 view instance in the bottom portion of the data view page. Additional context menu items on the view object node allow you to reexecute the query if needed, remove the view object from the data model panel, and perform other tasks.
In the master-detail data view page, you can scroll through the query results. Additionally, because instance of entity-based view objects are fully editable, Instead of displaying disabled UI controls showing read-only data for a read-only view object, the data view page displays editable fields. You are free to experiment with creating, inserting, updating, validating, committing, and rolling back.
For example, you can view multiple levels of master-detail hierarchies, opening multiple data view pages at the same time. Use the Detach context menu item to open any tab into a separate window and visualize multiple view object's data at the same time.
Using just the master-detail data view page, you can test several functional areas of your application.
6.3.5.1 Testing Master-Detail Coordination
When you click the navigation buttons on the Business Component Browser toolbar, you can see that the rows for the current master view object are correctly coordinated. For example, Figure 6-11 shows a master-detail hierarchy with products and warehouses. If you click the Next Row button in the master panel, the master panel will display the next product (identified by a product ID) and the detail panel will update to display the list of warehouses and quantities available for the product.
6.3.5.2 Testing UI Control Hints
The entity-based view object attributes inherit their control hints from those on the underlying entity object attribute. The prompts displayed in the data view page help you see whether you have correctly defined a user-friendly label text control hint for each attribute. For details on setting up the hint on your entity object, see Section 5.13, "Defining Control Hints for View Objects."
6.3.5.3 Testing Business Domain Layer Validation
Depending on the validation rules you have defined, you can try entering invalid values to trigger and verify validation exceptions. For example, when you have defined a range validation rule, enter a value outside the range and see an error similar to:
(oracle.jbo.AttrSetValException) Valid product codes are between 100 and 999
Click the rollback button in the toolbar to revert data to the previous state.
6.3.5.4 Testing Alternate Language Message Bundles and Control Hints
When your application defines alternative languages in your resource message bundles, you can configure the Business Component Browser to recognize these languages. In the Business Component Browser, you can then display the Locale menu and select among the available language choices.
To specify a default language for the Business Component Browser:
-
Choose Preferences from the JDeveloper Tools menu.
-
Expand Business Components in the selection panel, and select Tester.
-
To execute an entity-based view object in the Business Component Browser, expand the data model tree and double-click the desired view object node.
-
In the Business Component Browser page, add any locale for which you have created a resource message bundle to the Selected list.
Alternatively, you can configure the default language choice by setting ADF Business Components runtime configuration properties. These runtime properties also determine which language the Business Component Browser will display as the default. In the Select Business Component Browser Configuration dialog, select the Properties tab and enter the desired country code for the country and language. For example, to specify the Italian language, you would enter IT and it for these two properties:
-
jbo.default.country=IT -
jbo.default.language=it
Testing the language message bundles in the Business Component Browser lets you verify that the translations of the entity object control hints are correctly located. Or, if the message bundle defines date formats for specific attributes, the tool lets you verify that date formats change (like 04/12/2007 to 12/04/2007).
6.3.5.5 Testing View Objects That Reference Entity Usages
By scrolling through the data — or using the Specify View Criteria button in the Business Component Browser toolbar to search — you can verify whether you have correctly altered the WHERE clause in an entity-based view object's query to use an outer join. The rows should appear as expected.
You also can try changing a primary key attribute of a master view object. This will allow you to verify that the corresponding reference information is automatically updated to reflect the new primary key value.
Use the Business Component Browser to verify that control hints defined at the view object level override the ones it would normally inherit from the underlying entity object. If you notice that several attributes share the same label text, you can edit the control hint for the desired attributes at the view object level. For example, you can set the Label Text hint to Member Since for the RegisteredDate attribute and Provisioned? for the ProvisionedFlag attribute.
6.3.5.6 Testing Row Creation and Default Value Generation
When displaying an entity-based view object, click the Create Row button in the Business Component Browser toolbar for the view object instance to create a new blank row. Any fields that have a declarative default value will appear with that value in the blank row. If the a DBSequence-valued attribute is used, a temporary value will appear in the new row. After entering all the required fields, click the Commit button to commit the transaction. The actual, trigger-assigned primary key should appear in the field after successful commit.
6.3.5.7 Testing That New Detail Rows Have Correct Foreign Keys
If you click Create Row in the Business Component Browser toolbar to try adding a new row to an existing detail entity-based view object instance, you'll notice that the view link automatically ensures that the foreign key attribute value in the new row is set to the value of the current master view instance row.
6.3.6 How to Test Multiuser Scenarios in the Business Component Browser
When view objects and entity objects cooperate at runtime, two exceptions can occur when you run the application in a multiuser environment. To anticipate these exceptions, you can simulate a multiuser environment for testing purposes using the Business Component Browser. For example, when the application displays edit forms for view object queries, what is the expected behavior when two users attempt to modify the same attribute in their forms?
To understand the expected behavior, open two instances of the Business Component Browser on the application module to simulate two users editing the same view object attribute. Keep both instances open and perform the following two tests to demonstrate how multiuser exceptions can arise:
-
In one instance of the Business Component Browser, modify an attribute of an existing view object and tab out of the field. Then, in the other browser instance, try to modify the same view object attribute in some way and commit the change. You'll see that the second user gets the
oracle.jbo.AlreadyLockedException.You can then change the value of
jbo.locking.modeto bepessimisticon the Properties page of the Business Component Browser Connect dialog and try repeating the test (the default mode is set topessimistic). You'll see the error occurs for the second user immediately after changing hte value instead of after commiting the change. -
In one instance of the Business Component Browser, modify an attribute of an existing view object and tab out of the field. Then, in the other browser instance, retrieve (but don't modify) the same view object attribute. Back in the first window, commit the change. If the second user then tries to modify that same attribute, you'll see that the second user gets the
oracle.jbo.RowInconsistentException. The row has been modified and committed by another user since the second user retrieved the row into the entity cache.
6.3.7 How to Customize Configuration Options Before Running the Browser
Using the Select Business Components Configuration dialog, you can select a predefined configuration to run the tool using that named set of runtime configuration properties. The Select Configuration dialog also features a Properties tab that allows you to see the selected configurations settings and to override any of the configuration's settings for the current run of the browser. For example, you could alter the default language for the UI control hints for a single instance of the Business Component Browser by opening the Properties tab and setting the following two properties with the desired country code (in this case, IT for Italy):
-
jbo.default.country = IT -
jbo.default.language = it
Tip:
If you wanted to make the changes to your configuration permanent, you could use the Configuration Manager to copy the current configuration and create a new configuration in which you set the desired properties set. For example, anytime you wanted to test in Italian you could simply choose to use theUserServiceLocalItalian configuration, instead of the default UserServiceLocal.6.3.8 How to Enable ADF Business Components Debug Diagnostics
When launching the Business Component Browser, if your data model project's current run configuration is set to include the Java System parameter jbo.debugoutput=console, you can enable ADF Business Components debug diagnostics with messages directed to the JDeveloper Log window.
Note:
Despite the similar name, the JDeveloper project's run configurations are different from the ADF application module's configurations. The former are part of the project properties, the latter are defined along with your application module component in itsbc4j.xcfg file and edited using the Edit Business Components Configuration dialog.To set the system debug output property, open the Run/Debug/Profile page in the Project Properties dialog for your data model project. Click Edit to edit the chosen run configuration, and add following string to the Java Options field in the page.
-Djbo.debugoutput=console
The next time you run the Business Component Browser and double-click the view object, you'll see detailed diagnostic output in the console, as shown in Example 6-1. Using the diagnostics will allow you to visualize everything the framework components are doing for your application.
Example 6-1 Diagnostic Output of Business Component Browser
  :
[355] Oracle SQLBuilder: Registered driver: oracle.jdbc.OracleDriver
[356] Creating a new pool resource
[357] **** DBTransactionImpl establishNewConnection
[358] Successfully logged in
[359] JDBCDriverVersion: 11.1.0.7.0-Production
[360] DatabaseProductName: Oracle
[361] DBTransactionImpl initTransaction
[362] Replacing: null with: StoreServiceAM_AddressesPageDef
[363] Replacing: null with: StoreServiceAM_MostPopularProductsByCategoriesPageDef
...
[537] Orders ViewRowSetImpl.execute caused params to be "un"changed
[538] Column count: 41
[539] ViewObject: Orders Created new QUERY statement
[540] Orders>#q computed SQLStmtBufLen: 952, actual=865, storing=895
[541] SELECT OrderEO.ORDER_ID, OrderEO.ORDER_DATE, OrderEO.ORDER_SHIPPED_DATE,
       FROM ORDERS OrderEO ORDER BY OrderEO.ORDER_DATE desc
[542] Bind params for ViewObject: Orders
Other legal values for this property are silent (the default, if not specified) and file. If you choose the file option, diagnostics are written to the system temp directory.
Tip:
You can create separate JDeveloper run configurations, one with the ADF Business Components debug diagnostics enabled, and another without it. By choosing the appropriate project run configuration, you can easily run JDeveloper with or without debug diagnostics.6.3.9 What Happens at Runtime: When View Objects and Entity Objects Cooperate
On their own, view objects and entity objects simplify two important jobs that every enterprise application developer needs to do:
-
Work with SQL query results
-
Modify and validate rows in database tables
Entity-based view objects can query any selection of data that you want the end user to be able to view and modify. Any data the end user is allowed to change will be validated and saved by your reusable business domain layer. The key ingredients you provide as the developer are the ones that only you can know:
-
You decide what business logic should be enforced in your business domain layer
-
You decide what queries describe the data you need to put on the screen
These are the things that make your application unique. The built-in functionality of your entity-based view objects handles the rest of the implementation details.
Note:
Understanding row keys and what role the entity cache plays in the transaction are important concepts that help to clarify the nature of the entity-based view objects. These two concepts are addressed in Section 6.4.1, "ViewObject Interface Methods for Working with the View Object's Default RowSet."6.3.9.1 What Happens When a View Object Executes Its Query
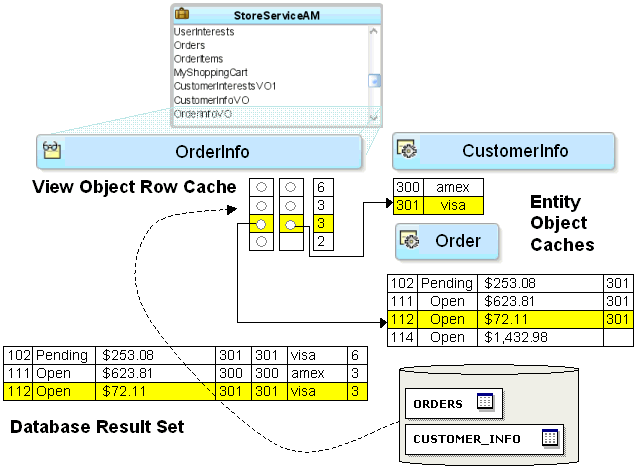
After adding an instance of an entity-based view object to the application module's data model, you can see what happens at runtime when you execute the query. Like a read-only view object, an entity-based view object sends its SQL query straight to the database using the standard Java Database Connectivity (JDBC) API, and the database produces a result set. In contrast to its read-only counterpart, however, as the entity-based view object retrieves each row of the database result set, it partitions the row attributes based on which entity usage they relate to. This partitioning occurs by creating an entity object row of the appropriate type for each of the view object's entity usages, populating them with the relevant attributes retrieved by the query, and storing each of these entity rows in its respective entity cache. Then, rather than storing duplicate copies of the data, the view row simply points at the entity row parts that comprise it.
Figure 6-12 illustrates how the entity cache partitions the result set attributes of two entity-based view objects. In this example, the highlighted row in the database result set is partitioned into an Order entity row with primary key 112 and a CustomerInfo entity row with primary key 301.
As described in Section 6.4.1.2, "The Role of the Entity Cache in the Transaction," the entity row that is brought into the cache using findByPrimaryKey() contains all attributes of the entity object. In contrast, an entity row created by partitioning rows from the entity-based view object's query result contains values only for attributes that appear in the query. It does not include the complete set of attributes. This partially populated entity row represents an important runtime performance optimization.
Since the ratio of rows retrieved to rows modified in a typical enterprise application is very high, you can save memory by bringing only the attributes into memory that you need to display instead of bringing all attributes into memory all the time.
By partitioning queried data this way into its underlying entity row constituent parts, the first benefit you gain is that all of the rows that include some data queried will display a consistent result when changes are made in the current transaction. In other words, if one view object allows the PaymentType attribute of customer 301 to be modified, then all rows in any entity-based view object showing the PaymentType attribute for customer 301 will update instantly to reflect the change. Since the data related to customer 301 is stored exactly once in the CustomerInfo entity cache in the entity row with primary key 301, any view row that has queried the order's PaymentType attribute is just pointing at this single entity row.
Luckily, these implementation details are completely hidden from a client working with the rows in a view object's row set. The client works with a view row, getting and setting the attributes, and is unaware of how those attributes might be related to entity rows behind the scenes.
6.3.9.2 What Happens When a View Row Attribute Is Modified
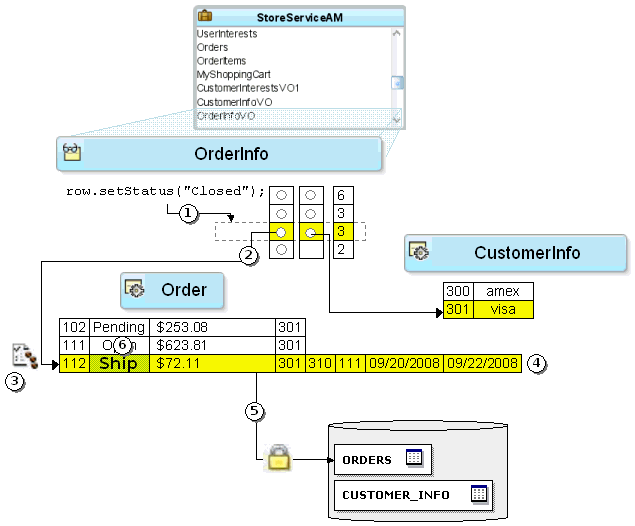
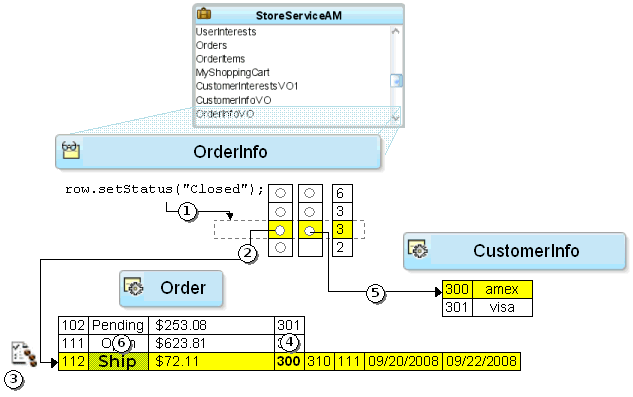
When a user attempts to update the attribute of a view row, a series of steps occur to automatically coordinate this view row attribute modification with the underlying entity row. These steps ensure that a validation rule defined on the entity-mapped attribute will be triggered before the value is changed.
Figure 6-13 illustrates the basic steps that occur at runtime when the user attempts to update an entity-mapped attribute. In this example, the modified attribute Status is mapped to an entity usage where a validation rule is defined.
-
The user attempts to set the
Statusattribute to the valueShip. -
Since
Statusis an entity-mapped attribute from theOrderentity usage, the view row delegates the attribute set to the appropriate underlying entity row in theOrderentity cache having primary key112. -
Any attribute-level validation rules on the
Statusattribute of theOrderentity object are evaluated and the modification attempt will fail if any rule does not succeed.Assume that some validation rule for the
Statusattribute programmatically references theShipDateattribute (for example, to enforce a business rule that anOrdercannot be shipped the same day it is placed). TheShipDatewas not one of theOrderattributes retrieved by the query, so it is not present in the partially populated entity row in theOrderentity cache. -
To ensure that business rules can always reference all attributes of the entity object, the entity object detects this situation and "faults-in" the entire set of
Orderentity object attributes for the entity row being modified using the primary key (which must be present for each entity usage that participates in the view object). -
After the attribute-level validations all succeed, the entity object attempts to acquire a lock on the row in the
ORDERStable before allowing the first attribute to be modified. -
If the row can be locked, the attempt to set the
Statusattribute in the row succeeds and the value is changed in the entity row.
Note:
Thejbo.locking.mode configuration property controls how rows are locked. The default value is optimistic. Typically, Fusion web applications will use the default setting optimistic, so that rows aren't locked until transaction commit time. In pessimistic locking mode, the row must be lockable before any change is allowed to it in the entity cache.6.3.9.3 What Happens When a Foreign Key Attribute is Changed
When a user attempts to update a foreign key attribute, a series of steps occur to automatically coordinate this view row attribute modification with the underlying entity row. These steps ensure that a validation rule defined on the foreign key, entity-mapped attribute will be triggered before the value is changed. They also ensure that the view row for the changed foreign key attribute reflects the correct attributes of all referenced entity objects.
Figure 6-14 illustrates the basic steps that occur at runtime when the user attempts to update a foreign key, entity-mapped attribute. In this example, the modified attribute CustomerInfoId is mapped to an entity usage Order where the attribute is associated with another entity object CustomerInfo.
-
The user attempts to set the
CustomerInfoIdattribute to the value300. -
Since
CustomerInfoIdis an entity-mapped attribute from theOrderentity usage, the view row delegates the attribute set to the appropriate underlying entity row in theOrderentity cache, which has primary key112. -
Any attribute-level validation rules on the
CustomerInfoIdattribute of theOrderentity object are evaluated and the modification attempt will fail if any rule does not succeed. -
The row is already locked, so the attempt to set the
CustomerInfoIdattribute in the row succeeds and the value is changed in the entity row. -
Since the
CustomerInfoIdattribute on theOrderentity usage is associated with theCustomerInfoentity object, this change of foreign key value causes the view row to replace its current entity row part for customer301with the entity row corresponding to the newCustomerInfoId = 300. This effectively makes the view row for order112point to the entity row for300, so the value of thePaymentTypein the view row updates to reflect the correct reference information for this newly assigned customer.
6.3.9.4 What Happens When a Transaction is Committed
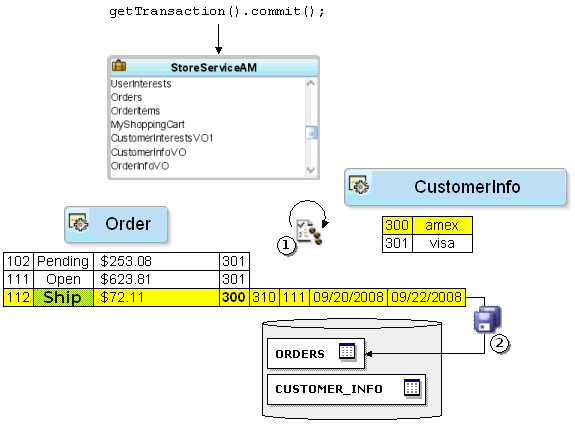
Suppose the user is satisfied with the changes, and commits the transaction. As shown in Figure 6-15, there are two basic steps:
-
The
Transactionobject validates any invalid entity rows in its pending changes list. -
The entity rows in the pending changes list are saved to the database.
The figure depicts a loop in Step 1 before the act of validating one modified entity object might programmatically affect changes to other entity objects. Once the transaction has processed its list of invalid entities on the pending changes list, if the list has entities, the transaction will complete another pass. It will attempt up to ten passes through the list. If by that point there are still invalid entity rows, it will throw an exception because this typically means you have an error in your business logic that needs to be investigated.
6.3.9.5 What Happens When a View Object Requeries Data
When you reexecute a view object's query, by default the view rows in its current row set are "forgotten" in preparation for reading in a fresh result set. This view object operation does not directly affect the entity cache, however. The view object then sends the SQL to the database and the process begins again to retrieve the database result set rows and partition them into entity row parts.
Note:
Typically when the view object requeries data, you expect it to retrieve the latest database information. If instead you want to avoid a database roundtrip by restricting your view object to querying only over existing entity rows in the cache, or over existing rows already in the view object's row set, see Section 39.5, "Performing In-Memory Sorting and Filtering of Row Sets."6.3.9.5.1 How Unmodified Attributes are Handled During Requery
As part of the entity row partitioning process during a requery, if an attribute on the entity row is unmodified, then its value in the entity cache is updated to reflect the newly queried value.
6.3.9.5.2 How Modified Attributes are Handled During Requery
However, if the value of an entity row attribute has been modified in the current transaction, then during a requery the entity row partitioning process does not refresh its value. Uncommitted changes in the current transaction are left intact so the end-user's logical unit of work is preserved. As with any entity attribute value, these pending modifications continue to be consistently displayed in any entity-based view object rows that reference the modified entity rows.
Note:
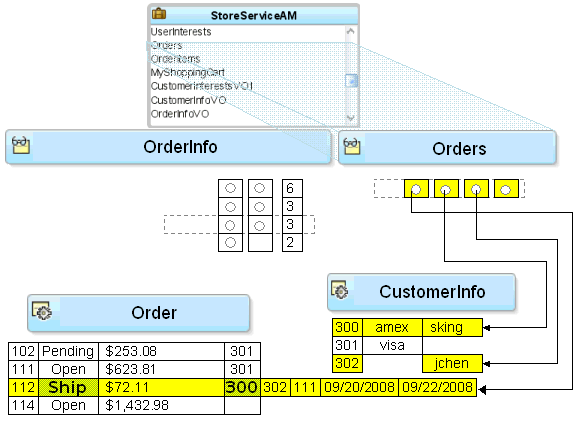
End-user row inserts and deletes are also managed by the entity cache, which permits new rows to appear and deleted rows to be skipped during requerying. For more information about new row behavior, see Section 39.1.2, "Maintaining New Row Consistency in View Objects Based on the Same Entity."For example, Figure 6-16 illustrates the scenario where a user "drills down" to a different page that uses the Orders view object instance to retrieve all details about order 112 and that this happens in the context of the current transaction's pending changes. That view object has two entity usages: a primary Orders usage and a reference usage for CustomerInfo. When its query result is partitioned into entity rows, it ends up pointing at the same Order entity row that the previous OrderInfo view row had modified. This means the end user will correctly see the pending change, that the order is assigned to sking in this transaction.
6.3.9.5.3 How Overlapping Subsets of Attributes are Handled During Requery
Two different view objects can retrieve two different subsets of reference information and the results are merged whether or not they have matching sets of attributes. For example, Figure 6-16 also illustrates the situation, where the Orders view object queries the user's Email, while the OrderInfo view object queried the user's PaymentOption. The figure shows what happens at runtime: if while partitioning the retrieved row, the entity row part contains a different set of attributes than does the partially populated entity row that is already in the cache, the attributes get "merged". The result is a partially populated entity row in the cache with the union of the overlapping subsets of user attributes. In contrast, for jchen (user 302), who wasn't in the cache already, the resulting new entity row contains only the Email attribute, but not the PaymentOption.
6.3.10 What You May Need to Know About Optimizing View Object Runtime Performance
The view object provides tuning parameters that let you control how SQL is executed and how data is fetched from the database. These tuning parameters play a significant role in the runtime performance of the view object. If the fetch options are not tuned correctly for the application, then your view object may fetch an excessive amount of data and may make too many roundtrips to the database.
You can use the Tuning section of the General page of the overview editor to configure the fetch options shown in Table 6-2.
Table 6-2 Parameters to Tune View Object Performance
| Fetch Tuning Parameters | Usage |
|---|---|
|
Fetch Mode |
The default fetch option is the All Rows option, which will be retrieved As Needed ( |
|
Fetch Size |
In conjunction with the Fetch Mode option, the in Batches of field controls the number of records fetched at one time from the database ( |
|
Max Fetch Size |
The default max fetch size for a view object is -1, which means that there is no limit to the number of rows the view object can fetch. In cases where the result set should contain only n rows of data, the option Only up to row number should be selected and set to n. The developer can alternatively call For view objects whose As mentioned earlier, setting a maximum fetch size of 0 (zero) makes the view object insert-only. In this case, no select query will be issued, so no rows will be fetched. When you want to specify a global threshold for all view object queries in the application, you can configure the Row Fetch Limit property in the |
|
Forward-only Mode |
If a data set will only be traversed going forward, then forward-only mode can help performance when iterating through the data set. This can be configured by programmatically calling |
When you tune view objects, you should also consider these issues:
-
Large data sets: View objects provide a mechanism to page through large data sets such that a user can jump to a specific page in the results. This is configured by calling
setRangeSize(n)followed bysetAccessMode(RowSet.RANGE_PAGING)on the view object where n is the number of rows contained within one page. When the user navigates to a specific page in the data set, the application can callscrollToRangePage(P)on the view object to navigate to page P. Range paging fetches and caches only the current page of rows in the view object row cache at the cost of another query execution to retrieve each page of data. Range paging is not appropriate where it is beneficial to have all fetched rows in the view object row cache (for example, when the application needs to read all rows in a dataset for an LOV or page back and forth in records of a small data set. -
Spillover: There is a facility to use the data source as "virtual memory" when the JVM container runs out of memory. By default, this is disabled and can be turned on as a last resort by setting
jbo.use.pers.coll=true. Enabling spillover can have a large performance impact. -
SQL style: If the generic SQL92 SQL style is used to connect to generic SQL92-compliant databases, then some view object tuning options will not function correctly. The parameter that choosing the generic SQL92 SQL style affects the most is the fetch size. When SQL92 SQL style is used, the fetch size defaults to 10 rows regardless of what is configured for the view object. You can set the SQL style when you define the database connection. By default, the SQL style will be Oracle. To manually override the SQL style, you can also pass the parameter
-Djbo.SQLBuilder="SQL92"to the JVM upon startup.
Additionally, you have some options to tune the view objects' associated SQL for better database performance:
-
Bind variables: If the query associated with the view object contains values that may change from execution to execution, use bind variables. Using bind variables in the query allows the query to reexecute without needing to reparse the query on the database. You can add bind variables to the view object in the Query page of the overview editor for the view object. For more information, see Section 5.10, "Working with Bind Variables."
-
Query optimizer hints: The view object can pass hints to the database to influence which execution plan to use for the associated query. The optimizer hints can be specified in the Retrieve from the Database group box in the Tuning section of the overview editor for the view object. For information about optimizer hints, see Section 39.2.4.3, "Specify a Query Optimizer Hint if Necessary."
6.4 Testing View Object Instances Programmatically
When you are ready to test a working application module containing at least one view object instance, you can build a simple test client program to illustrate the basics of working programmatically with the data in the contained view object instances.
From the point of view of a client accessing your application module's data model, the API's to work with a read-only view object and an entity-based view object are identical. The key functional difference is that entity-based view objects allow the data in a view object to be fully updatable. The application module that contains the entity-based view objects defines the unit of work and manages the transaction. This section presents four simple test client programs that work with the StoreFrontAM application module in the Fusion Order Demo to illustrate:
-
Iterating master-detail-detail hierarchy
-
Finding a row and updating a foreign key value
-
Creating a new order
-
Retrieving the row key identifying a row
6.4.1 ViewObject Interface Methods for Working with the View Object's Default RowSet
The ViewObject interface in the oracle.jbo package provides the methods to easily perform any data-retrieval task. Some of these methods used in the example include:
-
executeQuery(), to execute the view object's query and populate its row set of results -
setWhereClause(), to add a dynamic predicate at runtime to narrow a search -
setNamedWhereClauseParam(), to set the value of a named bind variable -
hasNext(), to test whether the row set iterator has reached the last row of results -
next(), to advance the row set iterator to the next row in the row set -
getEstimatedRowCount(), to count the number of rows a view object's query would return
Typically, when you work with a view object, you will work with only a single row set of results at a time. To simplify this overwhelmingly common use case, as shown in Figure 6-17, the view object contains a default RowSet, which, in turn, contains a default RowSetIterator. The default RowSetIterator allows you to call all of the data-retrieval methods directly on the ViewObject component itself, knowing that they will apply automatically to its default row set.
Note:
Chapter 39, "Advanced View Object Techniques" presents situations when you might want a single view object to produce multiple distinct row sets of results. You can also find scenarios for creating multiple distinct row set iterators for a row set. Most of the time, however, you'll need only a single iterator.The phrase "working with the rows in a view object," when used in this guide more precisely means working with the rows in the view object's default row set. Similarly, the phrase "iterate over the rows in a view object," more precisely means you will use the default row set iterator of the view object's default row set to loop over its rows.
6.4.1.1 The Role of the Key Object in a View Row or Entity Row
When you work with view rows you use the Row interface in the oracle.jbo package. As shown in Figure 6-18, the interface contains a method called getKey() that you can use to access the Key object that identifies any row. Notice that the Entity interface in the oracle.jbo.server package extends the Row interface. This relationship provides a concrete explanation of why the term entity row is so appropriate. Even though an entity row supports additional features for encapsulating business logic and handling database access, you can still treat any entity row as a Row.
An entity-based view object delegates the task of finding rows by key to its underlying entity row parts.
Recall that both view rows and entity rows support either single-attribute or multiattribute keys, so the Key object related to any given Row will encapsulate all of the attributes that comprise its key. Once you have a Key object, you can use the findByKey() method on any row set to find a row based on its Key object. When you use the findByKey() method to find a view row by key, the view row proceeds to use the entity definition's findByPrimaryKey() method to find each entity row contributing attributes to the view row key.
In the case of a read-only view object with no underlying entity row to which to delegate this task, the view object implementation automatically enables the manageRowsByKey flag when at least one primary key attribute is detected. This ensures that the findByKey() method is successful in the case of read-only view objects. If the manageRowsByKey flag is not enabled, then UI operations like setting the current row with the key, which depend on the findByKey() method, would not work.
Note:
When you define an entity-based view object, by default the primary key attributes for all of its entity usages are marked with their Key Attribute property set totrue. In any nonupdatable reference entity usages, you should disable the Key Attribute property for the key attributes. Since view object attributes related to the primary keys of updatable entity usages must be part of the composite view row key, their Key Attribute property cannot be disabled.6.4.1.2 The Role of the Entity Cache in the Transaction
An application module is a transactional container for a logical unit of work. At runtime, it acquires a database connection using information from the named configuration you supply, and it delegates transaction management to a companion Transaction object. Since a logical unit of work may involve finding and modifying multiple entity rows of different types, the Transaction object provides an entity cache as a "work area" to hold entity rows involved in the current user's transaction. Each entity cache contains rows of a single entity type, so a transaction involving two or more entity objects holds the working copies of those entity rows in separate caches.
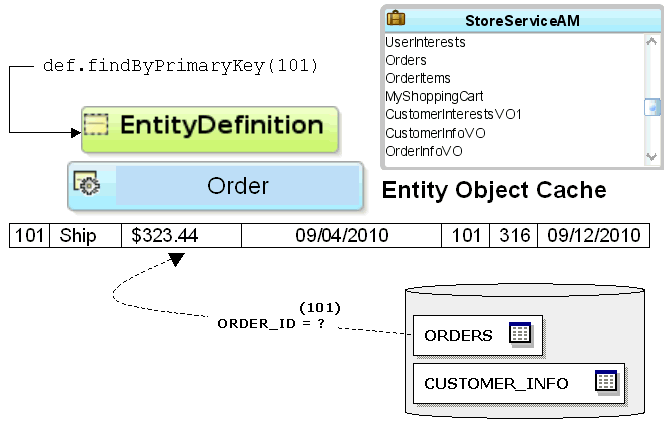
By using an entity object's related entity definition, you can write code in an application module to find and modify existing entity rows. As shown in Figure 6-19, by calling findByPrimaryKey() on the entity definition for the Order entity object, you can retrieve the row with that key. If it is not already in the entity cache, the entity object executes a query to retrieve it from the database. This query selects all of the entity object's persistent attributes from its underlying table, and finds the row using an appropriate WHERE clause against the column corresponding to the entity object's primary key attribute. Subsequent attempts to find the same entity row by key during the same transaction will find it in the cache, preventing the need for a trip to the database. In a given entity cache, entity rows are indexed by their primary key. This makes finding an entity row in the cache a fast operation.
When you access related entity rows using association accessor methods, they are also retrieved from the entity cache. If related entity rows are not in the cache, then they are retrieved from the database. Finally, the entity cache is also the place where new entity rows wait to be saved. In other words, when you use the createInstance2() method on the entity definition to create a new entity row, it is added to the entity cache.
When an entity row is created, modified, or removed, it is automatically enrolled in the transaction's list of pending changes. When you call commit() on the Transaction object, it processes its pending changes list, validating new or modified entity rows that might still be invalid. When the entity rows in the pending list are all valid, the Transaction issues a database SAVEPOINT and coordinates saving the entity rows to the database. If all goes successfully, it issues the final database COMMIT statement. If anything fails, the Transaction performs a ROLLBACK TO SAVEPOINT to allow the user to fix the error and try again.
The Transaction object used by an application module represents the working set of entity rows for a single end-user transaction. By design, it is not a shared, global cache. The database engine itself is an extremely efficient shared, global cache for multiple, simultaneous users. Rather than attempting to duplicate all the work of fine-tuning that has gone into the database's shared, global cache functionality, ADF Business Components consciously embraces it. To refresh a single entity object's data from the database at any time, you can call its refresh() method. You can setClearCacheOnCommit() or setClearCacheOnRollback() on the Transaction object to control whether entity caches are cleared at commit or rollback. The defaults are false and true, respectively. The Transaction object also provides a clearEntityCache() method you can use to programmatically clear entity rows of a given entity type (or all types). When you clear an entity cache, you allow entity rows of that type to be retrieved from the database fresh the next time they are either found by primary key or retrieved by an entity-based view object.
6.4.2 How to Create a Command-Line Java Test Client
To the create a test client program, use the Create Java Class wizard, which is accessible from the New Gallery.
6.4.2.1 Generating a Test Client with Skeleton Code
When you use the Create Java Class wizard to create the test client program, JDeveloper will open your program file in the source editor and allow you to add code from a predefined code template to complete the test client.
To generate a skeleton Java test client:
-
In the Application Navigator, right-click the project in which you want to create the test client and choose New.
-
In the New Gallery, expand General, select Java and then Java Class, and click OK.
-
In the Create Java Class dialog, enter a class name, like
TestClient, a package name, likeoracle.fodemo.storefront.client, and ensure that the Extends field showsjava.lang.Object. -
In Optional Attributes, deselect Constructors from Superclass and select Main Method.
-
Click OK.
The
.javafile opens in the source editor to show the skeleton code, as shown in Example 6-2.
6.4.2.2 Modifying the Skeleton Code to Create the Test Client
After you generate skeleton code for the test client, you can proceed to edit the file using the predefined bc4jclient code template available from JDeveloper.
To insert the bc4jclient code template:
-
Place the cursor on a blank line inside the body of the
main()method and use thebc4jclientcode template to create the few lines of necessary code. -
Type the characters
bc4jclientfollowed Ctrl + Enter.JDeveloper will expand the class file with the template as shown in Example 6-3.
-
Adjust the values of the
amDefandconfigvariables to reflect the names of the application module definition and the configuration that you want to use, respectively.For the Example 6-3, the changed lines look like this:
String amDef = "oracle.fodemo.storefront.store.service.StoreServiceAM";
String config = "StoreServiceAMLocal";
-
Finally, change the view object instance name in the call to
findViewObject()to the one you want to work with. Specify the name exactly as it appears in the Data Model tree on the Data Model page of the overview editor for the application module.For the Example 6-3, the changed line looks like this:
ViewObject vo = am.findViewObject("Persons");
Example 6-3 Expanded Skeleton Code for TestClient.java
package oracle.fodemo.storefront.client;
import oracle.jbo.client.Configuration;
import oracle.jbo.*;
import oracle.jbo.domain.Number;
import oracle.jbo.domain.*;
public class TestClient {
  public static void main(String[] args) {
    String        amDef = "test.TestModule";
    String        config = "TestModuleLocal";
    ApplicationModule am =
      Configuration.createRootApplicationModule(amDef,config);
    ViewObject vo = am.findViewObject("TestView");
    // Work with your appmodule and view object here
    Configuration.releaseRootApplicationModule(am,true);
  }
}
Your skeleton test client for your application module should contain source code like what you see in Example 6-4.
Note:
The examples throughout Section 9.10, "Working Programmatically with an Application Module's Client Interface" expand this test client sample code to illustrate calling custom application module service methods, too.Example 6-4 Working Skeleton Code for an Application Module Test Client Program
package oracle.fodemo.storefront.client;
import oracle.jbo.ApplicationModule;
import oracle.jbo.Row;
import oracle.jbo.RowSet;
import oracle.jbo.ViewObject;
import oracle.jbo.client.Configuration;

public class TestClient {

  public static void main(String[] args) {
    String  amDef = "oracle.fodemo.storefront.store.service.StoreServiceAM";
    String  config = "StoreServiceAMLocal";
    ApplicationModule am =
                        Configuration.createRootApplicationModule(amDef,config);
    // 1. Find the Persons view object instance.
    ViewObject personList = am.findViewObject("Persons");
    // Work with your appmodule and view object here
    Configuration.releaseRootApplicationModule(am,true);
  }
}
Replace // Work with your appmodule and view object here , with code that will execute the view objects you want to test. For example, to execute the view object's query, display the number of rows it will return, and loop over the result to fetch the data and print it out to the console, you can adapt the code shown in Example 6-5 for your model project components.
Example 6-5 Looping Over Master-Detail View Objects and Printing the Results to the Console
    // 2. Execute the query
    personList.executeQuery();
    // 3. Iterate over the resulting rows
    while (personList.hasNext()) {
        Row person = personList.next();
        // 4. Print the person's email
        System.out.println("Person: " + person.getAttribute("Email"));
        // 5. Get related rowset of Orders using view link accessor attribute
        RowSet orders = (RowSet)person.getAttribute("Orders");
        // 6. Iterate over the Orders rows
        while (orders.hasNext()) {
            Row order = orders.next();
            // 7. Print out some order attribute values
              System.out.println(" ["+order.getAttribute("OrderStatusCode")+"] "+
                                    order.getAttribute("OrderId")+": "+
                                    order.getAttribute("OrderTotal"));
              if(!order.getAttribute("OrderStatusCode").equals("COMPLETE")) {
                  // 8. Get related rowset of OrderItems
                  RowSet items = (RowSet)order.getAttribute("OrderItems");
                  // 9. Iterate over the OrderItems rows
                  while (items.hasNext()) {
                     Row item = items.next();
                     // 10. Print out some order items attributes
                     System.out.println("  "+item.getAttribute("LineItemId")+": "+
                                          item.getAttribute("LineItemTotal"));
                }
            }
        }
    }
The first line calls the executeQuery() method to execute the view object's query. This produces a row set of zero or more rows that you can loop over using a while statement that iterates until the view object's hasNext() method returns false. Inside the loop, the code puts the current Row in a variable named person, then invokes the getAttribute() method twice on that current Row object to get the value of the Email and Orders attributes to print order information to the console. A second while statement performs the same task for the line items of the order.
6.4.3 What Happens When You Run a Test Client Program
The call to createRootApplicationModule() on the Configuration object returns an instance of the application module to work with. As you might have noticed in the debug diagnostic output, the ADF Business Components runtime classes load XML component definitions as necessary to instantiate the application module and the instance of the view object component that you've defined in its data model at design time. The findViewObject() method on the application module finds a view object instance by name from the application module's data model. After the loop shown in Example 6-5, the test client executes releaseRootApplicationModule() on the Configuration object. This signals that you're done using the application module and it allows the framework to clean up resources, like the database connection that was used by the application module.
6.4.4 What You May Need to Know About Running a Test Client
The createRootApplicationModule() and releaseRootApplicationModule() methods are very useful for command-line access to application module components. However, you typically won't need to write these two lines of code in the context of an ADF-based web or Swing application. The ADF Model data binding layer cooperates automatically with the ADF Business Components layer to acquire and release application module components for you in those scenarios.
6.4.5 How to Count the Number of Rows in a Row Set
The getEstimatedRowCount() method is used on a RowSet to determine how many rows it contains:
long numReqs = reqs.getEstimatedRowCount();
The implementation of the getEstimatedRowCount() initially issues a SELECT COUNT(*) query to calculate the number of rows that the query will return. The query is formulated by "wrapping" your view object's entire query in a statement like:
SELECT COUNT(*) FROM ( ... your view object's SQL query here ... )
The SELECT COUNT(*) query allows you to access the count of rows for a view object without necessarily retrieving all the rows themselves. This approach permits an important optimization for working with queries that return a large number of rows, or for testing how many rows a query would return before proceeding to work with the results of the query.
Once the estimated row count is calculated, subsequent calls to the method do not reexecute the COUNT(*) query. The value is cached until the next time the view object's query is executed, since the fresh query result set returned from the database could potentially contain more, fewer, or different rows compared with the last time the query was run. The estimated row count is automatically adjusted to account for pending changes in the current transaction, adding the number of relevant new rows and subtracting the number of removed rows from the count returned.
You can also override getEstimatedRowCount() to perform a custom count query that suits your application's needs.
6.4.6 How to Access a Detail Collection Using the View Link Accessor
Once you've retrieved the RowSet of detail rows using a view link accessor, as described in Section 5.6.6.2, "Programmatically Accessing a Detail Collection Using the View Link Accessor,", you can loop over the rows it contains using the same pattern used by the view object's row set of results, as shown in Example 6-6.
Example 6-6 Pattern Used to Access a Detail Collection
while (reqs.hasNext()) {
  Row curReq = reqs.next();
  System.out.println("--> (" + curReq.getAttribute("OrderId") + ") " +
                     curReq.getAttribute("OrderTotal"));
}
Example 6-7 shows the main() method sets a dynamic WHERE clause to restrict the PersonList view object instance to show only persons whose person_type_code has the value CUST. Additionally, the executeAndShowResults() method accesses the view link accessor attribute and prints out the request number (PersonId) and Email attribute for each one.
To access the a detail collection using a view link accessor, follow these basic steps (as illustrated in Example 6-7):
-
Find the master view object instance.
-
Execute the query.
-
Iterate over the master view object rows.
-
Get the related row set of the detail view object using the view link accessor attribute.
-
Iterate over the detail view object rows.
-
Optionally, do something with the detail row set attributes.
Performance Tip:
If the code you write to loop over the rows does not need to display them, then you can call thecloseRowSet() method on the row set when you're done. This technique will make memory use more efficient. The next time you access the row set, its query will be reexecuted.Example 6-7 Programmatically Accessing Detail Rows Using the View Link Accessor
package devguide.examples.readonlyvo.client;

import oracle.jbo.ApplicationModule;
import oracle.jbo.Row;
import oracle.jbo.RowSet;
import oracle.jbo.ViewObject;
import oracle.jbo.client.Configuration;

public class TestClient2 {
  public static void main(String[] args) {
    String amDef = "devguide.examples.readonlyvo.PersonService";
    String config = "PersonServiceLocal";
    ApplicationModule am =
                        Configuration.createRootApplicationModule(amDef, config);
    // 1. Find the Persons view object instance.
    ViewObject vo = am.findViewObject("PersonList");
    // Add an extra where clause with a new named bind variable
    vo.setWhereClause("person_type_code = :ThePersonType");
    vo.defineNamedWhereClauseParam("ThePersonType", null, null);
    vo.setNamedWhereClauseParam("ThePersonType", "CUST");
    // Show results when :ThePersonType = 'CUST'
    executeAndShowResults(vo);
    Configuration.releaseRootApplicationModule(am, true);
  }
  private static void executeAndShowResults(ViewObject vo) {
    System.out.println("---");
    // 2. Execute the query
    vo.executeQuery();
    // 3. Iterate over the resulting rows of the Persons view object    while (vo.hasNext()) {
        Row curPerson = vo.next();
        // 4. Access the row set of Orders using the view link accessor attribute
        RowSet orders =(RowSet)curPerson.getAttribute("OrdersShippedToPurchaser");
        long numOrders = orders.getEstimatedRowCount();
        System.out.println(curPerson.getAttribute("PersonId") + " " +
                           curPerson.getAttribute("Email")+" ["+
                           numOrders+" orders]");
        // 5. Iterate over the resulting detail rows
        while (orders.hasNext()) {
            Row curOrder = orders.next();
        // 6. Print out some Order attribute values
            System.out.println("--> (" + curOrder.getAttribute("OrderId") + ") " +
                        curOrder.getAttribute("OrderTotal"));        }
    }
  }
}
Running TestClient2.java produces output in the Log window, as shown in Example 6-8. Each customer is listed, and for each customer that has some orders, the order total appears beneath their name.
Example 6-8 Results of Running TestClient.java
---
121 AFRIPP [0 orders]
115 AKHOO [0 orders]
109 DFAVIET [0 orders]
114 DRAPHEAL [0 orders]
118 GHIMURO [0 orders]
126 IMIKKILI [0 orders]
111 ISCIARRA [0 orders]
110 JCHEN [0 orders]
127 JLANDRY [0 orders]
112 JMURMAN [0 orders]
125 JNAYER [0 orders]
119 KCOLMENA [0 orders]
124 KMOURGOS [0 orders]
129 LBISSOT [0 orders]
113 LPOPP [1 orders]
--> (1013) 89.99
120 MWEISS [1 orders]
--> (1003) 5000
108 NGREENBE [1 orders]
--> (1002) 1249.91
122 PKAUFLIN [0 orders]
116 SBAIDA [0 orders]
128 SMARKLE [0 orders]
117 STOBIAS [0 orders]
123 SVOLLMAN [0 orders]
If you run TestClient2.java with debug diagnostics enabled, you will see the SQL queries that the view object performed. The view link WHERE clause predicate is used to automatically perform the filtering of the detail service request rows for the current row in the PersonList view object.
6.4.7 How to Iterate Over a Master-Detail-Detail Hierarchy
To iterate over a master-detail with an additional level of nesting, follow these basic steps (as illustrated in Example 6-9):
-
Find the master view object instance.
-
Executes the query.
-
Iterate over the resulting rows.
-
Optionally, do something with the attributes of the master row set.
-
Get the related row set of the detail view object using the view link accessor attribute.
-
Iterate over the detail row set rows.
-
Optionally, do something with the attributes of the detail row set.
-
Get the related row set of the second detail view object using the view link accessor attribute.
-
Iterates over the second detail row set rows.
-
Optionally, do something with the second detail row set attributes.
Other than having one additional level of nesting, Example 6-9 uses the same API's used in the TestClient program that was iterating over master-detail read-only view objects in Section 6.4.6, "How to Access a Detail Collection Using the View Link Accessor."
If you use JDeveloper's Refactor > Duplicate functionality on an existing TestClient.java class, you can quickly "clone" it to create a TestClient2.java class. For example, the TestClient.java class in Example 6-8 is suited to this technique.
Example 6-9 Iterating Master/Detail/Detail Hierarchy
package oracle.fodemo.storefront.client;
import oracle.jbo.ApplicationModule;
import oracle.jbo.Row;
import oracle.jbo.RowSet;
import oracle.jbo.ViewObject;
import oracle.jbo.client.Configuration;

public class TestClient2 {

  public static void main(String[] args) {
    String    amDef =
                "oracle.fodemo.storefront.store.service.StoreServiceAM";
    String    config = "StoreServiceAMLocal";
    ApplicationModule am =
                Configuration.createRootApplicationModule(amDef,config);
    // 1. Find the Persons view object instance.
    ViewObject personList = am.findViewObject("Persons");
    // 2. Execute the query
    personList.executeQuery();
    // 3. Iterate over the resulting rows
    while (personList.hasNext()) {
    Row person = personList.next();
    // 4. Print the person's email
    System.out.println("Person: " + person.getAttribute("Email"));
    // 5. Get related rowset of Orders using view link accessor attribute
    RowSet orders = (RowSet)person.getAttribute("Orders");
    // 6. Iterate over the Orders rows
    while (orders.hasNext()) {
        Row order = orders.next();
        // 7. Print out some order attribute values
        System.out.println(" ["+order.getAttribute("OrderStatusCode")+"] "+
                            order.getAttribute("OrderId")+": "+
                            order.getAttribute("OrderTotal"));
        if(!order.getAttribute("OrderStatusCode").equals("COMPLETE")) {
        // 8. Get related rowset of OrderItems using view link accessor attribute
        RowSet items = (RowSet)order.getAttribute("OrderItems");
        // 9. Iterate over the OrderItems rows
        while (items.hasNext()) {
            Row item = items.next();
            // 10. Print out some order items attributes
            System.out.println("  "+item.getAttribute("LineItemId")+": "+
                                item.getAttribute("LineItemTotal"));
            }
        }
        }
    }
    Configuration.releaseRootApplicationModule(am,true);
  }
}
Running the program produces the output shown in Example 6-10.
Example 6-10 Results of Running TestClient2.java
Staff Member: David Austin
 [Open] 104: Spin cycle not draining
  1: Researching issue
Staff Member: Bruce Ernst
 [Closed] 101: Agitator does not work
 [Pending] 102: Washing Machine does not turn on
  1: Called customer to make sure washer was plugged in...
  2: We should modify the setup instructions to include...
 [Open] 108: Freezer full of frost
  1: Researching issue
Staff Member: Alexander Hunold
 [Closed] 100: I have noticed that every time I do a...
 [Closed] 105: Air in dryer not hot
   :
6.4.8 How to Find a Row and Update a Foreign Key Value
To find a row and update a foreign key value, follow these basic steps (as illustrated in Example 6-11):
-
Find the view object instance.
-
Construct a
Keyobject to look up the row for the view instance. -
Use
findByKey()to find the row. -
Optionally, do something with the row's attribute.
Example 6-11 shows the main() method finds and updates a foreign key value to find a row of the Orders view object instance. The sample then prints out the existing value of the OrderStatusCode attribute before changing the value on the row.
Example 6-11 Finding and Updating a Foreign Key Value
package oracle.fodemo.storefront.client;

import oracle.jbo.ApplicationModule;
import oracle.jbo.JboException;
import oracle.jbo.Key;
import oracle.jbo.Row;
import oracle.jbo.ViewObject;
import oracle.jbo.client.Configuration;

public class TestFindAndUpdate {
    public static void main(String[] args) {
        String  amDef =
                    "oracle.fodemo.storefront.store.service.StoreServiceAM";
        String  config = "StoreServiceAMLocal";
        ApplicationModule am =
                    Configuration.createRootApplicationModule(amDef,config);
        // 1. Find the Orders view object instance
        ViewObject vo = am.findViewObject("Orders");
        // 2. Construct a new Key to find Order # 1011
        Key orderKey = new Key(new Object[]{1011});
        // 3. Find the row matching this key
        Row[] ordersFound = vo.findByKey(orderKey,1);
        if (ordersFound != null && ordersFound.length > 0) {
            Row order = ordersFound[0];
            // 4. Print some order information
            String orderStatus = (String)order.getAttribute("OrderStatusCode");
            System.out.println("Current status is: "+ orderStatus);
            try {
                // 5. Try setting the status to an illegal value
                order.setAttribute("OrderStatusCode","REOPENED");
            }
            catch (JboException ex) {
                System.out.println("ERROR: "+ex.getMessage());
            }
            // 6. Set the status to a legal value
            order.setAttribute("OrderStatusCode","PENDING");
            // 7. Show the value of the status was updated successfully
            System.out.println("Current status is: " +
                        order.getAttribute("OrderStatusCode"));
            // 8. Show the current value of the customer for this order
            System.out.println("Customer: " + order.getAttribute("CustomerId"));
            // 9. Reassign the order to customer # 113
            order.setAttribute("CustomerId",113); // Luis Popp
            // 10. Show the value of the reference information now
            System.out.println("Customer: "+order.getAttribute("CustomerId"));
            // 11. Rollback the transaction
            am.getTransaction().rollback();
            System.out.println("Transaction canceled");
        }        Configuration.releaseRootApplicationModule(am,true);
    }
}
Running this example produces the output shown in Example 6-12.
6.4.9 How to Create a New Row for a View Object Instance
To create a new view row instance, follow these basic steps (as illustrated in Example 6-13):
-
Find the view object instance.
-
Create a new row and insert it into the row set.
-
Set the values of the required attributes in the new row.
-
Commit the transaction.
Example 6-13 shows the main() method finds the Orders view object instance and inserts a new row into the row set. Because the Orders view object is entity-based, the CreatedBy attribute derives its value from the mapped entity object attribute. The sample then sets values for the remaining attributes before committing the transaction.
Example 6-13 Creating a New Order
package oracle.fodemo.storefront.client;
import oracle.jbo.ApplicationModule;
import oracle.jbo.Row;
import oracle.jbo.ViewObject;
import oracle.jbo.client.Configuration;
import oracle.jbo.domain.DBSequence;
import oracle.jbo.domain.Date;
import oracle.jbo.domain.Timestamp;

public class TestCreateOrder {
    public static void main(String[] args) throws Throwable {
        String amDef = "oracle.fodemo.storefront.store.service.StoreServiceAM";
        String config = "StoreServiceAMLocal";
        ApplicationModule am =
                Configuration.createRootApplicationModule(amDef, config);
        // 1. Find the Orders view object instance.
        ViewObject orders = am.findViewObject("Orders");
        // 2. Create a new row and insert it into the row set
        Row newOrder = orders.createRow();
        orders.insertRow(newOrder);
        // Show the entity object-related defaulting for CreatedBy attribute
        System.out.println("CreatedBy defaults to: " +
                            newOrder.getAttribute("CreatedBy"));
        // 3. Set values for some of the required attributes
        Date now = new Date(new Timestamp(System.currentTimeMillis()));
        newOrder.setAttribute("OrderDate", now);
        newOrder.setAttribute("OrderStatusCode", "PENDING");
        newOrder.setAttribute("OrderTotal", 500);
        newOrder.setAttribute("CustomerId", 110);
        newOrder.setAttribute("ShipToAddressId", 2);
        newOrder.setAttribute("ShippingOptionId", 2);
        newOrder.setAttribute("FreeShippingFlag", "N");
        newOrder.setAttribute("GiftwrapFlag", "N");
        // 4. Commit the transaction
        am.getTransaction().commit();
        // 5. Retrieve and display the trigger-assigned order id
        DBSequence id = (DBSequence)newOrder.getAttribute("OrderId");
        System.out.println("Thanks, reference number is " +
                            id.getSequenceNumber());
        Configuration.releaseRootApplicationModule(am, true);
    }
}
Running this example produces the results shown in Example 6-14.
6.4.10 How to Retrieve the Row Key Identifying a Row
To retrieve a row key to identify a row, follow these basic steps (as illustrated in Example 6-15):
-
Find the view object instance.
-
Construct a key using a supplied value.
-
Find the row with this key.
-
Optionally, do something with the key of the row.
Example 6-15 shows the main() method finds the Orders view object instance and constructs a row key to find an order number. The findByKey() method find the Orders rows with the specified key. The sample then displays the key of the row, accesses the row set using the OrderItems view link accessor, and iterates over the rows to display the key of each OrderItems row.
Example 6-15 Retrieving the Row Key Identifying a Row
package oracle.fodemo.storefront.client;
import oracle.jbo.ApplicationModule;
import oracle.jbo.Key;
import oracle.jbo.Row;
import oracle.jbo.RowSet;
import oracle.jbo.ViewObject;
import oracle.jbo.client.Configuration;

public class TestFindAndShowKeys {
    public static void main(String[] args) {
        String amDef = "oracle.fodemo.storefront.store.service.StoreServiceAM";
        String config = "StoreServiceAMLocal";
        ApplicationModule am =
            Configuration.createRootApplicationModule(amDef, config);
        // 1. Find the Orders view object instance
        ViewObject vo = am.findViewObject("Orders");
        // 2. Construct a key to find order number 1011
        Key orderKey = new Key(new Object[] { 1011 });
        // 3. Find the Orders row with the key
        Row[] ordersFound = vo.findByKey(orderKey, 1);
        if (ordersFound != null && ordersFound.length > 0) {
            Row order = ordersFound[0];
            // 4. Displays the key of the Orders row
            showKeyFor(order);
            // 5. Accesses row set of Orders using OrderItems view link accessor
            RowSet items = (RowSet)order.getAttribute("OrderItems");
            // 6. Iterates over the OrderItems row
            while (items.hasNext()) {
                Row itemRow = items.next();
                // 4. Displays the key of each OrderItems row
                showKeyFor(itemRow);
            }
        }
        Configuration.releaseRootApplicationModule(am, true);
    }

    private static void showKeyFor(Row r) {
        // get the key for the row passed in
        Key k = r.getKey();
        // format the key as "(val1,val2)"
        String keyAttrs = formatKeyAttributeNamesAndValues(k);
        // get the serialized string format of the key, too
        String keyStringFmt = r.getKey().toStringFormat(false);
        System.out.println("Key " + keyAttrs + " has string format " +
                            keyStringFmt);
    }
    // Build up "(val1,val2)" string for key attributes

    private static String formatKeyAttributeNamesAndValues(Key k) {
        StringBuffer sb = new StringBuffer("(");
        int attrsInKey = k.getAttributeCount();
        for (int i = 0; i < attrsInKey; i++) {
            if (i > 0)
                sb.append(",");
                sb.append(k.getAttributeValues()[i]);
        }
        sb.append(")");
        return sb.toString();
    }
}
Running the example produces the results shown in Example 6-16. Notice that the serialized string format of a key is a hexadecimal number that includes information in a single string that represents all the attributes in a key.
