31 Setting Up the Oracle Compute Self Service Portal
This chapter describes how to set up and configure an Oracle Compute Site for self service users. It contains the following sections:
31.1 Setting Up the Oracle Compute Site
After you have discovered the Oracle Compute site, you must configure it for self service users by defining tenants, configuring shapes, quota, templates, and so on.
To set up the Oracle Compute site, follow these steps:
-
Create tenant administrators and users. See Section 31.2, "Creating a Tenant" for details.
-
Configure shapes. See Section 31.3, "Creating a Shape" for details.
-
Define quotas. See Section 31.4, "Defining Quotas" for details.
-
Upload Oracle Compute templates. See Section 31.5, "Managing Oracle Compute Templates" for details.
-
Set up an orchestration template. See Section 31.6, "Creating an Orchestration Service Template"
-
Associate Enterprise Manager roles with Oracle Compute roles. See Section 31.7, "Mapping Enterprise Manager Roles to Oracle Compute Roles"
-
Configure request settings. See Section 11.2.3, "Configuring Request Settings"
-
Set up the charge plan. See Section 43.2, "Setting Up Chargeback".
31.2 Creating a Tenant
A tenant (or a customer) is the context or framework within which system objects such as users and templates are created. In an enterprise, a tenant can be an organization, a department within an organization, or even a single person. Each Oracle Compute site must contain at least one tenant.
Before you create a tenant, you must do the following:
-
Estimate the resource quotas to be allocated for the tenant
-
Identify the tenant users and tenant administrators
The quota for the vCPUs, memory, and storage resources can be defined during the tenant creation process. If the tenant does not have the required resources, then the Tenant Users cannot create and run instances in the tenant.
The cloud administrator can create one or more tenants in a selected Oracle Compute site. Each tenant can be associated with one or more tenant administrators and tenant users.
To create a tenant, follow these steps:
-
Log in to Enterprise Manager as a user with the
EM_CLOUD_ADMINISTRATORrole. -
From the Enterprise menu, select Cloud, then select Cloud Home.
-
From the Oracle Cloud menu, select Getting Started, then click on the Setup link next to the Infrastructure - Oracle Compute service family in the left panel.
-
Click Tenancy Management and select an Oracle Compute Site from the drop down list. Tenants that have already been created for the selected site are listed.
-
Click Create. The Create Tenant window appears.
-
Enter the name, password, description, and email address of the tenant administrator.
-
In the Enable Access to Service Networks region, select one or all of the following:
-
OMS Service Name: Select this option to enable VM instances created by the tenant to be monitored by Enterprise Manager.
-
Instance Storage Service Network: Select this option to enable VM instances created by the tenant to access the ZFS storage pool.
-
Service Manager Network: Select this option to enable access to the Platform Service Manager network.
-
-
In the Quota region, you can select:
-
Default: If you select this option, the default quota will be assigned to this tenancy.
-
Custom: If you select this option, you can define a custom quota that will be available to the tenancy. You can specify the following criteria:
-
Templates: Specify the number of images and the size.
-
Oracle Compute: Specify the number of VM instances, number of vCPUs, and total memory that will be available to all users in this tenancy. You can also set quotas on the number of instances allowed by specifying restrictions which can be comma separated key value pairs. For example, if you specify
os_license=20, the number of VM instances launched off machine images withos_licenseas attribute key cannot be greater than 20. -
Storage: Specify the storage volume size that will be available to all users in this tenancy.
-
Network: Specify the number of IP addresses that can be reserved from the VNET that is available to the tenancy.
-
-
-
Click Create. The newly created tenant will appear on the Tenancy Management page and the quota created for the tenant will appear on the User Management: Quotas page. See Defining the Quota for details. After the tenant has been created, the cloud administrator or the self service administrator can create tenant administrators and tenant users under each tenancy. See <Creating Users>
31.2.1 Editing a Tenant
Select a tenancy from the list displayed on the Tenancy Management page and click Edit. The Edit Tenant window appears. You can modify all the details of the tenancy except for the name of the tenant. After modifying the tenancy details, click Edit to confirm the changes and return to the Tenancy Management page.
31.3 Creating a Shape
A shape refers to the characteristics of a virtual machine that include the number of CPUs assigned to the virtual machine, the amount of RAM available, and the relative number of I/O processes. Each shape is combination of these characteristics and can be used by tenant users while requesting virtual machines. While defining a shape, you need to consider the capacity of your machines and the anticipated workload of the instances.
To create a shape, follow these steps:
-
Log in to Enterprise Manager as a user with the
EM_CLOUD_ADMINISTRATORrole. -
From the Enterprise menu, select Cloud, then select Cloud Home.
-
From the Oracle Cloud menu, select Getting Started, then click on the Setup link next to the Infrastructure - Oracle Compute service family in the left panel.
-
Click Shape Management and select an Oracle Compute Site from the drop down list. Shapes that have already been created for the selected site are listed.
-
Click Create. The Create Compute Machine window appears. Enter the name, description, number of CPUs, memory, and the relative number of IO processes that can be allocated to the virtual machine.
-
Click Create. The newly created shape will appear on the Shape Management page.
31.4 Defining Quotas
The administrator (cloud administrator or self service administrator) can define quota on system resources such as templates, instances, storage and networks. Quotas on system resources are enforced only when the administrator explicitly sets them. When a tenant is created, if a custom quota setting is not defined, the default quota setting is assigned to the tenant. Any quota settings defined while creating the tenant can be modified on the User Management: Quotas page.
To edit a quota setting, follow these steps:
-
Log in to Enterprise Manager as a user with the
EM_CLOUD_ADMINISTRATORrole. -
From the Enterprise menu, select Cloud, then select Cloud Home and navigate to the Oracle Compute Site Home page.
-
From the Oracle Compute Site menu, select User Management, then select Quota. The User Management: Quotas page appears. The quota settings assigned to each tenant are displayed. You can choose to view the quota by Usage or by Allowance by selecting the appropriate option from the View drop down list.
-
Select a quota that you wish to modify and click Edit. The Edit Quota window appears.
-
You can modify the description of the quota and the following criteria:
-
Templates: Specify the number of images and the size.
-
Oracle Compute: Specify the number of VM instances, number of vCPUs, and total memory that will be available to all users in this tenancy. You can also set quotas on the number of instances allowed by specifying restrictions which can be comma separated key value pairs. For example, if you specify
os_license=20, the number of VM instances launched off machine images withos_licenseas attribute key cannot be greater than 20. -
Storage: Specify the storage volume size that will be available to all users in this tenancy.
-
Network: Specify the number of IP addresses that can be reserved from the VNET that is available to the tenancy.
-
-
Click Edit to modify the quota and return to the User Management: Quotas page.
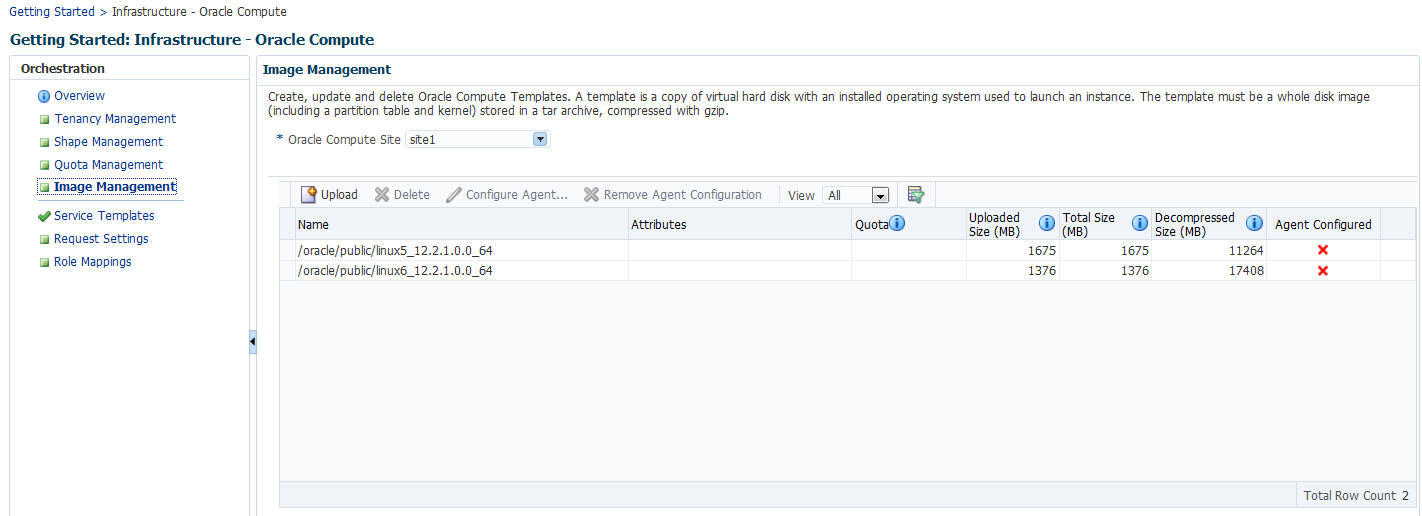
31.5 Managing Oracle Compute Templates
An Oracle Compute template is a copy of a virtual hard disk with an installed operating system used to launch a virtual machine instance. It is a whole disk image (including a partition table and a kernel) stored in a tar archive, compressed with gzip. Templates can be versions of Linux (such as Red Hat or Ubuntu), Microsoft Windows, or other operating systems.
To upload a template, follow these steps:
-
Log in to Enterprise Manager as a user with the
EM_CLOUD_ADMINISTRATORrole. -
From the Enterprise menu, select Cloud, then select Cloud Home and navigate to the Oracle Compute Site Home page.
-
From the Oracle Compute Site menu, select Image Management. You will see a list of templates that have been uploaded either from the Software Library or from a local disk.
-
Click Upload. The Template Management: Upload Template window appears. While uploading the image, the Template Scope can be:
-
Public: The image will be available to all the users. If you select this option, enter the name of the image in the Name field.
-
Tenant: The image will be available only to users belonging to the selected tenancy. If you select this option, select the Tenant in the Name drop down field and specify the name of the template. The image will be available to all users in the selected tenancy.
-
-
Specify any additional attributes that will be used when the service instance is provisioned.
-
In the Select Template field, select the image that is to be uploaded. The image you upload can either be present in your local disk or from the Software Library.
-
Click Upload to upload the template. The newly uploaded image will appear on the Image Management: Compute Templates page with the following details:
-
Name: The name of the image. If the image is available to all users, the format of the name is
/oracle/public/<image_name>. If the image is available only to users belonging a selected tenancy, the format is<tenant_name>/public/<image_name>. -
Attributes: Any user defined attributes that were specified when the image was uploaded.
-
Quota: The quota specified for the image.
-
Uploaded Size: The size of the image that has been uploaded.
-
Total Size: The total size of the image.
-
Decompressed Size: the size of the image in its decompressed state.
-
Agent Configured: Indicates if the Management Agent has been configured for this image. See Configuring the Management Agent.
-
31.5.1 Configuring the Management Agent
You can specify the details of the Management Agent that is to be associated with an image list. To configure the agent, follow these steps:
-
Log in to Enterprise Manager as a user with the
EM_CLOUD_ADMINrole. -
From the Enterprise menu, select Cloud, then select Compute Home. The Compute Cloud page appears.
-
From the Oracle Compute Cloud menu, select Resource Providers and click on an Oracle Compute Site from the list.The Oracle Compute Cloud page appears.
-
From the Oracle Compute Cloud menu, select Image Management. The Image Management page with a list of templates is displayed.
-
Select a template from the list and click Configure Agent. Specify the following details:
-
Agent Configuration Type: Select Fresh or Shared.
-
Installation Base Directory: If you selected Fresh, specify the base directory on the host machine on which the Management Agent is to be installed.
-
Shared Agent: If you selected Shared as the Agent Configuration Type, enter the name of the shared agent.
-
Oracle Home: If you have selected Shared as the Agent Configuration Type, specify the location of the shared Oracle Home of the existing Management Agent.
-
Platform: Select the platform on which it is be installed.
-
Instance Directory: Specify the Instance Directory for the Oracle Home.
-
Username & Password: Specify the credentials required to access the agent.
-
SSH Timeout: The SSH timeout period for Guest Virtual Machine communication during deployment.
-
Privilege Delegation Settings: Specify any privilege delegation settings.
-
-
Click OK to configure the agent and return to the previous page.
31.6 Creating an Orchestration Service Template
Prerequisites
-
One or more Oracle Compute sites must have been discovered.
-
One or more Oracle Compute templates must be available.
Orchestration is the automated management of your system components for high availability, monitoring, and persistence. An orchestration ties together the components you create into a single, manageable collection. For example, with orchestration you can associate networks, network security, and storage with the instantiation of a virtual machine. The administrator can create orchestration service templates that can be used to create Oracle Compute service instances. To create a service template, follow these steps:
-
Log in as a user with the
EM_CLOUD_ADMINISTRATORrole. -
From the Enterprise menu, select Cloud, then select Cloud Home.
-
From the Oracle Cloud menu, select Getting Started, then click on the Setup link next to the Infrastructure - Oracle Compute service family in the left panel.
-
Click Service Templates, then click Create. The Create Service Template window appears.
-
Select the Orchestration service type, then select Orchestration Custom Service Template and click Create to launch the Create Orchestration Custom Service Template wizard.
-
Enter the name and description for the template and click Next.
-
In the Characteristics page, enter the target properties such as contact, cost center, lifecycle status, and so on. These properties or characteristics will be applied to the instance as target properties when the service instance is created. Click Next.
-
In the Resource Providers page, click Add and select an Oracle Compute Site into which the service instances are to be provisioned.
-
Click Next. The Configuration page appears.
An Orchestration Template can be associated with one or more launch plans. Click Add Launch Plan to create a new launch plan. See Section 31.6.1, "Creating a Launch Plan" for details.
-
After defining one or more launch plans, you can configure the relationship between the launch plans by selecting the order in which the launch plans are to be executed. Select the Orchestration Template link on the left panel. In the Orchestration Configuration page, click Add in the Startup Order region and select the order for the launch plans. Click Next.
-
In the Roles page, click Add and select the roles to which the service template is to be available. Click Next.
-
In the Review page, review the template details and click Submit to create the Orchestration template.
31.6.1 Creating a Launch Plan
A launch plan defines the configuration settings for one or more VM instances. In the Launch Plan window, enter a name for the launch plan and click Add. The launch plan name you entered appears under the Orchestration Template header in the launch panel. Click on the launch plan name to specify the configuration details.

-
Launch Plan Configuration: Specify the following details.
-
High Availability: You can specify a high availability policy for an orchestration, which affects how the orchestration is managed by the system. This can be:
-
No High Availability: If you choose this option, the orchestration components are neither restarted nor monitored.
-
Active: The components defined by the orchestration are restarted if they stop unexpectedly due to causes such as power failure and node disconnection.
Note: A component will not be restarted if it is stopped due to an operator error such as an instance relaunch or an invalid image list or shape. In this case, the status of an orchestration will reflect the error, but the components will not be recreated. The reported operator error must be fixed and the orchestration restarted.
-
Monitor: The components are not restarted, they are only monitored.
-
-
Deploy on Different Nodes: Select this check box to deploy the launch plan on different nodes.
-
-
Common Settings: Click this tab to define the default settings that will be used for all VM instances in this launch plan. The default setting can be overridden at the VM instance level.
Specify the following details:
-
Oracle Compute Template: A template is a copy of virtual hard disk with an installed operating system used to launch an instance. The template must be a whole disk image (including a partition table and kernel) stored in a tar archive, compressed with gzip. Click the Search icon and select a template from the list. If you click the Lock icon to lock the template, the tenant administrator or tenant user cannot change the template while provisioning the service instance.
-
Shape: A shape is a combination of CPU, memory, and IO which define the characteristics of a virtual machine. Select a shape from the drop down list. If you click the Lock icon to lock the shape, the shape cannot be changed by the tenant administrator or tenant user while provisioning the service instance.
-
Configure EM Agent: Select this checkbox to add EoIB and IPoIB storage networks to the network table.
-
Credentials: You can set the SSH key credentials for password-less access to VM instances and host credentials for deploying the Management Agent. You can use:
-
Oracle SSH Key: If SSH key credentials have been set, and can be used as preferred credentials, select Use Preferences and choose the credential set from the drop down box. If you select Enter Key, you must specify the SSH public and private key pair required to access the VM instances. If you select Key is in a file, click Browse and select the public / private key from a file.
-
Root SSH Key: If SSH key credentials have been set for the host, and can be used as preferred credentials, select Use Preferences and choose the credential set from the drop down box. If you select Enter Key, you must specify the SSH public and private key pair required to access the VM instances. If you select Key is in a file, click Browse and select the public / private key from a file.
-
Oracle User: If you select Use Preferences, choose the preferred credentials from the drop down box. If you select Enter Password, you must enter the password for the Oracle user.
-
Root User: If you select Use Preferences, choose the preferred credentials from the drop down box. If you select Enter Password, you must enter the password for the root user.
-
-
Network Configuration: Click Add to select one or more network interfaces that will be associated with the VM instances. A network can be an IPoIB or EoIB network. In the Select Network window, you can choose:
-
Tenant Networks: These are networks configured for each tenant to communicate with other servers within Exalogic or outside Exalogic.
-
Service Networks: These are networks configured to communicate with other service providers such as ZFSSA or Exadata systems.
For external network interfaces, you can select one or all of the following:
-
Default Gateway: The selected network will be configured as the default gateway network.
-
Symmetric Routing: If this option is selected, the reply packets are routed through the same network interface on which the vNet IP packets were received.
-
Provider Role: *** need info ***
After adding the network, you can select the network and click the Lock icon to lock the network configuration.
-
-
Domain Name System (DNS) Configuration: Specify the DNS configuration for the network.
-
Servers: Enter a comma separated list of DNS servers for the selected network.
-
Search Domains: Enter a comma separated list of DNS Search Domains for the selected network.
-
-
Network Information Service (NIS) Configuration
-
NIS Domain Name: Enter the NIS Domain Name for the selected VM instance.
-
Network Information Services (NIS) Server: Click Add to add an NIS server. Enter the name and IP address of the NIS server and click Add to add the NIS server.
-
-
Storage Configuration: You can associate one or more storage volumes to the VM instances that are to be created. Click Create. In the Create Storage Volumes window, enter the name of the storage volume, size, the number of volumes to be created and click Add. You can then click the Lock icon and lock of the storage volume.
-
Advanced Configuration: You can optionally specify additional attributes for the VM instances. Click Add to add a key and value for the attribute.
-
-
After you have created the launch plan, you can add one or more VM instances that can use the launch plan. Select the launch plan you have created and click Add VM Instance. In the Add VM Instance window, specify the name and number of VM instances to be created. If you are adding more than one instance, the name you specify will be used as a prefix to generate a unique name for each VM instance.
You can define configuration settings at the instance level and override the settings defined at the launch plan level. To define instance level specific configuration settings, select the VM instance from the left panel. The Oracle VM Instance Configuration page appears. To define instance level settings, select the Override Common Settings checkbox to override the default launch plan level settings. Select the Oracle Compute Template, Shape, and specify the Network, and Storage Configuration.
In the Advanced Configuration region, you can optionally specify additional attributes. Click Add. In the Add Attributes window, specify the key and value for the attribute. In the Tags field, you can enter tags to identify the instance deployment request.
In the Optional Network Configuration region, you can specify additional configuration parameters for the network defined in the Network Configuration region. You can specify a list of DNS servers, configure the network as the default gateway network, and configure the VM instance as a provider on the underlying selected service network.
31.7 Mapping Enterprise Manager Roles to Oracle Compute Roles
You can associate an Enterprise Manager role with an Oracle Compute role. To define a role mapping, follow these steps:
-
Log in as a user with the
EM_CLOUD_ADMINISTRATORrole. -
From the Enterprise menu, select Cloud, then select Cloud Home.
-
From the Oracle Cloud menu, select Getting Started, then click on the Setup link next to the Infrastructure - Oracle Compute service family in the left panel.
-
Click Role Mappings. In the Role Mappings page, from the drop down list, select the Oracle Compute Site in which the role mappings are to be defined.
-
Click Create. In the Create Role Mapping window, select the Enterprise Manager role and the Oracle Compute role with which it should be associated and click Add to create the role mapping.