20 Creating Snap Clones for Databases
This chapter describes how to create snap clones. It contains the following sections:
20.1 About Snap Clones
Snap Clone provides a storage agnostic approach to creating rapid and space efficient clones of large databases. Clones of the production database are often required for test and development purposes, and it is difficult and time consuming to create these clones, especially if the databases are huge.
Enterprise Manager offers Snap Clone as a way to address this issue, so that thin clones can be created from production databases by using the copy on write technology available in some storage systems. This means that these clones take up little space initially (about 2 GB of writable space required for a thin clone of a multi-terabyte database), and will grow as inserts, updates and deletes are performed. Enterprise Manager offers two solutions with snap clone:
-
Hardware Solution: Vendor specific hardware solution which supports NetApps, Oracle Sun ZFS storage appliance, EMC VMAX, and VNX.
-
Software Solution: Storage agnostic software solution that supports all NAS and SAN storage devices. This is supported through use of the ZFS file system, and the CloneDB feature.
The main features of snap clone are:
-
Self Service Driven Approach: Empowers the self service user to clone databases as required on an ad-hoc basis.
-
Rapid Cloning: Databases can be cloned in minutes and not in days or weeks.
-
Space Efficient: This features allows users to significantly reduce the storage footprint.
20.2 Cloning and Refreshing Databases
The Enterprise Manager Data Lifecycle Management solution provides a complete end to end automated flow to move data from the production environment to the test environment.
In a production environment, the database administrator will first take a backup of this production database, create a test master database from the backup, then mask the sensitive data, and finally create clones from the test master. The clones then need to be refreshed as required to ensure that the data is in sync with the production data. With the Data Lifecycle Management solution, this process is completely automated and can be performed either from the Cloning Dashboard or through the Self Service Portal. The following options are available:
20.3 Creating Snap Clones from the Cloning Dashboard
You can create a snap clone from the Administration Dashboard and promote the snap clone as the Test Master Database. This section outlines the following procedures which you can use to create and manage snap clone databases:
20.3.1 Creating a Snap Clone Database
To create a Database Snap Clone, follow these steps:
-
On the Databases page, you can access the Database Snap Clone wizard by following any one method:
-
Select the database that you want to clone from the list of the databases displayed. On the Database homepage, click the Database menu, select Cloning, and then select Create Snap Clone.
-
Right click on the database target name, select Database, select Cloning, and then select Create Snap Clone.
-
Right click on the database target name, select Database, select Cloning, and then select Clone Management. On the Clone Management page, in the Snap Clone Databases box, click Create.
-
-
On the Create Snap Clone Database: Source and Destination page, do the following:
-
In the Source section, launch the credentials selector by clicking the search icons for SYSDBA Database and Database Host credentials. Click OK.
-
In the Data Time Series section, select Now or Prior Point in Time.
If you selected Now, specify or search and select the SYSASM ASM Credentials. Now refers to Live Clone.
In the Database Snapshot section specify the location, name, description, version, and vendor of the snapshot profile which will be created as part of the clone database job.You can add additional notes, such as host name, database, data content, and data content mode.
-
If you selected Prior Point in Time, a carousel of Storage Snapshot images appear. Select the appropriate RMAN backup by clicking Select on the image.
You can create snap clones by selecting a storage snapshot from the carousel. You can modify this in case you have to create a new clone between these two time periods. Similarly, you can do the same for SCN by selecting the Select SCN option.
-
-
In the Destination Database Definition section, do the following:
-
Specify a display name.
-
Specify a global database name and SID.
A database is uniquely identified by a Global Database Name. The typical form of a name is
name.domain.A database is referenced by at least one Oracle instance which is uniquely identified by SID. -
Select one of the following types of databases:
-
Single Instance Database.
In the Hosts section, specify the Oracle Home location. The host gets specified by default. Next, select the Database Home credentials and the SYSASM ASM credentials.
-
RAC Database
In the Hosts section, specify or select the cluster target. The Oracle Home location gets specified by default. Next, specify the Database Host credentials, and the SYSASM ASM credentials.
In the Nodes section, select the cluster and Oracle Home to display one or more hosts on which the administrator managed Oracle RAC database will be created.
-
RAC One Node Database
In the Hosts section, specify or select the cluster target. The Oracle Home location gets specified by default. Next, specify the Database Host credentials, and the SYSASM ASM credentials.
In the Nodes section, select the cluster and Oracle Home to display one or more hosts on which the administrator managed Oracle RAC database will be created.
Click Next.
-
Note:
Oracle supports inline patching as part of clones. When the destination home selected has patches applied such as the latest CPU or PSU, then the cloned database is automatically brought up with that level. -
-
On the Create Snap Clone Database: Configuration page, do the following:
-
In the Configure Volumes, configure the volumes that will be used by the clone database, by specifying the following:
-
Mount Point Prefix: Specify a new mount point for the database being cloned. This value would be prefixed to an auto-generated mount point where a clone of this volume will be mounted. The volume will be mounted on
/<mount-prefix> <unique-suffix-generated-by-EM> /<source-path>. The mount point prefix can be the Same for All Volumes or Different for Each Volume.Note:
the volumes must be pre-created. -
Writable Space: Specify the amount of space required for block changes. The value specified here cannot exceed the Storage Ceiling specified for the server. For example, for minimal data changes, you specify the value as 1% of the original volume size. The writable space can be the Same for All Volumes or Different for Each Volume.
-
-
The storage details of the selected database are displayed in the Volume Content Information section. Click Show Files to view the layout of the database files in the volumes.
-
In the Listener Configuration section, select the listener targets running under the new Oracle Home, to register the clone database, You can add new listeners by clicking Add, and specifying the listener name and port.
-
In the Database Credentials section, specify passwords for the SYS, SYSTEM, and DBSNMP administrative users in the clone database. You can choose to have the same password for all the three users or a different password for each.
Click Next.
-
-
On the Create Snap Clone Database: Initialization Parameters page, you can configure the values of various initialization parameters that affect the operation of the database instance. Select the parameter and click Edit to modify the value of the parameter.
Click Next.
-
On the Create Snap Clone Database: Post Processing page, specify the following:
-
Masking Definition: Data masking is the process of masking sensitive data in test or non-production databases. The masking definition defines the columns to be masked in the format of the masked data. Specify the masking definition to be applied after the database is cloned.
Note:
The masking definition can be used only when you have a Subset-Masking license pack. -
Custom Scripts: Specify the custom scripts that need to be executed before and after the database is created.
Click Next.
-
-
On the Create Snap Clone Database: Schedule page, specify a unique deployment procedure instance name. You can choose to start the deployment procedure immediately or at a later time.
In the Notification Details section, you can choose to set the following notifications:
-
Scheduled
-
Running
-
Action Required
-
Suspended
-
Succeeded
-
Problems
Click Next.
-
-
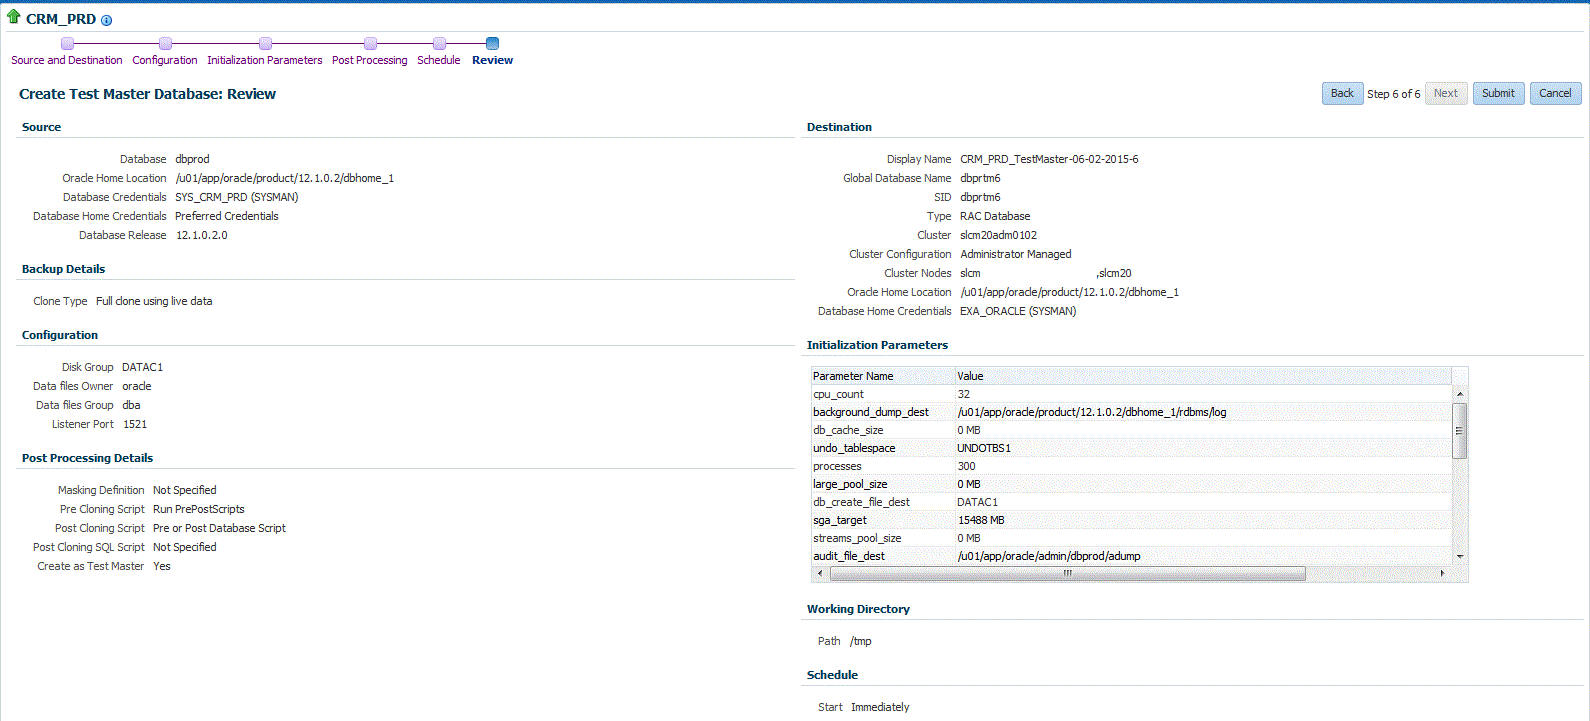
On the Create Snap Clone Database: Review page, verify the details of the source database, the data source of the clone, and the destination database.
Click Submit.

20.3.2 Creating an Exadata Test Master Database
A test master database is a sanitized version of the production database. Production data can be optionally masked before the test master is created. A test master can be created from a snapshot or an RMAN Backup profile taken at a prior point in time and refreshed at specific intervals. This option is useful if the source data has to be masked to hide sensitive data.
To create a test master, follow these steps:
-
On the Databases page, you can access the Full Clone database wizard by following any one method:
-
Select the database that you want to clone from the list of the databases displayed. On the Database home page, click the Database menu, select Cloning, and then select Create Test Master.
-
Right click on the database target name, select Database, select Cloning, and then select Create Test Master.
-
Right click on the database target name, select Database, select Cloning, and then select Clone Management. On the Clone Management page, in the Test Master Databases box, click Create.
-
-
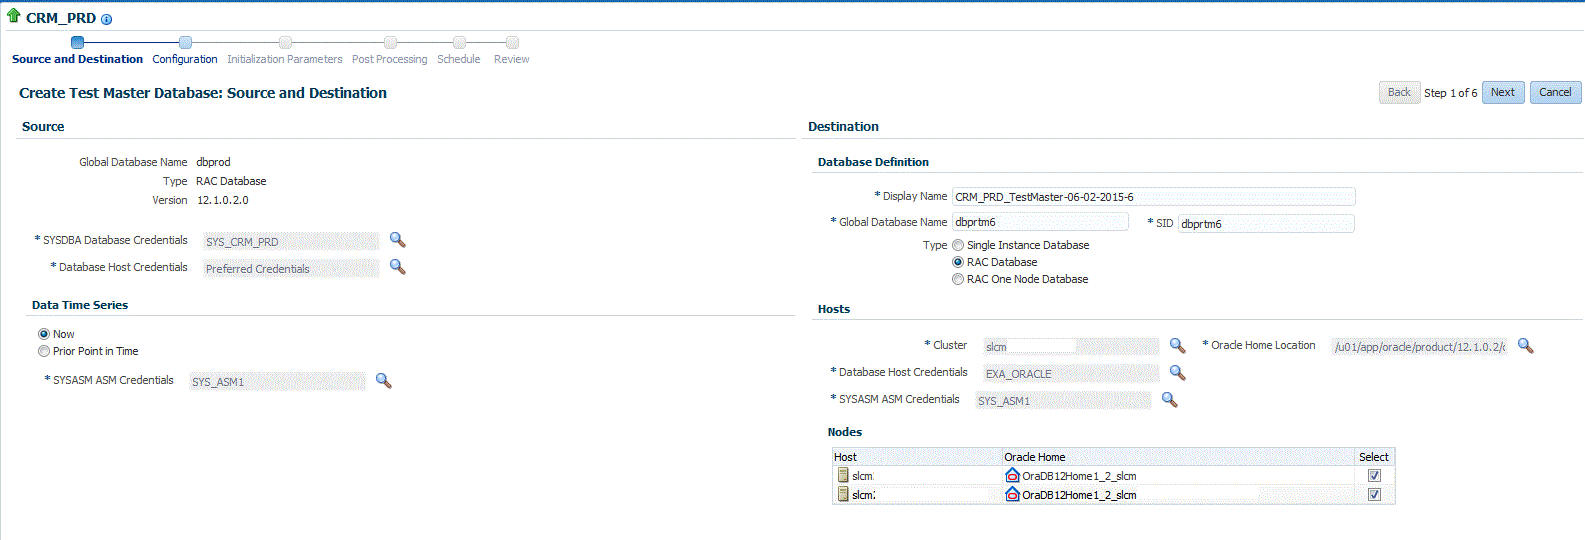
On the Create Test Master Database: Source and Destination page, do the following:
-
In the Source section, launch the credentials selector by selecting the search icons for SYSDBA Database and Database Host credentials. Click OK.
-
In the Data Time Series section, select Now or Prior Point in Time.
If you selected Now, specify or search and select the SYSASM ASM Credentials. Now refers to Live Clone.
If you selected Prior Point in Time, a carousel of RMAN Backup images appear. Select the appropriate RMAN backup by clicking Select on the image.
Select a specific time between the selected backup or snapshot and the next (or latest point of source). The backups or dumps are created at specific intervals and the test master that is based on these will reflect the production database at specific points in time. To reflect the latest data in the production database, the test master needs to be periodically refreshed.
-
-
In the Destination Database Definition section, do the following:
-
Specify a display name.
-
Specify a global database name and SID.
A database is uniquely identified by a Global Database Name. The typical form of a name is name.domain. A database is referenced by at least one Oracle instance which is uniquely identified by SID.
-
Select one of the following types of databases:
-
Single Instance Database.
In the Hosts section, specify the Oracle Home location. The host gets specified by default. Next, select the Database Home credentials and the SYSASM ASM credentials.
-
RAC Database
In the Hosts section, specify or select the cluster target. The Oracle Home location gets specified by default. Next, specify the Database Host credentials, and the SYSASM ASM credentials.
In the Nodes section, select the cluster and Oracle Home to display one or more hosts on which the administrator managed Oracle RAC database will be created.
-
RAC One Node Database
In the Hosts section, specify or select the cluster target. The Oracle Home location gets specified by default. Next, specify the Database Host credentials, and the SYSASM ASM credentials.
In the Nodes section, select the cluster and Oracle Home to display one or more hosts on which the administrator managed Oracle RAC database will be created.
Note:
Oracle supports inline patching as part of clones. When the destination home selected has patches applied such as the latest CPU or PSU, then the cloned database is automatically brought up with that level.
Click Next.
-
-
-
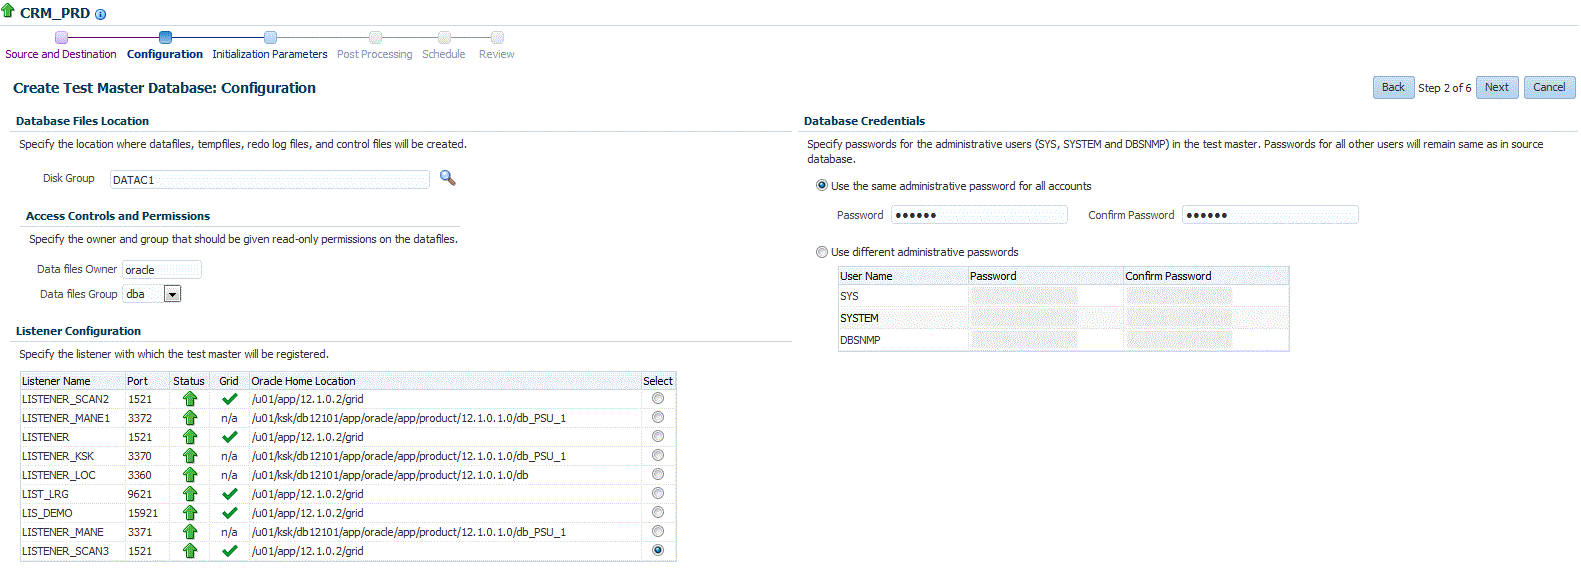
On the Create Test Master Database: Configuration page, do the following.
-
Database Files Location: Specify the location in which the data files, temporary files, redo log files, and control files will be created.
-
Access Controls and Permissions: Specify the data files owner and group that should be given read-only permissions on the datafiles.
-
Listener Configuration: Select the listener with which the test master will be registered.
-
Database Credentials: Specify the passwords for the administrative users (SYS, SYSTEM and DBSNMP) of the new database being cloned. You can choose to use the same password for all the schemas or different passwords for each schema.
-
Click Next.
-
-
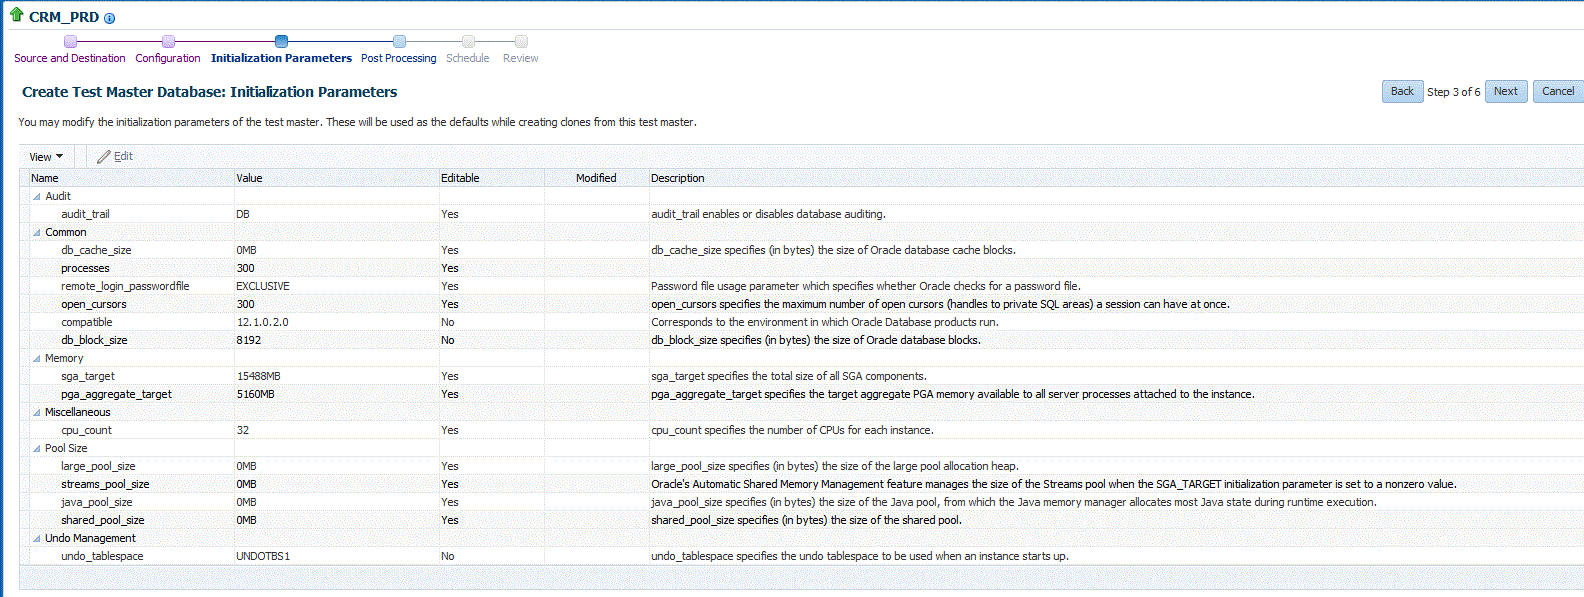
On the Create Test Master Database: Initialization Parameters page, you can configure the values of various initialization parameters that affect the operation of the database instance.
Select the parameter and click Edit to modify the value of the parameter. Some values such as
db_block_sizecannot be modified.Click Next.
-
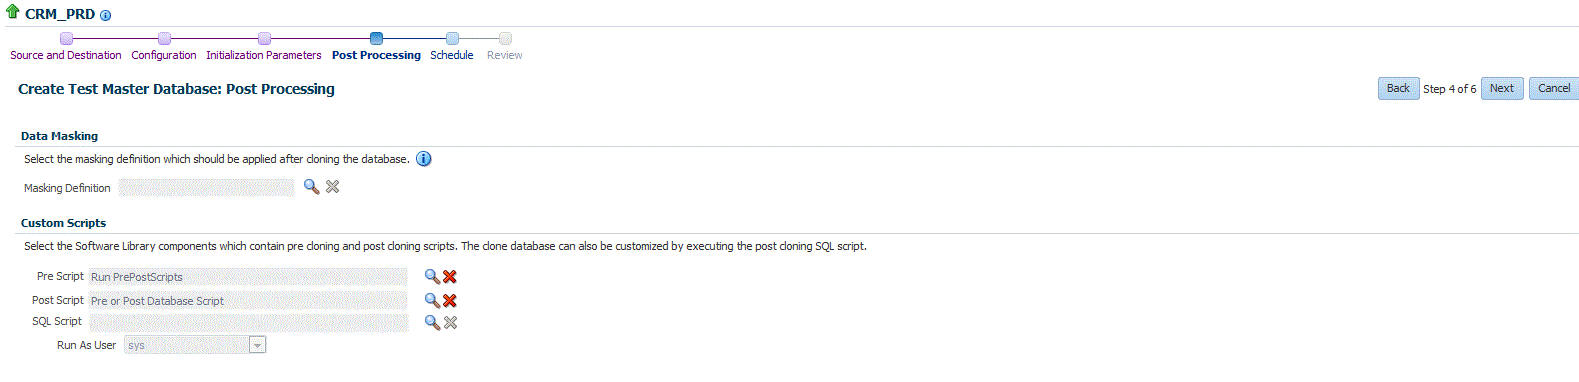
On the Create Test Master Pluggable Database: Post Processing page, in the Data Masking section, specify the data masking definition that you want to apply after creating the test master PDB. Data masking masks sensitive data in a database.
For information on how to create a data masking definition, see Oracle Data Masking and Subsetting Guide. Note that you can apply a data masking definition only if you have the Subset-Masking license pack.
In the Custom Scripts section, for Pre Script and Post Script, specify the Oracle Software Library components that contain the scripts that you want to run before, and after creating the test master PDB respectively. Also, for SQL Script, specify the SQL scripts that you want to run after creating the test master PDB. For Run As User, select the user account that you want to use to run the SQL scripts.
Click Next.
-
On the Create Test Master Database: Schedule page, specify the schedule for the creation of the test master. It can be created immediately (if physical standby used, it is created immediately and automatically refreshed) or can be created at a later date / time and refreshed at specified intervals.
Click Next.

-
On the Create Test Master Database: Review page, review and verify the information specified and click Submit to create the test master. After the Test Master has been created, you can refresh the Test Master as required to create a new version of the profile on which the Test Master is based.
20.3.3 Creating a Snapshot Clone of an Exadata Test Master Database
To create a snapshot clone of an Exadata Test Master database, follow these steps:
-
From the Targets menu, select Databases.
-
On the Databases page, you can access the Database Snap Clone wizard by following any one method:
-
Select the test master database that you want to clone from the list of the databases displayed. On the Database homepage, click the Database menu, select Cloning, and then select Create Snapshot Clone.
-
Right click on the test master database target name, select Database, select Cloning, and then select Create Snapshot Clone.
-
-
On the Create Exadata Snapshot Clone Database: Source and Destination page, do the following:
-
In the Source section, launch the credentials selector by clicking the search icons for SYSDBA Database and Database Host credentials. Click OK.
-
In the Data Time Series section, Now is selected by default.
Now refers to Live Clone.
Specify or select the SYSASM ASM credentials.
-
-
In the Destination Database Definition section, do the following:
-
Specify a display name.
-
Specify a global database name and SID.
A database is uniquely identified by a Global Database Name. The typical form of a name is
name.domain.A database is referenced by at least one Oracle instance which is uniquely identified by SID. -
Select one of the following types of databases:
-
Single Instance Database.
In the Hosts section, specify the Oracle Home location. The host gets specified by default. Next, select the Database Home credentials and the SYSASM ASM credentials.
-
RAC Database
In the Hosts section, the cluster field is auto selected from the parent database and disabled. The Oracle Home location gets specified by default. Next, specify the Database Host credentials, and the SYSASM ASM credentials.
In the Nodes section, select the cluster and Oracle Home to display one or more hosts on which the administrator managed Oracle RAC database will be created.
-
RAC One Node Database
In the Hosts section, specify or select the cluster target. The Oracle Home location gets specified by default. Next, specify the Database Host credentials, and the SYSASM ASM credentials.
In the Nodes section, select the cluster and Oracle Home to display one or more hosts on which the administrator managed Oracle RAC database will be created.
Click Next.
-
Note:
Oracle supports inline patching as part of clones. When the destination home selected has patches applied such as the latest CPU or PSU, then the cloned database is automatically brought up with that level. -
-
On the Create Exadata Snapshot Clone Database: Configuration page, do the following:
-
In the Database Files Location, specify the Sparse disk group and the redo log file size.
-
In the Recovery Files location, specify the location where you want the recovery files, such as archived redo logs, RMAN backups, and other related files to be created. You can choose to use the fast area recovery by selecting Use Fast Recovery Area. If you do, specify the fast recovery area size. The fast recovery area size is defaulted to that of source.
-
In the Listener Configuration section, select the listener targets running under the new Oracle Home, to register the clone database.
-
In the Database Credentials section, specify passwords for the SYS, SYSTEM, and DBSNMP administrative users in the clone database. You can choose to have the same password for all the three users or a different password for each.
Click Next.
-
-
On the Create Exadata Snapshot Clone Database: Initialization Parameters page, you can configure the values of various initialization parameters that affect the operation of the database instance. Select the parameter and click Edit to modify the value of the parameter.
Click Next.
-
On the Create Exadata Snapshot Clone Database: Post Processing page, specify the following:
-
Masking Definition: Data masking is the process of masking sensitive data in test or non-production databases. The masking definition defines the columns to be masked in the format of the masked data. Specify the masking definition to be applied after the database is cloned.
Note:
The masking definition can be used only when you have a Subset-Masking license pack. -
Custom Scripts: Specify the custom scripts that need to be executed before and after the database is created.
Click Next.
-
-
On the Create Exadata Snapshot Database: Schedule page, specify a unique deployment procedure instance name. You can choose to start the deployment procedure immediately or at a later time.
In the Notification Details section, you can choose to set the following notifications:
-
Scheduled
-
Running
-
Action Required
-
Suspended
-
Succeeded
-
Problems
Click Next.
-
-
On the Create Exadata Snapshot Database: Review page, verify the details of the source database, the data source of the clone, and the destination database.
Click Submit.
20.3.4 Enabling a Test Master Database
To convert a database to a test master database, follow these steps:
-
From the Targets menu, select Databases.
-
On the Databases page, right click on the database target that you want to enable as a test master database. From the menu that appears, select Oracle Database, select Cloning, and then select Enable Test Master.
-
On the Enable as a Test Master Database page, specify or search and select the SYSDBA database and database host credentials.
-
Specify or search and select the parent database from which the database has been cloned. This provides better lineage tracking.
-
Specify or select a data masking definition if you want to mask data in the cloned database before enabling it as a test master.
-
In the Custom Scripts section, you can select Software Library components that contain post cloning scripts. The clone database can also be customized by executing the post cloning SQL script.
-
In the Access Controls and Permissions section, specify the owner and group that should be given read-only permissions on the datafiles.
-
Click Submit.
20.3.5 Disabling a Test Master Database
To disable a test master database, follow these steps:
-
From the Targets menu, select Databases.
-
On the Databases page, right click on the database target that you want to disable as a test master database. From the menu that appears, select Oracle Database, select Cloning, and then select Disable Test Master.
-
On the Disable Test Master page, specify or search and select the SYSDBA database and database host credentials.
-
The Exadata Snapshot Clone Databases sections lists the database snapshot clones that will be deleted as part of the process of disabling the test master.
-
Click Submit. This action resets the datafiles to read-write mode and restarts the database in open mode. You can later make further changes to the database and then enable it as test master again, if you choose to.
20.3.6 Creating a CloneDB Database
You can create CloneDB databases only when you have RMAN Image backups.
To create a CloneDB database, follow these steps:
-
On the Databases page, you can access the CloneDB wizard by following any one method:
-
Select the database that you want to clone from the list of the databases displayed. On the Database home page, click the Database menu, select Cloning, and then select Create CloneDB.
-
Right click on the database target name, select Database, select Cloning, and then select Create CloneDB.
-
Right click on the database target name, select Database, select Cloning, and then select Clone Management. On the Clone Management page, in the CloneDB Databases box, click Create.
-
-
On the Create CloneDB Database: Source and Destination page, do the following:
-
In the Source section, launch the credentials selector by selecting the search icons for SYSDBA Database and Database Host credentials. Click OK.
-
In the Source Data Time Series, Prior Point in Time is selected automatically.
Select the appropriate RMAN Image backup by clicking Select on the image.
You can create full clones by selecting a backup and optionally modify the time and SCN to do a point in time restore.The Select Time option has the minimum limit set to the current backups time and maximum time limit set to the next backup time. You can modify this in case you have to create a new clone between these two time periods. Similarly, you can do the same for SCN by selecting the Select SCN option.
-
-
In the Destination Database Definition section, do the following:
-
Specify a display name.
-
Specify a global database name and SID.
A database is uniquely identified by a Global Database Name. The typical form of a name is name.domain. A database is referenced by at least one Oracle instance which is uniquely identified by SID.
-
The Single Instance database type is selected by default.
In the Hosts section, specify the Oracle Home location, the host, and the database host credentials.
In the Backups Location, specify the shared location.

Note:
Oracle supports inline patching as part of clones. When the destination home selected has patches applied such as the latest CPU or PSU, then the cloned database is automatically brought up with that level.Click Next.
-
-
On the Create CloneDB Database: Configuration page, do the following:
-
In the Database Files Location, specify the location where you want the data files, temp files, redo log files, and control files to be created. The File System option is selected by default.
-
In the Recovery Files location, specify the location where you want the recovery files, such as archived redo logs, RMAN backups, and other related files to be created. You can choose to use the fast area recovery by selecting Use Fast Recovery Area. If you do, specify the fast recovery area size. The fast recovery area size is defaulted to that of source.
-
In the Listener Configuration section, select the listener targets running under the new Oracle Home, to register the clone database.
-
In the Database Credentials section, specify passwords for the SYS, SYSTEM, and DBSNMP administrative users in the clone database. You can choose to have the same password for all the three users or a different password for each.
Click Next.
-
-
On the Create CloneDB Database: Initialization Parameters page, you can configure the values of various initialization parameters that affect the operation of the database instance. Select the parameter and click Edit to modify the value of the parameter.
Click Next.
-
On the Create CloneDB Database: Post Processing page, specify the following:
-
Masking Definition: Data masking is the process of masking sensitive data in test or non-production databases. The masking definition defines the columns to be masked in the format of the masked data. Specify the masking definition to be applied after the database is cloned.
Note:
The masking definition can be used only when you have a Subset-Masking license pack. -
Custom Scripts: Specify the custom scripts that need to be executed before and after the database is created.
-
Create Data Profile: This option enables you to automatically take a backup of the new cloned instance once it is created. When the clone or the Test Master is refreshed, this section displays the existing profiles created for the database. You can select the profile that has to be refreshed along with the database.
-
Create as Test Master: This option if you want to create the cloned database as a Test Master database.
Click Next.
-
-
On the Create CloneDB Database: Schedule page, specify a unique deployment procedure instance name. You can choose to start the deployment procedure immediately or at a later time.
In the Notification Details section, you can choose to set the following notifications:
-
Scheduled
-
Running
-
Action Required
-
Suspended
-
Succeeded
-
Problems
Click Next.
-
-
On the Create CloneDB Database: Review page, verify the details of the source database, the data source of the clone, and the destination database.
Click Submit.
20.3.7 Managing Clone Databases
The Clone Management page enables you to manage clone databases by adding clone databases, removing clone database, and promoting the clone databases as Test Master.
To access the Clone Management page, navigate to an Oracle database target home page. On the home page, click Oracle Database, select Cloning, and then select Clone Management.
The Add button can be used to add the clones of the current databases which have already been created.To add a database clone instance, click on Add. In the Select Targets dialog box that opens, select a database target, and click Select. The database instance gets added to the Clones section in the Database Cloning page.
Only the databases that are added using the Add button can be removed using the Remove button.To remove a database clone instance, select the database clone instance that you want to remove, from the Clones section. Click Remove.
Promoting Clone Databases as Test Master
To promote a database clone database instance as Test Master, select the clone instance that you want to recreate from the Clone section. Click Promote as Test Master.
You can also remove the clone database instance from Test Masters, by selecting the clone database instance from the Clones section, and clicking Remove from Test Masters.
To refresh a clone database, select the clone database instance from the Clone section, and then click Refresh. See Section 20.3.8, "Refreshing Clone Databases".

The Data Profiles tab on the Clone Management page displays the data profiles that you have created from the clone database. On the Data Profiles page, you can view the contents of existing data profiles. You can also Edit and Refresh these data profiles.
You can also create a new data profile by clicking Create. This takes you to the Create Provisioning Profile wizard. Refer to Enterprise Manager Cloud Control Administrator's Guide for information on how to create a provisioning profile using this wizard.
20.3.8 Refreshing Clone Databases
To refresh a clone database, navigate to the Clone Management page by following these steps:
-
From the Targets menu, select Databases.
-
On the databases home page, select the database clone instance that you want to refresh from the list of databases.
-
On the database target home page, click Oracle Database, select Cloning, and then select Clone Management.
-
On the Clone Management page, select the Refresh tab.
The Refresh page displays the following sections:
-
Drift from Source Database
This section displays the name of the source database from which this database has been cloned. It shows the number of days since the clone database has been refreshed. Click Refresh to refresh the clone database.
-
Database Volume Details
This section displays the storage details for the selected databases. Click Show files to view the layout of the database files in the volumes. A display box appears that shows the storage layout and file layout of the selected database.
-
History
This section displays the past refreshes of the database. It shows the date and time of the refresh, where it has been refreshed from, the owner of the database, and the status of the refresh action.
-
Storage Utilization
This section displays the storage volume of the database, the storage contents, the mount point, the amount of writable storage used, and the synchronization date.
20.4 Creating Snap Clones from an In-Sync Test Master
You can create snap clones using a standby database that is designated as the test master database. The test master database is always current and in sync with the production database. To create snap clones using this approach, follow these steps:
Table 20-1 Creating Snap Clone (Continuous Flow)
| Step | Task | Role |
|---|---|---|
|
1 |
Follow the steps in the Getting Started section to enable DBaaS. |
|
|
2 |
Register storage servers. |
|
|
3 |
Create one or more resource providers. |
|
|
4 |
Configure the request settings. |
|
|
5 |
Define quotas for each self service user. |
|
|
7 |
Add a standby database and designate it as the test master. |
See Section 20.4.6, "Using a Physical Standby Database as a Test Master" Note: This standby database must be present on a registered storage server (such as NetApp, Sun ZFS, or EMC) that allows creation of snap clones. |
|
6 |
Enable the test master for snap clone. |
See Section 20.4.7, "Enabling the Test Master for Snap Clone". |
|
Create snapshot profiles from the test master. |
Section 20.4.8, "Creating a Database Provisioning Profile Using Snapshots". |
|
|
8 |
Create a service template. |
See Section 20.4.9, "Creating Service Template Using Snap Clone Profile" |
|
9 |
Configure the Chargeback Service. (this step is optional) |
|
|
10 |
While deploying a database, select the service template you have created. |
20.4.1 Getting Started
20.4.2 Registering Storage Servers
To register storage servers for:
-
NetApp and Sun ZFS Storage Server: See Section 12.7.4.1, "Registering a NetApp or a Sun ZFS Storage Server".
-
Solaris File System (ZFS): See Section 12.7.4.2, "Registering a Solaris File System (ZFS) Storage Server".
-
EMC Storage Server: See Section 12.7.4.3, "Registering an EMC Storage Server".
20.4.3 Creating Resource Providers
You must create one or more resource providers which include:
-
PaaS Infrastructure Zones: See Section 11.2.2.1, "Creating a PaaS Infrastructure Zone".
-
Database Pool: See Section 20.4.3.1, "Creating a Database Pool for Database as a Service"
20.4.3.1 Creating a Database Pool for Database as a Service
To create a database pool for database as a service, follow these steps:
-
Log into Enterprise Manager as a user with the
EM_SSA_ADMINISTRATORrole. -
From the Enterprise menu, select Cloud, then select Cloud Home. From the Oracle Cloud menu, select Setup, then select Getting Started. Click the Setup link next to the Database service family, click the Database Pool link and click Create.
-
In the Credentials region, specify the following credentials:
-
Host: Required for creating and starting the database.
-
Root: Users with these credentials can perform privileged actions like executing root scripts. For snap clone databases, the snapshots must be mounted by a root user. To facilitate this, privileged credentials must be set up to perform typical root user actions with SUDO privileges.
-
Grid Infrastructure: This is an optional field and is required only for creating snap clones on EMC storage to create ASM disks.
-
Automatic Storage Management: This is an optional field. It is required if you plan to use this database pool for live cloning on any database running on ASM.
-
-
Enter a name and description for the database pool.
-
Specify the following details:
-
PaaS Infrastructure Zone: Select the PaaS Infrastructure Zone into which the database instance is to be provisioned.
-
Database Configuration: Specify the configuration of the database being provisioned. This can either be Single Instance or Cluster Database (RAC) but cannot be a combination of both.
-
Platform and Version: Specify the platform and version of the database being deployed.
-
-
Click Add and select one or more Oracle Homes to be added to the database pool.
-
In the Maximum Number of Database Instances (per host), enter the maximum number of database instances that can be running on each host in the pool.
Note:
For RAC databases. the value specified in this field is used to ensure that the nodes on which the database is be created meets this criteria. -
Click Submit to create a database pool. The newly created pool will appear in the Database Cloud Self Service Portal Setup: Database Pools page. The database pool can now be added to the Service Template.
20.4.4 Configuring Request Settings
You can configure the request settings by specifying when a request can be made, its duration, and so on. See Section 11.2.3, "Configuring Request Settings" for details.
20.4.5 Defining Quotas
After configuring the request settings, you must define quotas for each self service user. See Section 11.2.4, "Setting Up Quotas" for details.
20.4.6 Using a Physical Standby Database as a Test Master
A test master database is a sanitized version of the production database. A test master can be created from a live standby database by using the Oracle Data Guard feature. Profiles or snapshots can be created from the test master (see Section 20.4.8, "Creating a Database Provisioning Profile Using Snapshots") and these profiles can be used to create snap clones (see Section 22.2, "Requesting a Database"). Since the test master is a physical standby database with live data, you must schedule and create profiles and snapshots on a periodic basis to ensure that the latest data is captured in the profile (see Section 20.4.8.1, "Creating and Refreshing Snapshots of the Test Master"). Self service users can create multiple snap clones from each profile and refresh their snap clones (see Section 22.3, "Refreshing a Database") when a new profile or snapshot become available.
To create a test master, follow these steps:
-
From the Enterprise menu, select Cloud, then select Cloud Home. From the Oracle Cloud menu, select Setup, then select the Database Service family on the left panel. Click the Test Master Databases tab.
-
To create a test master from a live standby database, click Add and select a standby database that is to be designated as the test master. The newly added database appears in the Test Master Database page and can be used to create the snap clone database instances.
20.4.7 Enabling the Test Master for Snap Clone
After the test master database has been created, you must enable snap clone on the database.
Note:
You needSNAP_CLONE_TARGET or FULL_TARGET privilege on the database to enable snap clone.To enable snap clone, follow these steps:
-
On the Storage Registration page, in the Details section, select the Databases tab, and then select the database from the table which you want to use for Snap Clone, and then click Enable Snap Clone.
The Supported column in the table shows if the databases listed support Snap Clone or not.
Note: If a database listed shows the Not Supported icon in the Supported column, you can view the Message column from the View menu. This column displays the reason. A possible reason is that the data files are missing on the storage server and may be located on either local disk or some other unregistered storage server. Another reason could be that the data files reside on another storage that is not synchronized.
-
Once snap clone has been successfully enabled, a confirmation message appears. Click OK.
To view all the files located on the storage server, click Show Files. To view all the projects (aggregates), volumes, and snapshots in the storage server, select the Contents tab.
20.4.8 Creating a Database Provisioning Profile Using Snapshots
Prerequisites for Creating a Database Provisioning Profile Using Snapshots
Before you create a database provisioning profile, follow these prerequisites:
-
Ensure that the storage server you want to register for storage is available on the network.To register a storage server, refer to Section 12.7, "Registering and Managing Storage Servers".
Note:
NetApp ,Sun ZFS, Solaris ZFS, and EMC storage servers are supported in Enterprise Manager Cloud Control 12c. -
Ensure that the storage server is connected to a Management Agent installed and monitored in Enterprise Manager Cloud Control for communication.
-
Ensure that the storage server is registered, and at least one database should be present which is enabled for Snap Clone.
-
To create the profile, you must have the
EM_STORAGE_OPERATORorEM_STORAGE_ADMINISTRATORprivileges.
Creating a Database Provisioning Profile Using Snapshots
To create a database provisioning profile, follow these steps:
Note:
When a snapshot is used by a database, it cannot be deleted. When you remove a snapshot, it becomes obsolete.This means that you cannot request any new databases using the obsolete snapshot. This is indicated by the red pushpin against the database, which means that the snapshot is pinned and cannot be used.
When the database using that snapshot is deleted, it gets automatically purged in the next run.
-
You can access the Database Provisioning page using any of the following ways:
-
From the Enterprise menu, select Cloud, and then select Cloud Home. On the Cloud home page, click Oracle Cloud, select Setup, and then select Data Sources. On the Database: Data Sources page, in the Data Profiles tab, click Create.
-
From the Enterprise menu, select Provisioning and Patching, and then select Database Provisioning. On the Database Provisioning page, in the Profiles section, click Create.
-
From the database target home page, click Oracle Database, select Provisioning, and then select Create Provisioning Profile.
-
-
On the Reference Target page, click the search icon to select a target.
-
In the Search and Select:Targets display box, select the database you want to create a profile for, and then, click Select.
Note:
Ensure that the database you select is enabled for Snap Clone. For information refer to Enabling or Disabling Snap Clone. -
On the Reference Target page, select the following:
-
Data Content
-
Structure and Data to include physical and structural files from the database
-
Create
-
Storage Snapshots

-
-
In the Credentials section, select the database. In the Credentials column, you can select Named Credentials and then select a credential name from the Credential Name column (or) select Preferred Credentials. Click Next.

-
On the Create Database Provisioning Profile: Page, in the Profile Information section, do the following:
-
Specify or select a profile location in the software library where the database profile will be created.
-
Specify a unique profile name.
For example:
Snap Clone Profile for HR database
-
Add a description for the profile.
-
Verify the profile version and the vendor.
-
Add any additional notes such as host name, database, data content, data content mode, and the like.
-
-
In the Schedule section, you can choose to start the profile creation immediately, or you can schedule it for a later time. You can also choose to repeat the creation of the provisioning profile, and set a repeat time.
-
In the Purge Policy section, you have three options:
-
None. Select this option you do not want to purge any data collected.
-
Snapshots. This option enables you to specify the maximum number of snapshots that can be purged.
-
Day(s). This option enables you to specify the number of days after which the data component should be purged.
-
-
Specify or select a working directory. Click Next.
-
On the Review page, ensure that the selections you have made in the previous pages are correctly displayed and click Submit. Otherwise, click Back repeatedly till you reach the page where you want to make changes. Click Cancel to abort the provisioning profile creation.
Once you have submitted the provisioning profile creation job, manually refresh the page if View Data has been set to Real Time: Manual Refresh. Else, set View Data to reload after a specific period of time, and then select an execution step from the Procedure Steps tree on the left pane to view the details.
To view the submitted jobs, select the Procedure Activity link in the Data Profiles tab.
20.4.8.1 Creating and Refreshing Snapshots of the Test Master
After the snapshot profile has been created, you can refresh the profile at scheduled intervals and create new versions of the profile.
To create a snapshot profile of the test master (or the physical standby database), follow the steps listed in Section 20.4.8, "Creating a Database Provisioning Profile Using Snapshots". To refresh a snapshot profile, follow these steps:
-
From the Enterprise menu, select Cloud, then select Cloud Home. From the Oracle Cloud menu, select Setup, then select the Database Service family on the left panel. Click the Data Profiles tab.
-
Select the snapshot profile that is to be refreshed.
Click Refresh. You will see a message indicating that a new snapshot (version) of the profile will be created. Click Yes to submit the refresh profile job and create a new snapshot.
20.4.8.1.1
Snapshot Purge Policy
Snapshots can be refreshed at regular intervals to ensure that the latest production data is available to the users. Every time a snapshot is refreshed, a new version of the snapshot is created. When the self service user refreshes his database to a newer version of the snapshot, the older versions can be deleted. You can delete them manually or define a purge policy while creating the snapshot.
Purge Policy Example:
In Figure 20-2, you can see that for the HRMS Application Test Master Snapshots, the Purge Policy has been defined is 6 Snapshots. This means that when the 7th version of the snapshot is being created, the 1st one will be purged. At any point in time, only 6 snapshot versions can exist for the HRMS Application test Master Snapshots profile.
In this figure, you can also see in the Contains column, that 7 snapshots are available and the Removal Overdue column shows 1. This indicates that 1 snapshot version has been marked for deletion but is still available.
In the Contents region, you can see that in the Used By column, this snapshot cannot be deleted as it is being used by 1 database. You can drill down to the database page to identify the self service user who is using the snapshot version. You can then inform the self service user that he must refresh his database to the latest version. Once the database has been refreshed, the snapshot will be purged.
20.4.9 Creating Service Template Using Snap Clone Profile
To create a snap clone based service template, follow these steps:
-
Log into Enterprise Manager as a user with the
EM_SSA_ADMINISTRATORrole. TheEM_SSA_ADMINISTRATORrole you select must also have theEM_STORAGE_OPERATORprivileges. -
From the Enterprise menu, select Cloud, then select Cloud Home. The Cloud Home page appears. From the Oracle Cloud menu, select Setup, then select Getting Started.
-
Click the Setup link next to the Databases option in the left panel. Select Database from the drop down menu.
-
Click the Service Templates link. The Service Templates page appears. Click Create. The Create Service Template: General page appears.
-
Enter a name and description for the service template. The description must be unique and provide information on the type of service template being created.
-
In the Source Identification section, select the Using Profile radio button, click the Search icon and select the test master database based on the snap clone profile you created.
-
In the Profile Version field, you can select either of the following:
-
Latest: This ensures that the latest profile is always used by the self service user.
-
Selected by user at request time: If this option is selected, the self service user can select the profile to be used when creating a service request.
-
-
In the Database Definition region, specify the following:
-
Type: This can be Single Instance or Real Application Cluster (RAC). If you select RAC, specify the number of nodes.
-
Database SID: This is an optional field. You can select Specify Prefix or Specified by User at Request Time.
-
Specify Prefix: If you choose this option, enter a prefix that is to be used to generate a unique System Identifier (SID) at the time of database creation. The prefix helps to identify databases created using this service template. The prefix can be a maximum of 6 characters.
The new database name generated will be based on the SID Prefix specified here. For example, if the prefix is specified as MYDB, the SID for the new database is generated as MYDB0000, MYDB0001, MYDB0002, and so on.
For existing databases (running databases and in progress requests), a unique SID name is generated for single instance databases, or a unique name is generated for real application cluster databases. For example, if the existing SIDs running on a host are MYDB0000, MYDB0001, MYDB0002 And In progress are MYDB0003, MYDB0004, the new SID or database name generated for the new request is MYDB0005.
-
Specified by User at Request Time: If you choose this option, you can leave this field blank and specify the SID when you are making a database request.
-
-
Domain Name: This is an optional field. Enter a Domain Name to be used for the new database being created. You must ensure that the domain name does not contain a preceding "." (dot).
-
-
In the Zones region, click Add to select a PaaS Infrastructure Zone into which the database instance is to be provisioned. Click Assign Pool. Select a pool from the list and assign this pool to the PaaS Infrastructure Zone. The database will be provisioned into this pool.
-
After you have selected the zone and the pool, the host target is populated in the Reference Host field.
-
Click Next. The Database Cloud Self Service Portal Setup: Database page appears.
-
In the Reference Host region, the name of the PaaS Infrastructure zone, the database pool, and the reference host you have selected in the Database Cloud Self Service Portal Setup: General page are displayed.
The database values such as the location of the file system and the listener port you select must be available on the reference host.
-
Specify the following details:
-
Storage: You can configure the volumes that will be used by the database:
-
Mount Point Prefix: The mount point prefix can be the Same for All Volumes or Different for Each Volume.
Specify the prefix for the new mount point for the database being provisioned. This value would be prefixed to an auto-generated mount point where a clone of this volume will be mounted. The volume will be mounted on
/<mount-prefix>_<unique-suffix-generated-by-EM>/<source-path>. If the Mount Point Prefix is different for each volume, specify a different value for each volume, -
Writable Space: The Writable Space can be the Same for All Volumes or Different for Each Volume.
Specify the amount of space required for block changes. The value specified here cannot exceed the Storage Ceiling specified for the server. For example, for minimal data changes, you specify the value as 1% of the original volume size.
-
-
Enable Archiving: If this check box is selected, the database will not be shut down during a refresh. This allows self service users to schedule backups and restore operations without shutting down the database.
-
Snapshot Policy: Snapshots are sets of historical data for specific time periods. By default, Oracle Database automatically generates snapshots of the performance data once every hour and retains the statistics in the workload repository for 8 days. Select the Allow the user to take snapshots for the new database checkbox and specify the Maximum Number of Snapshots that can be taken.
Snapshots can be created for a specific point in time. The number of snapshots is determined by the value specified by the self service administrator in the Maximum Number of Snapshots field. Once the snapshot has been taken, the database can be restored to a specific snapshot taken a particular point in time. For example, if there are several snapshots such as snap1, snap2, and snap3, if the database is restored to snap2, snap3 will be deleted.
-
In the Listener Port field, specify listener port number that is to be associated with the new database. If you have selected a 11.2 or later RAC database, you must specify the scan port number.
-
Administrator Credentials: Specify passwords for the system schemas of the new database. These schemas will not be available to the
EM_SSA_USERS. You can choose to use the same password for all the schemas or different passwords for each schema. If these values are not specified, default values will be used and theEM_ADMINISTRATORcan change them. -
Non Administrator Credentials: Apart from the system schemas, if you want to restrict access to other schemas, you can select them in the Non-Administrator Credentials region and specify the password.
-
Master Account Privileges: Enter the name of the Master Account. You can specify the privileges that are to be provided to the master account user by specifying them in the Privileges field.
-
-
Click Next. The Create Service Template: Initialization Parameters page appears.
-
In this page, you can specify the following:
-
Database Sizes: Select the database sizes that are to be supported by this service template.
Note: The database size definitions must have already been defined using the
emcli create_database_sizecommand. See Section 47.5, "Database Size EM CLI Verbs" for details.You can select sizes such as small, medium, and large. Each database size has a specific memory, storage, CPU cores, and units. Select a size and select Include in Template to associate it with the service template. Click Default to designate it as the default database size.
-
Initialization Parameters: You can configure the values of various initialization parameters that affect the operation of the database instance. Select a parameter and click the Set icon to modify the value of the parameter.
-
-
Click Next. The Create Service Template: Customization page appears. Specify the custom scripts that need to be executed before and after the database is created. See Section 24.1, "Pre and Post Request Creation / Deletion Scripts" for details.
You can also specify a custom Post SQL Script and select the user who can run the script. For more details, see Section 24.1.1, "Post SQL Script".
-
In the Target Properties region, you can specify global target properties such as Location, Department, Line of Business, and so on. These properties will be applied to the database clones that are created. You can do the following:
-
Mark a property as mandatory by selecting the Required check box. If a property is marked as mandatory, the self service user must specify a value for this property while requesting a database.
-
Lock a property. When a property is locked, the self service user cannot modify the value of this property while requesting a database.
-
-
Click Next. The Create Service Template: Roles page appears. Click Add to select the SSA user roles to which this service template will be available. All users belonging to the selected role can use this service template. Click Next.
-
The Create Service Template: Review page appears. Click Create. The newly created service template will appear in the Database Cloud Self Service Portal Setup: Service Templates page.
20.4.10 Configuring Chargeback
Optionally, you can configure the chargeback service. See Chapter 43, "Chargeback Administration".
20.4.11 Requesting a Database
The self service user can now select the service template based on the database template profile and create a database. See Section 22.2, "Requesting a Database".
20.4.12 Example: Creating Snap Clones from an In-Sync Test Master
The following example shows how you can create a snap clones from a physical standby database.
-
First, you must make sure that all the prerequisites are met. See Section 12.1, "Getting Started".
-
The next step is to identify the production database and the physical standby database. The production database is prod1 and the standby database as prod1stb.
-
Next, you must register the storage server. This step validates the storage and discovers prod1stb on the storage server. See Section 20.4.2, "Registering Storage Servers".
-
You must then create one or more PaaS Infrastructure Zones and one or more database pools. See Section 20.4.3, "Creating Resource Providers"
-
Then, you must define the quota that you wish to allocate to the self service users. See Section 20.4.5, "Defining Quotas".
-
The next step is to designate the standby database, prod1stb as the test master.
-
Next, you must enable prod1stb for snap clone. This allows creation of snap clones using snapshot technology. See Section 20.4.7, "Enabling the Test Master for Snap Clone".
-
The next step is to create a snapshot profile from prod1stb. See Section 20.4.8, "Creating a Database Provisioning Profile Using Snapshots"
While creating the profile, specify the Start Date as 05/15/2015, the Repeat schedule as Every N Days and the Frequency as Every 1 day. Specify the End By date as 05/20/2015. A new version of the snapshot profile will be created every day from the Start date of 05/15/2015.
In the Purge Policy field, specify the Number of Snapshots as 5. This will ensure that after 5 versions of the snapshot are created, the first or oldest one will be purged.
-
To make this profile available to the self service user, you must create a service catalog entry or a service template. Create a template called Snap Clone Template. See Section 20.4.9, "Creating Service Template Using Snap Clone Profile". Set the Profile Version field to Selected by user at request time. The self service user can choose the profile version that is to be used to create the snap clone.
-
The self service user can then use the Snap Clone Template, select a version of the profile and use it to create the snap clone. See Section 22.2, "Requesting a Database". As and when a new version of the profile is available (see Section 20.4.8.1, "Creating and Refreshing Snapshots of the Test Master"), the self service user can choose to refresh the profile to the latest version. See Section 22.3, "Refreshing a Database".
Based on the Purge Policy which is set to 5 snapshots, the older versions of the snapshots will be deleted. But if the self service user has a database that is using that snapshot, the profile cannot be deleted until the self service user has refreshed the profile to the latest version.
20.4.13 Creating a Service Template for EMC Snap Clone
Note:
This option can be used only for snapshots created on EMC storage.Prerequisites
Before you can create snap clones on EMC storage, you must ensure that the prerequisites described in Configuring EMC Storage Servers are met.
To create a service template using an existing database, follow these steps:
-
Log into Enterprise Manager as a user with the
EM_SSA_ADMINISTRATORrole. -
From the Enterprise menu, select Cloud, then select Cloud Home. The Cloud Home page appears. From the Oracle Cloud menu, select Setup, then select Getting Started.
-
Click the Setup link next to the Databases option in the left panel. Select Database from the drop down menu.
-
Click the Service Templates link. The Service Templates page appears. Click Create. The Create Service Template: General page appears.
-
Enter a name and description for the service template. The description must be unique and provide information on the type of service template being created.
-
In the Source Identification section, select the Using Existing Database radio button, click the Search icon and select the test master database that you had created earlier. See Section 20.4.6, "Using a Physical Standby Database as a Test Master" for more details.
-
Specify the host and database credentials.
-
In the Database Definition region, the Create Snap Clone Database option is selected. Enter the following details:
-
Type: This can be Single Instance or Real Application Cluster (RAC). If you select RAC, specify the Number of Nodes.
-
Database SID: This is an optional field. You can select Specify Prefix or Specified by User at Request Time.
-
Specify Prefix: If you choose this option, enter a prefix that is to be used to generate a unique System Identifier (SID) at the time of database creation. The prefix helps to identify databases created using this service template. The prefix can be a maximum of 6 characters.
The new database name generated will be based on the SID Prefix specified here. For example, if the prefix is specified as MYDB, the SID for the new database is generated as MYDB0000, MYDB0001, MYDB0002, and so on.
For existing databases (running databases and in progress requests), a unique SID name is generated for single instance databases, or a unique name is generated for real application cluster databases. For example, if the existing SIDs running on a host are MYDB0000, MYDB0001, MYDB0002 And In progress are MYDB0003, MYDB0004, the new SID or database name generated for the new request is MYDB0005.
-
Specified by User at Request Time: If you choose this option, you can leave this field blank and specify the SID when you are making a database request.
-
-
Domain Name: This is an optional field. Enter a Domain Name to be used for the new database being created. You must ensure that the domain name does not contain a preceding "." (dot).
-
-
In the Zones region, click Add to select a PaaS Infrastructure Zone into which the database instance is to be provisioned. Click Assign Pool. Select a pool from the list and assign this pool to the PaaS Infrastructure Zone. The database will be provisioned into this pool.
-
After you have selected the zone and the pool, the host target is populated in the Reference Host field.
-
In the Listener Port field, specify listener port number that is to be associated with the new database. If you have selected a 11.2 or later RAC database, you must specify the scan port number. Click Next. The Create Service Template: Database page appears.
-
In the Reference Host region, the name of the PaaS Infrastructure zone, the database pool, and the reference host you have selected in the Database Cloud Self Service Portal Setup: General page are displayed.
The database values such as a Automatic Storage Management (ASM) disk group, location of the file system, and listener port you select must be available on the reference host.
-
Specify the following:
-
Storage Type: Select Automatic Storage Management (ASM). The Oracle Automatic Storage Management (ASM) is a volume manager and a file system for database files that supports single-instance and RAC configurations. ASM groups the disks in your storage system into one or more disk groups. If you select ASM, select the Disk Group here.
-
Fast Recovery (Optional): To simplify the management of backup and recovery files, you can create a fast recovery area for your database. Select the Enable Fast Recovery Area checkbox to specify the location in which recovery related files must be stored. The fast recovery area can be a ASM disk group or a file system that provides a centralized disk location for backup and recovery file. Specify the location of the Fast Recovery Area and the Fast Recovery Size. The amount of disk space to allocate for the fast recovery area depends on the size and activity levels of your database.
If the Enable Archiving check box is selected, the database will not be shut down during a refresh. This allows self service users to schedule backups and restore operations without shutting down the database.
-
-
In the Listener Port field, specify listener port number that is to be associated with the new database. If you have selected a 11.2 or later RAC database, you must specify the scan port number.
-
Specify the Administrator Credentials. Specify passwords for the system schemas of the new database. These schemas will not be available to the
EM_SSA_USERS. You can choose to use the same password for all the schemas or different passwords for each schema. If these values are not specified, default values will be used and theEM_ADMINISTRATORcan change them. -
Apart from the system schemas, if you want to restrict access to other schemas, you can select them in the Non-Administrator Credentials region and specify the password. These schemas will be locked and the
EM_SSA_USERScannot access them. Click Next. -
Click Next. The Create Service Template: Initialization Parameters page appears. In this page, you can specify the following:
-
Database Sizes: Select the database sizes that are to be supported by this service template.
Note: The database size definitions must have already been defined using the emcli create_database_size command. See Section 47.5, "Database Size EM CLI Verbs" for details.
You can select sizes such as small, medium, and large. Each database size has a specific memory, storage, CPU cores, and units. Select a size and select Include in Template to associate it with the service template. Click Default to designate it as the default database size.
-
Initialization Parameters: You can configure the values of various initialization parameters that affect the operation of the database instance. Select a parameter and click the Set icon to modify the value of the parameter.
-
-
Click Next. The Create Service Template: Customization page appears. Specify the custom scripts that need to be executed before and after the database is created. See Section 24.1, "Pre and Post Request Creation / Deletion Scripts" for details.
-
In the Target Properties region, you can specify global target properties such as Location, Department, Line of Business, and so on. You can do the following:
-
Mark a property as mandatory by selecting the Required check box. If a property is marked as mandatory, the self service user must specify a value for this property while requesting a database.
-
Lock a property. When a property is locked, the self service user cannot modify the value of this property while requesting a database.
-
-
Click Next. The Create Service Template: Roles page appears. Click Add to select the SSA user roles to which this service template will be available. All users belonging to the selected role can use this service template. Click Next.
-
The Create Service Template: Review page appears. Click Create. The newly created service template will appear in the Database Cloud Self Service Portal Setup: Service Templates page.
20.5 Creating Snap Clones from a Discretely Synchronized Test Master
You can create snap clones from a discretely synchronized test master if the test master is present on a NAS storage device. This table lists the steps involved in creating a snap clone using a snapshot profile.
Table 20-2 Creating Snap Clone - Discrete Flow
| Step | Task | Role |
|---|---|---|
|
1 |
Follow the steps in the Getting Started section to enable DBaaS. |
|
|
2 |
Register storage servers. |
|
|
3 |
Create one or more resource providers. |
|
|
4 |
Configure the request settings. |
|
|
4 |
Define quotas for each self service user. |
|
|
5 |
Create a test master database from an RMAN Backup. |
See Section 20.5.6, "Creating a Discretely Synchronized Test Master". |
|
6 |
Enable the test master for snap clone |
See Section 20.4.7, "Enabling the Test Master for Snap Clone" |
|
6 |
Create a snap clone profile from the test master. |
See Section 20.4.8, "Creating a Database Provisioning Profile Using Snapshots" |
|
9 |
Create a service template based on the profile you have created. |
See Section 20.5.7, "Creating a Service Template Using Snap Clone Profile". |
|
10 |
Configure the Chargeback Service. (this step is optional) |
|
|
11 |
Select the service template you have created and request a database. |
|
|
12 |
Refresh the test master and the database instance:
|
See: |
20.5.1 Getting Started
20.5.2 Registering Storage Servers
See Section 12.7, "Registering and Managing Storage Servers".
20.5.3 Creating Resource Providers
20.5.4 Configuring Request Settings
20.5.5 Defining Quotas
20.5.6 Creating a Discretely Synchronized Test Master
A test master database is a sanitized version of the production database. Production data can be optionally masked before the test master is created. A test master can be created from a snapshot or an RMAN Backup profile taken at a prior point in time and refreshed at specific intervals. This option is useful if the source data has to be masked to hide sensitive data.
To create a test master, follow these steps:
-
From the Enterprise menu, select Cloud, then select Cloud Home. From the Oracle Cloud menu, select Setup, then select the Database Service family on the left panel. Select Data Sources and click on the Test Master Databases tab.
-
To create a new test master, click on the Create menu. Select a production database from which the test master is to be created and click Select. The Clone Database: Source and Destination page appears.
-
On the Create Test Master Database: Source and Destination page, do the following:
-
In the Source section, launch the credentials selector by selecting the search icons for SYSDBA Database and Database Host credentials. Click OK.
-
In the Data Time Series section, select Now or Prior Point in Time.
If you selected Now, specify or search and select the SYSASM ASM Credentials. Now refers to Live Clone.
If you selected Prior Point in Time, a carousel of RMAN Backup images appear. Select the appropriate RMAN backup by clicking Select on the image.
Select a specific time between the selected backup or snapshot and the next (or latest point of source). The backups or dumps are created at specific intervals and the test master that is based on these will reflect the production database at specific points in time. To reflect the latest data in the production database, the test master needs to be periodically refreshed.
-
-
In the Destination Database Definition section, do the following:
-
Specify a display name.
-
Specify a global database name and SID.
A database is uniquely identified by a Global Database Name. The typical form of a name is name.domain. A database is referenced by at least one Oracle instance which is uniquely identified by SID.
-
Select one of the following types of databases:
-
Single Instance Database.
In the Hosts section, specify the Oracle Home location. The host gets specified by default. Next, select the Database Home credentials and the SYSASM ASM credentials.
-
RAC Database
In the Hosts section, specify or select the cluster target. The Oracle Home location gets specified by default. Next, specify the Database Host credentials, and the SYSASM ASM credentials.
In the Nodes section, select the cluster and Oracle Home to display one or more hosts on which the administrator managed Oracle RAC database will be created.
-
RAC One Node Database
In the Hosts section, specify or select the cluster target. The Oracle Home location gets specified by default. Next, specify the Database Host credentials, and the SYSASM ASM credentials.
In the Nodes section, select the cluster and Oracle Home to display one or more hosts on which the administrator managed Oracle RAC database will be created.
Note:
Oracle supports inline patching as part of clones. When the destination home selected has patches applied such as the latest CPU or PSU, then the cloned database is automatically brought up with that level.
Click Next.
-
-
-
On the Create Test Master Database: Configuration page, do the following.
-
Database Files Location: Specify the location in which the data files, temporary files, redo log files, and control files will be created. You must specify a mount point which must be present on a registered storage volume so that the self service administrator can enable this test master for snap clone.
You can select:
-
File System: The Oracle Database File System creates a standard file system interface on top of files and directories that are stored in database tables. If you select this option, you must specify or select the Location of the File System. You can specify a common location for all the files or you can select the Use Oracle Optimal Flexible Architecture-compliant directory structure (OFA) checkbox and specify different locations for data files, redo log files, and so on.
-
Automatic Storage Management: The Oracle Automatic Storage Management (ASM) is a volume manager and a file system for database files that supports single-instance and RAC configurations. ASM groups the disks in your storage system into one or more disk groups. If you select ASM, select a common location for the database files.
-
-
Recovery Files Location: To simplify the management of backup and recovery files, a fast recovery area can be created for your database. The fast recovery area can be a ASM disk group or a file system that provides a centralized disk location for backup and recovery file.To allow self service users to schedule backups and perform restore operations, you can select the Use Fast Recovery Area checkbox and specify the location of the Fast Recovery Area and the Fast Recovery Size. The amount of disk space to allocate for the fast recovery area depends on the size and activity levels of your database.
-
Listener Configuration: Click Add to add one or more listener targets that are to be associated with the new database.
-
Database Credentials: Specify the passwords for the administrative users (SYS, SYSTEM and DBSNMP) of the new database being cloned. You can choose to use the same password for all the schemas or different passwords for each schema.
-
-
Click Next. Some values such as
db_block_sizecannot be modified. -
Click Next. The Create Test Master Database: Post Processing page appears.
In the Post Processing page, specify the following:
-
Masking Definition: Data masking is the process of masking sensitive data in test or non-production databases. The masking definition defines the columns to be masked in the format of the masked data. Specify the masking definition to be applied after the database is cloned. After selecting the masking definition, select the In-Place Masking option to generate a script to replace the sensitive data in-place with masked data on the cloned database. For more details on creating a masking definition, see the Enterprise Manager Database Testing Guide.
Note:
The masking definition can be used only when you have the Oracle Data Masking and Subsetting license pack. -
Specify the custom scripts that need to be executed before and after the database is created. See Section 24.1, "Pre and Post Request Creation / Deletion Scripts" for details.
-
Specify the path for the SQL script which allows you to run the script against the newly cloned database as a user such as SYS, SYSTEM, or any other specified user. The SQL script allows you to customize the cloned database. For more details, see Section 24.1.1, "Post SQL Script".
-
Select the Create Data Profile check box if you wish to create a database provisioning profile that is based on the test master. These profiles can be refreshed automatically or at specified intervals. Different versions of the profile are saved and are available to the self service user until they are purged. This ensures that the test master is periodically updated and the latest data can be used by the self service user. You can create a database provisioning profile if:
-
This version of the test master must be available for cloning in future, even after the test master has be refreshed.
Enter the following details for the profile:
-
Profile Type: Select RMAN Backup or RMAN Image.
-
Backup Mode: If you select the RMAN Backup profile type, you can select one of the following: Select Online Backup to make a backup while the database is up and running. Select Offline Backup to shutdown the database for the duration of backup and bring it back once the backup is complete.
-
Backup Location: Enter the directory path that already contains a backup location.
-
Backup File Tag: Backup files will be tagged with the tag specified here.
-
Location: Select the directory for the backup location.
-
Enter the name, description, version number, vendor, and additional notes.
-
Purge Policy Type: This can be None, Snapshots, or Days. If you select None, the profiles will need to be manually deleted as required. If you select Snapshots, specify the maximum number of snapshots that can be retained. If you select Day(s), specify the number of days the profile can be retained.
-
Schedule: Specify whether the profile needs to be created immediately or at a later date.
-
-
-
Click Next. Specify the schedule for the creation of the test master. It can be created immediately (if physical standby used, it is created immediately and automatically refreshed) or can be created at a later date / time and refreshed at specified intervals.
-
Click Next. Review the information entered so far and click Submit to create the test master. After the test master has been created, you can refresh the test master as required to create a new version of the profile on which the test master is based.
Note:
You can also use theemcli create_clone command to create the test master. See Section 47.9, "Creating a Database Clone Using EM CLI Verbs" for more details.20.5.7 Creating a Service Template Using Snap Clone Profile
See Section 20.4.9, "Creating Service Template Using Snap Clone Profile".
20.5.8 Configuring Chargeback
Optionally, you can configure the chargeback service. See Chapter 43, "Chargeback Administration".
20.5.9 Requesting a Database
The self service user can now select the service template based on the database template profile and create a database. See Section 22.2, "Requesting a Database".
20.5.10 Refreshing the Test Master Database
The test master database is created from an RMAN Backup profile of the production database taken at a particular point in time. Since the production database is constantly updated, to ensure that the latest production data is available in the test master, it has to be refreshed at periodic intervals.
To refresh the test master database, follow these steps:
-
From the Enterprise menu, select Cloud, then select Cloud Home. From the Oracle Cloud menu, select Setup, then select the Database Service family on the left panel. Click the Test Master Databases tab.
-
Select the test master that is to be refreshed and click Refresh. The Refresh Database: Source and Destination page appears.
-
Select the Prior Point in Time option and select the backup to which the test master is to be refreshed. You can modify the source and destination credentials.
-
If you select the Now option, you will see the following screen.
Click Next. The Configuration page appears.
-
Specify the Mount Point Prefix for the storage volume that will be used by the clone database and the database credentials. Click Next.
-
In the Initialization Parameters page, edit the values of various initialization parameters that affect the operation of the database instance. Click Next.
-
In the Post Processing page, specify the following:
-
Masking Definition: Data masking is the process of masking sensitive data in test or non-production databases. The masking definition defines the columns to be masked in the format of the masked data. Specify the masking definition to be applied after the database is cloned. After selecting the masking definition, select the In-Place Masking option to generate a script to replace the sensitive data in-place with masked data on the cloned database. For more details on creating a masking definition, see the Enterprise Manager Database Testing Guide
Note:
The masking definition can be used only when you have the Oracle Data Masking and Subsetting license pack. -
Specify the custom scripts that need to be executed before and after the database is created. See Section 24.1, "Pre and Post Request Creation / Deletion Scripts" for details.
-
Specify the path for the SQL script which allows you to run the script against the newly cloned database as a user such as SYS, SYSTEM, or any other specified user. The SQL script allows you to customize the cloned database. For more details, see Section 24.1.1, "Post SQL Script".
-
-
Click Next. Specify the schedule for the creation of the test master. It can be created immediately (if physical standby used, it is created immediately and automatically refreshed) or can be created at a later date / time and refreshed at specified intervals.
-
Click Next. Review the information entered so far and click Submit to refresh the test master.
Note:
You can use theemcli refresh_databasecommand to refresh the database. See Section 47.6, "Database Profile EM CLI Verbs" for details.
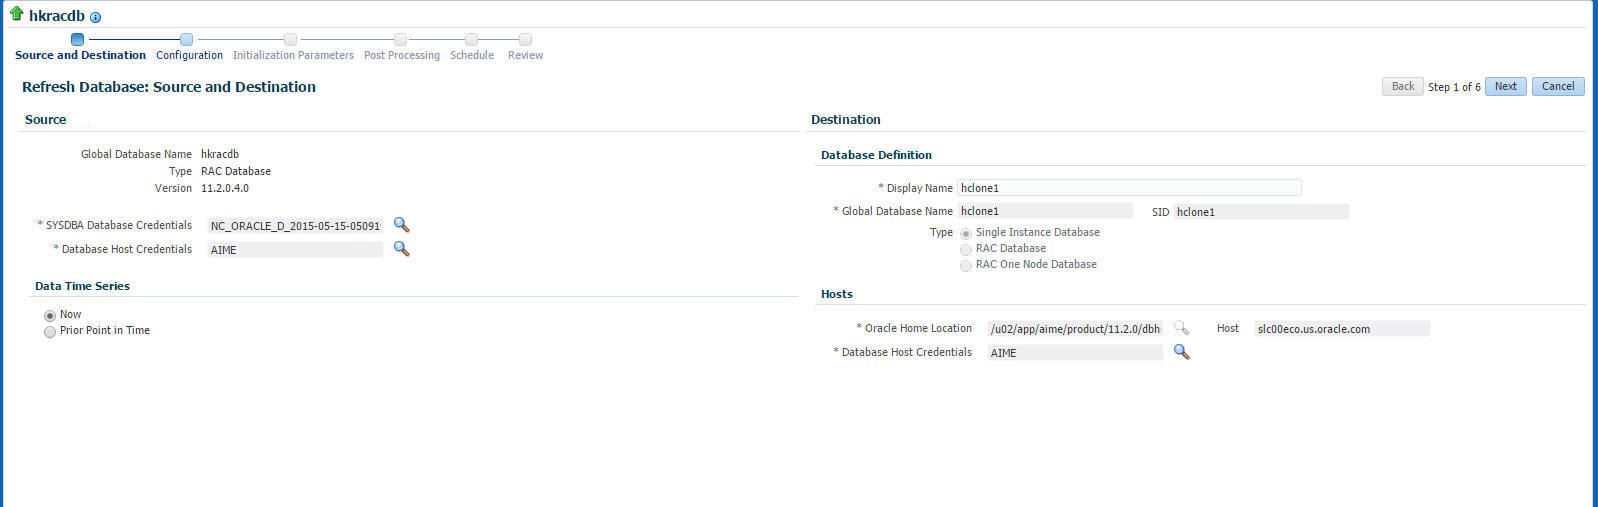
When the test master is refreshed, you can create a new profile based on the updated test master. The self service user can choose to refresh the database instances to the latest profile. The storage space that was used by the older version of the test master will be reclaimed by the updated (refreshed) test master.
20.5.11 Refreshing the Snap Shot Profile
After the test master has been refreshed, you must create a new revision of the snap shot profile. To do so, you must refresh the snap shot profile by following these steps:
-
From the Enterprise menu, select Cloud, then select Cloud Home. From the Oracle Cloud menu, select Setup, then select the Database Service family on the left panel. Click Data Sources.
-
In the Data Sources page, click the Data Profiles tab. The list of the profiles is displayed.
-
Select the profile to be refreshed and click Refresh Profile. A confirmation message is displayed. Click Yes to submit the refresh profile job.
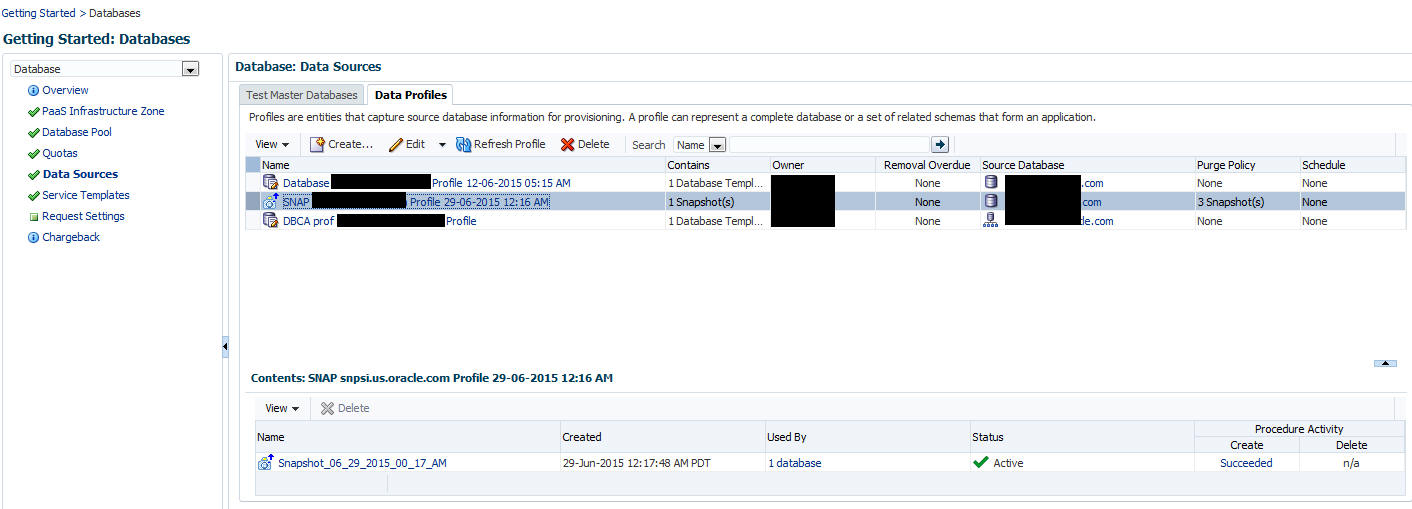
20.5.12 Example: Creating Snap Clones from Discretely Synchronized Test Master
The following example shows how you can create snap clones from a test master database that is refreshed at discrete intervals.
-
First, you must make sure that all the prerequisites are met. See Section 12.1, "Getting Started".
-
Next, you must register the storage server. See Section 20.4.2, "Registering Storage Servers".
-
You must then create one or more PaaS Infrastructure Zones and one or more database pools. See Section 20.4.3, "Creating Resource Providers".
-
Then, you must define the quota that you wish to allocate to the self service users. See Section 20.4.5, "Defining Quotas".
-
The next step is to identify the production database (prod1) and create an RMAN backup prod1_backup.
-
Create a test master (testmaster1) based on prod1_backup. See Section 20.5.6, "Creating a Discretely Synchronized Test Master".
-
Next, you must enable testmaster1 for snap clone. This allows creation of snap clones using snapshot technology. See Section 20.4.7, "Enabling the Test Master for Snap Clone".
-
Next, you must create a profile (snap_profile) that is based on testmaster1. See Section 20.4.8, "Creating a Database Provisioning Profile Using Snapshots"
-
To make this profile available to the self service user, you must create a service catalog entry or a service template. Create a template called Snap Clone Template1. See Section 20.5.7, "Creating a Service Template Using Snap Clone Profile". In the Service Template, the Profile Version field is set to Latest. This will ensure that the self service user will always use the latest version of the profile to create database instances.
-
The self service user can then use the Snap Clone Template1 to create the snap clone. See Section 22.2, "Requesting a Database".
-
To get the latest production data, the self service administrator refreshes TestMaster1. See Section 20.5.10, "Refreshing the Test Master Database".
-
Since the test master now contains updated data, a new revision of the profile must be created. See Section 20.5.11, "Refreshing the Snap Shot Profile".
-
Now that a new revision of the profile (snap_profile) is available, the self service user can refresh his database instance to get the latest production data. See Section 22.3, "Refreshing a Database". The storage space that was used by the older version of the test master will be reclaimed by the refreshed test master.
20.6 Creating a CloneDB Database
The CloneDB feature allows you to clone a database multiple times without copying the data into different locations. Instead Oracle Database creates the files in the Clone DB database using copy-on-write technology, so that only the blocks that are modified in the Clone DB database require additional storage on disk. Clone DB reduces the amount of storage required for testing purposes and enables rapid creation of multiple database clones. Clone DB is supported for database 11.2.0.3 or later versions.
You can create CloneDB databases by using a discretely synchronized test master by following these steps:
Table 20-3 Creating Snap Clone - Discrete Flow
| Step | Task | Role |
|---|---|---|
|
1 |
Follow the steps in the Getting Started section to enable DBaaS. |
|
|
3 |
Create one or more resource providers. |
|
|
4 |
Configure the request settings. |
|
|
5 |
Define quotas for each self service user. |
|
|
6 |
Create a database provisioning profile using snapshots from an RMAN Image Backup. |
See Section 20.6.1, "Creating a Database Provisioning Profile Using RMAN Database Image" |
|
9 |
Create a service template based on the profile you have created. |
See Section 20.6.2, "Creating a Service Template Using RMAN Image Profile". |
|
10 |
Configure the Chargeback Service. (this step is optional) |
|
|
11 |
Select the service template you have created and request a database. |
20.6.1 Creating a Database Provisioning Profile Using RMAN Database Image
To create a database provisioning profile, follow these steps:
-
You can access the Database Provisioning page using either of the following ways:
-
From the Enterprise menu, select Cloud, and then select Cloud Home. On the Cloud home page, click Oracle Cloud, select Setup, and then select Data Sources. On the Database: Data Sources page, in the Data Profiles tab, click Create.
-
From the Enterprise menu, select Provisioning and Patching, and then select Database Provisioning. On the Database Provisioning page, in the Profiles section, click Create.
-
From the database target home page, click Oracle Database, select Provisioning, and then select Create Provisioning Profile.
-
-
On the Reference Target page, click the search icon to select a target.
-
In the Search and Select: Targets display box, select the database you want to create a profile for, and then, click Select.
-
On the Reference Target page, select the following:
-
Data Content
-
Structure and Data to include physical and structural files from the database or Structure Only to include only the structural files in the template.
-
Create
-
RMAN Database Image
-
-
In the Credentials section, select the database. In the Credentials column, you can select Named Credentials and then select a credential name from the Credential Name column (or) select Preferred Credentials. Click Next.
-
On the Content Options page, specify the backup location for the RMAN image mode. By default, the backup location selected is Offline Backup. You can choose Online Backup only if it is enabled.
Then, select Directory for the backup location and enter the directory path, or select Fast Recovery Area, which already contains a backup location.
Note:
-
Ensure that the specified location is accessible to all the nodes in the database pool.
-
Depending on the database version, the profile (image) may need to be manually staged on an NFS shared location.
Click Next.
-
-
On the Create Database Provisioning Profile: Page, in the Profile Information section, do the following:
-
Specify or select a profile location in the software library where the database profile will be created.
-
Specify a unique profile name.
For example:
RMAN Database Image for HR database
-
Add a description for the profile.
-
Verify the profile version and the vendor.
-
Add any additional notes such as host name, database, data content, data content mode, and the like.
-
-
In the Schedule section, you can choose to start the profile creation immediately, or you can schedule it for a later time. You can also choose to repeat the creation of the provisioning profile, and set a repeat time.
-
In the Purge Policy section, you have three options:
-
None. Select this option you do not want to purge any data collected.
-
Snapshots. This option enables you to specify the maximum number of snapshots that can be purged.
-
Day(s). This option enables you to specify the number of days after which the data component should be purged.
-
-
Specify or select a working directory. Click Next.
-
On the Review page, ensure that the selections you have made in the previous pages are correctly displayed and click Submit. Otherwise, click Back repeatedly till you reach the page where you want to make changes. Click Cancel to abort the provisioning profile creation.
Once you have submitted the provisioning profile creation job, manually refresh the page if View Data has been set to Real Time: Manual Refresh. Else, set View Data to reload after a specific period of time, and then select an execution step from the Procedure Steps tree on the left pane to view the details.
To view the submitted jobs, select the Procedure Activity link in the Data Profiles tab.
20.6.2 Creating a Service Template Using RMAN Image Profile
To create a service template using RMAN Image Profile, follow these steps:
-
Log into Enterprise Manager as a user with the
EM_SSA_ADMINISTRATORrole. -
From the Enterprise menu, select Cloud, then select Cloud Home. The Cloud Home page appears. From the Oracle Cloud menu, select Setup, then select Getting Started.
-
Click the Setup link next to the Databases option in the left panel. Select Database from the drop down menu.
-
Click the Service Templates link. The Service Templates page appears. Click Create. The Create Service Template: General page appears.
-
Enter a name and description for the service template. The description must be unique and provide information on the type of service template being created.
-
Click the Search icon next to the Profile field and select the test master database based on the RMAN Image profile.
-
In the Profile Version field, you can select either of the following:
-
Latest: This ensures that the latest profile is always used by the self service user.
-
Selected by user at request time: If this option is selected, the self service user can select the profile to be used when creating a service request.
-
-
In the Database Definition region, select the following:
-
Create: Select CloneDB Database option. Each file is copied as an image copy which is a bit-for-bit copy of a database file created on disk. Image copies are identical to copies created with operating system commands such as cp on Linux or COPY on Windows, but are recorded in the RMAN repository and so are usable by RMAN. This option allows you reduce the amount of storage and enables rapid creation of multiple databases.
If you are doing an online backup, you must ensure that your Test Master database is in ARCHIVELOG mode and that all of the necessary archived redo log files are saved and accessible to the CloneDB database environment. If you are doing an offline backup, you must ensure that the backup copies are accessible to the CloneDB database environment.
-
Type: This can be Single Instance or Real Application Cluster (RAC). If you select RAC, specify the Number of Nodes.
-
Database SID: This is an optional field. You can select Specify Prefix or Specified by User at Request Time.
-
Specify Prefix: If you choose this option, enter a prefix that is to be used to generate a unique System Identifier (SID) at the time of database creation. The prefix helps to identify databases created using this service template. The prefix can be a maximum of 6 characters.
The new database name generated will be based on the SID Prefix specified here. For example, if the prefix is specified as MYDB, the SID for the new database is generated as MYDB0000, MYDB0001, MYDB0002, and so on.
For existing databases (running databases and in progress requests), a unique SID name is generated for single instance databases, or a unique name is generated for real application cluster databases. For example, if the existing SIDs running on a host are MYDB0000, MYDB0001, MYDB0002 And In progress are MYDB0003, MYDB0004, the new SID or database name generated for the new request is MYDB0005.
-
Specified by User at Request Time: If you choose this option, you can leave this field blank and specify the SID when you are making a database request.
-
-
Domain Name: This is an optional field. Enter a Domain Name to be used for the new database being created. You must ensure that the domain name does not contain a preceding "." (dot).
-
-
In the Pools and Zones region, click Add to select a PaaS Infrastructure Zone into which the database instance is to be provisioned. Click Assign Pool. Select a pool from the list and assign this pool to the PaaS Infrastructure Zone. The database will be provisioned into this pool.
-
After you have selected the zone and the pool, the host target is populated in the Reference Host field.
-
In the Reference Host region, the name of the PaaS Infrastructure zone, the database pool, and the reference host you have selected in the Database Cloud Self Service Portal Setup: General page are displayed.
-
In the Location field, specify the location for the database files. This must be an NFS location.
-
To simplify the management of backup and recovery files, you can optionally create a fast recovery area for your database. Select the Enable Fast Recovery Area checkbox to specify the location in which recovery related files must be stored. The fast recovery area can be a file system that provides a centralized disk location for backup and recovery file. Specify the location of the Fast Recovery Area and the Fast Recovery Size. The amount of disk space to allocate for the fast recovery area depends on the size and activity levels of your database.
If the Enable Archiving check box is selected, the database will not be shut down during a refresh. This allows self service users to schedule backups and restore operations without shutting down the database.
-
If you have chosen to create a CloneDB database, you can optionally allow the user to take a backup copy of the database. Select the Allow the user to take backup copy for the new database checkbox. Specify the maximum number of backups allowed and the backup location.
-
In the Listener Port field, specify listener port number that is to be associated with the new database. If you have selected a 11.2 or later RAC database, you must specify the scan port number.
-
Specify the Administrator Credentials. Specify passwords for the system schemas of the new database. These schemas will not be available to the
EM_SSA_USERS. You can choose to use the same password for all the schemas or different passwords for each schema. If these values are not specified, default values will be used and theEM_ADMINISTRATORcan change them. -
Apart from the system schemas, if you want to restrict access to other schemas, you can select them in the Non-Administrator Credentials region and specify the password. These schemas will be locked and the
EM_SSA_USERScannot access them. Click Next. -
Click Next. The Create Service Template: Initialization Parameters page appears. In this page, you can configure the values of various initialization parameters that affect the operation of the database instance. Select the parameter and click the Set icon to modify the value of the parameter.
-
Click Next. The Create Service Template: Customization page appears. Specify the custom scripts that need to be executed before and after the database is created. See Section 24.1, "Pre and Post Request Creation / Deletion Scripts" for details.
-
In the Target Properties region, you can specify global target properties such as Location, Department, Line of Business, and so on. You can do the following:
-
Mark a property as mandatory by selecting the Required check box. If a property is marked as mandatory, the self service user must specify a value for this property while requesting a database.
-
Lock a property. When a property is locked, the self service user cannot modify the value of this property while requesting a database.
-
-
Click Next. The Create Service Template: Roles page appears. Click Add to select the SSA user roles to which this service template will be available. All users belonging to the selected role can use this service template. Click Next.
-
The Create Service Template: Review page appears. Click Create. The newly created service template will appear in the Database Cloud Self Service Portal Setup: Service Templates page.