7 Setting Up the IaaS Self Service Portal
This chapter describes the process of setting up the Self Service Portal. It contains the following sections:
7.1 Setting Up the Self Service Portal
The Self Service Portal allows administrators to configure the cloud and perform various operations such as deciding the total amount of resources each user can reserve, quota for each user role, and so on. Users can log in to the Self Service Portal and identify the images they need, reserve resources (for example, compute power, storage, memory, and so on) and define policies specific to their system.
Note:
Click here to view a visual demonstration on how to enable the Self Service capability for the Cloud using Enterprise Manager Cloud Control 12c. You will see how to setup Self Service roles and users, allocating quota and privileges, publishing assemblies to the Self Service portal, and configuring metering and chargeback for the Cloud.Before the Self Service Portal can be used, the user quota, roles for zone access, and software components must be defined.
-
Enterprise Manager Cloud Control is set up to manage the cloud environment.
-
The Enterprise Manager administrator has the privileges to set up the self service application. This user must have the
EM_SSA_ADMINISTRATORrole. See Section 3.3, "Defining Roles and Assigning Users" for details.
Follow this process to set up and configure the Self Service Portal.
-
From the Setup menu, select Cloud, then select Infrastructure. Click Machine Sizes in the left panel. Small, Medium, and Large machine sizes are available out-of-the-box.
-
To view a demo on setting up the self service portal, click the video link next to the Page Refreshed section of the page. Click Create to add a machine size. You are prompted for the Name (internal name of the machine size), description, number of VCPUs, amount of memory and local storage to be assigned to machines of this size. Click Create to add this machine size.
-
Select a machine size from the list and click Edit. You can configure the machine sizes by specifying the amount of memory, number of CPUs, and the local storage for each machine. While requesting a server, the SSA user can specify any of the machine sizes defined here.
-
-
Click Request Settings in the left panel to define request related policies. On this page, you can enter the following details:
-
Future Reservation: Indicate how far in advance you can make a request.
-
Request Duration: The maximum duration for which requests should be made.
-
Network Restriction: Allows you to restrict the physical networks for each
EM_SSA_USERrole. If this feature is enabled, you can navigate to the Roles page and assign networks for eachEM_SSA_USERrole. -
Configure EM Agent: Select the Enable EM Agent Configuration check box to configure the Management Agent on the servers while the self service user's request is being processed.
Note:
If you have chosen to configure the Management Agent, you must ensure the following:-
Write permissions to the directory specified in the Installation Base Directory field must be available.
-
Write permissions to the
/home/oracle/agentdirectory specified during assembly or template deployment must be available. -
Necessary software components must be configured.
-
-
Allow Partial Deployment: Select this option to enable partial deployment. By default, when a deployment fails, the assembly instance, tier instance, and the Guest VMs that have been created are automatically deleted. But if partial deployment is enabled, this clean up activity is disabled.
-
Software Library Top Folder: Select the top level folder in the Software Library in which user specific folders need to be created. This folder is used by the SSA users to store their assemblies, templates, and deployment plans.
-
-
Click Roles in the left panel to define the mappings between roles and other entities like zones, quota, and network profiles. The SSA administrator can control the quota that the SSA user can request which ensures that there is no over provisioning of cloud resources.
-
In the Roles page, click Assign Quota to Role to define quota at the role level. The quota assigned to a role is available to all users with that role. For example, if the Number of Servers for the
SSA_USER_ROLE1is set to 5, all users with this role can have a maximum of 5 servers. The quota is the aggregate amount of resources that can be granted to each self service user belonging to a certain role. If the user has more than one role, his quota is calculated as the absolute maximum across the roles for each attribute value.-
Select Roles: Click the torch icon to select a role for which the mapping is to be defined. The list of all the SSA roles appears.
-
Select Zones: Click the torch icon. All zones marked as Cloud Self Service Zones during zone creation are displayed here. Select a zone from the list and click OK.
-
Number of Servers: Maximum number of servers that can be reserved at any time. This number is across the zones. For example if the quota for a user is 5. Then, the total number of instances from all zones is 5. So the user can have 3 instances in zone 1 and 2 instances in zone 2, or all 5 instances in the same zone.
-
Number of VCPUs: Maximum number of VCPUs that can be allocated.
-
Memory: Maximum amount of memory that can be allocated.
-
Local Disk: Maximum amount of local storage that can be allocated.
-
Additional Storage: Maximum amount of additional storage that can be allocated.
-
Allow Archiving to Software Library: Indicate whether the machine images can be archived in the Software Library after expiry. You can also select this option to save the machine image as a template when the guest virtual machine is stopped.
-
Select Networks: This field is displayed only if Network Restriction has been enabled. Click the torch icon to select the physical networks that are to be assigned to all users in the role.
-
Select Network Profiles: Select the network profile to assigned to the selected role. All deployments are done in a specific network defined by the network profile.
Note:
Network profiles that have been associated with networks in the selected zone are displayed. For more details on network profiles, see Section 5.8, "Creating a Network Profile" -
Override Global Request Settings: Select this checkbox to override the request settings for the selected role. You can modify the Future Reservation, Request Duration, and configure the Management Agent.
Select a role and click Edit. You can modify the role mappings in the Assign Quotas, Zones & Network Profiles to Role page.
-
-
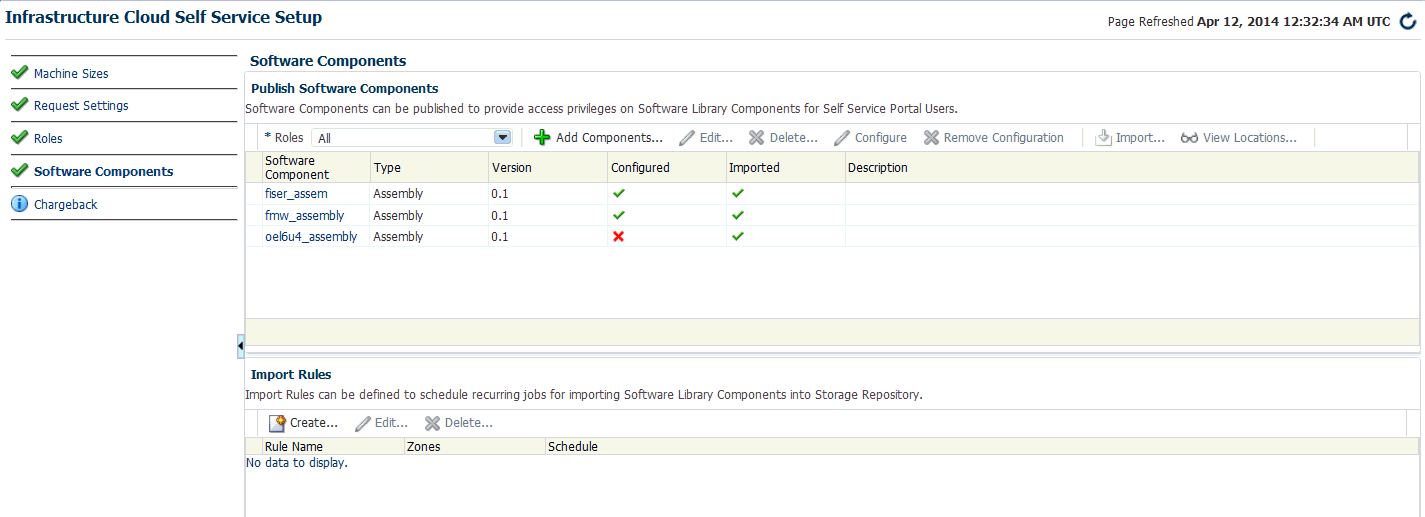
Click Software Components in the left panel to select the set of templates or assemblies that are accessible to the SSA users. You can publish the assemblies and templates to the SSA Portal and provide SSA users with access to these software components.
-
You can do the following on this page:
-
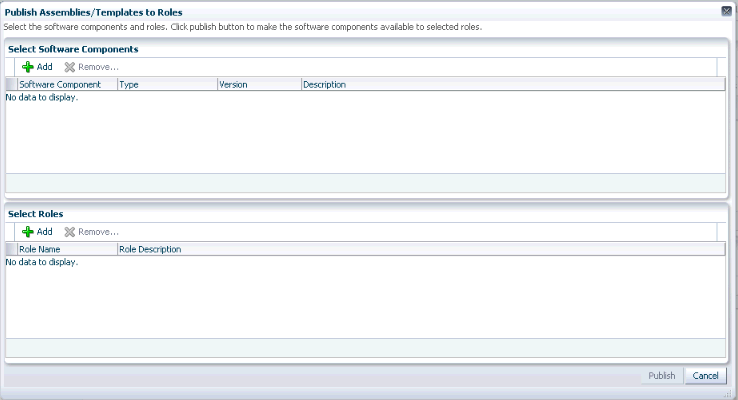
Add Components: Click Add Components. The Publish Assemblies / Templates to Roles page appears.
On this page, do the following:
-
Click Add. Select the assembly or template from the list and click Select.
-
Click Add in the Select Roles section. Select the role from the list and click Select.
-
Click Publish to publish these software components to the SSA Portal. These software components are now available to the SSA users and can be deployed.
Note:
You will see a list of assemblies or templates if they have been uploaded to the Software Library. See the Oracle Enterprise Manager Cloud Control Administration Guide for details on uploading components to the Software Library.-
Import: You can import the published assembly to a selected set of zones. Select the assembly and click Import. In the Select Zones page, select one or more zones and click Save to import the assembly to the selected zones.
-
Configure: Select a software component and click Configure to configure the Management Agent.
Note:
The Management Agent can be deployed only if the Enable Agent Configuration check box has been selected in the Request Settings page.The Management Agent configuration details are displayed:
-
Installation Base Directory (Mandatory): Specify the full path to the directory in which the Management Agent is to be installed. Ensure that the Installation Base Directory you specify in the response file is empty and has write permissions. This is a mandatory field.
-
Platform (Mandatory): The platform for which you want to download the Management Agent software. This is a mandatory field.
-
Password (Mandatory): Specify a password for registering the new Management Agents. By default, the communication between the Oracle Management Service and the Management Agent is secure and locked. Any new Management Agents that are registered must be authenticated. The password you specify here will be used to authenticate the new Management Agents.
-
Port (Mandatory): Enter the port used for the Management Agent process. If no value is specified, then either 3872 or any free port between 1830 and 1849 will be used.
-
Additional Parameters: You can add some options supported by agent installation. See the Enterprise Manager Basic Installation Guide for details.
-
SSH Timeout: The timeout minutes for SSH.
-
Privilege Delegation Settings: Run as root.
-
Tier Configuration: Specify the product and network configuration time out values and the log file location.
Specify the details and click OK to configure the Management Agent.
-
-
Import Rules: You can define rules to import published assemblies and templates to zones on a periodic basis based on a predefined schedule. Click Create in the Import Rules section. Enter a Rule Name, select a set of zones, a schedule for the import and click Save. The published assembly or template is imported to the selected server pools and zones on a regular basis.
-
-
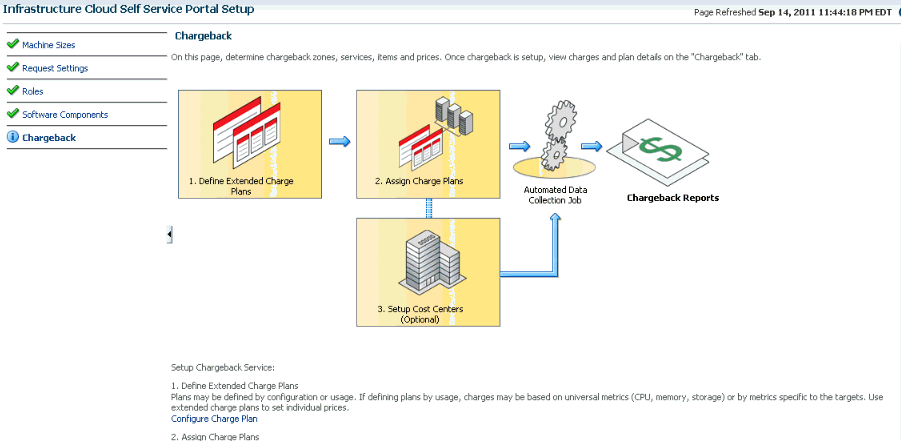
Click Chargeback tab in the left panel. The Chargeback application allows the SSA Administrator to define a charge plan and assign the plan to a specific zone or target.
-
Setting up the Chargeback Plan involves:
-
Defining Extended Charge Plans: Click Configure Charge Plan. You can edit the Base Charge Plan or create an Extended Charge Plan to customize the charge plan for a specified target type.
-
Assigning Charge Plans: Click Configure Targets. You can assign charge plans to a set of targets.
-
Setting Up the Cost Center: Click Configure Cost Center. You can setup cost centers to aggregate costs among groups of users.
For more details on setting up the chargeback plan, see Chapter 43, "Chargeback Administration".
-


7.2 Uploading Large Files on the Self Service Portal
The EM_SSA_USER can upload software components to a library location. See Section 8.7, "Viewing Library" for details. If the file to be uploaded is large, the EM_SSA_USER will see the following error message.
Error: The file is too large. Please add a smaller file,
To resolve this issue, you can use one of the following methods:
7.2.1 Setting the OMS Property Using emctl
To set the Oracle Management Service property, follow these steps:
-
Set the
oracle.sysman.emSDK.ui.trinidad.uploadedfilemaxdiskspaceOMS property to a value (in bytes) greater than the size of the file that is to be uploaded. For example, to set the value of the property to 3 GB,$ORACLE_HOME/bin/emctl set property -name "oracle.sysman.emSDK.ui.trinidad.uploadedfilemaxdiskspace" -sysman_pwd sysman -value 3221225472 -
If the file to be uploaded is huge, the page may expire while the upload is still in progress (usually after 10 minutes). To avoid this, the
oracle.sysman.eml.maxInactiveTimeOMS property must be set to a value (in seconds) greater than the expected time for the upload to complete. If this property is set, you must restart the OMS to reflect the new property value.
7.2.2 Modifying the web.xml Configuration File
To modify the web.xml configuration file, follow these steps:
-
Locate the
web.xmlconfiguration file by navigating to the following location in the Oracle Management Service Home./oms/sysman/archives/emgc/deployments/EMGC_DOMAIN/emgc.ear/em.war/WEB-INF/web.xmlIf this directory structure is not present, navigate to the following location in the Oracle Management Service Home
./oms/sysman/archives/emgc/deployments/GCDomain/emgc.ear/em.war/WEB-INF/web.xml -
Open the
web.xmlfile and locate the following four lines. If these lines are not present in theweb.xml, you must add them. Increase the size of the <param_value> parameter to a value larger than the size of the file to be uploaded.<context-param><param-name>org.apache.myfaces.trinidad.UPLOAD_MAX_DISK_SPACE</param-name><param-value>40960000</param-value></context-param><
context-param><param-name>org.apache.myfaces.trinidad.UPLOAD_MAX_FILE_SIZE</param-name><param-value>40960000</param-value></context-param> -
A smaller chunk size increases performance during large file upload. By default, the chunk size would be 2 GB. Setting this to a smaller chunk size such as 500MB will optimize browser memory usage. The parameter for setting the chunk size is
org.apache.myfaces.trinidad.UPLOAD_MAX_CHUNK_SIZE.<context-param><param-name> org.apache.myfaces.trinidad.UPLOAD_MAX_CHUNK_SIZE</param-name><param-value>40960000</param-value></context-param> -
If the file to be uploaded is huge, the page may expire while the upload is still in progress (usually after 10 minutes). To avoid this, the OMS property
oracle.sysman.eml.maxInactiveTimemust be set to a value (in seconds) greater than the expected time for the upload to complete.For example, set
$ORACLE_HOME/bin/emctl set property -name oracle.sysman.eml.maxInactiveTime -value 3600 -
Restart the Oracle Management Service to reflect the updated settings.
-
While the file upload is in progress, the uploaded chunks are written in a default location on the OMS. This default location is usually a subdirectory of where the application is deployed on the WebLogic Server. This location can be configured by setting the parameter
org.apache.myfaces.trinidad.UPLOAD_TEMP_DIRin theweb.xmlfile to a custom location. If there are multiple users uploading files concurrently on the OMS, you must ensure that this location has enough disk space to accommodate all of this data. It is recommended that this location is on a different volume than the location on which the OMS is installed. This ensures that if the volume runs out of space, there is no impact on the OMS performance.