10 Direct Monitoring of Xen Based Systems
This chapter describes the procedures to discover and monitor Xen based systems. It contains the following sections:
10.1 Direct Monitoring Overview
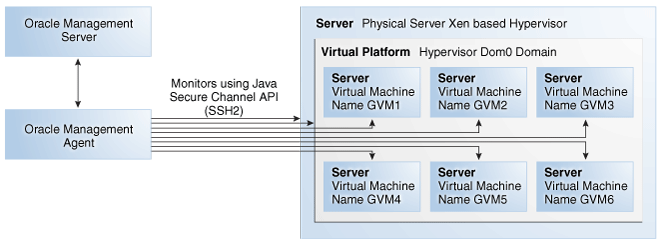
You can directly monitor a Xen based Hypervisor, the bare metal machine, its operating system, and the virtual machines without relying on their monitoring software. Monitoring these targets involves the following:
-
Direct Monitoring of the Oracle Virtual Server (Guest OS or DomU running on the Hypervisor) target based on Xen 4.1.2 or later.
-
Direct monitoring of Oracle Server (Physical Server)
-
Direct monitoring of the Oracle Virtual Server (Xen based Hypervisor).
-
Direct Monitoring of the Oracle Virtual Platform or the host operating system of the hypervisor machine.
Note:
To enable direct monitoring of Xen based Hypervisors, the Oracle Virtual Infrastructure 12.1.0.2 plugin must be deployed on the Management Server. This plugin is automatically deployed on the Management Agent when the Hypervisor is registered.The following figure shows the high level architecture.
10.2 Discovering the Hypervisor Target
Prerequisites:
-
To discover a Hypervisor target, the administrator must have the following privileges:
-
Add Any Target
-
Create Job
-
Operator privilege on the Management Agent that is monitoring the Hypervisor target.
-
To discover the Hypervisor by following these steps:
-
Log in to Enterprise Manager as a user with the above privileges.
-
From the Setup menu, select Add Targets, then select Add Targets Manually.
-
In the Add Targets Manually page, select Add Targets Using Guided Process (Also Related Targets) and select Oracle Virtual Platform from the Target Types drop down list.
-
Click Add Using Guided Process. The Discover Oracle Virtual Platforms page appears.
-
In the Default Monitoring Agent and Credentials region, enter the following details:
Note:
The credentials specified in this region will be applied to all Oracle Virtual Platform targets discovered through this process by default. You can choose to override these credentials for a specific Oracle Virtual Platform target.-
Monitoring Agent: Click the Search icon and select the default monitoring agent to monitor the targets.
-
Failover Monitoring Agent: Click the Search icon and select the failover monitoring agent to monitor the targets.
Note:
To ensure that Hypervisors and the associated targets can be monitored smoothly in a large scale environment, you must use the following recommendation for the Java Heap Size.-
If the Total Number of Targets (includes Oracle Virtual Platform, Oracle Server, and Oracle Virtual Server targets) is less than or equal to 300, the Java Heap Size for the Management Agent must be set to 128 MB.
-
If you add another 300 targets, you must increase the Java Heap Size by an additional 128 MB.
-
-
Privileged User: This field is used to provide the user with access to certain privileged commands. The access is available either by a root user or through the Privilege Delegation options provided here.
-
Yes: If you select Yes, you must be a user who can execute the following
xl / xmcommands that require root access privileges:/usr/sbin/xl list*,/usr/sbin/xl info*,/usr/sbin/xl network-list*,
/usr/sbin/xl uptime*,/usr/sbin/xl vcpu-list*,/usr/sbin/dmidecode,
/usr/sbin/xentop,/usr/bin/xenstore-read,/usr/bin/xenstore-list,
/usr/bin/xenstore-ls,/sbin/ethtool
These commands allow you to collect virtualization metrics when they are executed.If the xl command is not present on the system, the following commands will be used:
/usr/sbin/xm list*,/usr/sbin/xm info*,/usr/sbin/xm network-list*,
/usr/sbin/xm uptime*,/usr/sbin/xm vcpu-list*,/usr/sbin/dmidecode,
/usr/sbin/xentop,/usr/bin/xenstore-read,/usr/bin/xenstore-list,
/usr/bin/xenstore-ls,/sbin/ethtoo
-
No: If you select No, you cannot execute the
xl/xmcommands, and virtualization and configuration metrics for the Oracle Virtual Platform target are not collected.
-
-
Credential Type: Specify the credentials for the target being discovered. You can select Host Credentials or SSH Key Credentials. Depending on your choice, you must enter the credential properties as described in Section 10.2.2, "Setting the Credential Properties".
-
-
Click Add in the Host Name and IP Address region. In the Add Host/IP Address window, enter one or more host names, IP addresses or IP address ranges and click Add. Multiple host names, IP addresses or the ranges must be separated by a new line. The host names that you have added will appear in the Discover Oracle Virtual Platforms page.
-
You can choose to use the default agent and credentials or click Override to override them. You can also override the Failover Monitoring Agent credentials. In the Override Monitoring Agent and Credentials window, enter the monitoring agent and credential properties and click Override. This will override the monitoring credentials The new agent and credentials you specify will be applied.
-
Optionally, you can also specify the Global Target Properties. The Enterprise Manager Target Properties allows you to store descriptive target information, such as Contact or Location, which can then be used in dynamic/administration group definition, reports, incident rules and notifications. The Global Target Credentials region allows you to specify the values for the target properties that are applied to all the targets discovered using this process.
-
Click Submit. The registration information is validated and a job is submitted. On completion of the job, the following targets are discovered from a host that is running a Xen based hypervisor.
-
Oracle Server: The bare metal box running the hypervisor.
-
Oracle Virtual Platform: The host operating system that represents the hypervisor process.
-
Oracle Virtual Server: The virtual machines managed by the hypervisor domain.
Note:
To facilitate monitoring of these targets in a group, you can specify global target properties to create dynamic groups while registering the targets or by editing the already registered targets.For instance, you can include all production virtual platforms into a dynamic group with production lifecycle status.
-
10.2.1 Deleting the Targets
To delete the targets that have been discovered, you must first delete the Oracle Virtual Platform target. When this target is deleted, all associated Oracle Virtual Server and Oracle Server targets are deleted.
To delete the target, follow these steps:
-
From the Targets menu, select All Targets to navigate to the All Targets page.
-
In the left panel of the All Targets page, select Oracle Virtual Platform under Servers, Storage, and Network target type. The list of Oracle Virtual Platform targets available is displayed.
-
Click on one of the targets to navigate to the Oracle Virtual Platform Home page. From the Oracle Virtual Platform menu, select Target Setup, then select Remove Target. A confirmation message is displayed. Click Yes to delete the Oracle Virtual Platform target and the associated targets.
10.2.2 Setting the Credential Properties
You can specify the credentials for the Virtual Platform target being discovered. You can select the credential type as Host Credentials or SSH Key Credentials. Each of these credentials can be clubbed with the Sudo or PowerBroker privilege delegation option.
Host Credentials
If you have selected Host Credentials, you must specify the credential properties shown below:
-
User Name: The user name required to access the target.
-
Password: The password required to access the target.
-
Run Privilege: This can be:
-
None: Run privileges are not required. This option is used when the user is root and the Privileged User option is set to Yes.
-
Sudo: If you select Sudo, you must specify the following:
-
Sudo Command: Sudo allows a permitted user to execute a command as the super user or another user as specified in the sudoers file. Enter the command in the format
/usr/bin/sudo -S -u %RUN_AS% %COMMAND%where/usr/bin/sudois the path to the sudo executable,RUN_ASis the name of the user who is executing the command andCOMMANDrepresents that Sudo command being executed. -
Run As: Specify
rootto run this command as a root user. -
Enable Pseudo Terminal: Select the checkbox if the sudo command requires the user to log in to a real terminal (tty). If this flag is set, the sudo user must log into the machine via a separate terminal.
-
-
PowerBroker: If you select PowerBroker, you must specify the following:
-
PowerBroker Command: Enter the command in the format
/usr/bin/pbrun -l -u %RUN_AS% %COMMAND%where/usr/bin/pbrunis the path to the PowerBroker executable,RUN_ASis the name of the user running the command, andCOMMANDrepresents the PowerBroker command being executed. -
Password Prompt: The prompt that is to be displayed when the password is specified.
-
Run As: Specify
rootto run this command as a root user. -
Profile: Specify the user profile to be used to run this command.
-
-
SSH Key Credentials
If you select SSH Key Credentials, you must specify the user name, private and public key, passphrase (for further encryption), and the run privilege.
If you select Sudo or PowerBroker in the Run Privilege field, enter the additional details as listed in the Host Credentials section.
10.3 Viewing the Oracle Server Home Page
To view the Oracle Server Home page, follow these steps:
-
From the Targets menu, select All Targets to navigate to the All Targets page.
-
In the left panel of the All Targets page, select Oracle Server under Servers, Storage, and Network target type. The list of Oracle Server targets available is displayed.
-
Click on one of the targets to navigate to the Oracle Server Home page.
This page contains the following regions:
-
General: This region provides general details such as the Oracle Virtual Platform target, name of the target, CPU sockets, CPU cores, total memory, and local disk space.
-
Availability: The chart in this region shows the status of the target over the last 24 hours.
-
Overview of Incidents and Problems: This region shows any incidents or problems associated with the Oracle Server target.
10.4 Viewing the Oracle Virtual Platform Home Page
To view the Oracle Virtual Platform Home page, follow these steps:
-
From the Targets menu, select All Targets to navigate to the All Targets page.
-
In the left panel of the All Targets page, select Oracle Virtual Platform under Servers, Storage, and Network target type. The list of Oracle Virtual Platform targets available is displayed.
-
Click on one of the targets to navigate to the Oracle Virtual Platform Home page.
This page contains the following regions:
-
General: This region shows general details such as the Oracle Server target, platform version, name of the target, VCPUs allocated to Dom0 and total VCPUs allocated to the Oracle Virtual Server targets. It also indicates if this is a Privileged User. Virtualization metrics are collected only for privileged users.
-
Members: This region listed the virtual servers that belong to this virtual platform, their status, and the memory allocated to each virtual server.
Host names corresponding to the Oracle Virtual Server target are also displayed if the Management Agent is present on the virtual server.By default, this column is not visible. You can select this column using the View drop down menu.
-
Network Activity: This region shows the total throughput (MB per second) over the last 24 hours.
-
Overview of Incidents and Problems: This region shows any incidents or problems associated with the Oracle Server target.
-
Charts: The CPU utilization, Memory Utilization, Network, and Disk Activity charts show the activity over the last 24 hours. It shows the CPU and memory usage trending
-
Availability: The chart in this region shows the status of the target over the last 24 hours.
10.5 Viewing the Oracle VM Instance Home Page
To view the Oracle VM Instance Home page, follow these steps:
-
From the Targets menu, select All Targets to navigate to the All Targets page.
-
In the left panel of the All Targets page, select Oracle VM Instance under Servers, Storage, and Network target type. The list of Oracle VM Instance targets available is displayed.
-
Click on one of the targets to navigate to the Oracle VM Instance Home page.
This page contains the following regions:
-
General: This region provides general details such as the Oracle Server and Oracle Virtual Platform targets, name of the target, and allocated memory.
-
Availability: The chart in this region shows the status of the target over the last 24 hours.
-
Overview of Incidents and Problems: This region shows any incidents or problems associated with the Oracle Server target.
-
Charts: The CPU utilization, Memory Utilization, Network, and Disk Activity charts show the activity over the last 24 hours.