14 Managing Users and Permissions
This chapter explains the roles and permissions assigned to users within RUEI, as well as the creation and management of user accounts. The configuration of external user authentication mechanisms (such as LDAP and SSO), and the use of the password settings facility to enforce your organization's security policies, is also described.
14.1 Introduction
To start working with user definitions, select System, and then User management. The screen shown in Figure 14-1 appears.

This screen lists the currently defined system users. For each user account, their account name, full name, E-mail address, and authentication mechanism are listed. A user account's role and status is indicated through the color-coded scheme explained in Figure 14-2.
Figure 14-2 User Account Roles and Status
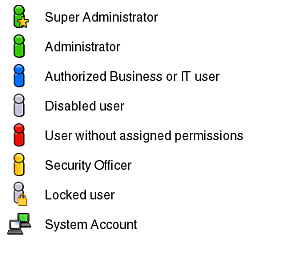
Description of "Figure 14-2 User Account Roles and Status"
In addition to user accounts, you can also create a system account which does not have access to the RUEI User Interface. These accounts are used to interact with RUEI at a service level, for example if you use the ADF Monitoring Service. System accounts have full access level, and can be configured to have the permissions described in Table 14-3.
The authentication of system users can either be performed by RUEI itself, based upon the user information stored within its database, or by an external authentication server. Currently, RUEI supports two external authentication mechanisms: via an LDAP server, or via an Oracle Single Sign-On (SSO) server. In both cases, the server must be configured to work with RUEI. The procedure to configure the LDAP server is described in Section 14.8, "Configuring LDAP Server User Authentication". The procedure to configure the Oracle SSO server is described in Section 14.9, "Configuring Oracle Single Sign-On (SSO) User Authentication".
14.2 Understanding User Account Roles and Permissions
This section explains how RUEI manages access to its configuration facilities, as well as to reported data. It is recommended that you carefully review the following information.
Each RUEI user is assigned a role. This role determines the actions that they can perform, and the type of information to which they have access. These roles are explained in Table 14-1.
| Role | Description |
|---|---|
|
Administrator |
This user performs the initial configuration of RUEI, and maintains the basic network-related configuration (such as mail settings and Collector attachments) used by the system. In addition, users assigned Administrator privileges act as first-level support for the system, and are responsible for such things as performing backups of the current configuration, the configuration of advanced system settings, and the administration of the other users authorized to work with the system. |
|
Security Officer |
This user is responsible for managing all system settings that are affected by the organization's network security policy. In particular, they:
|
|
Business users |
These users are concerned with evaluating visitor behavior according to business goals. As such, they use the business intelligence that the system offers them to monitor a wide variety of issues, such as identifying the most popular paths taken to your website, or how engaged visitors are on particular pages or sections. They may be concerned with improving customer satisfaction, retention, and loyalty, increasing conversion rates, or monitoring the effectiveness of website-based marketing activities. Based on assigned permissions, they use the dashboard functionality, as well as on-demand and mailed reports, to maintain an overview of the organization's operations. They can also use these reports and data exports as the basis for further analysis by IT specialists. |
|
IT users |
These users are concerned with supporting the IT and other technical information the system needs to monitor the web environment. Typically, they are responsible for deeper analysis of failed SLAs or KPIs. They use the reporting and Data Browser facilities to their fullest to locate the reported anomaly or failure. For example, they might identify that failed user sessions are only occurring for users from a particular network domain. |
|
Report Data Export |
These users use basic authentication to access reports. For more information on the feature see Section 2.13, "Exporting Report Data". |
14.2.1 User Account Roles
Depending on the configuration required by your organization, users can be authorized to perform combinations of these roles. There is no limit to the number of users who can be defined.
Super Administrator Versus Authorized Administrators
Be aware that there is one predefined RUEI user: the Super Administrator. Unlike all other users, their initial password is set using the set-admin-password.sh script, and is always locally authenticated. Depending on your operational requirements, other users can be assigned Administrator privileges. However, these users remain under the control of the Super Administrator. For clarity, when it is necessary to distinguish the Super Administrator from other users assigned Administrator privileges, the Super Administrator is referred to as the admin user.
Administrators Changing Each Other's Properties
By default, users with Administrator permissions can change the properties of other Administrators, as well as create and delete Administrator user accounts. If this is not consistent with your security requirements, you can disable this functionality. The procedure is described in the Oracle Real User Experience Insight Administrator's Guide.
14.2.2 User Account Access Level Permissions
In addition to roles, each user (other than Administrators) is also assigned a separate access level permission for Business and IT-related information. These define the modules (such as the Data Browser, KPI Overview, and System) to which the user has access. They are described in Table 14-2.
Table 14-2 Business and IT Access Level Permissions
| Access Level | Business User | IT User |
|---|---|---|
|
None |
The user has no access. |
The user has no access. |
|
OverviewFoot 1 |
The user can view their dashboards, the KPI overview, and alert history. |
The user can view their dashboards, the KPI overview, and alert history. |
|
Inquiry |
The user has read-only access to reports, and can create PDF downloads. |
The user has read-only access to reports, and can create PDF downloads. |
|
Analytical |
|
|
|
Full |
|
|
Footnote 1 A user who is not authorized to at least Overview level as either a Business or IT user cannot log on.
The management of user roles and access level permissions is described in Section 14.2, "Understanding User Account Roles and Permissions".
In this way, Business and IT users can immediately locate the information that is relevant to them. For example, on entry to the Report library, the list of displayed reports for a business users is filtered to reflect the reports with which they will want to work.
14.2.3 System Account Roles Permissions
Currently, there are no roles associated with system accounts and only the following permissions:
Table 14-3 System Account Permissions
| Access Level | System Account |
|---|---|
|
ADF Monitoring Service |
These users use RUEI to monitor ADF applications. For more information on setting up RUEI to work with ADF, see the RUEI Installation Guide. |
|
Enterprise Manager Access |
These users allow RUEI data to be available in Oracle Enterprise Manager. For more information on setting up RUEI to work with Oracle Enterprise Manager, see the RUEI Installation Guide. Users need to be authorized in order to access RUEI data within the Oracle Enterprise Manager Application Performance Management (APM) facility. This functionality is fully described in Oracle Enterprise Manager Cloud Control Oracle Fusion middleware Management Guide |
14.3 Adding New Users
To create a new user, do the following:
-
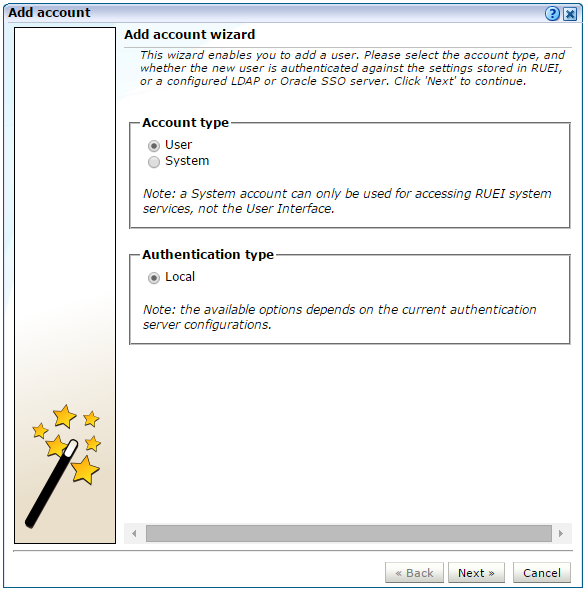
Select System, then User management, and click the Add new account command button in the taskbar (see Figure 14-1). A dialog similar to the one shown in Figure 14-3 appears.
If an LDAP or Oracle SSO server connection has been configured (as described in Section 14.8, "Configuring LDAP Server User Authentication"), the dialog shown in Figure 14-3 lists an LDAP authentication option.
-
Use the radio buttons shown in Figure 14-3 to create a new user or system account and to specify whether the user should be authenticated against the settings held in the RUEI installation (this is the default), or against a configured LDAP or Oracle SSO server. When ready, click Next. If an LDAP server is configured, the dialog shown in Figure 14-4 appears. Otherwise, a dialog similar to the one shown in Figure 14-8 appears.
-
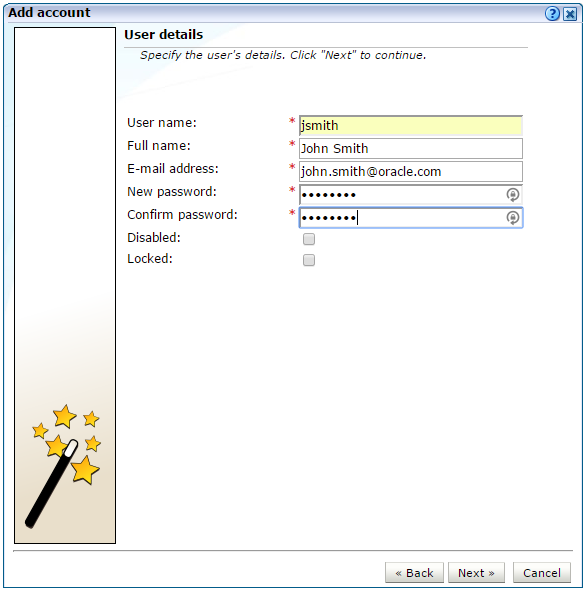
Use the dialog shown in Figure 14-8 to specify the following information for a new account:
-
The user name by which the user will be known within your RUEI installation. This must be a unique name. Users names are case sensitive. Note that if Oracle SSO server user authentication is enabled, the user is automatically created as an Oracle SSO user. In this case, specified user name must be the same as that defined within the Oracle SSO server.
-
The user's full name.
-
The user's E-mail address. This is the address to which reports and E-mail alerts will be sent. Ensure it is correct.
-
If the user will be authenticated against the settings held locally in the RUEI installation, you are required to specify and confirm a password for the new user. See Section 14.6, "Enforcing Password Security Policies" for information about password requirements. Note that the new password must be changed by the user within seven days or they are locked out.
-
Optionally, use the Disabled check box to disable the user at this time. You are free to enable them later.
If you selected user authentication against a configured LDAP server in Figure 14-3, you can click the Get user data from LDAP button to retrieve the user's settings from the configured LDAP server.
-
-
Click Next to continue. If you are adding a User account, proceed to step 4. If you are add a system account, as described in Section 14.1, "Introduction", proceed to step 5.
-
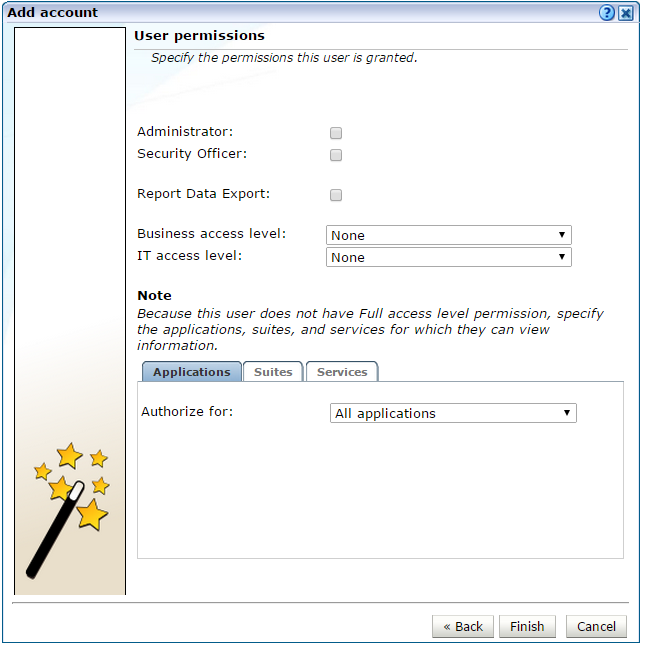
If you are adding a User account the dialog shown in Figure 14-5 appears.
Use the check boxes and menus to specify the role and permissions to be assigned to the new user. These are fully described in Section 14.2, "Understanding User Account Roles and Permissions". If the new user is assigned less than Full access level permission, you must use the Authorize for menu to specify the specific applications, suites, and services about which the user is authorized to view information.
-
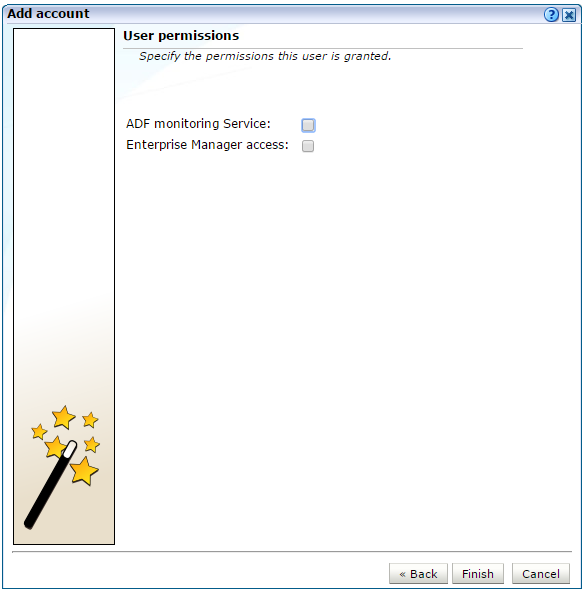
If you are adding a system account, the dialog shown in Figure 14-6 appears.
System accounts have full access to application, suite and service data. For information about setting up the ADF Monitoring Service and Enterprise Manager access, see the RUEI Installation Guide.
-
Click Finish to create the user definition. You are returned to the user list shown in Figure 14-1
Note:
In addition to the settings described above, there are a number of additional settings (such as language, mailing type, and so on) that are set to their default values when a user is created. These additional settings can also be modified using the procedure described in Section 1.5, "Customizing Your Environment".
14.4 Modifying Existing Users
To modify a user definition, select System, and then User management. The User management panel shown in Figure 14-1 appears. Right click the appropriate user. The context menu shown in Figure 14-7 appears.
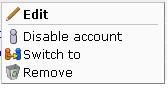
The options shown in Table 14-4 are available.
Table 14-4 User Context Menu Options
| Option | Description |
|---|---|
|
Edit |
Allows you to modify a user's definition. This is described in Section 14.5, "Modifying a User's Settings". |
|
Enable/Disable account |
Allows you to enable or disable the user account at this time. Note that all currently defined users are disabled when SSO authentication is enabled, and all SSO user accounts are disabled when SSO authentication is disabled. |
|
Switch to |
Allows you to temporarily change to the selected user. This is useful if you want to view the modules and reports that they are authorized to see. Select Switch back from the View menu to return to your own role. Note this option is not available when the selected user account is disabled. |
|
Remove |
Deletes the selected user from the system's user administration. Note that any private reports that the user created are also deleted. However, public reports created by the user remain available to other users. |
14.5 Modifying a User's Settings
To change the settings for an existing user, do the following:
-
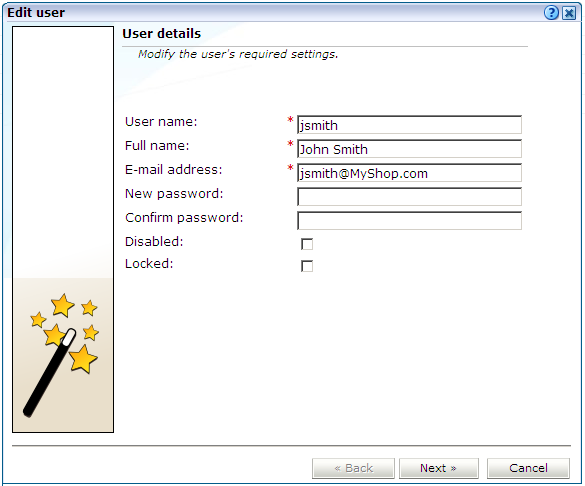
Select the required user within the user list shown in Figure 14-1, and select Edit. If an LDAP server connection has been configured (as described in Section 14.8, "Configuring LDAP Server User Authentication"), a dialog similar to the one shown in Figure 14-3 appears. Otherwise, the dialog shown in Figure 14-8 appears, and you should continue from step 3.
-
Use the radio buttons to specify whether the user's settings should be authenticated against the settings held in the RUEI installation (this is the default), or against a configured LDAP server. When ready, click Next. If an LDAP server is configured, the dialog shown in Figure 14-4 appears. Otherwise, the dialog shown in Figure 14-8 appears.
-
Optionally, modify any of the displayed information. Note that the fields shown with a red asterisk indicate they are mandatory. That is, they can not be left blank.
Note that when modifying an SSO user's account, and SSO authentication is disabled, the account is automatically converted to a locally authenticated account. Therefore, it becomes mandatory to specify and confirm a password for the user.
You can use the Disabled check box to prevent the user from using this account. You are free to enable them later. This facility is also useful because, as mentioned earlier, all currently defined user accounts are disabled when SSO authentication is enabled, and all SSO accounts are disabled when SSO authentication is disabled.
Because user accounts are automatically locked after a user has failed to correctly enter their password on five successive attempts, you can use the Locked check box to reset it. Password security is described in Section 14.6, "Enforcing Password Security Policies". You can use this check box to unlock the user's account. When ready, click Next. The dialog shown in Figure 14-9 appears.
Note:
If a user's password is changed via this interface, the user must change the password themselves (using the procedure described in Section 1.5, "Customizing Your Environment") within seven days or the account will be locked. -
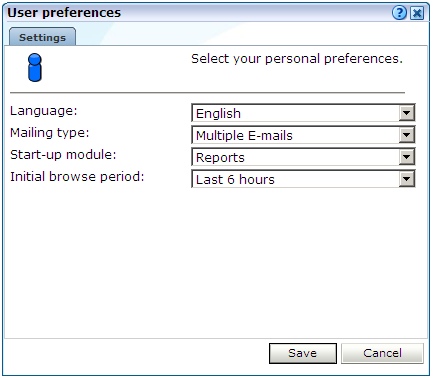
Optionally, you can modify the settings shown in Table 14-5.
Table 14-5 User Preference Settings
Setting Description Language
This is the language in which system messages and prompts appear. Currently, only English is available.
Mailing type
Specifies whether the reports the user receives are sent in multiple E-mails (one for each report) or bundled into a single E-mail. The default is multiple E-mails.
Startup module
Specifies the module in which the user starts their session. (For example, Reports, System, or User management). The default is the dashboard (described in Chapter 5, "Working With Dashboards").
Initial browse period
Specifies the initial period selection when entering the Data Browser or reports facility. The default is the last 6-hour period.
When ready, click Next. A dialog similar to the one shown in Figure 14-5 appears.
-
Optionally, use the check boxes and menus to specify the roles and permissions to be assigned to the user. These are explained in Section 14.2, "Understanding User Account Roles and Permissions". If the new user is not assigned Full access level permission, you should use the Authorize for menu to specify the specific applications, suites, and services they are authorized to view. When ready, click Finish for the changes you have made to take effect.
Resetting the Super Administrator Password
In the event that you need to reset the admin user password, you can do so using the use of the set-admin-password.sh script. This is described in the Oracle Real User Experience Insight Installation Guide. Note the new password must be changed (via the procedure described in Section 14.5, "Modifying a User's Settings") within seven days.
14.6 Enforcing Password Security Policies
Each user must be defined and authorized to work with RUEI. The procedure to do this is explained in Section 14.1, "Introduction". In order to optimize the security of your installation, you can use the password settings facility to enforce your organization's security policies. Specifically, you can control the maximum length of user passwords, how often users are required to change their passwords, the number of days after the creation of a new user account within which the initial password must be changed, and the number of failed logon attempts after which a user account is locked.
To control your installation's password enforcement, do the following:
-
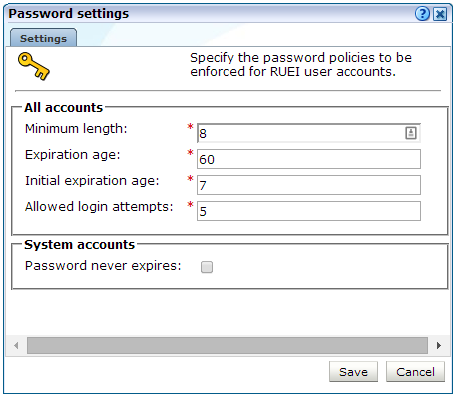
Select System, then User management, and click Password settings. The dialog shown in Figure 14-10 appears.
-
Specify the information shown in Table 14-6.
Table 14-6 Password Settings for All Accounts
Field Description Minimum length
Specifies the minimum number of characters that user passwords must contain. This must be between 8 -255 characters, and the default is 8 characters.
Expiration age
Specifies how often users are required to change their passwords. The default is 60 days. If set to 0, passwords will never expire. The maximum expiration period is 999 days.
Initial expiration age
Specifies the number of days after the creation of a new user account within which the initial password must be changed. This must be 1 - 30 days. It also specifies within how many days a user must change their password after it has been reset by an Administrator. The default is 7 days.
Allowed login attempts
Specifies the number of failed logon attempts after which a user account is locked. This must be between 1 - 10 times. The default is 5 times.
-
To specify that system account passwords should not expire, enable the Password never expires option. When ready, click Save.
When creating and authorizing users, the following rules are automatically enforced:
-
User accounts are locked after a specified number of failed attempts. The account must be unlocked before the user can logon again (described in Section 14.5, "Modifying a User's Settings"). However, locked users will continue to receive mailed reports and alerts.
-
If a password's expiration period is set to 0, and later re-set to a non-zero value (or vice versa), all existing user accounts will adapt to the newly specified password expiration period.
-
A user password must have a minimum of eight characters. It must contain at least one non-alphanumeric character (such as $, @, &, and !).
-
A password cannot include the defined user name, or their first or last name. In addition, the user's last three passwords are also remembered, and cannot be re-used.
-
Passwords are case sensitive.
14.7 Managing the Scope of Authorized Data Within Modules
Users with Full access level permission have access to all information within the Data Browser, reports, the KPI overview facility, and dashboards. For all other users, the information available to them is managed as part of their user profile. The use of this facility is fully described in Section 14.2, "Understanding User Account Roles and Permissions".
Generic vs. Application, Suite, and Service-Specific Items
KPIs, user flows, and dashboards can be defined as generic or bound to a specific application, suite, or service. Access to the information within an item is automatically managed through each user's assigned permissions.
If an item is defined as generic, only users that are authorized to access all applications would be able to view the item. This is because a generic item can contain information about multiple applications, suites, or services. Similarly, if a user is only authorized to view information about two applications, they would only be able to view KPIs, dashboards, Data Browser information, and reports directly concerning those two applications.
14.8 Configuring LDAP Server User Authentication
In order to provide enhanced security, RUEI can be configured to enable user authentication via an LDAP server, rather than through the settings held locally on your RUEI installation. If an LDAP server connection has been configured, you can specify the authentication method to be used for each defined user. Note because the admin user is predefined, and their password is set during initial configuration (see the Oracle Real User Experience Insight Installation Guide), only local authentication is available for this user.
If you plan to use LDAP authentication, it is recommended that you define your LDAP connection before the creation of user accounts. This is in order to prevent having to modify previously specified user settings.
Configuring the LDAP Server Certificate
Note that the LDAP secure server certificate should to in PEM format, and be specified via the TLS_CACERT directive in the /etc/openldap/ldap.conf file. The certificate file must be owned by the root user, and be readable by the RUEI and Apache user groups. Note that the CN of the LDAP server certificate must match the fully qualified domain name of the LDAP server.
Troubleshooting LDAP Connection Problems
If the LDAP secure server certificate configuration procedure described above does not provide a working connection, you can use the OpenLDAP utility (available on the Oracle Linux or RedHat Enterprise Linux distribution set) to validate the configuration of your LDAP server. The utility can be installed and run using the following commands:
sudo yum install openldap-clients
ldapsearch -x -P 2 -H "LDAP_server_URL" -D
cn=jsmith, dc=oracle, cn-com
where LDAP_server_URL specifies the full URL for your LDAP server, and the pair combinations depends on your LDAP server configuration. If specified correctly, information about that user is returned from the LDAP server. Otherwise, the problem encountered (such as the specified host name does not match the LDAP server or LDAP certificate was not installed correctly) is reported.
Note that if the certificate does not work, you can set the TLS_REQCERT directive to 'never' in the /etc/openldap/ldap.conf file to prevent validation of the certificate and continuation with the secure connection.
Configuring the LDAP Server Connection
To enable LDAP server authentication, do the following:
-
Select System, then User management, and then click Configure LDAP connection. Note that if an LDAP server connection has already been configured, the option is indicated as Modify LDAP connection. The dialog shown in Figure 14-11 appears.
-
Specify the information shown in Table 14-7.
Table 14-7 LDAP Settings Dalog Fields
Field Description Allow LDAP authentication
Specifies whether an LDAP server is available for user authentication. The default is unchecked (disabled).
Server name
Specifies the host name or IP address of the LDAP server to be used. Note that protocol information (such as LDAP://) should be omitted from the server name.
Connection type
Specifies the LDAP version and connection method. The default is V2 (non-secure).
Port number
Specifies the port to which the LDAP server is listening. If necessary, discuss this with your System Administrator. The default port is 389 or 636 (for SSL encryption).
Search base
Specifies the location in the directory structure within which the user ID needs to be unique. This must be a valid DN. For performance reasons, this should be as specific as possible. The default is the root of the directory tree.
Anonymous
Specifies if the LDAP server lookup should be performed using an anonymous user. If unchecked, then a valid Distinguished Name (DN) must be specified, and the password for that user is requested when a new user is created. The default is to use an anonymous lookup.
User ID, Email address, Full name
Specifies the attributes that should be used to extract user settings from the LDAP server. The defaults are based on standard LDAP functionality. If necessary, you should discuss these attributes with your LDAP administrator.
-
Optionally, you can click Test to verify whether a working connection to the LDAP server can be made. This is discussed in the following section. When ready, click Save.
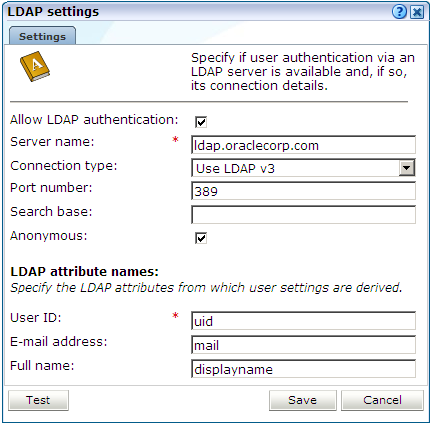
Any changes you specify to the LDAP configuration settings take effect immediately.
As mentioned earlier, you can test the connection to the LDAP server. Do the following:
-
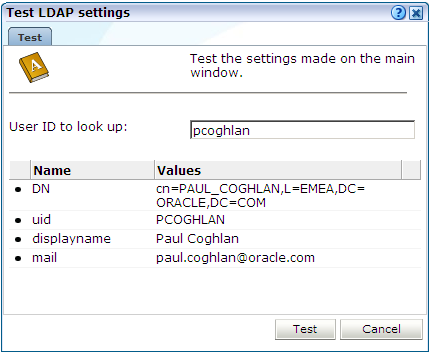
Within Figure 14-11, click Test. The dialog shown in Figure 14-12 appears.
-
Use the User ID to look up field to specify the user ID for which the LDAP server should search. This should be a valid user ID. When ready, click Test. Upon successfully finding the specified user's entry in the directory, their retrieved details are displayed. When ready, click Cancel. You are returned to the dialog shown in Figure 14-11.
14.9 Configuring Oracle Single Sign-On (SSO) User Authentication
In order to provide enhanced security, RUEI can be configured to enable user authentication via an Oracle Single Sign-On (SSO) server, rather than through the use of an LDAP server or the settings held locally on your RUEI installation.
When enabled, RUEI users (other than the admin user) are automatically re-directed to the Oracle SSO logon page. They then logon to RUEI through this page, rather than the RUEI login dialog (shown in Figure 1-1). Note because the admin user is predefined, and their password is set during initial configuration (see the Oracle Real User Experience Insight Installation Guide), only local authentication is available for this user. Note that other users with Administrator privileges still need to logon via the Oracle SSO server.
To activate the SSO server, do the following:
-
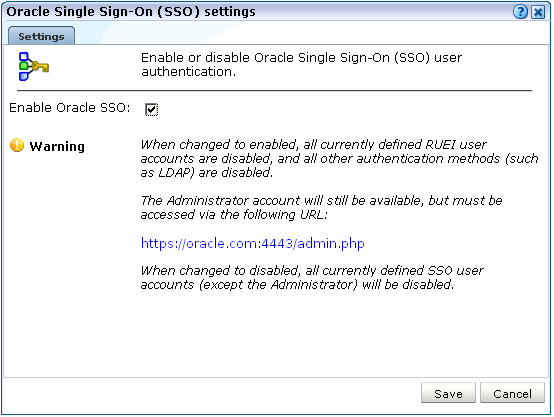
Select System, then User management, and then click Configure SSO connection. Note that if an Oracle SSO server connection has already been activated, the option is indicated as Modify SSO connection. A dialog similar to the one shown in Figure 14-13 appears.
Figure 14-13 Oracle Single Sign-On (SSO) Settings Dialog
Description of "Figure 14-13 Oracle Single Sign-On (SSO) Settings Dialog"
-
Use the Enable/Disable Oracle SSO check box to specify whether an SSO server is available for user authentication. The default is unchecked (disabled). When ready, click Save.
-
After enabling or disabling the Oracle SSO server, it is recommended that you logout and logon again to RUEI. This is to ensure that your RUEI installation reflects the change you have made.
Enabling Oracle SSO Authentication
When using an Oracle SSO server for user authentication, it is important to be aware of the following points:
-
When users are logged onto multiple SSO-registered applications, and they logout of an application, they are logged out of all other SSO-registered applications, including RUEI. Similarly, when users logout of RUEI, they are logged out of their SSO session.
-
When SSO authentication is enabled:
-
LDAP authentication is automatically disabled.
-
It is not possible to change a user's password through the Reporter interface. However, the
adminuser's password can still be changed because, as explained earlier, this is authenticated locally. -
All currently defined RUEI users are disabled. This includes users (other than the
adminuser) with Administrator privileges. -
When modifying an existing non- Oracle SSO user account, the user account name is converted to lowercase.
-
The currently defined password policy settings (see Section 14.6, "Enforcing Password Security Policies") only apply to the
adminuser. The Oracle SSO server enforces its own defined password policies.
-
-
If the SSO server is not running, or is experiencing problems, users are unable to logon.
-
The user name in the Oracle SSO directory must be the same as the user name specified in RUEI. Note also that user names are stored in lower case in RUEI, and any upper case characters in the Oracle SSO user names are automatically converted to lowercase in RUEI.
-
As mentioned earlier, the
adminuser remains locally authenticated. In order to logon, they must use the following URL:https://Reporter/ruei/admin.php
-
When registering the RUEI application with an SSO server, the logout URL should be specified in the following format:
https://hostname/ruei/index.php?frmWindow=wnd_logout&frmLogoutMode=initialwhere
hostnamespecifies the appropriate host name.
Installing and Configuring the Oracle SSO Server
Note that the Oracle HTTP server must be installed and configured before user authentication via an Oracle SSO server is available. The procedure to do this is fully explained in Chapter 7 of the Oracle Real User Experience Insight Installation Guide.