2 Troubleshooting Microsoft SQL Server Plug-in
This chapter provides troubleshooting scenarios related to the Microsoft SQL Server plug-in.
The following topics are provided:
2.1 Diagnostic Tools
The following diagnostic tools help you troubleshoot and resolve issues that you may encounter while working with the Microsoft SQL Server plug-in:
2.1.1 WBEMTEST
The WBEMTEST tool is available on Windows OS and is packaged along with the OS.
To launch WBEMTEST:
-
Click Run.
-
Enter
WBEMTESTin the open field. -
Click OK.
To check whether the WMI calls are working correctly for the namespace root\cimv2 outside of the Enterprise Manager environment:
Note:
You must be logged in as a user belonging to the local Administrators Group. Preferably, this should be a domain account.-
Launch
WBEMTESTlocally on the system where SQL Server is installed. -
Click Connect.
-
Enter
root\cimv2in theServer\Namespacetext field. -
Click Login.
-
Click Query (which is now enabled).
-
Enter the following query and click Apply:
select * from win32_service
To check whether WMI calls are working correctly for the name space root\default outside of the Oracle Enterprise Manager environment:
Note:
You must be logged in as a user belonging to the local Administrators Group. Preferably, this should be a domain account.-
Launch
WBEMTESTlocally on the system where SQL Server is installed. -
Click Connect.
-
Enter
root\defaultin theServer\Namespacetext field. -
Click Execute Method.
-
Enter
stdRegProvin the object path. -
Select
getStringValuefrom the Method drop-down list. -
Click Edit in Parameters.
-
Select the property
sSubKeyNameand then click Add Property. -
Specify the value. For example:
-
For SQL Server default (no-name) instance:
SOFTWARE\Microsoft\MSSQLServer\MSSQLServer\CurrentVersion
-
For SQL Server non-default instance:
SOFTWARE\Microsoft\MicrosoftSQLServer\<DATA_ROOT>\MSSQLServer\CurrentVersion
Where
<DATAROOT>will have values such asMSSQL.1,MSSQL.2, etc.
-
-
Select the property
sSubkeyValueand then click Add Property. -
Specify the value. For example:
CurrentVersion
-
Click Save Object.
-
Click Execute. A pop-up window with the message
Successfully Executedis displayed. -
Click Edit Out Parameters and verify the value of
sValueName.
Microsoft SQL Server 2000 Only
To check whether the WMI calls are working correctly for the namespace root\MicrosoftSQLServer outside of the Enterprise Manager environment:
Note:
You must be logged in as a user belonging to the local Administrators Group. Preferably, this should be a domain account.-
Launch
WBEMTESTlocally on the system where SQL Server is installed. -
Click Connect.
-
Enter
root\MicrosoftSQLServerin theServer\Namespacetext field. -
Click Login.
-
Click Query (which is now enabled).
-
Enter the following query and click Apply:
select name, clustered, package, versionstring from mssql_sqlserver
2.1.2 CIM Studio
To use CIM Studio, you require the Wmitools.exe executable, which can be downloaded from:
http://www.microsoft.com/en-us/download/details.aspx?id=24045
Follow the steps below to use the CIM Studio diagnostic tool:
-
Install WMI CIM Studio.
-
From Windows Start menu, launch WMI CIM Studio (from Start menu, select Programs, WMI Tools, and then WMI CIM Studio).
The "Connect to namespace" dialog box appears.
-
Specify the required name space, for example
root\CIMV2.Note:
WMI CIM Studio can be launched using Internet Explorer. Make sure that you have disabled the pop-up blocker. -
Click OK.
-
In the screen that appears, click the search icon (search for class) in the left pane and enter
win32_servicein the text-field. Click GO.This lists all the classes that contains
win32_servicestring. If not, it indicates that there are issues with WMI installation. -
Select
win32_servicefrom the search results and click OK. -
Click the WQL queries icon in the right pane.
-
In the Query dialog box, enter
select * from win32_servicein the Query text box and click Execute.This lists all services running on the system.
2.2 Diagnostic Steps
To monitor a Microsoft SQL Server target, you need to go through four phases:
Phase 1: Import the Plug-in on Enterprise Manager Cloud Control. See also Phase 1 Checklist.
Phase 2: Discover the SQL Server targets. See also Phase 2 Checklist.
Phase 3: Ensure that various features for monitoring the discovered SQL Server target are available and display the right behavior. See also Phase 3 Checklist.
2.2.1 Phase 1 Checklist
Before importing the SQL Server plug-in into Enterprise Manager Cloud Control, go to My Oracle Support and review Certification Note 412431.1 to check which release of the SQL Server Plug-in is certified with which release of:
-
Cloud Control OMS/Agent
-
Microsoft SQL Server
You can access this note from My Oracle Support:
https://support.oracle.com
2.2.2 Phase 2 Checklist
Verify the following:
Before discovering SQL Server targets, ensure that you meet all discovery-related pre-requisites. The checklist to follow is:
-
Preferred Credentials have been set in Cloud Control for the Agent which monitors the SQL Server instances and for the host on which the Agent is running.
-
(For Release 1 or Release 2 of the Plug-in only) Verify the exact name of the SQL Server Host and the SQL Server instance from the SQL Server Enterprise Manager.
-
Check that TCP/IP is enabled and verify the TCP/IP port. For details, see Enabling TCP/IP Port (Microsoft SQL Server 2005 Only) and Finding TCP/IP Port.
-
If the target is remote, necessary configuration for remote connection must be done as a pre-requisite.
2.2.3 Phase 3 Checklist
For monitoring of SQL Server targets to occur, ensure that you meet the following conditions:
-
The SQL Server instance has been successfully discovered. To do this:
-
In the Enterprise Manager Cloud Control, select Targets, then All Targets.
-
In All Targets page, enter
Microsoft SQL Serverin Search, and then press Return. -
Verify if SQL Server instance you added is listed.
Click the SQL Server name for details.
-
-
Check if the status of the SQL Server Instance is correct. To do this:
-
Go to SQL Server Instance Home page.
-
Verify the status.
Ensure that the status is not
Pending.
-
-
In the Incident Manager page, ensure the SQL Server instance has no open incidents or problems.
-
In the SQL Server Instance Home page, ensure that in All Metrics section, date and timestamp is displayed in the column Last Upload.
Notes:
-
Wait for the Schedule Interval (this can be 24 hours) to check that a specific metric is collected.
-
Some metrics might not be collected (for example, Backups or Jobs if no backup and no job were ever run for that SQL Server instance).
-
Some metrics might not be collected depending on the release of the Microsoft SQL Server or if some Windows services are not started (for example, the SQL Server Agent)
-
2.3 Finding TCP/IP Port
After enabling the TCP/IP protocol, restart the SQL Server to apply the changes.
From the SQL Server Configuration Manager, select SQL Server 2005 Network Configuration in the left panel and navigate to the SQL Server instance.
The right panel displays all protocols for the specified SQL Server instance and their status.
In the IP Addresses tab, TCP Dynamic Ports row of IP All will give the TCP/IP port of instance.
2.4 Microsoft URL for WMI Errors
To get a list of WMI Return Codes, go to the following Microsoft URL:
http://msdn.microsoft.com/en-us/library/aa394559.aspx
2.5 How To Fix Microsoft SQL Server Plug-in Issues
The following sections help you fix issues that you may encounter while working with the Microsoft SQL Server plug-in. The following topic areas are covered:
2.5.1 Downloading the Latest Version of the Plug-in
Download the latest version of the Microsoft SQL Server plug-in from Oracle Enterprise Manager Extensibility Exchange:
http://apex.oracle.com/pls/apex/f?p=34841:9
2.5.2 Enabling TCP/IP Port (Microsoft SQL Server 2005 Only)
-
From the SQL Server Configuration Manager, select SQL Server 2005 Network Configuration in the left panel and navigate to the SQL Server instance.
The right panel displays all protocols for the specified SQL Server instance and their status.
-
Ensure that TCP/IP is enabled.
-
(If TCP/IP is disabled), right-click TCP/IP and select Properties. The TCP/IP Properties dialog box appears.
-
In the Protocol tab, select enabled, and click Apply.
-
Restart the SQL Server instance.
2.5.3 Modifying Permissions
The following sections only provide steps to modify various permissions. For detailed documentation on any of these procedures, refer to the Microsoft web site.
2.5.3.1 Modifying Windows Management Instrumentation Control Permissions
For a secure Windows Management Instrumentation (WMI) namespace access, modify WMI Control Permissions for System or Job Username.
To do this on the SQL Server for the user you are going to use for monitoring and executing jobs, set the write permissions by following these steps:
Note:
If you do not have a user, then create one. To do so, from the task bar, go to Start, select Settings, and then Control Panel. In the Control Panel, double-click Users and Passwords and click Add in the Users tab.-
In the Control Panel, double-click Administrative Tools and then Computer Management. The Computer Management screen appears.
-
In the left panel, go to Services and Applications and select WMI Control.
-
Right-click WMI Control and select Properties.
The WMI Control Properties dialog box appears.
-
In the Security tab, go to the namespace navigation panel, double-click Root, select CIMV2, and click Security.
-
Click Add and select the specified user (or group) from the Select Users, Computers, or Groups dialog box.
-
In the WMI Control Properties dialog box, select the specified user (or group) under Name.
-
In the Permissions section, under Allow, check Enable Account and Remote Enable. Uncheck the remaining options.
Note:
To execute jobs, ensure that you check Execute Method in addition to Enable Account and Remote Enable. -
Go to WMI Control Properties dialog box and repeat the steps from 5 to 9 for Microsoft SQL Server (double-click Root and select Microsoft SQL Server) and Computer Management (double-click Root, Microsoft, and then select ComputerManagement).
See Also:
WMI Troubleshooting and Tips:http://technet.microsoft.com/library/ee692772.aspx#EABAC
2.5.3.2 Modifying Registry Permissions
For a secure registry access, modify WMI and registry permissions for System Username. To do this, follow the procedures given below.
WMI Modifications
To do this, on the SQL Server, for the user you are going to use for monitoring and executing jobs, set the write permissions by following these steps:
Note:
If you do not have a user, then create one. To do so, from the task bar, go to Start, select Settings, and then Control Panel. In the Control Panel, double-click Users and Passwords and click Add in the Users tab.-
In the Control Panel, double-click Administrative Tools and then Computer Management.
The Computer Management screen appears.
-
In the left panel, go to Services and Applications and select WMI Control.
-
Right-click WMI Control and select Properties.
The WMI Control Properties dialog box appears.
-
In the Security tab, go to the namespace navigation panel, double-click Root, select DEFAULT, and click Security.
-
Click Add and select the specified user (or group) from the Select Users, Computers, or Groups dialog box.
-
In the WMI Control Properties dialog box, select the specified user (or group) under Name.
-
In the Permissions section, under Allow, check Execute Methods, Enable Account, and Remote Enable. Uncheck remaining options.
Registry Editor Modifications
-
On the SQL Server task bar, go to Start, and click Run.
-
Type
regedt32.exein the Open field. -
Click OK.
The Registry Editor appears.
-
In the left panel, navigate down to Microsoft SQL Server by double-clicking HKEY_LOCAL_MACHINE, SOFTWARE, and then Microsoft.
-
Select Microsoft SQL Server, go to the Registry Editor main menu and click Security and then Permissions. The Permissions for Microsoft dialog box appears.
-
Click Add and select the specified user (or group) from the Select Users, Computers, or Groups dialog box.
-
In the Permissions for Microsoft dialog box, select the specified user (or group) under Name.
-
In the Permissions section, under Allow, check Read. Uncheck the remaining options.
-
Repeat the steps from step 5 to 8 after selecting MSSQLServer, if the SQL Server target to be monitored is the default (no-name) instance.
Note:
If a 32-bit version of SQL Server is installed on a 64-bit system (Xeon or AMD), the key in step 5 above will be:HKEY_LOCAL_MACHINE\SOFTWARE\Wow6432Node\Microsoft\Microsoft SQL Server
Similarly, the key mentioned in step 9 will be (if the SQL Server target to be monitored is the default (no-name) instance):
HKEY_LOCAL_MACHINE\SOFTWARE\Wow6432Node\Microsoft\MSSQLServer
See Also:
How to restrict access to the registry from a remote computer:http://support.microsoft.com/kb/153183
2.5.3.3 Modifying Permissions for Database Authentication
To do this, on the SQL Server, for the user you are going to use for monitoring and executing jobs, set the write permissions by following these steps:
Note:
If you do not have a user, then create one. To do so, from the task bar, go to Start, select Settings, and then Control Panel. In the Control Panel, double-click Users and Passwords and click Add in the Users tab.-
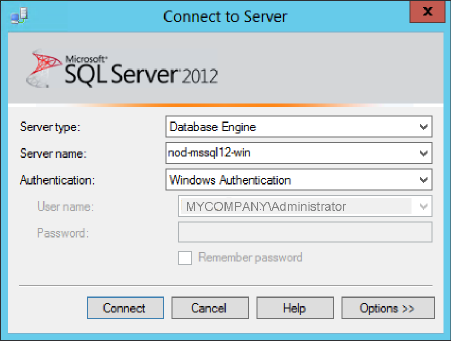
Log in to the Microsoft SQL Server Management Studio (Figure 2-1) with a predefined user account, or if one was not setup for SQL authentication, use Windows Authentication.
-
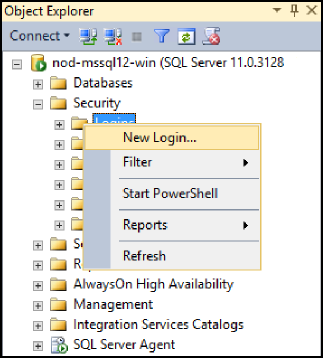
Right-click Logins and select New Login… as shown in Figure 2-2:
-
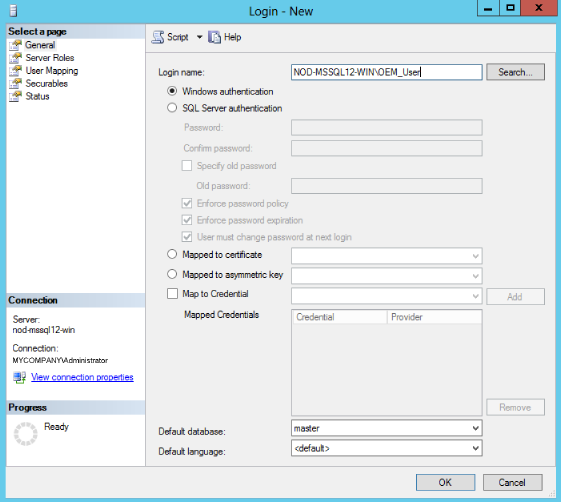
Select either Windows authentication and select a predefined user, or select SQL Server authentication to specify a new user as shown in Figure 2-3:
-
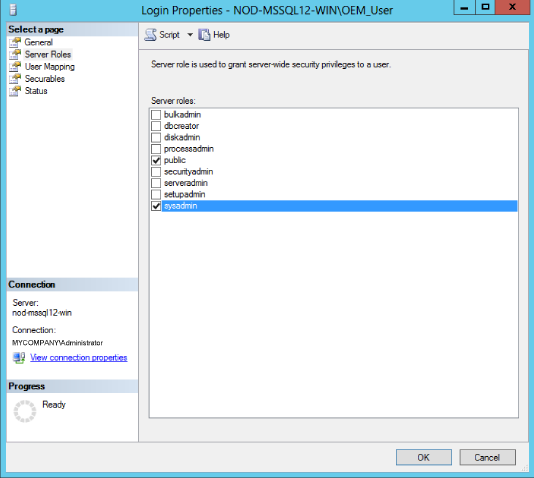
Under the Server Roles page, click the check box for the sysadmin server role as shown in Figure 2-4:
-
Click OK.
2.5.3.4 Assigning User Rights
The OS privileges for the user (set in the Preferred Credentials for the Agent) should meet the requirements documented in "Setting Credentials for the Job System to Work with Enterprise Manager" in the appropriate installation guide listed the Installation Guides section.
2.5.3.5 Modifying DCOM Remote Access Permissions
-
Click Start, click Run, type DCOMCNFG, and then click OK.
-
In the Component Services window, expand Component Services, expand Computers, and then right-click My Computer and click Properties.
-
In the My Computer Properties window, click the COM Security tab.
-
Under Launch and Activation Permissions, click Edit Limits.
-
In the Launch Permission dialog box, follow these steps if your name or group does not appear in the Groups or User Names list:
-
In the Launch Permission dialog box, click Add.
-
In the Select Users, Computers, or Groups dialog box, add your name and the group in the Enter the object names to select field, and then click OK.
-
In the Launch Permission dialog box, select your user and group in the Group or User Names field. In the Allow column under Permissions for User, select Remote Launch and select Remote Activation, and then click OK.
-
For more information about modifying DCOM settings and securing a remote WMI connection, refer to the following URL:
http://msdn.microsoft.com/en-us/library/aa393266.aspx
2.5.3.6 Modifying Access Privileges of SQL Server Services
Note:
Execute the following commands only if the Windows box in which SQL Server resides is Windows 2003 SP1 or later.Follow these steps to modify access privileges of SLQL Server services:
-
Grant authenticated users the right to remotely access Service Control Manager:
-
Click Start, click Run, type
cmd, and then click OK. -
Type the following command at the command prompt, and then press Enter:
sc sdset SCMANAGER D:(A;;CCLCRPRC;;;AU)(A;;CCLCRPWPRC;;;SY)(A;;KA;;;BA)S:(AU;FA;KA;;;WD)(AU;OIIOFA;GA;;;WD)
For more information, see:
http://support.microsoft.com/kb/907460
-
-
Assign Access right to SQL Server Services:
-
Click Start, click Run, type
cmd, and then click OK. -
Type the following command at the command prompt, and then press Enter:
sc sdshow <SQLServer_service_name>
-
Check the AU (Authenticated Users) access privileges in the output. For example, the default value is:
D:(A;;CCLCSWRPWPDTLOCRRC;;;SY)(A;;CCDCLCSWRPWPDTLOCRSDRCWDWO;;;BA)(A;;CCLCSWLOCRRC;;;IU)(A;;CCLCSWLOCRRC;;;SU)(A;;CR;;;AU)(A;;CCLCSWRPWPDTLOCRRC;;;PU)S:(AU;FA;CCDCLCSWRPWPDTLOCRSDRCWDWO;;;WD)
The above output lists CR (Control Access) privilege for Authenticated Users (A;;CR;;;AU).
-
If the privileges for AU (Authenticated Users) are not same as (A;;CCLCSWRPWPDTLOCRRC;;;AU), set it using the following command by replacing (A;;CR;;;AU) with (A;;CCLCSWRPWPDTLOCRRC;;;AU):
sc sdset SQLServer_service_name D:(A;;CCLCSWRPWPDTLOCRRC;;;SY)(A;;CCDCLCSWRPWPDTLOCRSDRCWDWO;;;BA)(A;;CCLCSWLOCRRC;;;IU)(A;;CCLCSWLOCRRC;;;SU)(A;;CCLCSWRPWPDTLOCRRC;;;AU)(A;;CCLCSWRPWPDTLOCRRC;;;PU)S:(AU;FA;CCDCLCSWRPWPDTLOCRSDRCWDWO;;;WD)
Repeat steps (a) to (c) for SQLServer Agent service also, by replacing SQLServer_service_name in step (a) with the SQLServer_agent_service_name.
For more information, see the following Microsoft documents:
-
2.6 General Issues
The following sections list the general issues and workarounds, if any, that can be used to resolve the issues that you may encounter while working with the Microsoft SQL Server plug-in:
2.6.1 The ”Add Microsoft SQL Server” Page Explained
In Enterprise Manager Cloud Control 12c, the page for adding a target instance for Microsoft SQL Server has changed in Release 12.1.0.3. In previous versions of Enterprise Manager, a bug in the console caused the credentials, which are supposed to be optional, to be required on this page.
Figure 2-5 shows the Add Microsoft SQL Server page.
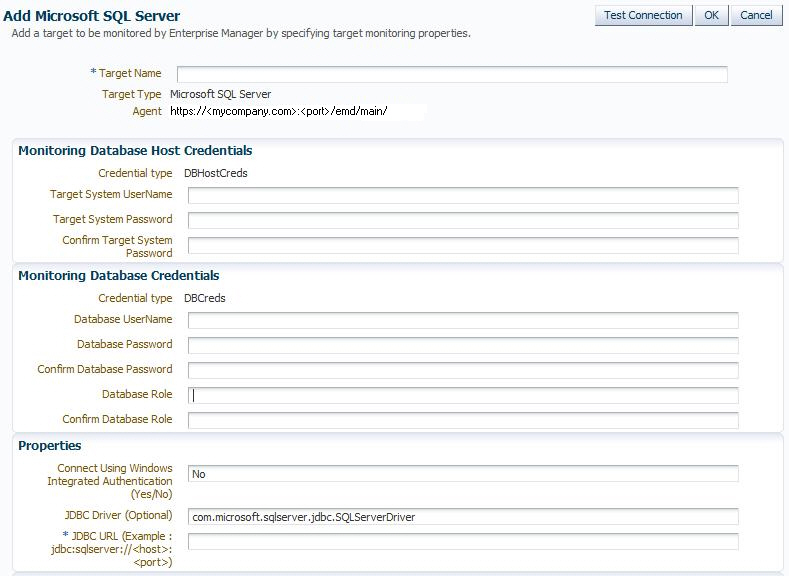
Some issues you may encounter could be because of credentials you were required to enter, but by entering them confuse the plug-in into not working. The following sections describe the credentials fields and whether or not they are required:
For more information about this issue, see What to configure as authentication details in SQL Server target discovery? (Doc ID 1500823.1) in My Oracle Support (https://support.oracle.com):
https://support.oracle.com/rs?type=doc&id=1500823.1
2.6.1.1 Monitoring Database Host Credentials
The Monitoring Database Host Credentials are the host credentials for the machine where your Microsoft SQL Server instance is installed. Local monitoring of your SQL Server instance occurs when the Enterprise Manager Agent is on the same machine as the SQL Server. Remote monitoring is when the Enterprise Manager Agent monitoring the SQL Server instance is on a different machine. Beginning with Enterprise Manager Cloud Control 12c Release 12.1.0.3, the credentials in this section are optional. However, they are required if you plan on doing remote monitoring of your SQL Server instance.
-
If you plan on remote monitoring, enter the valid credentials into this section:
-
Target System Username
-
Target System Password
Figure 2-6 shows an example of the Monitoring Database Host credentials fields.
-
-
If you do not plan on using remote monitoring, then leave these fields blank.

Note:
In Enterprise Manager Cloud Control 12c Release 12.1.0.2 and earlier, Monitoring Database Host credentials are required to add the target instance.For earlier versions of Enterprise Manager, you will have to enter something in this section (not necessarily valid credentials) and after the target instance is created, go to the Monitoring Configuration page (click Target, then Target Setup, and finally Monitoring Configuration from the menu on the target home page) and remove these entries.
The target instance monitoring will not work if you enter credentials in this section and are not doing remote monitoring. You must remove the entries in the Monitoring Configuration page for the target instance to work.
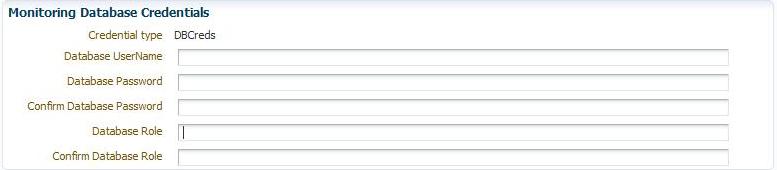
2.6.1.2 Monitoring Database Credentials
The Monitoring Database Credentials are the credentials for your Microsoft SQL Server instance. Beginning with Enterprise Manager Cloud Control 12c Release 12.1.0.3, the credentials in this section are optional. However, they are required if the SQL Server instance is not configured for Windows Integrated Authentication (WIA) and you plan on doing SQL authentication when connecting to the SQL Server instance.
Note:
SQL Servers are generally configured with both WIA and SQL authentication. In such cases, you should choose only one type of authentication for Enterprise Manager monitoring purposes. Configuring the Database username and password fields withWIA=YES will cause issues.-
If you plan on SQL authentication, enter the valid credentials into this section:
-
Database Username
-
Database Password
-
Database Role
Figure 2-7 shows an example of the Monitoring Database credentials fields.
Note:
If the SQL Server instance is configured for Windows Integrated Authentication (WIA), then leave these fields blank.The target instance monitoring will not work if you enter credentials in this section and are using WIA to monitor your SQL Server instance. You must remove the entries in the Monitoring Configuration page for the target instance to work.
-
-
If you do not plan on doing SQL authentication, then leave these fields blank.
Note:
In Enterprise Manager Cloud Control 12c Release 12.1.0.2 and earlier, Monitoring Database credentials are required to add the target instance.For earlier versions of Enterprise Manager, you will have to enter something in this section (not necessarily valid credentials) and after the target instance is created, go to the Monitoring Configuration page (click Target, then Target Setup, and finally Monitoring Configuration from the menu on the target home page) and remove these entries.
2.6.1.3 Using Windows Integrated Authentication
If you configure your target instance to use Windows Integrated Authentication (WIA) to connect to the SQL Server, then you must set the WIA target instance property to Yes and Database Credentials will not be set.
You also must ensure that your Enterprise Manager Agent is set up correctly for this type of connection. The Agent service in the Windows Server should be owned by the WIA Windows OS named user (and not local system).
2.6.2 Monitoring Error Messages
Table 2-1 describes monitoring issues and provides potential causes and actions.
Table 2-1 Monitoring Error Messages
| Error Message | Possible Cause | Action |
|---|---|---|
|
DLL file |
64-bit version of |
Download Type 4 Microsoft SQL Server 2005 JDBC Driver version 1.2 and copy the IA64 version of |
|
DLL file |
64-bit version of |
Download Type 4 Microsoft SQL Server 2005 JDBC Driver version 1.2 and copy the X64 version of |
|
Mirroring Monitoring metric cannot collect until the Database Mirroring Monitor has been launched. |
The Mirroring Monitor metric leverages data from the Database Mirroring Tool, and will fail to collect if this tool has not been launched. |
Launch Microsoft's Database Mirroring Monitor tool. |
|
Bad arg length for |
DNS resolution has failed. This may be due to incorrect host name specified in the JDBC URL field, failed attempts to contact DNS server, or "down" status of the DNS server. |
Check |
|
Error in adding target - |
DNS resolution has failed. This may be due to incorrect host name specified in the JDBC URL field, failed attempts to contact DNS server, or "down" status of the DNS server |
Check |
|
Error: 0x80041010 |
WMI repository is not up-to-date. As the class is part of root\cimv2 namespace, it should be available as part of default WMI installation. |
Perform the following steps:
Notes:
|
|
Target is In Broken State: Metric Collection Errors Encountered |
This behavior occurs when target, agent, or both and/or target system become slow or heavily loaded and computation of dynamic properties take longer than the default timeout value |
Execute the following command: emctl reload agent dynamicproperties <target name>:<target type> OR You can alternatively resubmit the target instance properties:
Note: This bug has been fixed for Oracle Enterprise Manager Agent version 10.2.0.3 and higher. You might encounter this issue only for Agent versions lower than 10.2.0.3. |
|
Can't resolve a non-optional query descriptor property [ |
This error occurs when the System Username and Password are specified during discovery (and not removed later on). In the case where the Agent is on the same box as the target instance (local monitoring), the System credentials must not be specified. |
See Metric Collection Error after MSSQL Target Discovery: Can't Resolve A Non-optional Query Descriptor (Doc ID 1503611.1) in My Oracle Support for more information: https://support.oracle.com/rs?type=doc&id=1503611.1 |
|
Metric Collection Error ”em_error=There was not enough memory to complete query ’SELECT name,pathname,processid,state FROM win32_service WHERE name='mssql$2008t' AND pathname LIKE ’%sqlservr.exe%'' ” |
The WMI service is not functioning properly. |
See How To Troubleshoot Microsoft SQL Server Plug-In Issues (Doc ID 367797.1) in My Oracle Support for more information: https://support.oracle.com/rs?type=doc&id=367797.1 |
|
Target instance remains in pending state after discovery. Agent log error: Execution error: |
The JDBC URL is incorrect or the database account used to connect has expired. |
See MSSQL Target Remains In Pending State After Discovery (Doc ID 1527441.1) in My Oracle Support for more information: https://support.oracle.com/rs?type=doc&id=1527441.1 |
2.6.3 General Connection Issues
This section addresses any issues the plug-in has with connecting to your target instance. These issues typically would show up either when the Test Connection button is pressed on the page for adding a target instance or in the Agent after the instance has already been added.
Note:
The Test Connection button should not be used prior to Enterprise Manager Release 12.1.0.3.0. Before that release, a bug prevented the Test Connection button from working for any of the non-Oracle database plug-ins. Add the target instance without attempting to test the connection.The following connection areas are presented:
2.6.3.1 General Connection Errors
Table 2-2 describes general connection issues.
Table 2-2 General Connection Issues
| Error Message | Possible Cause | Action |
|---|---|---|
|
Missing Properties or WMI Error (with error code) This may be any of the following:
|
This may be seen when the Management Agent encounters an error while computing any of the Dynamic Properties. To verify the behavior of the computation of Dynamic Properties, try Test Connection. You can try the connection from either the Add Target page (if the target is not already added) or the Target Home page (from the from the target instance home page, click Target, then Target Setup, and finally Monitoring Configuration). The reason for the failure in Dynamic Property computation may be because the Management Agent process owner and/or the provided System User Name (if the target is on a remote location that is different from the host where the Management Agent is running) do not have adequate privileges and permissions to monitor these targets. |
The Dynamic Property computation error needs to be resolved. Details on how to resolve the issue are mentioned below:
|
|
The host name/ IP address specified in JDBC URL is of Oracle Enterprise Manager Agent system. However, System Username is specified. For a SQL Server target on the same box as OEM Agent, System Username should not be specified. |
In case of Local Monitoring scenario, System User is specified in the System User Name field while adding target. |
Remove the System User Name from the System User Name field and re-try. |
|
Failed to connect, Network Error. Possible reasons are: Either JDBC URL is wrongly formed or one of its parameters are wrong |
Incorrect host name in the JDBC URL |
Provide the correct SQL Server hostname in the JDBC URL and re-try. |
|
Failed to connect, Login Failure. Possible reasons are: Encrypted properties are not provided. Provided Database Username or Password or both are not correct. Provided Database User may not exist. Login failed for user 'sa'. |
Incorrect credentials (Database Username or Database Password) for the Database user |
Provide the correct credentials |
|
Failed to connect, The TCP/IP connection to the host has failed. java.net.ConnectException: Connection refused: connect |
The following could be one of the causes:
|
Check the correct port number for the target. For information about checking the port number, see Enabling TCP/IP Port (Microsoft SQL Server 2005 Only). |
|
Cannot find the key: |
The following could be one of the causes:
|
Assign Read permission to the registry key(s) as documented. Replace permission entries on all child objects in the Advanced mode. |
|
|
Database User specified does not have privilege/role to the SQL Server instance. |
Assign sysadmin server role to the Database User as mentioned in the above article. |
2.6.3.2 JDBC Connection Errors
Table 2-3 describes the JDBC-related connection issues.
Table 2-3 JDBC Connection Issues
| Error Message | Possible Cause | Action |
|---|---|---|
|
No Owner for One or More Databases When you do a test connection, you might encounter this error while adding the target. |
There is no owner for one or more databases in the SQL Server instance. |
Do the following: Ensure that the output of the following are same:
Note: If 32-bit version of SQL Server is installed on 64-bit system, the registry key to be checked on the SQL Server target system is Using Microsoft SQL Query Analyzer:
|
|
Error While Obtaining Connection |
The port number provided is wrong. |
Provide the correct port number for the target. See Finding TCP/IP Port for details. |
|
JDBC Connection Fails |
If the JDBC connection fails, ensure the following:
|
|
|
Metric collection error:" The server principal "<username>" is not able to access the database "<dbname>" under the current security context......" |
Provide access to that database for the login user. |
|
|
Error while obtaining connection.[Microsoft][SQLServer 2000 Driver for JDBC]Error Establishing Socket or Failed to Connect |
The reason can be one of these:
|
Provide the correct port and host name. If the SQL Server is not running, then start it. Ensure that the TCP/IP port is enabled on the SQL Server instance. |
|
The following error is encountered: # _Wbem_Remote_Determination_DynamicProperty - Missing Properties: [iscluster] # MSSQL_NumClusterNodes - Error Querying: The user does not have permission to perform this action. # _MSSQL_Existence_TestMetric - em_error=em_error= Can't find the key: SOFTWARE\Microsoft\Microsoft SQL Server\SQLSRVR_ 2005\MSSQLServer\ CurrentVersion\\CurrentVersion |
Execute the following command from sysadmin user: GRANT VIEW SERVER STATE TO "login name" |
2.6.3.3 WMI Connection Errors
Table 2-4 addresses WMI-related connection issues.
Table 2-4 WMI Connection Issues
| Error Message | Possible Cause | Action |
|---|---|---|
|
Metric Collection Error While doing a test connection, you might encounter the following error:
|
(Failed to compute wbemremote) - is cluster missing due to wrong URL, wrong credential or wrong sqljdbc.dll file location. |
Check the |
|
WMI Error 0x8004100E |
The 0x8004100E error indicates the Namespace specified could not be found error string or SQL Server 2000 and SQL Server 2005 are both installed on the same machine. If it is the latter, this is an unsupported configuration. |
In this case, ensure the Note: This issue applies only to Microsoft SQL Server 2000. |
|
Could Not Connect. Error:0x80041064 You might encounter this error leading to a connection failure with a message explaining the failure to connect to WMI. |
For Local Agent Monitoring, System Username and password are provided. For Remote Agent Monitoring, System Username and Password are either incorrect or are fields are left blank. |
Remove the System Username and password using the Monitoring Configuration link. Provide System Username and Password using the Monitoring Configuration link. |
|
On non-Win2k computers- em_error=Could not connect. Error code = 0x80070005 em_error=Failed while connecting to WMI Error: On Win2k computers- em_error=Could not connect. Error code = 0x80041003 em_error=Failed while connecting to WMI You might encounter these errors leading to a connection failure, stating Failed while connecting to WMI. |
The following may be the possible causes:
|
Do the following:
|
|
Error: em_error=Could not connect. Error code = 0x800706ba em_error=Failed while connecting to WMI. |
Access denied because RPC Server is Unavailable. This may happen if:
|
Allow Remote Administration Exception in Windows Firewall setting. See the following link for more details: http://msdn.microsoft.com/en-us/library/aa389286(VS.85).aspx |
|
After Deploying the Plug-in To Management Agents Running on Cluster Nodes, Target-Type "Microsoft SQL Server" Is Not Displayed on the "Virtual Agent Service" Home Page in Enterprise Manager Grid Control |
Reload of virtual Management Agent is not performed after the plug-in is deployed to Management Agents running on ’real' nodes. |
From the ORACLE_HOME of the ’virtual' Management Agent, reload the Management Agent by running the following command: emctl reload agent |
2.6.4 Windows Authentication Issues
Table 2-5 describes general Windows authentication issues.
Table 2-5 Windows Authentication Issues
| Error Message | Possible Cause | Action |
|---|---|---|
|
DB Credentials should not be provided for Windows Integrated Security Connections |
Database credentials have been provided for Windows Authentication |
Remove the DB credentials and retry. |
|
Failed to connect, Login Failure. Possible reasons are: Encrypted properties are not provided. Provided Database Username or Password or both are not correct. Provided Database User may not exist. Login failed for user 'NT AUTHORITY\ANONYMOUS LOGON'. |
For remote monitoring scenario, user desires to use Windows Authentication, but System Username is not provided. |
Provide the System credentials and retry. |
|
Exception occurred while Logon: Logon failure: the user has not been granted the requested logon type at this computer. |
System User specified does not have login privilege on agent system. |
Assign ’Log on as Batch Job' to the Target System User on Agent system. To do this, follow these steps:
|
|
Failed to connect, Login Failure. Possible reasons are: Encrypted properties are not provided. Provided Database Username or Password or both are not correct. Provided Database User may not exist. Login failed for user (provided user) |
System user does not have login access to Database server. |
Provide System User login access to the instance. For detailed steps, see Modifying Permissions for Database Authentication. |
|
Error Querying: The user does not have permission to perform this action. |
System User specified does not have the required privilege/role to the Microsoft SQL Server instance. |
Assign sysadmin server role to the System User. For detailed steps, see Modifying Permissions for Database Authentication. |
2.7 Report Elements and Dependent Metrics
Table 2-6 lists the report elements and dependent metrics for Microsoft SQL Server plug-in:
Table 2-6 Report Elements and Dependent Metrics
| Report Name | Report Elements | Dependent Metrics |
|---|---|---|
|
Microsoft SQL Server Cache and Buffer |
Memory Status |
Memory Manager |
|
Buffer Performance |
Buffer Manager |
|
|
Buffer Allocation |
Buffer Manager |
|
|
Cache Performance |
Cache Manager |
|
|
Memory Allocation |
Memory Manager |
|
|
Memory Allocation Chart |
Memory Manager |
|
|
Microsoft SQL Server Cluster |
Cluster Nodes Summary |
Windows Cluster Name Windows Cluster Number of Nodes |
|
SQL Cluster Nodes Summary |
SQL Cluster Number of Nodes |
|
|
Nodes in Cluster |
Windows Cluster Nodes SQL Cluster Nodes Information Cluster Active Resource And Node |
|
|
Cluster Resources and Activity |
Cluster Active Resource And Node Cluster Resource and Owner Node Name Cluster Resource And Type Cluster Resource And Group Cluster Resources |
|
|
Microsoft SQL Server Database Configuration |
Databases |
Database |
|
Database Settings |
Database Setting (Configuration Metric) |
|
|
Microsoft SQL Server Database Backups and Jobs |
Database Backups |
SQL Server (Configuration Metric) |
|
Database Jobs |
Database Job |
|
|
Microsoft SQL Server Space Usage |
Database Space Usage |
Database |
|
Top 5 Databases by Space Used (%) |
Database |
|
|
Database Files |
SQL Server (Configuration Metric) Microsoft SQL DatabaseFile |
|
|
Microsoft SQL Server Alert Log and Alert Events |
Error Logs |
Registry Setting (Configuration Metric) |
|
Event Summary (in current log) |
SQL Server (Configuration Metric) Event Log Entry |
|
|
Server and Agent Errors |
SQL Server (Configuration Metric) Event Log Entry |
|
|
Server and Agent Warnings |
SQL Server (Configuration Metric) Event Log Entry |
|
|
Server Alerts |
Server Alerts |
|
|
Microsoft SQL Server Process Info and Locks |
Summary |
SQL Server Process |
|
Process States |
SQL Server Process |
|
|
Process Info |
SQL Server (Configuration Metric) SQL Server Process |
|
|
Process Locks |
Database Lock |
|
|
Lock Analysis |
Locks |
|
|
Microsoft SQL Server Memory Statistics |
Server Statistics |
Memory Statistics |
|
Buffer Cache Hit Ratio |
Memory Statistics |
|
|
Cache Hit Ratio |
Memory Statistics |
|
|
Average Latch Wait Time (ms) |
Memory Statistics |
|
|
Total Lock Wait Time (ms) |
Memory Statistics |
|
|
Microsoft SQL Server Performance |
Host CPU load percentage |
Processor |
|
Top SQL Server Processes by CPU Time |
SQL Server Process |
|
|
Memory Manager |
Memory Manager |
|
|
Top Server Processes by Memory Usage |
SQL Server Process |
|
|
Microsoft SQL Server Users and Privileges |
Logins |
Login |
|
Server roles |
SQL Server Role |
|
|
Database users |
User |
|
|
Top 10 User Logins Based on CPU Usage (ms) |
User Statistics |
|
|
Microsoft SQL Server Statistics |
Server Statistics |
Server Statistics |
|
Rate of Errors |
Server Statistics |
|
|
Packet Error Ratio |
Server Statistics |
|
|
Rate of Reads |
Server Statistics |
|
|
Rate of Writes |
Server Statistics |
|
|
Server Statistics |
General Statistics |
|
|
Microsoft SQL Server System Configuration |
Instance Information |
SQL Server (Configuration Metric) Response Agent Status |
|
Registry |
SQL Server (Configuration Metric) Registry Setting (Configuration Metric) |
|
|
Security |
Integrated Security Setting |
|
|
Server Parameters |
Database Parameter |
2.7.1 Report Error Messages
The following error messages may appear while attempting to generate a report:
Error Message: The data has an insufficient number of columns. This graph requires at least 2 columns of data. The data provided has 1 column.
Possible Cause: On charts, if there are insufficient data points available, the chart may display this error message.
Action: This error message is incorrect, as it should say the data has an insufficient number of rows, not columns. The error message will appear when there is an insufficient number of data points available to display.
2.8 Support References for Microsoft SQL Server Plug-in
The following support documents are available in My Oracle Support:
https://support.oracle.com
-
Test connection fails with DB Credentials are found missing (Doc ID 1503064.1):
https://support.oracle.com/rs?type=doc&id=1503064.1
-
What to configure as authentication details in SQL Server target discovery? (Doc ID 1500823.1):
https://support.oracle.com/rs?type=doc&id=11500823.1
-
Metric Collection Error after MSSQL Target Discovery: Can't Resolve A Non-optional Query Descriptor (Doc ID 1503611.1):
https://support.oracle.com/rs?type=doc&id=1503611.1
-
MSSQL Target Remains In Pending State After Discovery (Doc ID 1527441.1):
https://support.oracle.com/rs?type=doc&id=1527441.1
-
How To Troubleshoot Microsoft SQL Server Plug-in Issues (Doc ID 367797.1):
https://support.oracle.com/rs?type=doc&id=367797.1
-
How To Manually Run the Dynamic Properties for discovering Microsoft SQLServer Database (also details how to manually run each metric on the command line) (Doc ID 878709.1):
https://support.oracle.com/rs?type=doc&id=878709.1