18 Enterprise Manager Disaster Recovery
While the high availability solutions described in the previous chapter typically protect against component failure or system-level problems, in many enterprises it is also necessary to protect Enterprise Manager against larger outages such as catastrophic data center failure due to natural disasters, fire, electrical failure, evacuation, or pervasive sabotage.
Maximum Availability Architecture for Enterprise Manager involves deploying a remote failover architecture that allows a secondary data center to take over the management infrastructure in the event that disaster strikes the primary management infrastructure.
Note:
The recommended approach for OMS Disaster Recovery differs according to the version of Enterprise Manager.For Cloud Control 12.1.0.2 and earlier - Standby OMSs using Standby WebLogic Domain should be used. See Appendix I, "Standby OMSs Using Standby WebLogic Domain" for more information
For Cloud Control 12.1.0.3 and later - Standby OMSs using Storage Replication is the preferred approach and is discussed in this chapter.
BI Publisher server configuration is not supported on standby OMSs using Standby Weblogic Domain for Cloud Control 12.1.0.4 and later.
Advantages of Standby OMSs using Storage Replication are:
-
OMS patching and upgrade only needs to be performed at one site.
-
Plug-ins only need to be managed at one site.
This chapter covers the following topics:
18.1 Disaster Recovery Overview and Topology
The Disaster Recovery solution for a Cloud Control deployment involves replication of the OMS, Software Library and Repository components at a standby site. This solution can be combined with the high availability solution described in the previous chapter to ensure that failures ranging from component failure to a complete site outage can be recovered from with minimal disruption to the availability of Cloud Control.
A complete implementation of the Enterprise Manager Cloud Control combining the High Availability design from the previous chapter with the Disaster Recovery described in this chapter solution is shown in the following figure.
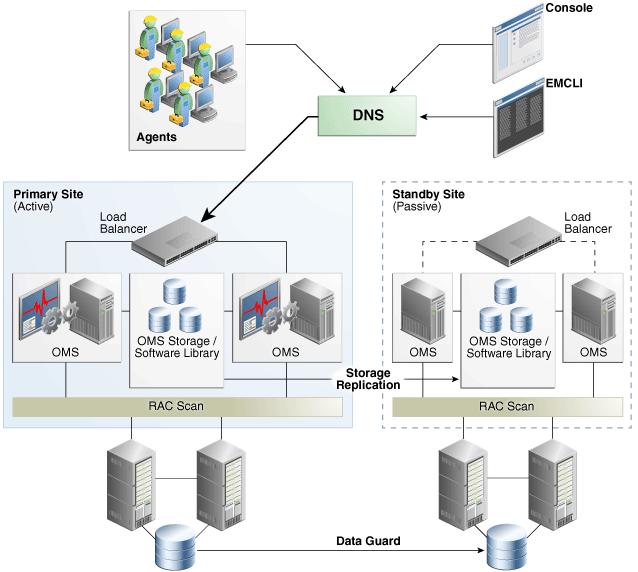
Key aspects of the DR solution shown in the figure are:
-
The solution has two sites. The Primary Site is running and active, while the Standby Site is in passive mode.
-
The traffic from the Enterprise Manager users and Agents is directed to the Primary Site by a Global Load Balancer or a DNS entry that resolves to an IP address hosted at the Primary Site.
-
The Standby Site is similar to the Primary Site in terms of hardware and network resources which ensures there will be no loss of performance when failover happens.
-
It is not necessary to perform an OMS installation at the Standby Site. Oracle Inventory, OMS Software, Agent and Software Library and all located on replicated storage. When the Production Site storage is replicated at the Standby Site the equivalent data are written to the Standby Site
-
The OMS hostnames must resolve to the IP addresses of the Primary OMSs when queried from the Primary Site and to the IP addresses of the corresponding standby hosts when queried from the Standby Site.
-
OMS software, Oracle Inventory, Software Library and Agent binaries and configuration files for all OMS(s) are on replicated storage.
-
OMS hosts on each site access the replicated storage using the same mount points
-
Replication between the sites takes place should take place at regular scheduled intervals and following configuration changes.
-
Oracle Data Guard Physical Standby is used to replicate the Repository database at the standby site.
-
There must be sufficient network bandwidth between the primary and standby sites to handle peak redo data generation.
-
When there is a failure or planned outage of the Primary Site, you perform the following steps to enable the Standby Site to assume the Primary role in the topology:
-
Stop OMSs at the primary site
-
Perform on-demand replication of storage (if primary site is available)
-
Failover/switchover of the database to the standby site
-
Reverse storage replication and activate replicated storage read/write at standby site
-
Start OMSs at standby site
-
Update DNS or global load balancer to re-route user requests to the standby site. At this point, the standby site has assumed the production role.
-
18.2 Design Considerations
This section discusses design considerations for a Cloud Control Disaster Recovery solution for an enterprise deployment.
The following topics are covered:
18.2.1 Network Considerations
The following sections discuss network considerations that must be taken into account when implementing standby Management Services using storage replication
18.2.1.1 Planning Host Names
In a Disaster Recovery topology, the production site host names must be resolvable to the IP addresses of the corresponding peer systems at the standby site. Therefore, it is important to plan the host names for the production site and standby site. After switchover or failover from a primary site to a standby site, it should be possible to start applications on the standby hosts without requiring you to change the hostname for hosts on the standby site.
This can be achieved in either of the following ways:
-
Option 1: Physical host names on primary site and alias on standby site: OMSs at the primary site are configured using physical host names and aliases for these host names are configured on the corresponding hosts at the standby site.
-
Option 2: Alias host names on both sites: OMSs at the primary site are configured using an alias host name that can be configured at both the primary and standby sites.
The choice between these options would depend on your network infrastructure and corporate policies. From a setup procedure perspective, Option 1 is easier to implement if you have an existing single site Cloud Control installation which uses the physical host names as it does not require any transformation of your existing site to setup DR. Option 2 is easier to implement if you are setting up a new Cloud Control installation and start with alias host names or you have an existing Cloud Control installation using alias host names.
Note:
If using Option 2, you should set ORACLE_HOSTNAME as the Alias host name when invoking the installer. For example:$ runInstaller ORACLE_HOSTNAME=oms1.example.com
You can also provide the ORACLE_HOSTNAME when prompted for this information from in Enterprise Manager runInstaller UI.
Host name resolution at each site can be done using either local resolution (/etc/hosts) or DNS based resolution or a combination of both. The following examples use these physical host names and IP addresses:
HOSTNAME             IP ADDRESS      DESCRIPTION
oms1-p.example.com   123.1.2.111     Physical host for OMS1 on Primary site
oms2-p.example.com   123.1.2.112     Physical host for OMS2 on Primary site
oms1-s.example.com   123.2.2.111     Physical host for OMS1 on Standby site
oms2-s.example.com   123.2.2.112     Physical host for OMS2 on Standby site
Note:
If using local resolution for either Option 1 or Option 2, ensure that the /etc/hosts file on each OMS at a site where alias host names are being used contains the physical and alias host names for all OMSs at the site as depicted in the examples below.Example for Option 1: /etc/hosts configurations when OMSs are installed at primary site using primary site physical host names (oms1-p.example.com and oms2-p.example.com):
Primary Site

127.0.0.1     localhost.localdomain  localhost
123.1.2.111   oms1-p.example.com     oms1-p #OMS1
123.1.2.112   oms2-p.example.com     oms2-p #OMS2

Standby Site

127.0.0.1     localhost.localdomain  localhost
123.2.2.111   oms1-s.example.com     oms1-s      oms1-p.example.com #OMS1
123.2.2.112   oms2-s.example.com     oms2-s      oms2-p.example.com #OMS2
If the network has been configured correctly, a ping of the OMS host name from the primary site should result in a reply from the primary host, and a ping of the OMS host name from the standby site should result in a reply from the standby host.
Ping results from primary site (reply from primary site):
[oracle@oms1-p ~]$ ping oms1-p.example.com
PING oms1-p.example.com (123.1.2.111) 56(84) bytes of data.
64 bytes from oms1-p.example.com (123.1.2.111): icmp_seq=1 ttl=64 time=0.018 ms
64 bytes from oms1-p.example.com (123.1.2.111): icmp_seq=2 ttl=64 time=0.020 ms
64 bytes from oms1-p.example.com (123.1.2.111): icmp_seq=3 ttl=64 time=0.022 ms
Ping results from standby site (reply from standby site)
[oracle@oms1-s ~]$ ping oms1-p.example.com
PING oms1-s.example.com (123.2.2.111) 56(84) bytes of data.
64 bytes from oms1-s.example.com (123.2.2.111): icmp_seq=1 ttl=64 time=0.018 ms
64 bytes from oms1-s.example.com (123.2.2.111): icmp_seq=2 ttl=64 time=0.020 ms
64 bytes from oms1-s.example.com (123.2.2.111): icmp_seq=3 ttl=64 time=0.022 ms
Example for Option 2: /etc/hosts configuration when OMSs are installed using alias host names (oms1.example.com and oms2.example.com):
Primary Site

127.0.0.1     localhost.localdomain   localhost
123.1.2.111   oms1-p.example.com      oms1-p     oms1.example.com #OMS1
123.1.2.112   oms2-p.example.com      oms2-p     oms2.example.com #OMS2

Standby Site

127.0.0.1    localhost.localdomain    localhost
123.2.2.111  oms1-s.example.com       oms1-s     oms1.example.com #OMS1
123.2.2.112  oms2-s.example.com       oms2-s     oms2.example.com #OMS2
If the network has been configured correctly, a ping of the OMS host name from the primary site should result in a reply from the primary host, and a ping of the OMS host name from the standby site should result in a reply from the standby host.
Example:
Ping results from primary site (reply from primary site):
[oracle@oms1-p ~]$ ping oms1.example.com
PING oms1-p.example.com (123.1.2.111) 56(84) bytes of data.
64 bytes from oms1-p.example.com (123.1.2.111): icmp_seq=1 ttl=64 time=0.018 ms
64 bytes from oms1-p.example.com (123.1.2.111): icmp_seq=2 ttl=64 time=0.020 ms
64 bytes from oms1-p.example.com (123.1.2.111): icmp_seq=3 ttl=64 time=0.022 ms
Ping results from standby site (reply from standby site)
[oracle@oms1-s ~]$ ping oms1.example.com
PING oms1-s.example.com (123.2.2.111) 56(84) bytes of data.
64 bytes from oms1-s.example.com (123.2.2.111): icmp_seq=1 ttl=64 time=0.018 ms
64 bytes from oms1-s.example.com (123.2.2.111): icmp_seq=2 ttl=64 time=0.020 ms
64 bytes from oms1-s.example.com (123.2.2.111): icmp_seq=3 ttl=64 time=0.022 ms
18.2.1.2 Load Balancers Consideration
If there is more than one OMS at each site, both Primary and Standby Sites require their own server load balancer. See "Configuring a Load Balancer". The SLB pools on each site will reference the IP addresses of the respective OMS hosts.
18.2.1.3 Application Virtual Host Name Consideration
A hostname through which the Cloud Control clients (agents and users) should access Cloud Control is required. When the primary site is active, this hostname should be configured in DNS to resolve to the IP address hosted by the primary site SLB. When the standby site is activated, the DNS entry should be updated so that the hostname resolves to the IP address hosted by the standby site SLB.
A sample DNS configuration for the Cloud Control application hostname when using multiple OMSs with an SLB at each site is shown in the table below:
| DNS NAME | DNS RECORD TYPE | VALUE | COMMENTS |
|---|---|---|---|
|
em.example.com |
CNAME |
slb_primary.example.com |
Virtual Hostname used by Cloud Control clients to communicate with Management Service. Should point to the currently active site. |
|
slb_primary.example.com |
A |
123.1.2.110 |
Primary Site SLB address |
|
slb_standby.example.com |
A |
123.2.2.110 |
Standby Site SLB address |
The DNS switchover can be accomplished by either using a global load balancer or manually changing DNS names.
-
A global load balancer can provide authoritative DNS name server equivalent capabilities. One advantage of using a global load balancer is that the time for a new name-to-IP mapping to take effect can be almost immediate. The downside is that an additional investment must be made for the global load balancer
-
Manually changing the DNS names. To ensure that DNS records cached by the Cloud Control clients are updated in a timely fashion after an update, it is recommended to set the TTL for the em.example.com CNAME to a low value such as 60 seconds. This will ensure that DNS changes will quickly propagate to all clients. However due to the shortened caching period, an increase in DNS requests can be observed.
18.2.2 Storage Considerations
The Disaster Recovery solution for a Cloud Control deployment involves installing the Software Library, OMS installation, Agent installation and Oracle inventory on replicated storage.
Storage Replication Requirements
Your chosen method of storage replication should support the following:
-
Snapshots and consistent filesystem copies
-
Ability to perform scheduled and on-demand replication between sites
The following section details the storage structure recommended by Oracle.
-
Create one volume per OMS host.
-
Mount the above volumes to each OMS host using the same mount point e.g. /u01/app/oracle/OMS. On each host, this volume would contain the OMS installation, Agent installation and Oracle inventory.
-
Create a consistency group for the above volumes so that consistent replication can be done for all the volumes.
-
Create one volume for the software library. This volume must be mounted simultaneously to all the OMS hosts using the same mount point. For example,
/swlib. -
Create one volume for the BIP. This volume must be mounted simultaneously to all OMS hosts using the same mount point. For example,
/bip. -
Decide on appropriate replication frequency for the OMS file systems, software library and BIP based on your infrastructure. Oracle recommends a minimum frequency of 24 hours for the OMS file system and continuous or hourly replication for the software library.
Once these volumes are mounted, ensure that the mounted directories are owned by the Oracle Software Owner User (typically, oracle) and the Oracle Inventory Group (typically, oinstall), and that the Oracle Software Owner User has read and write access to the directories.
Example: The following table shows an example configuration.
Table 18-2 Storage Configuration
| Volume | Mounted on Host | Mount Point | Comments |
|---|---|---|---|
|
VOLOMS1 |
oms1-p.example.com |
/u01/app/oracle/OMS |
Installation of Enterprise Manager on Primary Site OMS1 |
|
VOLOMS2 |
oms2-p.example.com |
/u01/app/oracle/OMS |
Installation of Enterprise Manager on Primary Site OMS2 |
|
VOLSWLIB |
oms1-p.example.com and oms2-p.example.com |
/swlib |
Software library on Primary Site OMS1 and OMS2 |
|
VOLBIP |
oms1-p.example.com and oms2-p.example.com |
/bip |
BIP Shared Storage on Primary Site OMS1 and OMS2 (If BIP is configured.) |
18.2.3 Database Considerations
This section provides the recommendations and considerations for setting up Repository databases for Disaster Recovery.
-
Oracle recommends creating Real Application Cluster databases on both the production site and standby site.
-
The Oracle Data Guard configuration used should be decided based on the data loss requirements of the database as well as the network considerations such as the available bandwidth and latency when compared to the redo generation. Make sure that this is determined correctly before setting up the Oracle Data Guard configuration.
-
To enable Data Guard to restart instances during the course of broker operations, a service with a specific name must be statically registered with the local listener of each instance.
-
To enable the most effective use of dgmgrl for Repository database switchover and failover operations, the TNS aliases for all primary and standby Repository databases must be added to the tnsnames.ora file under the ORACLE_HOME of each database instance.
-
It is strongly recommended to force Data Guard to perform manual database synchronization whenever middle tier synchronization is performed. This is especially true for components that store configuration data in the metadata repositories.
-
Once the connect descriptor is selected based on the recommendations discussed in Section 18.2.3.1, "Considerations Where Oracle Database Versions are Lower than 11g Release 2" and Section 18.2.3.2, "Considerations Where Oracle Database Versions are 11g Release 2 or Higher," run the following command on each OMS at the primary site to configure the connect descriptor.
emctl config oms -store_repos_details -repos_conndesc <connect descriptor> -repos_user <username>
The following usage example follows the connect descriptor recommendation discussed in Section 18.2.3.2.
emctl config oms -store_repos_details -repos_conndesc "(DESCRIPTION_LIST=(LOAD_BALANCE=off)(FAILOVER=on)(DESCRIPTION=(CONNECT_TIMEOUT=5)(TRANSPORT_CONNECT_TIMEOUT=3)(RETRY_COUNT=3)(ADDRESS_LIST=(LOAD_BALANCE=on)(ADDRESS=(PROTOCOL=TCP)(HOST=primary_cluster_scan.example.com)(PORT=1521)))(CONNECT_DATA=(SERVICE_NAME=haemrep.example.com)))(DESCRIPTION=(CONNECT_TIMEOUT=5)(TRANSPORT_CONNECT_TIMEOUT=3)(RETRY_COUNT=3)(ADDRESS_LIST=(LOAD_BALANCE=on)(ADDRESS=(PROTOCOL=TCP)(HOST=standby_cluster_scan.example.com)(PORT=1521)))(CONNECT_DATA=(SERVICE_NAME=haemrep.example.com))))" -repos_user SYSMAN
18.2.3.1 Considerations Where Oracle Database Versions are Lower than 11g Release 2
It is strongly recommended to set up aliases for the database host names on both the production and standby sites. This enables seamless switchovers, switchbacks and failovers. For example:
| Site | Repository Host Names | Repository Connect String |
|---|---|---|
| Primary | repos1-p.example.com | (DESCRIPTION=(ADDRESS_LIST=(FAILOVER=ON)(ADDRESS=(PROTOCOL=TCP)(HOST=repos1-p.example.com)(PORT=1521))(ADDRESS=(PROTOCOL=TCP)(HOST=repos2-p.example.com)(PORT=1521)))(CONNECT_DATA=(SERVICE_NAME=EMREP))) |
| repos2-p.example.com | ||
| Standby | repos1-s.example.com | (DESCRIPTION=(ADDRESS_LIST=(FAILOVER=ON)(ADDRESS=(PROTOCOL=TCP)(HOST=repos1-s.example.com)(PORT=1521))(ADDRESS=(PROTOCOL=TCP)(HOST=repos2-s.example.com)(PORT=1521)))(CONNECT_DATA=(SERVICE_NAME=EMREP))) |
| repos2-s.example.com |
In the above example, after a failover or switchover operation, the OMS on the standby site must be switched to use the standby repository connection string. You can avoid changing of connect strings by optionally setting up a host name alias for the repository database hosts. For example:
| Site | Repository Host Names | Host Name Alias |
|---|---|---|
| Primary | repos1-p.example.com | repos1.example.com |
| repos2-p.example.com | repos2.example.com | |
| Standby | repos1-s.example.com | repos1.example.com |
| repos2-s.example.com | repos2.example.com |
Thus the connect string on each site can be the same, alleviating the need to do a change during failover or switchover.
(DESCRIPTION=(ADDRESS_LIST=(FAILOVER=ON)(ADDRESS=(PROTOCOL=TCP)(HOST=repos1.example.com)(PORT=1521))(ADDRESS=(PROTOCOL=TCP)(HOST=repos2.example.com)(PORT=1521)))(CONNECT_DATA=(SERVICE_NAME=EMREP))).
18.2.3.2 Considerations Where Oracle Database Versions are 11g Release 2 or Higher
Oracle Database 11g Release 2 introduces two technologies that together dramatically improve the simplicity of connection string management for Repository databases for Disaster Recovery: Single Client Access Name (SCAN) addresses and role-based database services.
SCAN addresses provide a single address for a RAC cluster, eliminating the need to specify multiple VIP addresses in the connection string. For more information on SCAN addresses, please see the Oracle Clusterware Administration and Deployment Guide.
Role-based database services allow the creation of a database service that will run on a RAC cluster based on the role of the database without requiring the administrator to create and maintain database triggers to manage the database service. With a role-based database service, Oracle Clusterware will automatically start and stop the database service based upon the specified role (Primary or Standby). For more information on role-based database services, please see the Oracle Real Application Clusters Administration and Deployment Guide and the Client Failover Best Practices for Highly Available Oracle Databases: Oracle Database 12c technical whitepaper.
Combining these two technologies allows the creation of a Repository connection string that contains a single entry for the primary database and a single entry for the standby database. This connection string can be used from both the primary and standby sites, which removes the need to manually change the connection string during switchover or failover operations.
To create a role-based database service for use in connecting to the repository in a Level 4 MAA configuration, perform commands similar to the following to create the database service on both primary and standby clusters.
Primary cluster:
srvctl add service -d emrepa -s haemrep.example.com -l PRIMARY -r emrepa1,emrepa2
Standby cluster:
srvctl add service -d emreps -s haemrep.example.com -l PRIMARY -r emreps1,emreps2
Perform the following on a node of the primary cluster to start the service initially.
srvctl start service -d emrepa -s haemrep.example.com
The role-based database service is now active and will run on whichever cluster hosts the active database.
Oracle recommends the use of a connection string similar to the following in an environment using Oracle Database 11.2, Data Guard, and RAC, replacing the names of the scan addresses for each cluster and the role-based database service name with the appropriate values in your environment:
(DESCRIPTION_LIST=(LOAD_BALANCE=off)(FAILOVER=on)(DESCRIPTION=(CONNECT_TIMEOUT=5)(TRANSPORT_CONNECT_TIMEOUT=3)(RETRY_COUNT=3)(ADDRESS_LIST=(LOAD_BALANCE=on)(ADDRESS=(PROTOCOL=TCP)(HOST=primary-cluster-scan.example.com)(PORT=1521)))(CONNECT_DATA=(SERVICE_NAME=haemrep.example.com)))(DESCRIPTION=(CONNECT_TIMEOUT=5)(TRANSPORT_CONNECT_TIMEOUT=3)(RETRY_COUNT=3)(ADDRESS_LIST=(LOAD_BALANCE=on)(ADDRESS=(PROTOCOL=TCP)(HOST=standby-cluster-scan.example.com)(PORT=1521)))(CONNECT_DATA=(SERVICE_NAME=haemrep.example.com))))
18.2.4 Starting Points
Before setting up the standby site, the administrator must evaluate the starting point of the project. The starting point for designing an Enterprise Manager Cloud Control Disaster Recovery topology is usually one of the following:
-
The primary site is already created, standby site is being planned
-
The primary site is already created, standby site is already created using the deprecated "Standby WLS Domain" method
-
No installation exists, both primary and standby sites are being planned
18.2.4.1 The primary site is already created, standby site is being planned
When the starting point is an existing primary site, the OMS installation for the primary site already exist on the file system. Also, the host names, ports, and user accounts are already defined. The following procedure must be used to transform the site and prepare it for Disaster Recovery topology.
-
Review the Network Considerations and plan your host names
If using option 1, no host name changes are required on the primary site. Prepare your standby site hosts by adding appropriate alias host names.
If using option 2, change the OMS host name to move your existing OMS installation to use alias host names. Prepare your standby site hosts by adding the appropriate alias host names.
-
Review the Storage Considerations and move your OMS installation to shared storage
Migrate the primary site to shared storage. See "Migrating an Existing Site to Shared Storage".
-
Review the Database considerations and plan your repository host names and connect descriptors
To achieve seemless failover/switchover consider if you want to use hostname alias for the repository database. If so, migrate your repository database to use alias hostname.
-
Now that your primary site is ready, use the procedures in ""Setting Up Management Repository Disaster Recovery" and "Setting Up the OMS, Bi Publisher Shared Storage and Software Library Disaster Recovery" to complete the DR setup.
18.2.4.2 The primary site is already created, standby site is already created using the deprecated "Standby WLS Domain" method.
-
Use the deleting standby OMS procedure to delete the Standby OMS. See Removing Additional Standby OMS Instances in the Enterprise Manager Advanced Installation and Configuration Guide.
-
Use the procedure documented in "The primary site is already created, standby site is being planned".
18.2.4.3 No installation exists, both primary and standby sites are being planned
When you are designing a new primary site (not using a pre-existing primary site), its easier as the site planning can be done before starting the installation of software.
-
Review the Network Considerations and plan your host names.
-
Review the Storage Considerations and prepare your storage volumes.
-
Review the Database Considerations and prepare your repository host names.
-
Perform your primary site installation using the procedures in Chapter 17, "Enterprise Manager High Availability," taking care to use the correct host names and installing on the shared storage.
-
Now that your primary site is ready, see the following sections for procedures to complete the DR setup.
18.3 Setting Up Management Repository Disaster Recovery
The Management Repository should use Data Guard as a Disaster Recovery solution.
18.3.1 Configuring a Standby Database for the Management Repository
The following steps describe the procedure for setting up a standby Management Repository database.
-
Prepare Standby Management Repository hosts for Data Guard.
Install a Management Agent on each of the standby Management Repository hosts. Configure the Management Agents to upload by the SLB on the primary site. Install Grid infrastructure and RAC Database software on the standby Management Repository hosts. The version used must be the same as that on the primary site.
-
Prepare the primary Management Repository database for Data Guard.
If the primary Management Repository database is not already configured, enable archive log mode, setup flash recovery area and enable flashback database on the primary Management Repository database.
Note:
Ensure that the database is put into FORCE LOGGING mode to prevent standby database corruption during upgrades.When the primary Management Repository database is in FORCE LOGGING mode, all database changes are logged except for those in temporary tablespaces and temporary segments. FORCE LOGGING mode ensures that the standby database remains consistent with the primary Management Repository database.
-
Create the Physical Standby Database.
Use the Enterprise Manager console to set up a physical standby database in the standby environment. The Standby Management Repository database must be a Physical Standby. Logical standby Management Repository databases are not supported.
The Enterprise Manager console does not support creating a standby RAC database. If the standby database has to be RAC, configure the standby database using a single instance and then use the 'Convert to RAC' option from the Enterprise Manager Console to convert the single instance standby database to RAC. Note that the Convert to RAC option is available for Oracle Database releases 10.2.0.5, 11.1.0.7, and above. Oracle Database release 11.1.0.7 requires patch 8824966 for the Convert to RAC option to work.During single instance standby creation, best practice is to create the database files on shared storage, ideally ASM, to facilitate conversion to RAC later.
-
Add Static Service to the Listener.
To enable Data Guard to restart instances during the course of broker operations, a service with a specific name must be statically registered with the local listener of each instance. The value for the GLOBAL_DBNAME attribute must be set to a concatenation of <db_unique_name>_DGMGRL.<db_domain>. For example, in the LISTENER.ORA file:
SID_LIST_LISTENER=(SID_LIST=(SID_DESC=(SID_NAME=sid_name)
(GLOBAL_DBNAME=db_unique_name_DGMGRL.db_domain)
(ORACLE_HOME=oracle_home)))
-
Enable Flashback Database on the Standby Database.
To allow re-instate of an old primary database as a standby database after a failover, flashback database must be enabled. Hence do so for both the primary and the standby databases.
-
To allow Enterprise Manager to monitor a Physical Standby database (which is typically in a mounted state), specify sysdba monitoring privileges. This can be specified either during the Standby creation wizard itself or post creation by modifying the Monitoring Configuration for the standby database target.
-
Verify the Physical Standby
Verify the Physical Standby database through the Enterprise Manager Console. Click the Log Switch button on the Data Guard page to switch log and verify that it is received and applied to the standby database.
18.4 Setting Up the OMS, Bi Publisher Shared Storage and Software Library Disaster Recovery
The Disaster Recovery solution for a Cloud Control deployment involves installing the Software Library, OMS installation, Agent installation and Oracle inventory on replicated filesystem. This solution can also involve configuring BI Publisher shared storage.
Standby OMSs implemented using Standby WebLogic Domain are still supported but have been deprecated and may be desupported in a future release (see My Oracle Support Note 1563541.1 for details). The recommended method for creating Standby OMSs is to use storage replication as documented in this chapter. Creating standby OMSs using a Standby WebLogic Domain is documented in Appendix I, "Standby OMSs Using Standby WebLogic Domain."
Storage Replication Requirements
Your chosen method of storage replication should support the following:
-
Snapshots and consistent filesystem copies
-
Ability to perform an on-demand replication between sites
18.4.1 Management Service Disaster Recovery
-
Ensure that the primary OMS host names are resolvable to the IP addresses of the corresponding standby hosts at the standby site. This can be achieved in either of the following ways:
-
By installing OMSs at the primary site using physical host names and configuring aliases for these host names on the corresponding hosts at the standby site.
-
By installing each OMS using an alias host name that can be configured at both the primary and standby sites.
Host name resolution at each site can be done using either local resolution (/etc/hosts) or DNS based resolution or a combination of both.
Example /etc/hosts configurations when OMSs are installed at primary site using primary site physical host names (oms1-p.example.com and oms2-p.example.com):
Primary Site
127.0.0.1     localhost.localdomain
123.1.2.111   oms1-p.example.com  oms1-p #OMS1
123.1.2.112   oms2-p.example.com  oms2-p #
Standby Site
127.0.0.1     localhost.localdomain
123.2.2.111   oms1-s.example.com  oms1-s oms1-p.example.com #OMS1
123.2.2.112   oms2-s.example.com  oms2-s oms2-p.example.com #OMS2
Example /etc/hosts configuration when OMSs are installed using alias host names (oms1.example.com and oms2.example.com):
Primary Site
127.0.0.1     localhost.localdomain
123.1.2.111   oms1-p.example.com  oms1-p oms1.example.com #OMS1
123.1.2.112   oms2-p.example.com  oms2-p oms2.example.com #OMS2
Standby Site
127.0.0.1    localhost.localdomain
123.2.2.111  oms1-s.example.com  oms1-s oms1.example.com #OMS1
123.2.2.112  oms2-s.example.com  oms2-s oms2.example.com #OMS2
If the network has been configured correctly, a ping of the OMS host name from the primary site should result in a reply from the primary host, and a ping of the OMS host name from the standby site should result in a reply from the standby host.
Example
Ping results from primary site (reply from primary site):
[oracle@oms1-p ~]$ ping oms1-p.example.com
PING oms1-p.example.com (123.1.2.111) 56(84) bytes of data.
64 bytes from oms1-p.example.com (123.1.2.111): icmp_seq=1 ttl=64 time=0.018 ms
64 bytes from oms1-p.example.com (123.1.2.111): icmp_seq=2 ttl=64 time=0.020 ms
64 bytes from oms1-p.example.com (123.1.2.111): icmp_seq=3 ttl=64 time=0.022 ms
Ping results from standby site (reply from standby site)
[oracle@oms1-s ~]$ ping oms1-p.example.com
PING oms1-s.example.com (123.2.2.111) 56(84) bytes of data.
64 bytes from oms1-s.example.com (123.2.2.111): icmp_seq=1 ttl=64 time=0.018 ms
64 bytes from oms1-s.example.com (123.2.2.111): icmp_seq=2 ttl=64 time=0.020 ms
64 bytes from oms1-s.example.com (123.2.2.111): icmp_seq=3 ttl=64 time=0.022 ms
-
-
Ensure that the OMS installation, Agent Installation and Oracle Inventory for each OMS at the primary site is placed on replicated storage. This can either be done by specifying replicated storage during OMS installation or by moving these components onto replicated storage after installation.
Note:
If the components are moved to shared storage after installation they must retain their original pathnames. -
Configure an application virtual host name in DNS to point to Primary site.
-
If there is a single OMS at the primary site the DNS entry for the application virtual host name should point to this OMS.
-
If there are multiple OMSs at the primary site the DNS entry for the application virtual host name should point to the SLB.
-
This host name should be configured with a short TTL value (30-60 seconds) so that it will not be cached by clients for extended periods.
-
-
Configure SLB at the standby site (only required if multiple OMSs are required at the standby site). See "Configuring a Load Balancer" for more information. The SLB pools on the standby site will reference the IP addresses of the standby OMS hosts.
-
Resecure all Agents and OMSs using application virtual host name.
Examples
For OMS
emctl secure oms -sysman_pwd <sysman_pwd>
  -reg_pwd <agent_reg_password>
  -host em.example.com
  -secure_port 4900
  -slb_port 4900
  -slb_console_port 443
  -console
  -lock_upload  -lock_console
For Agent
emctl secure agent -emdWalletSrcUrl https://em.example.com:4901/em
-
Configure the storage replication schedule for as frequently as the network infrastructure will allow (minimum every 24 hours).
Note:
Refer to your storage/network documentation to determine a replication schedule that maximizes the resource utilization performance of your network infrastructure. -
Move HTTP Lock files to local filesystem. See the Enterprise Manager Cloud Control Advanced Installation and Configuration Guide for more information.
18.4.2 Monitoring Standby OMS Hosts
Monitoring the availability of the standby OMS hosts is necessary to ensure that they are ready for switchover/failover operations. In order to monitor these hosts, Agents should be deployed to local file systems on each standby OMS host.To avoid conflicts with the components that will be started on the standby site after a switchover/failover, when deploying Agents on the standby OMS hosts the following points should be considered:
-
The Agents deployed to the standby OMS hosts should not use the replicated Oracle Inventory. They should be installed using a local inventory that does not include the replicated OMS and Agent installs.
-
The Agents deployed to the standby OMS hosts should be deployed on a different port to that used by the replicated Agents. This will avoid port conflicts when the replicated OMS and Agent are started on the standby OMS host.
-
Regardless of which network topology is used (aliases at both sites or aliases only at the standby site), these Agents should be deployed using the physical hostnames of the standby OMS hosts.
-
These Agents should be deployed into a separate inventory so that they are kept apart from the inventory used for the OMS installation.
-
After deploying Agents to the standby OMS hosts, confirm that all OMS Agents (those installed with alias host names on replicated storage and those installed with physical host names on local storage) are configured consistently with the same time zone. See Changing the Management Agent Time Zone in the Enterprise Manager Cloud Control Administrator's Guide for details on changing the agent time zone.
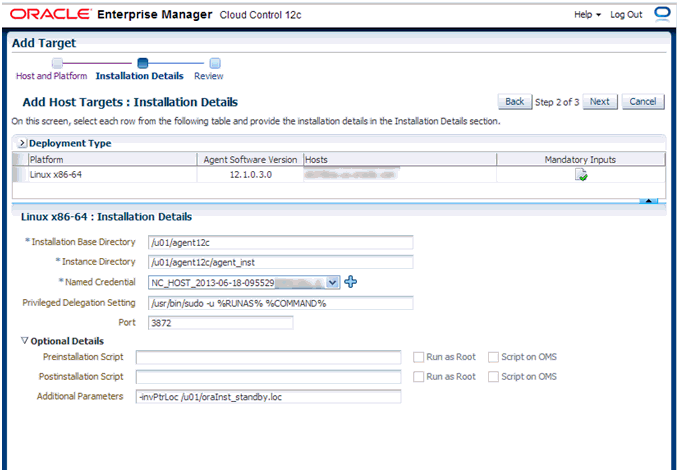
To specify an inventory location for Agent installation, an inventory pointer file can be created and the -invPtrLoc flag can be used during installation.
The following example shows an inventory pointer file that specifies the inventory location as /u01/oraInventory_standby
more /u01/oraInst_standby.loc

inventory_loc=/u01/oraInventory_standbyinst_group=dba
The -invPtrLoc flag can then be passed during Agent installation.
18.4.3 Software Library Disaster Recovery
-
The Software Library should be located on a file system that is replicated using storage replication. If the Software Library is currently located on another file system it can be migrated using the 'Migrate and Remove' option in the Software Library Administration page.
See the chapter on Configuring a Software Library in the Enterprise Manager Cloud Control Administrator's Guide for more information.
-
Configure the storage replication schedule for as frequently as the network infrastructure as the network infrastructure will allow. Oracle recommends continuous replication to occur every 2 hours (minimum).
18.4.4 BI Publisher Shared Storage Disaster Recovery
If BI Publisher has been configured then the BI Publisher shared storage must also participate in the disaster recovery scenarios.
-
The BI Publisher shared storage location should be located on a filesystem that is replicated using storage replication.
-
Configure the storage replication schedule for as frequently as the network infrastructure as the network infrastructure will allow. Oracle recommends continuous replication to occur every 2 hours (minimum).
18.4.5 Migrating an Existing Site to Shared Storage
Note:
You can migrate from your existing site to a shared storage file system even if you want to use Level 4 of the high-availability solution for your existing environment.-
Use file system backups to move existing OMS and agent installations to shared storage.
-
Use the following guidelines to migrate from local file system to shared storage
-
All backups must be offline backups, i.e. OMS and agent processes on a host must be shut down completed before backing up and restoring.
-
The backups must be performed as root user and permissions must be preserved.
-
The directory paths for Middleware Home and Instance Home must not change.
-
The migration can be done in a rolling fashion to avoid complete downtime of Cloud Control.
-
-
Use the process documented in "Removing (and Migrating) Software Library Storage Location" to move the software library to shared storage.
18.5 Performing Switchover and Failover Operations
Activating the standby site can take place either by using a switchover or a failover. These are used in different situations as described below:
-
Switchover - A pre-planned role reversal of the primary and standby sites. In a switchover, functionality is transferred from the primary site to a standby site in an orderly, coordinated operation. As such, both sites must be available for a switchover to complete. Switchover is usually performed for testing and validation of Disaster Recovery (DR) scenarios and for planned maintenance activities on the primary infrastructure. A switchover is the preferred method of activating the standby site as the primary.
-
Failover - Activation of the standby site as the primary site when the original primary site becomes unavailable.
Note:
If BI Publisher is configured in your environment, and if your disaster recovery approach uses Standby OMSs using Storage Replication as discussed in this chapter, BI Publisher will be functional on the standby site when switchover/failover occurs.Note:
If an error is encountered unmounting the OMS filesystem as part of a switchover or failover operation, it may be because Oracle Configuration Manager (OCM) is configured and running from the OMS home. If OCM is running, it should be stopped before unmounting the OMS filesystem. To check OCM status, run the following command:<OMS_HOME>/ccr/bin/emCCR status.
To stop OCM, run the following command:
<OMS_HOME>/ccr/bin/emCCR stop.
To start OCM after a switchover or failover, run the following command:
<OMS_HOME>/ccr/bin/emCCR start.
18.5.1 Switchover Procedure
This section describes the steps to switchover to the standby site. The same procedure is applied to switchover in either direction.
-
Shut down all OMS components at the primary site.
-
Shut down all virtual Management Agents at the primary site.
-
Unmount the OMS filesystem and the software library filesystems from OMS hosts at the primary site.
-
Perform on-demand replication of OMS and software library filesystems.
Note:
Refer to your storage documentation for steps required to perform an on-demand replication. -
Update DNS entry for the application virtual hostname.
-
Switchover Oracle Database using Data Guard switchover.
Use DGMGRL to perform a switchover to the standby database. The command can be run on the primary site or the standby site. The switchover command verifies the states of the primary database and the standby database, affects switchover of roles, restarts the old primary database, and sets it up as the new standby database.
SWITCHOVER TO <standby database name>;Verify the post switchover states. To monitor a standby database completely, the user monitoring the database must have SYSDBA privileges. This privilege is required because the standby database is in a mounted-only state. A best practice is to ensure that the users monitoring the primary and standby databases have SYSDBA privileges for both databases.
SHOW CONFIGURATION;SHOW DATABASE <primary database name>;SHOW DATABASE <standby database name>; -
Perform role reversal of the Software Library and OMS storage (refer to your storage documentation for instructions).
-
Re-enable replication schedules for SWLIB and OMS storage.
If BI Publisher has been configured, re-enable replication schedules for the BI Publisher shared storage location.
-
Mount OMS and Software Library filesystems on OMS hosts at Standby site.
If BI publisher has been configured, mount the BI Publisher shared storage filesystems on OMS hosts at the standby site.
-
Start the first OMS Admin Server at the standby site.
Note:
This step is not required if using a connection string that works from both primary and standby sites, such as by using SCAN addresses and Role-Based Database Services as described in Section 18.2.3, "Database Considerations." -
Point OMS to new Primary Repository Database using the following command:
emctl config oms -store_repos_details -repos_conndesc <connect descriptor> -repos_user <username>
Example
emctl config oms -store_repos_details -repos_conndesc '(DESCRIPTION=(ADDRESS_LIST=(ADDRESS=(PROTOCOL=TCP)(HOST=newscan.domain)(PORT=1521)))(CONNECT_DATA=(SERVICE_NAME=emreps.domain)))' -repos_user SYSMAN
Note:
This step is not required if using a connection string that works from both primary and standby sites, such as by using SCAN addresses and Role-Based Database Services as described in Section 18.2.3, "Database Considerations."This step should be repeated on each OMS.
-
Start the OMSs at the standby site.
-
Start the Management Agents at the standby site using the following command:
emctl start agent
-
Relocate Management Services and Repository target using the following command:
emctl config emrep -agent <agent name> -conn_desc <repository connection>
The Management Services and Management Repository target is monitored by a Management Agent on one of the Management Services on the primary site. To ensure that the target is monitored after switchover/failover, relocate the target to a Management Agent on the standby site by running the following command on one of the Management Service standby sites.
Note:
This step is not required if the following two conditions are met:-
Using a Repository Connect Descriptor that works from both primary and standby sites, such as by using SCAN addresses and Role-Based Database Services. Under this condition, the connection descriptor does not need to be updated in order to monitor the Management Services and Management Repository target.
-
Management Services and Management Repository target is monitored by a Management Agent installed on replicated storage using an Alias Host Name. Under this condition, the same agent will now be running on the standby site; therefore a different Agent does not need to be configured.
-
-
Update the URI for the WebLogic Admin Console from within Cloud Control.
Navigate to the target homepage for GCDomain. From the WebLogic Domain menu, select Target Setup, and then Monitoring Configuration.
18.5.2 Failover Procedure
This section describes the steps to failover to the standby site, recover the Enterprise Manager application state by resynchronizing the Management Repository database with all Management Agents, and finally enabling the original primary database
-
Shut down all OMS components at the primary site if running.
-
Shut down all virtual agents at primary site if running.
-
Unmount OMS and Software Library filesystems from OMS hosts at primary site.
If BI Publisher has been configured, umount the BI Publisher shared storage filesystem from OMS hosts at the primary site.
-
Perform on-demand replication of the OMS and Software Library file systems. (Depending on the type of failure encountered this may not be possible.) If BI Publisher has been configured, also perform an on-demand replication of the BI Publisher shared storage filesystem.
Note:
Refer to your storage documentation for steps required to perform an on-demand replication. -
Update the DNS entry for the application virtual hostname.
-
Failover Oracle Database using Data Guard failover.
-
Perform role reversal of Software Library and OMS storage.
-
Re-enable replication schedules for SWLIB and OMS storage
-
Mount the OMS and Software Library filesystems on OMS hosts at the standby site
-
Start the first OMS Admin Server.
Note:
This step is not required if the following two conditions are met:-
Using a Repository Connect Descriptor that works from both primary and standby sites, such as by using SCAN addresses and Role-Based Database Services.
-
Running in Data Guard Maximum Protection or Maximum Availability level as there is no data loss on failover.
-
-
Modify the OMS connect descriptor to point to the new Primary Repository Database.
emctl config oms -store_repos_details -repos_conndesc <connect descriptor> -repos_user <username>
Example
emctl config oms -store_repos_details -repos_conndesc '(DESCRIPTION=(ADDRESS_LIST=(ADDRESS=(PROTOCOL=TCP)(HOST=newscan.domain)(PORT=1521)))(CONNECT_DATA=(SERVICE_NAME=emreps.domain)))' -repos_user SYSMAN
Note:
This step is not required if using a Repository Connect Descriptor that works from both primary and standby sites, such as by using SCAN addresses and Role-Based Database Services.This step should be repeated on each OMS.
-
Perform a Repository Resynchronization to resync the Agents with the new Primary database.
Skip this step if you are running in Data Guard Maximum Protection or Maximum Availability level as there is no data loss on failover. However, if there is data loss, synchronize the new primary database with all Management Agents.
On any one Management Service on the standby site, run the following command:
emctl resync repos -full -name "<name for recovery action>"This command submits a resync job that is executed on each Management Agent when the Management Services on the standby site are brought up.
-
Start the Agents at the standby site.
-
Start the OMSs at the standby site.
-
Modify Management Services and Repository target connect descriptor.
From the Setup menu, select Manage Cloud Control and then Health Overview. The Management Services and Repository page displays. From the OMS and Repository menu, select Target Setup and then Monitoring Configuration.
The Repository Connect Descriptor should be modified to connect to the database that is currently active.
Note:
This step is not required if using a Repository Connect Descriptor that works from both primary and standby sites, such as by using SCAN addresses and Role-Based Database Services -
Update the URI for the WebLogic Admin Console from within Cloud Control.
Navigate to the target homepage for GCDomain. From the WebLogic Domain menu, select Target Setup, and then Monitoring Configuration.
18.6 Keeping the Standby Site in Sync with the Primary
The standby site will be kept in sync with the primary automatically through the combination of Data Guard and storage replication.
The administrator should ensure that an on-demand replication to the standby site takes place before and after the following operations on the OMS or the agent:
-
Plug-in deployment/undeployment, or existing plug-in upgrade
-
Upgrade
-
Patch
-
emctl commands (other than lifecycle verbs (start/stop/status oms))
-
Configuration of ADP/JVMD/BI Publisher
Note:
Refer to your storage documentation for steps required to perform an on-demand replication.18.7 Disaster Recovery Solution with ACFS Replication
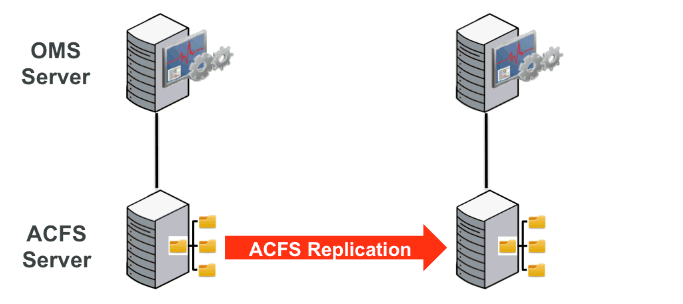
Automatic Storage Management Cluster File System (ACFS) replication enables replication of an ACFS file system across a network to a remote site. This capability is useful for providing disaster recovery capability. The following diagram shows how this feature can be leveraged to provide disaster recovery for an Enterprise Manager installation.
Configuring ACFS Replication
-
Install Grid Infrastructure and create an ACFS Server.
ACFS storage replication requires Grid Infrastructure to be installed for a Cluster, but it can also be installed using a single node (one node cluster).
-
Create an ACFS file system on the ACFS server (created in step 1) to be used for the OMS installation and Software Library.
-
Export the ACFS file system using NFS.
Disable root squash for the ACFS mount point, otherwise root.sh will not run after Enterprise Manager is installed on the client.
-
Mount the file system on a different node (to be used for the OMS) using the following options:
nfs rw,bg,hard,nointr,rsize=131072,wsize=131072,tcp,vers=3, timeo=300,actimeo=120
-
Install Enterprise Manager on the NFS (ACFS) file system.
-
Create a second ACFS server (one node cluster) with another ACFS file system to be used as a standby.
-
Establish ACFS replication between the primary and standby ACFS servers:
-
On the standby server, initiate the replication using the following command:
/sbin/acfsutil repl init standby -pby the root user.
-
Verify that the standby file system is initiated using the following command:
/sbin/acfsutil repl info -
On the primary server, initiate replication using the following command:
/sbin/acfsutil repl init primary -s -
Verify that the primary file system is initiated using the following command:
/sbin/acfsutil repl info -c
-
-
Switch over from the primary server to the standby. Refer to Section 18.5.1, "Switchover Procedure" for explicit instructions on performing the switchover operation with the following modifications:
At step 4:
Perform on-demand replication of the OMS and Software Library file systems by performing the following:
Run ACFS sync for the Enterprise Manager file system from the primary server using the following command:
/sbin/asfsutil repl sync applyAt step 7:
Perform role reversal of the Software Library and OMS storage by performing the following:
Terminate ACFS replication using the following command:
/sbin/acfsutil repl terminate standbyTo reconfigure ACFS replication, follow the instructions listed above in this section in step 7 Establish ACFS replication between the primary and standby ACFS servers.