30 Prerequisites for Discovering Oracle Identity Management Targets
This chapter lists the system requirements and prerequisites needed to discover identity management targets.
30.1 System Requirements
Table 30-1 lists the supported Oracle Identity Management products in the Management Pack Plus for Identity Management in Enterprise Manager Cloud Control 12c.
Note: For the most up-to-date list of supported platforms, check My Oracle Support Certification Matrix on My Oracle Support (http://support.oracle.com).
Table 30-1 Supported Identity Management Products and Platforms in Enterprise Manager Cloud Control
| Product | Application Server | Directory Server/Database |
|---|---|---|
|
Oracle Access Manager |
Not Applicable |
Oracle Internet Directory; Microsoft Active Directory |
|
Oracle Access Manager |
Oracle WebLogic Server |
Oracle Database |
|
Oracle Adaptive Access Manager |
Oracle WebLogic Server |
Oracle Database |
|
Oracle Directory Integration Platform |
Oracle WebLogic Server |
Oracle Database |
|
Oracle Directory Server Enterprise Edition |
Not Applicable |
Not Applicable |
|
Oracle Identity Federation |
Oracle Application Server |
Oracle Internet Directory |
|
Oracle Identity Federation |
Oracle WebLogic Server |
Oracle Internet Directory |
|
Oracle Identity Management Suite - Delegated Administration Services |
Oracle Application Server |
Oracle Database |
|
Oracle Identity Management Suite - Directory Integration Platform |
Oracle Application Server |
Oracle Database |
|
Oracle Identity Management Suite - Oracle Internet Directory |
Oracle Application Server |
Oracle Database |
|
Oracle Identity Management Suite - Single Sign-On Server |
Oracle Application Server |
Oracle Database |
|
Oracle Identity Manager |
Oracle WebLogic Server |
Oracle Database |
|
Oracle Identity Manager |
Oracle WebLogic Server; Oracle SOA Suite |
Oracle Database |
|
Oracle Internet Directory |
Oracle WebLogic Server |
Oracle Database |
|
Oracle Unified Directory |
Not Applicable |
Not Applicable |
|
Oracle Virtual Directory |
Oracle WebLogic Server |
Not Applicable |
30.2 Installing Oracle Enterprise Manager Cloud Control 12c
Before you begin configuring Cloud Control 12c to manage your Identity Management components, you must install and configure Cloud Control 12c on at least one host computer on your network. Oracle recommends that you install Cloud Control on dedicated host(s).
For example, if the Identity Management components are installed on emHost1.example.com, then install and configure the Oracle Management Service and Oracle Management Repository on emHost2.example.com. Install the Cloud Control 12c Management Agent on every host that includes the components you want to manage with Cloud Control.
See Also:
Oracle Enterprise Manager Cloud Control Basic Installation Guide
All documentation files can be accessed on the Oracle OTN website: http://docs.oracle.com/cd/E24628_01/nav/portal_booklist.htm
30.3 Prerequisites for Discovering Identity Management Targets in Enterprise Manager
Before you start monitoring Oracle Identity Management targets in Enterprise Manager, you must perform the following tasks:
-
Install Cloud Control 12c Agent on each of the hosts that run Oracle Identity Management components.
If you would like to monitor additional targets, such as Oracle Application Server, Oracle WebLogic Server, JBoss Application Server, MS Active Directory, MS IIS and databases supporting Oracle Identity Management, and you have the proper license for monitoring these targets, then install Cloud Control 12c Management Agent on these hosts as well.
-
Deploy the "Oracle Fusion Middleware" plug-in on the agents running on the hosts for Oracle Identity Management.
-
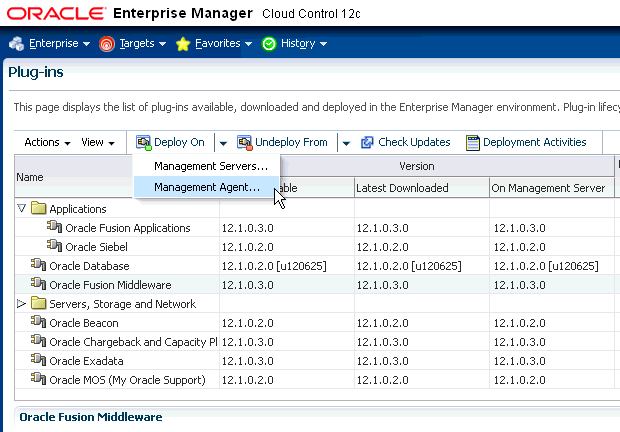
Log in to Enterprise Manager. Navigate to Setup, select Extensibility, then select Plugins.
-
Select Oracle Fusion Middleware plug-in and ensure that it has been deployed on the agents running on the hosts for Oracle Identity Management. See Figure 30-1.
-
-
After Enterprise Manager Cloud Control OMS and Management Agents are installed, complete the following steps before initiating the discovery process:
Oracle Access Manager 10.1.4.2, 10.1.4.3.0
-
Install Oracle Access Manager SNMP Agent on each of the hosts where the Oracle Access Manager Access Server and Identity Server are running. The SNMP Agent collects performance metrics and configuration parameters for the Oracle Access Manager Access Server and Identity Server, allowing you to monitor the various Oracle Access Manager components through Enterprise Manager Cloud Control. Refer to the Oracle Access Manager Installation Guide for instructions on installing the SNMP Agent (
https://download.oracle.com/docs/cd/B28196_01/idmanage.1014/b25353/snmp.htm#CHDFBJJC). -
Configure the SNMP Agent and specify the Management Agent's UDP and TCP Ports as well as the SNMP Agent Community Name. Make sure that you record the SNMP Agent UDP Port and Community Name, because these details will be needed in the discovery process. Refer to the Oracle Access Manager Installation Guide for instructions on configuring the SNMP Agent (
https://download.oracle.com/docs/cd/B28196_01/idmanage.1014/b25353/snmp.htm#CEGEIIFI).Also, refer to the Oracle Access Manager Identity and Common Administration Guide for instructions on setting up the SNMP Agent (
https://download.oracle.com/docs/cd/B28196_01/idmanage.1014/b25343/snmpmntr.htm#CEGHHDBC). -
Enable SNMP monitoring for both the Oracle Access Manager Access Server and Oracle Access Manager Identity Server by completing the following tasks:
-
From the Identity (or Access) System Console, select System Configuration, Identity Server (or Access Server).
-
Click a link for a particular server.
-
Click Modify to display the page where you can turn SNMP monitoring on or off. Click the SNMP State On button at the bottom of the page to turn on the collection of SNMP statistics.
-
In the SNMP Agent Registration Port field, enter the port number to define or change the port on which the SNMP Agent listens.
-
Restart the Identity Server (or Access Server).
Refer the Oracle Access Manager Identity and Common Administration Guide for instructions on setting up the SNMP Agent (
https://download.oracle.com/docs/cd/B28196_01/idmanage.1014/b25343/snmpmntr.htm#BABFFDDA). -
-
Complete all the configuration steps for the Oracle Access Manager Identity Server and Oracle Access Manager Access Server. Ensure that the communication details and the directory server details are defined so that Enterprise Manager can discover the topology of your Oracle Access Manager environment.
Refer to the Oracle Access Manager Installation Guide for instructions on configuring the Identity Server (
https://download.oracle.com/docs/cd/B28196_01/idmanage.1014/b25353/id_setup.htm#CHDHIBIB) and the Access Server (https://download.oracle.com/docs/cd/B28196_01/idmanage.1014/b25353/a_srvr.htm#BGBEFBBD). -
If you plan to monitor the directory server through Oracle Enterprise Manager Cloud Control, then ensure that the directory server is appropriately discovered in Enterprise Manger before moving on to the discovery of Oracle Access Manager Identity Server and Oracle Access Manager Access Server. Complete the following tasks to discover the supported directory servers:
-
Oracle Internet Directory 10.1.4
Discovery of Oracle Identity Management Suite 10g (including Oracle Internet Directory, Directory Integration Platform, Delegated Administration Server, and Single Sign-On Server) can be done using the discovery wizard on the Middleware page. From the Middleware page, select Oracle Application Server from the Add menu. For more information, refer to the Discovering Oracle Identity Management Suite 10.1.4.2, 10.1.4.3.0 section.
-
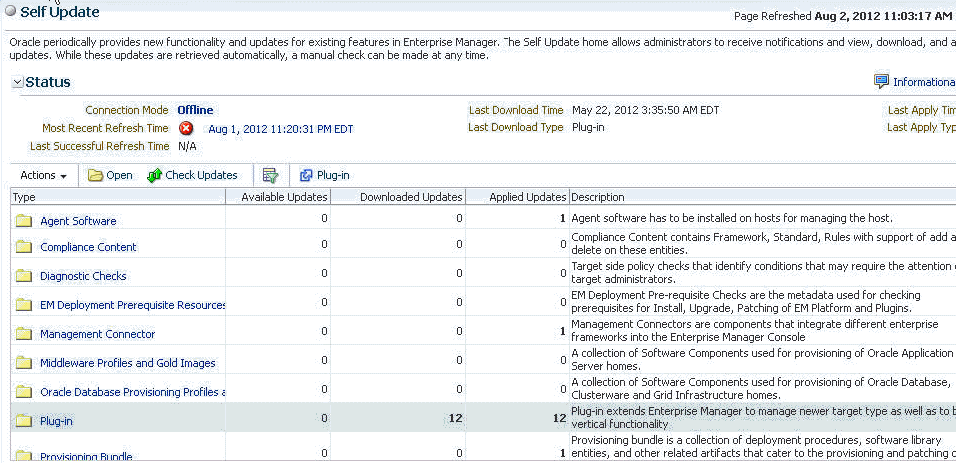
Self Update
Use the Self Update option in Enterprise Manager to get the plug-in.
1) From the Setup menu, select Extensibility, then select Self Update.
2) Click Plug-in and select the available plug-in for Microsoft Active Directory or other non-Oracle products that need to be monitored. See Figure 30-2.
-
Oracle Identity Federation 10.1.4.2, 10.1.4.3.0
-
Complete all the configuration steps for the Oracle Identity Federation. Ensure that the Federation Data Store details and User Data Store details are defined so that Enterprise Manager can discover the topology of your Oracle Identity Federation environment.
Refer to the Oracle Identity Federation Administrator's Guide for instructions on configuring the Identity Federation (
https://download.oracle.com/docs/cd/B28196_01/idmanage.1014/b25355/configuring.htm#BCGDGAAJ). -
Discover the Oracle Application Server on which Oracle Identity Federation is deployed in Enterprise Manager Cloud Control. Complete the following steps to discover Oracle Application Server in Cloud Control:
-
Log in to Enterprise Manager. Select Target, then select Middleware.
-
From the Add menu, select Oracle Application Server.
-
Enter the information requested for Oracle Application Server. Click Next once all the information requested is entered.
-
-
If you plan to monitor the directory server through Oracle Enterprise Manager Cloud Control, then ensure that the directory server is appropriately discovered in Enterprise Manger before moving on to the discovery of Oracle Identity Federation Server. Complete the following tasks to discover the supported directory servers:
-
Oracle Internet Directory 10.1.4
Discovery of Oracle Identity Management Suite 10g (including Oracle Internet Directory, Directory Integration Platform, Delegated Administration Server, and Single Sign-On Server) can be done using the discovery wizard on the Middleware page.
From the Middleware page, select Oracle Application Server from the Add menu. For more information, refer to the Discovering Oracle Identity Management Suite 10.1.4.2, 10.1.4.3.0 section.
-
-
If Oracle Database is used for the User Data Store, ensure that the database instance is discovered in Enterprise Manager Cloud Control before moving on to the discovery of the Oracle Identity Federation Server. Complete the following steps to discover Oracle Database Instance in Cloud Control:
-
Log in to Enterprise Manager. Select Targets, then select Databases.
-
Select Add from the Search List view.
-
Enter the information requested for the Database Instance. Click Next once all the information requested is entered.
-
Oracle Identity Manager 9.1.0.1
-
Complete all the configuration steps for Oracle Identity Manager. Ensure that the application server and database are appropriately set up and configured for Oracle Identity Manager.
Refer to the Oracle Identity Manager Installation and Upgrade Guide for instructions on configuring Oracle Identity Manager (
https://download.oracle.com/docs/cd/B31081_01/index.htm). -
Discover the application server on which Oracle Identity Manager is deployed in Enterprise Manager Cloud Control.
Note:
To verify whether the version of your third-party software for Oracle Identity Manager is supported in Oracle Enterprise Manager Cloud Control, refer to the certification matrix located on My Oracle Support (https://support.oracle.com).Complete the following steps to discover the supported application servers:
-
JBoss Application Server Version 4.0.2:
Log in to Enterprise Manager. Select Targets, then select Middleware.
From the Add menu, select JBoss Application Server.
Enter the information requested for the JBoss Application Server. Click Next once all the information requested is entered.
-
Oracle WebLogic Application Server Version 7.x and 8.x:
Log in to Enterprise Manager. Select Targets, then select Middleware.
From the Add menu, select Oracle WebLogic Domain 7.x and 8.x.
Enter the information requested for the WebLogic Application Server. Click Next once all information requested is entered.
-
Oracle WebLogic Application Server Version 10.x and later:
Log in to Enterprise Manager. Select Targets, then select Middleware.
From the Add menu, select Oracle Fusion Middleware/WebLogic Domain.
Enter the information requested for WebLogic Domain. Click Continue once all information requested is entered
-
WebSphere Application Server:
Log in to Enterprise Manager. Select Targets, then select Middleware.
From the Add menu, select IBM WebSphere Application Server.
Enter the information requested for the WebSphere Application Server. Click Next once all information requested is entered.
-
-
If Oracle Database is used for Oracle Identity Manager, ensure that the database instance is discovered in Enterprise Manager Cloud Control before moving on to the discovery of the Oracle Identity Manager Server.
Complete the following steps to discover Oracle Database Instance in Cloud Control:
Log in to Enterprise Manager. Select Targets, then select Database.
Select Add from the Search List view.
Enter the information requested for the Database Instance. Click Next once all information requested is entered.
-