4 Post-Deployment Configuration
This chapter describes the tasks to complete after the Management Agent is successfully deployed.
The following topics are described in this chapter:
4.1 Setting up the JDBC Driver
Follow the steps below to set up jConnect for the Sybase Adaptive Server plug-in:
-
Download the jConnect JDBC driver version 7.0.
-
Go to the SAP web site:
https://support.sap.com/swdc
-
Log in with your active SAP support credentials.
-
On the left side of the page, select Databases.
-
Select SAP Adaptive Server Enterprise.
-
Re-authenticate with your SAP support credentials.
-
Select Database Patches.
-
Select SAP ASE FOR BUSINESS SUITE.
-
Select SAP ASE 16 DBCLIENT BUS.SUITE
-
Select the appropriate platform for where the driver will be placed (Oracle Management Agent host):
- AIX 64-bit
- HP-UX on IA64 64-bit
- Linux on x86_64 64-bit
- Oracle Solaris on SPARC 64-bit
- Windows on x64 64-bit
-
Check the box for ASEBC1600002 and click Add to Download Basket.
-
Re-authenticate with your SAP support credentials. Close the pop-up dialog box once added to Download Basket.
-
Click Maintain Download Basket.
-
In the pop-up windows, click ASEBC1600002 in the description column.
-
The file
ASEBC1600002_0-20012477.SARwill begin downloading in your web browser. -
Extract the downloaded
.sarfile with SAP'ssapcar.exeextraction utility. This must be done on a Windows host. See Downloading SAPCAR for details. -
After extracting the
.sarfile, thejconn4.jarfile should be located in thesybjdbc\jconn4.jardirectory.
-
-
If it does not already exist, create a
$ORACLE_HOME/plugins/dependencies/oracle.em.ssad/jdbcdriver/directory. -
Copy the JDBC driver file (
jConn.jar) into the$ORACLE_HOME/plugins/dependencies/oracle.em.ssad/jdbcdriver/directory.
4.1.1 Downloading SAPCAR
Follow the steps below to download SAPCAR:
-
Go to the SAP web site:
https://support.sap.com/swdc
-
Log in with your active SAP support credentials.
-
On the left side of the page, select Support Packages and Patches.
-
Select Browse by.
-
Select Additional Components.
-
Select SAPCAR.
-
Select SAPCAR 7.21.
-
Select the platform used for extracting the
.sarfile:-
AIX 64bit
-
HP-UX on IA64 64bit
-
HP-UX on PA-RISC 64bit
-
Linux on IA32 32bit
-
Linux on IA64 64bit
-
Linux on Power 64bit
-
Linux on x86_64 64bit
-
Linux on zSeries 64bit
-
OS/400
-
Solaris on SPARC 64bit
-
Solaris on x86_64 64bit
-
Windows Server on IA32 32bit
-
Windows on IA64 64bit
-
Windows on x64 64bit
-
z/OS 64bit
-
-
Check the box for SAPCAR_0-80000935.EXE and select Add to Download Basket.
-
Select Maintain Download Basket.
-
Click SAPCAR in the Description column to begin the download of the
SAPCAR_0-80000935.EXEfile. You may need to re-authenticate with your SAP support credentials. -
Copy the
SAPCAR_0-80000935.EXEandASEBC1600002_0-20012477.SARfiles to the host system. -
Run the
sapcar.execommand to extract the.sarfile. For example:# ./SAPCAR_0-80000935.EXE -xvf ASEBC1600002_0-20012477.SAR
-
In the extracted folder
sybjdbc, copyjconn4.jarand move to the appropriate plug-in JDBC path.
4.2 Configure TCP/IP Port Information
The following sections provide information you require to enable the TCP/IP port and to find the TCP/IP port for a particular Sybase ASE instance:
4.2.1 Enabling the TCP/IP Port
For all editions of Sybase Adaptive Server Enterprise
-
From the Sybase Adaptive Server Configuration Manager, select Sybase Adaptive Server Network Configuration in the left panel and navigate to the Sybase Adaptive Server instance.
The right panel displays all protocols for the specified Sybase Adaptive Server instance and their status.
-
Ensure that TCP/IP is enabled.
-
(If TCP/IP is disabled), right-click TCP/IP and select Properties. The TCP/IP Properties dialog box appears.
-
In the Protocol tab, select enabled, and click Apply.
-
Restart the Sybase Adaptive Server instance.
4.3 Adding Instances for Monitoring
After successfully deploying the plug-in, follow these steps to add the plug-in target to Cloud Control for central monitoring and management:
-
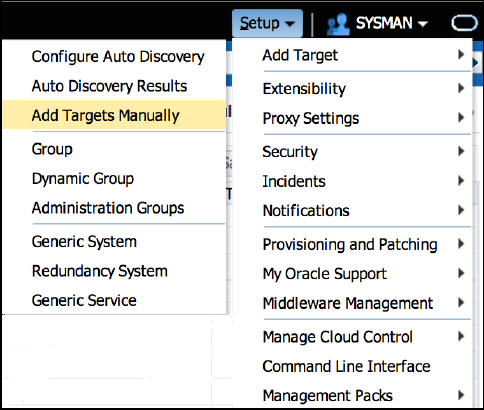
From the Setup menu, select Add Target and then Add Targets Manually as shown in Figure 4-1:
-
In the Add Targets Manually page (Figure 4-2), select Add Targets Declaratively by Specifying Target Monitoring Properties, select Target Type as Sybase Adaptive Server Enterprise, select a Monitoring Agent and click Add Manually.
-
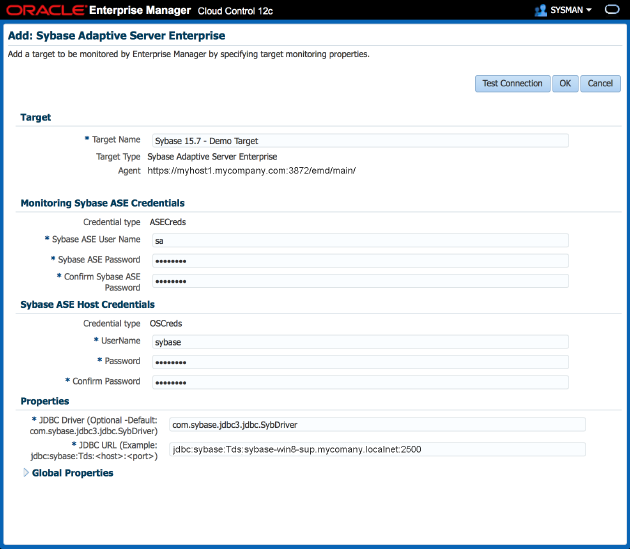
In the Add Sybase Adaptive Server Enterprise page (Figure 4-3), provide the following information for the properties:
-
Target Name: Unique target name across all the Cloud Control targets, such as
SybaseServer_Hostname. This is the display name in Cloud Control. It represents this Sybase Adaptive Server target across all user interfaces within Cloud Control. -
Monitoring Sybase ASE Credentials
-
Sybase ASE User Name: Valid user for the database in
mon_role. -
Sybase ASE Password: Corresponding password for the database user.
-
Confirm Sybase ASE Password: Confirm password entry.
-
-
Sybase ASE Host Credentials
-
User Name: Operating System account for Sybase host. This account must also be the Sybase User.
-
Password: Corresponding password for the host user name.
-
Confirm Password: Confirm password entry.
-
-
Properties
-
JDBC Driver: Optional parameter. Provide this value in the following format:
com.sybase.jdbc3.jdbc.SybDriver
-
JDBC URL: Provide the URL in the following format:
jdbc:sybase:Tds:<hostname>:<port>
For example:
jdbc:sybase:Tds:stmpi2.idc.oracle.com:5000
The JDBC URL argument represents a data source. Parameter definitions are as follows:
jdbc:sybase: Indicates that the connection is to a Sybase ASE server.
server: Fully qualified hostname or IP address of the database server.
port: TCP/IP server port number assigned to the database server, which is an integer between 0 and 65535. The default port for Sybase ASE is 5000.
-
-
-
Click Test Connection to make sure the parameters you entered are correct.

After you deploy and configure the plug-in to monitor one or more targets in the environment, you can customize the monitoring settings of the plug-in. This alters the collection intervals and threshold settings of the metrics to meet the particular needs of your environment. If you decide to disable one or more metric collections, this could impact the reports that the metric is a part of.
4.4 Verifying and Validating the Plug-in
After waiting a few minutes for the plug-in to start collecting data, use the following steps to verify and validate that Enterprise Manager is properly monitoring the plug-in target:
-
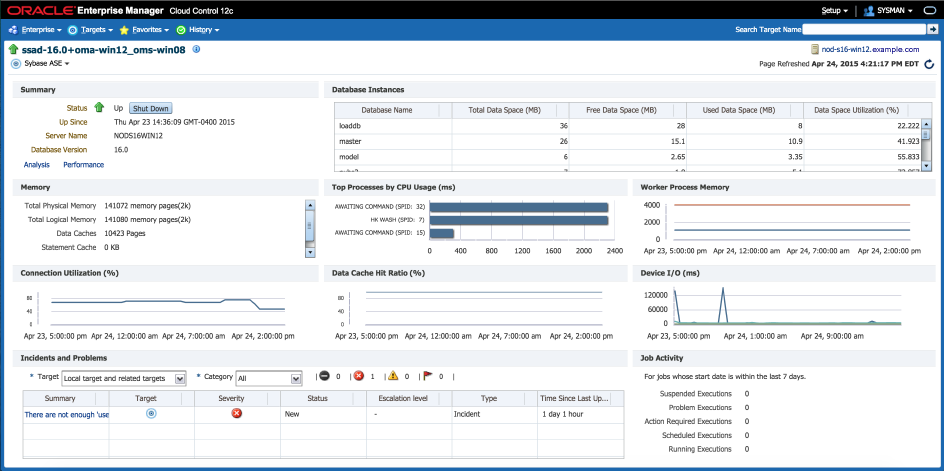
Click the Sybase Adaptive Server target link from the All Targets page. The Sybase ASE home page appears (Figure 4-4):
-
Verify that no metric collection errors are reported by clicking Monitoring and then Metric Collection Errors from the Target menu.
-
Ensure that reports can be seen and no errors are reported by clicking Information Publisher Reports in the Target menu and viewing reports for the Sybase ASE target type.
-
Ensure that configuration data can be seen by clicking Configuration and then Last Collected in the Target menu. If configuration data does not immediately appear, click Refresh in the Latest Configuration page.
-
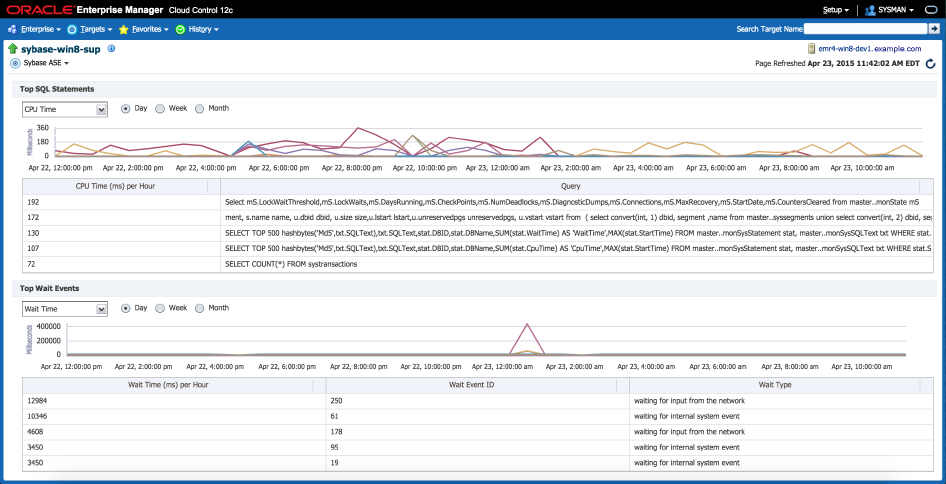
Ensure that the Analysis page can be viewed by clicking Analysis in the Target menu. The Sybase ASE Analysis page appears (Figure 4-5):
4.5 Undeploying the Plug-in
See the Plug-in Manager chapter in the Oracle Enterprise Manager Cloud Control Administrator's Guide for steps to undeploy the plug-in:
http://docs.oracle.com/cd/E24628_01/doc.121/e24473/plugin_mngr.htm