2 Configuration for the IBM DB2 Database Plug-in
This chapter provides the instructions for the configuration tasks you must complete before adding an IBM DB2 Database target to Enterprise Manager Cloud Control.
The following configuration tasks are provided:
-
Using a Suitable Operating System User and Assigning Authorities and Privileges
-
Configuring IBM DB2 for Health Indicator Metrics and Database Monitoring Metrics
2.1 Configure the Management Agent to Deploy the Plug-In
To configure the Agent, you must first ensure that the user starting the Agent service belongs to the Local Administrators Group. Also, you must set the preferred credentials on all Agents where you want to deploy the plug-in. To do so, follow the instructions given in the following sections:
2.1.1 Assigning Advanced Privileges to User
To assign advanced privileges, do the following:
-
Locally on the Microsoft Windows node hosting the Agent, check that the user starting the Agent service belongs to the Local Administrators Group. If not, add it.
-
Open the Local Security Settings Windows Tool and give the following Advanced Privileges to the user starting the Agent service:
-
Act as part of the operating system
-
Adjust memory quotas for a process
-
Logon as batch job
-
Replace a process level token
-
-
Restart the Agent service if it is running.
-
Set the Preferred Credentials for the Host and the Agent in Cloud Control. For more information, see Setting and Validating Preferred Credentials.
-
The OS user set in the Preferred Credentials must belong to the Local Administrators Group.
-
This OS user must have the following Advanced Privileges:
-
Act as part of the operating system
-
Adjust memory quotas for a process
-
Log on as batch job
-
Replace a process level token
-
-
2.1.2 Setting and Validating Preferred Credentials
To set the preferred credentials on all Agents where you want to deploy the plug-in, do the following:
-
In Enterprise Manager Cloud Control, from the Setup menu, select Security, then Preferred Credentials.
The Preferred Credentials page appears, showing a table of targets.
-
Select Host target type from the table and then click Managed Preferred Credentials.
The Host Preferred Credentials page appears.
-
In the Host Preferred Credentials page, in the Target Credentials section, select the host that is running the Management Agent where the plug-in has to be deployed, and click Set.
-
In the Select Named Credential dialog box, Select Credential as New and specify the user name and password and click Test and Save. If your test runs successfully, your credentials are set correctly.
-
Run the OS Command job for the Management Agent where the plug-in has to be deployed.
-
Log in to Enterprise Manager Cloud Control.
-
From the Enterprise menu, select Job and then Activity.
-
In the Job Activity page, from the Create Job list, select OS Command, and click Go.
-
Fill up the details required in the following pages, and click Submit to run the job. If the job runs successfully, your credentials are set correctly.
-
Note:
In order to run jobs from the UI, the target's Agent Host Preferred Credentials must be for a user that can run the db2 command-line utility and has permissions to start, stop, quiesce, and unquiesce the IBM DB2 database.2.2 Using a Suitable Operating System User and Assigning Authorities and Privileges
The System Monitoring Plug-In for IBM DB2 accesses the table functions used in IBM DB2. For the plug-in to have access to the table functions, you have to use a suitable operating system user and assign this new user to a user group. The operating system user must have at least the minimum privileges. In addition, you have to assign the correct authority levels to this user.
Note:
IBM DB2 users must be operating system users. IBM DB2 cannot have its own database users because it relies on the host operating system for security.If you do not have an operating system user already created, first, create one on the host where IBM DB2 is running. Then, follow these steps to assign this user to a new or existing UserGroup:
-
Open the IBM Data Studio.
-
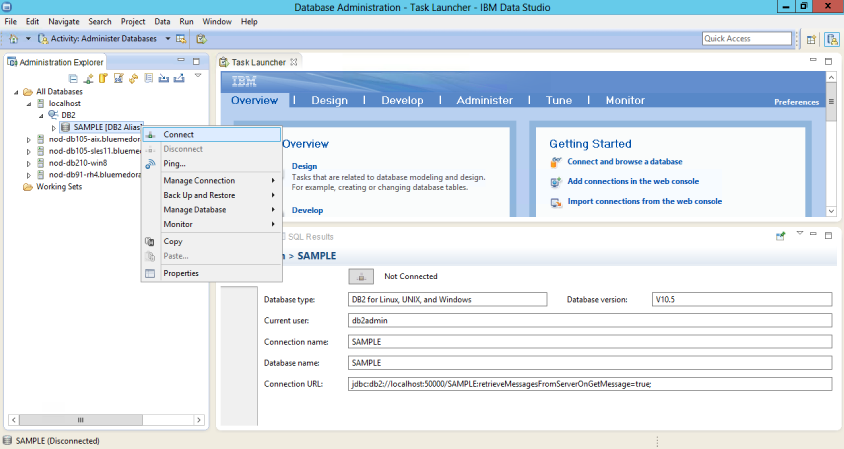
From the tree view, select the database that you wish to modify, and connect using an admin account as shown in Figure 2-1:
-
From the tree view, expand Users and Groups and select Users.
-
From the right pane, select Create a New Object.
-
In the General tab of the Properties window for the New User, enter the operating system user name.
-
From the Privileges tab, verify that the account is granted CONNECT.
-
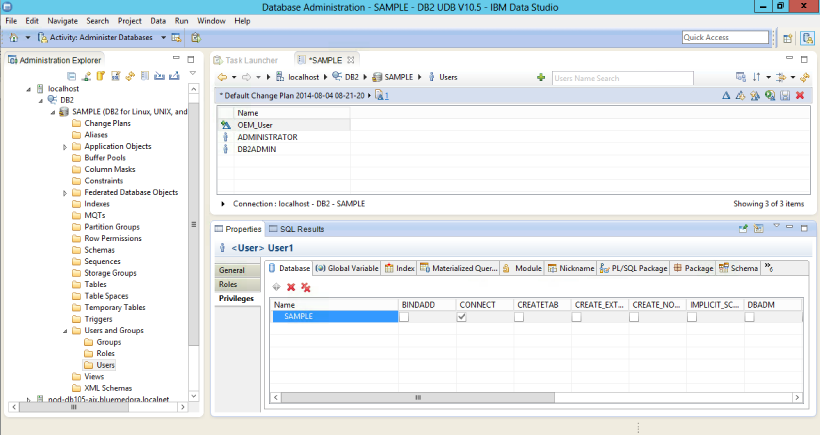
To verify the applied changes, try connecting to the database with the newly created user as shown in Figure 2-2:
Note:
These steps can also be performed from the command line using IBM DB2 SQL.Also, assign authorities and privileges for the operating system UserGroup. The authorities supported with IBM DB2 are SYSADM, SYSCTRL, SYSMAINT, DBADM, and LOAD. The SYSADM, SYSCTRL, and SYSMAINT authorities cannot be granted using the GRANT SQL statement. These special authorities can only be set from the database manager configuration file. DBADM privilege can only be granted by user at SYSADM authorization level.
SYSMON authority level is required to monitor IBM DB2. This level is required to access the table functions, such as SYSPROC.SNAPSHOT_DATABASE, which are used in IBM DB2.
Follow these steps to set SYSMON authority level to your UserGroup:
-
At the db2=> prompt, run the following commands:
db2=> update dbm cfg using sysmon_group USERGROUP
db2 => db2stop
db2 => db2start
-
To check whether the changes are effective, run the following command:
db2 => get dbm cfg
The following will be the output of the previous command:
Database Manager Configuration
Node type = Enterprise Server Edition with local and remote clients
.....
   SYSADM group name     (SYSADM_GROUP)   =
   SYSCTRL group name    (SYSCTRL_GROUP)  =
   SYSMAINT group name   (SYSMAINT_GROUP) =
   SYSMON group name     (SYSMON_GROUP)   = USERGROUP
......
Note:
To understand how authorities and privileges are implemented in IBM DB2, access the IBM website.2.3 Configuring IBM DB2 for Health Indicator Metrics and Database Monitoring Metrics
The following sections explain the post-installation configuration steps you need to perform on IBM DB2:
-
Configurations Required for Avoiding Metric Collection Errors for Database Monitoring Metrics
-
Configurations Required for Database Collection Health Indicator Metric
2.3.1 Configurations Required for Health Indicator Metrics
The health indicators for instance and database objects are enabled and disabled using the database manager configuration parameter HEALTH_MON. Then, the table functions HEALTH_TBS_HI, HEALTH_DB_HI, and HEALTH_DBM_HI get populated. These functions are used by the plug-in to show the alerts triggered based on the thresholds of health indicators.
Note:
Enabling these settings may result in some overheads, such as CPU and memory. Therefore, follow these steps only if you want to view the Health Indicator metrics.To enable or disable HEALTH_MON by CLP (Command Line Processor), run the following command:
db2==> update dbm cfg using HEALTH_MON [on;off]
To check if your changes are effective, run the following command:
db2==> get dbm cfg
The following is the output:
.....
.....
.....
Monitor health of instance and databases (HEALTH_MON) = ON
.....
..........
For more information, access the IBM website.
2.3.2 Configurations Required for Avoiding Metric Collection Errors for Database Monitoring Metrics
To avoid metric collection errors for the "Database Monitoring" metrics, make a call to the GET_DBSIZE_INFO package so that the STMG_DBSIZE_INFO table gets created and populated with the required data.
The GET_DBSIZE_INFO procedure calculates the database size and maximum capacity. The calculated values are returned as procedure output parameters and cached in the SYSTOOLS.STMG_DBSIZE_INFO table. The procedure caches these values because the calculations are costly.
The SYSTOOLS.STMG_DBSIZE_INFO table is created automatically the first time the procedure runs. If there are values cached in the SYSTOOLS.STMG_DBSIZE_INFO table and they are current enough, as determined by the snapshot-timestamp and refresh-window values, then these cached values are returned.
If the cached values are not current enough, new cached values are calculated, inserted into the SYSTOOLS.STMG_DBSIZE_INFO table and returned, and the snapshot-timestamp value is updated. The last parameter in the GET_DBSIZE_INFO call is refresh window.
Default value refresh window (time difference between successive calls) is 30 minutes. If your database is growing at a faster rate, then you can set a lower value.
To make a call to GET_DBSIZE_INFO by CLP, run the following command:
db2==>CALL GET_DBSIZE_INFO(?, ?, ?, -1)
In this case, the refresh window is 30 minutes.
For more information, access the following page on the IBM website:
http://publib.boulder.ibm.com/infocenter/db2luw/v9r5/index.jsp?topic=/com.ibm.db2.luw.sql.rtn.doc/doc/r0011863.html
2.3.3 Configurations Required for Statement Monitoring
To avoid metric collection errors for the statement monitoring metrics, run the following command at the DB2 prompt to update the database manager configuration so the switch for monitoring statements is on:
db2 => update dbm cfg using DFT_MON_STMT on
2.3.4 Configurations Required for Lock and Lock Waits Monitoring
To avoid metric collection errors for the lock and lock waits information in the analysis page, run the following command at the DB2 prompt to set up permissions so the monitoring plug-in user can query the lock waits administrative view in DB2.
For IBM DB2 Versions 9.1 and 9.5, update the database manager configuration so the switch for locks and lock waits is on:
db2 => update dvm cfg using DFT_MON_LOCK on
For IBM DB2 Versions 9.7 and above, ensure that the DB2 user has select permission on MON_LOCKWAITS administrative view, and has DATAACCESS authority. Run the following commands where '[username]' is the monitoring user name used when configuring the target:
db2 => GRANT DATAACCESS ON DATABASE TO USER [username]
db2 => GRANT SELECT on TABLE SYSIBMADM.MON_LOCKWAITS TO USER [username]
2.3.5 Configurations Required for Database Collection Health Indicator Metric
In order to see data for the Database Collection Health Indicator metric, you must enable table monitoring (DFT_MON_TABLE) on the database you are monitoring.
To enable or disable table monitoring by CLP, run the following command:
db2 => update dbm cfg using DFT_MON_TABLE [on; off]