4 Configuring Security
This chapter explains how to configure security for Business Transaction Management. You should read this chapter thoroughly, and, if you decide to configure security, you should perform the security configuration for the relevant execution environment before installing any Business Transaction Management components into it.
You can configure security for Business Transaction Management using the following mechanisms:
-
Network-level security, in which you configure your application servers to communicate over HTTPS.
For management components that communicate using HTTPS, this security mechanism provides one-way or mutual authentication, message integrity, and encryption of on-the-wire messaging data. Refer to Setting up Network-Level Security for details.
-
Business Transaction Management's built-in security for HTTP communications between Business Transaction Management components.
This security mechanism provides trust between management components that communicate using HTTP(S) and encryption of sensitive elements of their messaging data prior to serialization (that is, before being sent over the wire or stored to disk). Refer to Configuring the Business Transaction Management Assertion Secret and Encryption Key for details.
-
Business Transaction Management's built-in security for the transmission of observation messages from observers to monitors over a secure socket (SSL).
This security mechanism provides server authentication between an observer and monitor, message integrity, and encryption of observation messages sent over the wire. Refer to Setting up a Secure Socket (SSL) for Observation Messages for details.
Communication Protocols and Deployment Scenarios
Business Transaction Management is designed for use in a distributed environment. As such, some components might be deployed in remote data centers, in a DMZ, or in a network without access to a centralized database. The following table describes the type of access required between the various Business Transaction Management components and between those components and your business services.
Table 4-1 Business Transaction Management Communication Protocols
| From this Component | Required Protocol | To this Component | Description | Index to Diagrams |
|---|---|---|---|---|
|
Each central server (the Main, the Transaction, and the Performance server) |
HTTP or HTTPS |
Any other central server |
The central servers must be able to communicate with each other. The usual deployment topology will place each of these in the same network zone. |
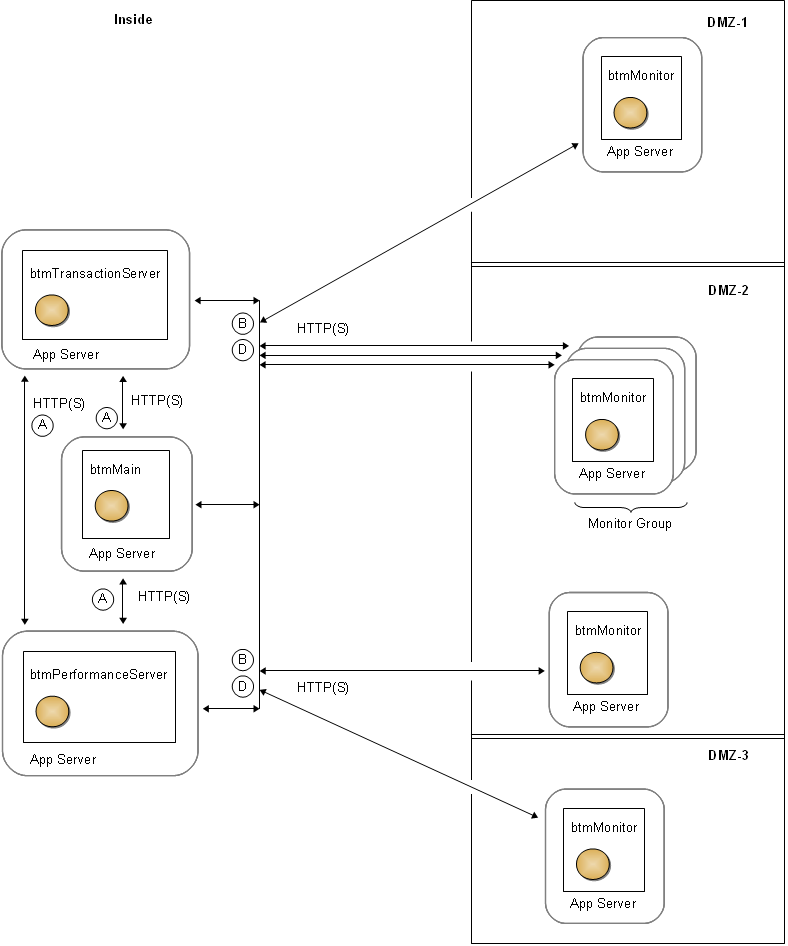
A |
|
Each central server |
HTTP or HTTPS |
All monitors |
Each of the central servers must be able to communicate with all monitors. This includes monitors that are deployed outside of the central network zone. |
B |
|
Main server |
TCP, HTTP or HTTPS |
All monitored business services |
The Main server should be able to communicate with the monitored business services to determine whether they are "alive" (up or down). Note that the precise protocol used to determine aliveness can be configured on a per-service basis. (For information on configuring this protocol, enter a service request at My Oracle Support.) |
C |
|
Each monitor |
HTTP or HTTPS |
All central servers |
Monitors must be able to communicate with each of the central servers. |
D |
|
Each monitor |
JDBC |
A Message Log Database (messageLogDB) |
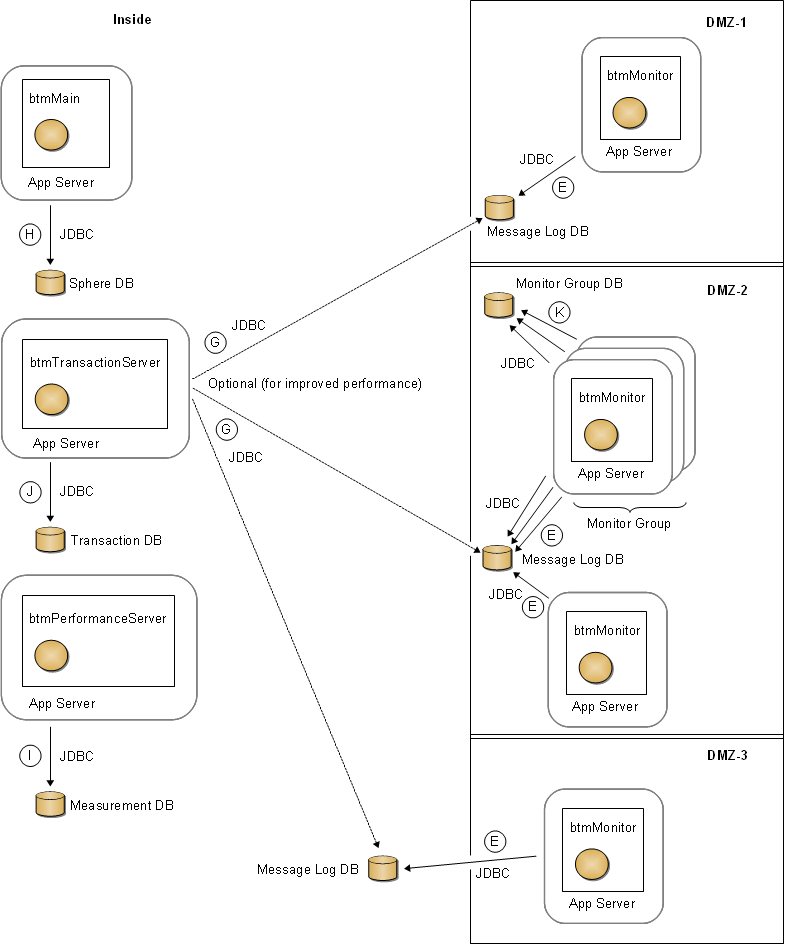
Each monitor must be able to write to, and read from, its Message Log Database using JDBC. The Message Log Database can be a single database inside a trusted network that is used by all monitors. Alternatively, if you have monitors in a DMZ or in a network without access to a centralized database, you can deploy one or more databases for the remote monitors. |
E |
|
Each observer |
TCP and HTTP or HTTPS |
Associated monitor |
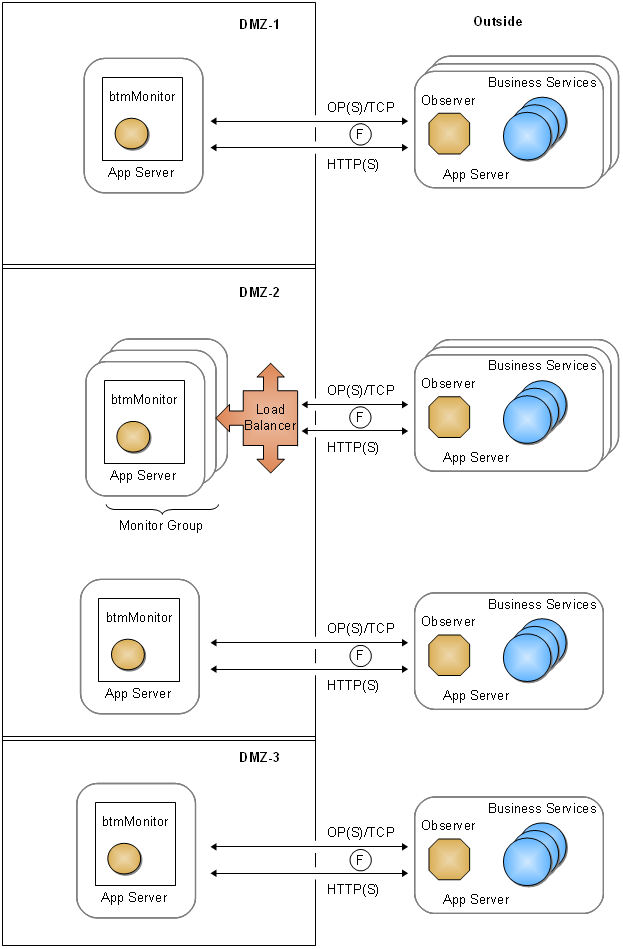
Each observer requires two connections to its associated monitor. The observer uses an HTTP(S) connection to download its configuration from the monitor. To transmit observation messages to the monitor, the observer connects using Observation Protocol (OP) over TCP or Observation Protocol Secure (OPS) over a secure socket. For monitor groups, these connections are made to the load balancer that fronts the monitor group. The socket port number is configured by way of the Observer Communication policy. |
F |
|
Transaction server |
JDBC |
All Message Log Databases |
Optional. The Transaction server does not require direct access to the Message Log Databases. However, by providing such access, you can improve the performance of message log queries. You should enable this communication channel whenever possible. |
G |
|
Main server |
JDBC |
Sphere database (sphereDB) |
The Main server must be able to write to the Sphere database using JDBC. |
H |
|
Performance |
JDBC |
Measurement database (measurementDB) |
The Performance server must be able to write to the Measurement database using JDBC. |
I |
|
Transaction |
JDBC |
Transaction database (transactionDB) |
The Transaction server must be able to write to the Transaction database using JDBC. |
J |
|
Monitor (in a monitor group) |
JDBC |
Monitor group database |
Each monitor in a particular monitor group must be able to write to the same monitor group database using JDBC. |
K |
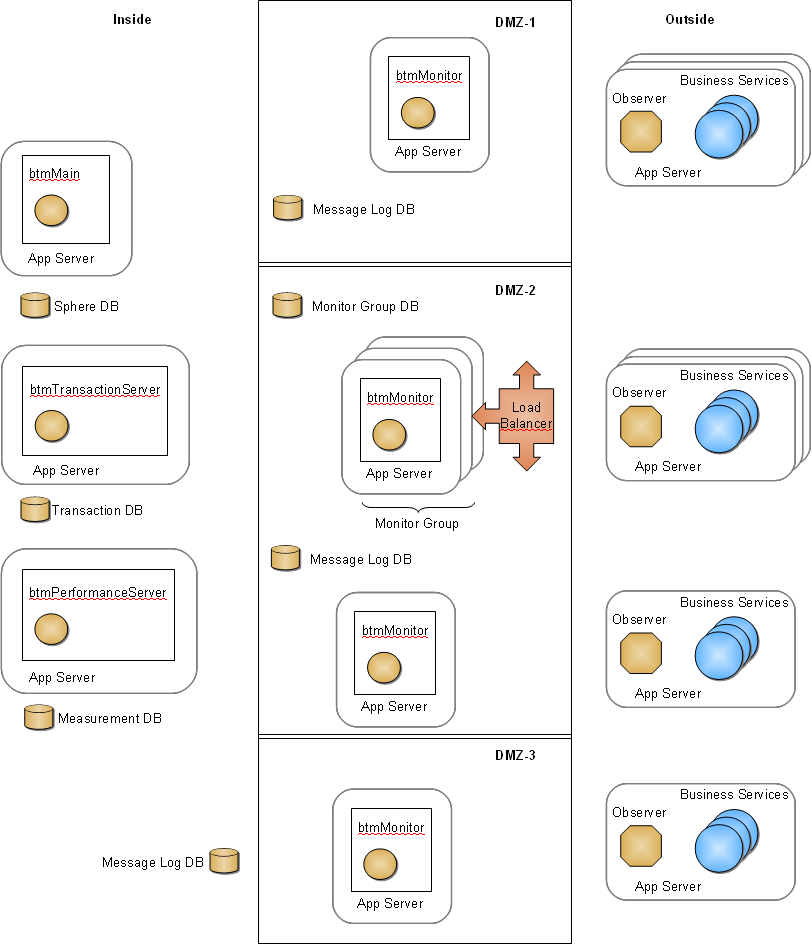
The following diagrams illustrate the type of access required by Business Transaction Management components in a variety of deployment scenarios. Note that the circled letters in the diagrams cross reference Table 4-1, "Business Transaction Management Communication Protocols".
-
Figure 4-1, "Deployed Business Transaction Management Components and Business Services"
-
Figure 4-3, "Connections Between Business Transaction Management Components and Databases"
-
Figure 4-4, "Communication Connections Between the Monitors and Observers"
-
Figure 4-5, "Communication Connections Between the Main Server and Business Services"
Figure 4-1 Deployed Business Transaction Management Components and Business Services
Description of "Figure 4-1 Deployed Business Transaction Management Components and Business Services"
Figure 4-2 Communication Connections Among the Central Servers and Between the Central Servers and Monitors
Description of "Figure 4-2 Communication Connections Among the Central Servers and Between the Central Servers and Monitors"
Figure 4-3 Connections Between Business Transaction Management Components and Databases
Description of "Figure 4-3 Connections Between Business Transaction Management Components and Databases"
Figure 4-4 Communication Connections Between the Monitors and Observers
Description of "Figure 4-4 Communication Connections Between the Monitors and Observers"
Figure 4-5 Communication Connections Between the Main Server and Business Services
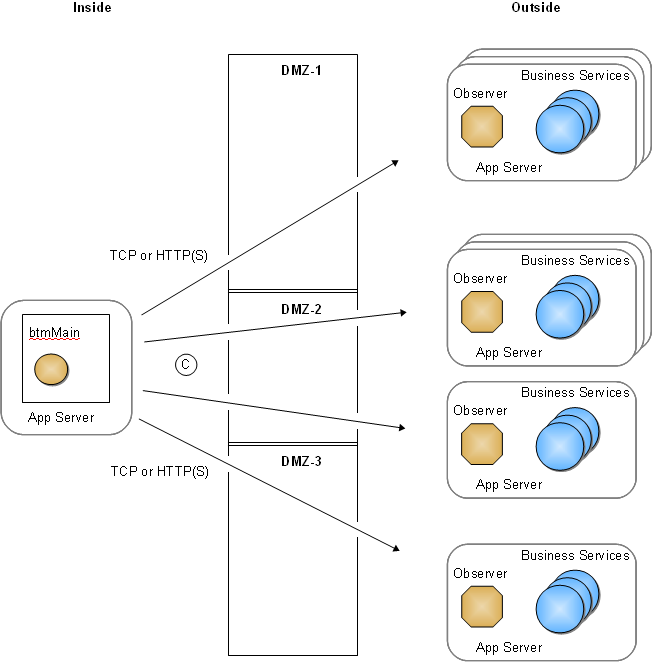
Description of "Figure 4-5 Communication Connections Between the Main Server and Business Services"
Setting up Network-Level Security
If you want to enable network-level security for Business Transaction Management components, you can do so using SSL/TLS provided by the application server in which the components are deployed. SSL provides message integrity and confidentiality for communication among distributed management components, encrypting management traffic as it flows from one server to another. When configured with client certificates, SSL also provides mutual authentication between management components. Business Transaction Management provides no specialized support for SSL and does not interfere with standard SSL configurations. Therefore, any configuration supported by your application server can be used to secure Business Transaction Management traffic. It is strongly recommended that you first ensure that your application servers are properly configured for SSL before you install any Business Transaction Management components.
Once you have configured and tested SSL on the application servers where Business Transaction Management will be deployed, you will install Business Transaction Management and then configure it using the browser-based Initial Configuration wizard. During initial configuration, you will provide the SSL address and port number for your installation. The Business Transaction Management components will automatically communicate over the secured transports.
Configuring HTTPS
This section pertains to the central servers.
If you are installing the central servers into an HTTPS-only environment (that is, an environment in which there is no HTTP traffic between components), you must do one of the following:
-
Ensure that the application servers hosting the central servers are listening only on HTTPS ports.
Or
-
Modify each web.xml file packaged in each of the central server WAR files so as to specify that only HTTPS access is allowed. You can do this by simply uncommenting the following <security-constraint> element that is provided in those files:
<security-constraint>
  <display-name>Require SSL communication</display-name>
  <web-resource-collection>
    <web-resource-name>All AmberPoint system services</web-resource-name>
    <url-pattern>/*</url-pattern>
  </web-resource-collection>
  <user-data-constraint>
    <transport-guarantee>CONFIDENTIAL</transport-guarantee>
  </user-data-constraint>
</security-constraint>
Configuring Firewalls
This section pertains to the central servers, monitors, and observers.
If you are using a firewall, you must configure it to allow access to each port on which a Business Transaction Management component receives communications. These are:
-
the ports on which the hosting application servers listen.
-
the sockets on which the monitors receive observation messages from the observers.
-
the ports used for JDBC connections to Business Transaction Management databases. These databases are discussed in Setting up Business Transaction Management Databases.
Configuring the Business Transaction Management Assertion Secret and Encryption Key
Note:
If you choose to perform the configuration described in this section, then you must do so on each application server that hosts a Business Transaction Management central server, monitor, or observer. You must also perform this configuration for the execution environment in which you use the Business Transaction Management command line interface (CLI).Communications between Business Transaction Management components are secured by way of trusted assertions. This means that for your Business Transaction Management components to communicate with each other, and for your Business Transaction Management installation to function properly, every Business Transaction Management component must be configured with an assertion secret of the same value.
Business Transaction Management also encrypts sensitive data contained in the communications between its components. It encrypts this data for both on-the-wire communications and storage in the Business Transaction Management databases.
These security mechanisms are enabled by default, and all Business Transaction Management components are preconfigured with a default value for both the assertion secret and the encryption key. This default security configuration fully enables the security mechanisms and, at the same time, simplifies the installation of Business Transaction Management.
However, because every Business Transaction Management installation uses the same default values, using the default values is a potential security threat. For demonstration purposes, and perhaps for development environments, using the default values might be adequate. But, in production environments, you should tighten security by providing your own unique values. You should also use your own values in your test environment before deploying Business Transaction Management into your production environment. If you intend to provide your own values for the assertion secret and encryption key, you should perform that configuration on each application server that hosts a Business Transaction Management component before you deploy the component.
For components deployed to WebLogic servers, you have a choice as to the method you use for configuring and storing these security settings—you can use either Oracle Wallet or Java system properties. (Oracle Wallet is an implementation of Oracle Credential Store Framework, or OCSF, and is a component of Java Platform Security, or JPS.) For all other Java application servers you use Java system properties. And, for observers deployed to .NET execution environments, you use environment variables.
You should use Oracle Wallet, if possible, because this method provides a tighter level of security. Oracle Wallet stores the assertion secret and encryption key in files that are protected by the operating system's file system security. Java system properties and environment variables, on the other hand, are visible to any user that has access to the machine. If necessary, you can mix these security configuration methods. For example, you could use Oracle Wallet on some application servers but use Java system properties (or environment variables for .NET observers) on other application servers.
Configuring Security Using Oracle Wallet
This section pertains to central servers, monitors, and observers that will be deployed to WebLogic application servers, only. It explains how to configure the assertion secret and encryption key for your Business Transaction Management components using Oracle Wallet. You must repeat this procedure for each central server, monitor, and observer for which you want to configure the assertion secret and encryption key using Oracle Wallet.
-
Ensure that the WebLogic domain in which the Business Transaction Management component will be installed includes the Java Runtime Files (JRF) template.
If the domain does not yet exist, be sure to add the JRF template when you create the domain. If the domain already exists but doesn't include the JRF template, extend the domain and add the template.
The JRF template includes the JPS JAR files that are referred to in later steps. (JPS is a component of Oracle Platform Security Services.)
-
Decide on names for the credentials that will hold your assertion secret and encryption key.
You are free to choose any name you want, but each of the two credentials must have a different name, and you must use the same two credential names for all of your Business Transaction Management components.
-
Decide on values for your issuer name and issuer assertion secret.
You are free to choose any values you want for these strings, but you must use the same values for all of your Business Transaction Management components.
-
Locate the distribution archive for the Business Transaction Management central servers and expand it into a directory on the machine that hosts the central server, monitor, or observer for which you want to configure security (this directory is henceforth referred to as BTM_Central_Expanded).
The distribution archive is named BTM_Servers*.zip, where * represents the version number.
-
Configure the setBtmOverriderEnv_via_CredStore script file by completing the following substeps.
Configuring the setBtmOverriderEnv_via_CredStore script file accomplishes these tasks: adds the JPS JAR files to your application server's classpath; overrides the default credential store; and specifies the names of the credentials that hold the shared secret and encryption key (note that you will create the credentials in a later step).
-
Locate the setBtmOverriderEnv_via_CredStore script file in BTM_Central_Expanded/security_add_ons.
For Windows systems, use setBtmOverriderEnv_via_CredStore.cmd; for UNIX-like systems, use setBtmOverriderEnv_via_CredStore.sh.
-
Copy the script file to your WebLogic server:
If you want to configure security for all domains, copy the script file to your WebLogic server's home directory. The home directory is the weblogic92 or wlserver_10.3 directory located in your WebLogic installation directory, for example, C:\bea\wlserver_10.3.
If you want to configure security for a particular domain, copy the script file to the top level of that domain's directory.
-
Open the script file in a text editor.
-
Specify the name of the credential that holds the assertion secret by replacing the string >>> YOUR_ISSUER_SECRET_CREDENTIAL_NAME_HERE <<< with the credential name you chose for your assertion secret.
-
Specify the name of the credential that holds the encryption key by replacing the string >>> YOUR_ENCRYPT_KEY_CREDENTIAL_NAME_HERE <<< with the credential name you chose for your encryption key.
-
Save and close the script file.
-
-
Configure your WebLogic domain startup scripts to call the setBtmOverriderEnv_via_CredStore script file:
Note:
This step assumes that you haven't modified your startWebLogic scripts. If you have modified your scripts, you might also have to modify the installation procedure accordingly.-
Navigate to the bin directory of one of the WebLogic domains for which you want to configure security and open the startup script in a text editor (open bin\startWebLogic.cmd for Windows systems or bin/startWebLogic.sh for UNIX-like systems; do not edit the startup script located directly within the domain directory).
-
Locate the following line (the first line is for Windows and the second for UNIX-like systems):
call "%DOMAIN_HOME%\bin\setDomainEnv.cmd" . ${DOMAIN_HOME}/bin/setDomainEnv.sh -
Directly after that line, add a line that calls the setBtmOverriderEnv_via_CredStore script file:
If you are configuring security for all domains on a Windows system, add this line:
call "%WL_HOME%\setBtmOverriderEnv_via_CredStore.cmd"
If you are configuring security for all domains on a UNIX-like system, add this line (note the initial period and space):
. ${WL_HOME}/setBtmOverriderEnv_via_CredStore.shIf you are configuring security for a particular domain on a Windows system, add this line:
call "%DOMAIN_HOME%\setBtmOverriderEnv_via_CredStore.cmd"
If you are configuring security for a particular domain on a UNIX-like system, add this line (note the initial period and space):
. ${DOMAIN_HOME}/setBtmOverriderEnv_via_CredStore.sh -
Repeat this step for each domain for which you want to configure security.
-
-
Add permission grants for Business Transaction Management components to the policy store:
-
Navigate to the config\fmwconfig directory of one of the WebLogic domains for which you are configuring security.
This directory was created when you extended the domain to include the JRF template and is the default location where the oracle.security.jps.config property looks.
-
Open the file system-jazn-data.xml in a text editor.
-
For each deployment in the domain for which you want to configure security, add a <grant> element as a child of the <jazn-data>/<jazn-policy> element, replacing the string Your Deployment Name Here with the name of the deployment, as shown in the following example:
<jazn-data>
 <jazn-policy>
 (... other <grant> elements, etc. ...)

  <!-- Begin of Business Transaction Management grants -->
  <grant>
   <grantee>
    <codesource>
     <url>file:${domain.home}/servers/${weblogic.Name}/tmp/_WL_user/Your Deployment Name Here/-</url>
    </codesource>
   </grantee>
   <permissions>
    <permission>
     <class>
      oracle.security.jps.service.credstore.CredentialAccessPermission
     </class>
     <name>context=SYSTEM,mapName=BTM,keyName=*</name>
     <actions>read,write</actions>
    </permission>
   </permissions>
  </grant>
  <!-- End of Business Transaction Management grants -->

 (... other <grant> elements, etc. ...)
 </jazn-policy>
</jazn-data>
Table 1-1 lists the deployment names for the central servers and monitors. For observers, use the name of the deployment that contains the business application you want to monitor.
-
Save and close the file.
-
Repeat this step for each domain for which you want to configure security.
-
-
Use the Business Transaction Management command line interface (CLI) to create a “Trusted Issuer and Secret” credential that contains your assertion secret and add it to the Oracle Wallet credential store associated with the policy store that you just configured:
In the following substeps, you will first set up the environment for the CLI, then point the CLI to the Oracle Wallet credential store, and finally use the CLI to create the credential for your assertion secret and add it to the store.
-
Open a command shell or window and ensure that its JAVA_HOME and JPS_11_HOME environment variables are set properly.
These variables can be set at the system or the shell/window level. The JAVA_HOME variable must point to a JDK that is version 6 or higher. The JPS_11_HOME variable must point to your oracle.jps file, for example, to:
oracle\Middleware\oracle_common\modules\oracle.jps_11.1.1
-
Open the file BTM_Central_Expanded/security_add_ons/jps_config_dir/jps-config.xml in a text editor and locate the following line:
<serviceInstance name="credstore" provider="credstoressp" location="./">
-
Change the value of the location attribute from ./ to the /config/fmwconfig/ directory under the WebLogic domain directory, for example:
<serviceInstance name="credstore" provider="credstoressp" location="C:/Oracle/Middleware/user_projects/domains/my_domain/config/fmwconfig/">
The value of the location attribute must match the location of the %DOMAIN_HOME%\config\fmwconfig directory where you configured the policy store for your domain, in step 7.
-
In your command shell/window, navigate to the BTM_Central_Expanded/tools directory and issue the following command (replacing my_credential_name with the name you chose for this credential in step 5d):
btmcli credStoreTool -createCred my_credential_name -credType isThe CLI then prompts you for the Trusted Assertion Issuer and the Trusted Assertion Secret. The latter is masked with asterisks as you type.
-
Input the values for the Trusted Assertion Issuer and the Trusted Assertion Secret (and keep the command shell/window open for the next step).
Use the values you chose in step 3.
Note:
If you prefer not to use the interactive mode, you can provide the issuer name and assertion secret by appending -credValue my_issuer:my_secret to the command line. However, using interactive mode is more secure because of the masking.
The credential for your assertion secret has now been created and added to the Oracle Wallet credential store.
-
-
In the same command shell/window, use the CLI to create a credential for your encryption key by issuing the following command (replacing my_credential_name with the name you chose for this credential in step 5e):
btmcli credStoreTool -createCred my_credential_name -credType bin -genKey AES:128This command creates a credential with the given name, generates an AES, 128-bit, random encryption key, and adds it to the Oracle Wallet credential store.
-
Retrieve the encryption key for use in configuring the other machines in your system by issuing the following command (replacing my_credential_name with the name of your credential):
btmcli credStoreTool -getCred my_credential_name -credType bin -showSecret
This command returns the string value of your encryption key. You will need to copy this string to the other machines in your system as you configure them.
-
Repeat the pertinent steps of this procedure for each central server, monitor, and observer for which you want to configure the assertion secret and encryption key using Oracle Wallet, but on repetition make the following changes:
-
Skip steps 2 and 3 (you will use the same credential names and issuer name and issuer assertion secret values that you used on the first machine).
-
Issue the following CLI command instead of the commands shown in steps 9 and 10 (replacing my_credential_name with the name of your credential, and my_encryption_key_string with the string you retrieved in step 10):
btmcli credStoreTool -createCred my_credential_name -credType bin -credValue my_encryption_key_stringThis command creates a credential with the given name and encryption key, and adds it to the Oracle Wallet credential store.
-
Configuring Security Using Java System Properties
This section pertains to the central servers and monitors, and to observers deployed in Java environments. It explains how to configure the assertion secret and encryption key using Java system properties.
Configuring the Assertion Secret Using Java System Properties
You must configure the assertion secret on each application server that hosts a Business Transaction Management component. To configure the assertion secret, you must set two Java system properties and, optionally, a third Java system property. You set these system properties in the server hosting the Business Transaction Management component.
This example shows how to set the first required system property:
-Dcom.amberpoint.SimpleIdentityAssertion.TrustedIssuerOverriderClassName=com.amberpoint.wsclient.TrustedIssuerOverriderByExtProp
This example shows how to set the second required system property:
-Dcom.amberpoint.SimpleIdentityAssertion.TrustedIssuerSecretOverride=MySecret
where MySecret is your own secret string.
By default, the name of the issuer of the security assertion is AmberPoint. You can override the default issuer's name by creating a third system property. This example shows how to set this property:
-Dcom.amberpoint.SimpleIdentityAssertion.TrustedIssuerNameOverride=MyIssuerName
where MyIssuerName is the name of the issuer of the security assertion.
Configuring the Encryption Key Using Java System Properties
You must configure the encryption key on each application server that hosts a Business Transaction Management component. To configure the encryption key, create a Java system property named com.amberpoint.security.encryption.aes.defaultKey in the server and set its value to your encryption key, for example:
-Dcom.amberpoint.security.encryption.aes.defaultKey=MyEncryptionKey
where MyEncryptionKey is a base 64-encoded, AES, 128-bit key.
After generating your encryption key, you can copy and paste it in order to set the value of your com.amberpoint.security.encryption.aes.defaultKey property. If your key includes special characters, you should enclose it in double quotes, for example:
-Dcom.amberpoint.security.encryption.aes.defaultKey="oylJKoTGXTHasOYwtjwA7g=="
Configuring Security for Observers Deployed in .NET Environments
This section pertains only to observers deployed in .NET environments. It explains how to configure the assertion secret and encryption key using environment variables. You must perform these configurations for each .NET environment that hosts an observer.
Configuring the Assertion Secret
To configure the assertion secret, you must set two environment variables and, optionally, a third environment variable as follows:
-
Create an environment variable named:
com.amberpoint.SimpleIdentityAssertion.TrustedIssuerOverriderClassName
and set its value to:
AmberPoint.Wsutility.Wsclient.TrustedIssuerOverriderByExtProp
-
Create an environment variable named:
com.amberpoint.SimpleIdentityAssertion.TrustedIssuerSecretOverride
and set its value to your assertion secret string.
-
Optional – By default, the name of the issuer of the security assertion is AmberPoint. You can override the default issuer's name by creating an environment variable named:
com.amberpoint.SimpleIdentityAssertion.TrustedIssuerNameOverride
and setting its value to the issuer name.
Configuring the Encryption Key
Configure the encryption key as follows:
-
Generate a base 64-encoded, AES, 128-bit encryption key.
-
On the machine hosting the observer, create an environment variable named:
com.amberpoint.security.encryption.aes.defaultKey
and set its value to your generated encryption key.
Setting up a Secure Socket (SSL) for Observation Messages
Observers send observation messages to their associated monitor by way of a socket connection. You can secure your observation messages by setting up a secure socket (SSL) for this communication channel.
Setting up a secure socket between a monitor and its associated observers requires a properly configured key store that is accessible to the monitor and a properly configured trust store that is accessible to the observers. Business Transaction Management provides built-in, preconfigured key and trust stores so as to minimize the setup required to enable SSL (a preconfigured server certificate is also provided for .NET-based observers). For demonstration purposes, and perhaps for development environments, using these built-in security stores might be adequate. But, in production environments, you should tighten security by providing your own security stores.
The following procedure describes how to create and deploy your own key store and trust store containing a self-signed certificate:
-
Prepare a key store and trust store containing an appropriate certificate and private key:
-
Locate the keytool application in your JDK.
-
Generate a key store containing a certificate-private key pair.
For example, the following keytool command generates a keystore containing a certificate-private key pair in a file named "mykeystore.ks". The alias for the certificate-private key pair is "myks", the common name is "MyMonitor", the algorithm is RSA, the password for accessing the certificate and private key is "mycertandprivkeypass", and the password for accessing the key store is "mykeystorepass" (this command creates the file if it does not yet exist):
keytool -genkey -alias myks -dname "CN=MyMonitor" -keyalg RSA -keypass mycertandprivkeypass -storepass mykeystorepass -keystore mykeystore.ks
-
Export the certificate from your key store to an external file.
For example, the following keytool command exports the certificate created in the previous example to a file named "mycertificate.cer":
-export -alias myks -storepass mykeystorepass -file mycertificate.cer -keystore mykeystore.ks
-
Import the certificate (without the associated private key) into the trust store.
For example, the following keytool command imports the certificate created in the previous example into the trust store contained in the file "mytruststore.ks" (this command creates the trust store file if it does not yet exist).
-import -v -trustcacerts -alias myks -file mycertificate.cer -keystore mytruststore.ks -keypass mycertandprivkeypass -storepass mykeystorepass
-
-
Deploy the key store to the machines that will host the monitors.
Copy the key store (for example, mykeystore.ks) either to the machines that will host the monitors or to a location accessible to the monitors by way of HTTP GET.
-
Deploy the trust store to the machines that will host your Java-based observers (ignore this step if you don't have Java-based observers).
Perform this task in one of these two ways:
-
Copy the trust store (for example, mytruststore.ks) either to the machine that will host the observers or to a location accessible to the observers by way of HTTP GET.
-
Copy the trust store (for example, mytruststore.ks) either to the machines that will host the monitors or to a location accessible to the monitors by way of HTTP GET. By using this second method, you can configure the monitor to automatically dispatch the trust store to the observers by enabling the Auto Dispatch Trust Store to Java Observers field when you configure the Observer Communication policy (see Applying an Observer Communication Policy).
-
-
Deploy the certificate to the machines that will host your .NET-based observers (ignore this step if you don't have .NET-based observers).
Using the Windows Certificate Import Wizard, import the certificate (for example, mycertificate.cer) to the Trusted Root Certification Authorities folder of the certificate store on the machines that will host the .NET-based observers.
If you decide to use the built-in security stores rather than your own, and you are going to use Java-based observers only, you do not have to perform any of the preliminary setup described in the previous procedure.
If you are going to use the built-in security stores with .NET-based observers, you need only to deploy the preconfigured certificate to the machines that will host the .NET observers (as described in step 4 of the previous procedure). You can find the preconfigured certificate at nanoagent\config\ssl\server.cer in the ZIP files containing the .NET-based observers.