4 Working with the Performance Page
This chapter describes the TimesTen performance page. The performance page displays performance specific information that has been customized for your TimesTen targets.
Topics include:
Viewing the performance page
To view the performance page, make sure you are on the TimesTen target page. For information on navigating to the TimesTen target page, see "Navigating to the TimesTen target page".
From the TimesTen IMDB menu, select Performance.
Analyzing information on the TimesTen performance page
Figure 4-1 shows the seven performance specific areas that have been customized for your TimesTen targets. Click on a specific tab to view detailed performance information.

A description of each area follows:
Connections
The connections page allows you to view information about database connections and disconnections. It is divided into two regions:
Connect and disconnect rates
Figure 4-2 Connect and disconnect rates region
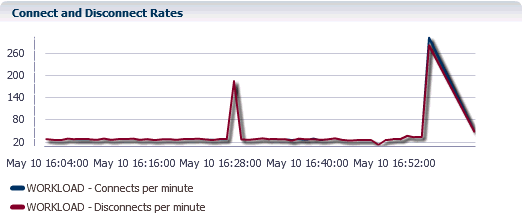
Description of "Figure 4-2 Connect and disconnect rates region"
The Connect and Disconnect rates region uses a line graph to show the rate of connects and disconnect per minute.
The X-Axis represents time. The Y-Axis represents the rate of connects and disconnects per minute. These rates represent all connects and disconnects from applications and connections created by the TimesTen plug-in to collect configuration and performance data.
If you see a high rate of connects and disconnects, then investigate why you are seeing this high rate. You may consider modifying your applications to do connection pooling.
Aggregates
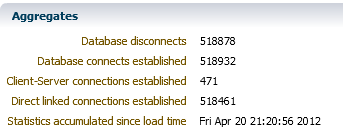
The aggregates region shows information that has accumulated since the time your current TimesTen target was loaded into memory.
Statements
The statements page allows you to compare and review the execution rates of your SQL statements. It is divided into five regions:
Write rates
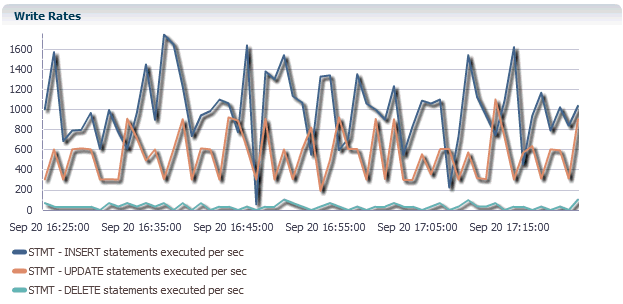
The write rates region uses a line graph to show the rate of INSERT, UPDATE, and DELETE statements executed per second.
Read rate
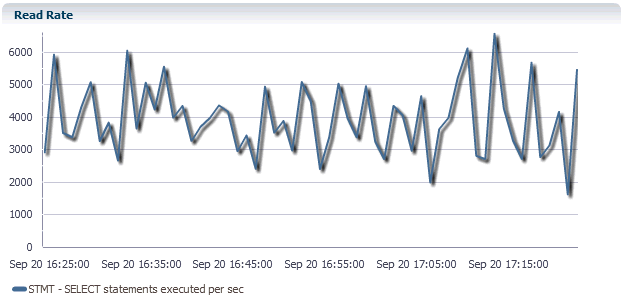
The read rate region uses a line graph to show the rate of SELECT statements executed per second.
Ratio of prepare to execute rates
Figure 4-6 Ratio of prepare to execute rates region
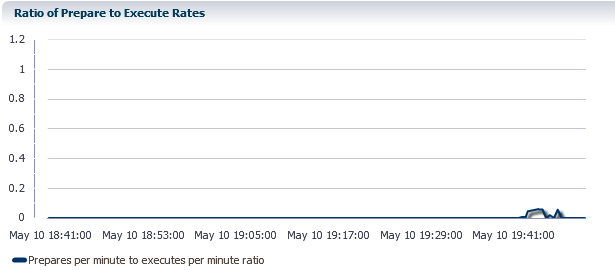
Description of "Figure 4-6 Ratio of prepare to execute rates region"
The ratio of prepare to execute rates region uses a line graph to show the overall performance of the statements that are executing.
If SQL statements are prepared for every execute, the ratio of prepares to executes is equal to a value of 1.0. This type of ratio impacts performance. Preparing SQL statements is CPU intensive. Try to minimize the number of times your SQL statements are prepared. In your applications, consider using bind variables. You can then prepare your SQL statements once and then execute your SQL statements multiple times.
A value less than 1.0 means that there are more executes than prepares. This means that the statements being executed are already in the SQL command cache and are already prepared. This results in less work that needs to be done to execute the statement.
Summary
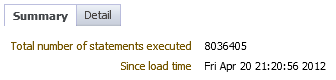
The summary region shows the total number of statements that have executed since your TimesTen target was loaded into memory.
Detail
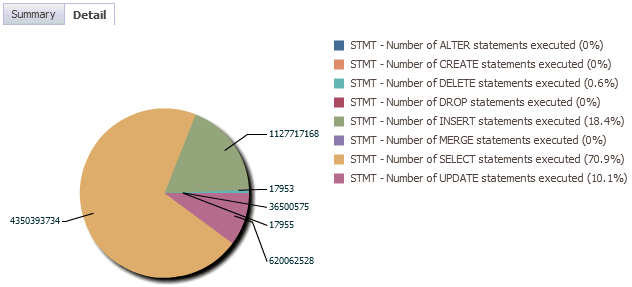
The detail region uses a pie chart to break down each type of statement (For example, SELECT, UPDATE, MERGE, DELETE statements) and, for each type of statement, shows the number of executions relative to the total number of statements executed since your TimesTen target was loaded into memory.
Workload
The workload page shows the workload of your TimesTen target. The page is divided into two regions:
Write workload
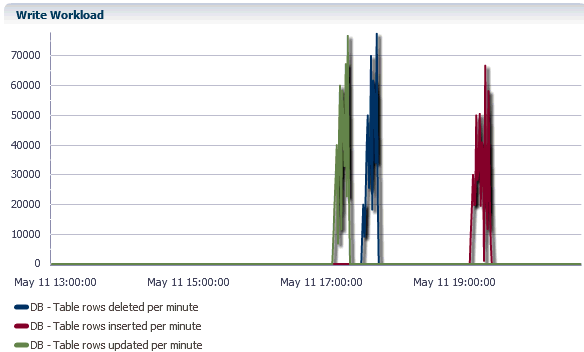
The read workload region uses a line graph to show the number of table rows deleted, inserted, and updated per minute.
The write workload region is populated when the TimesTen database is enabled to collect all database and operating system statistics. To enable TimesTen to collect all database and operating system statistics, execute the ttStatsConfig built-in procedure with the StatsLevel parameter set to ALL.
call ttStatsConfig('StatsLevel','ALL');
For more information about the ttStatsConfig built-in procedure, see "ttStatsConfig" in the Oracle TimesTen In-Memory Database Reference.
Read workload
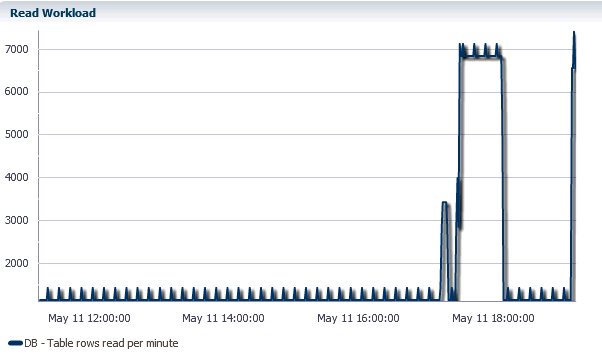
The read workload region uses a line graph to show the number of table rows read per minute.
The read workload region is populated when the TimesTen database is enabled to collect all database and operating system statistics. To enable TimesTen to collect all database and operating system statistics, execute the ttStatsConfig built-in procedure with the StatsLevel parameter set to ALL.
call ttStatsConfig('StatsLevel','ALL');
For more information about the ttStatsConfig built-in procedure, see "ttStatsConfig" in the Oracle TimesTen In-Memory Database Reference.
Prepares and reprepares
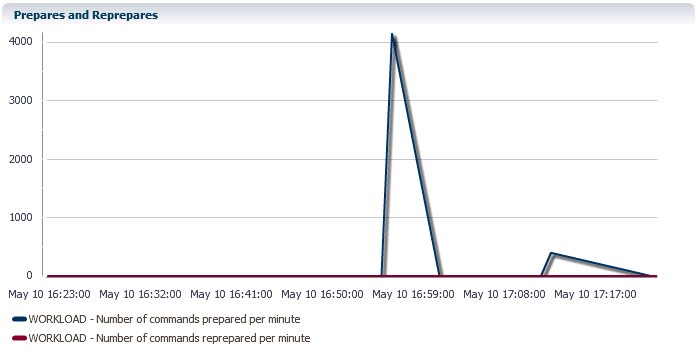
The prepares and reprepares region uses a line graph to show the number of commands prepared per minute and the number of commands reprepared per minute. If you see a high number of reprepared commands per minute, then this is an indication that there are invalidations occurring. This results in performance degradation.
In your applications, consider using bind variables and prepare your SQL statement once. You can then execute the SQL statement multiple times. If you do this, the number of commands prepared per minute should approach zero.
Aggregates
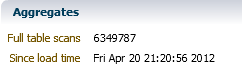
The aggregates region shows the number of full table scans performed since your TimesTen target was loaded into memory. This number should be small because full table scans consume resources and can take considerable time to perform.
Commits and rollbacks
Figure 4-13 Commit and rollback rates region
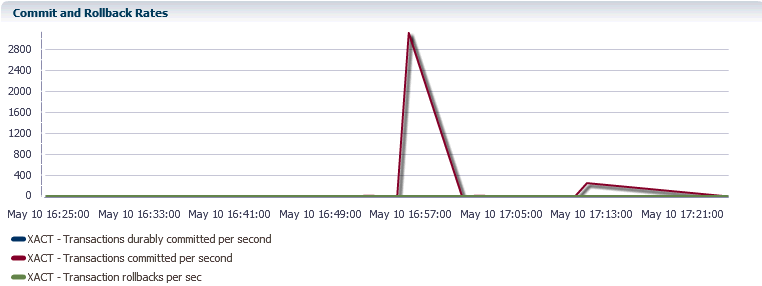
Description of "Figure 4-13 Commit and rollback rates region"
The commits and rollbacks region uses a line graph to show the relationship between durably committed transactions, committed transactions, and rollbacks.
The X-Axis represents time. The Y-Axis represents the rate of transactions durably committed, non-durably committed, and rolled back per second.
Locks
The locks page shows information about the concurrent operations of your TimesTen target. It is divided into two sub-tabs:
Lock performance
The lock performance sub-tab shows information related to the performance of the locks and concurrent operations of your TimesTen target. The sub-tab is divided into three regions:
Locks and deadlocks
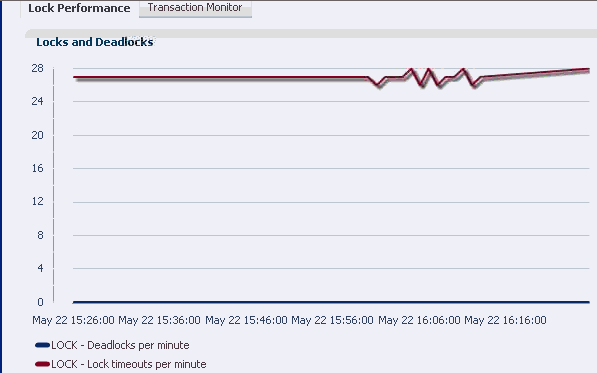
The locks and deadlocks region uses a line graph to show the rate of deadlocks per minute and the lock timeouts per minute.
The deadlock rate should be as low as possible. If you see a continued or growing rate of deadlocks, review the way in which your application acquires resources. If the deadlock rate is greater than zero, review the "Transaction monitor".
Lock timeouts per minute should be low. If the lock timeouts per minute is not low, then this is an indication there is contention for the same resource. To find out what is causing the lock timeouts, review the "Transaction monitor".
Lock grants
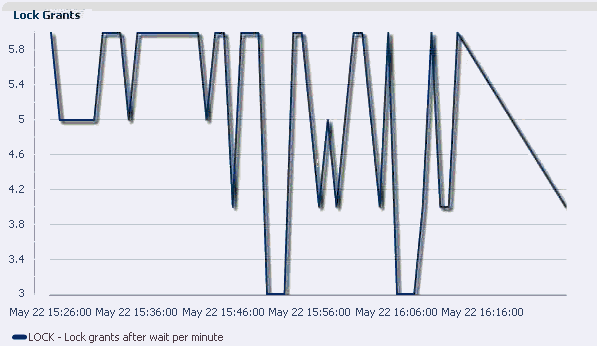
The lock grants region uses a line graph to show the lock grants after wait per minute. The rate of locks granted after wait should be low indicating that locks were acquired on time. Ideally, the rate should be 0.
Percentage of acquired locks without wait
Figure 4-16 Percentage of acquired locks without wait

Description of "Figure 4-16 Percentage of acquired locks without wait "
The percent of acquired locks without wait uses a line graph to show the ratio of immediate grants per minute divided by the total rate of grants per minute. This percentage should be close to 100% indicating that locks are acquired without wait. This graph is a good measure of lock contention and concurrency in your TimesTen target.
Transaction monitor
The transaction monitor displays a snapshot of the current transactions in your TimesTen database and describes details about your transactions. Use the transaction monitor to review how your transactions are processed. If your application is running slow, there may be an issue with how the transactions in the application are acquiring locks. If a lock is not released or is taking too long to be released, application responsiveness is degraded. The transaction monitor can help you identify transactions that are taking too long to be processed.
Before using the transaction monitor, make sure preferred credentials are set for your TimesTen. For more information about setting preferred credentials, see "Setting preferred credentials for a target".
The transaction monitor sub-tab is divided into four regions:
Refresh mode
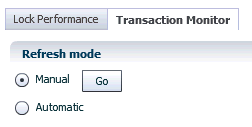
Refresh mode allows you to control how the transaction monitor is refreshed:
-
Manual
The transaction monitor starts in manual mode. Click Go to refresh the transaction monitor report.
-
Automatic
The automatic mode allows you to select how often the transaction monitor is refreshed.
To start automatic refresh mode:
-
Click in the circle to the left of Automatic.
-
In the Refresh interval in seconds field, specify a time interval. For example if you specify a time interval of 5, the transaction monitor refreshes every 5 seconds.
-
Click Go.
Once automatic refresh mode is active, the Go button is replaced with a Stop button.
It may be useful to stop automatic refresh mode if there are no active transactions. To stop automatic refresh mode, click in the box to the left of Stop when there are no transactions.
You cannot change the refresh interval while automatic mode is running. Stop automatic refresh mode first.
To stop automatic refresh mode:
Click Stop.
The automatic refresh mode stops and allows you to modify the refresh interval and switch the refresh mode to manual.
-

Outstanding locks

The outstanding locks region displays the current transactions that are holding locks in your database.
Click on a transaction to review detailed information about the transaction and the locks associated with the transaction.

The lock information for your selected transaction displays in the lock details region.
Lock details

The lock details region displays information about the locks of a selected transaction.
The number of locks in the lock details region should be low. If you see a large number of locks, review the way your application is acquiring locks.
You can also click on the text in the SQL text column. When you do this, a Full SQL text dialog opens showing the SQL query. Review the SQL query to understand the SQL that is holding locks.
For more information about locks and transactions, see "ttXactAdmin" in the Oracle TimesTen In-Memory Database Reference.
Awaiting locks

The awaiting locks region displays transactions that are competing for the same lock resources.
The number of locks in the awaiting locks region should be low. Locks that are awaiting events such as user input do not show in the table. If you see a transaction that does not clear after running the transaction monitor multiple times, review the lock. You may need to force a commit or a rollback on the transaction. For more information, see "ttXactAdmin" in the Oracle TimesTen In-Memory Database Reference.
You can also click on the text in the Holder SQL text column. When you do this, a Full SQL text dialog opens showing both the SQL query that is waiting for the lock and the SQL query that is holding the lock.
For more information about locks and transactions, see "ttXactAdmin" in the Oracle TimesTen In-Memory Database Reference.
Transaction Logs
The transaction logs page displays information about log holds and the performance of log holds. The page is divided into two sub-tabs:
Log holds
The log holds page provides a report of the logs that are being held for the different operations that are running on your TimesTen target. Such operations include transactions, checkpoints, and replication. The log holds sub-tab is divided into two regions:
Summary
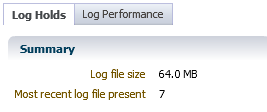
The summary region shows log file size and the most recent log file present.
Log holds
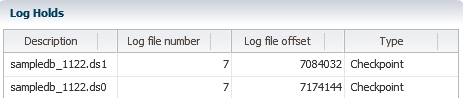
The log holds table contains the same columns and values as the ttLogHolds built-in procedure. For more information about ttLogHolds, see "ttLogHolds" in the Oracle TimesTen In-Memory Database Reference. Use the table to monitor how well the operations that depend on the log buffer are doing.
If logs start to accumulate in the log holds table, review the operations that are not allowing the log buffer to be purged.
Log performance
The log performance page allows you to review the performance of the log buffer. The log performance sub-tab is divided into three regions:
Aggregates

The aggregates regions displays information that has been accumulating since the current TimesTen target has been loaded into memory.
Log reads and log flushes
Figure 4-26 Log reads and log flushes region
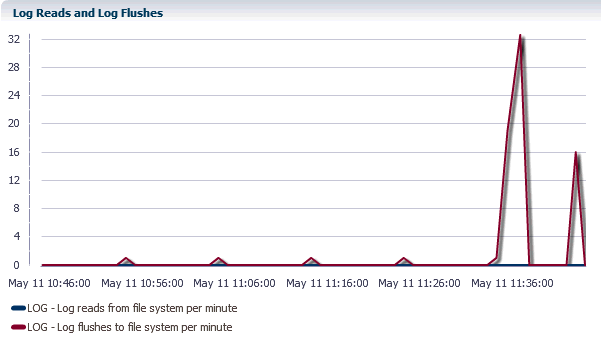
Description of "Figure 4-26 Log reads and log flushes region"
The log reads and log flushes region uses a line graph to show the log reads from the file system per minute and the log flushes to the file system per minute. Both the log reads and the log flushes should be low. A non zero rate of log reads from the file system results in poor response time. Ideally, all log records are read from memory (the log buffer) rather than from disk because reading log records from memory is significantly faster.
A high rate of log flushes to the file system may indicate either the need for a larger log buffer or that operations such as checkpoints, replication or XLA are not performing quickly, resulting in the log buffer being persisted to disk.
Log buffer wait
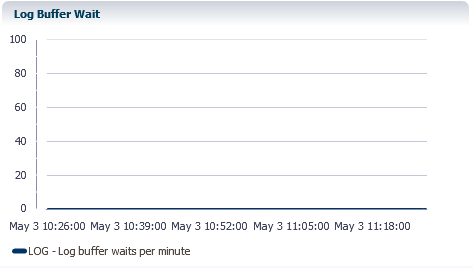
The log buffer waits per minute region helps you review how the operations that use the log files are doing. The values should be 0. A nonzero value indicates that transactions needed to wait before writing to the log buffer.
Checkpoints
The checkpoints page displays checkpoints history and a summary of cumulative values related to checkpoint operations. It is divided into two regions:
Checkpoint history
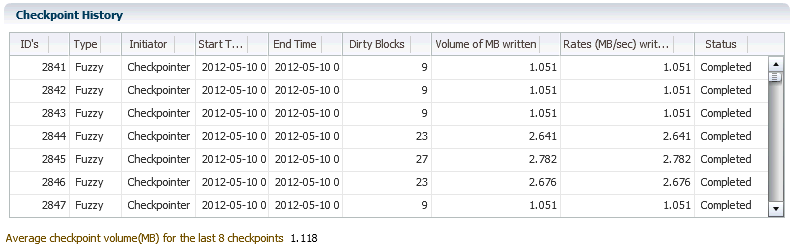
The checkpoint history table shows the checkpoint history for the last 24 hours. ID is a unique numeric identifier for the checkpoint. IDs increase monotonically during the lifetime of the database. If you destroy the database, the IDs are reset. If you destroy the database, but keep the target in Enterprise Manager, you may see a mixture of checkpoints from the both the destroyed and the new database. The new database IDs are likely to be small and are at the bottom of the table. If you wish to see the new database IDs at the top of the table, sort by Start Time.
Valid values for Type are static, blocking, fuzzy, or none. Valid values for initiator are user, checkpointer, or subdaemon. For the Dirty Blocks column, the values are the number of dirty blocks written. These are blocks that were modified since the last checkpoint. For the Rates column, the value is the volume written per second (in Megabytes). Valid values for the Status column are Progress, Completed, or Failed.
The TimesTen plug-in polls the TimesTen target every 10 minutes and checks the latest eight checkpoints. If there are more than eight checkpoints in a 10 minute interval, only the last eight checkpoints are displayed. You can sort checkpoints by start time by clicking on the column header.
The Average checkpoint volume for the last eight checkpoints is included at the end of the table. The volume is expressed in Megabytes.
Aggregates
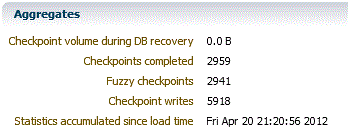
The aggregates region shows values that have been accumulating since the time your TimesTen target was loaded into memory.