1 Installing the Enterprise Manager Plug-in for TimesTen
The Enterprise Manager Plug-in for Oracle TimesTen In-Memory Database extends Oracle Enterprise Manager Cloud Control to add support for monitoring TimesTen databases.
This chapter focuses on the installation of the TimesTen plug-in.
Topics include:
Note:
The instructions and screenshots of this user's guide are based on Oracle Enterprise Manager Cloud Control 12c Release 4.Installation prerequisites
Before installing the Enterprise Manager Plug-in for TimesTen:
-
Install Oracle Enterprise Manager Cloud Control 12c Release 4 (or higher) for OMS, Enterprise Manager Repository, and Agent. Ensure that the agent can successfully communicate with your Oracle Enterprise Manager Server and can upload data.
-
Install Oracle TimesTen In-Memory Database Release 11.2.2.6.0 (or later).
Note:
The Oracle Enterprise Manager Cloud Control Agent and the TimesTen database must reside on the same system.When you configure your TimesTen instance target, you need to know:
-
The name of your TimesTen instance
When you configure your TimesTen database target, you need to know:
-
The name of your TimesTen instance
-
DSN
The DSN must be a system DSN that is described in either your
sys.odbc.inifile or the ODBC Data Source Administrator on Microsoft Windows. -
The TimesTen database user name and password
-
The user name and password are required when you configure the TimesTen target.
-
The user you specify when you configure the TimesTen target must have
ADMINprivileges. The user cannot be the instance administrator.
-
-
If your TimesTen database uses TimesTen Cache features, you need to know the cache admin/cache manager user name, the Oracle database cache admin password, and the TimesTen database cache manager password.
-
The cache admin/cache manager user name needs to exist on the TimesTen database and the Oracle database.
-
Note:
Be sure the TimesTen database specified by the instance and DSN is loaded into memory.For information on your TimesTen instance, run the ttStatus or ttVersion utility. For more information, see "ttStatus" or "ttVersion" in the Oracle TimesTen In-Memory Database Reference.
Additional requirements
Additional requirements or considerations include:
-
Use direct linked connections to define your target DSN. Client/Server connections are not supported for your target DSN.
-
The Enterprise Manager Plug-in for TimesTen generates temporary files. Each temporary file could require between 10 KB to 30 KB of free space on the Oracle Enterprise Manager Agent file system. If the Oracle Enterprise Manager Agent file system is full, the Oracle Enterprise Manager Agent can no longer monitor the TimesTen database. For information about the system requirements for the Oracle Enterprise Manager Agent, see "CPU, RAM, and Hard Disk Space Requirements for Management Agent" in the Oracle Enterprise Manager Cloud Control Basic Installation Guide.
-
The operating system user who installs the Oracle Enterprise Manager Agent must belong to the TimesTen users group of the installation being monitored. Also, ensure that the user has read access to
/etc/TimesTen/instance_info. For more information about the TimesTen users group, see "Create the TimesTen users group" in the Oracle TimesTen In-Memory Database Installation Guide. -
For optimal performance, ensure that TimesTen is on a different system than the Oracle Management Service (OMS) and the Enterprise Manager Repository.
-
Ensure that the My Oracle Support credentials are set up using the SYSMAN user. This is required to enable updates (plug-ins) to be downloaded from the My Oracle Support site. For more information, see "Saving Preferred Credentials to Access My Oracle Support" in the Oracle Enterprise Manager Cloud Control Security Guide.
-
Ensure that the Software Library (also known as the local store) is configured. Updates are downloaded to this local store before being deployed into Oracle Enterprise Manager Cloud Control. For more information, see "Configuring an OMS Shared Filesystem Location" in the Oracle Enterprise Manager Cloud Control Administrator's Guide.
Installing the Enterprise Manager Plug-in for TimesTen
To install the TimesTen plug-in for TimesTen, you must:
Download the plug-in
To download the plug-in, ensure that you are on the Oracle Enterprise Manager Cloud Control home page and are logged in as user SYSMAN.
-
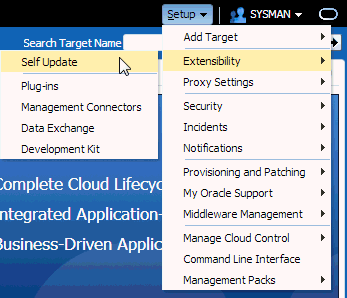
From the Setup menu, select Extensibility, then select Self Update.
The Self Update page displays.
-
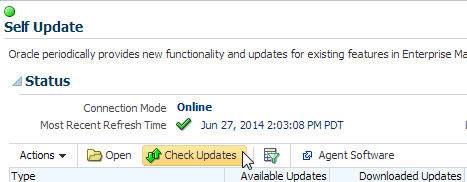
Click Check Updates.
The Confirmation dialog displays. You should see the informational message: "A job has been submitted successfully to check for new updates from Oracle".
-
Click OK.
The Self Update page displays with a Most Recent Refresh Time status indicating the status of the updates.
-
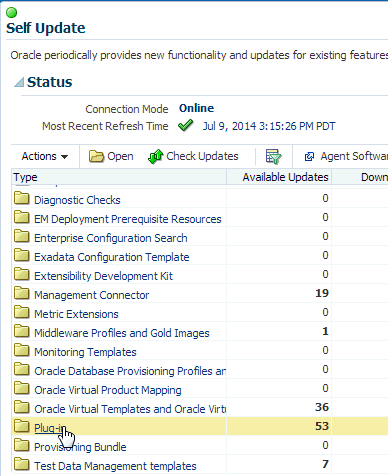
If you see a green check mark next to the Most Recent Refresh Time status, then Enterprise Manager has finished checking for updates. Locate the Plug-in folder.
-
If you see a status of Submitted or In Progress... for the Most Recent Refresh Time status, then Enterprise Manager is still checking for updates. Click the refresh button located in the top right of the Oracle Enterprise Manager Cloud Control page to refresh the status of the Most Recent Refresh Time. After you see a green check mark next to the Most Recent Refresh Time status, locate the Plug-in folder.
-
-
Click the name Plug-in.
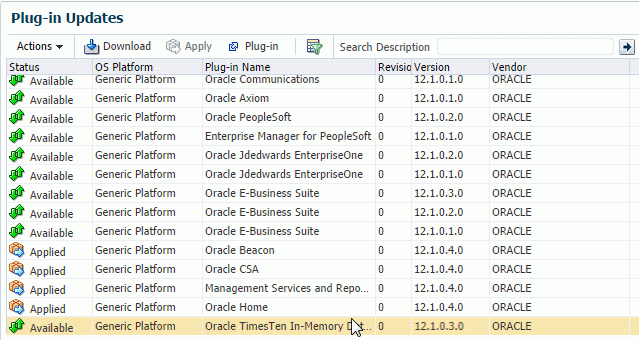
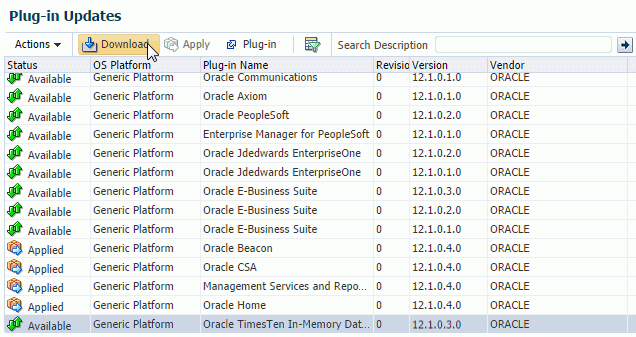
The Plug-in Updates page displays. In the Plug-in Name column, locate Oracle TimesTen In-Memory Database. Confirm the Status column is equal to Available.
-
In the Plug-in Name column, click Oracle TimesTen In-Memory Database.
Locate the Download button located under Plug-in Updates at the top of the page.
-
Click Download.
The Schedule Download dialog displays indicating that you can download the plug-in either immediately or later. When you choose Select, Enterprise Manager downloads the plug-in immediately.
-
Click Select.
A confirmation dialog displays indicating that the update (plug-in) is downloading.
-
Click OK.
You have successfully downloaded the plug-in. You can verify the plug-in has been downloaded by reviewing the Plug-in Updates page. You should see the Oracle TimesTen In-Memory Database plug-in with a status of Downloaded.
You are now ready to deploy the plug-in on the Oracle Management Service.
Deploy the plug-in on Oracle Management Service
You must deploy the plug-in on both the Oracle Management Service (OMS) and one or more Management Agents. After you successfully deploy the plug-in, both OMS and the agent know the plug-in exists. You then configure your TimesTen database as one of the targets for the agent and the agent begins the process of monitoring your target.
You must deploy the plug-in on OMS before deploying the plug-in on one or more Management Agents.
Note:
If there is a failure when deploying the plug-in, the Management Repository could be in an inconsistent state. It is recommended that you back up the Management Repository before deploying the plug-in.To deploy the plug-in on OMS, ensure that you are on the Oracle Enterprise Manager Cloud Control home page and are logged in as user SYSMAN.
-
From the Setup menu, select Extensibility, then select Plug-ins.
Figure 1-9 Select Extensibility, then Plug-ins
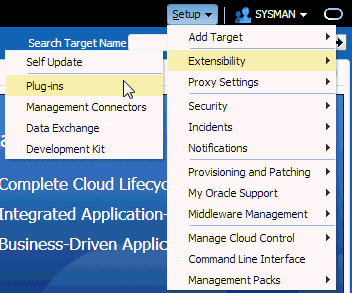
Description of "Figure 1-9 Select Extensibility, then Plug-ins"
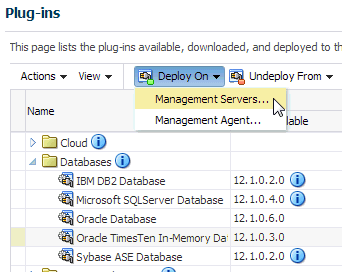
The Plug-ins page displays and you see the plug-ins that have been downloaded and can be deployed. Locate the Databases folder in the Name column.
-
Expand the Databases folder in the Name column and click Oracle TimesTen In-Memory Database.
Figure 1-10 Select TimesTen In-Memory Database plug-in
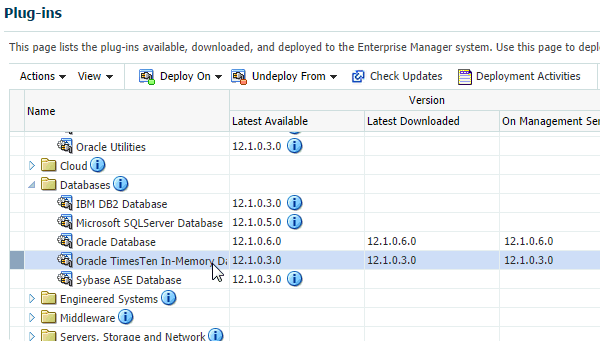
Description of "Figure 1-10 Select TimesTen In-Memory Database plug-in"
You are now ready to deploy the plug-in on OMS. Locate the Deploy On tab at the top of the page.
-
From the Deploy On menu, select Management Servers....
The Deploy Plug-in on Management Servers: Plug-ins page displays. The plug-in Oracle TimesTen In-Memory Database is displayed in the Name column and the Version is auto-filled. Locate the Next button in the top right of the page.
-
Click Next.
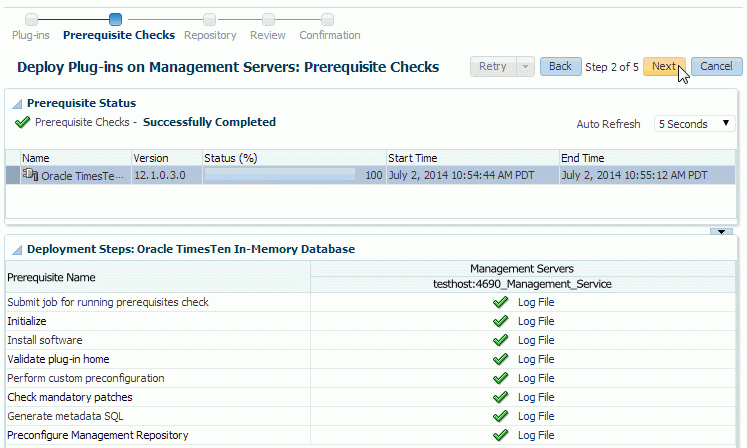
The Deploy Plug-ins on Management Servers: Prerequisite Checks page displays. The prerequisite checks can take several minutes. In the Prerequisite Status region, you should see a check to the left of the Prerequisite Checks text. To the right of this text, you should see the text "Successfully Completed". Ensure that there are green checks in the Status column of each row in the Deployment Steps: Oracle TimesTen In-Memory Database table. Locate the Next button in the top right of the page.
-
Click Next.
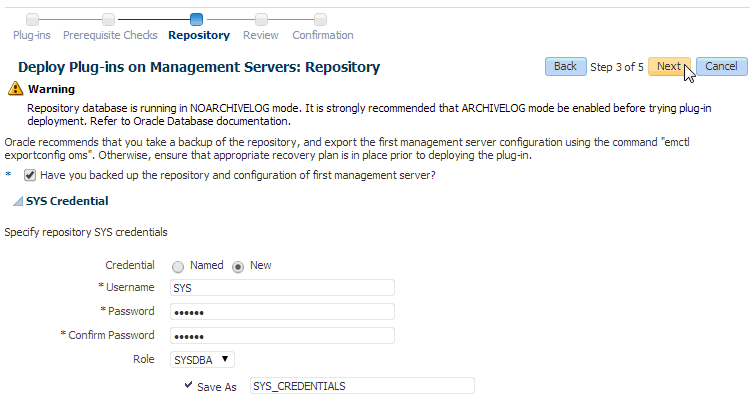
The Deploy Plug-ins on Management Servers: Repository page displays. Consider making a backup of the OMS repository before deploying the plug-in. For more information on backing up the OMS repository, see "Backing Up the OMS" in the Oracle Enterprise Manager Cloud Control Advanced Installation and Configuration Guide. Locate the Have you backed up the repository and configuration of first management server? check box.
-
Select the Have you backed up the repository and configuration of first management server? check box.
Figure 1-14 Select repository backup confirmation
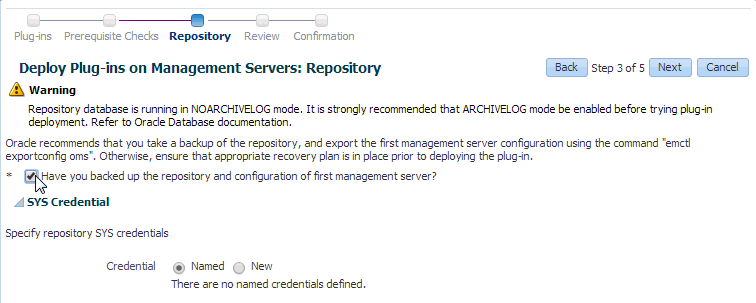
Description of "Figure 1-14 Select repository backup confirmation"
You are now ready to specify repository SYS credentials. Locate the circle to the left of the New credential type.
-
Click in the circle to the left of the text New.
Figure 1-15 Select the new credential type option
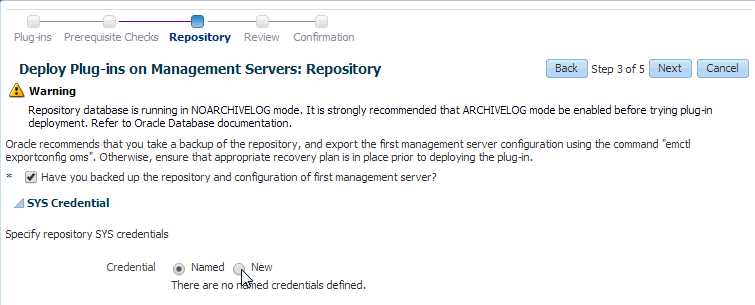
Description of "Figure 1-15 Select the new credential type option"
The Deploy Plug-Ins on Management Servers: Repository page refreshes. You are now required to enter the repository SYS credentials for your Enterprise Manager repository. The first property is the Username.
-
In the *Username text field, type the user who has access to the Enterprise Manager repository.
-
In the *Password text field, type the password for the user who has access to the Enterprise Manager repository.
-
In the *Confirm Password text field, re-type the password.
-
From the Role drop-down list, select SYSDBA.
-
Click in the check box to the left of the text Save As.
-
In the Save As text field, type the name you want to use for the preferred credentials. The credentials are saved with this name.
Locate the Next button at the top right of the page.
-
Click Next.
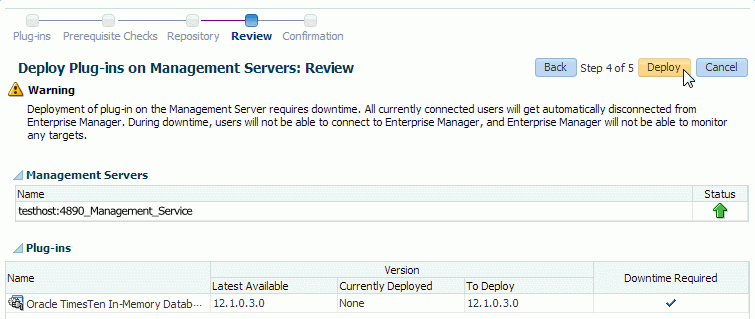
The Deploy Plug-ins on Management Servers: Review page displays. In the Management Servers table, verify that the name of the management server is correct. Verify the status is up. In the Plug-ins table, verify that the name of the plug-in is Oracle TimesTen In-Memory Database. Locate the Deploy button at the top right of the page.
-
Click Deploy.
Figure 1-17 Confirmation of the deployment to OMS
Description of "Figure 1-17 Confirmation of the deployment to OMS"
Note:
The Oracle Enterprise Manager Cloud Control server restarts during the deployment process.The Deploy Plug-ins on Management Servers: Confirmation page displays with a message indicating the deployment of the plug-in is in progress. The deployment can take several minutes. You can monitor the deployment status by clicking Show Status or going to the Deployment Activities page.
-
Click Show Status.
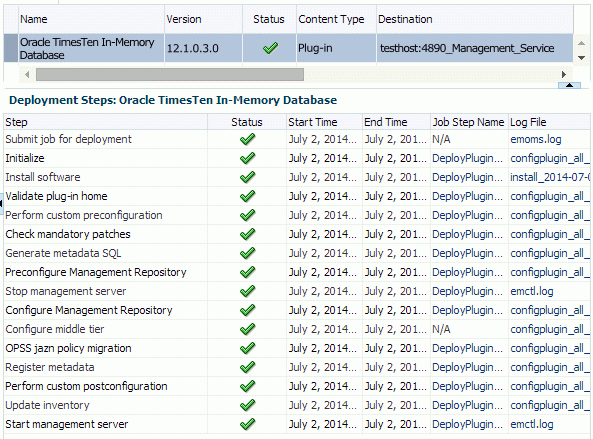
The Plug-ins Deployment Activities page displays showing the status of recent deployment activities and a detailed status of the TimesTen deployment steps in table format. The second table on this page, Deployment Steps: Oracle TimesTen In-Memory Database, shows the deployment steps for the TimesTen plug-in. The last step located in the last row of this table is named "Start management server". Once this step is completed, ensure that there are green checks in the Status column of each row in the Deployment Steps table. Such checks indicate all steps in the deployment process are completed and are successful. If auto refresh is set to off, you may want to set auto refresh to 15 seconds, so you can see the steps as they are completed. You may need to wait a few minutes before changing the auto refresh setting because the Oracle Enterprise Manager Cloud Control server restarts during this deployment.
The plug-in is deployed on OMS.
You are now ready to deploy the plug-in on the Management Agent.
Deploy the plug-in on the Management Agent
You must deploy the plug-in on OMS before deploying the plug-in on one or more Management Agents.
Note:
The TimesTen database, the plug-in, and the agent monitoring the database must be on the same system.To deploy the plug-in on the Management Agent, ensure that you are on the Oracle Enterprise Manager Cloud Control home page.
-
From the Setup menu, select Extensibility, then select Plug-ins.
Figure 1-20 Select Extensibility, then Plug-ins

Description of "Figure 1-20 Select Extensibility, then Plug-ins"
The Plug-ins page displays and you see the plug-ins that have been downloaded and can be deployed. Locate the Databases folder in the Name column.
-
Expand the Databases folder in the Name column and click Oracle TimesTen In-Memory Database.
Figure 1-21 Select Oracle TimesTen In-Memory Database plug-in

Description of "Figure 1-21 Select Oracle TimesTen In-Memory Database plug-in"
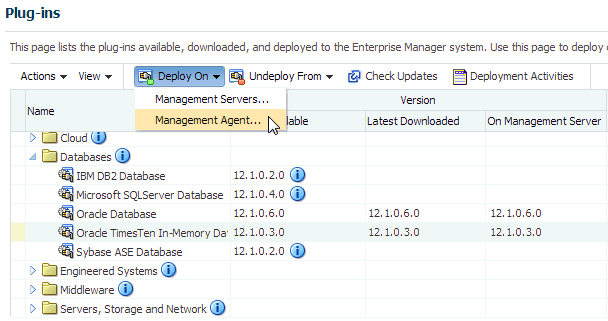
You are now ready to deploy the plug-in on the Agent. Locate the Deploy On tab at the top of the page.
-
From the Deploy On menu, select Management Agent....
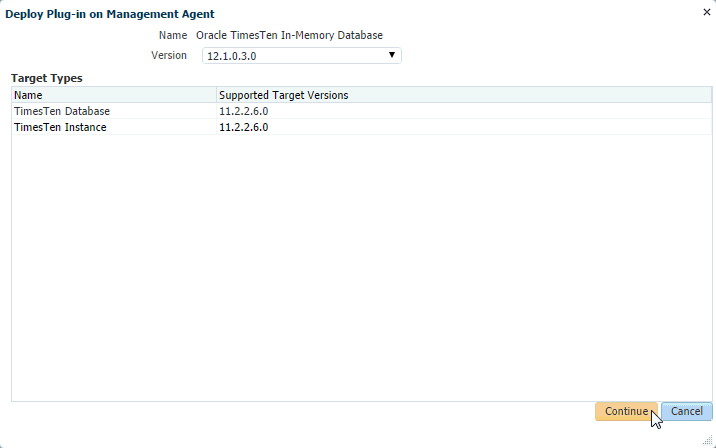
The Deploy Plug-in on Management Agent General page displays. The plug-in Oracle TimesTen In-Memory Database is displayed in the Name column and the Version is auto-filled. The supported target versions column indicates the minimum version of TimesTen that the agent supports. Locate the Continue button below the Target Types table.
-
Click Continue.
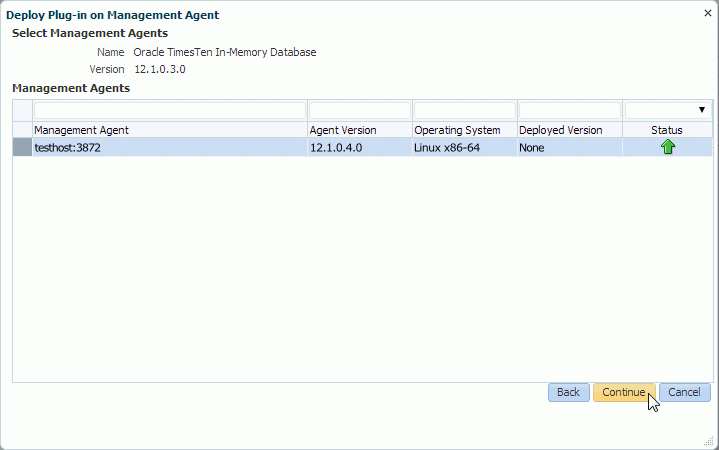
You can now select the agent where you want to deploy the plug-in. The agent status must be up as indicated by the green up arrow in the Status column of the Management Agents table.
-
In the Management Agents table, locate the row that contains the correct agent as identified by management agent. Click in this row and then click Continue.
Figure 1-24 Select agent and click Continue
Description of "Figure 1-24 Select agent and click Continue"
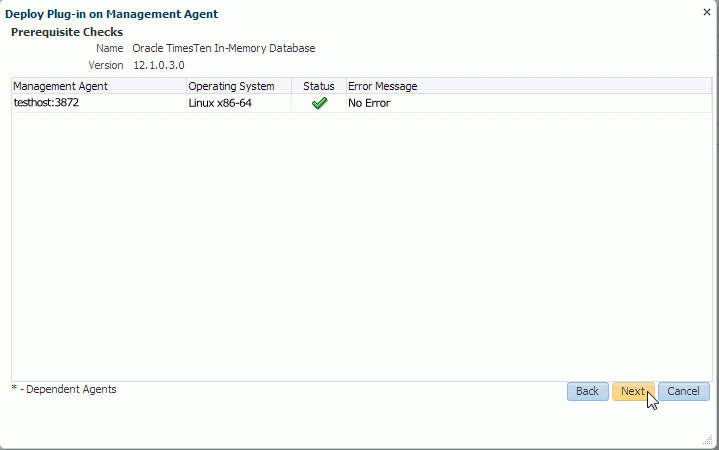
The Deploy Plug-in on Management Agent Prerequisite Checks page displays. In the Management Agent table, verify the Status column has a green check and the Error Message column contains the text "No Error."
-
Click Next.
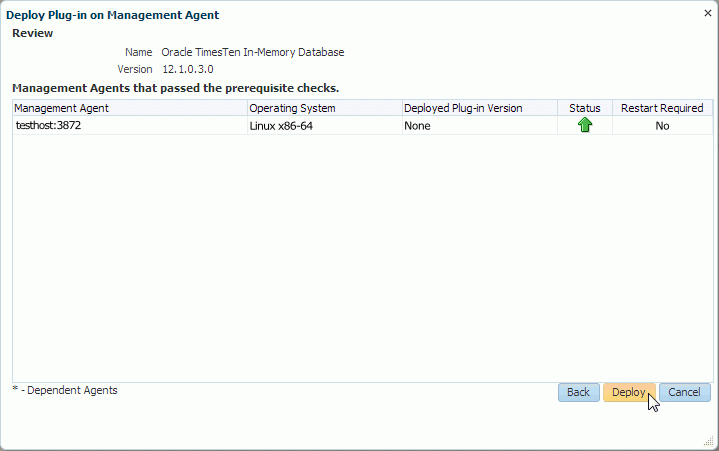
The Deploy Plug-in on Management Agent Review page displays. In the name column, verify the plug-in name is Oracle TimesTen In-Memory Database and the version is correct. Ensure that you see the text "Management Agents that passed the prerequisite checks" and ensure that the Management Agent is correct.
You are ready to deploy the plug-in.
-
Click Deploy.
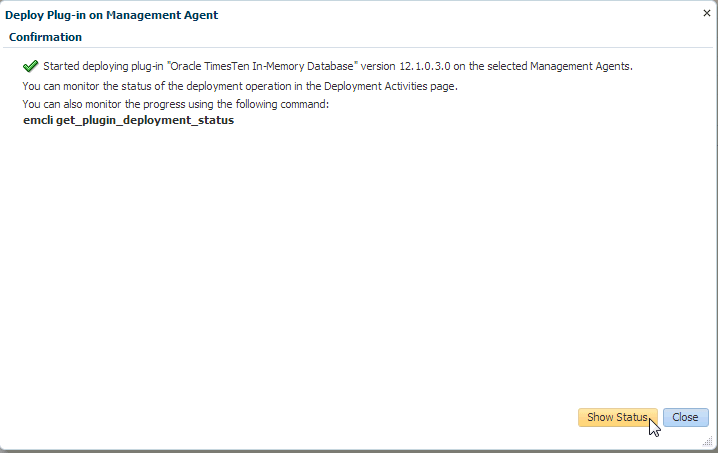
The Deploy Plug-in on Management Agent Confirmation page displays with a message indicating the deployment of the plug-in has started on selected agents. The deployment can take several minutes. You may monitor the deployment status by clicking Show Status or going to the Deployment Activities page.
-
Click Show Status.
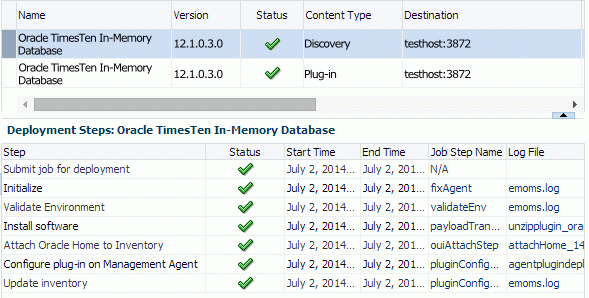
The Plug-ins Deployment Activities page displays showing the status of recent deployment activities and a detailed status of the TimesTen deployment steps in table format. The second table on this page, Deployment Steps: Oracle TimesTen In-Memory Database, shows the deployment steps for the TimesTen plug-in. The last step located in the last row of this table is named "Update inventory". Once this step is completed, ensure that there are green checks in the Status column of each row in the Deployment Steps table. Such checks indicate all steps in the deployment process are completed and are successful. If auto refresh is set to off, you may want to set auto refresh to 15 seconds, so you can see the steps as they are completed.
Figure 1-28 Deployment of agent successful
Description of "Figure 1-28 Deployment of agent successful"
The plug-in is deployed on the Management Agent and the automatic discovery scripts of the plug-in are deployed on the agent. You can now configure automatic discovery for the TimesTen plug-in, see "Initial automatic discovery configuration". Repeat steps 1-8 to deploy the plug-in on additional Management Agents.
You are now ready to configure a TimesTen target.
Configure a TimesTen target
You must configure a TimesTen target that is monitored by Enterprise Manager Cloud Control. You can configure a TimesTen target for TimesTen instances and each unique TimesTen database with either automatic discovery or manual configuration. When you configure a TimesTen database target, use a Data Manager DSN. Client/server DSNs are not supported. Manual configuration is recommended for advanced users.
Note:
You do not need to configure a TimesTen instance target to configure a TimesTen database target.Note:
Ensure that you are logged in as SYSMAN or a user that has add target privileges through an Enterprise Manager role. For more information, see "Defining roles".Follow these instructions before using automatic discovery:
These are the configuration types:
-
Automatic discovery configuration for a TimesTen instance target
-
Automatic discovery configuration for a TimesTen database target
Initial automatic discovery configuration
You must configure each host for automatic discovery before adding a TimesTen instance target or database target through automatic discovery. You do not need to configure automatic discovery if you are adding targets with manual configuration.
For each host that you want to configure for automatic discovery:
-
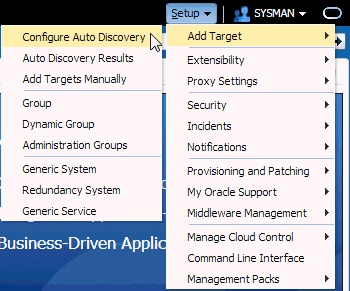
From the Setup menu, select Add Target, then select Configure Auto Discovery.
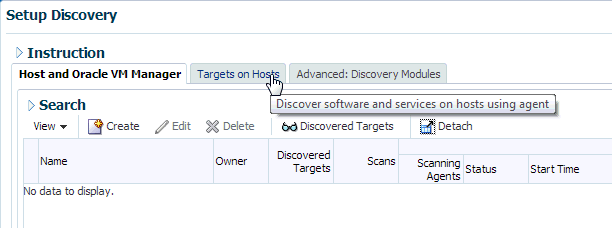
The Setup Discovery page displays. Locate the Target on Hosts tab in the Instruction region.
-
Click Target on Hosts.
Figure 1-30 Configure auto discovery on host
Description of "Figure 1-30 Configure auto discovery on host"
The Setup Discovery page reloads. You can now select the host where the agent is located. The agent status must be up as indicated by the green up arrow in the Agent Host Name column of the Search table.
-
In the Search table, locate the row that contains the correct agent host. Click in this row and then click Discovery Modules.
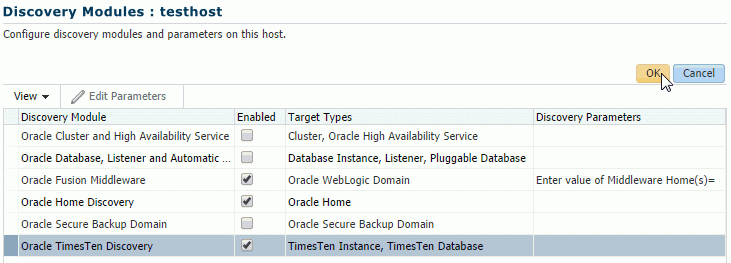
The Discovery Modules page for your host displays. You can now enable the Oracle TimesTen discovery module.
-
In the Discovery Modules table, locate the row that contains the Oracle TimesTen Discovery module. Click in the check box of the Enable column of this row and then click OK.
The Setup Discovery page displays. Repeat steps 1-4 to configure additional hosts for automatic discovery.
You are now ready to discover TimesTen targets on your configured hosts.
-
In the Search table, locate the row that contains the correct agent host. Click in this row and then click Discover Now.
The Discover Now dialog displays. Locate the Yes button.
-
Click Yes.
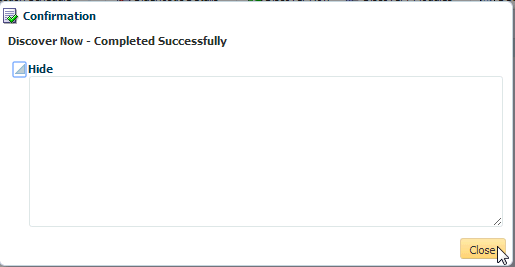
The Run Discovery Now - Confirmation dialog displays. The discovery can take several minutes. You should see the informational message: "Discover Now - Completed Successfully". Locate the Close button.
-
Click Close.
The Setup Discovery page displays. Enterprise Manager has discovered all the targets on your host. Repeat steps 5-7 to discover targets on additional hosts.
You are now ready to configure TimesTen targets with automatic discovery.
Automatic discovery configuration for a TimesTen instance target
Ensure that you have followed the steps described in "Initial automatic discovery configuration" before you configure a TimesTen instance target with automatic discovery. For each TimesTen instance target you want to configure with automatic discovery:
-
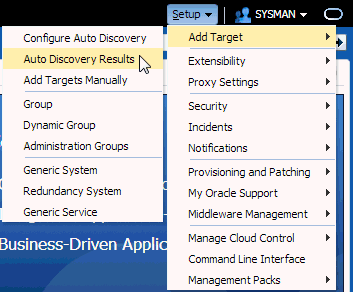
From the Setup menu, select Add Target, then select Auto Discovery Results.
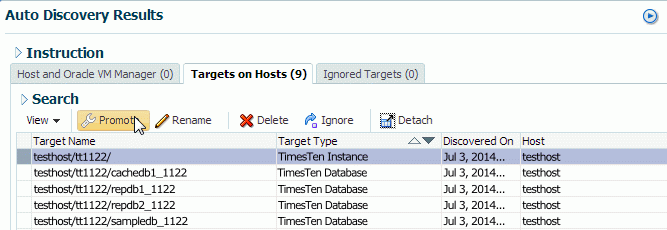
The Auto Discovery Results page displays. Locate the Target on Hosts tab in the Instruction region.
-
Click Target on Hosts.
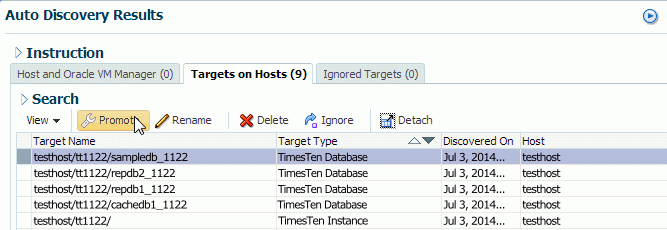
The Auto Discovery Results page reloads. In the Target Type column, locate TimesTen Instance.
-
In the Targets table, locate the row that contains the correct TimesTen instance as identified by the Target Name and Target Type column. Click in this row and then click Promote.
Note:
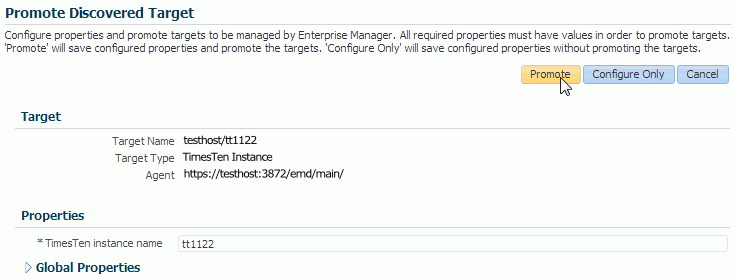
To change the name of a target, select your TimesTen Instance target and click the Rename button. Once you promote a target you cannot change the target name.The Promote Discovered Target page displays. Notice the Target Name, Target Type, and Agent text fields, located below the page title, are auto-filled and cannot be edited. The TimesTen instance name field, located in the Properties region, is auto-filled and is editable.
-
Ensure that the TimesTen instance name is correct and click Promote.
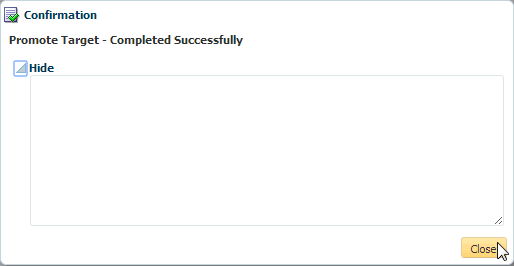
The Confirmation dialog displays. The target promotion can take several minutes. You should see the informational message: "Promote target - Completed Successfully". Locate the Close button.
-
Click Close.
Figure 1-40 Promote target completed successfully
Description of "Figure 1-40 Promote target completed successfully"
Your TimesTen instance target has been successfully added.
You can now verify and view information about your new target. For more information, see "Verifying and validating the plug-in".
Automatic discovery configuration for a TimesTen database target
Ensure that you have followed the steps described in "Initial automatic discovery configuration" before you configure a TimesTen database target with automatic discovery. For each TimesTen database target you want to configure with automatic discovery:
-
From the Setup menu, select Add Target, then select Auto Discovery Results.
The Auto Discovery Results page displays. Locate the Target on Hosts tab in the Instruction region.
-
Click Target on Hosts.
The Auto Discovery Results page reloads. In the Target Type column, locate TimesTen Database.
-
In the Targets table, locate the row that contains the correct TimesTen database as identified by the Target Name and Target Type column. Click in this row and then click Promote.
Note:
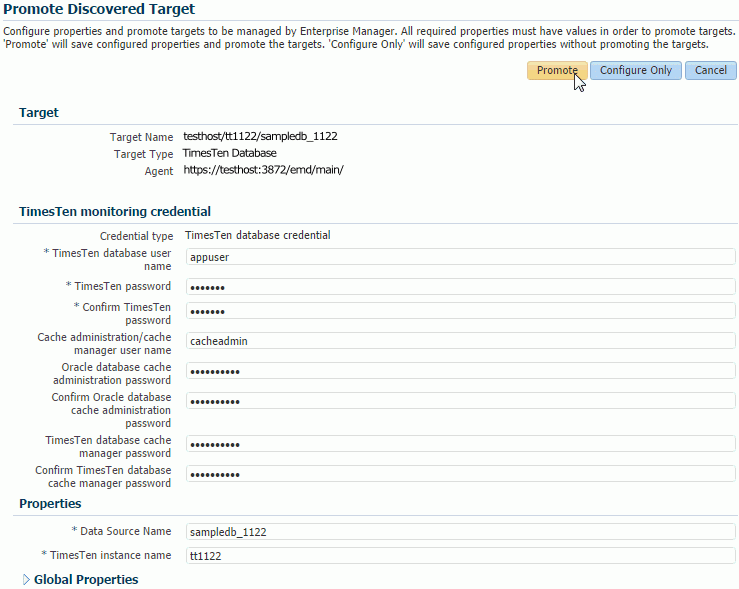
To change the name of a target, select your TimesTen Database target and click the Rename button. Once you promote a target you cannot change the target name.The Promote Discovered Target page displays. Notice the Target Name, Target Type, Agent text, and Credential Type fields, located below the page title, are auto-filled and cannot be edited. You are now ready to enter the TimesTen monitoring credentials properties.
-
In the *TimesTen database user name text field, type the TimesTen database user who has
ADMINprivileges. Note: This user cannot be the TimesTen instance administrator. -
In the *TimesTen password text field, type the password for the TimesTen database user.
-
In the *Confirm TimesTen password text field, re-type the password.
Note:
Steps 7-11 are only required if your database uses TimesTen cache features that you want to monitor. If you do not want to monitor TimesTen cache features, skip to step 12. For more information on TimesTen cache, see Oracle TimesTen Application-Tier Database Cache User's Guide. -
Type the TimesTen cache manager user in the Cache administration/cache manager user name text field. Note: This user must exist on the TimesTen database and the Oracle database.
-
Type the Oracle database cache manager user password in the Oracle database cache administration password text field.
-
In the Confirm Oracle database cache administration password text field, re-type the password.
-
Type the TimesTen cache manager password in the TimesTen database cache manager password text field.
-
In the Confirm TimesTen database cache manager password text field, re-type the password.
-
The *Data Source Name text field is auto-filled. Ensure that the data source name is correct.
-
The *TimesTen instance name text field is auto-filled. Ensure that the TimesTen instance name is correct.
-
Click Promote.
The Confirmation dialog displays. The target promotion can take several minutes. You should see the informational message: "Promote target - Completed Successfully". Locate the Close button.
-
Click Close.
Figure 1-45 Promote target completed successfully

Description of "Figure 1-45 Promote target completed successfully"
Your TimesTen database target has been successfully added.
You can now verify and view information about your new target. For more information, see "Verifying and validating the plug-in".
Manual configuration for a TimesTen instance target
For each TimesTen instance target you want to configure manually:
-
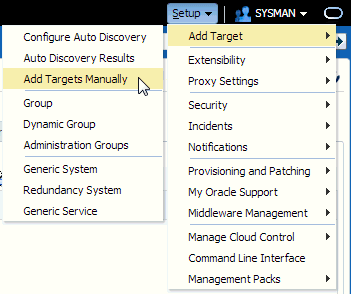
From the Setup menu, select Add Target, then select Add Targets Manually.
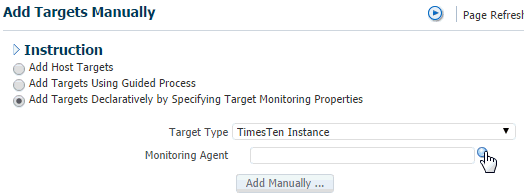
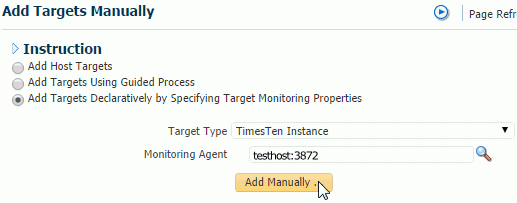
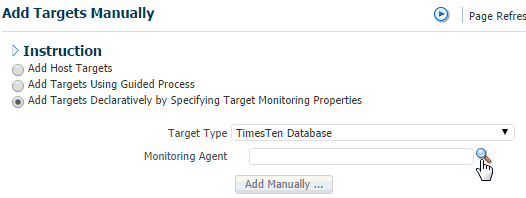
The Add Targets Manually page displays. Locate the Add Targets Declaratively by Specifying Target Monitoring Properties option in the middle left section of the page.
-
Click in the circle to the left of the text Add Targets Declaratively by Specifying Target Monitoring Properties.
The Target Type select list displays. You are now ready to select TimesTen Instance.
-
Expand the drop-down list labeled Target Type and select TimesTen Instance.
You are now ready to search for the Monitoring Agent. Locate the Monitoring Agent search box below the Target Type select list.
-
Click the Search icon located to the right of Monitoring Agent.
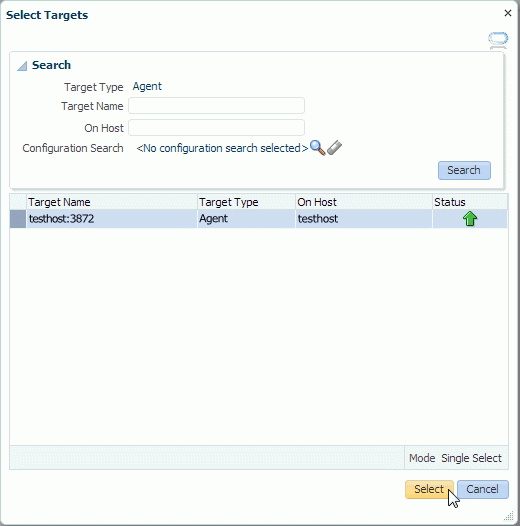
The Select Targets dialog displays. You are now ready to select the monitoring agent for your TimesTen instance target. Locate the Targets table with columns Target Name, Target Type, On Host, and Status. Identify the Target Name of your agent. Ensure that the Target Type is Agent and double check the On Host column to ensure that the host name is correct.
-
Click in the row that identifies the Target Name of your agent and click Select.
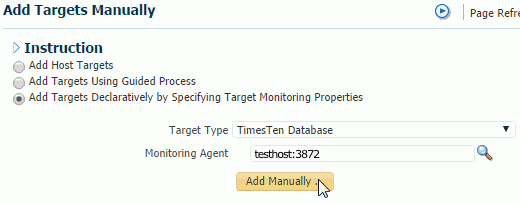
The Select Targets dialog closes and you are returned back to the Add Targets Manually page. Notice the agent you selected is auto-filled in the Monitoring Agent text field. Double check the Target Type is TimesTen Instance and the agent is correct.
You are now ready to add the target.
-
Click Add Manually...
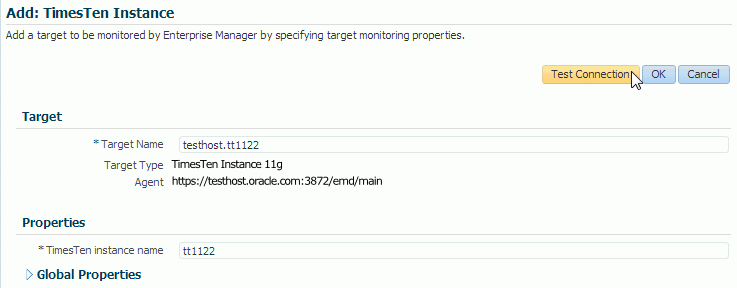
The Add: TimesTen Instance page displays. Prepare to enter the target properties for your instance target. The first property is the target name.
In the Target Name text field, you define the TimesTen instance target name. Select a name that is a meaningful identifier. (For example,
hostname.instance.) -
In the *Target Name text field, type the TimesTen target name.
Notice the Target Type and Agent text fields, located below the Target Name text field, are auto-filled. You are now ready to enter the TimesTen instance name.
-
In the *TimesTen instance name text field, type the name of your TimesTen instance. (Use the
ttStatusutility if you cannot recall the instance name. For more information, see "ttStatus" in the Oracle TimesTen In-Memory Database Reference.)You are now ready to test your connection to ensure that your target is deployed successfully and configured properly.
-
Click Test Connection.
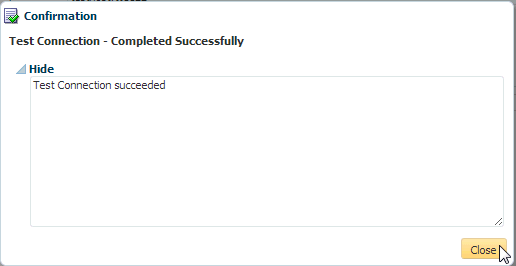
The Confirmation dialog displays. You should see the informational message: "Test Connection succeeded." If you do not see the "Test Connection succeeded" message, ensure that your instance name is correct.
-
In the Test Connection dialog, click Close.
The Confirmation dialog closes. Locate the OK button at the top right of the page.
-
Click OK.
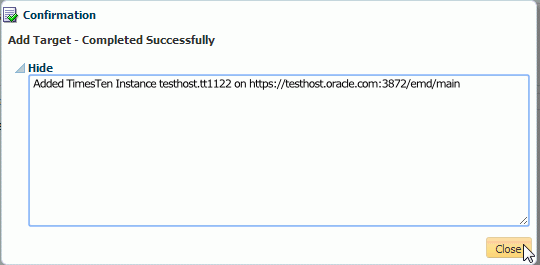
A second Confirmation dialog displays. You should see the informational message "Add Target - Completed Successfully." The target type (TimesTen Instance), Target name, and Agent are also displayed.
-
Click Close.
Your TimesTen instance target has been successfully added.
You can now verify and view information about your new target. For more information, see "Verifying and validating the plug-in".
Manual configuration for a TimesTen database target
For each TimesTen database target you want to configure manually:
-
From the Setup menu, select Add Target, then select Add Targets Manually.
The Add Targets Manually page displays. Locate the Add Targets Declaratively by Specifying Target Monitoring Properties option in the middle left section of the page.
-
Click in the circle to the left of the text Add Targets Declaratively by Specifying Target Monitoring Properties.
The Target Type select list displays. You are now ready to select TimesTen Database.
-
Expand the drop-down list labeled Target Type and select TimesTen Database.
You are now ready to search for the Monitoring Agent. Locate the Monitoring Agent search box below the Target Type select list.
-
Click the Search icon located to the right of Monitoring Agent.
The Select Targets dialog displays. You are now ready to select the monitoring agent for your TimesTen target. Locate the Targets table with columns Target Name, Target Type, On Host, and Status. Identify the Target Name of your agent. Ensure that the Target Type is Agent and double check the On Host column to ensure that the host name is correct.
-
Click in the row that identifies the Target Name of your agent and click Select.
The Select Targets dialog closes and you are returned back to the Add Targets Manually page. Notice the agent you selected is auto-filled in the Monitoring Agent text field. Double check the Target Type is TimesTen Database and the agent is correct.
You are now ready to add the target.
-
Click Add Manually...
The Add: TimesTen Database page displays. Prepare to enter the target properties for your target. The first property is the target name.
In the Target Name text field, you define the TimesTen target name. Select a name that is a meaningful identifier. (For example,
hostname.instance.DSN.) -
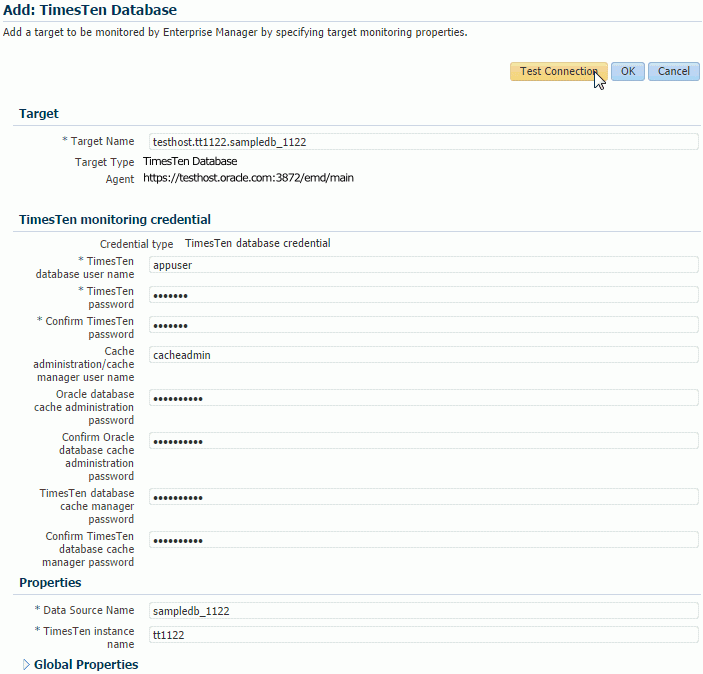
In the *Target Name text field, type the TimesTen target name.
Notice the Target Type, Agent, and Credential Type text fields, located below the Target Name text field, are auto-filled. You are now ready to enter the TimesTen monitoring credentials properties.
-
In the *TimesTen database user name text field, type the TimesTen database user who has
ADMINprivileges. Note: This user cannot be the TimesTen instance administrator. -
In the *TimesTen password text field, type the password for the TimesTen database user.
-
In the *Confirm TimesTen password text field, re-type the password. You are now ready to enter the TimesTen properties.
Note:
Steps 11-15 are only required if your database uses TimesTen cache features that you want to monitor. If you do not want to monitor TimesTen cache features, skip to step 16. For more information on TimesTen cache, see Oracle TimesTen Application-Tier Database Cache User's Guide. -
Type the TimesTen cache manager user in the Cache administration/cache manager user name text field. Note: This user must exist on the TimesTen database and the Oracle database.
-
Type the Oracle database cache manager user password in the Oracle database cache administration password text field.
-
In the Confirm Oracle database cache administration password text field, re-type the password.
-
Type the TimesTen cache manager password in the TimesTen database cache manager password text field.
-
In the Confirm TimesTen database cache manager password text field, re-type the password.
-
In the *Data Source Name text field, type the DSN. The DSN must be a system DSN that is described in either your
sys.odbc.inifile or the ODBC Data Source Administrator on MS Windows. -
In the *TimesTen instance name text field, type the name of your TimesTen instance. (Use the
ttStatusutility if you cannot recall the instance name. For more information, see "ttStatus" in the Oracle TimesTen In-Memory Database Reference.)You are now ready to test your connection to ensure that your target is deployed successfully and configured properly.
-
Click Test Connection.
Figure 1-59 Add TimesTen specific information
Description of "Figure 1-59 Add TimesTen specific information "
The Confirmation dialog displays. You should see the informational message: "Test Connection succeeded." If you do not see the "Test Connection succeeded" message, ensure that your instance name and DSN are correct and the TimesTen database for the DSN is loaded into memory.
-
In the Test Connection dialog, click Close.
The Confirmation dialog closes. Locate the OK tab at the top right of the page.
-
Click OK.
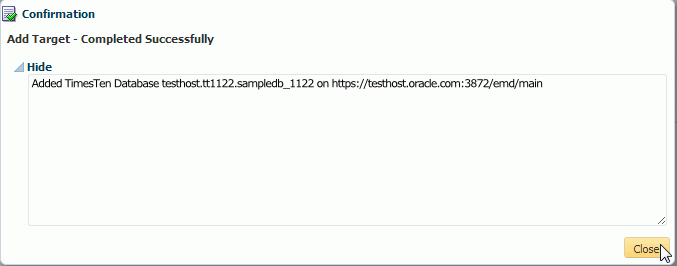
A second Confirmation dialog displays. You should see the informational message "Add Target - Completed Successfully." The target type (TimesTen Database), Target name, and Agent are also displayed.
-
Click Close.
Your TimesTen database target has been successfully added.
You can now verify and view information about your new target. For more information, see "Verifying and validating the plug-in".
Verifying and validating the plug-in
After waiting a few minutes for the plug-in to start collecting data:
-
From the Targets menu, select All Targets on the Enterprise Manager Cloud Control 12c home page.
The All Targets page displays. Locate the Refine Search panel under All Targets.
-
Expand Target Type, then Databases and click TimesTen Instance or TimesTen Database.
The target table displays. For each row in the table, confirm the column Target Type contains TimesTen Instance or TimesTen Database and each row of the table contains the name of the target you previously configured. For more information on configuring a TimesTen target, see "Configure a TimesTen target".
For each target type row, locate the column Target Status. Verify there is a green up arrow indicating the status is Up.
Figure 1-63 Verify the TimesTen target is Up.

Description of "Figure 1-63 Verify the TimesTen target is Up."
You are now ready to verify there are no metric errors.
-
In the target table, locate the row that contains your TimesTen target. In the column Target Name, click the Target Name. (The target name is the name of the TimesTen target you configured).
The TimesTen target page displays.
-
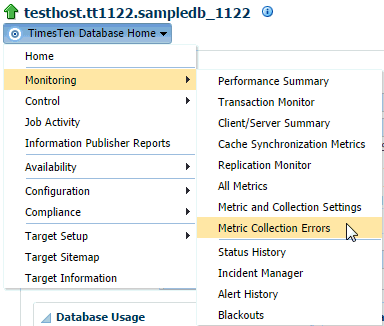
From the TimesTen Database Home menu, select Monitoring, then select Metric Collection Errors.
Figure 1-65 Select Metric Collection Errors
Description of "Figure 1-65 Select Metric Collection Errors"
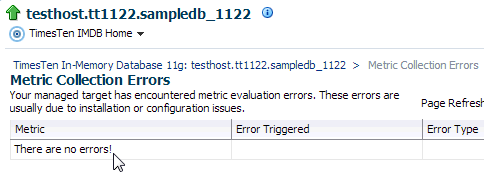
The Metric Collection Errors page displays a table with metric collection error information. Verify the first column named Metrics contains the text "There are no errors!".
You are now ready to set preferred credentials for your target.
Setting preferred credentials for a target
Set preferred credentials for a TimesTen target to:
-
Start and stop the TimesTen daemon of a TimesTen instance.
-
Use the transaction monitor of a TimesTen database.
-
Create backups of a TimesTen database.
-
Start and stop the TimesTen cache agent of a TimesTen database.
-
Start and Stop the TimesTen replication agent of a TimesTen database.
-
Load and unload a TimesTen database from memory.
For more information on the transaction monitor, see "Working with the Transaction Monitor".
To set the preferred credentials for a target:
-
Ensure that you are on the Enterprise Manager Cloud Control home page. From the Setup menu, select Security, then select Preferred Credentials.
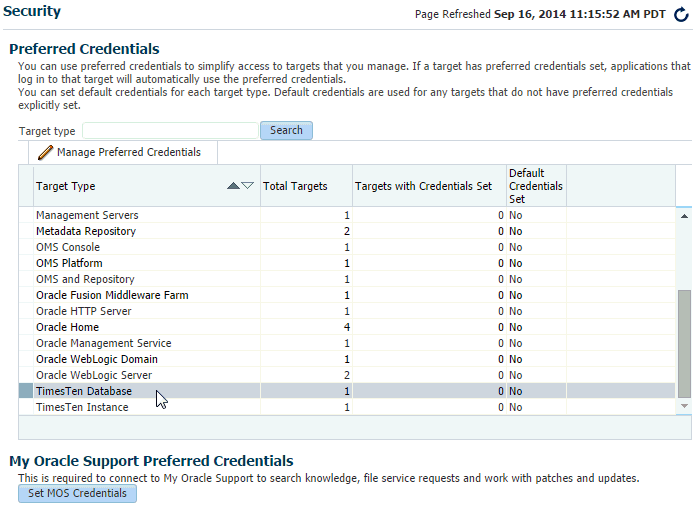
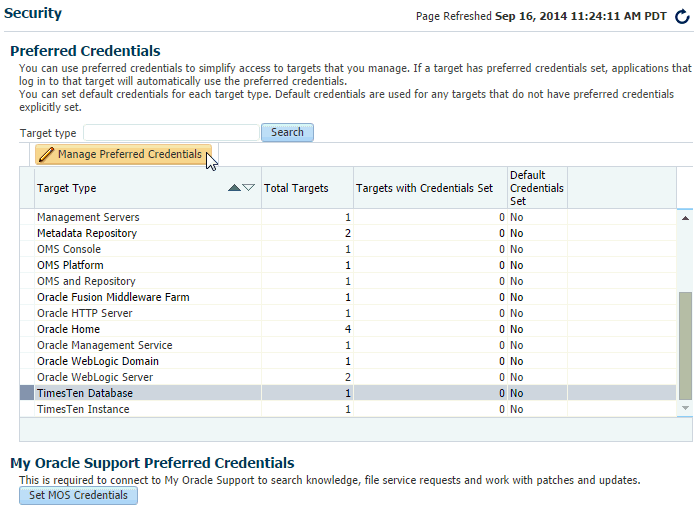
The Security Preferred Credentials page displays. Locate TimesTen Instance or TimesTen Database in the Target Type column.
-
Click TimesTen Instance or TimesTen Database.
You are now ready to set the preferred credentials for your TimesTen target. Locate the Manage Preferred Credentials button.
-
Click Manage Preferred Credentials.
Figure 1-68 Click Manage Preferred Credentials
Description of "Figure 1-68 Click Manage Preferred Credentials"
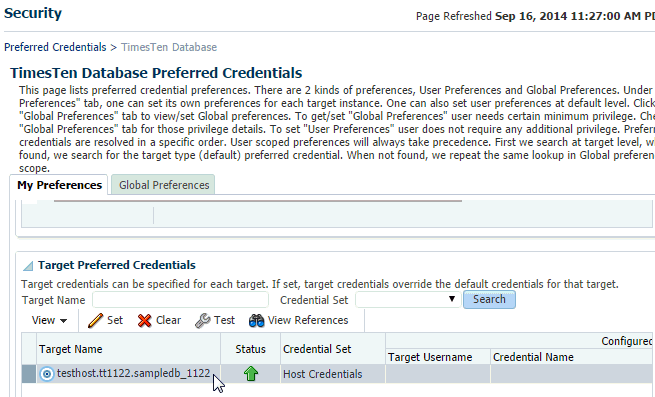
Depending on your selection, the TimesTen Instance Preferred Credentials or TimesTen Database Preferred Credentials page displays.
-
In the Target Preferred Credentials table, locate the row that contains your TimesTen target. In the column Target Name, click the Target Name. (The target name is the name of the TimesTen target you configured.)
-
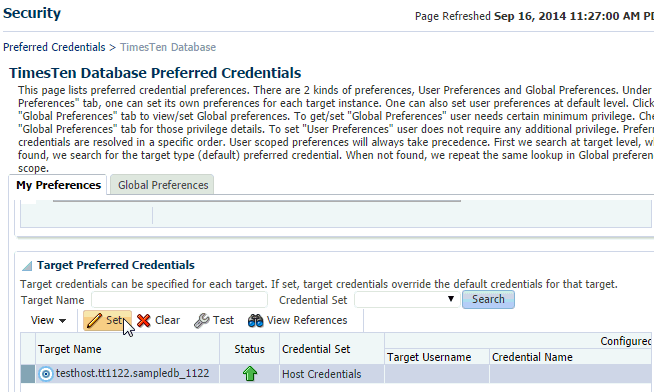
Click Set.
The Select Named Credentials dialog displays.
-
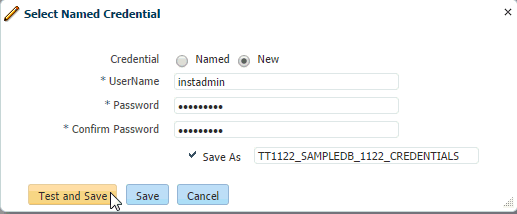
Click in the circle to the left of the text New.
Note:
If you already have a named credential, select it and skip to step 12.The Select Named credential dialog refreshes. You are now required to enter the preferred credentials for your TimesTen target. The first property is the UserName.
-
In the *UserName text field, type the user who has access to the target host. The username must be the operating system username of the TimesTen instance administrator.
-
In the *Password text field, type the password for the user who has access to the target host. The password must be the operating system password of the TimesTen instance administrator.
-
In the *Confirm password text field, re-type the password.
-
Click in the check box to the left of the text Save As.
-
In the Save As text field, type the name you want to use for the preferred credentials. The credentials are saved with this name.
-
Click Test and Save.
The information dialog displays with the text "Named credential association completed successfully".
Figure 1-73 Successful named credential association

Description of "Figure 1-73 Successful named credential association"
You have successfully associated the credential with your TimesTen target.
Changing the monitoring configuration of a TimesTen database target
When you configure your TimesTen database target, you specify the TimesTen username and password. If you change the password for this TimesTen user in the TimesTen database, you must update the password in the Enterprise Manager Cloud Control monitoring configuration. For more information on configuring your TimesTen target, see "Configure a TimesTen target".
To change the monitoring configuration of your TimesTen database target:
-
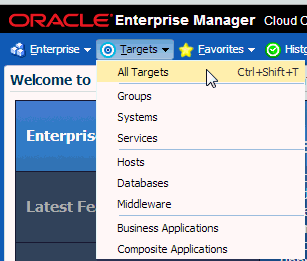
Ensure that you are on the Enterprise Manager Cloud Control home page. From the Targets menu, select All Targets on the Enterprise Manager Cloud Control 12c home page.
The All Targets page displays. Locate the Refine Search panel under All Targets.
-
Expand Target Type, then Databases and click TimesTen Instance or TimesTen Database.
Locate the row that contains the target name.
You are now ready to update the password.
-
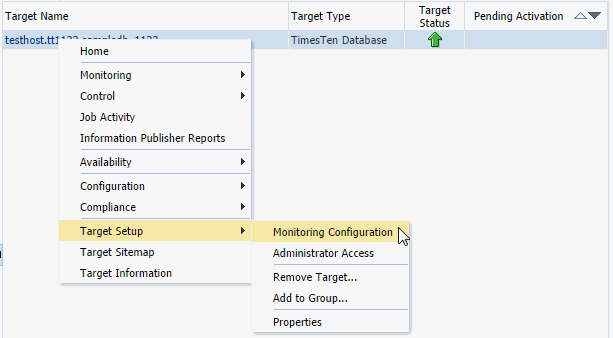
Right-click the Target Name located in the Target Name column of the row containing the TimesTen target and select Target Setup, then Monitoring Configuration.
Figure 1-76 Change the monitoring configuration
Description of "Figure 1-76 Change the monitoring configuration"
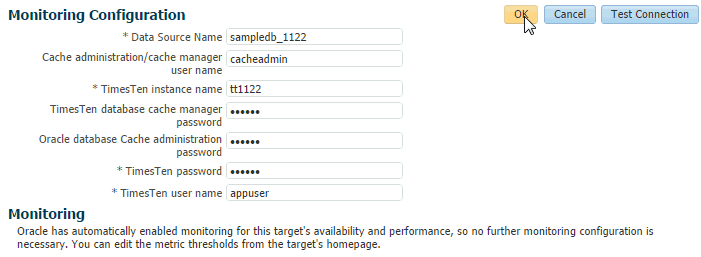
The target monitoring configuration page displays. The Data Source Name, the TimesTen instance name, and the TimesTen username are auto-filled. If you have the TimesTen cache feature configured, the Cache admin password and the Cache admin user name text fields are auto-filled.
-
In the TimesTen password text field, type the new password. This password must be the same password that exists in the TimesTen database for your TimesTen user. For example, if the TimesTen user name is
appuser, and in the TimesTen database, you modified the TimesTen password forappuserto benewpassword, then in the TimesTen password field, typenewpassword. For more information on changing a password in the TimesTen database, see "ALTER USER" in the Oracle TimesTen In-Memory Database SQL Reference. -
Click OK.
The Saved Successfully dialog displays indicating the settings are saved correctly in the repository.
-
In the Saved Successfully dialog, click OK.
Figure 1-78 Monitoring configuration saved successfully

Description of "Figure 1-78 Monitoring configuration saved successfully"
The Saved Successfully dialog closes.
You can verify the new monitoring configuration of your target. For more information on verifying a TimesTen target, see "Verifying and validating the plug-in".
Upgrading the Enterprise Manager Plug-in for TimesTen
You can upgrade the plug-in from version 12.1.0.2.0 to version 12.1.0.3.0. Upgrading the plug-in enables you to use the new features of the new plug-in while still keeping all of the metrics that the previous plug-in has collected.
Before upgrading, ensure that you have Oracle Enterprise Manager Cloud Control 12c Release 4 (or higher).
Note:
If you perform these operations while performing an upgrade, your Management Agent automatically upgrades to version 12.1.0.3.0:-
Adding new TimesTen targets to Management Agents with the 12.1.0.2.0 plug-in version.
-
Testing connection when modifying the monitoring configuration of an existing 12.1.0.2.0 TimesTen target. For more information, see "Changing the monitoring configuration of a TimesTen database target".
To upgrade the plug-in from version 12.1.0.2.0 to version 12.1.0.3.0:
-
Download the 12.1.0.3.0 plug-in. For more information, see "Download the plug-in".
-
Deploy the 12.1.0.3.0 plug-in on the Management Server. For more information, see "Deploy the plug-in on Oracle Management Service".
-
Deploy the 12.1.0.3.0 plug-in on the Management Agent. For more information, see "Deploy the plug-in on the Management Agent". It is recommended to complete this step after with step 2. However, if you only upgrade the Management Server while testing the new plug-in some features will not work. For more information, see "Limited functionality when only upgrading Management Server".
You have successfully upgraded the TimesTen plug-in from version 12.1.0.2.0 to version 12.1.0.3.0. You do not need to modify any of your TimesTen target settings.
Limited functionality when only upgrading Management Server
While testing the new plug-in, you may decide to only upgrade the 12.1.0.3.0 plug-in on the Management Server. In this case, your Management Server is version 12.1.0.3.0 while your Management Agent is version 12.1.0.2.0 and certain features will not work. The following features will not work:
-
On the database Home page, the SQL Monitor is unavailable.
-
On the database Performance page, checkpoint history is unavailable.
-
On the database Replication Monitor page, transmitter and receiver thread status is unavailable.
-
The database Transaction Monitor is unavailable.
Uninstalling the Enterprise Manager Plug-in for TimesTen
You must remove all TimesTen targets before you can undeploy the plug-in. For example, if you have three TimesTen targets and two targets are deployed to one agent and the third target is deployed to a second agent, you must:
-
Remove target 1 on agent 1.
-
Remove target 2 on agent 1.
-
Remove target 3 on agent 2.
You then undeploy and delete the plug-in from the Oracle Enterprise Manager Cloud Control.
To uninstall the Enterprise Manager Plug-in for TimesTen:
Remove the TimesTen target
For each TimesTen target you want to remove:
-
From the Targets menu, select All Targets on the Enterprise Manager Cloud Control home page.
The All Targets page displays. Locate the Refine Search panel under the text "All Targets."
-
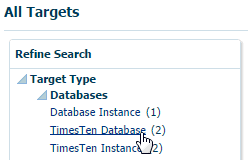
Expand Target Type, then Databases and click TimesTen Instance or TimesTen Database.
Figure 1-80 Select TimesTen In Memory Database
Description of "Figure 1-80 Select TimesTen In Memory Database"
The target table displays. For each row in the table, confirm the column Target Type is TimesTen Instance or TimesTen Database. Also, confirm each row of the table contains the name of the target you previously configured.
Locate the row that contains the target name you want to remove.
-
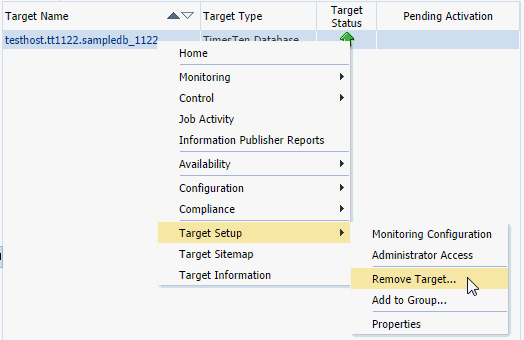
Right-click the Target Name located in the Target Name column of the row containing the TimesTen target and select Target Setup, then Remove Target...
The Confirmation dialog displays the text "You have chosen to remove
TimesTen_target_name(TimesTen Instance). Do you want to proceed?" or "You have chosen to removeTimesTen_target_name(TimesTen Database). Do you want to proceed?"The
TimesTen_target_nameis the name of your TimesTen target. For example,testhost.tt1122.sampledb_1122. -
Click Yes.
Figure 1-82 Remove target confirmation dialog

Description of "Figure 1-82 Remove target confirmation dialog"
The Information dialog displays the text "Target
TimesTen_target_name(TimesTen Instance) has been deleted" or "TargetTimesTen_target_name(TimesTen Database) has been deleted" whereTimesTen_target_nameis the name of your TimesTen target. -
Click OK.
Verify the row that contained the TimesTen target has been removed from the target table.
Your TimesTen target is removed. Repeat Steps 1-5 to remove additional targets. If all targets are removed, you can undeploy and then delete the plug-in from the Oracle Enterprise Manager Cloud Control.
Undeploy the plug-in from the Management Agent
You must undeploy the plug-in from all the Management Agents that are monitoring TimesTen targets.
Note:
Undeploy the plug-in from the Management Agents before you undeploy the plug-in from the Oracle Management Service (OMS).Ensure that you have removed all TimesTen targets. For more information on the steps to remove a TimesTen target, see "Remove the TimesTen target".
To undeploy the plug-in from the Management Agent, ensure that you are on the Oracle Enterprise Manager Cloud Control home page.
-
From the Setup menu, select Extensibility, then select Plug-ins.
Figure 1-84 Select Extensibility, then Plug-ins

Description of "Figure 1-84 Select Extensibility, then Plug-ins"
The Plug-ins page displays and shows the Plug-ins table. Locate the Databases folder in the Name column.
-
Expand the Databases folder in the Name column and click Oracle TimesTen In-Memory Database.
Figure 1-85 Select Oracle TimesTen In-Memory Database plug-in

Description of "Figure 1-85 Select Oracle TimesTen In-Memory Database plug-in"
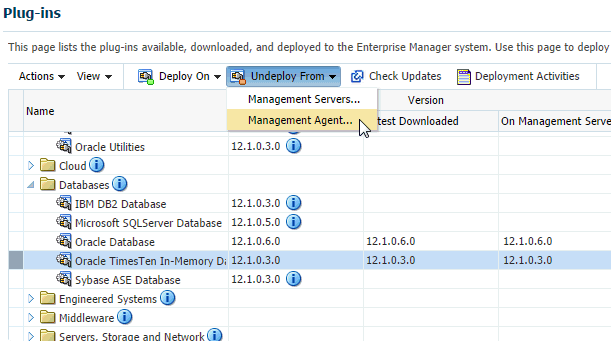
You are now ready to undeploy the plug-in from the agent. Locate the Undeploy From tab at the top of the page.
-
From the Undeploy From menu, select Management Agent....
Figure 1-86 Undeploy from Management Agent
Description of "Figure 1-86 Undeploy from Management Agent"
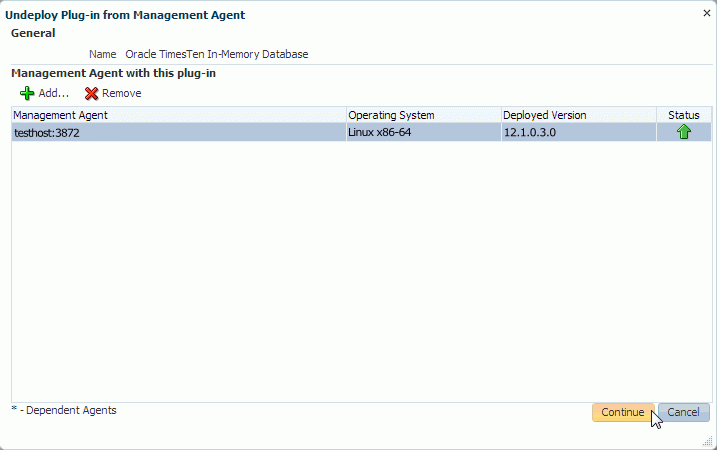
The Undeploy Plug-in from Management Agent General dialog displays. The plug-in Oracle TimesTen In-Memory Database is displayed in the Name column. Locate the Add... button below the Management Agent with this plug-in title.
-
Click Add...
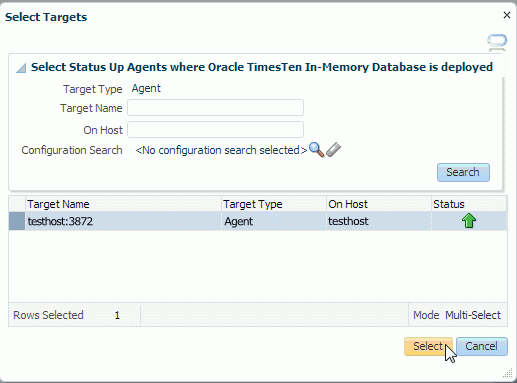
The Select Targets dialog displays. You are now ready to select the agent to undeploy. Below the text "Select Status Up Agents where TimesTen In-Memory Database is deployed," ensure that the Target Type column equals Agent.
-
In the Target table, locate the row that contains the correct agent as identified by target name and host. Click in this row and then click Select.
The Management Agent table is updated with the name of the Management Agent you selected.
-
Click Continue.
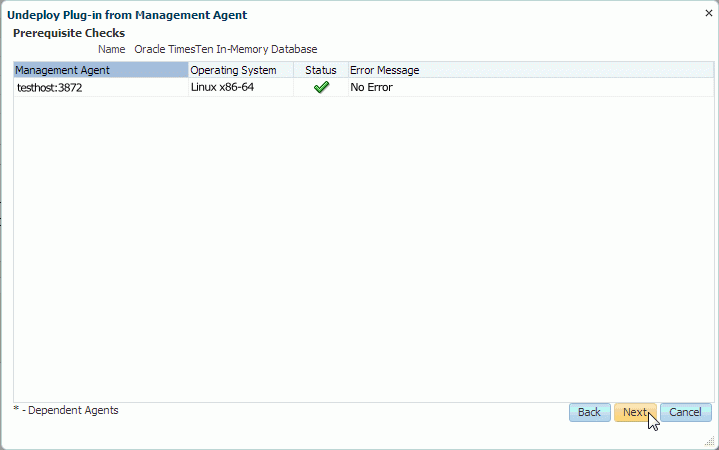
The Undeploy Plug-in from Management Prerequisite Checks dialog displays. Ensure that there is a green check mark in the Status column of the Management Agent table.
-
Click Next.
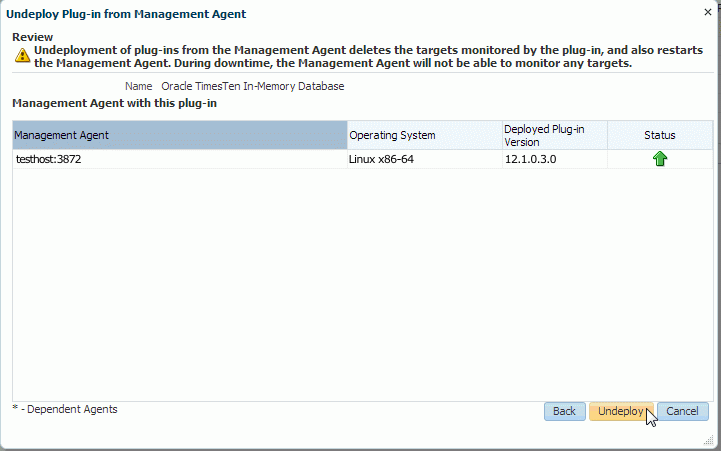
The Undeploy Plug-in From Management Agent Review dialog displays and shows the informational message, "Undeployment of plug-ins from the Management Agent deletes the targets monitored by the plug-in, and also restarts the Management Agent. During downtime, the Management Agent will not be able to monitor any targets."
In the Management Agent with this plug-in table, verify the name in the Management Agent column is correct.
-
Click Undeploy.
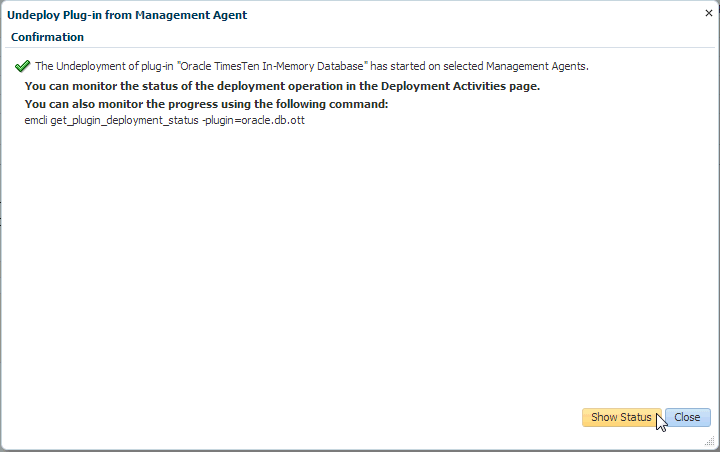
The Undeploy Plug-in from Management Agent Confirmation dialog displays with a message indicating the undeployment of the plug-in has started on selected agents. The undeployment time varies. You may monitor the undeployment status by clicking Show Status or going to the Recent Deployment Activities page.
-
Click Show Status.
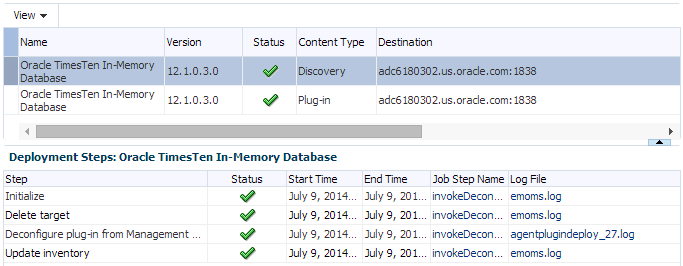
The Plug-ins Deployment Activities page displays showing the status of the undeployment steps in table format. Verify the first step located in the first row of the table contains the text, "Initialize" and verify the last step located in the last row of the table contains the text, "Update inventory." This is the last step in the undeployment process. Ensure that there are green checks in the Status column of each row in the Deployment Steps table. Such checks indicate all steps in the undeployment process are completed and are successful. Also, ensure that there is a green check in the Status column in the undeployment table located at the top of the page. If auto refresh is set to off, you may want to set auto refresh to 15 seconds, so you can see the steps as they are completed.
The plug-in is undeployed from the Management Agent and the automatic discovery scripts of the plug-in are removed from the Management Agent. Repeat Steps 1-8 to undeploy each management agent that is monitoring the plug-in.
You are now ready to undeploy the plug-in from the Oracle Management Service (OMS).
Undeploy the plug-in from OMS
Before you undeploy the plug-in from OMS, ensure that you have undeployed the plug-in from all the Management Agents that are monitoring the plug-in.
To undeploy the plug-in from OMS, ensure that you are on the Oracle Enterprise Manager Cloud Control home page.
-
From the Setup menu, select Extensibility, then select Plug-ins.
Figure 1-94 Select Extensibility, then Plug-ins

Description of "Figure 1-94 Select Extensibility, then Plug-ins"
The Plug-ins page displays and shows the Plug-ins table. Locate the Databases folder in the Name column.
-
Expand the Databases folder in the Name column and select Oracle TimesTen In-Memory Database.
Figure 1-95 Select TimesTen In-Memory Database plug-in

Description of "Figure 1-95 Select TimesTen In-Memory Database plug-in"
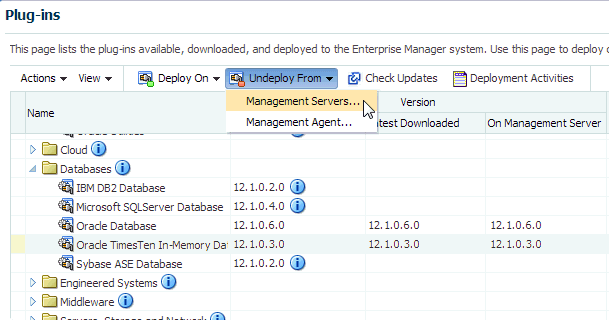
You are now ready to undeploy the plug-in from OMS. Locate the Undeploy From tab at the top of the page.
-
From the Undeploy From menu, select Management Servers....
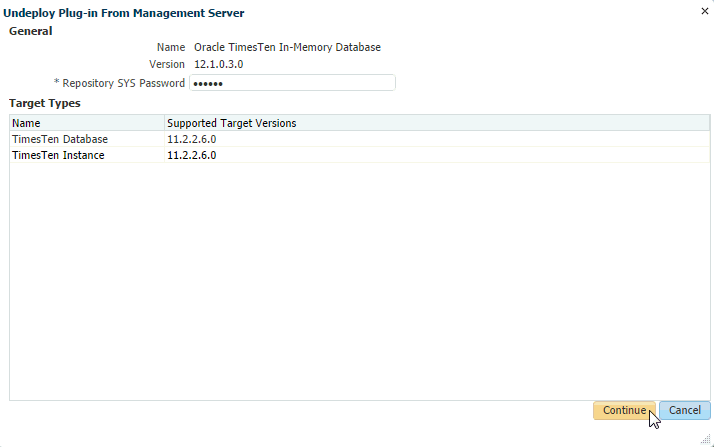
The Undeploy Plug-in from Management Server General page displays. The plug-in Oracle TimesTen In-Memory Database is displayed in the Name column and the Version is auto-filled. You must enter the Repository
SYSuser password. -
In the *Repository SYS Password column, type the Repository
SYSuser password.Locate the Continue button in the bottom right of the dialog.
-
Click Continue.
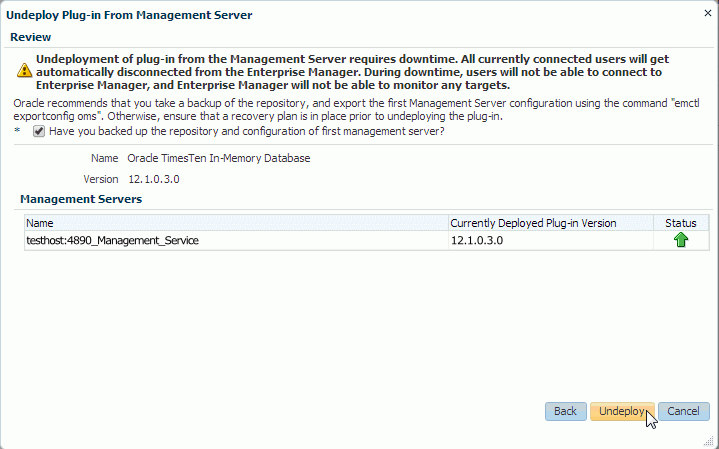
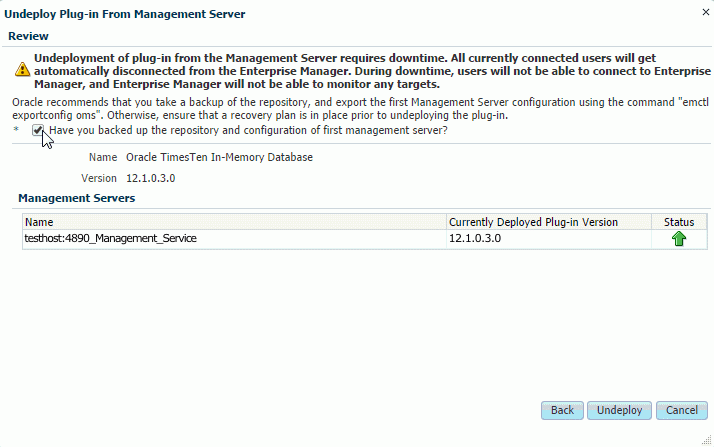
The Undeploy Plug-in From Management Server Review page displays. In the Management Servers table, verify the Management Server name is correct. Verify the version is correct. Also, consider making a backup of the OMS repository before deploying the plug-in. For more information on backing up the OMS repository, see "Backing Up the OMS" in the Oracle Enterprise Manager Cloud Control Advanced Installation and Configuration Guide.
-
Select the Have you backed up the repository and configuration of first management server? check box.
Figure 1-99 Select repository backup confirmation
Description of "Figure 1-99 Select repository backup confirmation"
-
Click Undeploy.
Note:
The Oracle Enterprise Manager Cloud Control server restarts during the undeployment process.The Undeploy Plug-in From Management Server Confirmation page displays with a message indicating the undeployment of the plug-in is in progress. The undeployment time varies. You may monitor the undeployment status by clicking Show Status or going to the Recent Deployment Activities page.
-
Click Show Status.
Figure 1-101 Undeploy from OMS confirmation
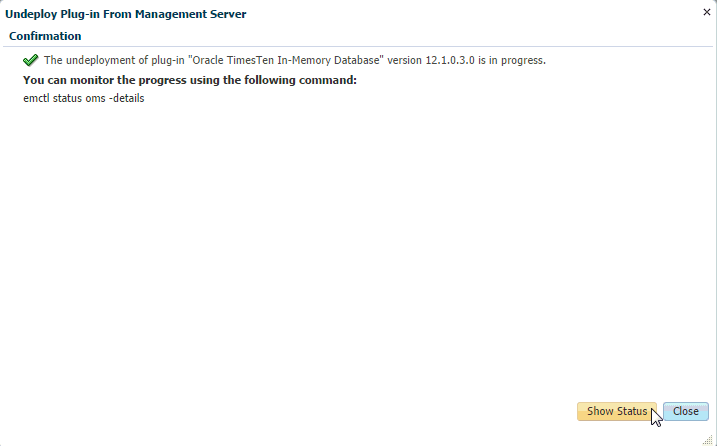
Description of "Figure 1-101 Undeploy from OMS confirmation"
The Plug-ins Deployment Activities page displays showing the status of the undeployment steps in table format. Verify the last step located in the last row of the table contains the text, "Remove plugin's oracle home." This is the last step in the undeployment process. Ensure that there are green checks in the Status column of each row in the Deployment Steps table. Such checks indicate all steps in the undeployment process are completed and are successful. Also, ensure that there is a green check in the Status column in the undeployment table located at the top of the page. If auto refresh is set to off, you may want to set auto refresh to 15 seconds, so you can see the steps as they are completed.
Figure 1-102 Undeployment of OMS successful
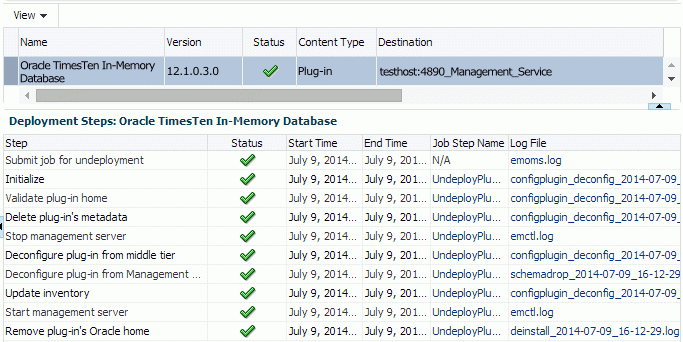
Description of "Figure 1-102 Undeployment of OMS successful"
The plug-in is undeployed from OMS.
You are now ready to delete the plug-in from OMS and the Management Agent.
Delete the plug-in
When you delete the plug-in, you remove the plug-in from the Oracle Enterprise Manager Cloud Control. To delete the plug-in, ensure that you are on the Oracle Enterprise Manager Cloud Control home page.
-
From the Setup menu, select Extensibility, then select Self Update.
Figure 1-103 Select Extensibility, then Self Update
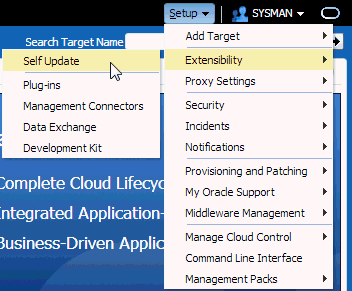
Description of "Figure 1-103 Select Extensibility, then Self Update"
The Self Update page displays. Locate the Plug-in folder.
-
Click the name Plug-in.
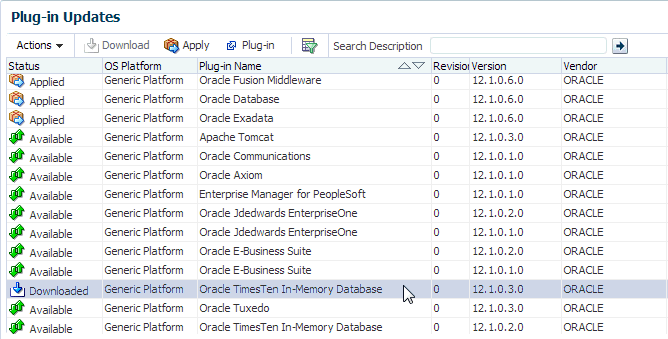
The Plug-in Updates page displays. In the Plug-in Name column, locate Oracle TimesTen In-Memory Database. Confirm the Status column is equal to Downloaded.
-
In the Plug-in Name column, click Oracle TimesTen In-Memory Database.
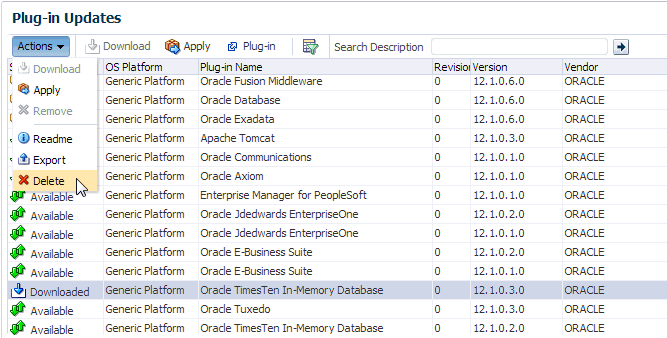
Prepare to expand the Actions tab located under Plug-in Updates at the top of the page.
-
Expand Actions and select Delete.
The Delete Update dialog displays indicating the delete will remove the update (plug-in) permanently. Prepare to confirm the delete by clicking Delete.
-
Click Delete.
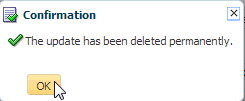
A confirmation dialog displays indicating that the update (plug-in) has been deleted permanently.
-
Click OK.
You have successfully deleted the plug-in. You can verify the plug-in has been deleted by reviewing the Plug-in Updates page. You should no longer see the TimesTen plug-in.
