17 Configuring an SSL Connection Between the EnterpriseOne HTML Server and Oracle BI Publisher Server for One View Reporting
This chapter contains the following topics:
-
Section 17.1, "Understanding an SSL Configuration for EnterpriseOne One View Reporting"
-
Section 17.2, "Implementing the SSL Connection for EnterpriseOne One View Reporting"
17.1 Understanding an SSL Configuration for EnterpriseOne One View Reporting
Secure Sockets Layer (SSL) is a cryptographic protocol that enables secure communication between applications across a network. Enabling SSL communication provides several benefits, including message encryption, data integrity, and authentication. An encrypted message ensures confidentiality in that only authorized users have access to it. Data integrity ensures that a message is received intact without any tampering. Authentication guarantees that the person sending the message is who he or she claims to be.
EnterpriseOne One View Reporting requires installing Oracle BI Publisher Server and configuring a connection with EnterpriseOne HTML Server. The Oracle BI Publisher Server uses a TCP/IP by default. You can configure SSL between Oracle BI Publisher and EnterpriseOne HTML Server to ensure secure network communication.
For more information about the installation and configuration of Oracle BI Publisher for EnterpriseOne One View Reporting, see "Installing and Configuring One View Reporting" in the JD Edwards EnterpriseOne Tools One View Administration Guide.
17.2 Implementing the SSL Connection for EnterpriseOne One View Reporting
Secure communication over SSL requires certificates signed by a certificate authority (CA). For internal communication, the SSL everywhere feature creates both the private certificate authority and the certificates for you. The internal certificates cannot be used for the outward facing web server because user web browsers are not aware of the private certificate authority. The web server must therefore be provided with a web server certificate signed by an externally recognized certificate authority.
You must perform the tasks in this section in the order listed here. The tasks include:
-
Section 17.2.1, "Enabling an SSL Connection on the EnterpriseOne HTML Server"
-
Section 17.2.2, "Enabling an SSL Connection on the Oracle BI Publisher Server"
-
Section 17.2.3, "Setting Up the EnterpriseOne HTML Certificate"
-
Section 17.2.4, "Setting Up the Oracle BI Publisher Certificate"
17.2.1 Enabling an SSL Connection on the EnterpriseOne HTML Server
This section contains the following tasks:
-
Enabling an SSL connection on Oracle WebLogic Server for the EnterpriseOne HTML Server
-
Using the keytool Feature to Generate a Self-Signed Certificate on the EnterpriseOne HTML Server
Important:
This section contains instructions for enabling an SSL connection on WebLogic Server. Enabling SSL on IBM WebSphere Application Server is described in the JD Edwards EnterpriseOne HTML Server on WebSphere Reference Guide. See the "Reference" tab in the JD Edwards EnterpriseOne Installation and Upgrade Documentation Library to locate the appropriate reference guide for your platform:Enabling an SSL connection on Oracle WebLogic Server for the EnterpriseOne HTML Server
-
Log in to Oracle WebLogic Server Administration Console.
-
In the Change Center, click Lock & Edit.
-
Expand the Environment node and click Servers to display the summary of Servers.
-
Click the server for which you want to enable SSL.
-
Select the General tab.
-
Select SSL Listen Port Enabled.
You can either keep the default SSL port or change it to your own port.
-
Click Save and then click Activate Changes.
-
Restart the server.
Using the keytool Feature to Generate a Self-Signed Certificate on the EnterpriseOne HTML Server
-
Sign in to the EnterpriseOne HTML Server.
-
Change the directory to the Java_Home of Oracle WebLogic Server.
-
Locate keytool from Java_Home/jdk/bin
-
Enter the following command to create the certificate:
./keytool -genkeypair -v -keyalg RSA -dname "cn=server.mycompany.com" -aliasjasserverkey-keystorejaskeystore.jks-validity 365where server.mycompany.com is the name of your EnterpriseOne HTML Server; the Validity field is in a "number of days" format.
Note:
You will be prompted for passwords.The default password for cacerts keystore is changeit. -
Export the certificate to a keystore using the following command:
./keytool -exportcert -v -aliasjasserverkey-keystorejaskeystore.jks-rfc -filejascert.cer -
Import the certificate to the existing keystore using the following command:
./keytool -importcert -trustcacerts -aliasjasserverkey-file <path>/jascert.cer-keystore../jre/lib/security/cacerts
Configuring WebLogic Server to Use the Custom Keystore
-
Sign in to the WebLogic Server Administration Console and select your EnterpriseOne HTML Server instance.
-
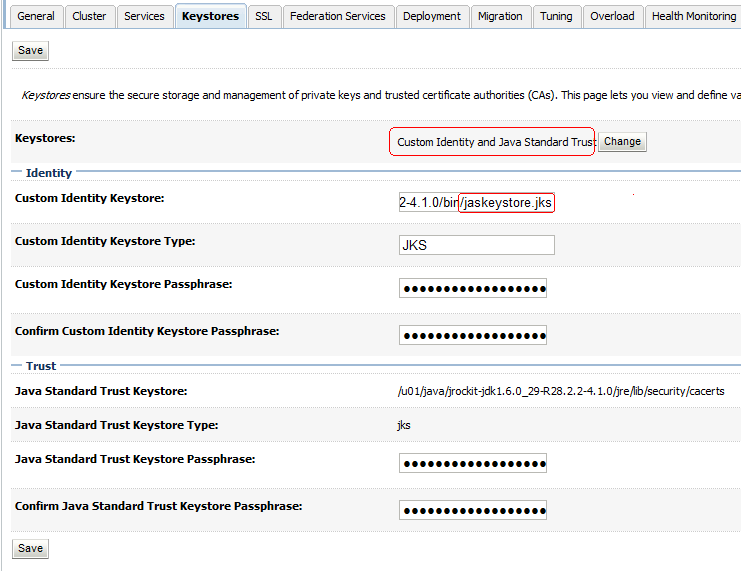
Select the Keystores tab.
-
In the Keystores field, change the keystore to
Custom Identity and Java Standard Trust. -
In the Custom Identity Keystore field, enter the location of the EnterpriseOne HTML Server keystore.jks file.
-
In the Custom Identity Keystore Type field, enter
JKS. -
Enter the password in the Custom Identity Keystore Passphrase fields.
-
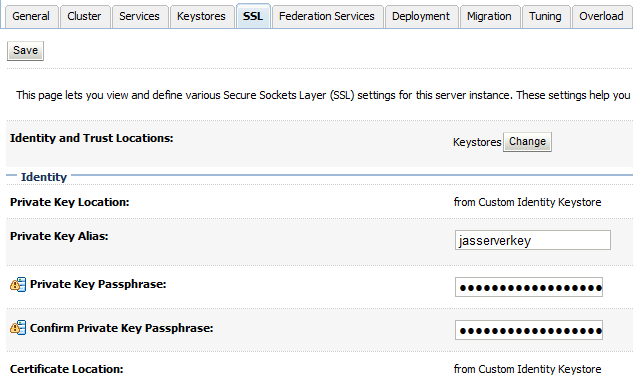
Click Save and then select the SSL tab.
-
In the Private Key Alias field, enter the alias, and then enter the password in the Private Key Passphrase field.
-
Click Save and then click Activate Changes.
-
Restart the server.
-
Test the SSL URL, for example:
https://host:sslport/jde/E1Menu.maf
17.2.2 Enabling an SSL Connection on the Oracle BI Publisher Server
This section contains the following tasks:
-
Enabling SSL on Oracle WebLogic Server for the Oracle BI Publisher Server
-
Using the keytool Feature to Generate a Self-Signed Certificate on Oracle BI Publisher Server
-
Configuring the Oracle BI Publisher Server to Use the Custom Keystore
Enabling SSL on Oracle WebLogic Server for the Oracle BI Publisher Server
-
Log in to the Oracle WebLogic Server Administration Console.
-
In the Change Center, click Lock & Edit.
-
Expand the Environment node and click Servers to display the summary of Servers.
-
Click the server, for example bi_server1, for which you want to enable SSL.
-
Select the General tab.
-
Select SSL Listen Port Enabled.
You can either keep the default SSL port or change it to your own port.
-
Click Save and then click Activate Changes.
-
Restart the server.
Using the keytool Feature to Generate a Self-Signed Certificate on Oracle BI Publisher Server
-
Change directory to
MW_Home/Oracle_BI1/jdk directory. -
Locate the keytool from
MW_Home/Oracle_BI1/jdk/bin. -
Enter the following command to create the certificate:
./keytool -genkeypair -v -keyalg RSA -dname "cn=server.mycompany.com" -aliasbipserverkey-keystorebipkeystore.jks-validity 365server.mycompany.com is your BI Publisher server name; the Validity field is in a "number of days" format.
Note:
You will be prompted for passwords.The default password for cacerts keystore is changeit. -
Use the following command to export the certificate to a keystore:
./keytool -exportcert -v -aliasbipserverkey-keystorebipkeystore.jks-rfc -filebipcert.cer -
Use the following command to import the certificate to the existing keystore:
./keytool -importcert -trustcacerts -aliasbipserverkey-file <path>/bipcert.cer-keystore ../jre/lib/security/cacerts
Configuring the Oracle BI Publisher Server to Use the Custom Keystore
-
Sign in to the WebLogic Administration Console and select your bi_server1 instance.
-
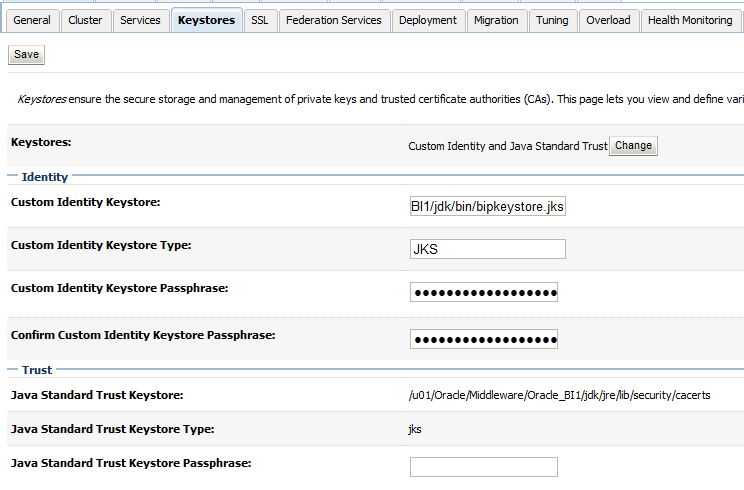
Select the Keystores tab.
-
In the Keystores field, change the keystore to
Custom Identity and Java Standard Trust. -
In the Custom Identity Keystore field, enter the location of the BI Publisher keystore.jks file.
-
In the Custom Identity Keystore Types field, enter
JKS. -
Enter the password in the Passphrase fields.
-
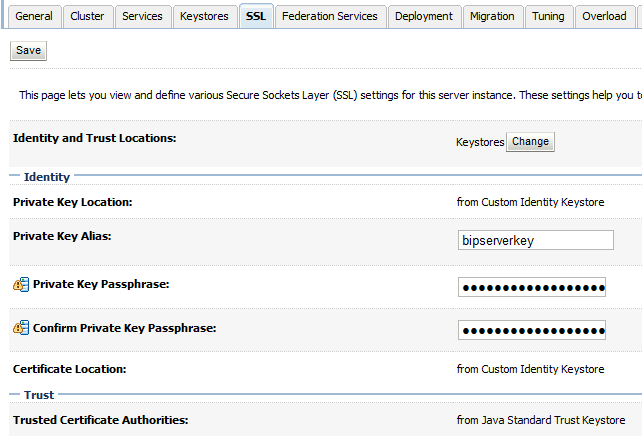
Click Save and then select the SSL tab.
-
In the Private Key Alias field, enter the alias, and then enter the password in the Private Key Passphrase fields.
Note:
For Oracle BI Publisher with JDK 1.7, you need to enable the "Use JSSE SSL" check box in the Advanced Section on the SSL tab. -
Click Save and then click Activate Changes.
-
Restart the BI Publisher server.
-
Test the SSL URL, for example:
https://host:sslport/xmlpserver
17.2.3 Setting Up the EnterpriseOne HTML Certificate
This section contains the following tasks:
-
Installing the EnterpriseOne HTML Certificate on the Web Browser
-
Importing the HTML Certificate to the Oracle BI Publisher Server
Installing the EnterpriseOne HTML Certificate on the Web Browser
Install the EnterpriseOne HTML certificate that you generated following the steps in section Section 17.2.1.
-
Enter the SSL URL of the EnterpriseOne HTML Server, for example:
https://host:sslport/jde/E1Menu.maf -
If a security message appears warning you about the security certificate or whether the site can be trusted, select the option to continue.
You will see a "Certificate Error" next to the URL address:

-
Click the error to view the certificate, making sure that you recognize the certificate that you created from the previous steps.
-
Click Install Certificate.
If you do not see the install option, then you need to add the server to the trusted site in the browser.
-
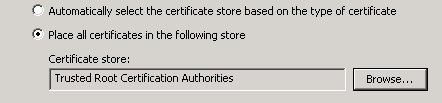
Install the certificate to "Trusted Root Certification Authorities."
-
Restart the Browser and you should see a "lock" icon instead of the error:

Exporting the EnterpriseOne HTML Certificate
-
Click the Lock icon, and then click View Certificates.
-
Click the Details tab.
-
Depending on the browser you are using, click Export or Copy to File.
The Export Wizard appears.
-
Select the Base-64 encoded X.509 option.
-
Name the export file and location.
-
Transfer the export file to the BI Publisher Server.
Importing the HTML Certificate to the Oracle BI Publisher Server
-
Copy the export cert file to your Oracle BI Publisher Server.
-
Sign in to your Oracle BI Publisher Server.
-
Change the directory to the MW_Home
/Oracle_BI1/jdk/bindirectory.MW_Home is your Fusion Middleware location.
Note:
The default keystore is on MW_home/Oracle_BI1/jdk/jre/lib/security/cacerts -
Execute the keytool command from MW_Home
/Oracle_BI1/jdk/bin./keytool -import -trustcacerts -file ../jascert_from_your_client.cer -keystore ../jre/lib/security/cacerts -aliasjasserverkeyIt will prompt for keystore password; the default is "changeit".
-
Add the keystore path to the JAVA_OPTION of setDomainEnv.sh (cmd).
-
Open setDomainEnv.sh (cmd) from MW_Home
/user_projects/domain/<domain>/bin -
Add the trustStore path to JAVA_OPTIONS:
-Djavax.net.ssl.trustStore=<path>/cacerts(This is the location of your keystore) -
Restart the server.
-
17.2.4 Setting Up the Oracle BI Publisher Certificate
This sections contains the following tasks:
-
Installing the Oracle BI Publisher Certificate on the Web Browser
-
Importing the BI Publisher Certificate to EnterpriseOne HTML Server on WebLogic Server Only
Installing the Oracle BI Publisher Certificate on the Web Browser
Install the BI Publisher certificate that you generated following the steps in section Section 17.2.2.
-
Enter the SSL URL of the Oracle BI Publisher Server, for example:
https://host:sslport/xmlpserver -
If a security message appears warning you about the security certificate or if the site can be trusted, select the option to continue.
You will see a "Certificate Error" next to the URL address:
-
Click the error to view the certificate, and make sure you recognize the certificate that you created from the previous steps.
-
Click Install Certificate.
If you do not see the install option, then you need to add the server to the trusted site in the browser.
-
Install the certificate to "Trusted Root Certification Authorities".
-
Restart the Browser and you should see a "Lock" icon instead of the error:
Exporting the BI Publisher Certificate
-
Click the Lock icon, and then click View Certificates.
-
Click the Details tab.
-
Depending on the browser you are using, click Export or Copy to File.
The Export Wizard appears.
-
Select the Base-64 encoded X.509 option.
-
Name the export file and location.
-
Transfer the export file to the EnterpriseOne HTML Server.
Importing the BI Publisher Certificate to EnterpriseOne HTML Server on WebLogic Server Only
-
Copy the exported certificate file to your EnterpriseOne HTML Server.
-
Sign in to the EnterpriseOne HTML server
-
Change directory to Java_Home
/jdk/bindirectoryNote:
The default keystore is on Java_home/jdk/jre/lib/security/cacerts. -
Execute the keytool command from Java_Home
/jdk/bin:./keytool -import -trustcacerts -file ../bipcert_from_your_client.cer -keystore ../jre/lib/security/cacerts -aliasbipserverkeyIt will prompt for keystore password; the default is "changeit".
-
Add the keystore path to the JAVA_OPTION of setDomainEnv.sh (cmd).
-
Open setDomainEnv.sh (cmd) from MW_Home
/user_projects/domain/<domain>/bin -
Add the trustStore path to JAVA_OPTIONS:
-Djavax.net.ssl.trustStore=<path>/cacertsThis is the location of your keystore.
-
-
Restart the server.
Importing the BI Publisher Certificate to EnterpriseOne HTML Server on IBM WebSphere Application Server Only
-
Download the certificate from the BI Publisher server using "Base-64 encoded X.509" format and save it in the following folder:
WebSphere/AppServer/profiles/AppSrv01/etc -
Sign in to the WebSphere Integrated Solution Console.
-
In the "Related Items" area on the right, click Key Stores and certificates.
-
Click NodeDefaultTrustStore and then click Singer certificate.
-
Click Add.
-
In the General Properties section, complete these fields:
-
Alias. Enter an alias for the certificate.
-
File name. Enter the certificate file name.
This will enable the retrieval of the file from
../WebSphere/AppServer/profiles/AppSrv01/etcfolder.
-
-
Click Apply.
-
Review the certificate information and click Save.
-
Repeat steps 4 - 8 for the NodeDefaultKeyStore.
Note:
If you do not have the certificate saved in the WebSphere/etcfolder, you can use Retrieve from port button instead of the Add button to retrieve the certificate. -
Restart the application server.
17.2.5 Editing the One View Reporting BI Publisher Soft Coding Record to Use the SSL Connection
To edit the soft coding record to use the SSL connection:
-
Sign in to the EnterpriseOne Web client.
-
In the Fast Path, enter
P954000. -
Edit the One View Reporting BI Publisher soft coding record to use the HTTPS connection.
-
Save the application.
-
Sign off and sign in to the EnterpriseOne HTML Server.
-
Test the SSL connection for One View Reporting.
Important:
You must restart all services for the changes to take effect.17.3 Viewing a Certificate
You can use one of the following keytool commands to view an existing certificate:
./keytool -list -keystore <path>/cacerts (you can add -v for detail information)
Or
./keytool -list -alias jasserverkey -keystore <path>/cacerts
17.4 Deleting a Certificate
You can use the following keytool command to delete a certificate:
./keytool -delete -alias jasserverkey