5 Setting Up the Composite Application Framework (Release 9.1 Update 3)
This chapter contains the following topics:
-
Understanding the Composite Application Framework
-
Configuring a BI Connection
-
Setting Up the Composite Application Framework
-
Creating a Publication List
-
Enabling EnterpriseOne Forms
-
Adding Webpage Templates
-
Sharing Layouts
-
Maintaining Records
5.1 Understanding the Composite Application Framework
Oracle's JD Edwards EnterpriseOne Composite Application Framework provides a loosely coupled, seamless integration framework that enables JD Edwards EnterpriseOne applications to integrate with third-party products such as pages from an external Website (using the webpage URL) and Oracle Business Intelligence Enterprise Edition (OBIEE) objects.
The Composite Application Framework enables authorized JD Edwards EnterpriseOne users to associate external webpages and OBIEE objects to JD Edwards EnterpriseOne application forms without involvement from development. The links to these external webpages and OBIEE objects are referred to as content. The same content can be reused and shared by multiple end users in multiple transactions on the same application form.
The JD Edwards EnterpriseOne system administrator enables users and forms for access to the Composite Application Framework and grants authorized users specific permissions for creating, viewing, and publishing webpage and OBIEE object content.
If creating OBIEE object content, the JD Edwards EnterpriseOne system administrator also configures the Business Intelligence (BI) connection.
5.1.1 JD Edwards EnterpriseOne Tables
The following tables are used by the Composite Application Framework:
5.1.2 Understanding Form-Level Security
The EnterpriseOne administrator activates the Composite Application Framework for user access by creating a record that defines these fields:
-
EnterpriseOne environment
-
EnterpriseOne user (role)
-
EnterpriseOne application form
-
EnterpriseOne application version
Defining this combination of fields establishes form-level security on the Composite Application Framework. Form-level security means that only the defined combination of user, environment, form, and application version can open the application form in the Composite Application Framework. However, any user who is not secured from the form (through other JD Edwards features) can open the form but the Composite Application Framework is not available.
5.1.3 Understanding Oracle BI Enterprise Edition
Oracle BI Enterprise Edition (OBIEE) users are set up separately from JD Edwards EnterpriseOne users. Within JD Edwards EnterpriseOne, a system administrator can set up different securities to control a user's access to certain applications or functionality.
Oracle BI Enterprise Edition has various granularities of security at the folder, report, and data level, which are not provided by JD Edwards EnterpriseOne. JD Edwards EnterpriseOne only controls how to map a user to the Oracle BI user defined by the soft coding values.
When a JD Edwards EnterpriseOne user is viewing OBIEE content, the system uses the mapped Oracle BI Enterprise Edition user account to set up the connection and authentication with the Oracle BI Application Server. Any security setup for that Oracle BI Enterprise Edition user is enforced by the Oracle BI Application Server. For example, the user could navigate from an assigned root folder to another subfolder or could navigate to a dashboard from an action link on a report. It is the administrator's responsibility to protect sensitive objects and data on the Oracle BI Application Server by using the access control list provided by Oracle BI Application Server. This protection is highly recommended.
For more information on setting up access control for BI catalog items, see the Oracle Business Intelligence Presentation Services Administration Guide.
5.2 Setting Up the Composite Application Framework
Note:
If your enterprise uses Oracle Business Intelligence, configure your system for Oracle BI Enterprise Edition (OBIEE) before you perform the tasks in this section. See Configuring a BI ConnectionThis section provides a list of tasks and the order for performing the task to set up the Composite Application Framework for your EnterpriseOne users. The section all identifies tasks that you might be asked to perform after content and layouts are created. Each task is discussed in detail in subsequent sections.
Tasks for setting up the Composite Application Framework:
-
Determine whether content should be created for OBIEE objects.
If OBIEE object content is to be available, do the following:
-
Create a soft coding template.
-
Create soft coding records.
-
Map users to the OBIEE server.
-
-
Determine the JD Edwards environments to be used with the Composite Application Framework.
-
Identify the users (or roles or all users) and the application forms they need to work with. Consider whether an application version needs to be specified.
From the list of users, identify:
-
Users for creating content and layouts.
-
Users for creating layouts only.
-
Users who can only view content created by authorized users.
From the list of users who are enabled for creating content, identify:
-
Users who can only view the content they create; the content cannot be shared with other users.
-
Users who can publish content after the content is approved.
-
Users who can publish content without approval.
-
-
Create publication lists and members of the publication list.
Members of the publication list can view published content.
-
Create template URLs
-
Create records that enable the Composite Application Framework for each environment, user, application form, and application version combination, as well as defining user permissions for viewing, creating, and publishing content.
Tasks to be performed after content and layouts are created:
-
Set edit permissions for users who can edit content that other users create.
-
Upon notification that content is ready to be published but is in Pending status, change the status for each member of the publication list.
See Access Control for Generic URL (P952335) Access Control for Generic URL (P952332)
-
Upon notification that a layout needs to be shared, share the layout with other users.
See Sharing Layouts
-
Maintain content records.
Note:
The system does not notify users that they can access specific forms using the Composite Application Framework or that they are allowed to create content or layouts for displaying the content. The system also does not notify users about the publishing options you have granted them or about other users (members of the publication list you define when you enable forms) who can view the content.In addition, the system does not notify you when a user to whom you have allowed create content permission or permission to publish the content with approval from you. The system does not notify you when new layouts are created and are ready to be shared.
You might want to set up procedures for notifying users and for users to notify you.
5.3 Creating Publication Lists
You create and manage publication lists for sharing content. A publication list is identified by a name and has a list of members. The publication list members can include a combination of individuals and roles. You can define *PUBLIC (all EnterpriseOne users) as a publication list member. You use the publication list to identify who can view published content.
You use the Publication Lists application (P952336) to create new publication lists and to find, review, and edit or delete existing publication lists. If you add a new member to an existing publication list, and content has already been created and published using that publication list, the new member sees only content that is added after being added to the publication list.
The publication list header information that you enter using P952336 is stored in the Related Information Publication List Header Table (F952336).
5.3.1 Forms Used to Manage Publication Lists
| Form Name | Form ID | Navigation | Usage |
|---|---|---|---|
| Work with Publication Lists | W952336G | From a web client, type P952336 in the Fast Path. | Locate, review, edit, and delete existing publication lists. |
| Work with Publication Lists and Members | W952336A | On Work with Publication Lists, click Add. | Crate new publication lists. |
5.3.2 Creating a Publication List
Use the Publication Lists (P952336) application to create and maintain publications lists. You can type P952336 in the Fast Path or use this path to navigate to the Related Information applications:
Navigator > EnterpriseOne Menus > EnterpriseOne Life Cycle Tools > System Administration Tools > Related Information Administration > Publication Lists.
Access the Work with Publication Lists form and complete the following fields:
-
Publication List
-
Publication List Description
-
Publication Target
| Field | Description |
|---|---|
| Publication List | Enter a name for the list. The name is limited to 10 characters. |
| Publication List Description | Enter a brief description of the list. |
| Publication Target | Enter user IDs, roles, or *PUBLIC as members of the publication list. You can enter either user IDs or roles or both. When you enter *PUBLIC, all of your EnterpriseOne users are members of the publication list, and at a minimum are allowed viewing privilege of the content. |
| Publication Target Description | The system enters the description based on information from the User Profile Revisions (P0092) application. |
5.4 Enabling EnterpriseOne Forms
You enable EnterpriseOne application forms that are to be available in the Composite Application Framework. You use the Relation Information Administration application (P952332) to enable and disable application forms. You can use the Copy feature on P952332 to copy an existing record and then modify it to create a new record.
When you add a record, you enter appropriate information into the fields on the top portion of the Related Information Revisions form to define the environment, the product type, the user or role or *PUBLIC, and the application form and version. These fields work together to identify when the Composite Application Framework appears for the defined user or role.
If you try to add a new record that contains the same information as an existing record, the system displays an error stating that duplicate keys are not allowed. Change the information in one or more of the fields to create a different record.
5.4.1 Enabling an Application Form
The Related Information Revisions form consists of three sections:
-
Fields to enable a user, form, environment, application version combination.
-
Options that enable users viewing and creating permission.
-
Options that enable authorized users publishing permission.
You use the top portion of the Related Information Revisions form to enable forms for the Composite Application Framework. If you enter WebCenter as the product type, the system disables the viewing, creating, and publishing options.
You enable application forms one at a time. The following types of application forms can be enabled:
-
Find Browse
-
Power Edit
-
Header Detail
-
Headerless Detail
-
Fix Inspect
5.4.2 Enable Viewing and Creation of Content
When you enable the environment, form, user, and application version combination, you also specify content viewing and creating permissions for the user. You enable a user to:
-
View Only
-
Create Composite Application Layouts
-
Create Content and Layouts
When you grant View Only permission, the user can always view the EnterpriseOne form that you define, but that user can only view content that is published to a publication list to which that user is a member, and the published content must be on a layout.
When you grant Create Composite Application Layouts permission, the user has the same viewing permissions as the View Only user and, in addition, can create new layouts from existing content. Users granted this permission can create layouts that support the many different monitor and laptop screen sizes and mobile devices.
When you grant Create Composite Application Layouts and Content permission, the user has the same viewing permissions as the view Only user and, in addition, can create and maintain content, as well as create new layouts. When you grant a user Create Composite application Layouts and Content permission, publishing options become available on the Related Information Revisions form.
5.4.3 Publish Options for Content
When you select the Create Composite Application Layouts and Content option, the system enables these three publishing options for the environment, user, form, version combination that you specified:
-
Do not allow user to publish URL content.
-
Allow user to publish to pre-defined Publication List.
-
Require approval to publish to pre-defined Publication List.
By default, the system selects the publish option, Do not allow user to publish URL content.
Do not allow user to publish URL content
When you select this option, the specified user can create content for the specified environment, form, version combination but only that user has access to the content. If a role is specified, members of the role can view the content. The content for the environment, form, version combination is not available to other users.
Allow user to publish to pre-defined Publication List
When you select the Allow user to publish to pre-defined Publication List option, the system enables the Publication List field. Selecting this option enables the specified user to create content for the specified environment, form, version combination and when the new content is added to a layout, allows immediate viewer access to members of the specified publication list.
If you do not have a predefined publication list, you can access the Publication Lists application (P952336) from the Form menu on the Related Information Form and create a new publication list.
Require approval to publish to pre-defined Publication List
When you select the Require approval to publish to pre-defined Publication List option, the system enables the Publication List field. Selecting this option enables the specified user to create content for the specified environment, form, version combination. When the new content is added to a layout, it is published to all members of the specified publication list with a pending status. You must manually change the status before members of the publication list have viewer access to the content. Changing the status is discussed in the Generic URL Access Control Management section.
If you do not have a pre-defined publication list, you can access the Publication Lists application (P952336) from the Form menu on the Related Information Form and create a new publication list.
5.4.4 Forms Used to Set Up Form Level Enablement
| Form Name | Form ID | Navigation | Usage |
|---|---|---|---|
| Work with Related Information | W952332A | From a JD Edwards EnterpriseOne web client, type P952332 in the Fast Path. | Locate, review, copy, edit, and delete an existing enabled form. |
| Related Information Revisions | W952332B | On Work with Related Information Revisions, click Add. | Enable a new JD Edwards EnterpriseOne application form for the Composite Application Framework. |
5.4.5 Enabling an EnterpriseOne Application Form
Use the Related Information Administration (P952332) application to create and maintain publications lists. You can type P952332 in the Fast Path or use this path to navigate to the Related Information applications:
Navigator > EnterpriseOne Menus > EnterpriseOne Life Cycle Tools > System Administration Tools > Related Information Administration > Related Information Administration
To enable an application form:
-
Access the Related Information Revisions form and complete the following fields:
-
Environment
-
Product Type
-
User or Role
-
Form Name
-
Version
-
-
Select one of these options for viewing and creating content:
-
View Only
-
Create Composite Application Layouts
-
Create Composite Application Layouts and Content
When Create Composite Application Layouts and Content is selected, the options and fields in the Publish Option group box are enabled.
-
-
Select one of these publishing options if you selected Create Composite Application Layouts and Content:
-
Do not allow user to publish URL content.
-
Allow user to publish to pre-defined Publication List.
-
Require approval to publish to pre-defined Publication List.
-
-
Enter the name of an existing publication list in the Publication List field if you selected an option that allows users to publish content.
-
Click OK to save the record.
-
On Work with Related Information, click Find to see the record.
| Field | Description |
|---|---|
| Environment | Enter the EnterpriseOne environment name. You can use the Search feature to find and select an applicable environment. If a form is to be used in multiple environments, you enable the form separately for each environment. |
| Product Type | Enter GENERICURL.
If you enter WEBCENTER, the system disables viewing and creating options and all publishing options. |
| User or Role | Enter an EnterpriseOne user ID, role, or *PUBLIC. This specifies the EnterpriseOne user or role for which a form is enabled. *PUBLIC enables the form for all JD Edwards EnterpriseOne users. |
| Form Name | Enter the name of the EnterpriseOne application form. You can use the search feature to find and select an applicable form. Do not enter *ALL.
If you select a form that has no version, the system disables the Version field. |
| Version | Enter a specific version of the application or *ALL.
The default value is *ALL, which you can change. When you enter *ALL, the Composite Application Framework is available for all versions of the application. If the application has no versions, the system clears any information from the Version field and disables the field. |
| View Only | Select this option to enable the user or role to view published content for the specified environment, form, version combination.
Selecting this option disables the options in the Publish Option group box. When View Only is selected, 0 appears in the Allow Create grid field and 0 appears in the Publish Option grid field on the Work with Related Information form. |
| Create Composite Application Layouts | Select this option to enable the user or role to create new layouts for existing content.
Selecting this option disables the options in the Publish Option group box. When Create Composite Application Layouts is selected, 2 appears in the Allow Create grid field and 0 appears in the Publish Option grid field on the Work with Related Information form. |
| Create Composite Application Layouts and Content | Select this option to enable the user or role to create content and layouts.
Selecting this option enables the options in the Publish Option group box. When Create Composite Application Layouts and content is selected, 1 appears in the Allow Create grid field on the Work with Related Information form. |
| Do not allow user to publish URL content | Content is accessible only to the specified user or role for the specific environment, form, version combination. The system clears and disables the Publication List field.When this option is selected, 0 appears in the Publish Option grid field on the Work with Related Information form. |
| Allow user to publish to pre-defined Publication List | After new content is added to a layout, the content is automatically published to all members defined in the specified publication list.
When this option is selected, 1 appears in the Publish Option grid field on the Work with Related Information form. |
| Require approval to publish to pre-defined Publication List | After new content is added to a layout, the content is published to all members defined in the Publication List with a Pending status, which requires a manual approval.
When this option is selected, 2 appears in the Publish Option grid field on the Work with Related Information form. |
5.5 Adding Webpage Templates for Creating Content
Users who are granted permission to create content might want to link to common webpage URLs (for example, URLs to maps, delivery tracking, or weather.) You can add webpage URL templates to simplify the task of creating generic webpage content. When creating new webpage content, the authorized user can select these templates from a drop-down list. The template then populates the name, description, and webpage URL.
Use the Media Object Queues (P98MOQUE) application to add webpage templates for content creators. You can type P98MOQUE in the Fast Path or use this path to navigate to the Related Information applications:
Navigator > EnterpriseOne Menus > EnterpriseOne Life Cycle Tools > System Administration Tools > Media Object Administration > Media Object Queues
To add a webpage URL template:
-
Access the P98MOQUE application.
-
Click Add.
-
Enter a short name for the webpage URL template in the Queue Name field (for example, Map).
This populates the URL field when a user creates new content and selects the template.
-
Enter the actual webpage URL in the Queue Path On-Line field.
This populates the URL field when a user creates new content and selects the template.
-
Enter a description for the URL in the Queue Path Off-Line field.
This populates the Description field when a user creates new content and selects the template.
-
Enter "10" (RIAF URL Template) in the Type field.
Note:
If the value 10 (RIAF URL Template) is not available, you may need to add it to the H91/QT UDC table. -
Click OK to save your record.
5.6 Sharing Layouts
Users that you have enabled as layout mangers (granted Create Composite Application Layouts permission) and content managers (granted Create Composite Application Layouts and Content permission) can create new layouts. After a new layout is created, the creator of the layout requests that you share the information with authorized users.
Note:
You may want to set up a procedure for authorized users to notify you that a layout is ready to be shared. To share a layout, you require this information:Use the User Overrides (P98950) application to share layouts.
To share a layout:
-
Access Work with User Overrides by typing P98950 in the Fast Path.
-
Click Find.
-
Use Query by Example in the grid area to search for and find the appropriate record.
-
Select the appropriate record and click the Copy icon.
The Copy Overrides form appears.
-
On Copy Overrides, verify the information in the From field is correct, and then enter the role or *PUBLIC to create a shared layout.
Entering a User ID copies the layout to the specified user as a personal layout.
-
Click OK.
When the shared with user runs the application form, this layout is available on the Composite Application Framework. However, if the shared with user is not a member of the publication list to which the content was published, the content does not appear on the layout. Users must be members of the publication list at the time the content is created.
5.7 Maintaining Content Records
After content is created, you use the Managing Metadata for Generic URL (P952334) and Management of Generic URL Access Control (P952335) applications to manage and maintain content. You use the Related Information Cross-Reference application (P952330) to manage and maintain captured key information for content. The system stores information about the Composite Application Framework content in these tables:
-
Metadata Table for Public Resource URL (F952334)
-
Access Control for Generic URL (F952335)
-
Context Cross-Reference Header Table for Integration (F952330)
-
Context Cross-Reference Detail Table for Integration (F952331)
5.7.1 Metadata Table for Public Resource URL (P952334)
You use P952334 to view and delete content records from the Metadata Table for Public Resource URL table (F952334). You can click Find on the Work with Metadata for Generic URL form without entering any heading information to see all content information for all forms, or you can enter information in the header area to see specific information. You can delete content from the Composite Application Framework for a user, form, version, environment combination by selecting the appropriate grid row and clicking Delete.
5.7.2 Access Control for Generic URL (P952335)
If you selected the Require approval to publish to pre-defined Publication List option for publishing content, you use P952335 to approve or reject records that have a pending status in the Participant Permission field of the Work with Access Control of Generic URL form. You can also assign editor permission to a user that did not create the content. You can define one of these permissions for a participant and content combination:
-
Editor - the participant can view, change, and delete content information.
-
Viewer - the participant can only view the content information.
-
Pending - the participant does not have any permissions and cannot view the content information. You must manually change the Participant Permission field to Editor or Viewer or delete the record.
You use P952335 to view, update permissions, and delete content records from the Generic URL Access Control Table (F952335). You can click Find on the Work with Access Control of Generic URL form without entering any heading information to see information for all forms, or you can enter information in the header area to see specific information.
You can use P952335 to remove content from the Composite Application Framework by selecting a grid row and clicking Delete. If the row you delete is for the creator of the content, the content creator is not be able to view the content but any participants can still view the content on the Composite Application Framework. When you use P952335 to remove content, the system automatically removes data in P952334. Users to whom you have granted Editor permission can also remove content.
For webpage URLs, if you need more information, you can select a row from the grid area of the form and then select Detail from the Row Menu to open the Review Metadata for Generic URL form. You can see the original URL for the content; context parameters do not appear on this form. If you click the Popup Preview button, a separate browser window opens to the original URL. If the user has mapped context parameters for this URL, you do not see the actual webpage that the user sees.
5.7.3 Content Cross-Reference Header Table for Integration (P952330)
You use P952330 to maintain EnterpriseOne key field information for content. You use P952330 to access the Context Cross-Reference Header Table for Integration (F952330) and the Context Cross-Reference Detail Table for Integration (F952331) tables. Using P952330, you can:
-
Query and review existing context-related link information to troubleshoot problems that a user might be having.
-
Remove existing context-related header and detail information for maintenance purposes.
See Maintaining Context-Related Information
Troubleshooting tips are discussed in the Composite Application Framework User's Guide.
See "Troubleshooting" in the JD Edwards EnterpriseOne Tools Composite Application Framework User's Guide.
5.8 Configuring a BI Connection
Note:
This section is applicable only if your enterprise uses OBIEE reports.All of the OBIEE reports are located on the Oracle BI Application Server. In order to connect to the Oracle BI Application Server, one or more BI connections must be created for the users. Before you can create BI connections, you create a BI connection template.
A BI connection defines how the system connects to the Oracle BI Application Server for any given JD Edwards EnterpriseOne user. A BI connection includes information about the server, the port of the Oracle BI application server, the Oracle BI user and password used to establish the connection, and the root folder (optional). A BI connection can be added for any valid JD Edwards EnterpriseOne user, role, or *PUBLIC. They represent three different levels of mapping. An administrator can create one BI configuration for *PUBLIC to cover all of the JD Edwards EnterpriseOne users or create multiple BI connection records to perform mapping at various levels. If multiple BI connection records are created, the system uses the following rules:
-
The system uses the most specific BI connection configuration (user>role>public)
-
When the user logs in with a role of *All, the system prioritizes all roles of the user based on role sequence.
Important:
If you use an https protocol to embed an OBIEE object, you must configure an SSL connection between the EnterpriseOne HTML server and the Oracle BI Publisher Server.See "Configuring an SSL Connection Between the JD Edwards EnterpriseOne HTML Server and Oracle BI Publisher Server for One View Reporting" in the JD Edwards EnterpriseOne Tools Security Administration Guide for instructions about configuring a secure connection between EnterpriseOne and Oracle BI Publisher.
5.8.1 Adding a BI Connection Template
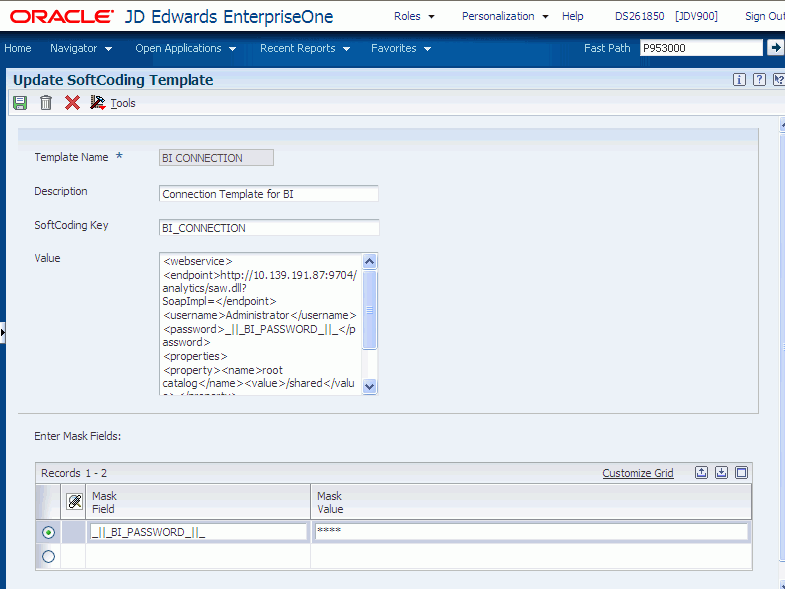
Use the Web Service Soft Coding Template (P953000) application to create a connection to the Business Intelligence server. You can type P953000 in the Fast Path or use this path to navigate to the Soft Coding applications:
Navigator > EnterpriseOne Menus > EnterpriseOne Life Cycle Tools > System Administration Tools > Soft Coding Administration
To add a BI Connection template:
-
Access the P953000 application
-
Click Add.
-
Enter BI CONNECTION in the Template Name field.
-
Enter BI Connection in the Description field.
-
Enter BI_CONNECTION in the SoftCoding Key field.
Important:
The value for SoftCoding Key must be BI_ CONNECTION. You cannot use any other value for this field. -
Enter the following in the Value field:
<webservice>
<endpoint>
http://server:port/analytics/saw.dll?SoapImpl=</endpoint>
<username>username</username>
<password>_||_BI_PASSWORD_||_</password>
<properties>
<property><name>root catalog</name><value>root catalog
folder</value></property>
</properties>
</webservice>
Note:
If you are using a secure protocol, replace http with https. -
Enter the Mask Fields in the grid (for example, BI_PASSWORD).
Mask fields are the fields that have _ | | _ as a prefix and postfix. However, you do not include the prefix and postfix when entering the mask field in the grid. The system adds the prefix and postfix for you.
-
Click OK to save the template.
Figure 5-1 Update Softcoding Template Form
Description of "Figure 5-1 Update Softcoding Template Form"
5.8.1.1 Softcoding Value Guidelines
When creating the BI connection template, use the following guidelines to ensure valid softcoding value parameters.
5.8.1.1.1 Http Address
The http address must follow this format with a valid Oracle BI Application Server name or IP address and port number:
http://<server>:<port>/analytics/saw.dll?SoapImpl=
5.8.1.1.3 _||_BI_PASSWORD_||_
You have two ways to supply the password for the Oracle BI user:
-
Use a placeholder parameter (masked parameter) in the softcoding value and assign the value to the parameter in the grid. The above example used a placeholder parameter called BI_PASSWORD and defined the BI_PASSWORD variable in the grid. The _ | | _ prefix and postfix are markers for placeholder variables.
When used this way, the value is encrypted before it is saved into the database and is masked for future display.
-
Use plain text directly in the softcoding value.
5.8.1.1.4 Root Catalog
The root catalog provides the default entry point folder when a user launches the BI catalog to create OBIEE content. By default, this folder could be the root folder, which is a forward slash (/) in the template. However, for security reasons, accessing the BI catalog at the root level may not be allowed in production. You should use a more specific path instead.
Important:
Within the <property> tags, the <name> must be root catalog because this is the hard-coded name in the system. If you use another name, the system ignores it. Only the <value> element is configurable.There are two ways to define the root catalog:
-
Log into the Oracle BI Application Server and click the Catalog tab and then the Manage Catalog button. The Manage Catalog window appears with the navigation link start from root folder "/". Drill up or down by clicking the parent or child links. When you find the folder location that you want to use as the root catalog for the JD Edwards EnterpriseOne end user, manually enter the folder path (for example, /shared/SampleSales) as the softcoding value for root catalog. The path is case sensitive. Make sure that you type the exact folder path. If the path is misspelled, JD Edwards EnterpriseOne fails to open the path. If you need to change the value for the root catalog, you must correct the value in P954000 and restart the HTML server to clean up the cached information.
-
The second approach can help you avoid typographical errors. You can use value "/" for initial testing if the mapped Oracle BI user has permission to access the root folder.
5.8.2 Creating a BI Connection
Use the Soft Coding Records (P954000) application to create a connection to the Business Intelligence server. You can type P954000 in the Fast Path or use this path to navigate to the Soft Coding applications:
Navigator > EnterpriseOne Menus > EnterpriseOne Life Cycle Tools > System Administration Tools > Soft Coding Administration
-
Access the P954000 application.
-
Click Add.
-
In the User/Role field, enter the JD Edwards EnterpriseOne user, role, or *PUBLIC.
-
In the Environment Name field, enter the JD Edwards EnterpriseOne environment for which you are creating this BI connection.
-
In the Template Name field, enter BI CONNECTION.
-
In the Soft Coding Key field, enter BI_CONNECTION.
-
Click the Populate Soft Coding Value button to populate the Soft Coding Description and Soft Coding Value fields with the information from the BI CONNECTION template.
-
Change the user name and root catalog in the Soft Coding Value for your connection.
-
Enter the Mask Value for any Mask Fields. For example, enter a value for BI_PASSWORD. You do not need to use the prefix and postfix values (_ | | _) when entering the mask field in the grid. The system adds these automatically.
-
Click OK to save the record.
5.8.3 Enabling Oracle Business Intelligence Objects
Any EnterpriseOne user who should have access to OBIEE content, either to create or view the content, must have access to the OBIEE server.
Use these steps to set up user access to the OBIEE server.
-
Install the latest update of JD Edwards EnterpriseOne Tools.
-
Install the latest version of Oracle BI Enterprise Edition and the Oracle BI Applications adapter for JD Edwards EnterpriseOne.
Note:
Releases prior to Oracle BI Enterprise Edition 11g are not supported. -
Set up Oracle BI Enterprise Edition user groups and security.
-
Set up the JD Edwards EnterpriseOne user and roles.
-
Set up mappings between the JD Edwards EnterpriseOne user and roles to the Oracle BI Enterprise Edition user.
-
Inform users about their access to OBIEE reports (content creators and content users).
For more information on setting up users and groups in Oracle BI Enterprise Edition, see the Oracle Fusion Middleware System Administrator's Guide for Oracle Business Intelligence Enterprise Edition guide.
5.8.4 Disabling iFrame Busting
The Oracle BI Enterprise Edition (OBIEE) automatically enables iFrame busting. When a user receives a system message indicating that OBIEE content cannot be displayed in an iframe, you can use the following steps to disable iFrame busting:
-
Stop all OBIEE services.
-
Edit the instanceconfig.xml file.
-
Edit the web.xml file
-
Restart all OBIEE services.
Note:
Make sure that you are editing the correct locations of the files.5.8.4.1 Editing the instanceconfig.xml File
After you stop all of the OBIEE services, use these steps to edit the instanceconfig.xml file:
-
Change the directory to:
<MW_Home>/instances/instance1/config/OracleBIPresentationServices Component/coreapplication_obips1/
-
Open the instanceconfig.xml file.
-
Search for the <Security> tag.
-
Add the tag
<InIFrameRenderingMode>allow </InIFrameRenderingMode>in the Security section, as illustrated here:<Security> <InIFrameRenderingMode>allow</InIFrameRenderingMode> <!--This Configuration setting is managed by Oracle Enterprise Manager Fusion Middleware Control--> <ClientSessionExpireMinutes>210</ClientSessionExpireMinutes> </Security> -
Save the file.
5.8.4.2 Editing the web.xml File
Use these steps to edit the web.xml file:
-
Open the web.xml file from one these directories:
For OBIEE 11.1.1.7
<MW_Home>\Oracle_BI1\bifoundation\web\appv2\WEB-INF
For OBIEE 11.1.1.5
<MW_Home>\Oracle_BI1\bifoundation\web\app\WEB-INF
-
Add the following code to the web.xml file:
<context-param>
   <param-name>oracle.adf.view.rich.security.FRAME_BUSTING</param-name>
   <param-value>never</param-value>
        </context-param>
The following illustration shows the code inserted after the servlet-mapping tag:
Figure 5-2 Example code for iFrame busting

Description of "Figure 5-2 Example code for iFrame busting"
-
Save the file.
-
Restart all OBIEE services.
-
Clear the browser cache.