2 Installing and Configuring One View Reporting
This chapter contains the following topics:
-
Section 2.2, "Installing JD Edwards EnterpriseOne Boilerplates for BI Publisher"
-
Section 2.3, "Giving the BIAuthor Role Access to the Boilerplates"
-
Section 2.6, "Verifying the One View Reporting BI Publisher Soft Coding Template"
-
Section 2.7, "Creating a One View Reporting BI Publisher Soft Coding Record"
-
Section 2.8, "Setting Up One View Reporting Feature Authorizations"
-
Section 2.9, "Mapping a JD Edwards EnterpriseOne User to a BI Publisher User"
2.1 Installing Oracle BI Publisher
This section provides an overview of installing Oracle Business Intelligence (BI) Publisher, lists prerequisites, and discusses how to install Oracle BI Publisher 11g. The new One View Reporting solution integrates JD Edwards EnterpriseOne interactive applications with BI Publisher interactive layout editor to create an easy to use end user reporting solution.
2.1.1 Oracle BI Publisher Installation Overview
Oracle BI Publisher is a reporting solution that enables you to author, manage, and deliver all your reports and documents easier and faster than traditional reporting tools.
For One View Reporting, you only need to install Oracle BI Publisher. You do not need to install Oracle Business Intelligence Enterprise Edition or Oracle Real-Time Decisions.
BI Publisher installs WebLogic, you do not need to install it beforehand. The default domain in WebLogic functions for BI Publisher, so you do not need to create an additional domain unless you prefer to keep the domains separate.
2.1.2 Prerequisites
Before you complete the tasks in this section, you must:
-
Install JD Edwards EnterpriseOne Applications Release 9.1.
-
Review the Certifications for JD Edwards EnterpriseOne One View Reporting. See document 745831.1 (JD Edwards EnterpriseOne Minimum Technical Requirements Reference) on My Oracle Support:
https://support.oracle.com/epmos/faces/DocumentDisplay?id=745831.1 -
Install and configure a supported database.
For the latest information about supported databases, visit the Oracle Fusion Middleware Certification document at:
http://www.oracle.com/technetwork/middleware/ias/downloads/fusion-certification-100350.htmlLook for product area ”Oracle Fusion Middleware 11g Release 1 Certifications” and then access ”System Requirements and Supported Platforms for Oracle Business Intelligence Suite Enterprise Edition 11gR1 (11.1.1.3.0-11.1.1.6.0) (xls).
-
After you have installed a database, ensure that it is configured correctly by referring to the ”Repository Creation Utility (RCU) Requirements” section in the System Requirements and Specification document for Oracle Fusion Middleware 11g Release 1 (11.1.1.x):
http://docs.oracle.com/html/E18558_01/fusion_requirements.htm#CHDJGECAYou can also access the document at:
http://www.oracle.com/technetwork/middleware/ias/downloads/fusion-requirements-100147.html -
Download Oracle BI Publisher from the Oracle Software Delivery Cloud:
Select Oracle Business Intelligence for the Product Pack field and choose the appropriate platform.
-
Download the Oracle Repository Utility (RCU) from Oracle Technology Network (OTN), Oracle Business Intelligence (11.1.1.x) Downloads page:
http://www.oracle.com/technetwork/middleware/bi-enterprise-edition/downloads/bi-downloads-1923016.htmlThe RCU version must match the BI Publisher version.
-
Configure your browser to allow pop-ups.
-
Ensure that Adobe Flash Viewer is installed.
2.1.3 Installing Oracle BI Publisher
If you do not plan to change any of the default settings, such as ports and security logins, then follow the Quick Installation Guide for Oracle Business Intelligence to perform the installation. If you do plan to change some of the default settings, then follow the Installation Guide for Oracle Business Intelligence. Please note that although the Oracle BI installation package includes the following products, with all the technology required to install, configure, and run them, you only need to install Oracle Business Intelligence Publisher:
-
Oracle Business Intelligence Publisher
-
Oracle Business Intelligence Enterprise Edition (Oracle BI Answers, Oracle BI Interactive Dashboards, Oracle BI Delivers, Oracle BI Administration Tool, Oracle BI Add-in for Microsoft Office, and Oracle BI Publisher) (optional)
-
Oracle Real-Time Decisions (optional)
-
Essbase Suite (optional)
Oracle BI Publisher 11g (11.1.1.7) is packaged with WebLogic Server 10.3.5.0 and Oracle JDK 1.6.0_35.
IMPORTANT!:
For One View Reporting, you only need to install Oracle BI Publisher.The following steps provide brief guidance for the installation. Review these steps first and then please use the installation guide, Quick Installation Guide for Oracle Business Intelligence, or if you plan to change some of the default settings, Installation Guide for Oracle Business Intelligence, for more detailed steps.
Note:
A new installation of BI Publisher 11.1.1.7 is recommended even if you are currently on a prior release. This allows you to do some parallel testing before switching to the latest release.To install Oracle BI Publisher:
-
Launch the Oracle Repository Utility (RCU) and create the BI Publisher Schemas. (BIPLATFORM and MDS).
For more information, see the Quick Installation Guide for Oracle Business Intelligence guide.
-
Launch the Oracle Business Intelligence Installer after the schemas are created.
Caution:
-
Do not install the software using a user ID that contains a special character.
-
BI Publisher and the HTML server must be within the same firewall in order to have two-way web service and http communication.
-
If you have anti-virus software running on your installing machine, the installation process may take longer.
-
-
Select the appropriate installation type:
-
”Simple Install” installs Oracle Business Intelligence components with the default settings on a single computer in the minimum number of steps. The Managed Server is not installed. This installation is targeted for demonstration, evaluation and proof of concept use cases.
-
”Enterprise Install” installs Oracle Business Intelligence components that you select and associates them with the Middleware, Oracle data source, and WebLogic Server homes that you specify. The enterprise installation type creates a separate Managed Server, bi_server1, along with the Admin Server. You should also use this installation type if you have a previous version of BI Publisher installed.
This installation type is recommended for a production environment.
-
”Software Only Install” installs software binary files in an existing Middleware home for later configuration.
-
-
When the Oracle Business Intelligence Component Installation screen appears, select only the Business Intelligence Publisher option:
Figure 2-1 Business Intelligence Publisher Installation Screen
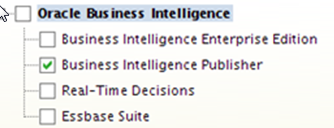
Description of "Figure 2-1 Business Intelligence Publisher Installation Screen"
Note:
For detailed instructions on how to install Oracle BI Publisher, see the Quick Installation Guide for Oracle Business Intelligence. -
When the installation and configuration finish, sign onto the WebLogic Admin Console and BI Server to make sure the servers are up and running by using the following URLs:
http://host:port/console (WebLogic Admin Console)
http://host:9704/xmlpserver (BI Publisher login page, port 9704 is the default port for ”Enterprise Install” type)
-
Review the Certifications for any updates or additional requirements.
To configure an SSL connection between the EnterpriseOne HTML Server and Oracle BI Publisher server, see ”Configuring an SSL Connection Between the EnterpriseOne HTML Server and Oracle BI Publisher Server for One View Reporting” in the JD Edwards EnterpriseOne Tools Security Administration Guide.
2.1.4 Migrating Users to a New Version of Oracle BI Publisher (Release 9.1 Update 3.3)
If you are upgrading your version of Oracle BI Publisher from a previous version (for example, moving from Oracle BI Publisher 11.1.1.5 to 11.1.1.7), after the installation, you must migrate the WebLogic users from an existing version to the new server.
To migrate users to a new version of Oracle BI Publisher:
-
Export the user information from the existing BI Server.
-
Log on to the BI Publisher WebLogic Admin Console.
-
Select Security Realm.
-
Select Export from the Migration tab.
-
Enter the location for the exported files.
-
Click Save.
-
-
Import the user information to the new server.
-
Log on to the BI Publisher WebLogic Admin Console.
-
Select Security Realm.
-
Select Import from the Migration tab.
-
Enter the location of the exported files.
-
Click Save.
-
-
Download and import the JD Edwards EnterpriseOne Reports for BI Publisher.
Note:
Existing reports from the previous version of BI Publisher will not run successfully; you must manually convert them to the new version.For personal reports, this is done when you select an existing report and use the Save, Save As, Copy, Promote, or Sync options on the Report Definition tab.
For shared reports, this is done when you select an existing report and use the Copy, Reserve, and Sync options on the Report Definition tab.
For more information, see the ”Enabling the Decimal Formatting Feature” section of the JD Edwards EnterpriseOne Applications One View Reporting User Guide.
-
Upload the JD Edwards EnterpriseOne Boilerplates templates.
2.2 Installing JD Edwards EnterpriseOne Boilerplates for BI Publisher
Template files are used to create JD Edwards EnterpriseOne report layouts. After BI Publisher is fully installed, you may want to install the boilerplate templates created by JD Edwards. These templates are not mandatory to run One View Reports, but you are welcome to use them to achieve a look and feel that is consistent with the delivered One View Reports.
To install JD Edwards EnterpriseOne boilerplate templates for BI Publisher:
-
Download the One View Boilerplates component (JDE_Boilerplates.zip) from the Update Center on My Oracle Support.
-
Extract the four .xpt files from JDE_Boilerplates.zip file using an unzip program and save them to your hard drive.
-
Log into BI Publisher with administrator privileges and navigate to the Catalog.
-
In the Folders pane, open Shared Folders directory and then the Components folder.
Note:
If you have installed both OBIEE and BI Publisher on the same server, you might not see the Components folder and boilerplates functionality. To correct this, see Missing Boilerplates in Components Folder in BI Publisher. -
Locate the Boilerplates report and select Edit.

-
Select Add New Layout from the upper right corner of the screen.
-
Select Upload and then when prompted, select the EnterpriseOne boilerplate template file (.xpt file) that you stored on your hard drive.
-
Provide a name for the template, select "BI Publisher Template" as the type, and select "English" for locale.
-
Select Upload to save the template.
-
Repeat these steps to add the remaining EnterpriseOne template files.
Note:
Any BI Publisher templates (.xpt files) added to the Boilerplates report are displayed to all users as shared templates.2.3 Giving the BIAuthor Role Access to the Boilerplates
After the Boilerplates are uploaded, you need to make sure that all users with the BIAuthor role have access to the boilerplates. Depending on your specific setup, you might also assign other roles to your users. Only the BIAuthor role is required.
To give the BIAuthor role access to the boilerplates:
-
Log into BI Publisher with administrator privileges and navigate to the Catalog.
-
In the Shared Folders directory, open the Components folder.
-
Select the More drop-down menu and then Permissions.
-
Select the "+" symbol (Create) and then the Search button.
-
Add the BIAuthor role and click OK.
-
Check all the check boxes for the BIAuthor role and click OK.
Note:
You, as the System Administrator, should determine whether or not to grant users the permission to delete boilerplates.
2.4 Configuring BI Publisher Users
When configuring BI Publisher users, you need to create a BI Publisher user for each JD Edwards EnterpriseOne user that designs or authors One View Reports. You may set up one proxy user in BI Publisher for all of the JD Edwards EnterpriseOne users who will only be running reports and not authoring them. This will minimize the amount of setup required. However, if you prefer to track each user individually for auditing purposes, you can create a one-to-one relationship by setting up a BI Publisher user for each JD Edwards EnterpriseOne user.
The following graphic shows the two types of users and how they are configured in BI Publisher.
Figure 2-2 User Setup in JD Edwards EnterpriseOne and BI Publisher
Description of "Figure 2-2 User Setup in JD Edwards EnterpriseOne and BI Publisher"
To configure a BI Publisher user:
-
Log into the WebLogic Server Administration Console.
-
Navigate to ”Security Realms” and then ”myrealm.”
-
Select the ”Users and Groups” tab and then click ”New.”
-
Create a new BIP account by providing a name, description, and password, and click OK.
Note:
Do not use BIP account names or passwords that contain special characters. -
In order to add the newly created user to the BI Author group:
-
Find and select your newly created user.
-
Navigate to the ”Groups” tab.
-
Select the BIAuthor group and move it under Chosen.
-
Click Save.
Note:
All BI Publisher users must belong to the BIAuthor group. -
-
Click Save.
-
Verify that you can log on to the Oracle BI Publisher server using your new user information.
See Oracle Fusion Middleware Administrator's Guide for Oracle Business Intelligence Publisher for more information.
You will need to set up mappings for each JD Edwards EnterpriseOne user to the corresponding BI Publisher user. This information appears later in this chapter in Mapping a JD Edwards EnterpriseOne User to a BI Publisher User.
Note:
After all BI Publisher users are created in the WebLogic Server Administration Console, you must either log each user onto the Oracle BI Publisher server as suggested in the last step or restart the BI Publisher server. One of these must be done before those users can connect from JD Edwards EnterpriseOne.2.5 Understanding and Managing One View Reports
One View Reports are managed as light weighted objects; they do not go through Object Management Workbench for their full life cycles.
Each One View Report is composed of these components:
-
A data model file.
-
A report template file. (This file has the same name as the data model file.)
Both of these files are stored on the BI Publisher server.
On the BI Publisher server, these reports are organized by path codes. For example, a personal report created in the One View Job Inquiry application (P51220) in DV910 path code (regardless of environment) is stored in the following BI Publisher folder: \BIP_user_id\DV910\P51200\.
A public report for the PY900 path code for the same application is stored here: \Shared Folder\PY910\P51200\.
You can move reports using import, export, or transfer functionality. You can export any report from any path code to a zip file. Then you can import the report into any path code. The transfer functionality allows you to transfer reports from one path code to another path code. However, both the source path code and target path code must point to the same BI Publisher server through the soft coding application.
In the soft coding application, please be aware that soft coding records are done at the environment level, not the path code level. You need to set up soft coding records for all environments for a particular path code.
When a user logs into a particular environment in JD Edwards EnterpriseOne, the system uses the soft coding record for the login environment and user credentials to look up the soft coding record. The soft coding record provides the BI Publisher server with which it connects, and the user ID and password required to connect to the BI Publisher server. Assuming it is BI Publisher server BIP_A, then if the user creates a report, the report will be stored on the BIP_A server. If the user then runs a report, the system will connect to the BIP_A server to run the report. If the user does an export, the system will export from the BIP_A server. If the user then imports a BI Publisher report, the system will upload the BI Publisher report to the BIP_A server. If the user transfers a report from the login path code to a target path code, the system will copy the report from the login path code folder of BIP_A to the target path code folder of the same server, BIP_A.
If the user wants to transfer a report to a different BI Publisher server, for example BIP_B, then the user will first need to export the report, logging in as a user and environment with a soft coding record pointing to BIP_A. Then the user will need to log out and log back in as a different user and environment, whose soft coding record points to BIP_B. Then the user can import the report. The system will upload the report to the BIP_B server, essentially accomplishing the task of copying a report from BIP_A to BIP_B.
2.6 Verifying the One View Reporting BI Publisher Soft Coding Template
Access the Web Services Soft Coding Template application (P953000) by selecting the following from the Navigator drop-down menu: EnterpriseOne Menus, EnterpriseOne Life Cycle Tools, System Administration Tools, Soft Coding Administration, Soft Coding Template. Use P953000 to verify that the One View Reporting BI Publisher soft coding template exists with these values:
| Field | Value |
|---|---|
| Template Name | JDE_ONEVIEW_CONNECTION |
| Description | One View Reporting Connection Template |
| SoftCoding Key | ONEVIEW_BIP_CONN
Important: The value for SoftCoding Key must be ONEVIEW_BIP_CONN. You cannot use any other value for this field. |
| Value | <webservice>
<endpoint>http://bip_server:bip_port</endpoint> <username>bip_user_name</username> <password>_||_BIP_PASSWORD_||_</password> <properties> <property><name>root catalog</name><value>JD Edwards</value></property> <property><name>bip version</name><value>11.1.1.7.0</value></property> <property><name>bip url</name><value>http://bip_server:bip_port</value></property> </properties> </webservice> To complete this field, please see the Soft Coding Value Guidelines below. |
Notes:
The version property only applies to Release 9.1 Update 3.3 and on.The bip url property must be added if you want to run One View reports from an external domain as well as an internal domain. You do not need to add this property if you are only planning to run One View reports from an internal domain (local intranet).
2.6.1 Soft Coding Value Guidelines
When updating the One View Reporting BI Publisher connection template, use the following guidelines to ensure valid soft coding value parameters:
2.6.1.1 Http Address
The http address must follow this format with a valid, fully qualified Oracle BI Application Server name or an IP address and port number:
http://<server>:<port>
2.6.1.2 Username
The user name must be a valid BI Publisher user name with administration privileges.
2.6.1.3 _||_BI_PASSWORD_||_
An administrator has two ways to supply the password for the Oracle BI user:
-
Use a placeholder parameter (masked parameter) in the soft coding value and assign the value to the parameter in the grid. The previous example used a place holder parameter called "BI_PASSWORD" and defined the BI_PASSWORD variable in the grid. The "_||_" prefix and postfix are markers for placeholder variables.
When used this way, the value will be encrypted before it is saved into the database and is masked for future display.
-
Use plain text directly in the soft coding value.
2.6.1.4 Bip Url
You need to add this property only if you want to run One View reports from both internal and external domains.
Verify that the BI Publisher URL used for this parameter can be opened via a web browser from both external and internal domains. This is necessary so that the One View report window, which is launched when running the report, can connect to the BI Publisher server. If the URL is set up properly, you should see the BI Publisher sign-in page when running from both an external and internal domain.
2.7 Creating a One View Reporting BI Publisher Soft Coding Record
This section provides an overview of soft coding records and discusses how to create a soft coding record.
2.7.1 Overview
You must set up a BI Publisher soft coding record in order to establish a connection from the HTML server to the BI Publisher server. You set up soft coding records by environment and by user (or role, or *PUBLIC). When a soft coding record is set up for *PUBLIC and a particular environment, everyone logged into the environment will use the same soft coding record to locate and connect to the BI Publisher server. Use the Soft Coding Records (P954000) application to set up soft coding records.
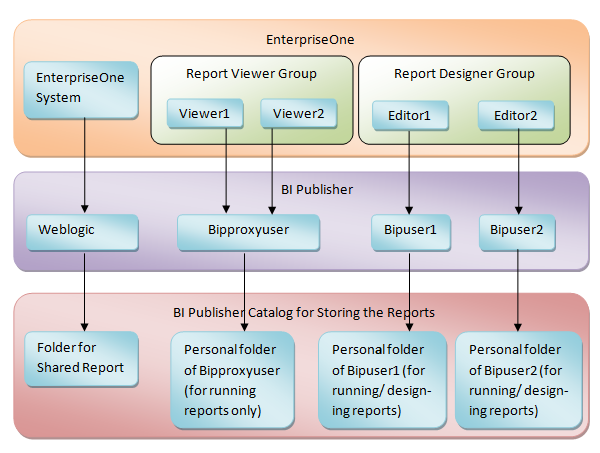
The number of soft coding records that you set up depends on how you want to set up your users. You may set up soft coding records differently. It is recommended that you divide your users into two groups:
- Viewer Group
-
This group consists of the JD Edwards EnterpriseOne users who are only interested in viewing reports instead of designing reports. For this group of users, only set up one proxy BI Publisher user and let them share the proxy user setting in the soft coding record as their common personal credential. Do not set up JD Edwards EnterpriseOne to BI Publisher user mappings for these users in their user profiles. When setting up permissions, assign permission to run One View Reports to their JD Edwards EnterpriseOne accounts or their common JD Edwards EnterpriseOne role in the Runtime Feature Authorizations application (P958974).
- Designer Group
-
This group consists of the JD Edwards EnterpriseOne users who design new and existing reports. For this group of users, set up their individual BI Publisher accounts on the BI Publisher Server and individual JD Edwards EnterpriseOne to BI Publisher user mappings in their JD Edwards EnterpriseOne user profiles. The individual JD Edwards EnterpriseOne to BI Publisher user mapping setting in the user profile has a higher priority than the proxy user setting in the soft coding record. Assign permission to design and share One View Reports to these users in the Runtime Feature Authorizations application (P958974).
Figure 2-3 Viewer Group and Designer Group Example
Description of "Figure 2-3 Viewer Group and Designer Group Example"
The system checks both the user profile and soft coding record for the personal credentials based on the following rules:
-
If the soft coding record does not contain the optional proxy user and proxy password setting, and the JD Edwards EnterpriseOne to BI Publisher user mapping is not set up in the user profile, then One View Reporting is disabled for the user.
-
If the soft coding record does not contain the optional proxy user and proxy password setting, and the JD Edwards EnterpriseOne to BI Publisher user mapping is set up in the user profile, then the user uses the personal BI Publisher account to access BI Publisher.
-
If the soft coding record contains the optional proxy user and proxy password setting, and the JD Edwards EnterpriseOne to BI Publisher user mapping is not set up in the user profile, then the user uses the proxy user to access BI Publisher.
-
If the soft coding record contains the optional proxy user and proxy password setting, and the JD Edwards EnterpriseOne to BI Publisher user mapping is set up in the user profile, then the user uses the personal BI Publisher account to access BI Publisher.
Important:
Be sure to set up soft coding records for all of the users or roles that you intend to use.2.7.2 Creating a Soft Coding Record
To create a One View Reporting BI Publisher soft coding record:
-
Access the P954000 application by selecting the following from the Navigator drop-down menu: EnterpriseOne Menus, EnterpriseOne Life Cycle Tools, System Administration Tools, Soft Coding Administration, Soft Coding Records.
-
Select Add.
-
Enter the following information:
Field Value User/Role Enter the JD Edwards EnterpriseOne user, role, or *PUBLIC. Use *PUBLIC to set up one record for all users. Note: This must be an administrative user ID. Make sure you set up soft coding records for all of the users and roles that you intend to use.
Environment Name Enter the JD Edwards EnterpriseOne environment for which you are creating this soft coding record. Template Name JDE_ONEVIEW_CONNECTION SoftCoding Key ONEVIEW_BIP_CONN Important:
The value for SoftCoding Key must be ONEVIEW_BIP_CONN. You cannot use any other value for this field. -
Click the Populate Soft Coding Value button to populate the Soft Coding Description and Soft Coding Value fields with the information from the JDE_ONEVIEW_CONNECTION template.
-
Enter the Mask value for any Mask fields (for example, enter a value for the BI_PASSWORD).
-
Enter values for the proxy user and proxy password if you plan to use a proxy user. These values are optional. The two new properties need to be added as the sibling tag after property for root catalog.
Note:
The name of the property must be "proxy user" and "proxy password". For example:<property><name>proxy user</name><value>_||_PROXY_USER_||_</value></property>
<property><name>proxy password</name><value>_||_PROXY_PASSWORD_||_</value></property>
Enter the values of _||_PROXY_USER_||_ and _||_PROXY_PASSWORD_||_ in the grid.
-
(Release 9.1 Update 3.3) Enter a value for the bip version property:
<property><name>bip version</name><value>11.1.1.7.0</value></property>
-
Enter a value for the bip url property if you want to run One View reports from both internal and external domains:
<property><name>bip url</name><value>http://bip server:bip port</value></property>
-
Modify the server and port to reflect your specific installation.
-
Click OK to save the record.
Note:
You must add a soft coding record for each path code.2.7.3 Soft Coding Value Guidelines
When updating the One View Reporting BI Publisher connection template, use the following guidelines to ensure valid soft coding value parameters:
2.7.3.1 Http Address
The http address must follow this format with a valid, fully qualified Oracle BI Application Server name or an IP address and port number:
http://<server>:<port>
2.7.3.2 Username
The user name must be a valid BI Publisher user name with administration privileges.
2.7.3.3 _||_BI_PASSWORD_||_
The administrator has two ways to supply the password for the Oracle BI user:
-
Use a placeholder parameter (masked parameter) in the soft coding value and assign the value to the parameter in the grid. The previous example used a place holder parameter called "BI_PASSWORD" and defined the BI_PASSWORD variable in the grid. The "_||_" prefix and postfix are markers for placeholder variables.
When used this way, the value will be encrypted before it is saved into the database and is masked for future display.
-
Use plain text directly in the soft coding value.
2.7.3.4 Bip Url
Verify that the BI Publisher URL used for this parameter can be opened via a web browser from both internal and external domains.
The http address must follow this format with a valid, fully-qualified Oracle BI Application Server name or an IP address and port number:
http://<server>:<port>
2.8 Setting Up One View Reporting Feature Authorizations
This section contains these topics:
-
Verifying Runtime Feature Definitions
-
Setting Up Feature Authorizations
-
Copying Feature Authorizations by User or Environment
2.8.1 Verifying Runtime Feature Definitions
Use the Runtime Feature Definitions application (P958973) to view or set up One View Reporting usage capabilities, such as running reports or updating shared reports. Four types of usage records are provided with One View Reporting. They are:
- JDE_NOONEVIEW
-
User is not allowed access to One View.
- JDE_RUNONEVIEW
-
User is only allowed to run One View Reports.
- JDE_DESIGNONEVIEW
-
User is allowed to run, add, edit, and remove One View Reports.
- JDE_DESIGNSHAREDONEVIEW
-
User is allowed to run, add, edit, and remove One View Reports and can request to promote them.
To view these records:
-
Access the Runtime Feature Definitions application from the Runtime Feature Administration (GH9098) menu or enter P958973 in the Fastpath.
You can also select the following from the Navigator drop-down menu to get there: EnterpriseOne Menus, EnterpriseOne Life Cycle Tools, System Administration Tools, Runtime Feature Administration, Runtime Feature Definitions.
-
Select the One View Report option.
-
Select Find.
Note:
One View Reporting uses only these four records. You do not need to add any other records.2.8.2 Setting Up Feature Authorizations
Use the Runtime Feature Authorizations application (P958974) to set up access control for users. You can set up a particular One View Reporting feature for individual users, roles, or *Public on different levels, such as system code, application level, form level, or *ALL.
You might want to consider adding roles specific to your licensed products (for example, Inventory, Financials, or Sales).
You can also set up access control to Databrowser by entering DATABROWSE as the application ID and *ALL for the other fields.
To set up access control for users:
-
Access the P958974 application by selecting the Form exit, Feature Auth from P958973 or directly from the Runtime Feature Administration (GH9098) menu.
You can also select the following from the Navigator drop-down menu to get there: EnterpriseOne Menus, EnterpriseOne Life Cycle Tools, System Administration Tools, Runtime Feature Administration, Runtime Feature Authorizations.
-
Select Add.
-
On the Feature Authorizations Revisions form, enter the feature name for which you want to add records (for example, JDE_RUNONEVIEW) and select Find. This will prevent having to scroll through too many records to add the new one.
-
Scroll down to the first empty grid line and enter the following information:
Field Value Environment Name Enter the environment name. User/Role/*Public Enter the user or role for which you want to create the authorization record. You can also enter *Public. Feature Name Enter the feature name that provides the appropriate permissions that you want to give users. This is one of the four features that you verified or added in the previous section.
Form Name Enter the form name or *ALL. Object Name This field is automatically populated based on the form. You can also enter "DATABROWSE" in this field to turn on the feature for Databrowser. Product Code Enter the product code. -
Click OK to save the record.
2.8.3 Copying Feature Authorizations by User or Environment
After you have created feature authorization records, you may want to copy all the feature authorization records from one user or role to another user, role, or *Public. Alternatively, you might want to copy all the feature authorization records from one environment to another.
To copy by user:
-
Access the P958974 application from the Runtime Feature Administration (GH9098) menu.
-
Select Copy By User from the Form menu.
-
On the Copy Feature Authorizations form, enter the user or role from which to copy the feature authorizations. Then enter the user, role, or *PUBLIC to which you want to copy the feature authorizations.
-
Click the Save button.
To copy by environment:
-
Access the P958974 application from the Runtime Feature Administration (GH9098) menu.
-
Select Copy By Environment from the Form menu.
-
On the Copy Feature Authorizations form, enter the source environment from which to copy the feature authorizations, and enter the target environment.
-
Click the Save button.
2.9 Mapping a JD Edwards EnterpriseOne User to a BI Publisher User
You need to map each JD Edwards EnterpriseOne user to a BI Publisher user for all of the JD Edwards EnterpriseOne users who need to create and edit reports. For JD Edwards EnterpriseOne users who only run public reports, you can use the soft coding parameter <proxy user> and <proxy password> to connect to BI Publisher, and you do not need to map those JD Edwards EnterpriseOne users.
Note:
If you are using a proxy user, then the password is not required in the JD Edwards EnterpriseOne user profile.This section discusses how to enter the BI Publisher user ID and password in the user's profile in JD Edwards EnterpriseOne so that the system can use the BI Publisher user ID and password to connect to BI Publisher servers on behalf of the EnterpriseOne user.
To map a JD Edwards EnterpriseOne user to a BI Publisher user:
-
Select My System Options from the JD Edwards EnterpriseOne Personalization menu.
-
Select User Profile Revisions.
-
From the Form exits, select BI Publisher Pswd.
-
Enter the information from your BI Publisher account in the BI Publisher User ID and BI Publisher Password fields.
-
Log out of and back into JD Edwards EnterpriseOne so that the settings will take effect.
-
Whenever you change your user ID and password on the BI Publisher server, you will need to change it here as well.
Note:
After all BI Publisher users are created in BI Publisher, you must restart the BI Publisher server before those users can connect from JD Edwards EnterpriseOne.2.10 Installing One View Reports
-
Download the One View Reports zip files, which are applicable to your JD Edwards EnterpriseOne version and BI Publisher version, from the Update Center.
-
Log into the HTML server as a JD Edwards EnterpriseOne user with a mapped BI Publisher user.
Note:
Verify that the user has access to a One View Reporting feature as described in the Setting Up Feature Authorizations section. -
Launch an application and try to add a new report in order to verify the correct configuration. If the BI Publisher connection is set up properly, you will see the BI Publisher layout editor appear after saving the new report.
-
Navigate to EnterpriseOne Menus, EnterpriseOne Life Cycle Tools, One View Reports, and open Work with Importing One View Reports (P982402).
-
Select Add.
-
On the Work with Importing One View Reports - Import User Generated Contents form, select the Load Import File button.
-
Find and select the One View Reports zip file that you downloaded.
-
On the File Upload form, select the Load button.
The file is imported.
-
Select the import record to review the import results.
-
On the Detail for Imported Objects form, verify that "Completed Process" appears in the Status Description column for all items.
If you need to transfer the imported One View reports to another path code, see Transfer One View Reports.
2.11 Working with Configuration Settings
To maximize the end user experience, you can use these Web Runtime configuration settings. You can access and change these in Server Manager under Web Runtime, Web Objects Settings. The settings are:
- One View Reporting: Default Record Count
-
When a One View Report runs, three options control how many records the report will run. The three options that you see in the user interface of the One View report or Layout Tab are:
-
Retrieve Record Count: X
-
Use current data in grid
-
Retrieve all records
When you select the first option, Retrieve Record Count, the system uses this Server Manager setting to set the default record count for the report.
-
- One View Reporting: Maximum Record Count
-
This is the maximum number of records the system will retrieve for any One View Report.
- One View Reporting: Connection Wait Time
-
This is the default time in milliseconds to wait for a connection to the BI Publisher server before launching the first One View Report. You may want to increase this value for a slow network and decrease it for a faster network.
The Server Manager interface for runtime and metric parameters provides details on the usage of each setting applicable to that parameter. Access this by clicking the ”i” (Information) icon for a desired parameter.
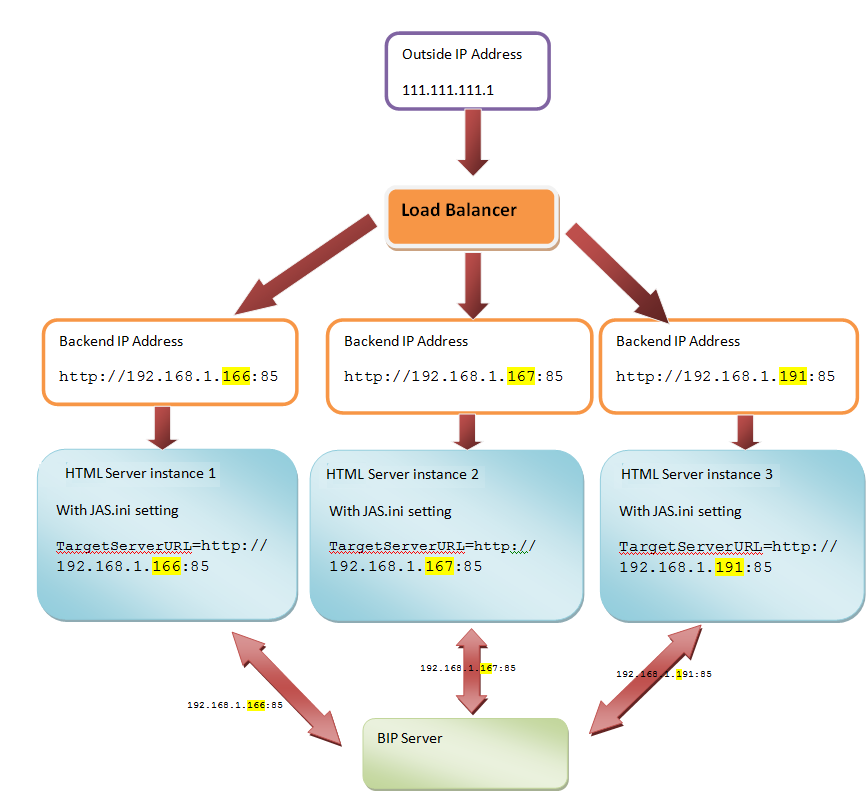
2.12 HTML Server Clustering Considerations
In order for One View Reporting to function with an HTML Server cluster, for example, Oracle HTTP Server (OHS), you must:
-
Verify that the Tool Release is 9.1.2.3 or higher, or 9.1.3 or higher.
-
Update the jas.ini so that all HTML Server instances point to the actual backend HTML Server URL. This can be done using the following parameter in Server Manager in the Web Objects Settings section of Web Runtime:
- One View Reporting: Target JAS Server and Port
-
For each HTML server, the value must be set in the format http://<server>:<port> where <server> is the fully qualified host name or IP address of the backend HTML Server.
Important:
For vertical and horizontal cluster server setup through Oracle HTTP Server, the setting needs to be added manually each time after Server Manager synchronizes all of the .ini files.The following diagram describes a typical clustering or load balancing setup: