7 Using Media Object Attachments
This chapter contains the following topics:
7.1 Media Object Attachments Overview
JD Edwards EnterpriseOne software media objects and imaging features enable you to attach useful information to an application, including information that might currently exist as a paper-based document. The media objects feature enables you to attach the information to JD Edwards EnterpriseOne software applications, forms and rows, and Object Librarian objects. The imaging feature within media objects gives you the flexibility to create an efficient method of information storage.
Use media objects to link information to applications, either to individual rows in a grid or to a form. The following list discusses the types of information that you can attach to a grid row or form:
| Information | Description |
|---|---|
| Text | The media objects functionality includes a word processor that lets you create a text-only attachment. For example, you could use a text attachment to provide specific instructions for a form or additional information about a record. |
| Image | Images include files such as Windows bitmaps, Graphics Interchange Format (GIF) files, and Joint Photographic Experts Group (JPG) files. These files might represent electronically created files as well as scanned images of paper-based documents. |
| Object Linking and Embedding (OLE) | Media objects can be files that conform to the OLE standard. OLE enables you to create links among different programs. Using these links, you can create and edit an object from one program through a different program. JD Edwards EnterpriseOne software provides the links that you need to attach OLE objects.
You attach OLE media objects at the base form level. Media objects attached at this level are attached to a form and not to any data that might appear in the form. You can attach media objects to a grid row or a form, but the files themselves exist in separate directories. The only file information included with the application to which the OLE links is the path to the supporting file. You can only use OLE objects that you properly register and install as OLE objects through Windows. |
| JDE shortcuts | A JDE shortcut is a link that opens a JD Edwards EnterpriseOne software application. Within media objects, you can only attach JD Edwards EnterpriseOne software shortcuts; you cannot attach shortcuts to third-party applications. |
| Uniform Resource Locators (URL)/files | Media objects can be links to Web page URLs or other related files. When a developer attaches a URL media object to a control object on a form, the Web page appears as part of the form. When a user attaches a URL to a form or Object Librarian object, the media object acts as a link to the URL. |
System administrators can set up templates that might include their own attachments, such as images and shortcuts. For example, you can create a letterhead and a standard form for a memo. Also, you might create a shortcut, to be included in the template, that provides access to an application that uses data specific to the information that you add to the template.
Each time you save a media object, whether it is a new media object, or whether you have modified an existing one, EnterpriseOne timestamps the media object with your user ID, the date, and time. This information appears in the upper right corner of the media object. The information that displays is retrieved from the Enterprise server, so if your Enterprise server resides in a different time zone, the time and date that displays will be different than the time zone in which you are working. For example, if you work in the Eastern time zone, but the Enterprise server you are using resides in the Pacific time zone, the date and time that is recorded when you save the media object is Pacific time.
Note:
If you open a Microsoft Excel OLE media object, place the cursor in the spreadsheet, then click Save, EnterpriseOne timestamps the media object even if you have not made changes.7.2 Using Media Objects
You can use the Media Objects feature to add text, graphics, and other objects to forms and records. For example, you can use a text attachment to explain special circumstances surrounding a journal entry. Or you can attach drawings, animations, and other types of objects to forms and records. A pop-up menu provides access to established templates for attachments and an option to set the properties for the Media Objects form.
When you attach a media object to a form, the attachment might not be available if you access different data on the form. For example, if you attach a media object to a detail form that contains data for Order Number 2002, this attachment does not appear on the detail form that appears when you access data for Order Number 3003. The base form, which in this case is a detail form, is the same for both Order Numbers, but the data associated with the form is specific to each Order Number. The Order Number represents the key to the location where an attachment is stored.
JD Edwards EnterpriseOne software supports Object Linking and Embedding (OLE). OLE enables you to create links among different programs. Using these links, you can save an object from one program into a different program. The system provides the links that you need to attach OLE objects. You can attach OLE objects as media objects and at the base form level. When you attach an object at the base level of the form, you attach the object to the form and not to any data that might appear in the form.
If attachments exist for a form, a paper clip button appears at the right of the status bar when you open the form. For an OLE object attached at the base form level, a document button appears at the right of the status bar.
When a form first opens, grid rows do not indicate whether attachments exist for the corresponding records. You can perform a search on every record that the system loads onto your workstation or you can search each record to determine whether attachments exist for records.
The Text feature includes a word processor that lets you create, view, edit, and delete notes. When you create a text attachment, you can also set up templates. You can use templates to create a format for a frequently used media object.
7.2.1 HTML Media Objects
The HTML editor offers eight font faces (Arial, Courier New, Comic Sans, Georgia, Helvetica, Impact, Tahoma, Times New Roman) and font size from HTML size 1 to 7.
Note:
The font appearance is dependent on the browser being used.Note:
: Tab space is not supported in the HTML editor.When the HTML mode is enabled and you access an existing ActiveX attachment you are presented with two options:
-
Download File
-
Data conversion
The data conversion option converts the ActiveX text to HTML and is displayed in the HTML editor.
Note:
: Once the data is converted and saved to the database in XHTML it cannot be returned to the ActiveX RTF format.The ActiveX rich text editor supports font sizes from 10 to 72 pts, the HTML editor supports HTML font size 1 to 7. The font mapping for the data conversion is listed below.
| ActiveX Font Size | HTML Font Size |
|---|---|
| 10 | 2 |
| 11, 12 | 3 |
| 13, 14 | 4 |
| 16, 18 | 5 |
| 20, 22, 24 | 6 |
| 26, 28, 36, 48, 72 | 7 |
If a company switched from HTML mode to ActiveX mode after attachments were created the attachments will be read-only.
7.2.2 Checking for Attachments
To find out whether an attachment exists for a record, you must first perform a search on the record. You can perform this search on one record or on a number of records simultaneously. The system only searches for attachments on records that you load onto your workstation. For example, when you initially click the Find button to locate a number of records, only the records that appear in the grid exist on your workstation. Use the page buttons to view more records.
Access a form with the attachments feature available.
To check for all attachments:
On a form with the attachments feature available, click the Search for Attachments button to the left of the row of column titles. This button looks like a paper clip overlapping a magnifying glass.
A paper clip button appears in the row header for each loaded record with an attachment.
7.2.3 Checking for Attachments for a Single Row or a Range of Rows
Access a form with the attachments feature available.
-
On a form with the attachments feature available, hold the cursor over the row header for the grid row.
If an attachment exists for the row, a paper clip button appears in the row header.
-
Move the cursor up or down in the row header column to search for attachments for adjacent rows.
7.3 Attaching Media Objects
Use the Attachments feature to attach text, photos, drawings, spreadsheets, video images, sounds, and application shortcuts to forms and grid rows. For example, you might attach the image of an invoice to a data entry record, attach a legal document to a record that describes a contractual agreement, or attach text that describes a process on a form. The attachments feature is not available on all forms.
Note:
You cannot create attachments until an administrator has established and mapped media object queues as described in Media Objects and Imaging in the System Administration Guide.When you enter text, you can format the paragraphs and run a spell check. JD Edwards EnterpriseOne software also supports object linking and embedding (OLE).
7.3.1 Attaching Text
Access a form with the attachments feature available.
-
On a form where attachments are available, do one of these tasks:
-
To attach text to a form, from the Form menu, select Attachments.
If attachments exist for the form, click the paper clip button to the right of the status bar.
-
To attach text to a grid row, select the row and then, from the Row menu, select Attachments.
The Media Objects workspace is split into two panels. The left panel is the button panel and the right panel is the viewer panel. Icons for any files previously attached to the record appear in the button panel.
-
-
Do one of these tasks:
-
From the File menu, select New, and then Text.
-
In the button panel, click the right mouse button, select New, and then select Text from the pop-up menu.
-
-
In the viewer panel, type the desired text.
-
When you finish, from the File menu, select Save and Exit.
You can use the formatting tools at the top of the viewer panel to format the text of your note.
7.3.2 Spell Checking Text Media Objects
EnterpriseOne enables you to spell check text media objects. When you run spell checker, EnterpriseOne displays your text in a read-only field, and highlights each word in red that it identifies as a possible error. It displays why it identified the item as an error, and provides suggestions to correct it. You can choose a suggestion, manually correct the word in Replace With field, or ignore the word.
You can enable or disable the items you want spell checker to identify as possible errors. The list below shows which items are enabled or disabled by default:
-
Ignore All-Caps Words Option - Disabled.
-
Ignore Words with Numbers Option - Disabled.
-
Ignore Words with Mixed Case Option - Disabled.
-
Ignore Domain Names Option - Enabled.
-
Report Doubled Words Option - Enabled.
-
Case Sensitive Option - Enabled.
-
Suggest Split Words Option - Enabled.
If the language preference setting you are using is not supported by the spell checker, you will receive an error when you try to spell check your text media objects.
To spell check your text media objects:
-
Click the Spell Check icon located on the media object control toolbar.
-
On Spell Checker, choose one of the following options:
-
Change
Click this option if you accept the suggestion displayed in the Replace With field. You can also manually change the word in the Replace With field, and click Change.
-
Change All
Click this option if you want spell checker to automatically replace every instance of the word with the suggestion displayed in the Replace With field. You can also manually change the word in the Replace With field, and click Change All.
-
Ignore
Click this option if you want to disregard that the word displayed in the Problem field is an error.
-
Ignore All
Click this option if you want to disregard that all instances of the word displayed in the Problem field is an error.
-
Show Options
Click this option to display a list of the items spell checker identifies as possible errors. Click the check box to enable or disable any item.
-
-
Click OK to close the Spell Checker.
7.3.3 Attaching a File
Access a form where attachments are available.
-
On a form where attachments are available, do one of these tasks:
-
To attach an image to a form, from the Form menu, select Attachments.
If attachments exist for the form, click the paper clip button to the right of the status bar.
-
To attach an image to a grid row, select the row and then, from the Row menu, select Attachments.
-
-
On Media Objects, do one of these tasks:
-
From the File menu, select New and then Image.
-
In the button panel, click the right mouse button, select New, and then select Image from the pop-up menu.
-
-
Complete these options:
-
Queue Name
-
Files of Type
The Preview option contains a default check mark to display a sample of the selected image. Toggle this option to display or hide the preview image.
-
-
Choose an image, and then click OK.
If the system supports the graphic format, the image appears in the viewer panel.
-
When you finish, from the File menu, select Save and Exit.
Field Explanation Queue Name The name of the directory where the image file exists. Files of Type The list of file extensions that the system supports. For example, file types might include .bmp for a Windows bitmap, .gif for a graphics interchange format file, and .jpg for a joint photographic experts group file.
7.3.4 Attaching an OLE Object
Access a form where attachments are available.
-
On a form where attachments are available, do one of these tasks:
-
To attach an OLE object to a form, from the Form menu, select Attachments.
If attachments exist for the form, click the paper clip button to the right of the status bar.
-
To attach an OLE object to a grid row, select the row and then, from the Row menu, select Attachments.
-
-
On Media Objects, do one of these tasks:
-
From the File menu, select New and then OLE.
-
In the button panel, click the right mouse button, select New, and then select OLE from the pop-up menu.
-
-
On Insert Object, to create a new object, select an object type and click OK.
Selections vary from system to system depending on what the system administrator installs on your workstation and on the network.
-
Create your object.
-
To attach an existing object, select Create from File, locate the object on your system, and then click OK.
Depending on whether you create an object or attach an existing object, the application associated with the object displays in the viewer panel either a blank workspace or the existing object.
The menu bar displays the menus for the application from which you call the object. For example, if you select an Excel document, the Excel menus display on the menu bar.
-
On Media Objects, edit the object in the viewer panel as necessary.
-
When you finish, from the File menu, select Save and Exit.
7.3.5 Attaching a Shortcut
Access a form where attachments are available.
Include a shortcut to provide access directly from a record to an associated application.
-
On a form where attachments are available, do one of these tasks:
-
To attach a shortcut to a form, from the Form menu, select Attachments.
If attachments exist for the form, click the paper clip button to the right of the status bar.
-
To attach a shortcut to a grid row, select the row and then, from the Row menu, select Attachments.
-
-
On Media Objects, do one of these options:
-
From the File menu, select New and then Shortcut.
-
In the button panel, click the right mouse button, select New, and then select Shortcut from the pop-up menu.
-
-
On the Open form, browse through your files, select the appropriate shortcut, and click Open.
Your shortcut appears in the viewer panel.
-
When you finish, from the File menu, select Save and Exit.
7.3.6 Attaching a URL or File
Access a form where attachments are available.
Attach a URL to provide access to a Web page or a file on a disk. You can also attach file types that cannot be attached as images or OLE files, such as bitmaps.
-
On a form where attachments are available, do one of these tasks:
-
To attach a URL or file to a form, from the Form menu, select Attachments.
If attachments exist for the form, click the paper clip button to the right of the status bar.
-
To attach a URL or file to a grid row, select the row and then, from the Row menu, select Attachments.
-
-
On Media Objects, do one of these tasks:
-
From the File menu, select New and then URL/File.
-
In the button panel, click the right mouse button, select New, and then select URL/File from the pop-up menu.
-
-
On Add URL/File, browse your files or queues, select the appropriate URL or file, and click Open. You can also type a URL in the field.
-
Click OK.
Your URL or file appears in the viewer panel. If you are attaching a URL, a download dialog box appears. You can either verify that the URL is active or you can click Cancel.
-
When you finish, from the File menu, select Save and Exit.
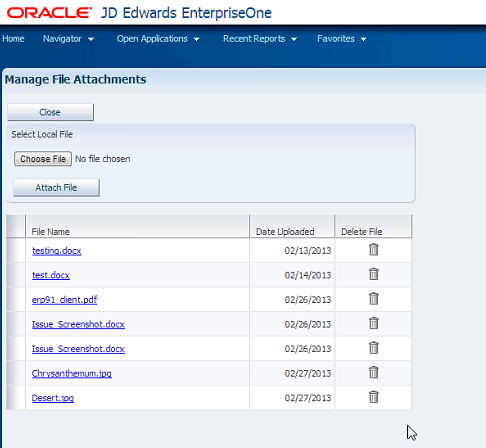
7.3.7 Attach Media Objects Directly from Applications (Release 9.1 Update 3)
This feature allows you to manage media objects directly from applications. The Manage Media Object system function can be invoked from the Event Rule (ER), to bring up the Manage Media Object window. This system function can be used on any control such as a Link, Button or clickable image.
The following screenshot is an example of the Manage Media Object window.
See Media Object System Functions in the JD Edwards EnterpriseOne Tools Form Design Aid Guide
7.4 Searching for Media Objects
You can search for a specific media object in the system by using information such as creation date, alternate keys, or UDCs.
Note:
You can only search for media objects that already have codes defined for them and that your system administrator has made available to all users in the system.7.4.1 Searching for a Media Object
Access a form where attachments are available.
-
On a form where attachments are available, do one of these tasks:
-
To search for a media object to attach to a form, from the Form menu, select Attachments.
If attachments exist for the form, click the paper clip button to the right of the status bar.
-
To search for a media object to attach to a grid row, select the row, and then from the Row menu, select Attachments.
-
-
On the Media Objects form, do one of these tasks:
-
From the File menu, select New and then Search.
-
In the button panel, click the right mouse button, select New, and then Search from the pop-up menu.
-
-
On the Media Object Search form, complete the Type field and click Find.
Enter the type of media object attachment for which you are searching. You can use the Query by Example line to limit your search.
Only attachments with defined metadata appear.
-
Choose an attachment and click Select.
Your media object appears in the viewer panel.
-
When you finish, from the File menu, select Save and Exit.
7.4.2 Renaming Attachments
When you add an attachment, the system displays its filename under its button in the button panel. You can rename the button to make it more meaningful to other users if you want.
-
On the Media Objects form, select a button and do one of these tasks:
-
From the File menu, select Rename.
-
In the button panel, click the right mouse button and select Rename from the pop-up menu.
-
-
Type a new name for the button and then click anywhere on the form.
7.4.3 Deleting Media Objects
When you no longer need an attachment, use the Delete feature on Media Objects to remove the object. When you delete text, the text is permanently erased. When you delete images and OLE objects, you remove the attachment of the file to the record. The system continues to store a file for the object.
Access a form where attachments are available.
-
Complete one of these tasks:
-
To delete an attachment to a form, from the Form menu, select Attachments.
If attachments exist for the form, click the paper clip button to the right of the status bar.
-
To delete an attachment to a grid row, select a row with a paper clip button, and then, from the Row menu, select Attachments.
-
-
On the Media Objects form, select the appropriate button in the button panel and then select Delete from the File menu.
-
On Confirm Media Object Delete, click Yes to confirm the deletion.
The button disappears from the button panel.
-
When you finish, from the File menu, select Save and Exit.
7.5 Using Templates
This section discusses how to:
-
Create a template
-
Attach a template
-
Modify a template
-
Delete a template
-
Delete a template with media objects
7.5.1 Creating a Template
On the Media Objects form, you can access the Work With Media Objects Templates form. On this form, you can attach, create, modify, and delete templates to help you format your text attachments.
Access a form where attachments are available.
-
Select the row from which you want to attach a template, and then select Attachments from the Row menu.
-
On the Media Objects form, in the button panel, click the right mouse button and select Templates from the pop-up menu.
-
On the Media Objects Template form, click Add.
-
On the Media Object Template Revisions form, complete these fields, and then enter your template information into the workspace:
-
Template Name
-
Description
-
-
Click Add.
7.5.2 Attaching a Template
Access a form where attachments are available.
-
Select the row to which you want to attach a template, and then select Attachments from the Row menu.
-
On the Media Objects form, in the button panel, click the right mouse button and select Templates from the pop-up menu.
-
On the Work With Media Object Templates form, click Find.
You can use the query-by-example line to refine your search.
-
To preview the template, double-click the paper clip button in the row header.
-
Choose the grid row for the template that you want to attach, and then click Select.
-
The template appears in the workspace on Media Objects.
7.5.3 Modifying a Template
Access a form where attachments are available.
-
Select the row from which you want to modify a template, and then select Attachments from the Row menu.
-
On the Media Objects form, in the button panel, click the right mouse button and then select Templates from the pop-up menu.
-
On the Work With Media Object Templates form, click Find.
You can use the Query by Example line to refine your search.
-
Choose the grid row for the template that you want to modify and then click Select.
-
On the Media Objects form, modify the template as necessary and then from the File menu, select Save and Exit.
7.5.4 Deleting a Template
Access a form where attachments are available.
-
Select the row from which you want to delete a template, and then select Attachments from the Row menu.
-
On the Media Objects form, in the button panel, click the right mouse button and then select Templates from the pop-up menu.
-
On the Work With Media Object Templates form, click Find.
You can use the Query By Example line to refine your search.
-
Choose the grid row for the template that you want to delete, click Delete, and then on Confirm Delete, click OK.
7.5.5 Deleting a Template on Media Objects
Access a form where attachments are available.
-
Select the row from which you want to delete a template, and then select Attachments from the Row menu.
-
On the Media Objects form, in the button panel, select the text button for the template, and then select Delete from the File menu.
-
On the Confirm Media Object Delete form, click Yes.
The template and the text button disappear.
7.6 Setting Media Object Properties
The pop-up menu that appears when you right-click in the button panel on the Media Objects form provides you with the option to view and, for some objects, to change the properties of an object. Each object has unique properties.
In addition, you can define metadata for an object. Metadata contains information about the object, such as a description of the object, who created it, and when it was created. Other users can search for the object based on this information.
-
On the Media Objects form, in the button panel, right-click and then select Properties.
The form or row must contain an attachment in order to access the Media Objects properties.
-
On the Properties form, review the "Technical information about the key for the form" on the Key Information tab.
-
Click the Flags tab and review this information:
-
Allow Text Items
-
Allow Image Item
-
Allow OLE Items
-
Allow RTF Text
-
Show Text Item On Open
-
Read Only
-
7.6.1 Setting Text Properties
-
On the Media Objects form, in the button panel, right-click a text button, and then select Properties from the pop-up menu.
-
On the text properties form, review these fields on User Audit Information:
-
Created by
-
Date Created
-
Time Created
-
Updated By
-
Date Updated
-
Time Updated
-
-
Click the Printing Information tab and then do the following, if necessary:
-
Click the Check to print before report item option
-
Complete the Effective From field
-
Complete the Effective To field
-
7.6.2 Setting Image Properties
-
On the Media Objects form, in the button panel, right-click an image button, and then select Properties from the pop-up menu.
-
On the Image Properties tab, review these fields:
-
File Name
-
Queue Name
-
Queue Path
-
-
To give the image a title, complete the Description field.
7.6.3 Viewing OLE Properties
Access a form where attachments are available.
-
On the Media Objects form, in the button panel, right-click an OLE object button, and then select Properties from the pop-up menu.
-
On the OLE Object Properties tab, review these fields:
-
File Name
-
Queue Name
-
Queue Path
-
7.6.4 Setting Shortcut Properties
-
On the Media Objects form, in the button panel, right-click a shortcut button, and then select Properties from the pop-up menu.
-
On the JDEShortcut Control Properties form, review these fields on the General tab:
-
Menu Name
-
Selection
-
Icon File
-
Icon Index
-
-
Do these tasks, if necessary:
-
Click the Colors tab to set the color for the shortcut hypertext.
-
Click the Fonts tab to set font properties such as size, family, bold, italics, underline, and strikeout.
-
7.7 Enabling Metadata for Media Objects
The system enables you to add information to media objects in the form of metadata. Metadata can include items such as author, creation date, and language of the media object attachment.
Before you can add metadata, you must enable the metadata fields for the media object in the Media Object Category Constants program (P00167).
7.7.1 Enabling Metadata Fields
To enable metadata fields for media objects:
From the GH9016 menu, select Media Object Constants (P00167).
-
On the Work With Media Object Category Constants form, find the media object that you want to enable.
The system enables the metadata fields for all the media objects that are associated with the media object that you select.
-
Highlight the media object and then click Select.
-
On the General tab of the Media Object Category Constants Revisions form, select the check boxes next to the available metadata field options to enable those metadata fields in the media object.
-
Click OK.
7.7.2 Viewing and Defining Metadata
Access a form with an attachment.
-
On any form with an attachment, in the Media Objects button panel, right-click an object button, and then select Characterize Object from the pop-up menu.
-
On the Media Object Category Revisions form, click the General tab, and then complete the available fields for the media object.
-
Click OK.
Description Glossary Description A short description to describe what the media object is about. Author This is the author of the media object document or attachment. Creation Date For World, used in the DDS specifications for IBM's file-field reference display. Status Indicate if this media object is active or obsolete.
7.8 Attaching OLE Objects at the Base Form Level
At the base level of a standard form, you can attach OLE objects using the OLE Objects button on the Links toolbar. Menu bars and toolbars appear on all standard forms. When you attach an OLE object at the base level of a form, rather than associating the attachment with a record, the OLE object attaches only to the form. No matter what record appears on the form, the OLE object that you attach using the OLE Objects button will always appear when you open the form.
-
Complete one of these tasks:
-
From the Links toolbar, select Preferences, and then OLE Objects.
-
From the Preferences menu, select OLE Objects.
-
If attachments exist for the form, click the document button to the right of the status bar.
-
-
On the Choose Queue form, select the appropriate queue.
Note:
If you do not know the queue in which the object you want to attach exists, ask your system administrator. -
On the OLE Objects form, do one of the following:
-
From the File menu, select Add Object.
-
In the button panel, click the right mouse button and then select Add Object.
-
-
On Insert Object, to create a new object, select the type of object that you want to create and then click OK.
Selections vary from system to system depending on what the system administrator installs on your workstation and on the network.
-
Create your object.
-
To attach an existing object, select Create from File, locate the object on your system, and then click OK.
Depending on whether you create an object or attach an existing object, the application associated with the object displays either a blank workspace or the existing object in the viewer panel.
The menu bar displays the menus for the application from which you call the object. For example, if you select an Excel document, Excel menus display on the menu bar.
-
Edit the object in the viewer panel.
-
To return to the main form, click the Cancel button on the OLE Objects form in the application workspace.
7.8.1 Deleting OLE Objects at the Base Form Level
-
Complete one of these tasks:
-
From the Links toolbar, select Preferences and then select OLE Objects.
-
From the Preferences menu, select OLE Objects.
-
Click the document button to the right of the status bar.
-
-
On the OLE Objects form, select the object and complete one of these tasks:
-
From the File menu, select Delete Object.
-
In the button panel, click the right mouse button and select Delete Object.
-
-
On Confirm Media Object Delete, click Yes.
-
To return to the main form, click the Cancel button on the OLE Objects form in the application workspace.