3 Working with the Server Manager Management Console
This chapter contains these sections:
-
Section 3.1, "Accessing the Certifications (Minimum Technical Requirements)"
-
Section 3.5, "Update Center Components for JD Edwards EnterpriseOne Tools (Release 9.1 Update 2)"
-
Section 3.11, "Deinstall the Server Manager Management Console for Tools Release 9.1"
3.1 Accessing the Certifications (Minimum Technical Requirements)
Customers must conform to the supported platforms for the release as detailed in the JD Edwards EnterpriseOne Certifications (MTRs). In addition, JD Edwards EnterpriseOne may integrate, interface, or work in conjunction with other Oracle products. Refer to the following link for cross-reference material in the Program Documentation for Program prerequisites and version cross-reference documents to assure compatibility of various Oracle products.
http://www.oracle.com/corporate/contracts/index.html
Access the current JD Edwards EnterpriseOne Certifications (MTRs) from My Oracle Support (https://support.oracle.com) by searching the ”JD Edwards Server Manager” product.
See document 745831.1 (JD Edwards EnterpriseOne Minimum Technical Requirements Reference) on My Oracle Support.
3.2 Understanding the Server Manager Management Console Installation, Upgrade, and Update for Tools Release 9.1
For Tools Release 9.1, you can run the Server Manager Management Console installer in installation or upgrade mode. The installer automatically runs in Installation mode for new installations. In Upgrade mode, the installer automatically detects an existing installation that can be upgraded and gives you the option to upgrade that installation from the previous release to the latest version that is compatible with Tools Release 9.1.
Caution:
Beginning with Tools Release 9.1, the Upgrade mode is new functionality that is different than the existing Update function. You must follow the proper sequence to first Upgrade and then Update your Server Manager Agents running on target machines as described in the section of this guide entitled: Upgrade the Server Manager Management Console from a Previous Release to Tools Release 9.1.-
Installation
Use this mode to install a new installation of the Management Console onto a machine on which the Server Manager Console has not previously been installed. This installation mode is described in the section of this guide entitled: Install the Server Manager Management Console for JD Edwards EnterpriseOne Tools (Release 9.1 Update 2)
-
Upgrade
Use this mode to upgrade an existing installation of the Management Console onto a machine on which Server Manager Console has previously been installed by a release of JD Edwards EnterpriseOne prior to Tools Release 9.1. The Upgrade mode is described in the section of this guide entitled: Upgrade the Server Manager Management Console from a Previous Release to Tools Release 9.1.
-
Update
Use the Server Manager Update to update an existing installation of the Management Console to the latest dot release of JD Edwards EnterpriseOne Tools. For example, from 9.1.0.0 to 9.1.0.1. The Update mode is described in the section of this guide entitled: Update Server Manager.
3.3 Matrix of Supported Application Servers, JDKs, and Platforms for JD Edwards EnterpriseOne Tools (Release 9.1 Update 2)
The following table shows the matrix of supported application servers and platforms onto which the JD Edwards EnterpriseOne Server Manager Console can be installed and run on JD Edwards EnterpriseOne Release 9.1 Update 2. Refer to Section 3.1, "Accessing the Certifications (Minimum Technical Requirements)" in this guide for details on determining the supported release levels for each product and platform.
| Application Server and JDK | Platform | Notes |
|---|---|---|
| Oracle WebLogic Server with JRockit or Oracle JDK |
|
Require the pre-installation of WebLogic Server.
Unique installers are available per supported platform. |
| IBM WebSphere Application Server IBM JDK | Windows Server 2008 and Windows Server 2008 R2
64-bit only |
Requires the pre-installation of the Websphere Application Server.
The IBM iSeries platform is not supported. |
| Oracle Container for Java (OC4J) with JDK | Windows Server 2008 and Windows Server 2008 R2
64-bit only |
Does not require the pre-installation of an application server. This is a self-contained ”light” version of the Oracle Application Server that is pre-packaged with the installer.
Previous to 9.1 Update 2, this was the only supported Application Server for Server Manager. |
3.4 Understanding the Installation, Upgrade, and Update Strategy for JD Edwards EnterpriseOne Tools (Release 9.1 Update 2)
This section describes the installation, upgrade, and update strategy for JD Edwards EnterpriseOne Tools Release 9.1 Update. The strategy shown in the following table is based on the matrix of supported application servers and platforms described in the preceding section of this guide entitled: Section 3.3, "Matrix of Supported Application Servers, JDKs, and Platforms for JD Edwards EnterpriseOne Tools (Release 9.1 Update 2)".
Note:
An Upgrade is applicable to major releases, such as upgrading from Release 8.98 to Release 9.1. An Upgrade is performed using an installer program.An Update is applicable to revisions within a major release. For example, from Release 9.1 to Release 9.1.2. An Update is performed from within the Server Manager Console itself.
| Platform | Application Server | Current Release | Upgrade Release | Update Release | Notes |
|---|---|---|---|---|---|
| Windows | OC4J | 8.97 through 8.98.4x | 9.1.x | n/a | Must Upgrade using the Release 9.1 Update x installer (Upgrade Mode).
Future updates possible using standard Update functionality. |
| Windows | OC4J | 9.1.x | n/a | 9.1.x | Must Update using existing standard self-update functionality. |
| Windows
Linux Solaris |
WebLogic | 9.1.2 | 9.1.x | 9.1.x | For a WebLogic server, you must perform a fresh install using the Release 9.1 Update 2 or Update 3 installer.
Future Updates possible using standard Update functionality. There is no Upgrade from OC4J. There is no Upgrade from one platform or application server to another. |
| Windows
Linux Solaris |
WebSphere | 9.1.2 | 9.1.x | 9.1.x | For a WebSphere server, you must perform a fresh install using the Release 9.1 Update 2 or Update 3 installer.
Future updates possible using standard Update functionality. There is no Upgrade from OC4J. There is no Upgrade from one platform or application server to another. |
3.5 Update Center Components for JD Edwards EnterpriseOne Tools (Release 9.1 Update 2)
For JD Edwards EnterpriseOne Tools Release 9.1 Update 2, in support of the matrix of products onto which the Server Manager Console can be installed and run (as described in the previous section entitled: Section 3.3, "Matrix of Supported Application Servers, JDKs, and Platforms for JD Edwards EnterpriseOne Tools (Release 9.1 Update 2)"), the following components are available for download from the JD Edwards EnterpriseOne Update Center:
-
Server Manager Console Installer 9.1.3 for Microsoft Windows (the same installer is used for all supported application servers)
-
Server Manager Console Installer 9.1.3 for Linux
-
Server Manager Console Installer 9.1.3 for Solaris
-
Server Manager Console Update 9.1.3 (the same installer is used for all supported platforms)
3.6 Obtain and Extract the Server Manager Management Console for JD Edwards EnterpriseOne Tools (Release 9.1 Update 2)
To obtain and extract the Server Manager Console:
-
Create a temporary installation directory on the machine where you want to install the Server Manager Console.
Microsoft Windows
Log on to the Microsoft Windows-based machine onto which you are installing the Server Manager Management Console as a user with Administrator rights. The recommended machine is the JD Edwards EnterpriseOne Deployment Server.
Linux or Solaris
Log on to your Linux or Solaris server.
-
Create a temporary installation directory in any preferred location. The recommend directory is:
Microsoft Windows
C:\SM_ConsoleLinux or Solaris
/u01/SM_Console -
Access the Oracle Software Delivery Cloud site, continue through the screens, and select these values on the Media Pack Search screen:
Microsoft Windows
-
Select a Product Pack: JD Edwards EnterpriseOne
-
Platform: JD Edwards EnterpriseOne Tools 9.1 Update 3 Media Pack for Microsoft Windows x64 (64-bit)
Linux
-
Select a Product Pack: JD Edwards EnterpriseOne
-
Platform: JD Edwards EnterpriseOne Tools 9.1 Update 3 Media Pack for Linux x64 (64-bit)
Solaris
-
Select a Product Pack: JD Edwards EnterpriseOne
-
Platform: JD Edwards EnterpriseOne Tools 9.1 Update 3 Media Pack for Solaris (64-bit)
-
-
Click the Go button to display the results.
-
In the results grid, click the radio button next to the proper description. There are not separate downloads for English and non-English languages. The description is entitled:
Microsoft Windows
-
JD Edwards EnterpriseOne 9.1.3 Server Manager Installer Windows (1/2)
-
JD Edwards EnterpriseOne 9.1.3 Server Manager Installer Windows (2/2)
Linux
-
JD Edwards EnterpriseOne 9.1.3 Server Manager Installer Linux
Solaris
-
JD Edwards EnterpriseOne 9.1.3 Server Manager Installer Solaris
-
-
Click the Download button next to the item that you wish to download.
Note:
Multiple Parts Downloads. Due to the maximum file size restrictions for downloads on Oracle Software Delivery Cloud, you will need to download multiple parts for a selected part number. -
Save the
.zipfile to the temporary installation directory you created in Step 2. If you followed the recommendation, the directory is namedMicrosoft Windows
C:\SM_ConsoleLinux or Solaris
/u01/SM_Console -
Microsoft Windows
After you finish downloading the first item, labeled (1/2), select the corresponding row for the second item labeled (2/2) and click the Download button.
Linux or Solaris
Proceed to Step 10.
-
Again, save the
.zipfile to the same directory where you saved the previous.zipfile. -
After you finish downloading all parts of your item, use your preferred unzip program to extract the contents of the first two downloaded files to the temporary installation directory that you created in Step 2. If you followed the recommendation:
Microsoft Windows
C:\SM_ConsoleNote:
Extract Option. When extracting, be sure to click in the check box to enable this option:Use folder names
Linux or Solaris
/u01/SM_Console -
The example below illustrates the directory structure when the .zip files are extracted into the example temporary installation directory:
Microsoft Windows
C:\SM_Console
-------------\Disk1
-------------------\install
-------------------\stage
-------------\Disk2
-------------------\stage
Caution:
Ensure that the Disk1 and Disk2 directories are present directly under the SM_Console directory.Linux or Solaris (see Note below)
/SM_Console
-------------/Disk1
-------------------/install
-------------------/stage
-------------/Disk2
-------------------/stage
Caution:
Ensure that the Disk1 and Disk2 directories are present directly under the SM_Console directory. Note that the Disk2 directory will be present in the unzipped structure even though only one image was downloaded.The following screen shows an example of the disk structure for the extracted
.parfile for the Solaris version of the Management Console installer:
3.7 Install the Server Manager Management Console for JD Edwards EnterpriseOne Tools (Release 9.1 Update 2)
This section assumes this is a new installation of the Server Manager Management Console. The standard procedure after installing the Management Console is to obtain the software components for the agents, deploy the agent installer to the target machine, and run the agent installer on the target machine. It is very important that the 9.1 Update 2 or Update 3 version of Server Manager Console uses the corresponding 9.1 Update 2 or Update 3 versions of the agents.
This section describes these topics:
-
Section 3.7.1, "Installing the Management Console as an OC4J (Standalone Application Server)"
-
Section 3.7.2, "Installing the Management Console on WebLogic Server Tools (Release 9.1 Update 2)"
3.7.1 Installing the Management Console as an OC4J (Standalone Application Server)
Note:
This installation process is the same for both the base and Update 2 and Update 3 release of JD Edwards EnterpriseOne Tools Release 9.1. The installer bundles a standalone application server and the Server Manager Console on Microsoft Windows platforms only. The only difference between the OC4J installer for base Tools Release 9.1 and Tools Release 9.1 Update 2 and Update 3 is the addition of a selection screen for the Application Server Types. Otherwise the installers are functionally identical.This section discusses these topics:
3.7.1.1 Prerequisites for OC4J
The TEMP and TMP Environment Variables should be configured and should point to valid paths on the machine and should have enough of disk space to perform the installation. The Admin user running the Server Manager Console installer should have read/write access to the directories pointed by TEMP and TMP Environment Variables.
3.7.1.2 Running the OC4J Installer for the Server Manager Console
To install the Server Manager Console:
-
Change to the directory in which you extracted the Server Manager Console installer as described in the previous section of this chapter entitled: Section 3.6, "Obtain and Extract the Server Manager Management Console for JD Edwards EnterpriseOne Tools (Release 9.1 Update 2)".
-
Launch the OUI installer as follows:
Microsoft Windows
Using ”Run As Administrator”, run
setup.exefrom the directory in which you unzipped the installer. For example, if you followed the recommendation in Section 3.6, "Obtain and Extract the Server Manager Management Console for JD Edwards EnterpriseOne Tools (Release 9.1 Update 2)":C:\SM_Console\Disk1\installThe Windows Command window starts indicating Windows is preparing to launch the Oracle Universal Installer for the Server Manager Management Console.
Linux or Solaris
Execute
runInstallerfrom the directory in which you unzipped the installer. For example, if you followed the recommendation in Section 3.6, "Obtain and Extract the Server Manager Management Console for JD Edwards EnterpriseOne Tools (Release 9.1 Update 2)":./SM_Console/Disk1/install/runInstallerAll Platforms
As the setup program launches, the Oracle Universal Installer (OUI) Wizard begins to initialize and prepare the bundled JVM for the JD Edwards EnterpriseOne Management Console installer. Although this may take a few minutes to completely initialize, you can view the progress on the Command window dialog that appears on your screen or Task Bar. When the initialization is complete, a new and separate JD Edwards EnterpriseOne Management Console installer window is displayed.
It will take a minute or so for the initialization to complete. Upon completion the OUI Welcome panel displays:
-
On Welcome, click the Next button.
-
On Specify Home Details, complete these fields:
-
Name
Enter a unique name of the Management Console. The default value is:
EOne_ManagementConsole
Note:
If there is an existing installation of the Management Console with the default name, the installer will append the default name with a number to make it unique. For example, EOne_ManagementConsole1. -
Path
Enter the drive and directory where you want the files installed on your Management Console. The JD Edwards EnterpriseOne Management Console installer automatically detects the root drive location on the Microsoft Windows machine and by default appends this value:
jde_home
Note:
Although jde_home is the default and recommended setting, you can specify any value to replace the default value. If there is an existing installation of the Management Console the default name will be appended with an underscore and a number. For example, JDE_HOME_1.Caution:
You cannot specify a directory that already exists.
-
-
Click the Next button.
-
On Select Application Server, select this radio button:
OC4J
Oracle Container For Java
-
Click the Next button.
-
On Enter Admin Password, enter and confirm the password for the jde_admin user.
Note:
The user name itself cannot be changed from jde_admin. The password must be at least eight (8) characters in length and cannot contain space or blank character values. Values are alphanumeric and these special characters: ! @ # $ _.Note:
The default value for the user named jde_admin is automatically populated by the Management Console installer and cannot be altered. This is the administrative user account that is associated with the Management Console.Caution:
Because there is no programmatic way to retrieve a lost or forgotten password, it is critical that you remember and safeguard this password. If the password is forgotten or lost, the only recovery is a complete reinstallation of Server Manager.If you reinstall the Management Console and specify the JMX port the original installation was configured to use, you will retain all your managed homes and associated instances along with the configuration of those instances. However, you will lose this data:
-
Console configuration, which includes database information entered using the Setup Wizard and information regarding security server(s) used to authenticate users.
-
User Configuration, which are the added JD Edwards EnterpriseOne users and defined user groups, including their permissions.
-
Server Groups and associated template configurations.
-
Defined monitors and their associated monitor history.
-
-
Click the Next button.
-
On Enter Port Number, complete this field:
-
Management Console HTTP Port
Enter valid unused port number for use by the Management Console.
The default value is 8999.
Caution:
This port number must be available and cannot be in use by any other application on this machine. Since the installer cannot validate the port, you must be certain that these conditions are met or else the Management Console will not start.If there is insufficient disk space to complete the installation on the Management Console target machine, the installer displays an error message.
-
-
Click the Next button.
-
On Summary, verify your selections and click the Install button to begin the installation.
The Install progress screen is displayed. Note that this screen displays the location of the log of this installation. For example:
C:\Program Files (x86)\Oracle\Inventory\logs\installActions2011-10-18-02-15-14PM.log
-
On End of Installation, verify the installation was successful. The ”Please remember …” section also provides the installation log location.
-
Click Exit to exit the Oracle Universal Installer for the Server Manager Management Console.
-
On the Exit dialog, click the Yes button.
3.7.1.3 Verifying the OC4J Installation
To verify the OC4J installation:
-
Verify that after the initial installation of the Server Manager Console, an administrator can sign on to the Server Manager Console using the jde_admin user and password specified during the installation. Access the Server Manager Console using this URL:
http://servername:port/managewhere
server_nameis the name of the Server Manager machine on which the Server Manager Console is installed, andwhere
portis the port that you specified for the Server Manager Console when you ran the Server Manager Console installer.For example:
http://server:8999/manage/
Description of the illustration ''logon_screen.gif''
3.7.2 Installing the Management Console on WebLogic Server Tools (Release 9.1 Update 2)
Beginning with JD Edwards Tools Release 9.1 Update 2, you can install the Server Manager Console on WebLogic Server on Microsoft Windows, Linux, or Solaris platforms.
Note:
Installation of the Server Manager Console on Oracle WebLogic Server 12c is supported beginning with Tools Release 9.1, Update 4.See Also
Refer to these sites for additional information about Oracle WebLogic Server:
-
Oracle WebLogic Server 10.3.5 Documentation Home
-
Oracle WebLogic Server 12.1.2 Documentation Home
-
Node Manager Overview Documentation Home
http://docs.oracle.com/cd/E13222_01/wls/docs81/adminguide/nodemgr.htmlhttp://docs.oracle.com/middleware/1212/wls/NODEM/overview.htm
This section discusses these topics:
-
Section 3.7.2.2, "Running the WebLogic Server Installer for the Server Manager Console"
-
Section 3.7.2.3, "Verifying the Server Manager Console Installation on WebLogic Server"
-
Section 3.7.2.4, "Enable SSL for Server Manager Console on the WebLogic Server"
-
Section 3.7.2.6, "Troubleshooting the Server Manager Console Installation on WebLogic Server"
3.7.2.1 Prerequisites for WebLogic Server
Ensure the following prerequisites are met prior to running the Server Manager Console installer:
-
The Server Manager Console installer must be run with the same user who installed and is running WebLogic server. The user running the Server Manager Console installer should have read/write access to the directories pointed by TEMP and TMP Environment Variables. The TEMP and TMP Environment Variables must be configured to point to valid paths.
Note:
Linux/Solaris Platforms. The paths pointed to by TEMP and TMP environment variables should refer to the same mount point where the WebLogic Server is installed and where the Server Manager Console is to be installed. For example, the mount point might be/u01. If the variable points to a different mount point the Server Manager Console installation may fail with this message: permission denied on scf.properties file. -
The machine on which the Server Manager Console will be installed must have adequate disk space to perform the installation.
-
You must create a new and separate WebLogic Server Domain in which you will install the Server Manager Console.
-
If there are other managed servers in the Domain in which you are attempting to install the Server Manager Console they must be in a STOPPED state at the time of installation. Only the AdminServer of the domain and the nodemanager associated with the domain should be running at the time of installation (see troubleshooting 5.6.2.4).
-
The Server Manager Console cannot be installed into a WebLogic Server Domain where a JD Edwards EnterpriseOne BSSV Instance/Server is already installed. Conversely, a JD Edwards EnterpriseOne BSSV Instance/Server cannot subsequently be installed into the same WebLogic domain where you install the Server Manager Console.
-
There must be a valid nodemanager associated with the WebLogic Domain into which the Server Manager Console will be installed as described below:
Microsoft Windows
Ensure the nodemanager is running as a Microsoft Windows service or using the
startNodeManager.cmdprogram.Linux and Solaris
Ensure the nodemanager is started by using the
startNodeManager.shcommand. -
The nodemanager logical machine name must be known to the administrator performing the installation. This is necessary because the installer requires this value as an input. It is important to note that this value must be the logical nodemanager machine name, which is not necessarily the physical server name.
-
The
nodemanger.propertiesfile used by the nodemanager must have this value set to true (the default value is false):StartScriptEnabled=trueNote that you must restart the nodemanager in order for any changed values to take effect. The
nodemanger.propertiesfile is typically located at this location:Microsoft Windows
WebLogic Server 11g
C:\Oracle\Middleware\wlserver_10.3\common\nodemanager\nodemanager.propertiesWebLogic Server 12c
C:\Oracle\Middleware\user_projects\domains\<domain_name>\nodemanager\nodemanager.propertiesLinux and Solaris
WebLogic Server 11g
/u01/Oracle/Middleware/wlserver_10.3/common/nodemanager/nodemanager.propertiesWebLogic Server 12c
/u01/Oracle/Middleware/user_projects/domains/<domain_name>/nodemanager/nodemanager.properties -
There is no utility to stop the nodemanager process and this has to be stopped as follows:
Microsoft Windows
Stopping the Windows service or by killing the nodemanager process.
Linux and Solaris
Killing the nodemanager process using this command:
kill -9 <pid of nodemanager process> -
Verify that the nodemanager is reachable to the AdminServer using this process:
-
Login into WebLogic Server AdminServer console.
-
Go to the Environment > Machines tab and select the nodemanager machine to which the Domain is registered.
-
Go to the Monitoring tab and verify that Reachable is displayed. This value indicates that a valid nodemanager is configured with the WebLogic Server Domain and that it is running.
-
-
An AdminServer must be associated with the WebLogic Domain into which the Server Manager Console is to be installed and it must be running at the time of installation.
-
The administrator performing the installation must know the AdminServer http/t3 port number and the Hostname/IP Address on which the AdminServer is listening for http/t3 connections. You can find this value from the AdminServer logs or must be known because this value is configured when WebLogic is installed. Currently the https/t3s protocols are not supported for installing Server Manager Console software.
-
The administrator performing the installation will be prompted to input the path to the WebLogic Server directory during the install. The typical values are:
Microsoft Windows
WebLogic Server 11g
C:\Oracle\Middleware\wlserver_10.3WebLogic Server 12c
C:\Oracle\Middleware\wlserverLinux and Solaris
WebLogic Server 11g
/u01/Oracle/Middleware/wlserver_10.3WebLogic Server 12c
/u01/Oracle/Middleware/wlserver -
The administrator performing the installation will be prompted to input the Listen port of the AdminServer, the admin userid and password of the AdminServer.
-
At the time of the Server Manager Console installation, the AdminServer cannot not be locked for editing. You can confirm this by determining if the "Lock & Edit" button is enabled in the WebLogic Admin Console.
As a double-check, you can verify that no file named
edit.lokexists in the Domain directory. If the file exists, you should delete it. The typical location is:Microsoft Windows
C:\Oracle\Middleware\user_projects\domains\E1Apps\edit.lokLinux and Solaris
/u01/Oracle/Middleware/user_projects/domains/E1Apps/edit.lok -
The hosts file must have the entry for localhost (loopback).
-
The hosts file should have an entry for the correct IP Address of the machine mapping to the appropriate hostname of the machine.
-
The hostname of the machine should not map to the IP Address 127.0.0.1, because that IP address is typically used for localhost.
-
The AdminServer must not have any particular Listen Address configured and it must be left blank. A blank setting specifies that it will listen for connection on all IP addresses available on the machine.
3.7.2.2 Running the WebLogic Server Installer for the Server Manager Console
To install the Server Manager Console:
-
Log on to the machine onto which you are installing the Server Manager Management Console as a user with privileges as described in the preceding section of this guide entitled: Section 3.7.2.1, "Prerequisites for WebLogic Server".
-
Change to the directory in which you extracted the Server Manager Console installer as described in the previous section of this chapter entitled: Section 3.6, "Obtain and Extract the Server Manager Management Console for JD Edwards EnterpriseOne Tools (Release 9.1 Update 2)".
-
Launch the OUI installer as follows:
Microsoft Windows
Using ”Run As Administrator”, run
setup.exefrom the directory in which you unzipped the installer. For example, if you followed the recommendation in Section 3.6, "Obtain and Extract the Server Manager Management Console for JD Edwards EnterpriseOne Tools (Release 9.1 Update 2)":C:\SM_Console\Disk1\installThe Windows Command window starts indicating Windows is preparing to launch the Oracle Universal Installer for the Server Manager Management Console.
Linux or Solaris
Execute
runInstallerfrom the directory in which you unzipped the installer. For example, if you followed the recommendation in Section 3.6, "Obtain and Extract the Server Manager Management Console for JD Edwards EnterpriseOne Tools (Release 9.1 Update 2)":./SM_Console/Disk1/install/runInstallerAll Platforms
The Oracle Universal Installer (OUI) Wizard begins to initialize and prepare the JVM for the JD Edwards EnterpriseOne Management Console installer. This may take a few minutes to completely initialize. When the initialization is complete, a new and separate JD Edwards EnterpriseOne Management Console installer window is displayed.
-
On Welcome, click the Next button.
-
On Specify Home Details, complete these fields:
-
Name
Enter a unique name of the Management Console. The default value is:
EOne_ManagementConsole
Note:
If there is an existing installation of the Management Console with the default name, the installer will append the default name with a number to make it unique. For example, EOne_ManagementConsole1. -
Path
Enter the drive and directory where you want the files installed on your Management Console. The JD Edwards EnterpriseOne Management Console installer automatically detects the root drive location on the machine and by default appends this value:
jde_home
Note:
Although jde_home is the default and recommended setting, you can specify any value to replace the default value. If there is an existing installation of the Management Console the default name will be appended with an underscore and a number. For example, JDE_HOME_1.Caution:
You cannot specify a directory that already exists.
-
-
Click the Next button.

Note:
If using Oracle Enterprise Linux, the above screen will not appear. The selection will default to WLS. -
On Select Application Server, select this radio button:
WLS
Oracle WebLogic Application Server
-
Click the Next button.
-
On Enter Admin Password, enter and confirm the password for the jde_admin user.
Note:
The user name itself cannot be changed from jde_admin. The password must be at least eight (8) characters in length and cannot contain space or blank character values. Values are alphanumeric and these special characters: ! @ # $ _Note:
The default value for the user named jde_admin is automatically populated by the Management Console installer and cannot be altered. This is the administrative user account that is associated with the Management Console.Caution:
Because there is no programmatic way to retrieve a lost or forgotten password, it is critical that you remember and safeguard this password. If the password is forgotten or lost, the only recovery is a complete reinstallation of Server Manager.If you reinstall the Management Console and specify the JMX port the original installation was configured to use, you will retain all your managed homes and associated instances along with the configuration of those instances. However, you will lose this data:
-
Console configuration, which includes database information entered using the Setup Wizard and information regarding security server(s) used to authenticate users.
-
User Configuration, which are the added JD Edwards EnterpriseOne users and defined user groups, including their permissions.
-
Server Groups and associated template configurations.
-
Defined monitors and their associated monitor history.
-
-
Click the Next button.
-
On Enter Port Number, complete this field:
-
Management Console HTTP Port
Enter valid unused port number for use by the Management Console.
The default value is 8999.
Caution:
This port number must be available and cannot be in use by any other application on this machine. Since the installer cannot validate the port, you must be certain that these conditions are met or else the Management Console will not start.If there is insufficient disk space to complete the installation on the Management Console target machine, the installer displays an error message.
-
-
On Enter Information for WebLogic Server, complete the following fields:
-
Install Directory
Enter the path to the WebLogic installation directory. For example:
Microsoft
WebLogic Server 11g
C:\Oracle\Middleware\wlserver_10.3WebLogic Server 12c
C:\Oracle\Middleware\wlserverLinux and Solaris
WebLogic Server 11g
/u01/Oracle/Middleware/wlserver_10.3WebLogic Server 12c
/u01/Oracle/Middleware/wlserver -
Host/IP
Enter the hostname or the IP Address at which the WebLogic Admin Server is listening for http/t3 connections. This is usually the hostname/IP Address of the physical machine. For example:
shravind-idc.peoplesoft.com
-
Node Manager Machine Name
The nodemanager machine name is not necessarily the physical machine name, but it can be the same.
-
Domain Port
Enter the port number on which WebLogic AdminServer is listening for http/t3 connections. This value is configured when you created the WebLogic Domain.
-
Admin User Name
Enter the user name of the WebLogic Server admin account.
-
Admin User Password
Enter the password for the WebLogic Server admin account.
Caution:
The values on this form must be confirmed manually. You must validate or update, as appropriate, all configuration items. If you enter invalid values, you will have to re-run the installer with the correct values. -
-
Click the Next button.
-
A popup dialog is displayed with the message that the AdminServer will be restarted during the installation. Click OK to continue or click Cancel in the next Summary panel to abort the installation if you do not wish to have the AdminServer restarted at this time.
-
On Summary, verify your selections and click the Install button to begin the installation.
The Install progress screen is displayed. Note that this screen displays the location of the log of this installation. For example:
C:\Program Files (x86)\Oracle\Inventory\logs\installActions2011-10-18-02-15-14PM.log -
On End of Installation, verify the installation was successful. The ”Please remember …” section also provides the installation log location.
-
Click Exit to exit the Oracle Universal Installer for the Server Manager Management Console.
-
On the Exit dialog, click the Yes button.
3.7.2.3 Verifying the Server Manager Console Installation on WebLogic Server
To verify the Server Manager Console Installation on WebLogic Server:
-
Verify the
jmxremote_optional.jarandManagementLogonModule_JAR.jarfiles are in this directory:Microsoft Windows
%DomainDir%\libLinux or Solaris
$DomainDir/lib -
Go to the WebLogic Admin Server console and navigate to Environment > Servers. Verify that the Server Manager Console installer created a a new J2EE Server and that the state of that server is RUNNING. The following screen shows an example.
-
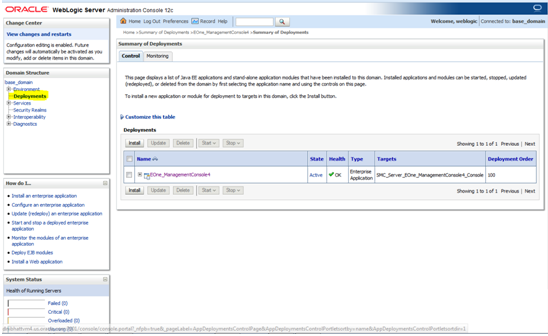
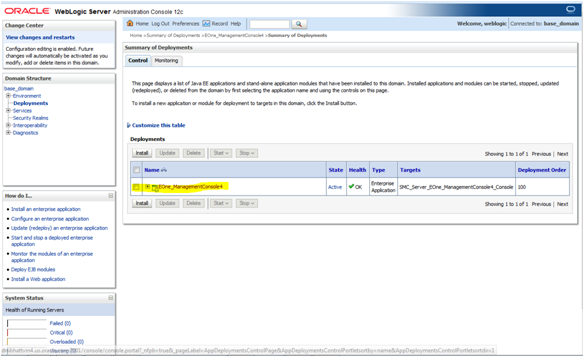
Go to Deployments and verify that the Server Manager Console is installed. The following screen shows an example.
-
Go to Security Realms > myrealm > Providers and verify that the SCFAuthenticator is configured. The following screen shows an example.
-
Go to the Configuration tab and verify that both the SCFAuthenticator and DefaultAuthenticator have Control Flags that are set to SUFFICIENT. The following screen shows an example.
-
Verify that after the initial installation of the Server Manager Console, an administrator can sign on to the Server Manager Console using the jde_admin user and password specified during the installation. Access the Server Manager Console using this URL:
http://servername:port/managewhere
server_nameis the name of the Server Manager machine on which the Server Manager Console is installed, andwhere
portis the port that you specified for the Server Manager Console when you ran the Server Manager Console installer.For example:
http://server:8999/manage/
Description of the illustration ''logon_screen.gif''
3.7.2.4 Enable SSL for Server Manager Console on the WebLogic Server
To enable SSL for the Server Manager Console on the WebLogic Server:
-
Access the Weblogic Admin Console in the browser for the Weblogic domain in which the Server Manager Console is installed. A sample URL would be:
https://denpbds11.company.com:7001/console -
Login to the Weblogic Admin Console using Weblogic Administrative Credentials.
-
Navigate to Environments -> Servers.
-
Click on the Server Manager Console J2ee server (in the example below it will be SMC_Server_E1WLSSMC_Console).
-
Click Lock and Edit (if this option is available).
-
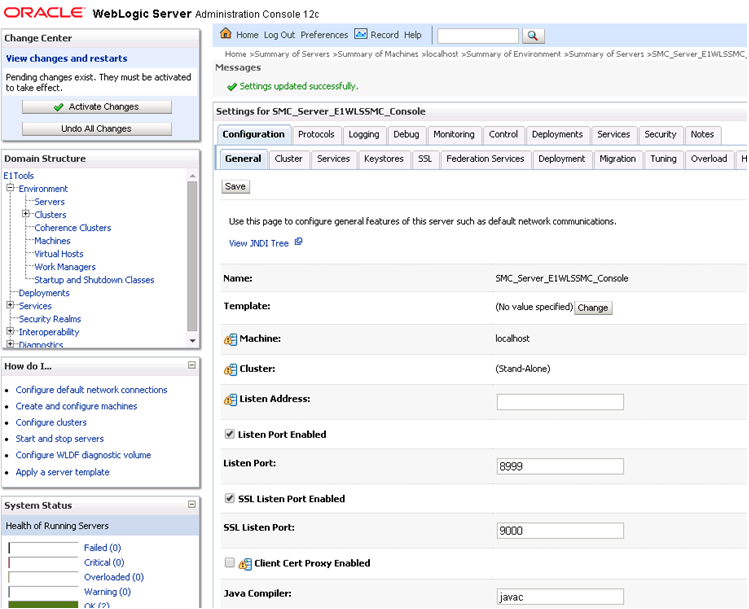
Ensure you are in the General -> Configuration tab.
-
Select the SSL Listen Port Enabled check box.
-
Change the SSL Listen Port to something different than the existing HTTP Server Port for the Server Manager Console. (In the example below, the HTTP Port is 8999 and the HTTPS/SSL Port has been set to 9000.

-
Click Save.
-
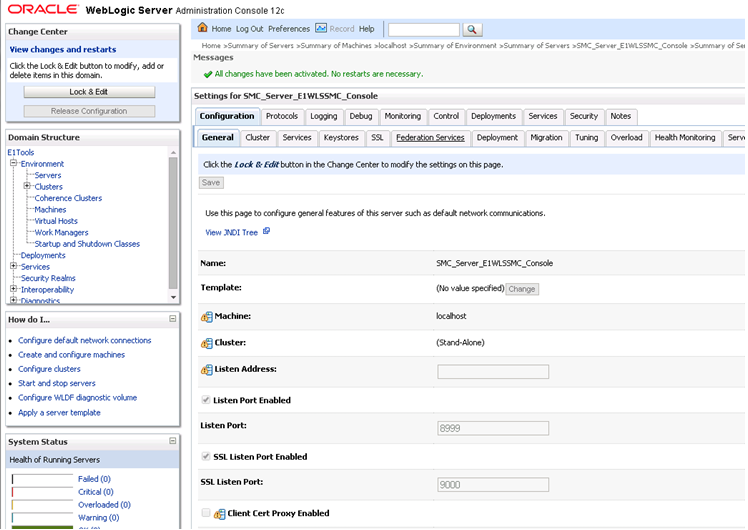
Click Activate Changes.
-
Based on the message displayed, it may or may not be required to restart the Server Manager Console j2ee server.
-
If required, stop and start the Server Manager Console J2ee server.
-
Next, access the Server Manager Console in the browser using an HTTPS/SSL based URL (https://<Server_Manager_Console_HostName>:< SSL_Listen_Port>/manage/home). In this example the URL is
https://denpbds11.company.com:9000/manage/home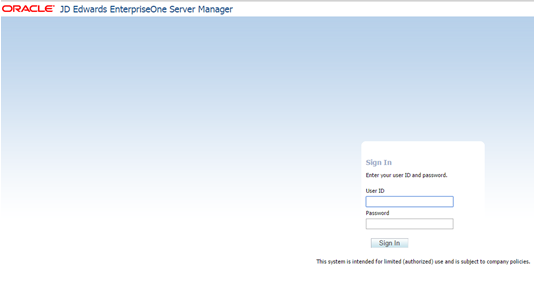
-
Go to Section 3.7.2.5, "Import Server Manager Console Certificate into the Server Manager Agent Truststore/Keystore" and perform the steps.
3.7.2.5 Import Server Manager Console Certificate into the Server Manager Agent Truststore/Keystore
To import the Server Manager Console Certificate into the Server Manager Agent Truststore/Keystore:
-
Export the Server Manager Console Certificate to a file using these steps:
-
From the browser click the lock icon on the left hand side of the URL of the HTTPS/SSL based Server Manager Console URL.
-
Click on Certificate Information.
-
Go to details tab and select the Copy to File option.
-
Click Next.
-
Select DER encoded binary X.509 (.CER) format.
-
Click Next.
-
Enter file information.
-
I have given the name as SMC_Certificate.cer.
-
Click Next.
-
Click Finish.
-
You will get a message saying ”Export is Successful”.
-
You can view the Certificate in the path given in the above step.
-
-
This Certificate needs to be imported into the Truststore/Keystore of each of the Server Manager Agents (cacerts file of X:\jde_home_1\SCFHA\jdk\jre\lib\security\cacerts file).
-
Before performing the import, backup the cacerts file located at X:\jde_home_1\SCFHA\jdk\jre\lib\security\cacerts file.
-
Below is the command to import the Certificate file on Windows Platform. A similar step needs to be done for the Linux/UNIX/AS400 platforms and also for Server Manager Agents installed on these platforms.Import the Certificate using the command below. When prompted for whether you trust the Certificate, answer Yes.
X:\jde_home_1\SCFHA\jdk\jre\bin\keytool -import -alias smc_cert -file C:\SMC_Certificate.cer -keystoreX:\jde_home_1\SCFHA\jdk\jre\lib\security\cacerts -storepass <password> -
After this step, restart the Server Manager Agent. This step needs to be done on each of the Server Manager Agent machines. Without this step the Server Manager Agent may not be able to communicate with the Server Manager Console.
-
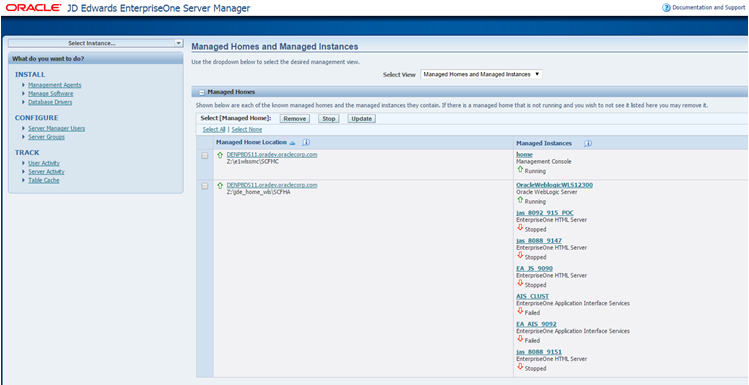
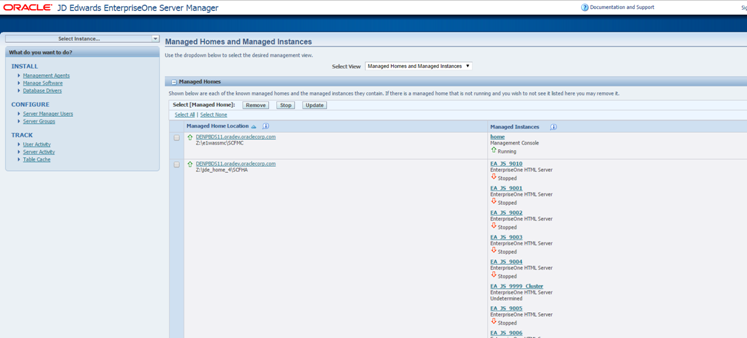
Next, login into the Server Manager Console and ensure that above Server Manager Agent is showing up with a Running Status.
On WLS:
On WAS:
This completes the configuration required for running the Server Manager Console on Weblogic/WebSphere with HTTPS/SSL Enabled and completes the importing of the Certificate on the Server Manager Agents.
If the hostname in the Certificate generated by WebSphere or Weblogic does not exactly match the Fully Qualified Hostname of the Server Manager Console machine, then you will see the type of errors listed below in the Server Manager Agent stderr.log/e1agent.logs.
In this case a valid Self Signed Certificate will need to be created using the keytool utility and imported into the Weblogic Custom Truststore and Custom Keystore, and Weblogic will need to be configured to use the Custom Truststore and Custom Keystore. Similarly on WebSphere, a Self Signed Certificate will need to be created and will need to be imported. trust.p12 and key.p12 files and will need to be set as the default Certificate using the iKeyMan.bat/.sh utility. This Self Signed Certificate will also need to be imported in the cacerts file of the Server Manager Agents.
javax.net.ssl.SSLException: hostname in certificate didn't match: <10.139.162.143> != <denpbds.company.com> at org.apache.http.conn.ssl.AbstractVerifier.verify(AbstractVerifier.java:227) at org.apache.http.conn.ssl.BrowserCompatHostnameVerifier.verify(BrowserCompatHostnameVerifier.java:54) at org.apache.http.conn.ssl.AbstractVerifier.verify(AbstractVerifier.java:147) at org.apache.http.conn.ssl.AbstractVerifier.verify(AbstractVerifier.java:128) at org.apache.http.conn.ssl.SSLSocketFactory.connectSocket(SSLSocketFactory.java:437) at org.apache.http.impl.conn.DefaultClientConnectionOperator.openConnection(DefaultClientConnectionOperator.java:180) at org.apache.http.impl.conn.ManagedClientConnectionImpl.open(ManagedClientConnectionImpl.java:294) at org.apache.http.impl.client.DefaultRequestDirector.tryConnect(DefaultRequestDirector.java:643) at org.apache.http.impl.client.DefaultRequestDirector.execute(DefaultRequestDirector.java:479) at org.apache.http.impl.client.AbstractHttpClient.execute(AbstractHttpClient.java:906) at org.apache.http.impl.client.AbstractHttpClient.execute(AbstractHttpClient.java:805) at org.apache.http.impl.client.AbstractHttpClient.execute(AbstractHttpClient.java:784) at com.jdedwards.mgmt.agent.UserPasswordCallBack._getUserCredentials(UserPasswordCallBack.java:40) at com.jdedwards.mgmt.agent.UserPasswordCallBack.<init>(UserPasswordCallBack.java:31) at com.jdedwards.mgmt.agent.E1Agent$ManagementServerDaemonThread.run(E1Agent.java:2259) at java.lang.Thread.run(Thread.java:722)
3.7.2.6 Troubleshooting the Server Manager Console Installation on WebLogic Server
To troubleshoot the Server Manager Console Installation on WebLogic Server:
-
Verify that all the prerequisites are met as listed in the section of this guide entitled: Section 3.7.2.1, "Prerequisites for WebLogic Server".
-
Locate and inspect the contents of the
.outand.errlog files located in these directories:Microsoft Windows Platform
C:\<Server_Manager_Console_Home>\SCFMC\data\*.datfileswhere
<Server_Manager_Console_Home>is the Server Manager Console installation directory. For example:C:\jde_home_1\SCFMC\dataLinux/Solaris Platforms
<Server_Manager_Console_Home>/SCFMC/data/*.datfileswhere
<Server_Manager_Console_Home>is the Server Manager Console installation directory. For example:/u01/jde_home_1/SCFMC/data -
Locate and inspect the contents of the Server Manager Console installer-related log files for errors. These logs are typically located in following locations:
Note:
The location of these logs and the log file name are displayed on in the lower portion of the installer screens during the installation process.C:\Program Files (x86)\Oracle\Inventory\logs -
Locate and inspect the contents of the application server log files for errors. These logs are typically located in following locations:
Microsoft Windows
C:\Oracle\Middleware\user_projects\domains\E1Apps\servers\AdminServer\logsC:\Oracle\Middleware\user_projects\domains\E1Apps\servers\SMC_Server_xxxx\logsC:\Oracle\Middlware\wlserver_10.3\common\nodemanager\logsLinux or Solaris
/u01/Oracle/Middleware/user_projects/domains/E1Apps/servers/AdminServer/logs/u01/Oracle/Middleware/user_projects/domains/E1Apps/servers/SMC_Server_xxxx/logs/u01/Oracle/Middleware/wlserver_10.3/common/nodemanager/logs -
You might encounter this message:
[Management:141245]Schema Validation Error in /config.xmlif any managed servers are running.
BUG 20578571 - SERVER MANAGER CHARTS NOT UPDATING UPON PAGE LOAD
Issue / Resolution:
The resource charts for Enterprise Servers do not update each time you go to an Enterprise Server page. In order to get the charts to display current information, you must either do a CTRL+F5 or clear the browser cache. Otherwise, the charts will continue to display stale data.
This issue is fixed in Tools Release 9.2. The users on a Tools Release prior to 9.2. can get the Patch/POC from bug:
BUG 20578571 - SERVER MANAGER CHARTS NOT UPDATING UPON PAGE LOAD
For Server Manager users on WebLogic, if this patch/fix does not work, follow these steps to make it work:
-
Login to the WebLogic Admin console.
-
On the left pane, if available, please click the lock and edit option.
-
Select Deployments on the left panel.
-
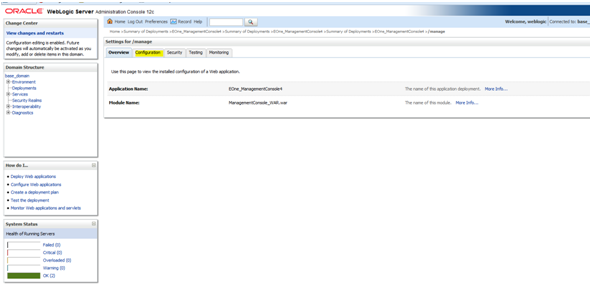
Select the SM console deployment in the Deployments section.
-
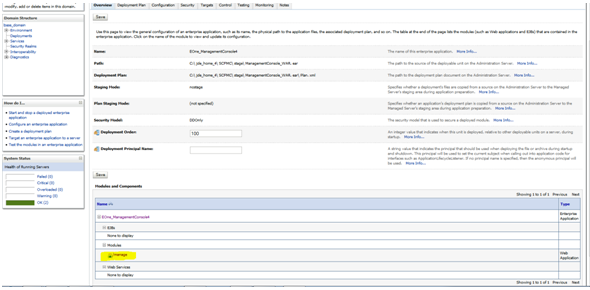
In the Overview tab choose the /manage module.
-
Click on the Configuration tab.
-
On the configuration tab, if the value of Resource Reload Check (in seconds): is
-1, then change it to0.These are the available values:
-
The value
-1means never reload. This is the default value in a production environment. -
The value
0means always reload. -
The value
1means reload every second. This is the default value in a development environment.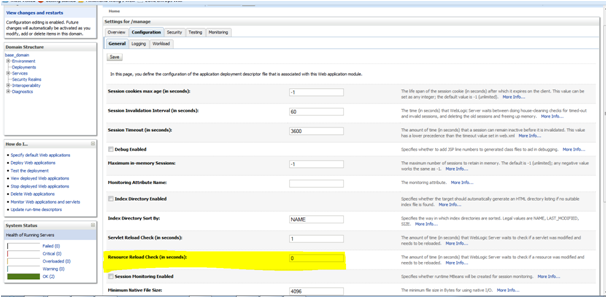
-
-
Click Save.
-
Click on Release configuration in the left pane, if it's available.
3.7.3 Installing the Management Console on WebSphere Application Server (Tools Release 9.1 Update 2 and Update 3)
Beginning with JD Edwards Tools Release 9.1 Update 2, you can install the Server Manager Console on WebSphere Application Server on Microsoft Windows platforms.
See Also
IBM WebSphere Application Server 7/8.5 Infocenter
http://pic.dhe.ibm.com/infocenter/wasinfo/v7r0/index.jsp
http://pic.dhe.ibm.com/infocenter/wasinfo/v8r5/index.jsp
This section discusses these topics:
-
Section 3.7.3.2, "General Hostname/IP Address Configuration Prerequisites"
-
Section 3.7.3.3, "Creating a Profile for WebSphere Application Server Release 7.0/8.5"
-
Section 3.7.3.4, "Prerequisites for WebSphere Application Server"
-
Section 3.7.3.5, "Running the WebSphere Application Server Installer for the Server Manager Console"
-
Section 3.7.3.6, "Verifying the Server Manager Console Installation on WebSphere Application Server"
-
Section 3.7.3.7, "Enable SSL for Server Manager Console on the WebSphere Application Server"
3.7.3.1 Starting and Stopping the Server Manager Console on WebSphere on the Microsoft Windows Platform
For Tools Release 9.1 Update 2, the supported WebSphere version is 7.0. For Tools Release 9.1 Update 2.3 onwards, the supported WebSphere version is 8.5.
When installing Server Manager Console on any version of WebSphere on Microsoft Windows, it is important to note that the installer does not configure the Server Manager Console as a Windows Service. Therefore, you must manually start and stop the Server Manager Console using the IBM utility called startServer.bat. This is also true for other JD Edwards EnterpriseOne components such as HTML Server, RTE Server, and BSSV Server.
To use the startServer.bat utility:
-
These instructions assume the Server Manager Console was installed into WebSphere with these properties:
-
Installation Directory
C:\IBM\WebSphere\AppServer -
Profile to which the Server Manager Console is Installed
AppSrv01
-
Name of the J2EE Container
SMC_Server_ManagementConsole1
-
-
Open a Microsoft Windows Command Prompt as an Administrator.
-
Use this command to start the Server Manager Console:
C:\IBM\WebSphere\AppServer\profiles\AppSrv01\bin\startServer.bat SMC_Server_ManagementConsole1 -
Use this command to stop the Server Manager Console:
C:\IBM\WebSphere\AppServer\profiles\AppSrv01\bin\stopServer.bat SMC_Server_ManagementConsole1
3.7.3.2 General Hostname/IP Address Configuration Prerequisites
This section lists the configuration prerequisites for the hostname and IP address:
-
The hosts file must have the entry for localhost (loopback).
-
The hosts file should have an entry for the correct IP Address of the machine mapping to the appropriate hostname of the machine.
-
The hostname of the machine should not map to the IP Address 127.0.0.1, because that IP address is typically used for localhost.
3.7.3.3 Creating a Profile for WebSphere Application Server Release 7.0/8.5
This section is provided for reference only as it relates to recommendations when used in conjunction with JD Edwards EnterpriseOne running on WebSphere Application Servers. For complete details, refer to the IBM documentation on the IBM WebSphere Application Server 7/8.5 Infocenter. The following example is based on WebSphere Application Server 7.0.
To create a profile for WebSphere Application Server Release 7.0/8.5 running on Microsoft Windows:
-
Open a Command Window and launch the
pmt.batprofile management utility, which is typically located in this directory:c:\IBM\WebSphere\AppServer\bin\ProfileManagement
-
On Welcome to the Profile Management Tool, click the Launch Profile Management Tool button.
-
With the Profiles tab selected, click the Create button.

-
On Environment Selection, in the list of Environments, select this tree node:
-
Application server
-
-
Click the Next button.
-
On Profile Creation Options, select this radio button:
-
Advanced profile creation
-
-
On Optional Application Deployment, select these check boxes:
-
Deploy the administrative console (recommended).
-
Deploy the default application.
-
-
Click the Next button.
-
On Profile Name and Location, you can accept the default values or enter your own.
-
It is recommended that you enable this check box to make the this new profile to be the default profile:
-
Make this profile the default
-
-
Click the Next button.
-
On Node and Host Names, complete these fields:
-
Node name
Accept the default or enter your own value.
-
Server Name
Accept the default or enter your own value.
-
Host name
Ensure the correct hostname defaults into this field. This must be the fully qualified domain name of the machine. You cannot use a loopback or localhost.
-
-
Click the Next button.
-
On Administrative Security, ensure this check box is selected:
-
Enable administrative security
-
-
You should not accept the default values for these Administrative credentials. Instead you should enter unique credentials for the WebSphere Administrative user for this profile.
Caution:
Be sure and note these credentials as you will need them later in this procedure to populate settings in thesoap.client.propsfile. -
Click the Next button.
-
On Security Certificate (Part 1), you can accept the default values, which has these radio buttons selected:
-
Create a new default personal certificate.
-
Create a new root signing certificate.
-
-
Click the Next button.
-
On Security Certificate (Part 2), you can accept the default values for these fields or configure them for your installation:
-
Default personal certificate (a personal certificate for this profile, public and private key):
-
Issued by distinguished name:
-
Issued to distinguished name:
-
Expiration period in years
-
-
Root signing certificate (personal certificate for signing other certificates, public and private key):
-
Expiration period in years:
-
-
Default keystore password
-
Confirm the default keystore password
Caution:
The default value for the keystore is well documented in the Information Center and should be changed to protect the security of the keystore files and SSL configuration.
-
-
Click the Next button.
-
On Port Value Assignments, generally you should not change the system-derived port numbers. This is because the WebSphere installer assigns unique port numbers for each profile.
Note:
You should note the Administrative console port and the SOAP connector port as you will need these configuration values in order to complete connectivity. -
Click the Next button.
-
On Windows Service Definition, you can choose whether to use a Windows service to run WebSphere Application Server. Windows services can start and stop WebSphere Application Server, and can configure startup and recovery actions. If you want to use a Windows service to run WebSphere Application Server, click this check box:
-
Run the application server process as a Windows service.
If you enable this check box, you can further define the type of account on which to log on as. You can also choose the startup type for the service.
-
-
Click the Next button.
-
On Web Server Definition, optionally you can create a Web server definition if you use a Web Server to route requests for dynamic content to the application server. Alternatively, you can create a Web Server definition from the Administrative console or a script that is generated during Web Server plug-ins installation.
Tip:
For JD Edwards EnterpriseOne, it is not required to create a web server definition for the profile into which Server Manager Console will be installed. However, if you wish to the same profile to install other EnterpriseOne web components (for example, HTML Web Server, Transaction (RTE) Server, Business Services Server (BSSV)), then creating a web server definition is required. In that case, you should select this check box and configure the web server type:-
Create a Web Server definition
-
-
Click the Next button.
-
On Profile Creation Summary, review the information in the summary for correctness. If the information is correct, click the Create button to start creating a new profile. Otherwise, click the Back button to change values on the previous panels.
If you clicked the Create button, wait for the configuration to complete, which is indicated by the following screen.
-
On Profile Creation Complete, ensure this check box is not checked:
-
Launch the First steps console.
-
-
Click the Finish button.
-
Exit the Profile Creation Tool; this completes the profile creation procedure.
-
Locate the
soap.client.propsfile in the\propertiesdirectory. For example :z:\IBM\WebSphere\AppServer\profiles\AppSvr01\properties -
Using Notepad, open the
soap.client.propsfile and update the Administrative userid and password from the default values to the Administrative userid and password with the information provided during the profile creation time. Within thesoap.client.propsfile, these values are specified as shown by the highlighted segment in the example below.
-
Change the value of the
com.ibm.SOAP.securityEnabled=setting from the default value of false to true as shown in this example:
-
It is recommended that you change the value of the
com.ibm.SOAP.requestTimeout=setting from the default value of 180 to 300. -
Save the changes to the
soap.clien.propsfile and close the Notepad utility. -
Open an Administrative Command Prompt Window and start the Administrative server of the newly created profile using this utility:
startServer.batThe following shows an example of a properly executed
startServer.batcommand.
-
Access Administrative Console using this URL:
<machine_name>:<port>/ibm/console/login.jspFor example:
denlab.mlab.jdedwards.com/ibm/console/login.jsp
-
After you log in to the Administrative Console, you have completed the profile creation step.
3.7.3.4 Prerequisites for WebSphere Application Server
The prerequisites depend on your profile type:
Important:
There is no special requirement to install the Server Manager Console into a separate WebSphere Server profile; an existing profile can be used.A single WebSphere Server profile can run both the JD Edwards EnterpriseOne BSSV Instance/Server and the Server Manager Console.
The WebSphere profile onto which the Server Manager Console is installed should be the default profile for the WebSphere setup. If you are installing the Server Manager Console to a new profile, the profile should be created as the default profile prior to installation. For further information refer to Bug 14487301, which is entitled: GRAPHS ARE NOT SHOW FOR THE ENTERPRISE SERVER IN SM INSTALLED ON WAS.
3.7.3.4.1 Standalone Profile
Ensure the following prerequisites are met prior to running the Server Manager Console installer into a Standalone profile.
-
A Standalone WebSphere Profile with administrative security enabled must be available, where admin security is enabled during profile creation time. An unsecure WebSphere Profile (defined as a profile on which the Administrative Security is not enabled) is not supported.
-
The admin server for the profile (for example, the server1 server) must be running and accessible.
-
The
soap.client.propsfile within the$PROFILE_DIR\propertiesdirectory should have SOAP security enabled and the SOAP connection userid and password to be configured. -
The profile onto which the Server Manager Console is being installation should be the default profile in the WebSphere installation.
-
The Administrator performing installation must know the WebSphere admin userid and password because these values are required as input to the installer.
-
The user performing installation must know the AppServer installation directory because this value is required as input to the installer. For example:
C:\IBM\WebSphere\AppServer -
The user performing the installation must know the Hostname as configured during WebSphere Profile creation time because this value is required as input to the installer. You can obtain value by checking the Hostname entry in this file:
C:\IBM\WebSphere\AppServer\profiles\<Profile_Name>\logs\AboutThisProfile.txtFor example, a valid value might be:
Host Name: shravind-idc.peoplesoft.com -
The user performing installation must know the SOAP connector port for the WebSphere profile into which the Server Manager Console will be installed because this value is required as input to the installer. This value can be located in the
AboutThisProfile.txtfile. For example:SOAP connector port: 8880 -
In the
soap.client.propsfile for the WebSphere profile, which is typically located at this location:C:\IBM\WebSphere\AppServer\profiles\<Profile_Name>\properties\soap.client.propsverify the following entries are present and set correctly:
com.ibm.SOAP.securityEnabled=true(the default value is false)com.ibm.SOAP.loginUserid=<admin userid>com.ibm.SOAP.loginPassword=<admin password>Note:
Prior to running the installer for the Server Manager Console, you must restart the Admin Server (for example, server1) after you have made any changes to thesoap.client.propsfile.
3.7.3.4.2 DMGR Profile
Ensure the following prerequisites are met prior to running the Server Manager Console installer into a DMGR profile.
-
The user performing installation must know the AppServer installation directory because this value is required as input to the installer. For example:
C:\IBM\WebSphere\AppServer -
The DMGR + Cell Profile must have administrative security enabled.
-
In the
soap.client.propsfile for the WebSphere profile, which is typically located at this location:C:\IBM\WebSphere\AppServer\profiles\Dmgr01\properties\soap.client.propsverify the following entries are present and set correctly:
com.ibm.SOAP.securityEnabled=true(the default value is false)com.ibm.SOAP.loginUserid=<admin userid>com.ibm.SOAP.loginPassword=<admin password>Note:
Prior to running the installer for the Server Manager Console, you must restart the Admin Server (for example, the deployment manager server and the node agents) after you have made any changes to thesoap.client.propsfile.Similarly the
soap.client.propsfile of the Federated Profile must have the above entries present and set correctly. -
The DMGR Server must be running. You can start the server using this command:
C:\IBM\WebSphere\AppServer\profiles\Dmgr01\bin\startManager.bat -
The nodeAgent associated with the Federated Profile (for example, AppSrv02) must be running. You can start the agent using this command:
C:\IBM\WebSphere\AppServer\profiles\AppSrv02\bin\startNode.bat -
The Hostname and the SOAP connector port for the DMGR must be known to the administrator performing the installation because this value is required as input to the installer. This information is available by checking the entries for Hostname and SOAP connector port in this file:
C:\IBM\WebSphere\AppServer\profiles\<Profile_Name>\logs\AboutThisProfile.txt -
The username and password to login into the DMGR must be known to the administrator performing the installation because this value is required as input to the installer.
3.7.3.5 Running the WebSphere Application Server Installer for the Server Manager Console
To install the Server Manager Console:
-
Log on to the machine onto which you are installing the Server Manager Management Console as a user with privileges as described in the preceding section of this guide entitled: Section 3.7.3.4, "Prerequisites for WebSphere Application Server".
-
Change to the directory in which you extracted the Server Manager Console installer as described in the previous section of this chapter entitled: Section 3.6, "Obtain and Extract the Server Manager Management Console for JD Edwards EnterpriseOne Tools (Release 9.1 Update 2)".
-
Launch the OUI installer as follows:
Microsoft Windows
Using "Run As Administrator", run
setup.exefrom the directory in which you unzipped the installer. For example, if you followed the recommendation in Section 3.6, "Obtain and Extract the Server Manager Management Console for JD Edwards EnterpriseOne Tools (Release 9.1 Update 2)":C:\SM_Console\Disk1\installThe Windows Command window starts indicating Windows is preparing to launch the Oracle Universal Installer for the Server Manager Management Console.
Linux or Solaris
Execute
runInstallerfrom the directory in which you unzipped the installer. For example, if you followed the recommendation in Section 3.6, "Obtain and Extract the Server Manager Management Console for JD Edwards EnterpriseOne Tools (Release 9.1 Update 2)":./SM_Console/Disk1/install/runInstallerAll Platforms
The Oracle Universal Installer (OUI) Wizard begins to initialize and prepare the JVM for the JD Edwards EnterpriseOne Management Console installer. This may take a few minutes to completely initialize. When the initialization is complete, a new and separate JD Edwards EnterpriseOne Management Console installer window is displayed.
-
On Welcome, click the Next button.
-
On Specify Home Details, complete these fields:
-
Name
Enter a unique name of the Management Console. The default value is:
EOne_ManagementConsole
Note:
If there is an existing installation of the Management Console with the default name, the installer will append the default name with a number to make it unique. For example, EOne_ManagementConsole1. -
Path
Enter the drive and directory where you want the files installed on your Management Console. The JD Edwards EnterpriseOne Management Console installer automatically detects the root drive location on the machine and by default appends this value:
jde_home
Note:
Although jde_home is the default and recommended setting, you can specify any value to replace the default value. If there is an existing installation of the Management Console the default name will be appended with an underscore and a number. For example, JDE_HOME_1.Caution:
You cannot specify a directory that already exists.
-
-
Click the Next button.

-
On Select Application Server, select this radio button:
WAS
WebSphere Application Server
-
Click the Next button.
-
On Enter Admin Password, enter and confirm the password for the jde_admin user.
Note:
The user name itself cannot be changed from jde_admin. The password must be at least eight (8) characters in length and cannot contain space or blank character values. Values are alphanumeric and these special characters: ! @ # $ _Note:
The default value for the user named jde_admin is automatically populated by the Management Console installer and cannot be altered. This is the administrative user account that is associated with the Management Console.Caution:
Because there is no programmatic way to retrieve a lost or forgotten password, it is critical that you remember and safeguard this password. If the password is forgotten or lost, the only recovery is a complete reinstallation of Server Manager.If you reinstall the Management Console and specify the JMX port the original installation was configured to use, you will retain all your managed homes and associated instances along with the configuration of those instances. However, you will lose this data:
-
Console configuration, which includes database information entered using the Setup Wizard and information regarding security server(s) used to authenticate users.
-
User Configuration, which are the added JD Edwards EnterpriseOne users and defined user groups, including their permissions.
-
Server Groups and associated template configurations.
-
Defined monitors and their associated monitor history.
-
-
Click the Next button.
-
On Enter Port Number, complete this field:
-
Management Console HTTP Port
Enter valid unused port number for use by the Management Console.
The default value is 8999.
Caution:
This port number must be available and cannot be in use by any other application on this machine. Since the installer cannot validate the port, you must be certain that these conditions are met or else the Management Console will not start.If there is insufficient disk space to complete the installation on the Management Console target machine, the installer displays an error message.
-
-
On Enter Information for WebLogic Server, complete the following fields:
-
Install Directory
Enter the path to the WebSphere installation directory (
AppServer). For example:C:\IBM\WebSphere\AppServer -
Host/IP
Enter the hostname or the IP Address at which the WebSphere server1 (or Deployment Manager) is listening for SOAP connections. This is usually the hostname/IP Address of the physical machine. For example:
shravind-idc.peoplesoft.com
-
SOAP Port
Enter the port number on which the server1 (or Deployment Manager) is listening for SOAP Connections. For a particular profile, you can obtain this value from this location:
C:\IBM\WebSphere\AppServer\profiles\<profile_name>\logs\AboutThisProfile.txt -
Admin User Name
Enter the user name of the WebSphere admin account.
-
Admin User Password
Enter the password for the WebSphere admin account.
Caution:
The values on this form must be confirmed manually. You must validate or update, as appropriate, all configuration items. If you enter invalid values, you will have to re-run the installer with the correct values. -
-
Click the Next button.
-
On Summary, verify your selections and click the Install button to begin the installation.
The Install progress screen is displayed. Note that this screen displays the location of the log of this installation. For example:
C:\Program Files (x86)\Oracle\Inventory\logs\installActions2011-10-18-02-15-14PM.logImportant for Installations for WebSphere running on Microsoft Windows using the Tools Release 9.1 Update 2 or Update 3 version of the Server Manager Console Installer. When installing the Server Manager Console on WebSphere on a non default profile (that is a profile which is not configured as a default profile during the profile creation time), the wsadmin scripting interface will prompt the administrator to add the signer to the default trust store. In this case, the admin must select ”y” option in order to proceed with the installation. If you select ”n”, all wsadmin activities will fail. If the preceding conditions in this note are true, the below applet, entitled: ”SSL Signer Exchange Prompt”, pops up during the installation process:

Troubleshooting Installations for WebSphere running on Microsoft Windows using the Tools Release 9.1 Update 2 and Update 3 version of the Server Manager Console Installer. If you do not select ”y” on the above applet prompt entitled: ”SSL Signer Exchange Prompt”, the Server Manager Console installation will fail. Such failure is indicated by the logs as shown in this example:
CWPKI0022E: SSL HANDSHAKE FAILURE:  A signer with SubjectDN "CN=DENITSD62.mlab.jdedwards.com, OU=DENITSD62Node02Cell, OU=DENITSD62Node02, O=IBM, C=US" was sent from target host:port "10.139.163.123:8881".  The signer may need to be added to local trust store "Z:/WebSphere/wp_profile1/etc/trust.p12" located in SSL configuration alias "DefaultSSLSettings" loaded from SSL configuration file "file:Z:\WebSphere\wp_profile1/properties/ssl.client.props".  The extended error message from the SSL handshake exception is: "PKIX path building failed: java.security.cert.CertPathBuilderException: PKIXCertPathBuilderImpl could not build a valid CertPath.; internal cause is:

java.security.cert.CertPathValidatorException: The certificate issued by CN=DENITSD62.mlab.jdedwards.com, OU=Root Certificate, OU=DENITSD62Node02Cell, OU=DENITSD62Node02, O=IBM, C=US is not trusted; internal cause is:

java.security.cert.CertPathValidatorException: Certificate chaining error".
CWPKI0040I: An SSL handshake failure occurred from a secure client.  The server's SSL signer has to be added to the client's trust store.  A retrieveSigners utility is provided to download signers from the server but requires administrative permission.  Check with your administrator to have this utility run to setup the secure environment before running the client.  Alternatively, the com.ibm.ssl.enableSignerExchangePrompt can be enabled in ssl.client.props for "DefaultSSLSettings" in order to allow acceptance of the signer during the connection attempt.

WASX7023E: Error creating "SOAP" connection to host "DENITSD62.mlab.jdedwards.com"; exception information: com.ibm.websphere.management.exception.ConnectorNotAvailableException: [SOAPException: faultCode=SOAP-ENV:Client; msg=Error opening socket: javax.net.ssl.SSLHandshakeException: com.ibm.jsse2.util.g: PKIX path building failed: java.security.cert.CertPathBuilderException: PKIXCertPathBuilderImpl could not build a valid CertPath.; internal cause is:

java.security.cert.CertPathValidatorException: The certificate issued by CN=DENITSD62.mlab.jdedwards.com, OU=Root Certificate, OU=DENITSD62Node02Cell, OU=DENITSD62Node02, O=IBM, C=US is not trusted; internal cause is:

java.security.cert.CertPathValidatorException: Certificate chaining error; targetException=java.lang.IllegalArgumentException: Error opening socket: javax.net.ssl.SSLHandshakeException: com.ibm.jsse2.util.g: PKIX path building failed: java.security.cert.CertPathBuilderException: PKIXCertPathBuilderImpl could not build a valid CertPath.; internal cause is:

java.security.cert.CertPathValidatorException: The certificate issued by CN=DENITSD62.mlab.jdedwards.com, OU=Root Certificate, OU=DENITSD62Node02Cell, OU=DENITSD62Node02, O=IBM, C=US is not trusted; internal cause is:

java.security.cert.CertPathValidatorException: Certificate chaining error]
WASX7213I: This scripting client is not connected to a server process; please refer to the log file Z:\WebSphere\wp_profile1\logs\wsadmin.traceout for additional information.

WASX8011W: AdminTask object is not available.
For all other installations using WebSphere on platforms other than Microsoft Windows, the following End of Installation screen is displayed.
-
On End of Installation, verify the installation was successful. The ”Please remember …” section also provides the installation log location.
-
Click Exit to exit the Oracle Universal Installer for the Server Manager Management Console.
-
On the Exit dialog, click the Yes button.
-
The Administrator should refer to the
readme.txtfile in the provided in this directory:$ORACLE_HOME\SCFMC\
3.7.3.6 Verifying the Server Manager Console Installation on WebSphere Application Server
To verify the Server Manager Console installation on WebSphere Application Server:
-
Login into the WebSphere Server Admin Console.
-
Go to Servers > Server Types > WebSphere Application Servers.
-
Verify a new J2EE Server is created for the Server Manager Console. The following screen shows an example.

-
Go to Security > Security Domains and verify that the Security Domain has been created. The following screen shows an example.

-
Go to Virtual Hosts > default_host > Host Aliases and verify that there is a host alias entry created with the HTTP Port number that you specified during the installation of the Server Manager Console. The following screen shows an example.
-
Verify that the successful installation has automatically started the Server Manager Console.
3.7.3.7 Enable SSL for Server Manager Console on the WebSphere Application Server
-
Access the WebSphere Admin Console in the browser for the profile in which the Server Manager Console is installed. A sample URL would be:
https://denpbds11.company.com:9146/ibm/console
-
Login to the WebSphere Admin Console using the WebSphere Administrative credentials.
-
Navigate to Servers -> Server Types -> WebSphere Application Servers.
-
Click on the Server Manager Console J2ee server (in the example below it is the SMC_Server_e1wassmc_Console).
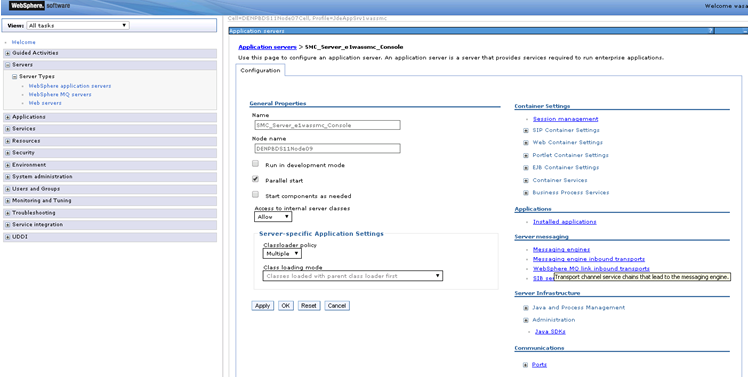
-
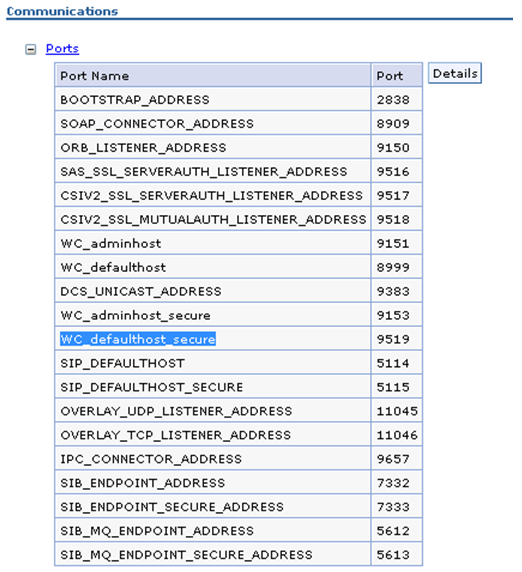
Expand the Ports tab on the lower right hand side and write down the WC_defaulthost_secure port number. This is the port which we will use to access the Server Manager Console over HTTPS/SSL. In this example, the WC_defaulthost is the port number over which we will access Server Manager over HTTP.
-
In this example the WC_defaulthost_secure parameter is set to 9519 while the WC_defaulthost is set to 8999.
-
Next, navigate to Environment -> Virtual hosts -> default_host -> Host Aliases.
-
Select New and add a host alias with Host Name set to * and the Port set to the entry noted for WC_defaulthost_secure (in this example it is 9519).
-
Click OK.
-
Click Save.
-
Restart the Server Manager Console J2ee container (in this example, SMC_Server_e1wassmc_Console) from the command prompt using these commands:
Z:\Program Files (x86)\IBM\WebSphere\AppServer\profiles\JdeAppSrv1wassmc\bin>stopServer.bat SMC_Server_e1wassmc_ConsoleZ:\Program Files (x86)\IBM\WebSphere\AppServer\profiles\JdeAppSrv1wassmc\bin>startServer.bat SMC_Server_e1wassmc_Console -
Next, access the Server Manager Console in the browser using an HTTPS/SSL based URL (https://<Server_Manager_Console_HostName>:< WC_defaulthost_secure_port>/manage/home). In this example the URL is:
https://denpbds11.company.com:9519/manage/home
-
Go to Section 3.7.2.5, "Import Server Manager Console Certificate into the Server Manager Agent Truststore/Keystore" and perform the steps.
3.7.3.8 Troubleshooting the Server Manager Console Installation on WebSphere Application Server
To troubleshoot the Server Manager Console installation on WebSphere Application Server:
-
Verify that all the prerequisites are met as listed in the section of this guide entitled: Section 3.7.3.4, "Prerequisites for WebSphere Application Server".
-
Locate and inspect the contents of the
.outand.errlog files located in these directories:Microsoft Windows
C:\<Server_Manager_Console_Home>\SCFMC\datawhere
<Server_Manager_Console_Home>is the Server Manager Console installation directory. For example:C:\jde_home_1\SCFMC\data -
Locate and inspect the contents of the Server Manager Console installer-related log files for errors. These logs are typically located in following locations:
Note:
The location of these logs and the log file name are displayed on in the lower portion of the installer screens during the installation process.Microsoft Windows
C:\Program Files (x86)\Oracle\Inventory\logsLinux or Solaris
/u01/app/oracle/oraInventory/logs -
Locate and inspect the contents of the application server log files for errors. These logs are typically located in following locations:
C:\IBM\WebSphere\AppServer\profiles\AppSrv01\logs\server1\logsC:\IBM\WebSphere\AppServer\profiles\AppSrv01\logs\SMC_Server_xxxx\logsC:\IBM\WebSphere\AppServer\profiles\DMGR01\logs\dmgr\logsC:\IBM\WebSphere\AppServer\profiles\AppSrv01\logs\ffdc
Please note the following bug numbers and special instructions with regard to the Server Manager Console installed on WebSphere:
BUG 14369731 - FOR SMC ON WAS 8.5 MANAGEMENT AGENTS SHOWING STOPPED IN HOME PAGE AFTER LOGIN
Issue/ Resolution:
This issue is specifically for a Server Manager Console installed on WAS 8.5 (typically not applicable to Server Manager Console on WAS 7.x). The issue is caused because the JMX ports being used by the Server Manager Console (14501/14502 by default) are not freed during the self-update process and as a result, when the Server Manager Console application is updated and starts up it is unable to bind to the same JMX ports. Thus, the Server Manager Console now binds to the next free set of ports available. Because the Server Manager Agents connected to the Server Manager Console are not aware of this, they still attempt to connect to the old Server Manager Console port (14501 by default). As a result they show a status of stopped as the Server Manager Console and Server Manager Agents are not able to communicate. This is being investigated as to whether this is an EnterpriseOne Server Manager bug or a IBM WebSphere issue.
The resolution is to restart the Server Manager Console J2EE server after the self-update using these steps:
-
Stop the Server Manager Console WAS J2EE container using:
Z:\Program Files (x86)\IBM\WebSphere\AppServer\profiles\AppSrv01\bin\stopServer.bat <server_name>
-
Start the Server Manager Console J2EE server from the command line using:
Z:\Program Files (x86)\IBM\WebSphere\AppServer\profiles\AppSrv01\bin\startServer.bat <server_name>
After applying these steps the Server Manager Agents connected to the Server Manager Console should show the correct statuses.
3.7.4 Troubleshoot the Management Console Installation
This section discusses:
3.7.4.1 Installer Fails to Complete
If the Management Console installer fails to complete, an exception screen is displayed. For details, examine the log file located in the Oracle\Inventory\logs directory.
Tip:
The log file location is displayed on the End of Installation screen for the Management Console installer. Refer to the section of this guide entitled: Install the Server Manager Management Console for JD Edwards EnterpriseOne Tools (Release 9.1 Update 2).For example, the complete path and log file name might be:
C:\Program Files (x86)\Oracle\Inventory\logs\installActions2011-10-18-02-15-14PM.log
3.7.4.2 Management Console Will Not Start
The HTTP port number must be available and cannot be in use by any other application on this machine. Since the installer cannot validate the port, you must be certain that these conditions are met or else the Management Console will not start.
3.7.4.3 Management Console Will Not Save Configuration Settings
If the Management Console generates an error when you try to save configuration settings, verify that the JMX port that the Management Console is using is not being used by another application. To view what port is currently set as the JMX port and to change it, use the Management Agent Port Assignments section on the Management Agents page of the Management Console.
For example:
3.8 Upgrade the Server Manager Management Console from a Previous Release to Tools Release 9.1
Note:
An Upgrade is applicable to major releases, such as upgrading from Release 8.98 to Release 9.1. An Upgrade is performed using an installer program.An Update is applicable to revisions within a major release. For example, from Release 9.1 to Release 9.1.2. An Update is performed from within the Server Manager Console itself.
For Tools Release 9.1, you have the option to Upgrade an existing Server Manager Management Console that was installed with a previous release. It is important to note that this Upgrade is new functionality that is independent of the existing Server Manager self-updating functionality, which is obtained through the Update Center. You cannot use the Server Manager internal Update functionality to Upgrade to Tools Release 9.1.
Caution:
If you decide to Upgrade your Management Console, there is no automated rollback path.Caution:
During the upgrade process the following folders from previous release will be backed up under\backup folder in the same Management Console home:
-
\backup\components\backup\jdk\backup\oc4j
This is illustrated in the screen segment below.
Functionally an Upgrade of your Management Console preserves your existing Management Console configuration including the JMX port number and existing connections to the target machines of the Management Console.
Note:
After you have upgraded your Server Manager Console using the OUI installer for Tools Release 9.1 (or above), you must use OUI to deinstall it as described in the section of this chapter entitled: Section 3.11, "Deinstall the Server Manager Management Console for Tools Release 9.1".This section discusses these topics:
-
Upgrade Sequence
-
Running the Management Console Installer in Upgrade Mode
3.8.1 Upgrade Sequence
It is very important that you follow this sequence for upgrading:
-
Obtain the Tools Release 9.1 version of the Server Manager Management Console from the Oracle Software Delivery Cloud.
-
Run the Tools Release 9.1 installer on the machine with the existing Management Console installation.
-
The installer detects the existing Management Console installation(s) and gives you the option of upgrading.
-
If you choose to upgrade your existing Management Console, the installer creates a new JDE_HOME in which to install the Tools Release 9.1 Management Console, but uses the existing installation to obtain configuration information.
Caution:
The existing pre-9.1 installation of the Management Console must not be corrupted and must contain valid .xml files that can be read by the 9.1 Installer. If you have attempted to run the Server Manager Console Update for 9.1 prior to running the 9.1 Installer to Upgrade, you will corrupt the installation. The only recovery will be a new installation of the 9.1 which you will have to manually configure. -
For installations beyond the initial general availability of Tools Release 9.1, you can use the standard functionality to obtain and run the update the Server Manager Console.
-
Use the standard functionality to obtain and run the updates for the Server Manager Agents on the target machines. This step is very important because for Tools Release 9.1 the Management Console and the agents must be running at least the base Tools Release 9.1.
Caution:
An exception to the Server Manager Management Console automated agent update is the AIX operating system. Prior to running the agent update, on AIX you must manually ensure that the requisite JDK or JRE for the agent is installed on the machine. For instructions on manually installing a JDK or JRE on AIX, refer to the section of this guide entitled: Manually Installing a JDK or JRE on AIX.
3.8.2 Running the Management Console Installer in Upgrade Mode
Caution:
Before running the installer to Upgrade your Server Manager Management Console, you must ensure the Management Console is stopped as described in the section of this guide entitled: Start, Stop, and Restart the Management Console.You should verify the Management Console is stopped by attempting to access the URL to the console. Refer to the section of this guide entitled: Access the Management Console.
To Upgrade the Server Manager Management Console from a previous release to Tools Release 9.1:
-
Log on to the Microsoft Windows-based machine onto which you are installing the Server Manager Management Console as a user with Administrator rights. The recommended machine is the JD Edwards EnterpriseOne Deployment Server.
-
Obtain the Tools Release 9.1 Server Manager Console installer images from the Oracle Software Delivery Cloud.
-
Copy the installer images to the machine on which you intend to install the Server Manager Console.
-
Unzip the images into this structure:
\Disk1
\Disk2
-
Run setup.exe from:
\Disk1\Install
The Windows Command window starts indicating Windows is preparing to launch the Oracle Universal Installer for the Server Manager Management Console.
It will take a minute or so for the initialization to complete. Upon completion the OUI Welcome panel displays:
-
On Welcome, click the Next button.
-
On Specify Home Details, complete these fields:
-
Name
Enter a unique name of the Management Console. The default value is:
EOne_ManagementConsole
Note:
If there is an existing installation of the Management Console with the default name, the installer will append the default name with a number to make it unique. For example, EOne_ManagementConsole1.Note:
For upgrades you cannot specify an existing name. You must specify a new name for the upgraded Management Console. -
Path
Enter the drive and directory where you want the files installed on your Management Console. The JD Edwards EnterpriseOne Management Console installer automatically detects the root drive location on the Microsoft Windows machine and by default appends this value:
JDE_HOME
Note:
Although JDE_HOME is the default and recommended setting, you can specify any value to replace the default value. If there is an existing installation of the Management Console the default name will be appended with an underscore and a number. For example, JDE_HOME_2.Caution:
For Upgrades, you cannot re-use an existing Name or Path. You must enter unique values.
-
-
Click the Next button.
-
This Select Installation Type screen is displayed if an existing pre-Tools Release 9.1 installation of the Server Manager Console is detected.
If you select Upgrade, your current Server Manager Console will be upgraded to the latest release. If you select Install, the Server Manager Console will be installed in a new home.
By default, the Upgrade radio button is selected.
-
To Upgrade, with the Upgrade radio button selected, click the Next button.
-
With Yes button selected, click the Next button.
-
On Select Upgrade Location, click the radio button(s) for each home you want to upgrade.
-
Click the Next button.
-
On Enter Existing Admin Password, enter the valid jde_admin password for the Server Manager to be upgraded.
Caution:
The installer cannot verify the password you enter here. If you enter the incorrect password, the installer will proceed until it reaches a point where validation can occur. If you enter an invalid password, the result will be a corrupted Server Manager. Recovery will require a deinstall of the previous version followed by an install the new version. -
Click the Next button.
-
On Summary, confirm the selections.
-
Click the Install button.
The Install progress screen is displayed. Note that this screen displays the location of the log of this installation. For example:
C:\Program Files\Oracle\Inventory\logs\installActions2011-10-18_04-36-53PM.log
-
On End of Installation, click the Exit button to exit the Oracle Universal Installer for the Server Manager Management Console.
-
On the Exit dialog, click the Yes button.
3.8.3 Post Upgrade Notes
After the Server Manager Console upgrade is complete, you might have two home folders:
-
One home folder contains the Server Manager Console as a result of the upgrade
-
The other home folder contains the OUI installer.
You must not delete any one of these folders. If you do, your Server Manager Console installation will be corrupted and you will not be able to reinstall or deinstall.
For example, in the below screen shot jde_home1 is the upgraded home, while jde_home_1 is the OUI home.
3.9 Upgrade the Server Manager Management Console with Oracle WebLogic Server 12.1.2 (Release 9.1 Update 4)
This section discusses these topics:
-
Overview
-
Uninstalling Server Manager Console installed on Oracle WebLogic Server 10.3.6
-
Installing Oracle WebLogic Server 12.1.2
-
Installing Server Manager Console on WebLogic Server 12.1.2
-
Restoring the previous Server Manager Console Configurations
3.9.1 Overview
The purpose of this document is to provide information about upgrading the Server Manager Console to be used with WebLogic Server 12.1.2.
There is no direct upgrade path available for upgrading Server Manager Console installed on WebLogic Server 10.3.6 to WebLogic Server 12.1.2.
WebLogic Server 12.1.2 has to be a new install and Server Manager Console needs to be installed on it.
Most of the Server Manager configuration from the previous installation can be preserved with some manual configuration.
The steps below can be followed to upgrade Server Manager Console install to WebLogic Server 12.1.2
-
Uninstall the Server Manager console installed on WebLogic Server 10.3.6.
-
Install Oracle WebLogic Server 12.1.2.
-
Install Server Manager Console on WebLogic Server 12.1.2.
-
Restore the previous Server Manager Console Configurations.
3.9.2 Uninstalling Server Manager Console Installed on Oracle WebLogic Server 10.3.6
Uninstall the Server Manager Console by using the Oracle Universal Installer.
Prior to uninstalling the existing Server Manager Console, keep a backup these folders and files:
-
The folder ”<SM_CONSOLE_HOME>\targets\home\config”
-
management-console.xml under ”<SM_CONSOLE_HOME>\targets\home”
-
monitors.xml under ”<SM_CONSOLE_HOME>\targets\home”
-
scf-history.xml under ”<SM_CONSOLE_HOME>\targets\home”
-
security-realm.xml under ”<SM_CONSOLE_HOME>\targets\home”
To uninstall the Server Manager Console using the Oracle Universal Installer:
-
Invoke the Oracle Universal Installer on the Server Manager Console installed machine.
-
The welcome screen appears. Click on ”Deinstall Products”.
-
The ”Inventory” screen appears. Select the Server Manager Console component. Click ”Remove”.

This will guide you further and remove the Server Manager Console component.
3.9.3 Installing Oracle WebLogic Server 12.1.2
The examples in this document assume you are using a Windows based platform. If you are installing the Oracle WebLogic Server on a UNIX machine, some of the files names and directories may be slightly different. When installing on UNIX, the Oracle web tier components should be installed using a non-root user.
http://docs.oracle.com/middleware/1212/webtier/WTINS/index.html
-
Download the ”Oracle Fusion Middleware 12c WebLogic Server and Coherence (12.1.2.0.0)” package that is appropriate for your platform from the edelivery web site (
https://edelivery.oracle.com). The file name of the installer is wls_121200.jar. Refer to the JD Edwards EnterpriseOne Certifications for more information. -
Unzip the downloaded file into a temporary directory on the machine you are targeting for installation.
-
Open a Command window with Run as Administrator option and run this command from the prompt:
>java -jar wls_121200.jarFor HP-UX and Solaris use the ’-d64' option:
>java –jar –d64 wls_121200.jarThe first screen you will see is the welcome screen.
-
Click the ”Next” button to begin the installation.
If you have an existing directory into which one or more Oracle products have already been installed, that directory can be viewed in the drop-down list. You can see which products are installed in that particular directory by clicking View next to ”Features Sets Installed at Selected Oracle Home.”
If you want your product to be installed in a new directory, type the full path of your new directory in the Oracle Home field; the installer will create the specified directory for you.
-
Click ”Next”.
Use this screen to determine the type of installation you want to perform and consequently, which products and features are installed.
The options you see on this screen will differ depending on the product you are installing. Refer to your product installation guide for specific details.
-
Click ”Next”.
This screen analyzes the host computer to ensure that specific operating system prerequisites have been met.
-
On completion of the Prerequisites Checks, click ”Next”.
If you wish to register your installation, enter your Email address and your My Oracle Support password. If you wish to decline registration, deselect "I wish to receive security updates via My Oracle Support” and confirm your choice.
-
Click ”Next”.
The Installation Summary screen contains a list of the feature sets you selected for installation.
-
Click ”Install”.
This screen shows the progress of the installation. When the progress bar reaches 100%, the installation is complete.
-
Click ”Next”.
This screen appears at the conclusion of the installation and provides a summary of the products and features that were installed. Click ”Finish”.
-
Create a domain using the Configuration Wizard.
Run the Configuration Wizard to create a domain. Configuration Wizard can also be invoked by running the command < ORACLE_ HOME>\oracle_common\common\bin\config.cmd.
-
Provide the domain location. The domain location is
C:\Oracle\Middleware\user_projects\domains\base_domainand the base_domain is the domain name. Click ”Next”. -
Select the template ”Basic WebLogic Server Domain” and Click ”Next”.
-
Provide the Administrative Username/Password for the domain and Click ”Next”
-
On Domain Mode for use with JD Edwards EnterpriseOne, you must select ”Production”. JDK Location is selected by default. You can provide any external JDK Location also. Click ”Next”.
-
On Advanced Configuration, select these check boxes to modify the server settings:
-
Administration Server
-
Node Manager
Click ”Next”.
-
-
You may change the Listen Port on this screen. Click ”Next”.
-
Select the Node Manager Type as ”Per Domain”. Provide Node Manager Username and Password. Configuration Summary is displayed. Click ”Create”.
-
Domain creation is successful. Click ”Finish”.
-
Start Node Manager.
Node Manager can be started by running the command
startNodeManager.batavailable at:<ORACLE_ HOME>\user_projects\domains\base_domain\bin -
Start WebLogic Server.
HTTP Server can be started by running the command
startComponent.batavailable at:< ORACLE_ HOME>\user_projects\domains\base_domain\bin -
Run the command
startWebLogic.bat.
3.9.4 Installing Server Manager Console on WebLogic Server 12.1.2
To install the Server Manager Console:
-
Change to the directory in which you extracted the Server Manager Console installer.
-
Launch the OUI installer as follows:
Using ”Run As Administrator”, run the
setup.exefrom the directory (e.g C:\SM_Console\Disk1\install) in which you unzipped the installer.The Windows Command window starts indicating that Windows is preparing to launch the Oracle Universal Installer for the Server Manager Management Console.
-
On Welcome, click the Next button.
-
On Specify Home Details, complete the Name field.
On Specify Home Details, complete the Name field.
Enter a unique name of the Management Console. The default value is
EOne_ManagementConsole.Note:
If there is an existing installation of the Management Console with the default name, the installer will append the default name with a number to make it unique. For example, EOne_ManagementConsole1. -
On Select Application Server, select the WLS radio button.
-
Click the Next button.
-
On Enter Admin Password, enter and confirm the password for the jde_admin user.
Note:
The user name itself cannot be changed from jde_admin. The password must be at least eight (8) characters in length and cannot contain space or blank character values. Values are alphanumeric and these special characters: ! @ # $ _Note:
The default value for the user named jde_admin is automatically populated by the Management Console installer and cannot be altered. This is the administrative user account that is associated with the Management Console.Caution:
Because there is no programmatic way to retrieve a lost or forgotten password, it is critical that you remember and safeguard this password. If the password is forgotten or lost, the only recovery is a complete reinstallation of Server Manager.If you reinstall the Management Console and specify the JMX port the original installation was configured to use, you will retain all your managed homes and associated instances along with the configuration of those instances. However, you will lose this data:
-
Console configuration, which includes database information entered using the Setup Wizard and information regarding security server(s) used to authenticate users.
-
User Configuration, which are the added JD Edwards EnterpriseOne users and defined user groups, including their permissions.
-
Server Groups and associated template configurations.
-
Defined monitors and their associated monitor history.
-
-
Click the Next button.
-
On Enter Port Number, complete the Management Console HTTP Port field.
Enter the port on which the previous Server Manager Console was installed. Assume that the previous server manager was installed on port 8999.
Caution:
This port number must be available and cannot be in use by any other application on this machine. Since the installer cannot validate the port, you must be certain that these conditions are met or else the Management Console will not start. -
Click the Next button.
-
On Enter Information for WebLogic Server, complete the following fields:
-
Install Directory
Enter the path to the WebLogic installation directory (wlserver).
For example:
C:\Oracle\Middleware\Oracle_Home\wlserverEnter the hostname or the IP Address at which the WebLogic Admin Server is listening for http/t3 connections. This is usually the hostname/IP Address of the physical machine. For example: DNDEDASVM4
-
Node Manager Machine Name
Enter the logical name of the nodemanager machine associated with the domain. This is not the physical machine name.
-
Domain Port
Enter the port number on which WebLogic AdminServer is listening for http/t3 connections. This value is configured when you created the WebLogic Domain.
-
Admin User Name
Enter the user name of the WebLogic Server admin account.
-
Admin User Password
Enter the password for the WebLogic Server admin account.
Caution:
The values on this form must be confirmed manually. You must validate or update, as appropriate, all configuration items. If you enter invalid values, you will have to re-run the installer with the correct values.
-
-
Click the Next button.
-
On Summary, verify your selections and click the Install button to begin the installation.
The Install progress screen is displayed. Note that this screen displays the location of the log of this installation.
-
On End of Installation, verify the installation was successful.
-
Click Exit to exit the Oracle Universal Installer for the Server Manager Management Console.
-
On the Exit dialog, click the Yes button.

3.9.5 Restoring the Previous Server Manager Console Configurations
If you had server groups setup in the previous Server Manager Console, you can preserve them by copying all the files and folders you had backed up from the previous installation under ”<SM_CONSOLE_HOME>\targets\home\config to the same location after Server Manager is re-installed.
To restore the user's setup in the previous Server Manager Console, you can preserve them copying all the files and folders you had backed up from the previous installation under ”<SM_CONSOLE_HOME>\targets\home\security-realm.xml to the same location after SM is re-installed.
To restore monitors setup in the previous Server Manager Console, you can preserve them copying all the files and folders you had backed up from the previous installation under ”<SM_CONSOLE_HOME>\targets\home\monitors.xml to the same location after SM is re-installed.
To restore history in the previous Server Manager Console, you can preserve them copying all the files and folders you had backed up from the previous installation under ”<SM_CONSOLE_HOME>\targets\home\scf-history.xml to the same location after SM is re-installed.
To restore registered instances in the previous Server Manager Console, you can preserve them copying all the files and folders you had backed up from the previous installation under ”<SM_CONSOLE_HOME>\targets\home\ management-console.xml to the same location after SM is re-installed.
After restoring these configurations, you need to restart the Server Manager console to take effect.
3.10 Manually Installing a JDK or JRE on AIX
For AIX platforms running the Server Manager agent, the agent java version must be upgraded manually in order for the agent to continue communicating with the Management Console.
To manually update the java version:
-
Download and install a 1.6 JDK or JRE to the AIX machine to be upgraded.
-
On the AIX machine running the Server Manager agent to be upgraded, sign on as the user that owns the Server Manager directory structure.
-
Stop the Server Manager agent using the {agent-home}/bin/stopAgent script.
-
Locate the directory named "jdk" under the installation location for the Server Manager agent.
-
Rename the "jdk" directory to "jdk_original".
-
Copy the 1.6 JDK directory to the Server Manager agent install location. Make sure the new directory is named 'jdk'. Alternately, you can create a soft link named 'jdk' from the Server Manager agent install location to the 1.6 JDK.
-
Start the Server Manager agent using the {agent-home}/bin/startAgent script.
At this point the Server Manager agent should be able to communicate with the Server Manager console. You can now update the Server Manager agent version normally.
3.11 Deinstall the Server Manager Management Console for Tools Release 9.1
Caution:
If you uninstall the Management Console, you can no longer remotely manage servers associated with that Management Console. Without the Management Console, you cannot deploy updates to servers associated with that Management Console.Caution:
Important Prerequisites. Prior to running the deinstaller/uninstaller, verify the following prerequisites.WebLogic
Verify that the WebLogic AdminServer and the Nodemanager of the WebLogic Domain is running.
WebSphere
Ensure the Administration Server (or deployment manager) of the WAS Profile is running.
-
Once launched the deinstallation steps are the same for Microsoft Windows and Linux/Solaris platforms. The invocation methods are listed below:
Microsoft Windows
Go to Start > All Programs > Oracle - JDE_Standalone_Home > Oracle Installation Products > Universal Installer.
The Windows Command window starts indicating Windows is preparing to launch OUI.
Linux and Solaris
You can invoke the deinstaller/uninstaller by re-running the Server Manager Console installer. If the installer software has been deleted, you can still launch it using this command:
$ORACLE_HOME/oui/runInstallerIt will take a minute or so for the initialization to complete. Upon completion the OUI Welcome panel displays:
-
On Welcome, click the Deinstall Products … button.
-
On Inventory, select the node under Oracle Homes that corresponds to your Server Manager Management Console installation. For example: EOne_ManagementConsole
-
Once the component to be deinstall is selected, verify the Location in the Product Information portion of the screen.
-
On Inventory, with the Contents tab selected, if the selected Oracle Home is correct, click the Remove … button.
-
On Confirmation, click Yes to begin the deinstallation of the selected Oracle Home.
The Remove progress dialog is displayed:
-
On Inventory, verify the selected Oracle Home is no longer displayed.
-
On Inventory, click the Close button.
-
On the Welcome screen, click the Cancel button to exit the Oracle Universal Installer.
-
On the Exit dialog, click the Yes button to OUI.